


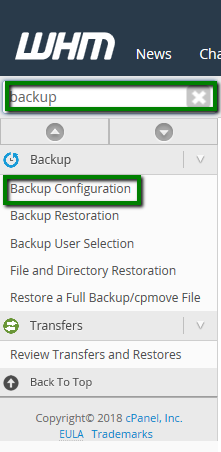
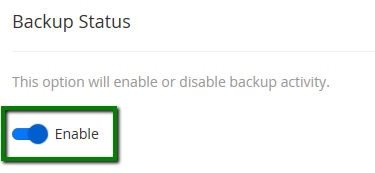
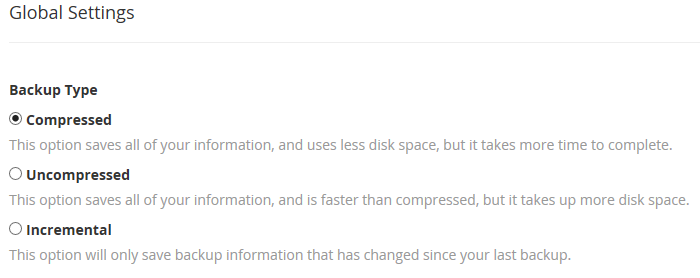


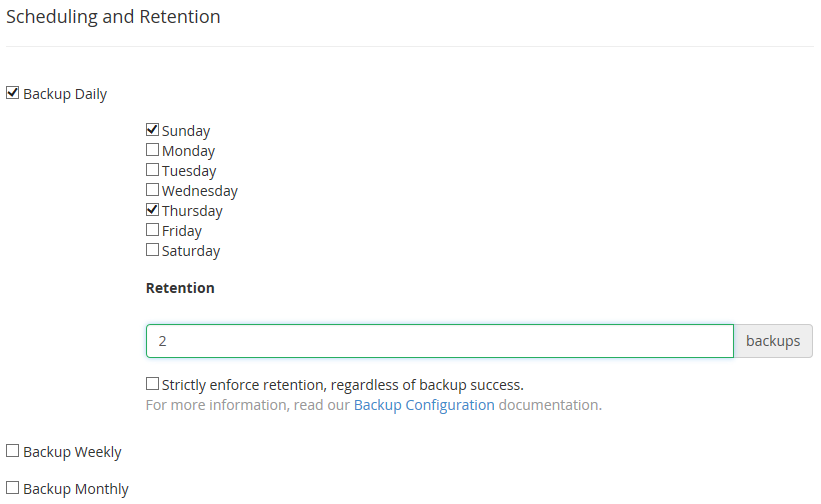
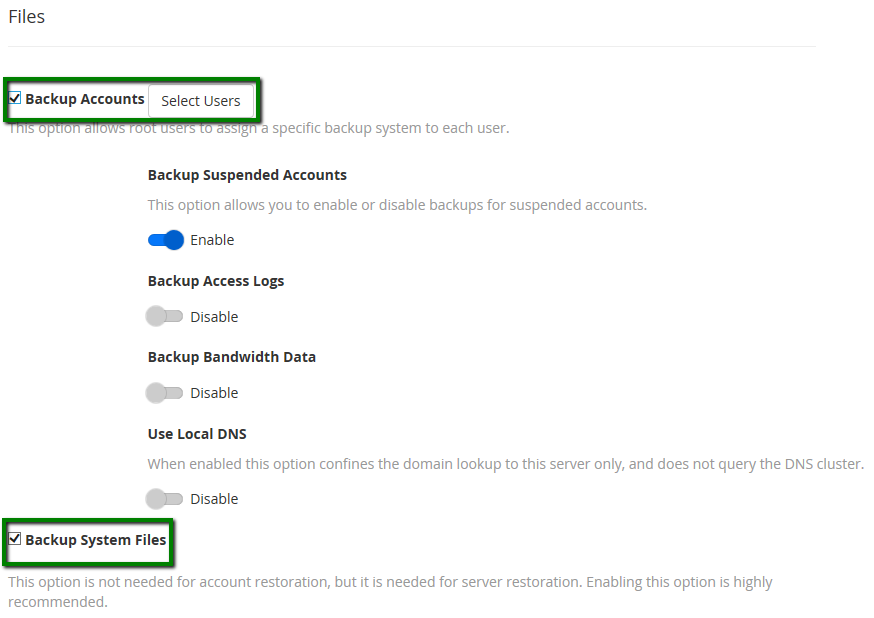
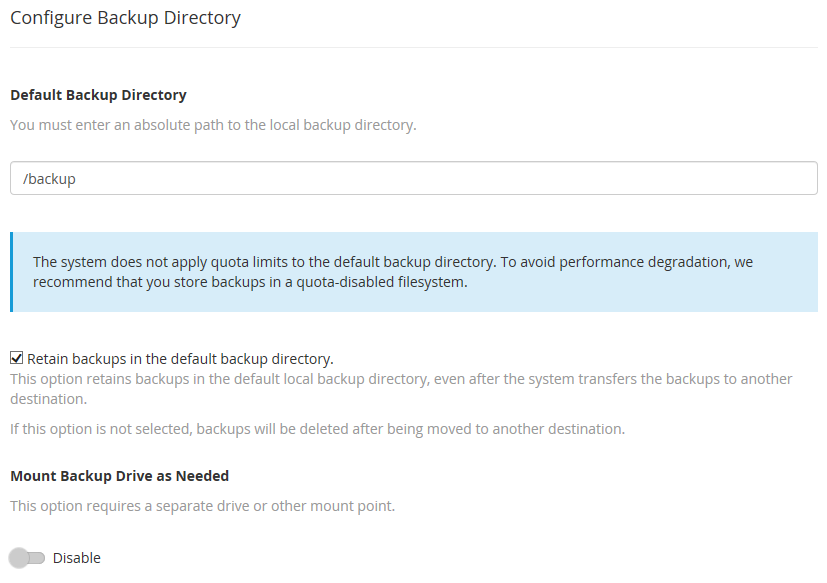
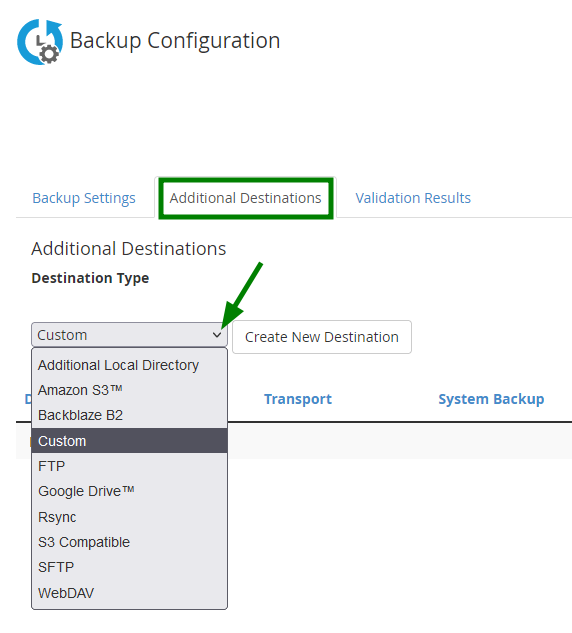
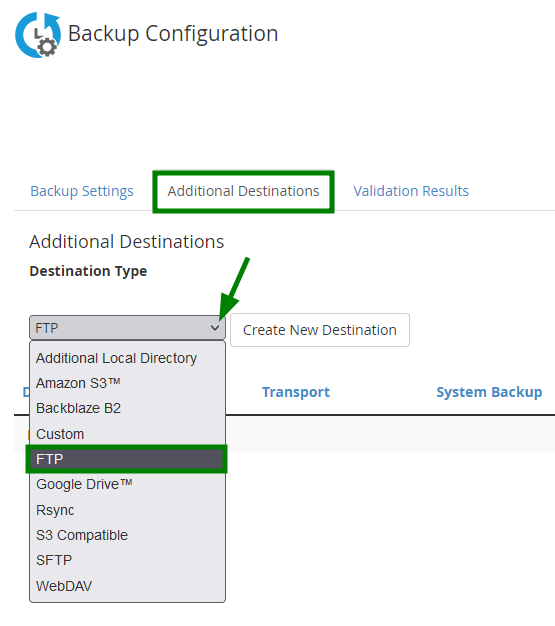
Configure the Backup Directory
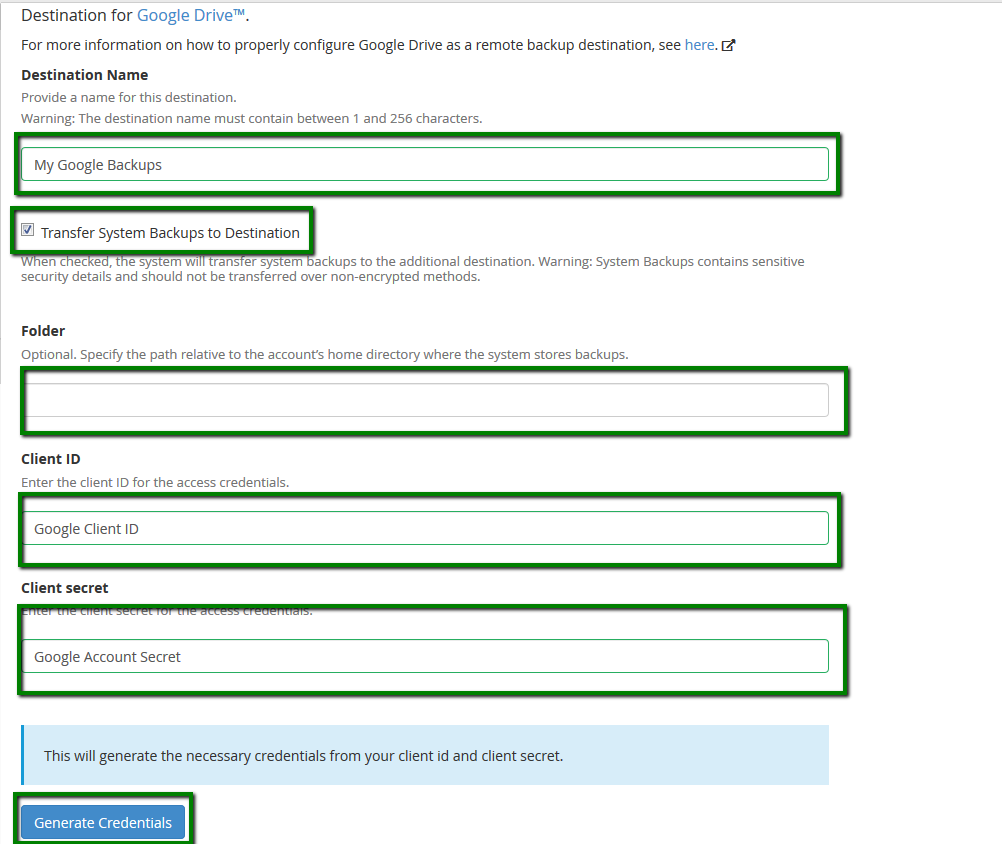
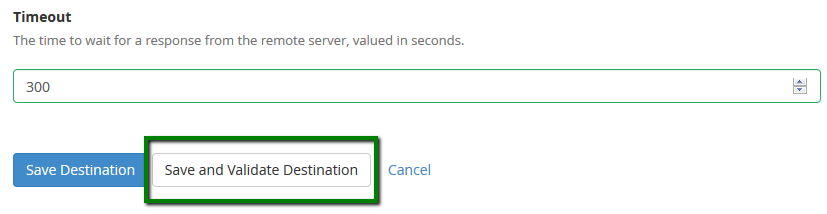
 The following fields should be filled in:Destination Name – a name to identify this backup rule on your server (E.g 'FTP storage').Transfer System Backups to Destination – check this option if you prefer that backups are removed from the server and only saved to FTP storage.Backup Directory – an optional setting to specify the folder to which the backups are saved. If left blank, the system will use the home directory. We would recommend leaving it blank.Remote Host - target FTP IP address or FQDN (e.g server1.example.tld)Port - Port for the FTP protocol on the target server. Usually it is '21'.Remote Account Username - The account name for the connection to the remote server or storage.Remote Password - Password string for accessing remote storage or server.Timeout - The amount of time before the connection times out. Indicated in seconds.Once the details were entered, press the 'Save and Validate Destination' button.
 After that, perform the following command to install Duplicity:yum install -y duplicityThe following output is expected:
In order to backup the directories with Duplicity to the remote FTP storage, the following details are required:
 Listing backupsTo list the created backups, feel free to issue the following command, XXXXX is to be replaced with your FTP password and 2039-9922 with your FTP user:FTP_PASSWORD=XXXXXXXXXXXXX duplicity collection-status ftp://2039-992200@phxnas01.dcops.techDefinitionscollection-status - lists the backup at the specified URL/storage.You may see the following output when running the command against your storage server:
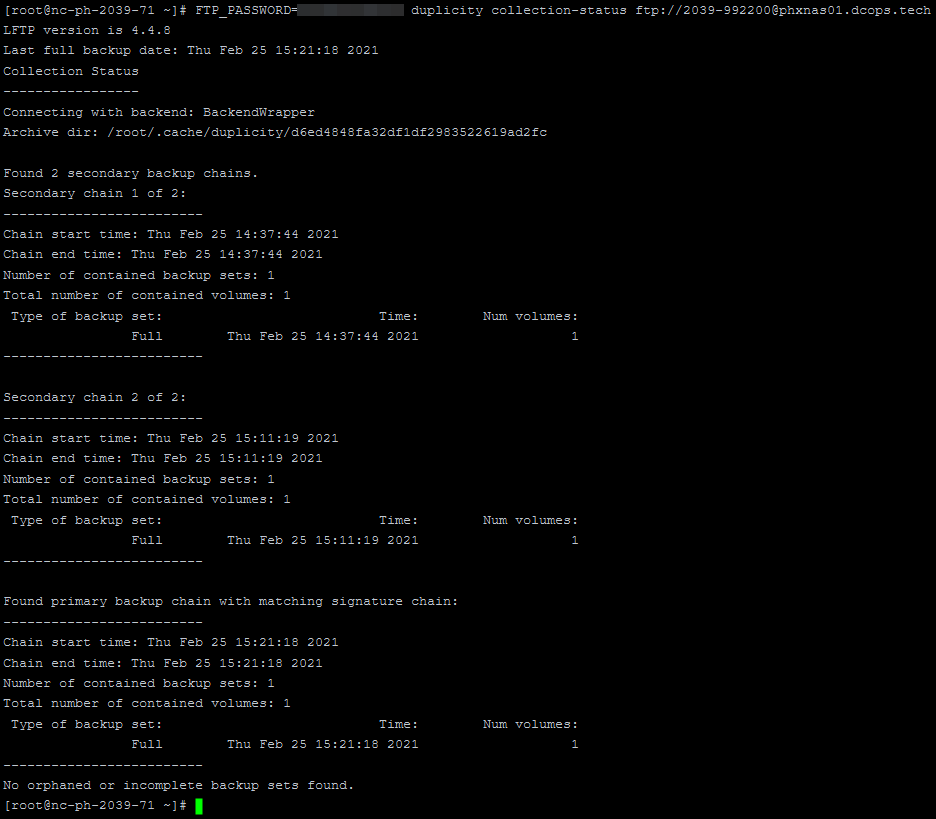 Please note that the test server already performed the backups so the amount of the backups listed is higher than the initial run.Restoring the backups:
It is not recommended to overwrite an existing folder that was archived previously. In our example, we will extract the latest archive from storage to the /home/temp_backup folder, so it can be used later for restoration purposes.To restore the latest backup, run the following command, replacing the variables with the ones that match to your environment (FTP host, user, ftp password):FTP_PASSWORD=XXXXXXXXXXX duplicity restore ftp://2039-992200@phxnas01.dcops.tech/ /home/temp_backups --no-encryptionDefinitions:Restore - defines the restoration function for the software./home/temp_backups - the temporary directory that is used for restored files.--no-encryption - key for disabling GPG backup encryption.The following output is expected when the restore is successful:
Please note that the test server already performed the backups so the amount of the backups listed is higher than the initial run.Restoring the backups:
It is not recommended to overwrite an existing folder that was archived previously. In our example, we will extract the latest archive from storage to the /home/temp_backup folder, so it can be used later for restoration purposes.To restore the latest backup, run the following command, replacing the variables with the ones that match to your environment (FTP host, user, ftp password):FTP_PASSWORD=XXXXXXXXXXX duplicity restore ftp://2039-992200@phxnas01.dcops.tech/ /home/temp_backups --no-encryptionDefinitions:Restore - defines the restoration function for the software./home/temp_backups - the temporary directory that is used for restored files.--no-encryption - key for disabling GPG backup encryption.The following output is expected when the restore is successful: Backups removal:In case there is a need to remove backups but leave only a single copy, the following command should be issued:FTP_PASSWORD=XXXXXXXXXX duplicity remove-all-but-n-full 1 ftp://2039-992200@phxnas01.dcops.tech/ --no-encryption --forceDefinitions:remove-all-but-n-full - specifies the removal of all copies except the latest one.1 - specifies the amount of the backups to keep.--force - key that specifies the forced action.
You may see the following output, depending on the amount of the backups performed:
Backups removal:In case there is a need to remove backups but leave only a single copy, the following command should be issued:FTP_PASSWORD=XXXXXXXXXX duplicity remove-all-but-n-full 1 ftp://2039-992200@phxnas01.dcops.tech/ --no-encryption --forceDefinitions:remove-all-but-n-full - specifies the removal of all copies except the latest one.1 - specifies the amount of the backups to keep.--force - key that specifies the forced action.
You may see the following output, depending on the amount of the backups performed:  Running backups via cron
In order to automate backups, make sure to add the command to the cronjobs of the root user. You can do this by adding the command to the crontab in your system.To enter the edit mode for the crontab, please issue the following command:crontab -e -u root
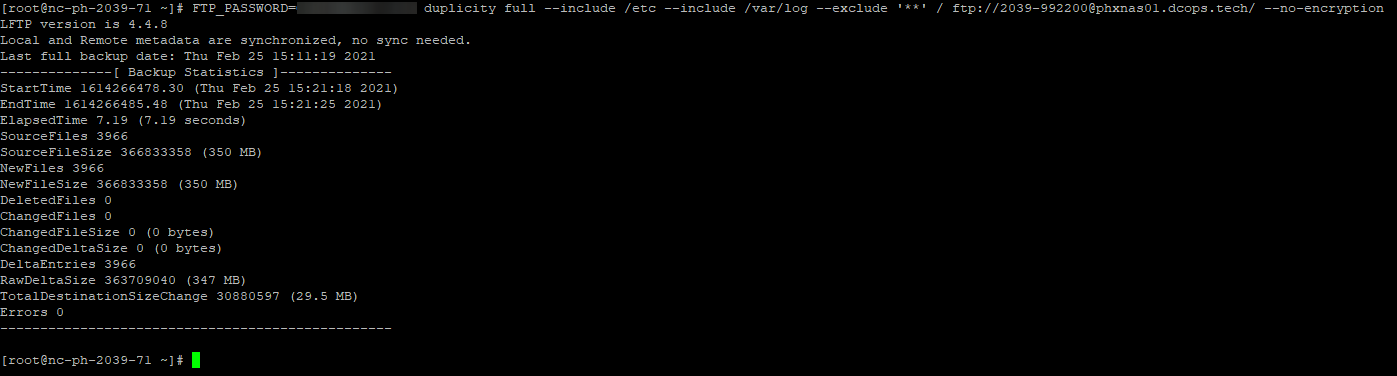
The default editor for the crontab is Vi/Vim, thus you will need to hit ‘I’ button (Insert) for the insert mode and append the following command to the end of the file:0 0 * * 0 FTP_PASSWORD=XXXXXXXXXX duplicity full --include /etc --include /var/log --exclude '**' / ftp://2039-992200@phxnas01.dcops.tech/ --no-encryption > /root/dub_log 2>&1
After that, press ‘ESC’ to enter command mode, press ‘Shift + : ’ and type ‘wq!’ to save and exit. That should save the entry in the crontab. Definitions:0 0 * * 0 - values that specify to run the cron every week on Sunday.> - redirects output to the specified file./root/dub_log - the target redirect of the cron output.2>&1 - redirect the errors to the output.
This concludes our how-to guide on using the Duplicity software.For more additional options or custom configurations please refer to
Duplicity’s official page.How to configure data backups with the Interworx control panel
In order to configure the backups for your data at Interworx control panel, follow the guide described in this paragraph.
Access your Siteworx interface via the following URL:https://IP:2443/siteworx/'IP' should be replaced with the IP of your Dedicated Server.You may receive the following message depending on which browser you use:
Google Chrome:
Running backups via cron
In order to automate backups, make sure to add the command to the cronjobs of the root user. You can do this by adding the command to the crontab in your system.To enter the edit mode for the crontab, please issue the following command:crontab -e -u root
The default editor for the crontab is Vi/Vim, thus you will need to hit ‘I’ button (Insert) for the insert mode and append the following command to the end of the file:0 0 * * 0 FTP_PASSWORD=XXXXXXXXXX duplicity full --include /etc --include /var/log --exclude '**' / ftp://2039-992200@phxnas01.dcops.tech/ --no-encryption > /root/dub_log 2>&1
After that, press ‘ESC’ to enter command mode, press ‘Shift + : ’ and type ‘wq!’ to save and exit. That should save the entry in the crontab. Definitions:0 0 * * 0 - values that specify to run the cron every week on Sunday.> - redirects output to the specified file./root/dub_log - the target redirect of the cron output.2>&1 - redirect the errors to the output.
This concludes our how-to guide on using the Duplicity software.For more additional options or custom configurations please refer to
Duplicity’s official page.How to configure data backups with the Interworx control panel
In order to configure the backups for your data at Interworx control panel, follow the guide described in this paragraph.
Access your Siteworx interface via the following URL:https://IP:2443/siteworx/'IP' should be replaced with the IP of your Dedicated Server.You may receive the following message depending on which browser you use:
Google Chrome: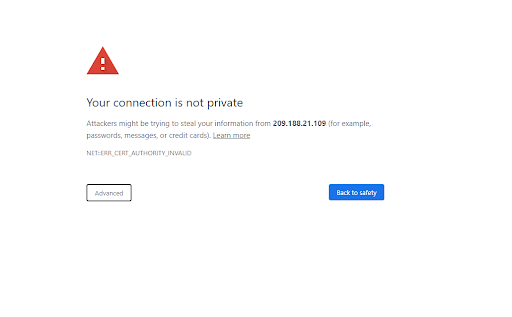 Click on 'Advanced' and 'Proceed to IP (unsafe)' buttons:
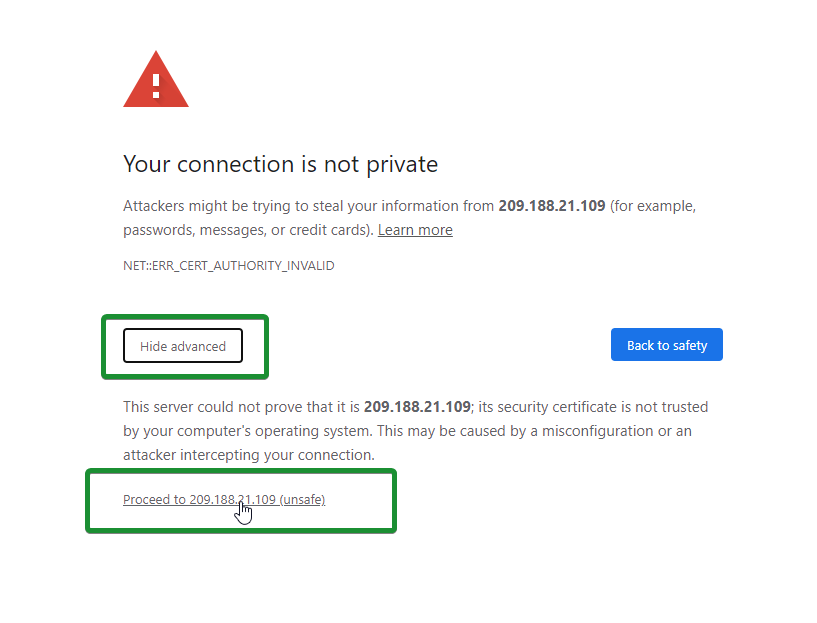 Firefox:
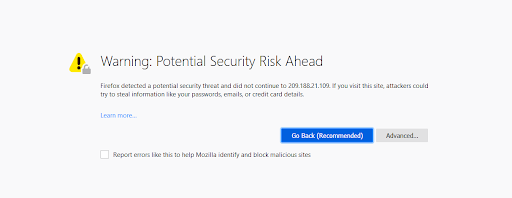 Click on 'Advanced...' and 'Accept the Risk and Continue' buttons:
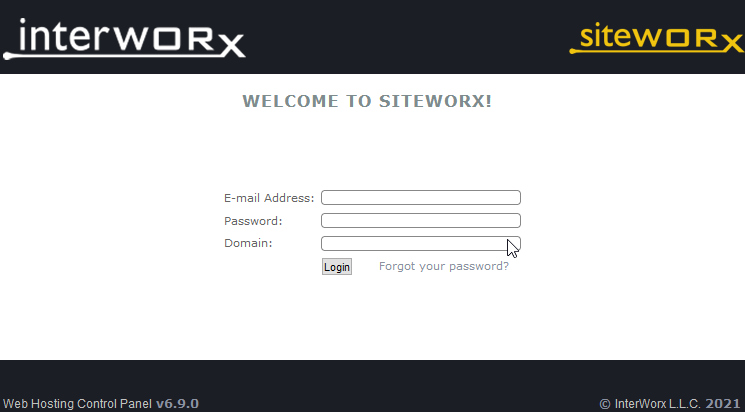 Make sure to use the 'Email', 'Password','Domain' that were used for the SiteWorx account creation at the Nodeworx panel.Once the SiteWorx panel has been accessed, navigate to 'Backups' menu, following 'Backup now' button:
 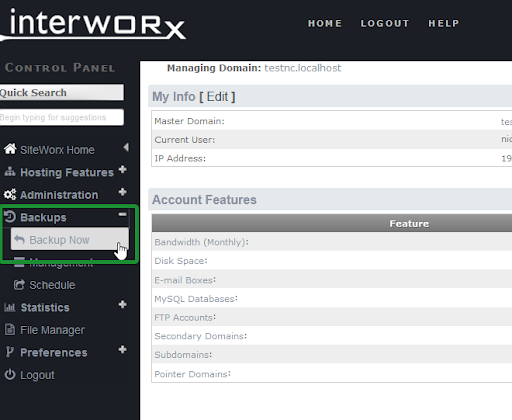 At the 'Backup now' menu, select backup type 'Full backup' and backup where you see 'FTP':
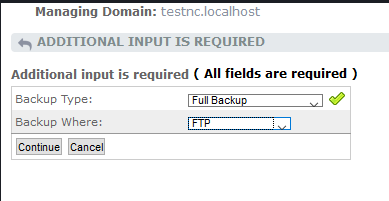 Click on the 'Continue' button to proceed.Fill in the details from your FTP storage at the corresponding fields:
 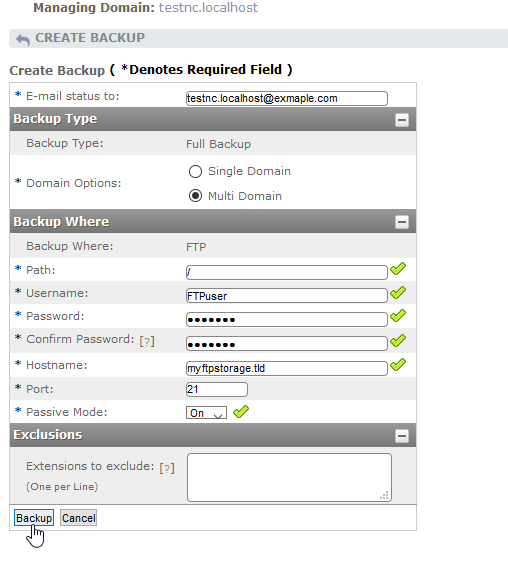 DefinitionsE-mail status to: - specifies the email address for the notifications regarding backup status.Domain options: - specifies whether to backup only the main domain or all of the domains. For the complete backup, we select the 'Multi Domain' option.Backup where: - the remote destination for the backup storage. In our example, we will use “FTP”.Path: - specifies the remote storage path where the data would be saved. Usually it is '/'Username: - the remote storage username.Password: - the remote storage password.Confirm Password: - the password confirmation remote storage.Hostname: - the host name to access the remote storage.Port: - FTP port. We will use default '21'.Passive Mode:- Specifies which FTP mode to use. In most cases, the passive mode should be set “on”.Extensions to exclude: - defines which extensions will not be backed up by Siteworx. You can check more details about this by hovering over the [?] sign next to it.
As soon as the details are filled in, please click on the 'Backup' button to create the backup:
DefinitionsE-mail status to: - specifies the email address for the notifications regarding backup status.Domain options: - specifies whether to backup only the main domain or all of the domains. For the complete backup, we select the 'Multi Domain' option.Backup where: - the remote destination for the backup storage. In our example, we will use “FTP”.Path: - specifies the remote storage path where the data would be saved. Usually it is '/'Username: - the remote storage username.Password: - the remote storage password.Confirm Password: - the password confirmation remote storage.Hostname: - the host name to access the remote storage.Port: - FTP port. We will use default '21'.Passive Mode:- Specifies which FTP mode to use. In most cases, the passive mode should be set “on”.Extensions to exclude: - defines which extensions will not be backed up by Siteworx. You can check more details about this by hovering over the [?] sign next to it.
As soon as the details are filled in, please click on the 'Backup' button to create the backup: 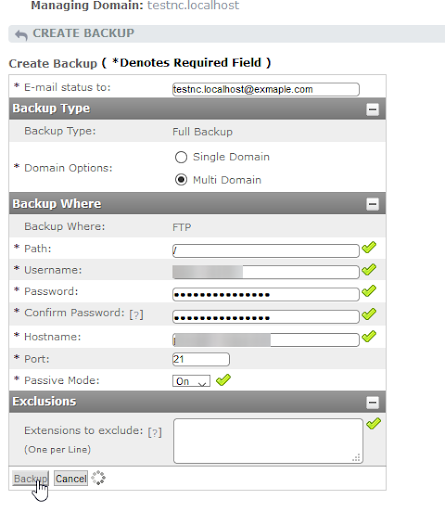 Restoring backupsIn order to restore the full backup created by Interworx, you'll need to download the backup archive from the FTP storage by using the “ftp” command line tool. In order to do that, you’ll need to access the server over SSH to perform these command line actions.
Now we’ll provide a guide on how to check the backups via the FTP. You can access the FTP storage via command line using the following commands:
Run 'ftp IP or FQDN' in order to connect to storage via shell. Once prompted for the username, enter the 'Username' from remote storage:
Restoring backupsIn order to restore the full backup created by Interworx, you'll need to download the backup archive from the FTP storage by using the “ftp” command line tool. In order to do that, you’ll need to access the server over SSH to perform these command line actions.
Now we’ll provide a guide on how to check the backups via the FTP. You can access the FTP storage via command line using the following commands:
Run 'ftp IP or FQDN' in order to connect to storage via shell. Once prompted for the username, enter the 'Username' from remote storage:  Hit the 'Enter' button.
Enter the password from remote storage in the 'Password:' field. It would stay blank for the security purposes:
Hit the 'Enter' button.
Enter the password from remote storage in the 'Password:' field. It would stay blank for the security purposes: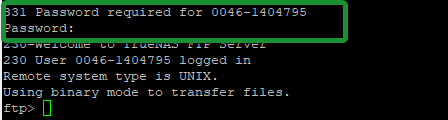 Here’s an indication of the successful FTP login:230 User YourUserHere logged in
Now issue the 'ls' FTP command to list the current directory:
Here’s an indication of the successful FTP login:230 User YourUserHere logged in
Now issue the 'ls' FTP command to list the current directory:  As you can see, we have previously created the 'test1.localhost+full-Feb.26.2021-09.30.51.tgz'.
Now change the local directory for the FTP client to /home by issuing the following command:lcd /home
As you can see, we have previously created the 'test1.localhost+full-Feb.26.2021-09.30.51.tgz'.
Now change the local directory for the FTP client to /home by issuing the following command:lcd /home In order to download file, issue the following command get test1.localhost+full-Feb.26.2021-09.30.51.tgz
 This will download the file 'test1.localhost+full-Feb.26.2021-09.30.51.tgz' to the /chroot/home location at your server.
Now hit the 'Ctrl D' combination to exit the FTP command line tool.
Once the file has been downloaded and restore the account with overwrite option, type in the following terminal command:/home/interworx/bin/import.pex --archive=/path/to/.tgz --control-panel=siteworx --ip-address=YourIP --force
This will download the file 'test1.localhost+full-Feb.26.2021-09.30.51.tgz' to the /chroot/home location at your server.
Now hit the 'Ctrl D' combination to exit the FTP command line tool.
Once the file has been downloaded and restore the account with overwrite option, type in the following terminal command:/home/interworx/bin/import.pex --archive=/path/to/.tgz --control-panel=siteworx --ip-address=YourIP --force Definitions:/home/interworx/bin/import.pex - the Interworx utility that refers to restoration/import.--archive= - specifies the restoration file. /path/to/.tgz should be replaced with the path to your backup file. In our example, we used /home/test1.localhost+full-Feb.26.2021-09.30.51.tgz--control-panel= - the control panel that was used for the backup creation. In our case, the value is siteworx.--ip-address= - specifies the IP address that should be used for the account and domain names within.--force -specifies the overwrite flag, which overwrites all of the existing account data from the backup.
Once the restoration is complete, you will be able to see the following output at the end of the report:
Definitions:/home/interworx/bin/import.pex - the Interworx utility that refers to restoration/import.--archive= - specifies the restoration file. /path/to/.tgz should be replaced with the path to your backup file. In our example, we used /home/test1.localhost+full-Feb.26.2021-09.30.51.tgz--control-panel= - the control panel that was used for the backup creation. In our case, the value is siteworx.--ip-address= - specifies the IP address that should be used for the account and domain names within.--force -specifies the overwrite flag, which overwrites all of the existing account data from the backup.
Once the restoration is complete, you will be able to see the following output at the end of the report: 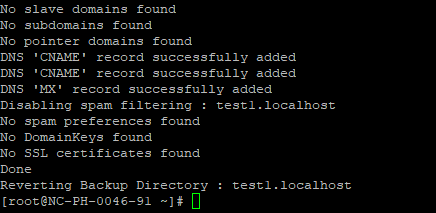 For additional details or custom configurations, please refer to the official Interworx support article.How to access the FTP storage via the ftp command lineIn order to be able to use the “ftp” command line tool, please log in to the server over SSH. If you have the cPanel/WHM control panel installed, navigating the “Terminal” menu in the cPanel/WHM will work, too.In order to access the remote FTP storage, we will need your FTP username, your FTP host, and your FTP password. At your terminal window, please issue the following command: ftp phxnas01.dcops.techPlease note that all of the actions are performed on the server.Definitions:ftp - invokes the ftp command line utilityPhxnas01.dcops.tech - the remote FTP storage address (either IP address or hostname)The following output is expected:
 Type in your username in the next field and hit the “Enter” button:
 2039-992200 is our FTP test username. Make sure to specify your own FTP username.In the “Password” field, copy and paste your password from your FTP storage.The following is an indication of a successful login:
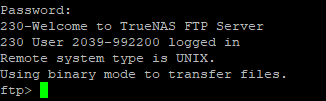
 lcd home
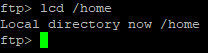 pwd - prints the current working directory on the remote FTP server. Usually it is “/”:
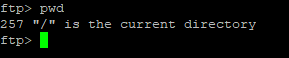 dir - prints the content of the current working directory on the remote FTP server:
 In our directory example, we had 1 directory “account.” cd - changes the working directory on the remote FTP server. In our example, we had
directory 2021-02-25 on the FTP storage so we will use it as argument to the “cd” function:
In our directory example, we had 1 directory “account.” cd - changes the working directory on the remote FTP server. In our example, we had
directory 2021-02-25 on the FTP storage so we will use it as argument to the “cd” function: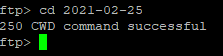 If you see the “250 CWD command successful” message, this indicates that command was successful.put - uploads the specified file to the remote FTP storage. The name of the transferred file is passed as the first argument.Next, we will place the file named “version” into the 2021-02-25 directory. The next command will be issued in order to perform that:put versionThe following output is expected:
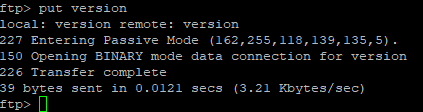 Please note that the file should exist on the local working directory at your server (/home/version - example).delete - removes the file from the remote FTP storage:
 In our example, we removed the “version” file that we uploaded earlier. get - will download the specified file to your local working directory from the remote FTP storage:
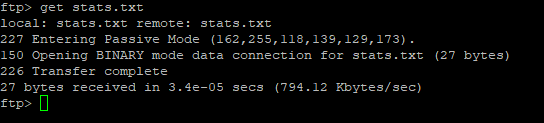 stats.txt was used as an argument to the “get” command, the file to be downloaded.In order to exit the FTP command line utility, enter the “bye” command:
 This concludes our short FTP tutorial!Feel free to refer to the official documentation of the FTP project.
Need help? We're always here for you.