DNS (Domain Name System) translates domain names
(like www.yourdomain.com) into IP addresses that computers use. Changing your DNS settings directs where visitors are sent, such as to your website or email services, ensuring everything works correctly.
To change the DNS for your Namecheap domain, you are welcome to use this video guide:
Alternatively, you can refer to the step-by-step illustrated instruction below.
Changing the DNS for your domain is a straightforward process that involves the following steps:
1. Log in to your Namecheap account.
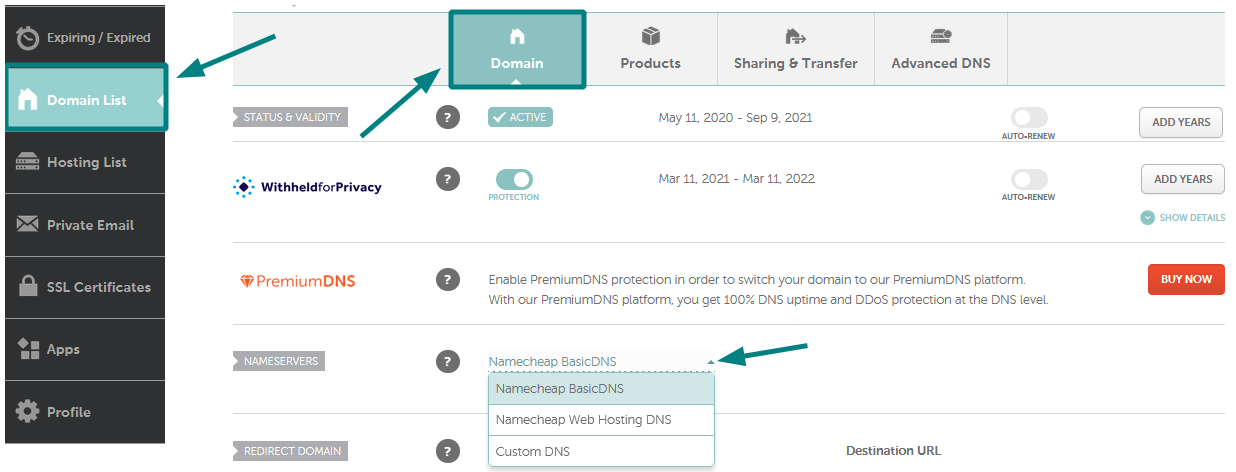
2. From the left sidebar, select Domain List and click on the Manage button next to your domain:

3. In the Nameservers section, select your preferred option from the drop-down menu and click on the green checkmark to save the changes:

NOTE: Nameservers are part of the Domain Name System (DNS) database that acts as a directory for devices and the IP addresses attached to them. When registering nameservers, an IP address is assigned to them, and unregistered nameservers cannot work correctly with some domains.
There are four options to choose from:
- Namecheap BasicDNS: If you want to point your domain to Namecheap's default DNS, use the following nameservers:
- dns1.registrar-servers.com
- dns2.registrar-servers.com
- Namecheap PremiumDNS: This is a paid DNS service that can be used with any domain registered at any Registrar. This option is available for the domains that have a PremiumDNS subscription attached.
NOTE: If you change nameservers from custom nameservers to Namecheap's default ones or vice versa, the host records will not be added to the new nameservers automatically. Please make sure to save all the needed settings and set them up manually after the nameservers switch.
Nameservers changes do not propagate instantly. It may take up to 24 hours (more, in rare cases) for local ISPs to update their DNS caches so that everyone can see your website. You can always check your domain name using a proxy server as they do not store cache and will show non-cached information.
Points to keep in mind:
- If the nameservers for .CM domains are changed 3 times within 28 days, the Registry lock is set for such a domain. It will not be possible to remove the lock anyhow after that; just to wait for 28 days to be able to update the nameservers in such a case.
- For .IS domains at least two different nameservers must
be specified and the hosts must not resolve to the same IP address. The
DNS zone should be presetup. NS records should have TTL 86400 (24
hours) or more for a domain to be pointed to them.
- The maximum number of nameservers that can be set for .MX domains is 5.
- .TO registry allows setting up to 4 nameservers for a domain name.
- .CA domains must have at least 2 Nameservers, and maximum 6 nameservers
per a domain name. Each nameserver must have a unique IP, meaning none of
the nameservers can have the same IP. Only one IPv4 address and only one IPv6 address allowed per host.
- .FR domains can be pointed to
third-party nameservers. In order for the settings to be configured
properly, the SOA record should be created for the domain name at the
side of these nameservers beforehand. There are to be at least two
nameservers indicated for the domain name.
- Nameservers requirements for .DE domains can be checked in How can I update the nameservers for my .DE domain?.
That's it!
If you have any questions, feel free to contact our Support Team.


