This article is valid for both new plans (purchased on or after June 2, 2026) and legacy Private Email plans (purchased before June 2, 2026).
If your domain is hosted with us (using our hosting nameservers dns1-2.namecheaphosting.com) and you would like to use the Namecheap Private Email service, you can set appropriate MX, CNAME, SRV, and TXT records in your cPanel. We have a step-by-step guide on how to log into cPanel for your convenience.
NOTE: The cPanel email service included in Namecheap Web Hosting is configured by default. If you decide to switch to Private Email, please note that the two services cannot work simultaneously. Once the Private Email DNS records are added to your cPanel, the cPanel email service will stop working. You can check the differences between these two email services here.
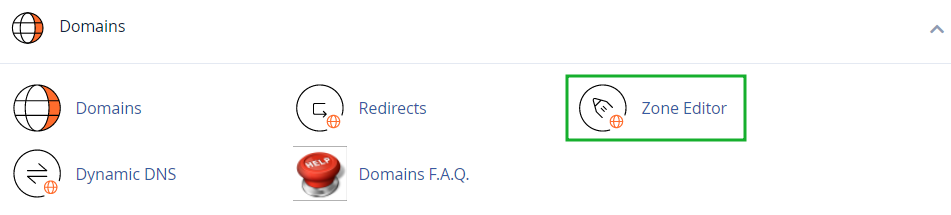
1. Log into cPanel and navigate to the Domains section > the Zone Editor menu:
2. Click the Manage button next to the domain, the DNS zone of which you would like to edit:

3. Choose the MX option and remove all the existing MX records:
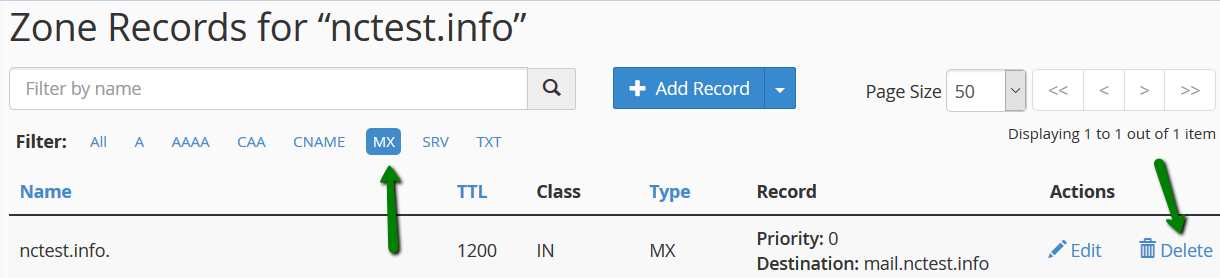
4. Once done, add 2 new MX records with priority 10 using the +Add Record box:
mx1.privateemail.com
mx2.privateemail.com

Verify the changes:

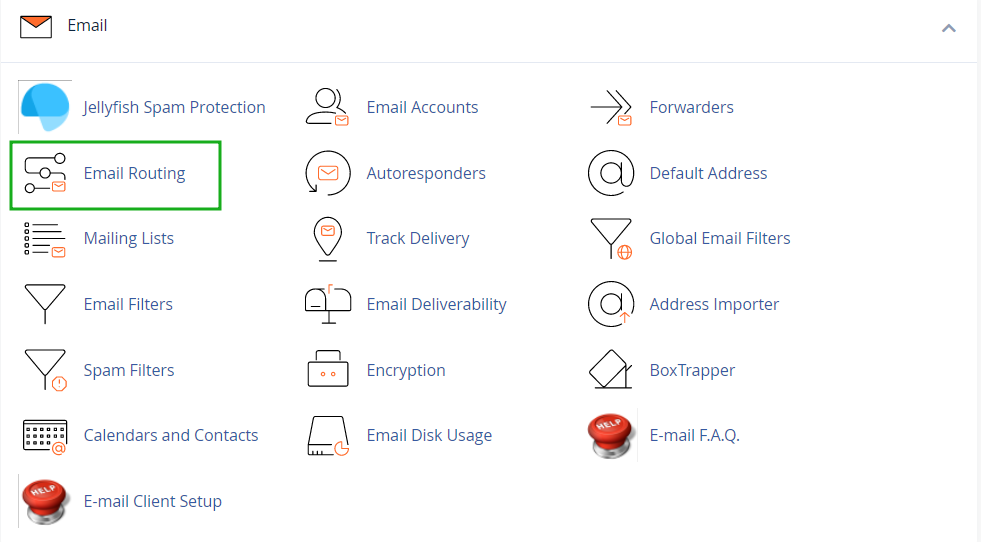
Next, go to the Email section in cPanel > the Email Routing menu:
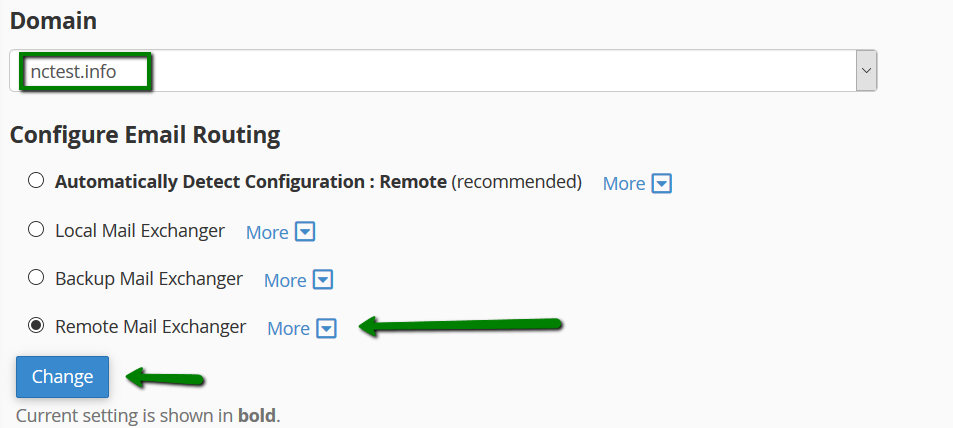
If you have several domains or subdomains, choose the needed domain from the drop-down list and set Email Routing to Remote Mail Exchanger > click Change:
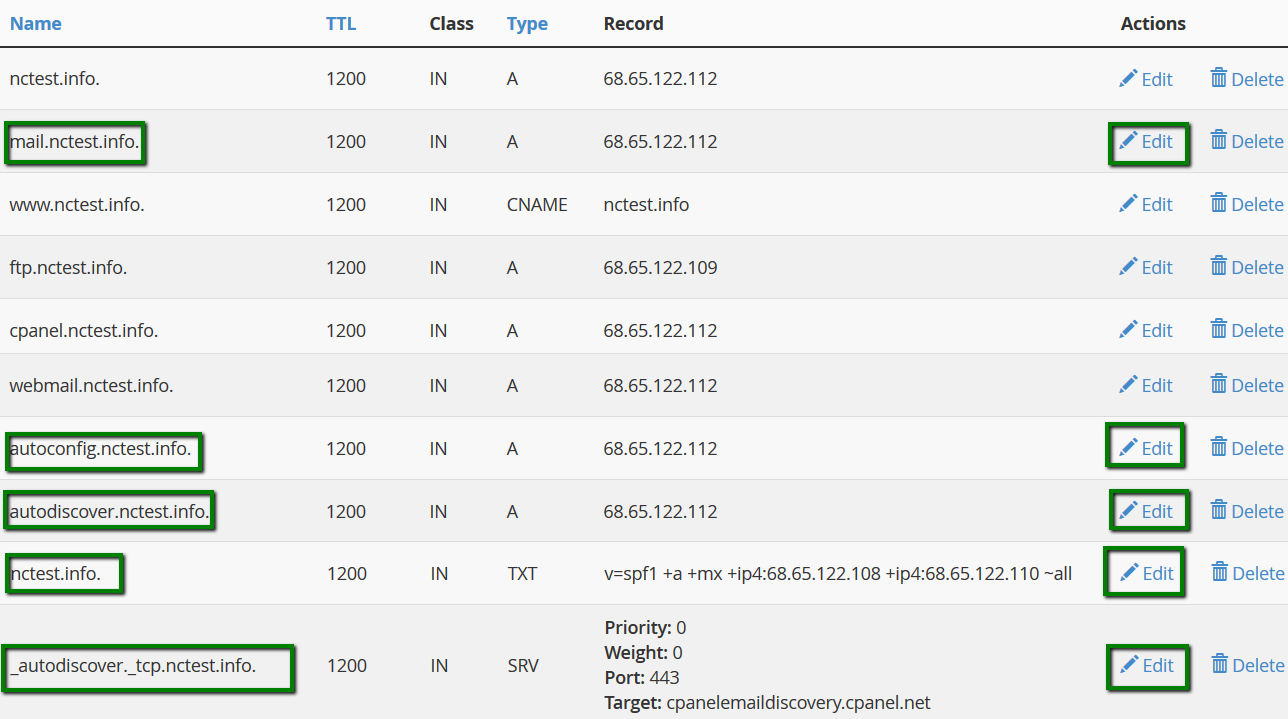
5. Now go back to the cPanel home page and navigate to the Domains section > the Zone Editor menu:
Click the Manage button next to the domain, the DNS zone of which you would like to edit:
6. At this step, you will need to update DNS records for your domain.
NOTE: make sure not to edit/remove the A record of your domain name, as it may result in your website downtime.

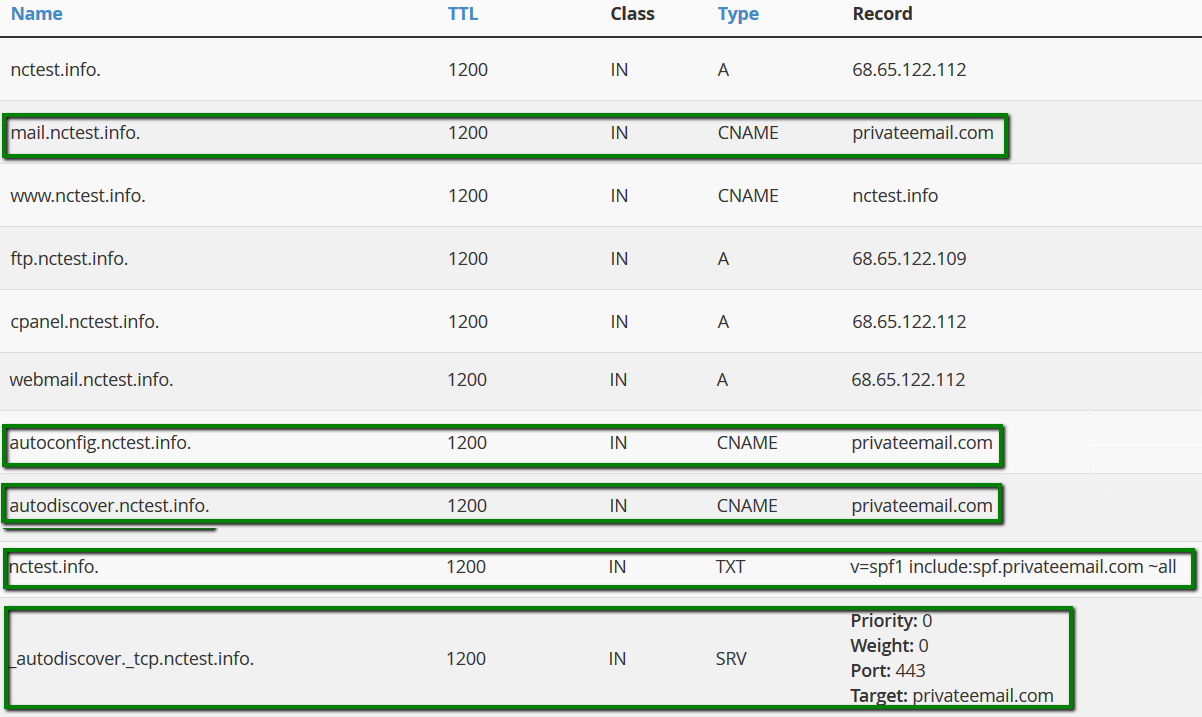
Create new records (or edit the present ones) with the following syntax:
NOTE: if your cPanel default TTL value is 14400 - feel free to use this value instead of 1200.
NOTE 1: before adding a new CNAME record, it's necessary to remove an A record for the host named mail (if present).
mail.yourdomain.com CNAME 1200 privateemail.com
default._domainkey (privateemail._domainkey) TXT 1200 should be generated and copied using this guide
NOTE: SPF, DKIM rand DMARC ecord is a mandatory entry to ensure outgoing mail works correctly. It can be generated only after a mailbox has been created.
NOTE 1: For Private Email subscriptions purchased on or after June 2, 2026, DKIM name is privateemail._domainkey. For subscriptions purchased before that date, it is default._domainkey.
A regular length of a DKIM record required for Private Email is 2048-bit (400+ characters). At the same time, the max length of the value that can be included in the DNS record in cPanel by default is only 255 characters.
An easy way to divide the DKIM value properly is the following:
1. Copy the full value.
2. Paste it into any text editor. You will use this document to split the value correctly.
3. In cPanel, paste your DKIM value into the first string of the DNS record.
4. Copy the value shown in the first TXT string in cPanel.
5.Go back to your text document and use Ctrl+F / Cmd+F to find the copied part:

6. Copy the remaining DKIM value from the document:

7. In cPanel, click "+ Add TXT string to record" and paste the remaining DKIM value into the second TXT string:

8. Press Save.
yourdomain.com TXT 1200 v=spf1 include:spf.privateemail.com ~all
autoconfig.yourdomain.com CNAME 1200 privateemail.com
autodiscover.yourdomain.com CNAME 1200 privateemail.com
_autodiscover._tcp.yourdomain.com SRV 1200 Priority: 0
Weight: 0
Port: 443
Target: privateemail.com
Once done, verify the changes:
 Allow up to 30 minutes for the records to propagate and check the work of your mail service.
NOTE: If your domain already has an SPF record for cPanel email services, you might want to merge it with the SPF record required for Namecheap Private Email. This ensures that system notifications from cPanel continue to be delivered while also authorizing Namecheap Private Email to send emails on behalf of your domain.
Here’s how the merged SPF record should look: v=spf1 +a +ip4:[Your_Server_IP] include:_spf.cpanel.net include:spf.privateemail.com ~all
To configure DMARC, you will first need to generate a DMARC record using an online DMARC generator tool (for example, MXToolbox DMARC Record Generator) and then add it as a TXT record to your domain’s DNS zone.
_dmarc TXT v=DMARC1; p=reject;
NOTE: The DMARC policy can later be adjusted to quarantine or reject depending on your email setup and monitoring preferences.
What are the functions of these records?
MX record (mail exchange record), is an entry in the Domain Name System that identifies the mail server that is responsible for handling e-mails for that domain name. MX record is used to direct emails to a specific email server - thus, it is necessary for delivery emails to domain-based email addresses.
TXT record (text record) is a type of resource record in the Domain Name System (DNS) used to provide the ability to associate some arbitrary and unformatted text with a host or other name, such as human-readable information about a server, network, data center, and other accounting information. SPF and DKIM records are set up as the TXT ones, and they provide other mail servers a way to verify if the email was sent from a mail server authorized by the domain owner (SPF), and whether it wasn't changed from the moment the message had left the initial mail server (DKIM). These records do not affect email delivery to the domain they are set up for.
SRV record (service record) is a specification of data in the Domain Name System defining the location, i.e. the hostname and port number, of servers for specified services.
CNAME record (canonical name record) is a type of resource record in the Domain Name System (DNS) used to specify that a domain name is an alias for another domain, the 'canonical' domain. All information, including subdomains, IP addresses, etc., is defined by the canonical domain. A CNAME record for the mail subdomain is set up only for URL redirect from mail.domain.tld to Private Email Webmail (https://privateemail.com/). CNAME records for the autodiscover and autoconfig subdomains and the SRV record are used for automatic email accounts set up by some email clients.
Once done, do not forget to create an email box using this guide.
That's it!
Need any help? Contact our HelpDesk
