Prerequisites
Step 1. Apache
Installation
Initial basic configuration
Configuring firewall daemon
Step 2. MariaDB
Installation
Running initial secure configuration script
Step 3. PHP
Installing recent PHP version
Adding most common PHP extensions
Step 4. Testing LAMP
Step 5. Installation of a WordPress script on a http://domain.tld
Creating website directory
Editing Apache configuration
Installing latest version of WordPress script
Installing MySQL database management system (bonus section)
Installation
Running initial secure configuration script
Changing authentication method for MySQL root user
A LAMP (Linux, Apache, MariaDB, PHP) stack is commonly used to prepare servers for hosting web content. This detailed guide will come in handy if you are planning to manage the server without a cPanel (control panel) installed. We will show how to install LAMP on the server with Ubuntu 16.04 or 18.04.
All aforementioned versions of Ubuntu represent
current Long-Term Releases (LTS) and use the same package manager
apt (Advanced Package Manager).
In this guide, we will set up recent versions of Apache, MariaDB, and PHP on a server with the hostname server1.ncsupport.info. Additionally, we will set up a basic
configuration of LAMP to host a WordPress content management system and install its latest version at http://domain.tld.
- Ubuntu 16.04 or 18.04 blank version. If you have a VPS with Namecheap, one of these operating systems can be installed using your access to the
SolusVM management tool.
- Internal server account with root access (#) or the one with sudo privileges. For simplicity, the following steps will be illustrated using the “root” account. Therefore, commands to be executed start with the “#” sign, which should not be copied.
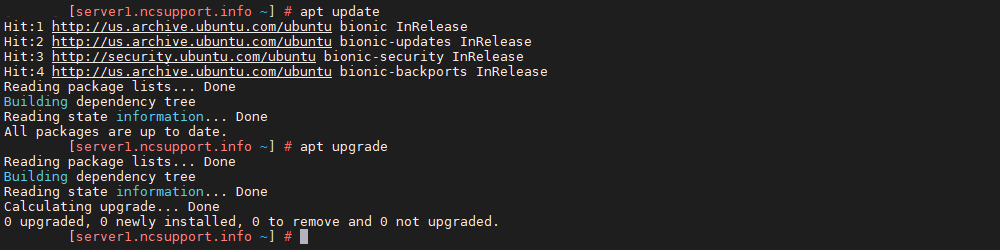
We recommend updating the operating system (OS) prior to proceeding with further steps.
apt update
apt upgrade
If you see “0 upgraded, 0 newly installed, 0 to remove and 0 not upgraded” after running “apt upgrade”, you are using the most up-to-date software.
It may be required to review and confirm/deny certain changes during the process. To answer “Yes” automatically, you can use the option “-y” with apt. For instance, “apt -y upgrade” instead of “apt upgrade.” This will be valid for any apt-based commands that follow.
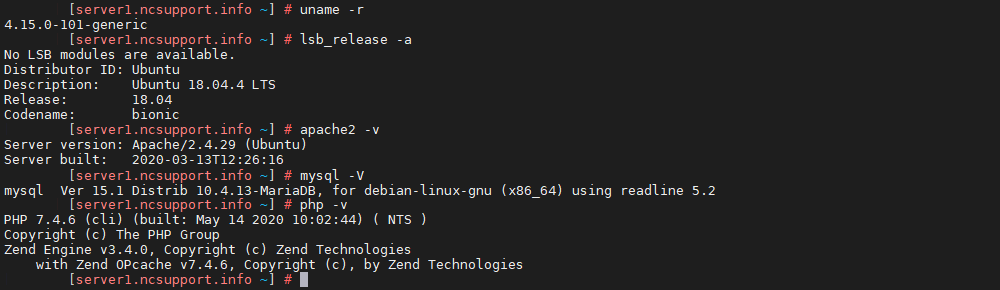
Another optional step is to reboot the server and check its current configuration.
reboot
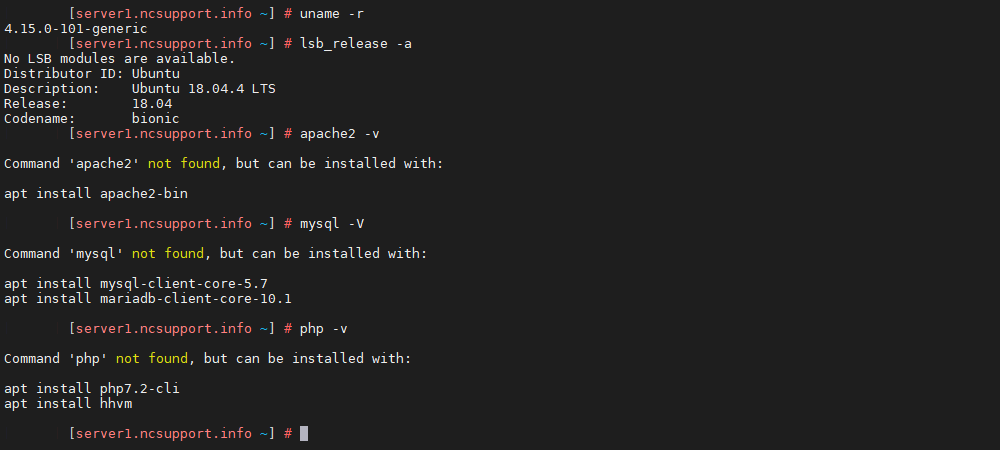
uname -r
lsb_release -a
apache2 -v
mysql -V
php -v
Above is a simple confirmation that our test environment does not have any Apache, MariaDB, and PHP modules installed yet.
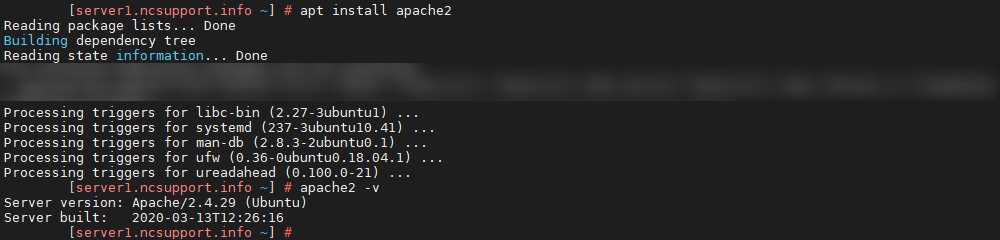
The process is as simple as running a single command below:
apt install apache2
apache2 -v
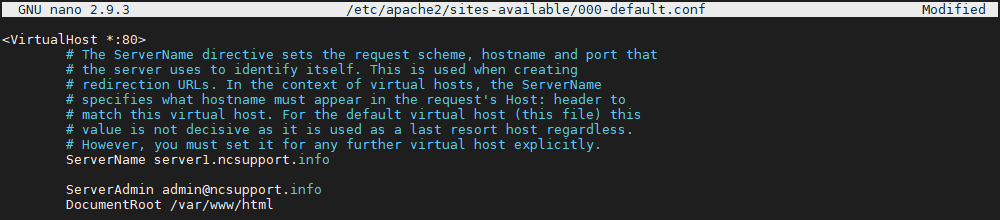
Initial basic configuration
This time we need to edit the Apache configuration file. We will use the text editor “
nano” but you can use one of your choice.
The Apache main virtual host configuration file is /etc/apache2/sites-available/000-default.conf. Therefore, we can open it using the following command:
nano /etc/apache2/sites-available/000-default.conf
Use keyboard arrows to scroll down the file. You will need to change to lines:
ServerAdmin and
ServerName. ServerAdmin can be any email address you wish to send server notifications to. ServerName should be the hostname you set with HTTP port 80. Make sure that there is no comment (# sign) at the beginning of either ServerAdmin or ServerName lines.
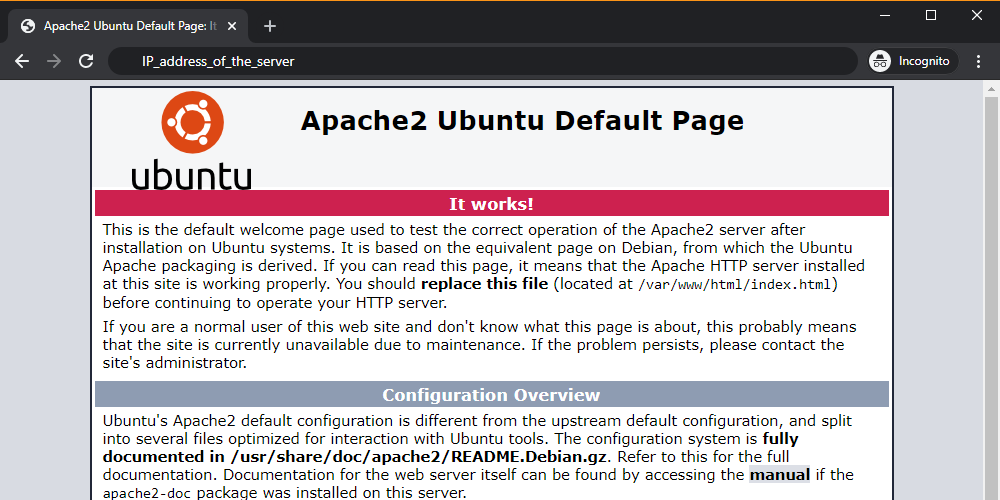
In case a domain name is pointed to the server, you can check the Apache start page. Feel free to use your own domain name. Alternatively, you should be able to see the start page of the Apache server when entering the IP address of the server in your web browser.
If you do not remember the IP address assigned to the server, this command will come in handy:
ip addr show eth0 | grep inet | awk '{ print $2; }' | sed 's/\/.*$//'
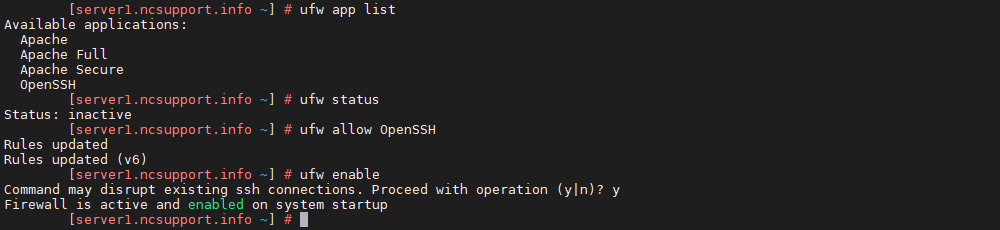
Ubuntu comes bundled with a default firewall named
Uncomplicated Firewall (UFW). It allows for the operating with so-called profiles that should ease the overall management of firewall rules. You can review the list of existing application profiles, check the status of the firewall, white-list certain profiles, and enable the firewall using the following commands:
ufw app list
ufw status
ufw allow OpenSSH
ufw enable
NOTE: If you enable the firewall without white-listing the OpenSSH application with “ufw allow OpenSSH” first, it will not be possible to reconnect to the server via SSH. Therefore, it will be required to log in using VNC credentials:
SolusVM VNC
in case of VPS, or
IPMI
in the case of Dedicated Servers.
As a part of our initial Apache setup, let’s make sure that any incoming external requests through ports 80 and 443 do not get blocked. By the way, you can check the profile’s description using the “ufw app info” command.
ufw app info "Apache Full"
ufw allow in "Apache Full"
By default, Ubuntu can be set up with the MySQL server.
MariaDB
is a fully-functional and open-source counterpart drop-in replacement for MySQL – with more features and better performance. That is why we proceed with the installation of MariaDB within the main sequence of steps and leave the MySQL part as a bonus.
Installation
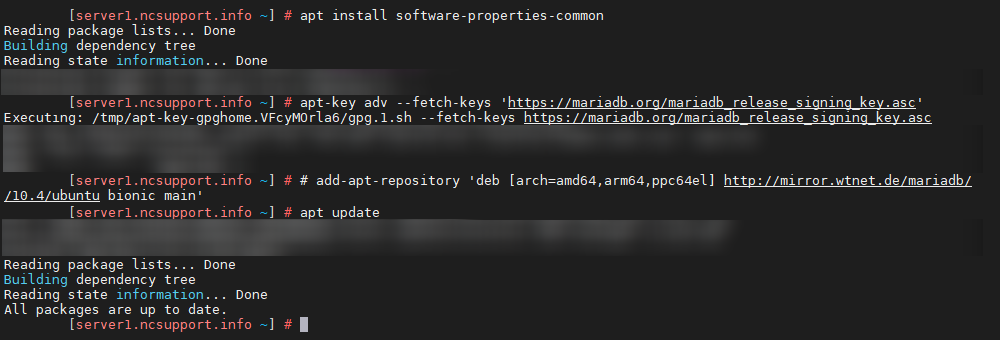
You can install MariaDB without the hassle only using “apt install mariadb-server mariadb-client.” However, you will get the MariaDB version 10.1, which may be considered outdated depending on your setup preferences. We will install MariaDB 10.4 which is currently considered a stable release. The instructions and commands to use are conveniently provided on the
official web page of MariaDB:
apt install software-properties-common
apt-key adv --fetch-keys 'https://mariadb.org/mariadb_release_signing_key.asc'
add-apt-repository 'deb [arch=amd64,arm64,ppc64el] http://mirror.wtnet.de/mariadb/repo/10.4/ubuntu bionic main'
apt update
We are now ready to install MariaDB 10.4:
apt install mariadb-server
mysql -V

Running initial secure configuration script
The MariaDB server comes with a security script that should be run as a part of the initial configuration. The script will go through the enabling unix_socket, the resetting of MariaDB's own root password, the removal of anonymous users and the test database as well as the disabling of the remote root login, etc.
The important part here is the unix_socket. In MariaDB 10.4.3 and later, the
unix_socket authentication plugin is installed by default. It allows the user to use operating system credentials when connecting to MariaDB via the local Unix socket file. In certain cases, socket authentication may not meet your needs and create additional confusion. With that in mind, you have a chance to disable it when running the initial installation script at the step “Switch to unix_socket authentication [Y/n]”:
Answering “Y” will enable the unix_socket authentication for the database root user
Answering “n” will keep the mysql_native_password option enabled for the database root user instead
Regardless of your decision, it can also be
changed later.
mysql_secure_installation
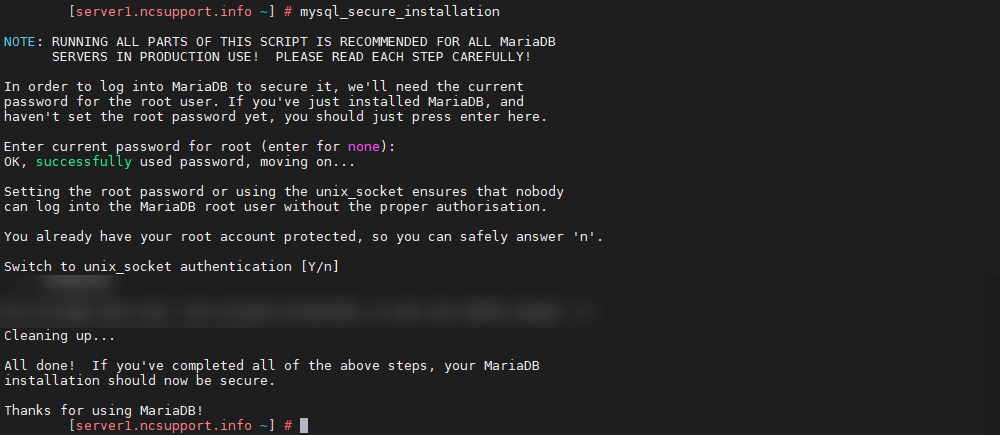
In the end, you should see the message:
Thanks for using MariaDB!Logging into MariaDB and creating the basic database
You can launch the MariaDB command line interface using this command:
mysql -u root -p
The prompt will request a password. It must be the one that you just set for your root database access after going through the secure installation script. Afterward, the command line will allow you to manage the MariaDB server. Let’s create a basic database named “foo_db” and grant full access to this database for the MariaDB user “foo_user” with the password “foo_password”:
MariaDB> CREATE DATABASE foo_db; GRANT ALL ON foo_db.* TO 'foo_user'@'localhost' IDENTIFIED BY 'foo_password';

You can double-check the list of existing databases with “show databases;” prior to leaving the MySQL/MariaDB server with “quit.”
Step 3. PHP
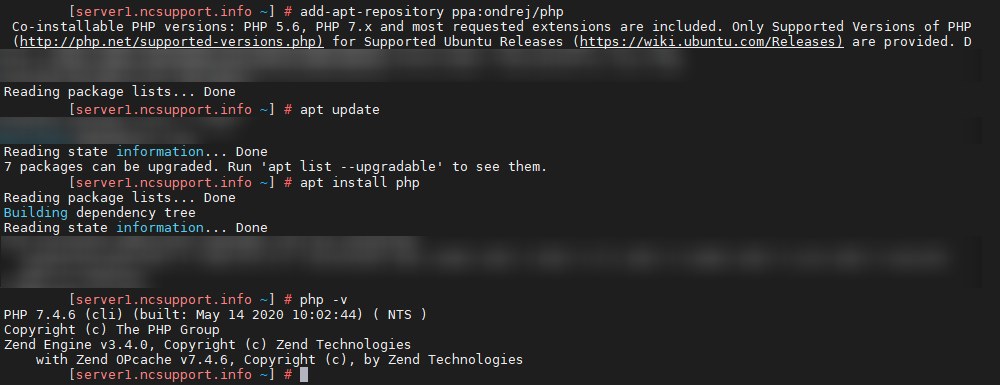
Installing the recent PHP version
Although it’s possible to install the PHP with “apt install php,” we will get the outdated PHP 7.2 only. This version is
not actively supported
anymore. Instead, we will focus on the most recent PHP environment version as of these days – 7.4. By the way, developers of
WordPress recommend the use of PHP 7.4 or above.
To get the up-to-date versions of PHP, you will need to add the extra repository:
apt install software-properties-common
add-apt-repository ppa:ondrej/php
apt update
apt install php
php -v
NOTE: If you have installed “software-properties-common” during the MariaDB installation, there is no need to run this command again.
PHP 7.4 itself is not enough. For instance, WordPress requires at least 14 essential PHP extensions. In other words, we will need to double-check the presence of these and a couple of other popular PHP extensions with the following command (missing extensions will get installed):
apt install php-cli php-curl php-gd php-json php-ldap php-mbstring php-mysql php-odbc php-soap php-xml php-xmlrpc php-zip
Step 4. Testing LAMP
At this point, LAMP stack is set up and ready to resolve content on the Internet. We can re-run our initial checks from the “Prerequisites” section of this article. Additionally, we will reboot the server to make sure that all changes are applied.
reboot
uname -r
lsb_release -a
apache2 -v
mysql -V
php -v
By default, the server is set up to resolve the content of /var/www/html/ when accessed via an IP address or server’s domain name. To test this, let’s create a simple index.html file after renaming existing one:
mv /var/www/html/index.html /var/www/html/index.html_bak
nano /var/www/html/index.html
<html>
<head>
<title>My website on Ubuntu</title>
</head>
<body>
<h1>A simple index.html file</h1>
<p>Test page for ncsupport.info</p>
</body>
</html>
A combination of Ctrl+O and Ctrl+X will save the file and exit the “nano” text editor. Now, visiting your own website should resolve the content of the index.html file we have just created:

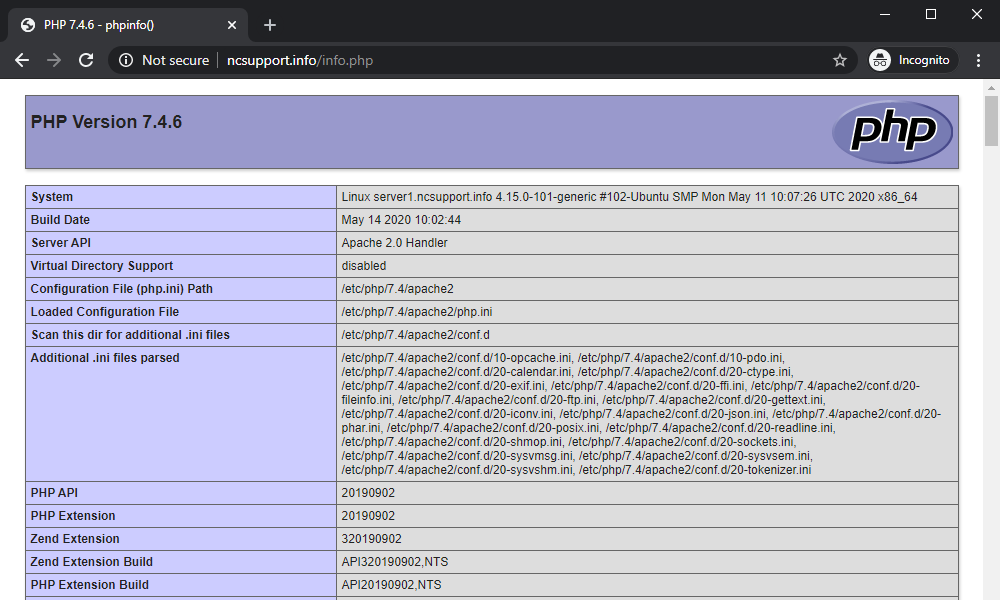
Everything looks good! Keeping the PHPinfo() function file present on the server is not secure, however. Therefore, let’s prevent exposing sensitive information by removing it:
rm /var/www/html/info.php
Step 5. Installation of a WordPress script on a http://domain.tld
Going through steps 1-4 will ensure that any domain name pointed to the server’s IP address will resolve the content of /var/www/html/. In most cases, this is not the ideal setup. Hosting separate content of several domain names, independently, will require a bit of extra tweaking.
Creating website directory
Basically, you need to create a folder to upload specific website files and tell Apache where specific hosted files are located. Let’s try hosting a WordPress website at http://domain.tld/. Replace “domain.tld” in each command listed below with your actual domain name in order to match your own setup.
To start with, let’s create a folder which will store files of your new website. Once done, you need to change ownership permissions to the Apache user (each service has its own user) and set the appropriate www folder permissions to 755.
mkdir -p /var/www/domain.tld
chown -R www-data:www-data /var/www/domain.tld
chmod 755 /var/www/domain.tld

Editing the Apache configuration
You will need to
modify virtual hosts
and create a virtual host file to make sure that correct content is served for a domain name. Instead of modifying existing default virtual host file /etc/apache2/sites-available/000-default.conf, let’s create a new one. Please remember to replace “domain.tld” with the actual domain name of yours:
nano /etc/apache2/sites-available/domain.tld.conf
<VirtualHost *:80>
ServerAdmin admin@domain.tld
DocumentRoot /var/www/domain.tld
ServerName domain.tld
ErrorLog /var/www/domain.tld/error_log
CustomLog /var/www/domain.tld/access_log common
</VirtualHost>
Let’s enable the new virtual host file with an in-built tool “
a2ensite” and check the syntax of Apache configuration files. If everything is fine, we will need to restart Apache to make sure that all custom changes are applied.
a2ensite domain.tld.conf
apache2ctl configtest
systemctl restart apache2
Besides, it’s worth enabling the .htaccess file. To do so, you need to
find these lines at the beginning of the Apache main configuration file
/etc/apache2/apache2.conf and change "AllowOverride None" to
"AllowOverride All" within the section <Directory /> as
illustrated below.
Installing the latest version of WordPress script
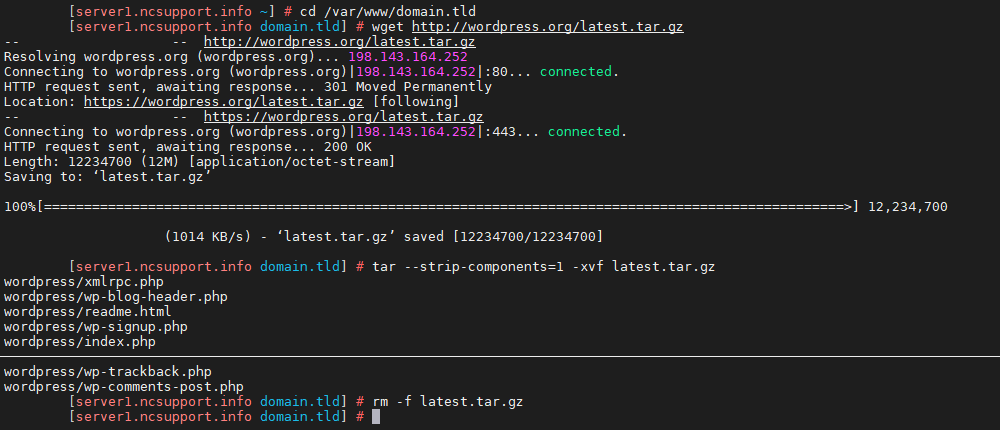
Currently, our http://domain.tld/ is pointed to the content of the directory /var/www/domain.tld and should resolve files stored in the directory (if any). The next batch of commands will allow you to download and extract WordPress files:
cd /var/www/domain.tld
wget http://wordpress.org/latest.tar.gz
tar --strip-components=1 -xvf latest.tar.gz
rm -f latest.tar.gz
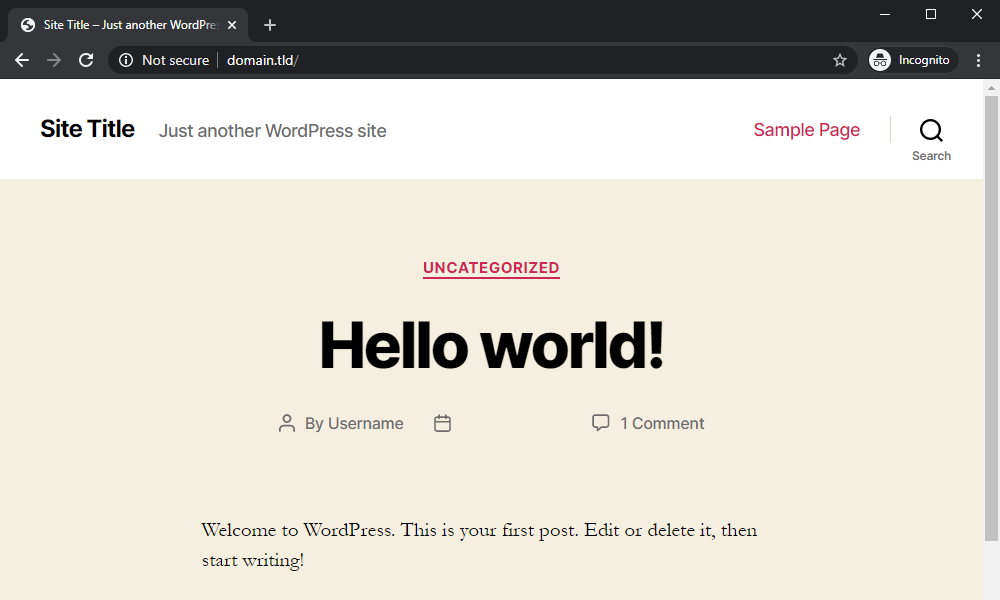
If everything goes well, refreshing http://domain.tld/ in the web-browser should lead to the default installation sequence of WordPress at http://domain.tld/wp-admin/setup-config.php. Using the details of a previously set up database “foo_db” you can finish the initial configuration and check your fresh WordPress website:
Installation
If you wish to install MySQL on an Ubuntu-based server instead of MariaDB, the following command can be used. In the case of Ubuntu 18.04, MySQL 5.7 will be downloaded and set up automatically.
apt install mysql-server
mysql -V
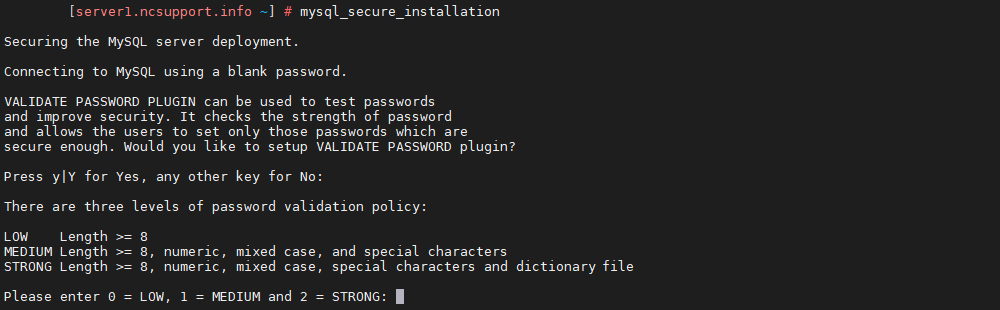
Running the initial secure configuration script
MySQL has its own initial secure configuration script which is initiated with the following command:
mysql_secure_installation
The initial prompt will ask whether you would like to turn on the “Validate Password” plugin. If enabled, this plugin will test new passwords to make sure a predefined password strength is achieved. Levels of password validation policy are as follows:
0 = LOW Length >= 8
1 = MEDIUM Length >= 8, numeric, mixed case, and special characters
2 = STRONG Length >= 8, numeric, mixed case, special characters and dictionary file
It is safe to leave validation disabled, but you should always use strong, unique passwords for database credentials. The rest of the prompts can be answered “Y” until you see the message “
All done!”.
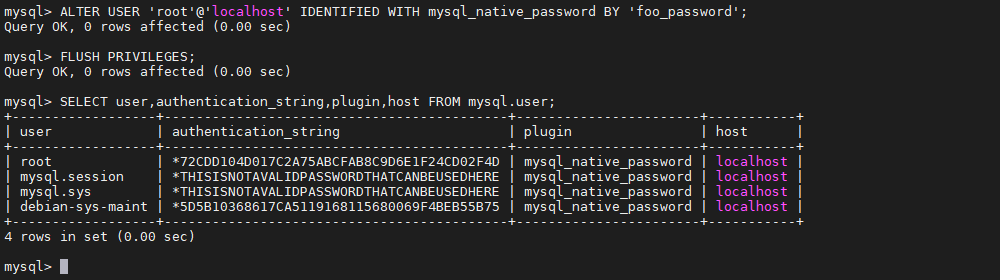
Changing the authentication method for MySQL root user
Unlike MariaDB, the root user in MySQL is set up with the authentication through the auth_socket by default. This can be double-checked with the following MySQL query:
mysql> SELECT user,authentication_string,plugin,host FROM mysql.user;

If you wish to use a password with the MySQL root user, mysql_native_password plugin has to be assigned instead of auth_socket. Please note that the change of plugin and assignment of a new password must be made with a single command. Make sure to use a strong password instead of “foo_password” from the example below:
mysql> ALTER USER 'root'@'localhost' IDENTIFIED WITH mysql_native_password BY 'foo_password';
mysql> FLUSH PRIVILEGES;
Double-checking the setup should confirm that the change was successful and the root MySQL user now uses mysql_native_password.
That’s it! You can now host and build websites based on a server with Ubuntu and LAMP stack.