What is spam
Locating spamming activity
Analyzing and managing the mail queue
Hardening anti-spam security policies on the server
Detecting malware software/scripts
What is spam
Spam emails are those unwanted messages sent in bulk, primarily from a commercial advertiser. Spam email traffic constitutes more than 50% of total email traffic these days.
Spamming
– sending a heap of unnecessary commercial messages or
advertisements to a group of addressees, usually by email (but can also
be posted to online chat rooms, message boards and cells (mobile phone
spam or also known as m-spam)). Spamming people is considered to be a
gross violation of internet etiquette and is punishable. Sending spam can result even in a hosting account cancellation without any compensation.
As a hosting service provider,
we do not tolerate any spamming activities on our servers. Namecheap servers are powered by sophisticated email filtering software aimed to protect our clients, and Namecheap’s infrastructure, from a wide variety of external and internal email threats.
Despite that, if you own our
VPS or
Dedicated server hosting options, spamming activity originating from any account or script hosted on it can result in your server’s IP being blocked by different Real-time Blackhole Lists (RBLs). This will decrease the reputation of the server on the Internet significantly. However, as a server administrator, you have a variety of tools at your disposal. Such tools may be useful to locate and deal with spamming activity within the server directly.
Exim Mail Transfer Agent (MTA) is pre-installed and configured out-of-the-box on all cPanel-based server instances. Its default configuration is sufficient to ensure the email deliverability from the server. All emails originating from the server (it does not matter whether those are legit or spam messages) are handled by the Exim module. If you suspect your server to be a part of the ongoing spamming activity, a setup like this is convenient for detecting and troubleshooting unwanted spamming actions on the server.
To follow along and test further information of this article in practice you will need:
- Root access to the server. All our VPS and dedicated servers with User-Responsible or Basic management come with the root access pre-configured for you. These details can be found in the Hosting Welcome email from us. However, it is recommended to reset the root password for either VPS or dedicated server regularly.
- Configured SSH access. Although some troubleshooting features may be available within the interface of your WHM, the use of terminal is essential for a more thorough analysis and automation. This article elaborates on several ways on how to establish a connection to the server via SSH.
First of all, it is important to understand what is going on within the Exim. Recalling the initial definition of spam, these messages are usually sent in bulk cluttering the email bandwidth of the server. Ideally, the email queue should be empty. However, it is not always the realistic case of an active mail server. There are numerous reasons why emails would get into the delivery queue, for instance, the load on the server is above the delivery threshold or the receiving mail server is not available at the moment.
Here is a basic command to check the number of messages currently existing within the queue:
exim -bpc
NOTE: A bulked-up mail queue is not an indicator of the ongoing spamming activity on the server solely. We recommend further investigation, for instance analyzing possible reasons why messages get queued. Eventually, reviewing headers/body of queued messages and tracing them in Exim logs will shed extra light on the context.
Every email message sent on the Internet has its unique ID. This Message ID will follow the email across multiple servers and will not get changed. It can be found within email logs and in
message headers. At the same time, another local identifier is assigned to the same message – an Exim ID. The latter is not guaranteed to be a unique number after the message leaves the local network. However, when local spamming activity is investigated, the Exim ID is worth using and referring to.
Below is the command that provides basic information about each message in the queue (where 73m – time spent in the queue; 46K – the size of the message; 1iqxSJ-0006JQ-Dy – Exim ID):
exim -bp
By the way, if the email queue is large, you can pipe the result of “exim -bp” to “less” command to avoid cluttering:
exim -bp | less
As long as you have the unique local identifier of the message (Exim ID), you can output the
message’s header information (“-Mvh” flag), the content of the message (“-Mvb” flag) or its log (“-Mvl” flag):
exim -Mvh Exim ID
exim -Mvb Exim ID
exim -Mvl Exim ID
We do not recommend clearing the queue, or removing messages manually before the investigation (to avoid the removal of legitimate messages). However, if you are sure that a certain message can be removed from the queue, this action can be executed with the following command:
exim -Mrm Exim ID
Alternately, to force a message delivery retry, use this command:
exim -M Exim ID
Eventually, Exim comes with a useful utility that covers the process of screening entries matching the search query through the queue and outputs:– exiqgrep (not to be confused with exigrep, which looks through log files for entries that match a given pattern). As an example, it is possible to output queued messages from a specific sender’s email “sender@domain.tld” only (“-f” flag):
exiqgrep -f sender@domain.tld
This query will search through the queue and will output Exim IDs only (“-i” flag) for messages with @gmail.com recipients (“-r” flag):
exiqgrep -i -r @gmail.com
The use of the aforementioned “-i” flag may be of the utmost importance when it comes to the removal of emails from a specific sender (piping through the “xargs” command):
exiqgrep -i -f sender@domain.tld | xargs exim -Mrm
It is possible to clear all emails in the current queue.
NOTE: This action is irreversible and must be undertaken with full understanding of the consequences:
exim -bp|grep "<"|awk {'print $3'}|xargs exim -Mrm
Exim writes down the current working directory (CWD) of any process that triggers outbound mail delivery to its primary log file at /var/log/exim_mainlog. This is a handy feature when it comes to locating and tracking the initial message sending script. In particular, this popular one-liner will pull the most used mailing script’s location from the Exim mail log:
grep cwd=/ /var/log/exim_mainlog | cut -d = -f 2 | cut -d " " -f 1 | sort | uniq -c | sort -n
You will get something like this:
According to the output above, more than 20 000 emails have been sent by the script located in the directory /home/cpusername1/domain.tld/.well-known/pki-validation/ksdjgfkls/wtuds. Although there are legitimate email accounts and scripts that can send a large number of emails (for instance, hosted forum content management systems), if there are a lot of outgoing emails originating from home-based directories, it is better to take a closer look.
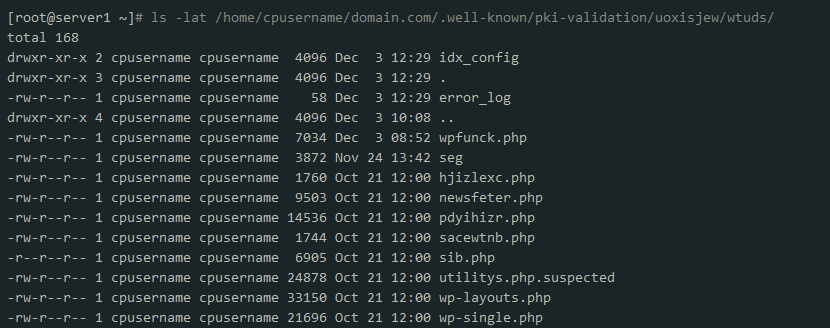
Spam-producing scripts may not always be easily distinguished from legitimate ones. Nevertheless, there are a couple of general tendencies: scripts can have a randomly generated file name (like pdyihizr.php), so they look similar to existing system files (for instance, template.config.php), or can be embedded in an existing legitimate file. With that in mind, it is worth checking the content of the directory suspected to have a spam script inside:
ls -lat /home/cpusername1/domain.tld/.well-known/pki-validation/ksdjgfkls/wtuds/
After a suspicious file is detected, it can be disabled by changing its
set of permissions to 000:
chmod 000 /home/cpusername1/domain.tld/.well-known/pki-validation/ksdjgfkls/wtuds/pdyihizr.php
As soon as you are sure that the script pdyihizr.php was the one responsible for spamming activity, it is possible to check which IP addresses were used to access it:
grep pdyihizr.php /home/cpusername1/access-logs/ -rl
grep pdyihizr.php /home/cpusername1/access-logs/domain.tld | awk '{print $1}' | sort -n | uniq -c | sort -n
According to the output, you will see the IP (123.123.123.123) and the frequency (12450) it accessed the script. If you are unaware of this IP, it may be worth
blacklisting it on the server.
If the X-PHP-Script header is enabled (by default, it is installed as a part of the core PHP installation in EasyApache 4), the spamming script can also be detected by checking the X-PHP-Script field in the header of the emails.
grep X-PHP-Script /var/spool/exim/input/*/*-H | awk '{print $3}' | sort | uniq -c | sort -nr
The command above will screen the active mail queue on the server only.
In some cases, spam is sent as the same message, repeatedly, to a large number of recipients. The following command can be used to pick up such emails from the Exim log (not limited with the queue):
awk -F"T=\"" '/<=/ {print $2}' /var/log/exim_mainlog | cut -d\" -f1 | sort | uniq -c | sort -n
The output of the aforementioned command can be used to locate the account responsible for sending emails with the same subject:
grep "Here is a subject that has been sent 1243 times" /var/log/exim_mainlog | awk '{print $5}' | sort | uniq -c | sort -n
Having the email account responsible for the spamming activity (spam@domain.tld), it is possible to check which IPs it has been accessed from:
grep "<= spam@domain.tld" /var/log/exim_mainlog | grep "Here is a subject that has been sent 1243 times" | grep -o "\[[0-9.]*\]" | sort -n | uniq -c | sort -n
Analysis of mail delivery queue and Exim logs may result in detecting certain tendencies of mail behavior on your server. If so, we suggest incorporating those tendencies as a basis for hardening your server-side anti-spam security measures and policies. We have collected several recommendations for you that may be used as a starting point for the review.
Just like a
single hosting account, the server’s security level will certainly facilitate the regular change of access credentials, not exposing any sensitive information, the use of a secured connection, the maintenance of a viable backup system, and keeping all modules up-to-date. It is a nice approach to
change the default SSH port for the server. Additionally, preventing any unwanted access to the server can always be configured with the
firewall system.
The Clam AntiVirus Scanner (ClamAV) antivirus software can be used to locate malicious entities within the server’s file system. If the scanner identifies a potential security threat, it flags the file to allow you to take the appropriate action. ClamAV requires root access to install, and may be installed via either root WHM or through SSH.
Upon installation, it can be configured through the
WHM >>
Plugins >>
Configure ClamAV Scanner menu or using the
command line.
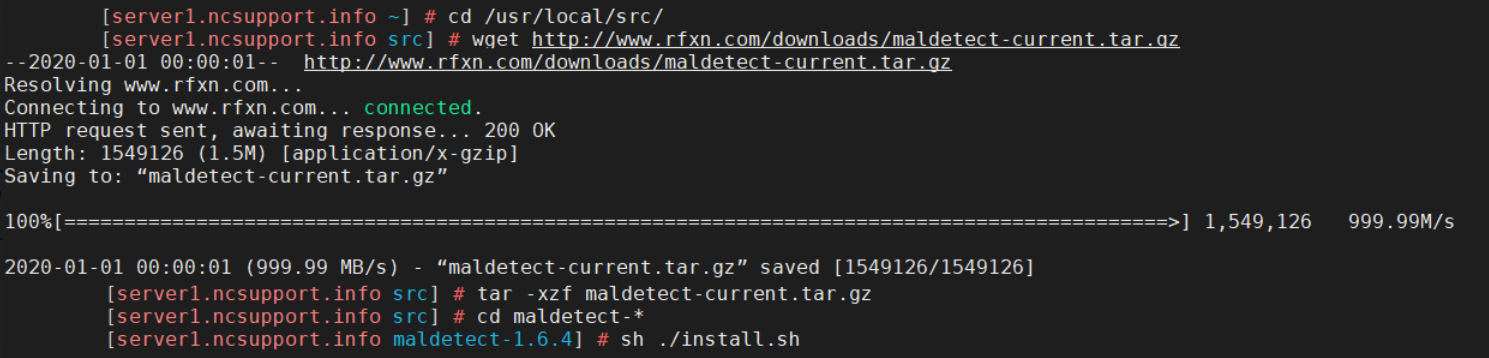
Linux Malware Detect (LMD) is a malware scanner for Linux-based systems and is specifically designed around the threats faced in shared hosted environments. LMD can be installed using the root SSH access and executing these commands:
cd /usr/local/src/

wget http://www.rfxn.com/downloads/maldetect-current.tar.gz

tar -xzf maldetect-current.tar.gz

cd maldetect-*

sh ./install.sh
Having both ClamAV and LMD installed makes it possible to combine them with the creation of symbolic links:
ln -s /usr/local/cpanel/3rdparty/bin/clamscan /usr/local/bin/clamscan
ln -s /usr/local/cpanel/3rdparty/bin/freshclam /usr/local/bin/freshclam
By default, the LMD does not come with preferences already set up. However, the configuration is performed with uncommenting and further tweaking of the conf.maldet file:
nano /usr/local/maldetect/conf.maldet
CXS is a server antivirus system that can detect and mitigate various types of malware.
CXS is a commercial product that is sold and licensed strictly on a one-time per-server basis.
Upon availability of the license,
CXS scan can be configured and executed via SSH.