
{"/api/v1/ncpl/simplekb/getarticle:\"{\\\"articleId\\\":10107,\\\"categoryId\\\":2188}\"":{"body":{"Id":10107,"FriendlyId":"","ArticleTypeId":0,"Title":"How to set up a DNS zone on a server without cPanel","ArticleName":"How to set up a DNS zone on a server without cPanel","ArticleSummary":null,"PreponedSummary":false,"Approved":true,"Body":"SW4gb3JkZXIgdG8gdXNlIHByaXZhdGUgbmFtZXNlcnZlcnMsIGl04oCZcyBpbXBvcnRhbnQgeW91IGtub3cgaG93IHRvIHNldCB1cCBhIEROUyB6b25lIG9uIHlvdXIgc2VydmVyLCB3aXRob3V0IGNQYW5lbCwgYW5kIGxldCBpdCBoYW5kbGUgRE5TIHJlcXVlc3RzLiA8YnIgLz48YnIgLz5BbHRob3VnaCB3ZSB3aWxsIHByaW1hcmlseSBmb2N1cyBvbiBVYnVudHUgb3BlcmF0aW5nIHN5c3RlbSwgbmFtZWx5IFVidW50dSAxNi4wNCwgdGhpcyBndWlkZSBtYXkgYWxzbyBwcm92ZSB1c2VmdWwgdG8gTGludXggdXNlcnMgc2luY2UgdGhlIGJhc2ljIHByaW5jaXBsZXMgYXJlIHRoZSBzYW1lLjxiciAvPjxiciAvPlJlZ2FyZGluZyBvdXIgRE5TIHNvZnR3YXJlLCB3ZSB1c2UgQklORDkuIE9uIGEgaHlwb3RoZXRpY2FsIHNlcnZlciwgd2Ugd2lsbCBmaXJzdCBzZXQgdXAgYSBETlMgem9uZSB3aXRoIHRoZSBJUCBhZGRyZXNzIDxpPjxiPjEuMi4zLjQ8L2I+PC9pPiBmb3IgdGhlIGRvbWFpbiBuYW1lIDxpPjxiPm5jdGVzdC5pbmZvPC9iPjwvaT4gd2l0aCBuYW1lc2VydmVycyA8aT48Yj5uczEubmN0ZXN0LmluZm88L2I+PC9pPiBhbmQgPGk+PGI+bnMyLm5jdGVzdC5pbmZvPC9iPjwvaT4uPGJyIC8+PGJyIC8+PGI+SU1QT1JUQU5UOjwvYj4gV2hlbiBmb2xsb3dpbmcgdGhlIGJlbG93IGluc3RydWN0aW9ucywgeW91IHdpbGwgbmVlZCB0byByZXBsYWNlIDxpPjEuMi4zLjQ8L2k+IGFuZCA8aT5uY3Rlc3QuaW5mbzwvaT4gd2l0aCB0aGUgPGI+Y29ycmVzcG9uZGluZyBJUCBhZGRyZXNzIG9mIHlvdXIgc2VydmVyPC9iPiBhbmQgPGI+eW91ciBkb21haW4gbmFtZTwvYj4gdG8gZW5zdXJlIGl0IHdvcmtzIHByb3Blcmx5LjxiciAvPjxiciAvPjx1bD48bGk+PGI+PGEgaHJlZj0iI1VidW50dSI+VWJ1bnR1PC9hPjwvYj48L2xpPjxsaT48YSBocmVmPSIjQWxtYUxpbnV4Ij48Yj5BbG1hTGludXg8L2I+PC9hPjwvbGk+PC91bD48YnIgLz48ZGl2PjwvZGl2PjxwPjxhIG5hbWU9IlVidW50dSI+PGI+U2V0dGluZyB1cCBhIEROUyB6b25lIHdpdGggVWJ1bnR1PC9iPjwvYT48L3A+PGJyIC8+MS4gRmlyc3Qgb2YgYWxsLCB5b3UgbmVlZCB0byA8YSBocmVmPSJodHRwczovL3d3dy5uYW1lY2hlYXAuY29tL3N1cHBvcnQva25vd2xlZGdlYmFzZS9hcnRpY2xlLmFzcHgvMTAxNi84OS9ob3ctdG8tYWNjZXNzLWEtaG9zdGluZy1hY2NvdW50LXZpYS1zc2giIGxpbmt0ZXh0PSJjb25uZWN0IHRvIHlvdXIgc2VydmVyIHZpYSBTU0giIGxpbmt0eXBlPSJDdXN0b20iIHRhcmdldD0iX2JsYW5rIj5jb25uZWN0IHRvIHlvdXIgc2VydmVyIHZpYSBTU0g8L2E+LjxiciAvPjxiciAvPk9uIExpbnV4IGFuZCBNYWNPUywgeW91IGNhbiB1c2UgdGhlIGZvbGxvd2luZyBjb21tYW5kOjxiciAvPjxiciAvPjxwcmUgY2xhc3M9InByZXR0eXByaW50Ij5zc2ggcm9vdEAmbHQ7SVAmZ3Q7IC1wUE9SVDwvcHJlPjxiciAvPjxpPjxiPklQPC9iPjwvaT4gaXMgdGhlIElQIG9mIHRoZSBzZXJ2ZXIgeW91IGFyZSBjb25uZWN0aW5nIHRvIDxiciAvPjxpPjxiPlBPUlQ8L2I+PC9pPjogY29ubmVjdGlvbiBwb3J0IC0gMjIgZm9yIGEgVlBTL0RlZGljYXRlZCBzZXJ2ZXIgYnkgZGVmYXVsdDxiciAvPjxiciAvPkluIG91ciBleGFtcGxlOjxiciAvPjxiciAvPjxwcmUgY2xhc3M9InByZXR0eXByaW50Ij5zc2ggcm9vdEAxLjIuMy40IC1wMjI8L3ByZT48YnIgLz5Gb3IgV2luZG93cywgeW91IGNhbiB1c2UgPGEgaHJlZj0iaHR0cHM6Ly93d3cubmFtZWNoZWFwLmNvbS9zdXBwb3J0L2tub3dsZWRnZWJhc2UvYXJ0aWNsZS5hc3B4LzEwMjIvODkvaG93LXRvLWdldC1hbi1zc2gtY2xpZW50IiBsaW5rdGV4dD0iUHVUVFkgc29mdHdhcmUiIGxpbmt0eXBlPSJDdXN0b20iIHRhcmdldD0iX2JsYW5rIj5QdVRUWSBzb2Z0d2FyZTwvYT4uPGJyIC8+PGJyIC8+Mi4gT25jZSB5b3UgYXJlIGxvZ2dlZCBpbiwgbWFrZSBzdXJlIHlvdXIgc2VydmVyIGlzIGZ1bGx5IHVwZGF0ZWQuIFRvIGRvIHRoaXMsIHJ1biB0aGUgZm9sbG93aW5nIGNvbW1hbmRzIG9uZSBieSBvbmU6PGJyIC8+PGJyIC8+PHByZSBjbGFzcz0icHJldHR5cHJpbnQiPmFwdC1nZXQgdXBkYXRlPGJyIC8+PGJyIC8+YXB0LWdldCB1cGdyYWRlPGJyIC8+PGJyIC8+YXB0LWdldCBkaXN0LXVwZ3JhZGU8L3ByZT48YnIgLz4zLiBPbmNlIHlvdeKAmXZlIGRvbmUgdGhpcywgaW5zdGFsbCBCSU5EIHVzaW5nIHRoZSBmb2xsb3dpbmcgY29tbWFuZDo8YnIgLz48YnIgLz48cHJlIGNsYXNzPSJwcmV0dHlwcmludCI+YXB0LWdldCBpbnN0YWxsIGJpbmQ5IGJpbmQ5dXRpbHMgYmluZDktZG9jPC9wcmU+PGJyIC8+T25jZSB0aGUgY29tbWFuZCBpcyBleGVjdXRlZCwgdGhlIEJJTkQ5IEROUyBzZXJ2ZXIgaXMgbm93IGluc3RhbGxlZCBvbiB5b3VyIHN5c3RlbSBhbmQgeW91IGNhbiBzdGFydCBjb25maWd1cmluZyBpdC48YnIgLz48YnIgLz40LiBPcGVuIHRoZSBtYWluIGNvbmZpZ3VyYXRpb24gZmlsZSB1c2luZyB0aGUgY29tbWFuZDo8YnIgLz48YnIgLz48cHJlIGNsYXNzPSJwcmV0dHlwcmludCI+bmFubyAvZXRjL2JpbmQvbmFtZWQuY29uZjwvcHJlPjxiciAvPkFuZCBtYWtlIHN1cmUgdGhhdCB0aGUgZm9sbG93aW5nIGxpbmVzIGFyZSBpbmNsdWRlZCBpbiB0aGUgZmlsZTo8YnIgLz48YnIgLz48cHJlIGNsYXNzPSJwcmV0dHlwcmludCI+aW5jbHVkZSAiL2V0Yy9iaW5kL25hbWVkLmNvbmYub3B0aW9ucyI7PGJyIC8+aW5jbHVkZSAiL2V0Yy9iaW5kL25hbWVkLmNvbmYubG9jYWwiOzxiciAvPmluY2x1ZGUgIi9ldGMvYmluZC9uYW1lZC5jb25mLmRlZmF1bHQtem9uZXMiOzwvcHJlPjxiciAvPjxpbWcgY2xhc3M9ImtiLWltYWdlIiBzcmM9Imh0dHBzOi8vTmFtZWNoZWFwLnNpbXBsZWtiLmNvbS9TaXRlQ29udGVudHMvMi03QzIyRDUyMzZBNDU0M0VCODI3RjNCRDg5MzZFMTUzRS9tZWRpYS9kbnNfem9uZV93aXRob3V0X2NwYW5lbF8xLnBuZyIgLz48YnIgLz48ZGl2PjxiciAvPjwvZGl2PjxkaXY+VGhlc2UgbGluZXMgYXJlIG5lY2Vzc2FyeSB0byBpbmNsdWRlIG90aGVyIGNvbmZpZ3VyYXRpb24gZmlsZXMsIGJlc2lkZXMgdGhlIG1haW4gb25lLCB0byB0aGUgYXBwbGljYXRpb24gY29uZmlndXJhdGlvbiB0aGF0IGlzIG5lZWRlZCBmcm9tIHVzLiBJZiB0aGUgbGluZXMgYXJlIG5vdCBhZGRlZCwgZmVlbCBmcmVlIHRvIGFkZCB0aGVtLjxiciAvPjxiciAvPlRoZW4sIHByZXNzIDxiPkNvbnRyb2wrWDwvYj4sIHR5cGUgPGI+WSA8L2I+YW5kIHByZXNzIDxiPkVudGVyL3JldHVybjwvYj4uIEl0IHdpbGwgc2F2ZSBjaGFuZ2VzIGFuZCBjbG9zZSB0aGUgZmlsZS48YnIgLz48YnIgLz41LiBOb3cgd2UgbmVlZCB0byBkZWZpbmUgb3VyIEROUyB6b25lLiBUbyBkbyBzbywgb3BlbiB0aGUgZmlsZSA8aT4vZXRjL2JpbmQvbmFtZWQuY29uZi5sb2NhbDwvaT46PGJyIC8+PGJyIC8+PHByZSBjbGFzcz0icHJldHR5cHJpbnQiPm5hbm8gL2V0Yy9iaW5kL25hbWVkLmNvbmYubG9jYWw8L3ByZT48YnIgLz5BbmQgaW5zZXJ0IHRoZSBmb2xsb3dpbmcgdG8gdGhlIGZpbGU6PGJyIC8+PGJyIC8+PHByZSBjbGFzcz0icHJldHR5cHJpbnQiPnpvbmUgIjxiPm5jdGVzdC5pbmZvPC9iPiIgezxiciAvPsKgwqDCoMKgwqDCoMKgIHR5cGUgbWFzdGVyOzxiciAvPsKgwqDCoMKgwqDCoMKgIGZpbGUgIi9ldGMvYmluZC88Yj5uY3Rlc3QuaW5mbzwvYj4iOzxiciAvPsKgfTs8L3ByZT48YnIgLz5LZWVwIGluIG1pbmQgdGhhdCA8aT5uY3Rlc3QuaW5mbzwvaT4gc2hvdWxkIGJlIHJlcGxhY2VkIHdpdGggeW91ciBvd24gZG9tYWluIG5hbWUuPGJyIC8+PC9kaXY+PGJyIC8+PGltZyBjbGFzcz0ia2ItaW1hZ2UiIHNyYz0iaHR0cHM6Ly9OYW1lY2hlYXAuc2ltcGxla2IuY29tL1NpdGVDb250ZW50cy8yLTdDMjJENTIzNkE0NTQzRUI4MjdGM0JEODkzNkUxNTNFL21lZGlhL2Ruc196b25lX3dpdGhvdXRfY3BhbmVsXzIucG5nIiAvPjxiciAvPjxiciAvPg0KSXQgd2lsbCB0ZWxsIEJJTkQ5IHRvIGxvb2sgZm9yIHRoZSBmaWxlIDxpPi9ldGMvYmluZC9uY3Rlc3QuaW5mbzwvaT4gdG8gZmluZCB0aGUgRE5TIHpvbmUgZm9yIDxpPm5jdGVzdC5pbmZvPC9pPi48YnIgLz48YnIgLz5QcmVzcyA8Yj5Db250cm9sK1g8L2I+LCB0eXBlIDxiPlkgPC9iPmFuZCBwcmVzcyA8Yj5FbnRlci9yZXR1cm48L2I+LiA8YnIgLz48YnIgLz42LiBOb3cgeW91IG11c3Qgb3BlbiB0aGUgem9uZSBmaWxlIGFuZCBhZGQgdGhlIG5lY2Vzc2FyeSBETlMgcmVjb3JkcyB0aGVyZTo8YnIgLz48YnIgLz48cHJlIGNsYXNzPSJwcmV0dHlwcmludCI+bmFubyAvZXRjL2JpbmQvPGI+bmN0ZXN0LmluZm88L2I+PC9wcmU+PGJyIC8+VGhlIGZvbGxvd2luZyB0ZXh0IGFsc28gbmVlZHMgdG8gYmUgYWRkZWQgdG8gdGhlIGZpbGU6PGJyIC8+PGJyIC8+PHByZSBjbGFzcz0icHJldHR5cHJpbnQiPiRUVEwgODY0MDA8YnIgLz5AwqDCoCBJTsKgIFNPQcKgwqDCoMKgIDxiPm5zMS5uY3Rlc3QuaW5mbzwvYj4uIHJvb3QuPGI+bmN0ZXN0LmluZm88L2I+LiAoPGJyIC8+wqDCoMKgwqDCoMKgwqAgMjAxOTAyMTUwMcKgIDtTZXJpYWw8YnIgLz7CoMKgwqDCoMKgwqDCoCAzNjAwwqDCoMKgwqDCoMKgwqAgO1JlZnJlc2g8YnIgLz7CoMKgwqDCoMKgwqDCoCAxODAwwqDCoMKgwqDCoMKgwqAgO1JldHJ5PGJyIC8+wqDCoMKgwqDCoMKgwqAgNjA0ODAwwqDCoMKgwqDCoCA7RXhwaXJlPGJyIC8+wqDCoMKgwqDCoMKgwqAgODY0MDDCoMKgwqDCoMKgwqAgO01pbmltdW0gVFRMPGJyIC8+KTxiciAvPkDCoMKgwqDCoMKgwqAgSU7CoCBOU8KgwqDCoMKgwqDCoMKgwqDCoCA8Yj5uczEubmN0ZXN0LmluZm88L2I+LjxiciAvPkDCoMKgwqDCoMKgwqAgSU7CoCBOU8KgwqDCoMKgwqDCoMKgwqDCoCA8Yj5uczIubmN0ZXN0LmluZm88L2I+LjxiciAvPm5zMcKgwqDCoMKgIElOwqAgQcKgwqDCoMKgwqDCoMKgwqDCoMKgIDEuMi4zLjQ8YnIgLz5uczLCoMKgwqDCoCBJTsKgIEHCoMKgwqDCoMKgwqDCoMKgwqDCoCAxLjIuMy40PGJyIC8+QMKgwqDCoMKgwqDCoCBJTsKgIEHCoMKgwqDCoMKgwqDCoMKgwqDCoCAxLjIuMy40PC9wcmU+PGJyIC8+PGI+SU1QT1JUQU5UOjwvYj4gRG8gbm90IGZvcmdldCB0byBjaGFuZ2UgdGhlIGRvbWFpbiBuYW1lIDxpPm5jdGVzdC5pbmZvPC9pPiBhbmQgdGhlIElQIGFkZHJlc3MgPGk+MS4yLjMuNDwvaT4gdG8gdGhlIG5lY2Vzc2FyeSB2YWx1ZXMuPGJyIC8+PGJyIC8+VGhlIDxiPlNlcmlhbCBudW1iZXI8L2I+IHNob3VsZCBiZSBjaGFuZ2VkIGFjY29yZGluZyB0byB0aGUgY3VycmVudCBkYXRlIGluIGEgZm9ybWF0IDxiPllZWVlNTUREWFg8L2I+LCB3aGVyZSA8Yj5YWCA8L2I+cmVwcmVzZW50cyB0aGUgbnVtYmVyIG9mIHRoZSB6b25lIGNoYW5nZXMgb24gYSBzcGVjaWZpYyBkYXkuIElmIHlvdSBvbmx5IGNyZWF0ZSB0aGUgem9uZSwgcHV0IDAxIHRoZXJlLiBJZiBpdOKAmXMgdGhlIHRoaXJkIHRpbWUgaW4gYSBkYXkgdGhhdCB5b3UgbW9kaWZ5IHRoZSBETlMgem9uZSwgcHV0IDA0IGluc3RlYWQgb2YgPGI+WFg8L2I+LiA8YnIgLz48YnIgLz5Zb3UgY2FuIGFsc28gYWRkIGFueSBuZWNlc3NhcnkgRE5TIHJlY29yZHMgaW4gdGhpcyBmaWxlLCB3aGljaCB3aWxsIHN0b3JlIHRoZSB6b25lIG9mIHlvdXIgZG9tYWluIG5hbWUuIEluIG9yZGVyIHRvIG1ha2UgYW55IGNoYW5nZXMgdG8gaXRzIHpvbmUsIHlvdSB3aWxsIG5lZWQgdG8gb3BlbiB0aGlzIGZpbGUgYW5kIGVkaXQgaXQuIFdoZW4geW91IHBlcmZvcm0gYW55IGNoYW5nZXMsIGRvIG5vdCBmb3JnZXQgdG8gaW5jcmVhc2UgdGhlIDxiPlNlcmlhbCBudW1iZXI8L2I+IChhY2NvcmRpbmcgdG8gdGhlIGN1cnJlbnQgZGF0ZSkuPGJyIC8+PGJyIC8+SGVyZSBpcyBhbiBleGFtcGxlIG9mIGEgRE5TIHpvbmU6PGJyIC8+PGJyIC8+PGltZyBjbGFzcz0ia2ItaW1hZ2UiIHNyYz0iaHR0cHM6Ly9OYW1lY2hlYXAuc2ltcGxla2IuY29tL1NpdGVDb250ZW50cy8yLTdDMjJENTIzNkE0NTQzRUI4MjdGM0JEODkzNkUxNTNFL21lZGlhL2Ruc196b25lX3dpdGhvdXRfY3BhbmVsXzMucG5nIiAvPjxiciAvPjxiciAvPk9uY2UgeW91IGhhdmUgZG9uZSB0aGlzLCBwcmVzcyA8Yj5Db250cm9sK1g8L2I+LCB0eXBlIDxiPlkgPC9iPmFuZCBwcmVzcyA8Yj5FbnRlci9yZXR1cm48L2I+LiA8YnIgLz48YnIgLz43LiBUaGUgbmV4dCBzdGVwIHdvdWxkIGJlIG1ha2luZyBzdXJlIHRoYXQgdGhlIEJJTkQ5IGRpcmVjdG9yeSBoYXMgdGhlIGNvcnJlY3QgcGVybWlzc2lvbnMgYW5kIG93bmVyOjxiciAvPjxiciAvPjxwcmUgY2xhc3M9InByZXR0eXByaW50Ij5jaG1vZCAtUiA3NTUgL2V0Yy9iaW5kPGJyIC8+Y2hvd24gLVIgYmluZDpiaW5kIC9ldGMvYmluZDwvcHJlPjxiciAvPjguIE5vdyB0aGF0IHRoZSBpbml0aWFsIGNvbmZpZ3VyYXRpb25zIGFyZSBkb25lLCBsZXTigJlzIGNoZWNrIHRvIHNlZSBpZiBldmVyeXRoaW5nIGlzIGNvbmZpZ3VyZWQgcHJvcGVybHkuIFRvIGRvIHNvLCBydW4gdGhlIGZvbGxvd2luZyBjb21tYW5kczo8YnIgLz48YnIgLz48cHJlIGNsYXNzPSJwcmV0dHlwcmludCI+bmFtZWQtY2hlY2tjb25mIC9ldGMvYmluZC9uYW1lZC5jb25mPGJyIC8+bmFtZWQtY2hlY2tjb25mIC9ldGMvYmluZC9uYW1lZC5jb25mLmxvY2FsPC9wcmU+PGJyIC8+SWYgdGhlc2UgY29tbWFuZHMgZG8gbm90IHJldHVybiBhbnl0aGluZywgaXQgbWVhbnMgZXZlcnl0aGluZyBpcyBwcm9wZXJseSBjb25maWd1cmVkLjxiciAvPjxiciAvPjkuIE5vdyBjaGVjayB0aGUgRE5TIHpvbmUgeW91IGNyZWF0ZWQ6PGJyIC8+PGJyIC8+PHByZSBjbGFzcz0icHJldHR5cHJpbnQiPm5hbWVkLWNoZWNrem9uZSA8Yj5uY3Rlc3QuaW5mbzwvYj4gL2V0Yy9iaW5kLzxiPm5jdGVzdC5pbmZvPC9iPjwvcHJlPjxiciAvPlRoZSBvdXRwdXQgc2hvdWxkIGJlIGFzIGZvbGxvd3M6PGJyIC8+PGJyIC8+PHByZSBjbGFzcz0icHJldHR5cHJpbnQiPnpvbmUgPGI+bmN0ZXN0LmluZm88L2I+L0lOOiBsb2FkZWQgc2VyaWFsIDIwMTkwMjE1MDE8YnIgLz5PSzwvcHJlPjxiciAvPjEwLiBBcyB0aGUgZmluYWwgc3RlcCwgcmVzdGFydCB5b3VyIEROUyBzZXJ2ZXI6PGJyIC8+PGJyIC8+PHByZSBjbGFzcz0icHJldHR5cHJpbnQiPnN5c3RlbWN0bCByZXN0YXJ0IGJpbmQ5PC9wcmU+PGJyIC8+MTEuIE1ha2Ugc3VyZSB0aGF0IHRjcC91ZHAgcG9ydCA1MyBpcyBvcGVuZWQgaW4gdGhlIGZpcmV3YWxsLjxiciAvPjxiciAvPlRoYXTigJlzIGl0IcKgIFlvdSBub3cgY2FuIGNoZWNrIHRvIHNlZSBob3cgaXQgd29ya3MgYnkgdXNpbmcgdGhlIGRpZyBjb21tYW5kLjxiciAvPjxiciAvPjxiPklNUE9SVEFOVDogPC9iPlRvIGVuc3VyZSBpdOKAmXMgd29ya2luZywgeW91ciBwcml2YXRlIG5hbWVzZXJ2ZXJzIG11c3QgYmUgcmVnaXN0ZXJlZCB3aXRoIHlvdXIgcmVzcGVjdGl2ZSBkb21haW4gcmVnaXN0cmFyLiBJZiB5b3VyIGRvbWFpbiBuYW1lIGlzIHJlZ2lzdGVyZWQgd2l0aCBOYW1lY2hlYXAsIHBsZWFzZSA8YSBocmVmPSJodHRwczovL3d3dy5uYW1lY2hlYXAuY29tL3N1cHBvcnQva25vd2xlZGdlYmFzZS9hcnRpY2xlLmFzcHgvNzY4LzEwL2hvdy1kby1pLXJlZ2lzdGVyLXBlcnNvbmFsLW5hbWVzZXJ2ZXJzLWZvci1teS1kb21haW4vIiBsaW5rdGV4dD0iZm9sbG93IHRoaXMgZ3VpZGUiIGxpbmt0eXBlPSJDdXN0b20iIHRhcmdldD0iX2JsYW5rIj5mb2xsb3cgdGhpcyBndWlkZTwvYT4uPGJyIC8+PGJyIC8+WW91IG1heSBoYXZlIG5vdGljZWQgd2Ugb25seSBjb25maWd1cmVkIGEgZm9yd2FyZCBETlMgem9uZS4gV2h5PyBCZWNhdXNlIGl04oCZcyBub3QgcG9zc2libGUgdG8gY29uZmlndXJlIGEgcmV2ZXJzZSBETlMgem9uZSBhbmQgc2V0IHVwIHRoZSBQVFIgcmVjb3JkIGZvciB5b3VyIHNlcnZlcuKAmXMgSVAgYWRkcmVzcyBpbiB0aGUgc2FtZSB3YXkuPGJyIC8+PGJyIC8+SWYgeW91IGhhdmUgYSBWUFMsIHBsZWFzZSA8YSBocmVmPSJodHRwczovL3d3dy5uYW1lY2hlYXAuY29tL3N1cHBvcnQva25vd2xlZGdlYmFzZS9hcnRpY2xlLmFzcHgvOTk3NC80OC9ob3ctdG8tbWFuYWdlLXlvdXItdnBzLXdpdGgtc29sdXN2bS1mb3Ita3ZtI3B0ciIgbGlua3RleHQ9ImZvbGxvdyB0aGlzIGd1aWRlIHRvIGRvIGl0IiBsaW5rdHlwZT0iQ3VzdG9tIiB0YXJnZXQ9Il9ibGFuayI+Zm9sbG93IHRoaXMgZ3VpZGUgdG8gZG8gaXQ8L2E+LiBJZiB5b3UgaGF2ZSBhIERlZGljYXRlZCBTZXJ2ZXIsIHBsZWFzZSByZWFjaCBvdXQgdG8gb3VyIEhvc3RpbmcgZGVwYXJ0bWVudCB2aWEgPGEgaHJlZj0iaHR0cHM6Ly93d3cubmFtZWNoZWFwLmNvbS9oZWxwLWNlbnRlci9saXZlLWNoYXQvIj5MaXZlIENoYXQ8L2E+IG9yIDxhIGhyZWY9Imh0dHBzOi8vd3d3Lm5hbWVjaGVhcC5jb20vc3VwcG9ydC9rbm93bGVkZ2ViYXNlL2FydGljbGUuYXNweC8yMjcvNS9ob3ctY2FuLWktcmVxdWVzdC1zdXBwb3J0LXZpYS1lbWFpbC8iPmVtYWlsPC9hPi48YnIgLz48ZGl2PjxiciAvPjwvZGl2PjxkaXY+PGJyIC8+PC9kaXY+PGJyIC8+PHA+PGEgbmFtZT0iQWxtYUxpbnV4Ij48Yj5TZXR0aW5nIHVwIGEgRE5TIHpvbmUgd2l0aCBBbG1hTGludXg8L2I+PC9hPjxiciAvPjxiciAvPjEuIEZpcnN0IG9mIGFsbCwgeW91IG5lZWQgdG8gPGEgaHJlZj0iaHR0cHM6Ly93d3cubmFtZWNoZWFwLmNvbS9zdXBwb3J0L2tub3dsZWRnZWJhc2UvYXJ0aWNsZS5hc3B4LzEwMTYvODkvaG93LXRvLWFjY2Vzcy1hLWhvc3RpbmctYWNjb3VudC12aWEtc3NoLyI+Y29ubmVjdCB0byB5b3VyIHNlcnZlciB2aWEgU1NIPC9hPi48YnIgLz48YnIgLz4NCk9uIExpbnV4IGFuZCBNYWNPUywgeW91IGNhbiB1c2UgdGhlIGZvbGxvd2luZyBjb21tYW5kOjxiciAvPjxiciAvPjwvcD48cHJlIGNsYXNzPSJwcmV0dHlwcmludCI+c3NoIHJvb3RAPGlwPiAtcFBPUlQ8L2lwPjwvcHJlPjxiciAvPjxiPjxpPklQPC9pPjwvYj4gaXMgdGhlIElQIG9mIHRoZSBzZXJ2ZXIgeW91IGFyZSBjb25uZWN0aW5nIHRvPGJyIC8+PGI+PGk+UE9SVDwvaT48L2I+OiBjb25uZWN0aW9uIHBvcnQgLSAyMiBmb3IgYSBWUFMvRGVkaWNhdGVkIHNlcnZlciBieSBkZWZhdWx0PGJyIC8+PGJyIC8+DQpJbiBvdXIgZXhhbXBsZTo8YnIgLz48YnIgLz48cHJlIGNsYXNzPSJwcmV0dHlwcmludCI+c3NoIHJvb3RAMS4yLjMuNCAtcDIyPC9wcmU+PGJyIC8+DQpGb3IgV2luZG93cywgeW91IGNhbiB1c2UgPGEgaHJlZj0iaHR0cHM6Ly93d3cubmFtZWNoZWFwLmNvbS9zdXBwb3J0L2tub3dsZWRnZWJhc2UvYXJ0aWNsZS5hc3B4LzEwMjIvODkvaG93LXRvLWdldC1hbi1zc2gtY2xpZW50LyI+UHVUVFkgc29mdHdhcmU8L2E+LjxiciAvPjxiciAvPg0KMi4gT25jZSB5b3UgYXJlIGxvZ2dlZCBpbiwgbWFrZSBzdXJlIHlvdXIgc2VydmVyIGlzIGZ1bGx5IHVwZGF0ZWQuIFRvIGRvIHRoaXMsIHJ1biB0aGUgZm9sbG93aW5nIGNvbW1hbmQ6PGJyIC8+PGJyIC8+PHByZSBjbGFzcz0icHJldHR5cHJpbnQiPmRuZiAteSB1cGRhdGU8L3ByZT48YnIgLz4NCjMuIE9uY2UgeW91IGhhdmUgZG9uZSB0aGlzLCBpbnN0YWxsIEJJTkQgdXNpbmcgdGhlIGZvbGxvd2luZyBjb21tYW5kOjxiciAvPjxiciAvPjxwcmUgY2xhc3M9InByZXR0eXByaW50Ij5kbmYgLXkgaW5zdGFsbCBiaW5kIGJpbmQtdXRpbHM8L3ByZT48YnIgLz4NCk9uY2UgdGhlIGNvbW1hbmQgaXMgZXhlY3V0ZWQsIHRoZSBCSU5EOSBETlMgc2VydmVyIGlzIG5vdyBpbnN0YWxsZWQgb24geW91ciBzeXN0ZW0gYW5kIHlvdSBjYW4gc3RhcnQgY29uZmlndXJpbmcgaXQuPGJyIC8+PGJyIC8+DQo0LiBCeSBkZWZhdWx0LCBvbmx5IDxpPmxvY2FsaG9zdDwvaT4gaXMgYWxsb3dlZC4gSG93ZXZlciwgd2UgbmVlZCBvdXIgbmFtZXNlcnZlcnMgdG8gcmVwbHkgdG8gcXVlcmllcyBmcm9tIGFsbCBvdmVyIHRoZSB3b3JsZCwgc28gaXQgaXMgcmVxdWlyZWQgdG8gY2hhbmdlIHRoaXMgY29uZmlndXJhdGlvbi48YnIgLz48YnIgLz4NCk9wZW4gdGhlIG1haW4gY29uZmlndXJhdGlvbiBmaWxlIHVzaW5nIHRoZSBjb21tYW5kOjxiciAvPjxiciAvPjxwcmUgY2xhc3M9InByZXR0eXByaW50Ij5uYW5vIC9ldGMvbmFtZWQuY29uZjwvcHJlPjxiciAvPg0KSW4gdGhlIGZpbGUsIGNoYW5nZSB0aGUgZm9sbG93aW5nIHBhcmFtZXRlcnMgdG8gPGI+YW55PC9iPjo8YnIgLz48YnIgLz4NCmxpc3Rlbi1vbiBwb3J0IDUzPGJyIC8+DQphbGxvdy1xdWVyeTxiciAvPjxiciAvPjxpbWcgY2xhc3M9ImtiLWltYWdlIiBzcmM9Imh0dHBzOi8vTmFtZWNoZWFwLnNpbXBsZWtiLmNvbS9TaXRlQ29udGVudHMvMi03QzIyRDUyMzZBNDU0M0VCODI3RjNCRDg5MzZFMTUzRS9tZWRpYS9hbG1hMS4xLnBuZyIgLz48YnIgLz48YnIgLz4NCjUuIFRoZW4sIHdlIG5lZWQgdG8gaW5jbHVkZSA8aT5uYW1lZC5jb25mLmxvY2FsPC9pPiB0byB0aGUgYXBwbGljYXRpb24gY29uZmlndXJhdGlvbiB3aGljaCB3ZSB3aWxsIHVzZSB0byBkZWZpbmUgb3VyIEROUyB6b25lcy48YnIgLz48YnIgLz4NCkFkZCB0aGUgZm9sbG93aW5nIGxpbmUgdG8gdGhlIGVuZCBvZiB0aGUgZmlsZTo8YnIgLz48YnIgLz4NCmluY2x1ZGUgIi9ldGMvbmFtZWQvbmFtZWQuY29uZi5sb2NhbCI7PGJyIC8+PGJyIC8+PGltZyBjbGFzcz0ia2ItaW1hZ2UiIHNyYz0iaHR0cHM6Ly9OYW1lY2hlYXAuc2ltcGxla2IuY29tL1NpdGVDb250ZW50cy8yLTdDMjJENTIzNkE0NTQzRUI4MjdGM0JEODkzNkUxNTNFL21lZGlhL2FsbWExLjIucG5nIiAvPjxiciAvPjxiciAvPg0KUHJlc3MgPGI+Q29udHJvbCtYPC9iPiwgdHlwZSA8Yj5ZPC9iPiBhbmQgcHJlc3MgPGI+RW50ZXIvcmV0dXJuPC9iPi4gSXQgd2lsbCBzYXZlIGNoYW5nZXMgYW5kIGNsb3NlIHRoZSBmaWxlLjxiciAvPjxiciAvPg0KNi4gSW4gb3JkZXIgdG8gdGVsbCBCSU5EOSB0byBsb29rIGZvciB0aGUgZmlsZSA8aT4vZXRjL25hbWVkL25jdGVzdC5pbmZvPC9pPiB0byBmaW5kIHRoZSBETlMgem9uZSBmb3IgPGk+bmN0ZXN0LmluZm88L2k+LCBvcGVuIHRoaXMgZmlsZTo8YnIgLz48YnIgLz48cHJlIGNsYXNzPSJwcmV0dHlwcmludCI+bmFubyAvZXRjL25hbWVkL25hbWVkLmNvbmYubG9jYWw8L3ByZT48YnIgLz4NCkhlcmUsIGl0IHNob3VsZCBiZSBlbXB0eS4gTm93IGluc2VydCB0aGUgZm9sbG93aW5nIHRvIHRoZSBmaWxlOjxiciAvPjxiciAvPjxwcmUgY2xhc3M9InByZXR0eXByaW50Ij56b25lICI8Yj5uY3Rlc3QuaW5mbzwvYj4iIHs8YnIgLz7CoMKgwqDCoMKgwqDCoCB0eXBlIG1hc3Rlcjs8YnIgLz7CoMKgwqDCoMKgwqDCoCBmaWxlICIvZXRjL25hbWVkLzxiPm5jdGVzdC5pbmZvPC9iPiI7PGJyIC8+wqB9OzwvcHJlPjxiciAvPg0KS2VlcCBpbiBtaW5kIHRoYXQgPGk+bmN0ZXN0LmluZm88L2k+IHNob3VsZCBiZSByZXBsYWNlZCB3aXRoIHlvdXIgb3duIGRvbWFpbiBuYW1lLjxiciAvPjxiciAvPjxpbWcgY2xhc3M9ImtiLWltYWdlIiBzcmM9Imh0dHBzOi8vTmFtZWNoZWFwLnNpbXBsZWtiLmNvbS9TaXRlQ29udGVudHMvMi03QzIyRDUyMzZBNDU0M0VCODI3RjNCRDg5MzZFMTUzRS9tZWRpYS9hbG1hMS4zLnBuZyIgLz48YnIgLz48YnIgLz4NClByZXNzIDxiPkNvbnRyb2wrWDwvYj4sIHR5cGUgPGI+WTwvYj4gYW5kIHByZXNzIDxiPkVudGVyL3JldHVybjwvYj4uPGJyIC8+PGJyIC8+DQo3LiBOb3csIG9wZW4gdGhlIHpvbmUgZmlsZSBhbmQgYWRkIHRoZSBuZWNlc3NhcnkgRE5TIHJlY29yZHMgdGhlcmU6PGJyIC8+PGJyIC8+PHByZSBjbGFzcz0icHJldHR5cHJpbnQiPm5hbm8gL2V0Yy9uYW1lZC88Yj5uY3Rlc3QuaW5mbzwvYj48L3ByZT48YnIgLz4NClRoZSBmb2xsb3dpbmcgdGV4dCBhbHNvIG5lZWRzIHRvIGJlIGFkZGVkIHRvIHRoZSBmaWxlOjxiciAvPjxiciAvPjxwcmUgY2xhc3M9InByZXR0eXByaW50Ij4kVFRMIDg2NDAwPGJyIC8+QMKgwqAgSU7CoCBTT0HCoMKgwqDCoCA8Yj5uczEubmN0ZXN0LmluZm88L2I+LiByb290LjxiPm5jdGVzdC5pbmZvPC9iPi4gKDxiciAvPsKgwqDCoMKgwqDCoMKgIDIwMTkwMjE1MDHCoCA7U2VyaWFsPGJyIC8+wqDCoMKgwqDCoMKgwqAgMzYwMMKgwqDCoMKgwqDCoMKgIDtSZWZyZXNoPGJyIC8+wqDCoMKgwqDCoMKgwqAgMTgwMMKgwqDCoMKgwqDCoMKgIDtSZXRyeTxiciAvPsKgwqDCoMKgwqDCoMKgIDYwNDgwMMKgwqDCoMKgwqAgO0V4cGlyZTxiciAvPsKgwqDCoMKgwqDCoMKgIDg2NDAwwqDCoMKgwqDCoMKgIDtNaW5pbXVtIFRUTDxiciAvPik8YnIgLz5AwqDCoMKgwqDCoMKgIElOwqAgTlPCoMKgwqDCoMKgwqDCoMKgwqAgPGI+bnMxLm5jdGVzdC5pbmZvPC9iPi48YnIgLz5AwqDCoMKgwqDCoMKgIElOwqAgTlPCoMKgwqDCoMKgwqDCoMKgwqAgPGI+bnMyLm5jdGVzdC5pbmZvPC9iPi48YnIgLz5uczHCoMKgwqDCoCBJTsKgIEHCoMKgwqDCoMKgwqDCoMKgwqDCoCAxLjIuMy40PGJyIC8+bnMywqDCoMKgwqAgSU7CoCBBwqDCoMKgwqDCoMKgwqDCoMKgwqAgMS4yLjMuNDxiciAvPkDCoMKgwqDCoMKgwqAgSU7CoCBBwqDCoMKgwqDCoMKgwqDCoMKgwqAgMS4yLjMuNDwvcHJlPjxiciAvPg0KRG8gbm90IGZvcmdldCB0byBjaGFuZ2UgdGhlIGRvbWFpbiA8aT5uY3Rlc3QuaW5mbzwvaT4gYW5kIHRoZSBJUCBhZGRyZXNzIDxpPjEuMi4zLjQ8L2k+IHRvIHRoZSByZXF1aXJlZCB2YWx1ZXMuPGJyIC8+PGJyIC8+DQpUaGUgPGI+U2VyaWFsIG51bWJlcjwvYj4gc2hvdWxkIGJlIGNoYW5nZWQgYWNjb3JkaW5nIHRvIHRoZSBjdXJyZW50IGRhdGUgaW4gYSBmb3JtYXQgPGI+WVlZWU1NRERYWDwvYj4sIHdoZXJlIDxiPlhYPC9iPiByZXByZXNlbnRzIHRoZSBudW1iZXIgb2YgdGhlIHpvbmUgY2hhbmdlcyBvbiBhIHNwZWNpZmljIGRheS4gSWYgeW91IG9ubHkgY3JlYXRlIHRoZSB6b25lLCBwdXQgMDEgdGhlcmUuIElmIGl04oCZcyB0aGUgdGhpcmQgdGltZSB5b3UgbW9kaWZ5IHRoZSBETlMgem9uZSBhIGRheSwgcHV0IDA0IGluc3RlYWQgb2YgPGI+WFg8L2I+LjxiciAvPjxiciAvPg0KWW91IGNhbiBhbHNvIGFkZCBhbnkgbmVlZGVkIEROUyByZWNvcmRzIGluIHRoaXMgZmlsZS4gSXQgd2lsbCBzdG9yZSB0aGUgem9uZSBvZiB5b3VyIGRvbWFpbiBuYW1lLCBhbmQgdG8gbWFrZSBhbnkgY2hhbmdlcyB0byBpdHMgem9uZSwgeW91IHdpbGwgbmVlZCB0byBvcGVuIHRoaXMgZmlsZSBhbmQgZWRpdCBpdC4gV2hlbiB5b3UgcGVyZm9ybSBhbnkgY2hhbmdlcywgZG8gbm90IGZvcmdldCB0byBpbmNyZWFzZSB0aGUgU2VyaWFsIG51bWJlciAoYWNjb3JkaW5nIHRvIHRoZSBjdXJyZW50IGRhdGUpLjxiciAvPjxiciAvPg0KSGVyZSBpcyBhbiBleGFtcGxlIG9mIGEgRE5TIHpvbmU6PGJyIC8+PGJyIC8+PGltZyBjbGFzcz0ia2ItaW1hZ2UiIHNyYz0iaHR0cHM6Ly9OYW1lY2hlYXAuc2ltcGxla2IuY29tL1NpdGVDb250ZW50cy8yLTdDMjJENTIzNkE0NTQzRUI4MjdGM0JEODkzNkUxNTNFL21lZGlhL2FsbWExLjQucG5nIiAvPjxiciAvPjxiciAvPg0KT25jZSBkb25lLCBwcmVzcyA8Yj5Db250cm9sK1g8L2I+LCB0eXBlIDxiPlk8L2I+IGFuZCBwcmVzcyA8Yj5FbnRlci9yZXR1cm48L2I+LjxiciAvPjxiciAvPg0KOC4gVGhlIG5leHQgc3RlcCB3b3VsZCBiZSBtYWtpbmcgc3VyZSB0aGF0IHRoZSBCSU5EOSBkaXJlY3RvcnkgaGFzIHRoZSBjb3JyZWN0IHBlcm1pc3Npb25zIGFuZCB0aGUgY29ycmVjdCBvd25lcjo8YnIgLz48YnIgLz48cHJlIGNsYXNzPSJwcmV0dHlwcmludCI+Y2htb2QgLVIgNzU1IC9ldGMvbmFtZWQ8L3ByZT48cHJlIGNsYXNzPSJwcmV0dHlwcmludCI+Y2hvd24gLVIgbmFtZWQ6bmFtZWQgL2V0Yy9uYW1lZDwvcHJlPjxiciAvPg0KOS4gTm93IHRoYXQgdGhlIGluaXRpYWwgY29uZmlndXJhdGlvbnMgYXJlIGRvbmUsIGxldOKAmXMgY2hlY2sgdG8gc2VlIGlmIGV2ZXJ5dGhpbmcgaXMgcHJvcGVybHkgY29uZmlndXJlZC4gVG8gZG8gc28sIHJ1biB0aGUgZm9sbG93aW5nIGNvbW1hbmRzOjxiciAvPjxiciAvPjxwcmUgY2xhc3M9InByZXR0eXByaW50Ij5uYW1lZC1jaGVja2NvbmYgL2V0Yy9uYW1lZC5jb25mPC9wcmU+PHByZSBjbGFzcz0icHJldHR5cHJpbnQiPm5hbWVkLWNoZWNrY29uZiAvZXRjL25hbWVkL25hbWVkLmNvbmYubG9jYWw8L3ByZT48YnIgLz4NCklmIHRoZXNlIGNvbW1hbmRzIGRvIG5vdCByZXR1cm4gYW55dGhpbmcsIGl0IG1lYW5zIGV2ZXJ5dGhpbmcgaXMgcHJvcGVybHkgY29uZmlndXJlZC48YnIgLz48YnIgLz4NCjEwLiBOb3cgY2hlY2sgdGhlIEROUyB6b25lIHlvdSBjcmVhdGVkOjxiciAvPjxiciAvPjxwcmUgY2xhc3M9InByZXR0eXByaW50Ij5uYW1lZC1jaGVja3pvbmUgPGI+bmN0ZXN0LmluZm88L2I+IC9ldGMvbmFtZWQvPGI+bmN0ZXN0LmluZm88L2I+PC9wcmU+PGJyIC8+DQpUaGUgb3V0cHV0IHNob3VsZCBiZSBhcyBmb2xsb3dzOjxiciAvPjxiciAvPjxwcmUgY2xhc3M9InByZXR0eXByaW50Ij56b25lIDxiPm5jdGVzdC5pbmZvPC9iPi9JTjogbG9hZGVkIHNlcmlhbCAyMDE5MDIxNTAxPC9wcmU+DQpPSzxiciAvPjxiciAvPg0KMTEuIEFzIHRoZSBmaW5hbCBzdGVwLCByZXN0YXJ0IHlvdXIgRE5TIHNlcnZlcjo8YnIgLz48YnIgLz48cHJlIGNsYXNzPSJwcmV0dHlwcmludCI+c2VydmljZSBuYW1lZCByZXN0YXJ0PC9wcmU+PGJyIC8+DQoxMi4gTWFrZSBzdXJlIHRoYXQgdGNwL3VkcCBwb3J0IDUzIGlzIG9wZW5lZCBpbiB0aGUgZmlyZXdhbGwuIFlvdSBjYW4gb3BlbiBpdCB3aXRoIHRoZSBmb2xsb3dpbmcgY29tbWFuZDo8YnIgLz48YnIgLz48cHJlIGNsYXNzPSJwcmV0dHlwcmludCI+ZmlyZXdhbGwtY21kICAtLWFkZC1zZXJ2aWNlPWRucyAtLXpvbmU9cHVibGljICAtLXBlcm1hbmVudDwvcHJlPjxiciAvPjxwcmUgY2xhc3M9InByZXR0eXByaW50Ij5maXJld2FsbC1jbWQgLS1yZWxvYWQ8L3ByZT48YnIgLz4NClRoYXTigJlzIGl0ISAgWW91IG5vdyBjYW4gY2hlY2sgdG8gc2VlIGhvdyBpdCB3b3JrcyB1c2luZyB0aGUgZGlnIGNvbW1hbmQuPGJyIC8+PGJyIC8+PGI+SU1QT1JUQU5UPC9iPjogVG8gZW5zdXJlIGl04oCZcyB3b3JraW5nLCB5b3VyIHByaXZhdGUgbmFtZXNlcnZlcnMgbXVzdCBiZSByZWdpc3RlcmVkIHdpdGggeW91ciByZXNwZWN0aXZlIGRvbWFpbiByZWdpc3RyYXIuIElmIHlvdXIgZG9tYWluIG5hbWUgaXMgcmVnaXN0ZXJlZCB3aXRoIE5hbWVjaGVhcCwgcGxlYXNlIGZvbGxvdyA8YSBocmVmPSJodHRwczovL3d3dy5uYW1lY2hlYXAuY29tL3N1cHBvcnQva25vd2xlZGdlYmFzZS9hcnRpY2xlLmFzcHgvNzY4LzEwL2hvdy1kby1pLXJlZ2lzdGVyLXBlcnNvbmFsLW5hbWVzZXJ2ZXJzLWZvci1teS1kb21haW4vIj50aGlzIGd1aWRlPC9hPi48YnIgLz48YnIgLz4NCllvdSBtYXkgaGF2ZSBub3RpY2VkIHdlIG9ubHkgY29uZmlndXJlZCBhIGZvcndhcmQgRE5TIHpvbmUuIFdoeT8gQmVjYXVzZSBpdOKAmXMgbm90IHBvc3NpYmxlIHRvIGNvbmZpZ3VyZSBhIHJldmVyc2UgRE5TIHpvbmUgYW5kIHNldCB1cCB0aGUgUFRSIHJlY29yZCBmb3IgeW91ciBzZXJ2ZXLigJlzIElQIGFkZHJlc3MgaW4gdGhlIHNhbWUgd2F5LjxiciAvPjxiciAvPg0KSWYgeW91IGhhdmUgPGEgaHJlZj0iaHR0cHM6Ly93d3cubmFtZWNoZWFwLmNvbS9ob3N0aW5nL3Zwcy8iPmEgVlBTPC9hPiwgcGxlYXNlIDxhIGhyZWY9Imh0dHBzOi8vd3d3Lm5hbWVjaGVhcC5jb20vc3VwcG9ydC9rbm93bGVkZ2ViYXNlL2FydGljbGUuYXNweC85OTc0LzQ4L2hvdy10by1tYW5hZ2UteW91ci12cHMtd2l0aC1zb2x1c3ZtLWZvci1rdm0jcHRyIj5mb2xsb3cgdGhpcyBndWlkZSB0byBkbyBpdDwvYT4uIElmIHlvdSBoYXZlIGEgRGVkaWNhdGVkIFNlcnZlciwgcGxlYXNlIHJlYWNoIG91dCB0byBvdXIgSG9zdGluZyBkZXBhcnRtZW50IHZpYSA8YSBocmVmPSJodHRwczovL3d3dy5uYW1lY2hlYXAuY29tL2hlbHAtY2VudGVyL2xpdmUtY2hhdC8iPkxpdmUgQ2hhdDwvYT4gb3IgPGEgaHJlZj0iaHR0cHM6Ly93d3cubmFtZWNoZWFwLmNvbS9zdXBwb3J0L2tub3dsZWRnZWJhc2UvYXJ0aWNsZS5hc3B4LzIyNy81L2hvdy1jYW4taS1yZXF1ZXN0LXN1cHBvcnQtdmlhLWVtYWlsLyI+ZW1haWw8L2E+Lg==","NewTillDate":null,"FeaturedTillDate":null,"ModifiedDateTime":"2025-02-07T12:58:01.0000000","LiveDateTime":"1754-02-02T00:00:00.0000000","CreatedDateTime":"2019-04-04T12:32:36.0000000","ApprovalDatetime":"2019-04-04T13:26:12.0000000","RequestCount":55633,"MarkedAsNew":false,"MarkedAsFeatured":false,"RatingValue":0,"CategoryPaths":[{"__type":"Nc:SimpleKB:Abstractions:Dtos:CategoryPathDto","Level":1,"CategoryId":12,"CategoryName":"Hosting"},{"__type":"Nc:SimpleKB:Abstractions:Dtos:CategoryPathDto","Level":2,"CategoryId":2188,"CategoryName":"Dedicated Server"}],"AssociatedCategories":[{"CategoryId":48,"CategoryName":"VPS","CategoryDisplayName":"HostingVPS"},{"CategoryId":2188,"CategoryName":"Dedicated Server","CategoryDisplayName":"HostingDedicated Server"}],"AssociatedTags":[],"RelatedArticles":[],"AssociatedMedias":[],"PreferredCategoryId":0,"RootParentCategoryName":"","RootParentCategoryId":0},"status":200,"statusText":"OK"},"/api/v1/ncpl/simplekb/getcategorybycategoryid:\"{\\\"categoryId\\\":2188}\"":{"body":{"__type":"Nc:SimpleKB:Abstractions:Dtos:CategoryDto","ParentCategoryId":12,"Parent_Category_Name":"Hosting","FriendlyId":null,"ApprovedYN":true,"TreatAsTopicYN":false,"CreatedDateTime":"04/25/2013 17:59:30","CurrentCategoryPaths":[{"__type":"Nc:SimpleKB:Abstractions:Dtos:CategoryPathDto","Level":1,"CategoryId":12,"CategoryName":"Hosting"},{"__type":"Nc:SimpleKB:Abstractions:Dtos:CategoryPathDto","Level":2,"CategoryId":2188,"CategoryName":"Dedicated Server"}],"RelatedCategories":[],"AssociatedArticles":[{"ArticleId":9979,"Title":"What operating systems are available with a VPS/Dedicated Server","ArticleName":"What operating systems are available with a VPS/Dedicated Server","LiveDateTime":"02/02/1754 00:00:00","NewTillDate":null,"FeaturedTillDate":null,"ModifiedDateTime":"04/14/2026"},{"ArticleId":9989,"Title":"What is the difference between Shared Hosting and Dedicated server","ArticleName":"What is the difference between Shared Hosting and Dedicated server","LiveDateTime":"02/02/1754 00:00:00","NewTillDate":null,"FeaturedTillDate":null,"ModifiedDateTime":"12/24/2024"},{"ArticleId":10054,"Title":"What is an Outlet (Clearance) Dedicated server?","ArticleName":"What is an Outlet (Clearance) Dedicated server?","LiveDateTime":"02/02/1754 00:00:00","NewTillDate":null,"FeaturedTillDate":null,"ModifiedDateTime":"12/19/2019"},{"ArticleId":10084,"Title":"Resetting Dedicated server root password via Virtual Console","ArticleName":"Resetting Dedicated server root password via Virtual Console","LiveDateTime":"02/02/1754 00:00:00","NewTillDate":null,"FeaturedTillDate":null,"ModifiedDateTime":"10/17/2025"},{"ArticleId":10085,"Title":"How to set up automated backups for VPS and Dedicated server","ArticleName":"How to set up automated backups for VPS and Dedicated server","LiveDateTime":"02/02/1754 00:00:00","NewTillDate":null,"FeaturedTillDate":null,"ModifiedDateTime":"02/18/2022"},{"ArticleId":10107,"Title":"How to set up a DNS zone on a server without cPanel","ArticleName":"How to set up a DNS zone on a server without cPanel","LiveDateTime":"02/02/1754 00:00:00","NewTillDate":null,"FeaturedTillDate":null,"ModifiedDateTime":"02/07/2025"},{"ArticleId":10108,"Title":"Resolving Disk Space issues on a VPS/Dedicated server","ArticleName":"Resolving Disk Space issues on a VPS/Dedicated server","LiveDateTime":"02/02/1754 00:00:00","NewTillDate":null,"FeaturedTillDate":null,"ModifiedDateTime":"04/04/2019"},{"ArticleId":10202,"Title":"How to install Node.js on a VPS or a Dedicated server","ArticleName":"How to install Node.js on a VPS or a Dedicated server","LiveDateTime":"02/02/1754 00:00:00","NewTillDate":null,"FeaturedTillDate":null,"ModifiedDateTime":"05/20/2024"},{"ArticleId":10220,"Title":"What is a Dedicated Server?","ArticleName":"What is a Dedicated Server?","LiveDateTime":"02/02/1754 00:00:00","NewTillDate":null,"FeaturedTillDate":null,"ModifiedDateTime":"04/29/2020"},{"ArticleId":10221,"Title":"Private Network on Dedicated servers","ArticleName":"Private Network on Dedicated servers","LiveDateTime":"02/02/1754 00:00:00","NewTillDate":null,"FeaturedTillDate":null,"ModifiedDateTime":"02/07/2025"},{"ArticleId":10231,"Title":"Is there any downtime when I change between Shared Hosting plans and/or Reseller Hosting plans?","ArticleName":"Is there any downtime when I change between Shared Hosting plans and/or Reseller Hosting plans?","LiveDateTime":"02/02/1754 00:00:00","NewTillDate":null,"FeaturedTillDate":null,"ModifiedDateTime":"05/09/2025"},{"ArticleId":10232,"Title":"How can I change the operating system on my VPS/Dedicated Server","ArticleName":"How can I change the operating system on my VPS/Dedicated Server","LiveDateTime":"02/02/1754 00:00:00","NewTillDate":null,"FeaturedTillDate":null,"ModifiedDateTime":"07/19/2024"},{"ArticleId":10295,"Title":"SATA 3 vs M.2 vs NVMe SSD - Faster future for everyone","ArticleName":"SATA 3 vs M.2 vs NVMe SSD - Faster future for everyone","LiveDateTime":"02/02/1754 00:00:00","NewTillDate":null,"FeaturedTillDate":null,"ModifiedDateTime":"08/28/2020"},{"ArticleId":10319,"Title":"How to install VestaCP on a VPS/Dedicated Server","ArticleName":"How to install VestaCP on a VPS/Dedicated Server","LiveDateTime":"02/02/1754 00:00:00","NewTillDate":null,"FeaturedTillDate":null,"ModifiedDateTime":"02/07/2025"},{"ArticleId":10328,"Title":"How to install Linux, Apache, MariaDB, PHP stack (LAMP) on AlmaLinux and host a website","ArticleName":"How to install Linux, Apache, MariaDB, PHP stack (LAMP) on AlmaLinux and host a website","LiveDateTime":"02/02/1754 00:00:00","NewTillDate":null,"FeaturedTillDate":null,"ModifiedDateTime":"07/21/2025"},{"ArticleId":10330,"Title":"How to install Linux, Apache, MariaDB, PHP stack (LAMP) on Ubuntu and host a website","ArticleName":"How to install Linux, Apache, MariaDB, PHP stack (LAMP) on Ubuntu and host a website","LiveDateTime":"02/02/1754 00:00:00","NewTillDate":null,"FeaturedTillDate":null,"ModifiedDateTime":"11/09/2020"},{"ArticleId":10596,"Title":"How does a dedicated server work?","ArticleName":"How does a dedicated server work?","LiveDateTime":"02/02/1754 00:00:00","NewTillDate":null,"FeaturedTillDate":null,"ModifiedDateTime":"04/09/2024"},{"ArticleId":10768,"Title":"What is Proxmox VE?","ArticleName":"What is Proxmox VE?","LiveDateTime":"02/02/1754 00:00:00","NewTillDate":null,"FeaturedTillDate":null,"ModifiedDateTime":"01/16/2026"},{"ArticleId":9409,"Title":"How to configure initial WHM settings (VPS and Dedicated server)","ArticleName":"How to configure initial WHM settings (VPS and Dedicated server)","LiveDateTime":"02/02/1754 00:00:00","NewTillDate":null,"FeaturedTillDate":null,"ModifiedDateTime":"12/15/2021"},{"ArticleId":9661,"Title":"How to manage features in WHM","ArticleName":"How to manage features in WHM","LiveDateTime":"02/02/1754 00:00:00","NewTillDate":null,"FeaturedTillDate":null,"ModifiedDateTime":"05/12/2022"},{"ArticleId":9309,"Title":"How to access IPMI for dedicated servers","ArticleName":"How to access IPMI for dedicated servers","LiveDateTime":"02/02/1754 00:00:00","NewTillDate":null,"FeaturedTillDate":null,"ModifiedDateTime":"02/07/2025"},{"ArticleId":207,"Title":"How to set up personal nameservers (VPS and Dedicated servers)","ArticleName":"How to set up personal nameservers (VPS and Dedicated servers)","LiveDateTime":"02/02/1754 00:00:00","NewTillDate":null,"FeaturedTillDate":null,"ModifiedDateTime":"07/01/2022"},{"ArticleId":9211,"Title":"How to order cPanel/WHM for a VPS/Dedicated server","ArticleName":"How to order cPanel/WHM for a VPS/Dedicated server","LiveDateTime":"02/02/1754 00:00:00","NewTillDate":null,"FeaturedTillDate":null,"ModifiedDateTime":"04/22/2026"},{"ArticleId":9212,"Title":"How to order Softaculous for a dedicated server/VPS","ArticleName":"How to order Softaculous for a dedicated server/VPS","LiveDateTime":"02/02/1754 00:00:00","NewTillDate":null,"FeaturedTillDate":null,"ModifiedDateTime":"05/09/2025"},{"ArticleId":9213,"Title":"What Dedicated Server Management options do you provide?","ArticleName":"What Dedicated Server Management options do you provide?","LiveDateTime":"02/02/1754 00:00:00","NewTillDate":null,"FeaturedTillDate":null,"ModifiedDateTime":"12/30/2025"},{"ArticleId":9215,"Title":"How to upgrade RAM/bandwidth/disk space on a VPS/Dedicated server","ArticleName":"How to upgrade RAM/bandwidth/disk space on a VPS/Dedicated server","LiveDateTime":"02/02/1754 00:00:00","NewTillDate":null,"FeaturedTillDate":null,"ModifiedDateTime":"04/20/2026"},{"ArticleId":9223,"Title":"How to order additional IP addresses for a Dedicated Server","ArticleName":"How to order additional IP addresses for a Dedicated Server","LiveDateTime":"02/02/1754 00:00:00","NewTillDate":null,"FeaturedTillDate":null,"ModifiedDateTime":"02/06/2025"},{"ArticleId":9227,"Title":"How to increase port speed on a Dedicated server","ArticleName":"How to increase port speed on a Dedicated server","LiveDateTime":"02/02/1754 00:00:00","NewTillDate":null,"FeaturedTillDate":null,"ModifiedDateTime":"09/13/2024"},{"ArticleId":9224,"Title":"How to order additional bandwidth for a Dedicated Server","ArticleName":"How to order additional bandwidth for a Dedicated Server","LiveDateTime":"02/02/1754 00:00:00","NewTillDate":null,"FeaturedTillDate":null,"ModifiedDateTime":"02/06/2025"},{"ArticleId":9221,"Title":"How much does it cost to transfer the content of my account to a Dedicated server?","ArticleName":"How much does it cost to transfer the content of my account to a Dedicated server?","LiveDateTime":"02/02/1754 00:00:00","NewTillDate":null,"FeaturedTillDate":null,"ModifiedDateTime":"05/09/2025"},{"ArticleId":9225,"Title":"Backups for Dedicated servers with Complete management","ArticleName":"Backups for Dedicated servers with Complete management","LiveDateTime":"02/02/1754 00:00:00","NewTillDate":null,"FeaturedTillDate":null,"ModifiedDateTime":"04/29/2026"},{"ArticleId":9942,"Title":"How to reboot VPS or dedicated server through WHM","ArticleName":"How to reboot VPS or dedicated server through WHM","LiveDateTime":"02/02/1754 00:00:00","NewTillDate":null,"FeaturedTillDate":null,"ModifiedDateTime":"12/16/2021"},{"ArticleId":9944,"Title":"How to change the root password via WHM","ArticleName":"How to change the root password via WHM","LiveDateTime":"02/02/1754 00:00:00","NewTillDate":null,"FeaturedTillDate":null,"ModifiedDateTime":"02/07/2025"},{"ArticleId":9849,"Title":"How to change PHP configuration on a VPS/Dedicated server (for EasyApache 4)","ArticleName":"How to change PHP configuration on a VPS/Dedicated server (for EasyApache 4)","LiveDateTime":"02/02/1754 00:00:00","NewTillDate":null,"FeaturedTillDate":null,"ModifiedDateTime":"07/23/2024"},{"ArticleId":9742,"Title":"What is a CXS License?","ArticleName":"What is a CXS License?","LiveDateTime":"02/02/1754 00:00:00","NewTillDate":null,"FeaturedTillDate":null,"ModifiedDateTime":"08/18/2025"},{"ArticleId":9660,"Title":"How to work with cPHulk","ArticleName":"How to work with cPHulk","LiveDateTime":"02/02/1754 00:00:00","NewTillDate":null,"FeaturedTillDate":null,"ModifiedDateTime":"11/30/2021"},{"ArticleId":9662,"Title":"How to work with the CSF plugin","ArticleName":"How to work with the CSF plugin","LiveDateTime":"02/02/1754 00:00:00","NewTillDate":null,"FeaturedTillDate":null,"ModifiedDateTime":"12/26/2024"},{"ArticleId":9670,"Title":"How to install Softaculous on a VPS/Dedicated server with cPanel/WHM","ArticleName":"How to install Softaculous on a VPS/Dedicated server with cPanel/WHM","LiveDateTime":"02/02/1754 00:00:00","NewTillDate":null,"FeaturedTillDate":null,"ModifiedDateTime":"12/21/2021"},{"ArticleId":9672,"Title":"How to install the Vade Retro Plugin on VPS/Dedicated server with cPanel/WHM","ArticleName":"How to install the Vade Retro Plugin on VPS/Dedicated server with cPanel/WHM","LiveDateTime":"02/02/1754 00:00:00","NewTillDate":null,"FeaturedTillDate":null,"ModifiedDateTime":"12/14/2021"},{"ArticleId":9549,"Title":"RAID technology – Explained","ArticleName":"RAID technology – Explained","LiveDateTime":"02/02/1754 00:00:00","NewTillDate":null,"FeaturedTillDate":null,"ModifiedDateTime":"02/06/2025"}],"AssociatedTags":[{"TagId":27348,"Tag":"cxs"}],"CategoryId":2188,"CategoryName":"Dedicated Server"},"status":200,"statusText":"OK"},"/api/v1/ncpl/simplekb/getcategories:\"{\\\"parentCategoryId\\\":0,\\\"getTree\\\":true}\"":{"body":[{"__type":"Nc:SimpleKB:Abstractions:Dtos:CategoryItemDto","ParentCategoryId":93,"TreatAsTopicYN":false,"Description":"","ImageUrl":"","ShortDesc":"","CategoryId":2216,"CategoryName":"Spam Protection"},{"__type":"Nc:SimpleKB:Abstractions:Dtos:CategoryItemDto","ParentCategoryId":14,"TreatAsTopicYN":false,"Description":"","ImageUrl":"","ShortDesc":"","CategoryId":2217,"CategoryName":"Renewal"},{"__type":"Nc:SimpleKB:Abstractions:Dtos:CategoryItemDto","ParentCategoryId":14,"TreatAsTopicYN":false,"Description":"","ImageUrl":"","ShortDesc":"","CategoryId":2218,"CategoryName":"cPanel SSL Plugin"},{"__type":"Nc:SimpleKB:Abstractions:Dtos:CategoryItemDto","ParentCategoryId":12,"TreatAsTopicYN":false,"Description":"","ImageUrl":"","ShortDesc":"","CategoryId":2219,"CategoryName":"PHP Configuration"},{"__type":"Nc:SimpleKB:Abstractions:Dtos:CategoryItemDto","ParentCategoryId":14,"TreatAsTopicYN":false,"Description":"","ImageUrl":"","ShortDesc":"","CategoryId":2221,"CategoryName":"Multi-Domain SSL Certificates"},{"__type":"Nc:SimpleKB:Abstractions:Dtos:CategoryItemDto","ParentCategoryId":14,"TreatAsTopicYN":false,"Description":"","ImageUrl":"","ShortDesc":"","CategoryId":2222,"CategoryName":"Cancellation"},{"__type":"Nc:SimpleKB:Abstractions:Dtos:CategoryItemDto","ParentCategoryId":14,"TreatAsTopicYN":false,"Description":"","ImageUrl":"","ShortDesc":"","CategoryId":2223,"CategoryName":"Browser errors"},{"__type":"Nc:SimpleKB:Abstractions:Dtos:CategoryItemDto","ParentCategoryId":14,"TreatAsTopicYN":false,"Description":"","ImageUrl":"","ShortDesc":"","CategoryId":2224,"CategoryName":"Site Seal, Logo"},{"__type":"Nc:SimpleKB:Abstractions:Dtos:CategoryItemDto","ParentCategoryId":12,"TreatAsTopicYN":false,"Description":"","ImageUrl":"","ShortDesc":"","CategoryId":2225,"CategoryName":"SEO"},{"__type":"Nc:SimpleKB:Abstractions:Dtos:CategoryItemDto","ParentCategoryId":93,"TreatAsTopicYN":false,"Description":"","ImageUrl":"","ShortDesc":"","CategoryId":2226,"CategoryName":"Email Migration"},{"__type":"Nc:SimpleKB:Abstractions:Dtos:CategoryItemDto","ParentCategoryId":2211,"TreatAsTopicYN":false,"Description":"","ImageUrl":"","ShortDesc":"","CategoryId":2227,"CategoryName":"SSL Resellers"},{"__type":"Nc:SimpleKB:Abstractions:Dtos:CategoryItemDto","ParentCategoryId":0,"TreatAsTopicYN":true,"Description":"","ImageUrl":"/assets/img/pictograms/150/cloud-red.png","ShortDesc":"","CategoryId":2228,"CategoryName":"Apps","SubCategories":[{"__type":"Nc:SimpleKB:Abstractions:Dtos:CategoryItemDto","ParentCategoryId":2228,"TreatAsTopicYN":false,"Description":"","ImageUrl":"","ShortDesc":"","CategoryId":2251,"CategoryName":"Supersonic CDN"},{"__type":"Nc:SimpleKB:Abstractions:Dtos:CategoryItemDto","ParentCategoryId":2228,"TreatAsTopicYN":false,"Description":"","ImageUrl":"","ShortDesc":"","CategoryId":2298,"CategoryName":"Site Maker"},{"__type":"Nc:SimpleKB:Abstractions:Dtos:CategoryItemDto","ParentCategoryId":2228,"TreatAsTopicYN":false,"Description":"","ImageUrl":"","ShortDesc":"","CategoryId":177,"CategoryName":"Google Workspace (formerly G Suite)"}]},{"__type":"Nc:SimpleKB:Abstractions:Dtos:CategoryItemDto","ParentCategoryId":2211,"TreatAsTopicYN":false,"Description":"","ImageUrl":"","ShortDesc":"","CategoryId":2229,"CategoryName":"Hosting Resellers"},{"__type":"Nc:SimpleKB:Abstractions:Dtos:CategoryItemDto","ParentCategoryId":34,"TreatAsTopicYN":false,"Description":"","ImageUrl":"","ShortDesc":"","CategoryId":2232,"CategoryName":"DNSSEC"},{"__type":"Nc:SimpleKB:Abstractions:Dtos:CategoryItemDto","ParentCategoryId":34,"TreatAsTopicYN":false,"Description":"","ImageUrl":"","ShortDesc":"","CategoryId":2234,"CategoryName":"Google Workspace (formerly G Suite)"},{"__type":"Nc:SimpleKB:Abstractions:Dtos:CategoryItemDto","ParentCategoryId":34,"TreatAsTopicYN":false,"Description":"","ImageUrl":"","ShortDesc":"","CategoryId":2237,"CategoryName":"Host records setup"},{"__type":"Nc:SimpleKB:Abstractions:Dtos:CategoryItemDto","ParentCategoryId":14,"TreatAsTopicYN":false,"Description":"","ImageUrl":"","ShortDesc":"","CategoryId":2238,"CategoryName":"SSL installation errors"},{"__type":"Nc:SimpleKB:Abstractions:Dtos:CategoryItemDto","ParentCategoryId":0,"TreatAsTopicYN":false,"Description":"","ImageUrl":"/assets/img/pictograms/150/easywp-red.png","ShortDesc":"","CategoryId":2239,"CategoryName":"EasyWP","SubCategories":[{"__type":"Nc:SimpleKB:Abstractions:Dtos:CategoryItemDto","ParentCategoryId":2239,"TreatAsTopicYN":false,"Description":"","ImageUrl":"","ShortDesc":"","CategoryId":2280,"CategoryName":"Getting Started"},{"__type":"Nc:SimpleKB:Abstractions:Dtos:CategoryItemDto","ParentCategoryId":2239,"TreatAsTopicYN":false,"Description":"","ImageUrl":"","ShortDesc":"","CategoryId":2279,"CategoryName":"General Information"},{"__type":"Nc:SimpleKB:Abstractions:Dtos:CategoryItemDto","ParentCategoryId":2239,"TreatAsTopicYN":false,"Description":"","ImageUrl":"","ShortDesc":"","CategoryId":2281,"CategoryName":"WordPress Migration"},{"__type":"Nc:SimpleKB:Abstractions:Dtos:CategoryItemDto","ParentCategoryId":2239,"TreatAsTopicYN":false,"Description":"","ImageUrl":"","ShortDesc":"","CategoryId":2282,"CategoryName":"Plugins and Themes"},{"__type":"Nc:SimpleKB:Abstractions:Dtos:CategoryItemDto","ParentCategoryId":2239,"TreatAsTopicYN":false,"Description":"","ImageUrl":"","ShortDesc":"","CategoryId":2284,"CategoryName":"WordPress Management"},{"__type":"Nc:SimpleKB:Abstractions:Dtos:CategoryItemDto","ParentCategoryId":2239,"TreatAsTopicYN":false,"Description":"","ImageUrl":"","ShortDesc":"","CategoryId":2285,"CategoryName":"SFTP and Database access"},{"__type":"Nc:SimpleKB:Abstractions:Dtos:CategoryItemDto","ParentCategoryId":2239,"TreatAsTopicYN":false,"Description":"","ImageUrl":"","ShortDesc":"","CategoryId":2286,"CategoryName":"Domains questions"},{"__type":"Nc:SimpleKB:Abstractions:Dtos:CategoryItemDto","ParentCategoryId":2239,"TreatAsTopicYN":false,"Description":"","ImageUrl":"","ShortDesc":"","CategoryId":2288,"CategoryName":"Billing questions"},{"__type":"Nc:SimpleKB:Abstractions:Dtos:CategoryItemDto","ParentCategoryId":2239,"TreatAsTopicYN":false,"Description":"","ImageUrl":"","ShortDesc":"","CategoryId":2287,"CategoryName":"SSL questions"}]},{"__type":"Nc:SimpleKB:Abstractions:Dtos:CategoryItemDto","ParentCategoryId":2228,"TreatAsTopicYN":false,"Description":"","ImageUrl":"","ShortDesc":"","CategoryId":2251,"CategoryName":"Supersonic CDN"},{"__type":"Nc:SimpleKB:Abstractions:Dtos:CategoryItemDto","ParentCategoryId":12,"TreatAsTopicYN":false,"Description":"","ImageUrl":"","ShortDesc":"","CategoryId":2252,"CategoryName":"InterWorx questions"},{"__type":"Nc:SimpleKB:Abstractions:Dtos:CategoryItemDto","ParentCategoryId":2253,"TreatAsTopicYN":false,"Description":"","ImageUrl":"","ShortDesc":"","CategoryId":2254,"CategoryName":"Domains How-To"},{"__type":"Nc:SimpleKB:Abstractions:Dtos:CategoryItemDto","ParentCategoryId":2253,"TreatAsTopicYN":false,"Description":"","ImageUrl":"","ShortDesc":"","CategoryId":2255,"CategoryName":"Hosting How-To"},{"__type":"Nc:SimpleKB:Abstractions:Dtos:CategoryItemDto","ParentCategoryId":2253,"TreatAsTopicYN":false,"Description":"","ImageUrl":"","ShortDesc":"","CategoryId":2257,"CategoryName":"Sales & Payments How-To"},{"__type":"Nc:SimpleKB:Abstractions:Dtos:CategoryItemDto","ParentCategoryId":2253,"TreatAsTopicYN":false,"Description":"","ImageUrl":"","ShortDesc":"","CategoryId":2258,"CategoryName":"cPanel Email How-To"},{"__type":"Nc:SimpleKB:Abstractions:Dtos:CategoryItemDto","ParentCategoryId":93,"TreatAsTopicYN":false,"Description":"","ImageUrl":"","ShortDesc":"","CategoryId":2260,"CategoryName":"Private Email Contacts and Calendars Setup"},{"__type":"Nc:SimpleKB:Abstractions:Dtos:CategoryItemDto","ParentCategoryId":2253,"TreatAsTopicYN":false,"Description":"","ImageUrl":"","ShortDesc":"","CategoryId":2262,"CategoryName":"EasyWP How-To"},{"__type":"Nc:SimpleKB:Abstractions:Dtos:CategoryItemDto","ParentCategoryId":0,"TreatAsTopicYN":false,"Description":"","ImageUrl":"https://download.namecheap.com/assets/img/domainvault-red@2x.png","ShortDesc":"","CategoryId":2289,"CategoryName":"Domain Vault","SubCategories":[]},{"__type":"Nc:SimpleKB:Abstractions:Dtos:CategoryItemDto","ParentCategoryId":14,"TreatAsTopicYN":false,"Description":"","ImageUrl":"","ShortDesc":"","CategoryId":2290,"CategoryName":"CSR code"},{"__type":"Nc:SimpleKB:Abstractions:Dtos:CategoryItemDto","ParentCategoryId":12,"TreatAsTopicYN":false,"Description":"","ImageUrl":"","ShortDesc":"","CategoryId":2291,"CategoryName":"Webuzo questions"},{"__type":"Nc:SimpleKB:Abstractions:Dtos:CategoryItemDto","ParentCategoryId":2265,"TreatAsTopicYN":false,"Description":"","ImageUrl":"","ShortDesc":"","CategoryId":2292,"CategoryName":"Browser Extensions"},{"__type":"Nc:SimpleKB:Abstractions:Dtos:CategoryItemDto","ParentCategoryId":14,"TreatAsTopicYN":false,"Description":"","ImageUrl":"","ShortDesc":"","CategoryId":2293,"CategoryName":"Automated SSL management"},{"__type":"Nc:SimpleKB:Abstractions:Dtos:CategoryItemDto","ParentCategoryId":2228,"TreatAsTopicYN":false,"Description":"","ImageUrl":"","ShortDesc":"","CategoryId":2298,"CategoryName":"Site Maker"},{"__type":"Nc:SimpleKB:Abstractions:Dtos:CategoryItemDto","ParentCategoryId":12,"TreatAsTopicYN":false,"Description":"","ImageUrl":"","ShortDesc":"","CategoryId":27,"CategoryName":"Getting Started"},{"__type":"Nc:SimpleKB:Abstractions:Dtos:CategoryItemDto","ParentCategoryId":0,"TreatAsTopicYN":false,"Description":"","ImageUrl":"/assets/img/pictograms/150/support-red.png","ShortDesc":"","CategoryId":5,"CategoryName":"General & Support","SubCategories":[]},{"__type":"Nc:SimpleKB:Abstractions:Dtos:CategoryItemDto","ParentCategoryId":2200,"TreatAsTopicYN":false,"Description":"","ImageUrl":"","ShortDesc":"","CategoryId":7,"CategoryName":"Billing FAQ"},{"__type":"Nc:SimpleKB:Abstractions:Dtos:CategoryItemDto","ParentCategoryId":2209,"TreatAsTopicYN":false,"Description":"","ImageUrl":"","ShortDesc":"","CategoryId":8,"CategoryName":"Transfer Information"},{"__type":"Nc:SimpleKB:Abstractions:Dtos:CategoryItemDto","ParentCategoryId":12,"TreatAsTopicYN":false,"Description":"","ImageUrl":"","ShortDesc":"","CategoryId":22,"CategoryName":"Hosting Information"},{"__type":"Nc:SimpleKB:Abstractions:Dtos:CategoryItemDto","ParentCategoryId":14,"TreatAsTopicYN":false,"Description":"","ImageUrl":"","ShortDesc":"","CategoryId":38,"CategoryName":"SSL General"},{"__type":"Nc:SimpleKB:Abstractions:Dtos:CategoryItemDto","ParentCategoryId":9,"TreatAsTopicYN":false,"Description":"","ImageUrl":"","ShortDesc":"","CategoryId":45,"CategoryName":"Account Security"},{"__type":"Nc:SimpleKB:Abstractions:Dtos:CategoryItemDto","ParentCategoryId":34,"TreatAsTopicYN":false,"Description":"","ImageUrl":"","ShortDesc":"","CategoryId":46,"CategoryName":"Domain Management"},{"__type":"Nc:SimpleKB:Abstractions:Dtos:CategoryItemDto","ParentCategoryId":2211,"TreatAsTopicYN":false,"Description":"","ImageUrl":"","ShortDesc":"","CategoryId":63,"CategoryName":"Namecheap API"},{"__type":"Nc:SimpleKB:Abstractions:Dtos:CategoryItemDto","ParentCategoryId":2228,"TreatAsTopicYN":false,"Description":"","ImageUrl":"","ShortDesc":"","CategoryId":177,"CategoryName":"Google Workspace (formerly G Suite)"},{"__type":"Nc:SimpleKB:Abstractions:Dtos:CategoryItemDto","ParentCategoryId":93,"TreatAsTopicYN":false,"Description":"","ImageUrl":"","ShortDesc":"","CategoryId":2179,"CategoryName":"Private Email: General Information"},{"__type":"Nc:SimpleKB:Abstractions:Dtos:CategoryItemDto","ParentCategoryId":2265,"TreatAsTopicYN":false,"Description":"","ImageUrl":"","ShortDesc":"","CategoryId":2274,"CategoryName":"General"},{"__type":"Nc:SimpleKB:Abstractions:Dtos:CategoryItemDto","ParentCategoryId":2239,"TreatAsTopicYN":false,"Description":"","ImageUrl":"","ShortDesc":"","CategoryId":2280,"CategoryName":"Getting Started"},{"__type":"Nc:SimpleKB:Abstractions:Dtos:CategoryItemDto","ParentCategoryId":2239,"TreatAsTopicYN":false,"Description":"","ImageUrl":"","ShortDesc":"","CategoryId":2279,"CategoryName":"General Information"},{"__type":"Nc:SimpleKB:Abstractions:Dtos:CategoryItemDto","ParentCategoryId":93,"TreatAsTopicYN":false,"Description":"","ImageUrl":"","ShortDesc":"","CategoryId":2215,"CategoryName":"Private Email: Mailbox Management"},{"__type":"Nc:SimpleKB:Abstractions:Dtos:CategoryItemDto","ParentCategoryId":2211,"TreatAsTopicYN":false,"Description":"","ImageUrl":"","ShortDesc":"","CategoryId":2196,"CategoryName":"WHMCS module for SSL"},{"__type":"Nc:SimpleKB:Abstractions:Dtos:CategoryItemDto","ParentCategoryId":0,"TreatAsTopicYN":false,"Description":"","ImageUrl":"/assets/img/pictograms/150/savings-red.png","ShortDesc":"","CategoryId":2200,"CategoryName":"Checkout & Billing","SubCategories":[{"__type":"Nc:SimpleKB:Abstractions:Dtos:CategoryItemDto","ParentCategoryId":2200,"TreatAsTopicYN":false,"Description":"","ImageUrl":"","ShortDesc":"","CategoryId":7,"CategoryName":"Billing FAQ"},{"__type":"Nc:SimpleKB:Abstractions:Dtos:CategoryItemDto","ParentCategoryId":2200,"TreatAsTopicYN":false,"Description":"","ImageUrl":"","ShortDesc":"","CategoryId":2201,"CategoryName":"Domains Billing"},{"__type":"Nc:SimpleKB:Abstractions:Dtos:CategoryItemDto","ParentCategoryId":2200,"TreatAsTopicYN":false,"Description":"","ImageUrl":"","ShortDesc":"","CategoryId":21,"CategoryName":"Hosting Billing"},{"__type":"Nc:SimpleKB:Abstractions:Dtos:CategoryItemDto","ParentCategoryId":2200,"TreatAsTopicYN":false,"Description":"","ImageUrl":"","ShortDesc":"","CategoryId":71,"CategoryName":"SSL Certificates Billing"},{"__type":"Nc:SimpleKB:Abstractions:Dtos:CategoryItemDto","ParentCategoryId":2200,"TreatAsTopicYN":false,"Description":"","ImageUrl":"","ShortDesc":"","CategoryId":2177,"CategoryName":"Private Email"}]},{"__type":"Nc:SimpleKB:Abstractions:Dtos:CategoryItemDto","ParentCategoryId":2200,"TreatAsTopicYN":false,"Description":"","ImageUrl":"","ShortDesc":"","CategoryId":2201,"CategoryName":"Domains Billing"},{"__type":"Nc:SimpleKB:Abstractions:Dtos:CategoryItemDto","ParentCategoryId":14,"TreatAsTopicYN":false,"Description":"","ImageUrl":"","ShortDesc":"","CategoryId":67,"CategoryName":"Activation"},{"__type":"Nc:SimpleKB:Abstractions:Dtos:CategoryItemDto","ParentCategoryId":2209,"TreatAsTopicYN":false,"Description":"","ImageUrl":"","ShortDesc":"","CategoryId":83,"CategoryName":"Transfer to Namecheap"},{"__type":"Nc:SimpleKB:Abstractions:Dtos:CategoryItemDto","ParentCategoryId":9,"TreatAsTopicYN":false,"Description":"","ImageUrl":"","ShortDesc":"","CategoryId":43,"CategoryName":"Profile Management"},{"__type":"Nc:SimpleKB:Abstractions:Dtos:CategoryItemDto","ParentCategoryId":34,"TreatAsTopicYN":false,"Description":"","ImageUrl":"","ShortDesc":"","CategoryId":10,"CategoryName":"DNS Questions"},{"__type":"Nc:SimpleKB:Abstractions:Dtos:CategoryItemDto","ParentCategoryId":12,"TreatAsTopicYN":false,"Description":"","ImageUrl":"","ShortDesc":"","CategoryId":29,"CategoryName":"cPanel questions"},{"__type":"Nc:SimpleKB:Abstractions:Dtos:CategoryItemDto","ParentCategoryId":2200,"TreatAsTopicYN":false,"Description":"","ImageUrl":"","ShortDesc":"","CategoryId":21,"CategoryName":"Hosting Billing"},{"__type":"Nc:SimpleKB:Abstractions:Dtos:CategoryItemDto","ParentCategoryId":34,"TreatAsTopicYN":false,"Description":"","ImageUrl":"","ShortDesc":"","CategoryId":11,"CategoryName":"Dynamic DNS"},{"__type":"Nc:SimpleKB:Abstractions:Dtos:CategoryItemDto","ParentCategoryId":9,"TreatAsTopicYN":false,"Description":"","ImageUrl":"","ShortDesc":"","CategoryId":44,"CategoryName":"Account Access"},{"__type":"Nc:SimpleKB:Abstractions:Dtos:CategoryItemDto","ParentCategoryId":2209,"TreatAsTopicYN":false,"Description":"","ImageUrl":"","ShortDesc":"","CategoryId":84,"CategoryName":"Transfer to another provider"},{"__type":"Nc:SimpleKB:Abstractions:Dtos:CategoryItemDto","ParentCategoryId":14,"TreatAsTopicYN":false,"Description":"","ImageUrl":"","ShortDesc":"","CategoryId":68,"CategoryName":"Validation"},{"__type":"Nc:SimpleKB:Abstractions:Dtos:CategoryItemDto","ParentCategoryId":12,"TreatAsTopicYN":false,"Description":"","ImageUrl":"","ShortDesc":"","CategoryId":2182,"CategoryName":"cPanel: Software Management"},{"__type":"Nc:SimpleKB:Abstractions:Dtos:CategoryItemDto","ParentCategoryId":93,"TreatAsTopicYN":false,"Description":"","ImageUrl":"","ShortDesc":"","CategoryId":2214,"CategoryName":"Email Forwarding"},{"__type":"Nc:SimpleKB:Abstractions:Dtos:CategoryItemDto","ParentCategoryId":2265,"TreatAsTopicYN":false,"Description":"","ImageUrl":"","ShortDesc":"","CategoryId":2270,"CategoryName":"Routers"},{"__type":"Nc:SimpleKB:Abstractions:Dtos:CategoryItemDto","ParentCategoryId":2239,"TreatAsTopicYN":false,"Description":"","ImageUrl":"","ShortDesc":"","CategoryId":2281,"CategoryName":"WordPress Migration"},{"__type":"Nc:SimpleKB:Abstractions:Dtos:CategoryItemDto","ParentCategoryId":2239,"TreatAsTopicYN":false,"Description":"","ImageUrl":"","ShortDesc":"","CategoryId":2282,"CategoryName":"Plugins and Themes"},{"__type":"Nc:SimpleKB:Abstractions:Dtos:CategoryItemDto","ParentCategoryId":2265,"TreatAsTopicYN":false,"Description":"","ImageUrl":"","ShortDesc":"","CategoryId":2272,"CategoryName":"TV"},{"__type":"Nc:SimpleKB:Abstractions:Dtos:CategoryItemDto","ParentCategoryId":12,"TreatAsTopicYN":false,"Description":"","ImageUrl":"","ShortDesc":"","CategoryId":2187,"CategoryName":"cPanel: WordPress"},{"__type":"Nc:SimpleKB:Abstractions:Dtos:CategoryItemDto","ParentCategoryId":2209,"TreatAsTopicYN":false,"Description":"","ImageUrl":"","ShortDesc":"","CategoryId":219,"CategoryName":"Canceled Transfers"},{"__type":"Nc:SimpleKB:Abstractions:Dtos:CategoryItemDto","ParentCategoryId":2200,"TreatAsTopicYN":false,"Description":"","ImageUrl":"","ShortDesc":"","CategoryId":71,"CategoryName":"SSL Certificates Billing"},{"__type":"Nc:SimpleKB:Abstractions:Dtos:CategoryItemDto","ParentCategoryId":93,"TreatAsTopicYN":false,"Description":"","ImageUrl":"","ShortDesc":"","CategoryId":2176,"CategoryName":"Private Email: DNS Settings"},{"__type":"Nc:SimpleKB:Abstractions:Dtos:CategoryItemDto","ParentCategoryId":14,"TreatAsTopicYN":false,"Description":"","ImageUrl":"","ShortDesc":"","CategoryId":69,"CategoryName":"Installation"},{"__type":"Nc:SimpleKB:Abstractions:Dtos:CategoryItemDto","ParentCategoryId":0,"TreatAsTopicYN":false,"Description":"","ImageUrl":"/assets/img/pictograms/150/reseller-red.png","ShortDesc":"","CategoryId":34,"CategoryName":"Domains","SubCategories":[{"__type":"Nc:SimpleKB:Abstractions:Dtos:CategoryItemDto","ParentCategoryId":34,"TreatAsTopicYN":false,"Description":"","ImageUrl":"","ShortDesc":"","CategoryId":2232,"CategoryName":"DNSSEC"},{"__type":"Nc:SimpleKB:Abstractions:Dtos:CategoryItemDto","ParentCategoryId":34,"TreatAsTopicYN":false,"Description":"","ImageUrl":"","ShortDesc":"","CategoryId":2234,"CategoryName":"Google Workspace (formerly G Suite)"},{"__type":"Nc:SimpleKB:Abstractions:Dtos:CategoryItemDto","ParentCategoryId":34,"TreatAsTopicYN":false,"Description":"","ImageUrl":"","ShortDesc":"","CategoryId":2237,"CategoryName":"Host records setup"},{"__type":"Nc:SimpleKB:Abstractions:Dtos:CategoryItemDto","ParentCategoryId":34,"TreatAsTopicYN":false,"Description":"","ImageUrl":"","ShortDesc":"","CategoryId":46,"CategoryName":"Domain Management"},{"__type":"Nc:SimpleKB:Abstractions:Dtos:CategoryItemDto","ParentCategoryId":34,"TreatAsTopicYN":false,"Description":"","ImageUrl":"","ShortDesc":"","CategoryId":10,"CategoryName":"DNS Questions"},{"__type":"Nc:SimpleKB:Abstractions:Dtos:CategoryItemDto","ParentCategoryId":34,"TreatAsTopicYN":false,"Description":"","ImageUrl":"","ShortDesc":"","CategoryId":11,"CategoryName":"Dynamic DNS"},{"__type":"Nc:SimpleKB:Abstractions:Dtos:CategoryItemDto","ParentCategoryId":34,"TreatAsTopicYN":false,"Description":"","ImageUrl":"","ShortDesc":"","CategoryId":35,"CategoryName":"Registrations"},{"__type":"Nc:SimpleKB:Abstractions:Dtos:CategoryItemDto","ParentCategoryId":34,"TreatAsTopicYN":false,"Description":"","ImageUrl":"","ShortDesc":"","CategoryId":2207,"CategoryName":"Renewal questions"},{"__type":"Nc:SimpleKB:Abstractions:Dtos:CategoryItemDto","ParentCategoryId":34,"TreatAsTopicYN":false,"Description":"","ImageUrl":"","ShortDesc":"","CategoryId":36,"CategoryName":"Domains with extended attributes"},{"__type":"Nc:SimpleKB:Abstractions:Dtos:CategoryItemDto","ParentCategoryId":34,"TreatAsTopicYN":false,"Description":"","ImageUrl":"","ShortDesc":"","CategoryId":51,"CategoryName":"FreeDNS"},{"__type":"Nc:SimpleKB:Abstractions:Dtos:CategoryItemDto","ParentCategoryId":34,"TreatAsTopicYN":false,"Description":"","ImageUrl":"","ShortDesc":"","CategoryId":15,"CategoryName":"Namecheap Market"},{"__type":"Nc:SimpleKB:Abstractions:Dtos:CategoryItemDto","ParentCategoryId":34,"TreatAsTopicYN":false,"Description":"","ImageUrl":"","ShortDesc":"","CategoryId":2208,"CategoryName":"3rd Party Services Setup"},{"__type":"Nc:SimpleKB:Abstractions:Dtos:CategoryItemDto","ParentCategoryId":34,"TreatAsTopicYN":false,"Description":"","ImageUrl":"","ShortDesc":"","CategoryId":2278,"CategoryName":"Handshake TLDs"}]},{"__type":"Nc:SimpleKB:Abstractions:Dtos:CategoryItemDto","ParentCategoryId":34,"TreatAsTopicYN":false,"Description":"","ImageUrl":"","ShortDesc":"","CategoryId":35,"CategoryName":"Registrations"},{"__type":"Nc:SimpleKB:Abstractions:Dtos:CategoryItemDto","ParentCategoryId":14,"TreatAsTopicYN":false,"Description":"","ImageUrl":"","ShortDesc":"","CategoryId":70,"CategoryName":"Reissuance"},{"__type":"Nc:SimpleKB:Abstractions:Dtos:CategoryItemDto","ParentCategoryId":0,"TreatAsTopicYN":false,"Description":"","ImageUrl":"/assets/img/pictograms/150/protection-red.png","ShortDesc":"","CategoryId":37,"CategoryName":"Domain Privacy Protection","SubCategories":[]},{"__type":"Nc:SimpleKB:Abstractions:Dtos:CategoryItemDto","ParentCategoryId":2200,"TreatAsTopicYN":false,"Description":"","ImageUrl":"","ShortDesc":"","CategoryId":2177,"CategoryName":"Private Email"},{"__type":"Nc:SimpleKB:Abstractions:Dtos:CategoryItemDto","ParentCategoryId":93,"TreatAsTopicYN":false,"Description":"","ImageUrl":"","ShortDesc":"","CategoryId":2178,"CategoryName":"Private Email: Webmail Features"},{"__type":"Nc:SimpleKB:Abstractions:Dtos:CategoryItemDto","ParentCategoryId":34,"TreatAsTopicYN":false,"Description":"","ImageUrl":"","ShortDesc":"","CategoryId":2207,"CategoryName":"Renewal questions"},{"__type":"Nc:SimpleKB:Abstractions:Dtos:CategoryItemDto","ParentCategoryId":12,"TreatAsTopicYN":false,"Description":"","ImageUrl":"","ShortDesc":"","CategoryId":2210,"CategoryName":"cPanel Add-ons"},{"__type":"Nc:SimpleKB:Abstractions:Dtos:CategoryItemDto","ParentCategoryId":2265,"TreatAsTopicYN":false,"Description":"","ImageUrl":"","ShortDesc":"","CategoryId":2273,"CategoryName":"Gaming Consoles"},{"__type":"Nc:SimpleKB:Abstractions:Dtos:CategoryItemDto","ParentCategoryId":2239,"TreatAsTopicYN":false,"Description":"","ImageUrl":"","ShortDesc":"","CategoryId":2284,"CategoryName":"WordPress Management"},{"__type":"Nc:SimpleKB:Abstractions:Dtos:CategoryItemDto","ParentCategoryId":2239,"TreatAsTopicYN":false,"Description":"","ImageUrl":"","ShortDesc":"","CategoryId":2285,"CategoryName":"SFTP and Database access"},{"__type":"Nc:SimpleKB:Abstractions:Dtos:CategoryItemDto","ParentCategoryId":2265,"TreatAsTopicYN":false,"Description":"","ImageUrl":"","ShortDesc":"","CategoryId":2268,"CategoryName":"macOS"},{"__type":"Nc:SimpleKB:Abstractions:Dtos:CategoryItemDto","ParentCategoryId":93,"TreatAsTopicYN":false,"Description":"","ImageUrl":"","ShortDesc":"","CategoryId":2175,"CategoryName":"Private Email: Client Setup"},{"__type":"Nc:SimpleKB:Abstractions:Dtos:CategoryItemDto","ParentCategoryId":0,"TreatAsTopicYN":false,"Description":"","ImageUrl":"/assets/img/pictograms/150/status-red.png","ShortDesc":"","CategoryId":2209,"CategoryName":"Domain Transfers","SubCategories":[{"__type":"Nc:SimpleKB:Abstractions:Dtos:CategoryItemDto","ParentCategoryId":2209,"TreatAsTopicYN":false,"Description":"","ImageUrl":"","ShortDesc":"","CategoryId":8,"CategoryName":"Transfer Information"},{"__type":"Nc:SimpleKB:Abstractions:Dtos:CategoryItemDto","ParentCategoryId":2209,"TreatAsTopicYN":false,"Description":"","ImageUrl":"","ShortDesc":"","CategoryId":83,"CategoryName":"Transfer to Namecheap"},{"__type":"Nc:SimpleKB:Abstractions:Dtos:CategoryItemDto","ParentCategoryId":2209,"TreatAsTopicYN":false,"Description":"","ImageUrl":"","ShortDesc":"","CategoryId":84,"CategoryName":"Transfer to another provider"},{"__type":"Nc:SimpleKB:Abstractions:Dtos:CategoryItemDto","ParentCategoryId":2209,"TreatAsTopicYN":false,"Description":"","ImageUrl":"","ShortDesc":"","CategoryId":219,"CategoryName":"Canceled Transfers"}]},{"__type":"Nc:SimpleKB:Abstractions:Dtos:CategoryItemDto","ParentCategoryId":12,"TreatAsTopicYN":false,"Description":"","ImageUrl":"","ShortDesc":"","CategoryId":48,"CategoryName":"VPS"},{"__type":"Nc:SimpleKB:Abstractions:Dtos:CategoryItemDto","ParentCategoryId":34,"TreatAsTopicYN":false,"Description":"","ImageUrl":"","ShortDesc":"","CategoryId":36,"CategoryName":"Domains with extended attributes"},{"__type":"Nc:SimpleKB:Abstractions:Dtos:CategoryItemDto","ParentCategoryId":0,"TreatAsTopicYN":true,"Description":"","ImageUrl":"/assets/img/pictograms/150/server-red.png","ShortDesc":"","CategoryId":12,"CategoryName":"Hosting","SubCategories":[{"__type":"Nc:SimpleKB:Abstractions:Dtos:CategoryItemDto","ParentCategoryId":12,"TreatAsTopicYN":false,"Description":"","ImageUrl":"","ShortDesc":"","CategoryId":2219,"CategoryName":"PHP Configuration"},{"__type":"Nc:SimpleKB:Abstractions:Dtos:CategoryItemDto","ParentCategoryId":12,"TreatAsTopicYN":false,"Description":"","ImageUrl":"","ShortDesc":"","CategoryId":2225,"CategoryName":"SEO"},{"__type":"Nc:SimpleKB:Abstractions:Dtos:CategoryItemDto","ParentCategoryId":12,"TreatAsTopicYN":false,"Description":"","ImageUrl":"","ShortDesc":"","CategoryId":2252,"CategoryName":"InterWorx questions"},{"__type":"Nc:SimpleKB:Abstractions:Dtos:CategoryItemDto","ParentCategoryId":12,"TreatAsTopicYN":false,"Description":"","ImageUrl":"","ShortDesc":"","CategoryId":2291,"CategoryName":"Webuzo questions"},{"__type":"Nc:SimpleKB:Abstractions:Dtos:CategoryItemDto","ParentCategoryId":12,"TreatAsTopicYN":false,"Description":"","ImageUrl":"","ShortDesc":"","CategoryId":27,"CategoryName":"Getting Started"},{"__type":"Nc:SimpleKB:Abstractions:Dtos:CategoryItemDto","ParentCategoryId":12,"TreatAsTopicYN":false,"Description":"","ImageUrl":"","ShortDesc":"","CategoryId":22,"CategoryName":"Hosting Information"},{"__type":"Nc:SimpleKB:Abstractions:Dtos:CategoryItemDto","ParentCategoryId":12,"TreatAsTopicYN":false,"Description":"","ImageUrl":"","ShortDesc":"","CategoryId":29,"CategoryName":"cPanel questions"},{"__type":"Nc:SimpleKB:Abstractions:Dtos:CategoryItemDto","ParentCategoryId":12,"TreatAsTopicYN":false,"Description":"","ImageUrl":"","ShortDesc":"","CategoryId":2182,"CategoryName":"cPanel: Software Management"},{"__type":"Nc:SimpleKB:Abstractions:Dtos:CategoryItemDto","ParentCategoryId":12,"TreatAsTopicYN":false,"Description":"","ImageUrl":"","ShortDesc":"","CategoryId":2187,"CategoryName":"cPanel: WordPress"},{"__type":"Nc:SimpleKB:Abstractions:Dtos:CategoryItemDto","ParentCategoryId":12,"TreatAsTopicYN":false,"Description":"","ImageUrl":"","ShortDesc":"","CategoryId":2210,"CategoryName":"cPanel Add-ons"},{"__type":"Nc:SimpleKB:Abstractions:Dtos:CategoryItemDto","ParentCategoryId":12,"TreatAsTopicYN":false,"Description":"","ImageUrl":"","ShortDesc":"","CategoryId":48,"CategoryName":"VPS"},{"__type":"Nc:SimpleKB:Abstractions:Dtos:CategoryItemDto","ParentCategoryId":12,"TreatAsTopicYN":false,"Description":"","ImageUrl":"","ShortDesc":"","CategoryId":2188,"CategoryName":"Dedicated Server"},{"__type":"Nc:SimpleKB:Abstractions:Dtos:CategoryItemDto","ParentCategoryId":12,"TreatAsTopicYN":false,"Description":"","ImageUrl":"","ShortDesc":"","CategoryId":30,"CategoryName":"WHM questions"},{"__type":"Nc:SimpleKB:Abstractions:Dtos:CategoryItemDto","ParentCategoryId":12,"TreatAsTopicYN":false,"Description":"","ImageUrl":"","ShortDesc":"","CategoryId":32,"CategoryName":"DNS settings"},{"__type":"Nc:SimpleKB:Abstractions:Dtos:CategoryItemDto","ParentCategoryId":12,"TreatAsTopicYN":false,"Description":"","ImageUrl":"","ShortDesc":"","CategoryId":103,"CategoryName":"LVE (CloudLinux)"},{"__type":"Nc:SimpleKB:Abstractions:Dtos:CategoryItemDto","ParentCategoryId":12,"TreatAsTopicYN":false,"Description":"","ImageUrl":"","ShortDesc":"","CategoryId":89,"CategoryName":"SSH Access"},{"__type":"Nc:SimpleKB:Abstractions:Dtos:CategoryItemDto","ParentCategoryId":12,"TreatAsTopicYN":false,"Description":"","ImageUrl":"","ShortDesc":"","CategoryId":205,"CategoryName":"FTP questions"},{"__type":"Nc:SimpleKB:Abstractions:Dtos:CategoryItemDto","ParentCategoryId":12,"TreatAsTopicYN":false,"Description":"","ImageUrl":"","ShortDesc":"","CategoryId":2180,"CategoryName":"MySQL questions"},{"__type":"Nc:SimpleKB:Abstractions:Dtos:CategoryItemDto","ParentCategoryId":12,"TreatAsTopicYN":false,"Description":"","ImageUrl":"","ShortDesc":"","CategoryId":2199,"CategoryName":"Hosting Migration"},{"__type":"Nc:SimpleKB:Abstractions:Dtos:CategoryItemDto","ParentCategoryId":12,"TreatAsTopicYN":false,"Description":"","ImageUrl":"","ShortDesc":"","CategoryId":2194,"CategoryName":"Tips & Tricks"},{"__type":"Nc:SimpleKB:Abstractions:Dtos:CategoryItemDto","ParentCategoryId":12,"TreatAsTopicYN":false,"Description":"","ImageUrl":"","ShortDesc":"","CategoryId":239,"CategoryName":"WHMCS"},{"__type":"Nc:SimpleKB:Abstractions:Dtos:CategoryItemDto","ParentCategoryId":12,"TreatAsTopicYN":false,"Description":"","ImageUrl":"","ShortDesc":"","CategoryId":33,"CategoryName":"SSL Installation"}]},{"__type":"Nc:SimpleKB:Abstractions:Dtos:CategoryItemDto","ParentCategoryId":93,"TreatAsTopicYN":false,"Description":"","ImageUrl":"","ShortDesc":"","CategoryId":2171,"CategoryName":"Private Email: Active Sync (Exchange) Setup"},{"__type":"Nc:SimpleKB:Abstractions:Dtos:CategoryItemDto","ParentCategoryId":12,"TreatAsTopicYN":false,"Description":"","ImageUrl":"","ShortDesc":"","CategoryId":2188,"CategoryName":"Dedicated Server"},{"__type":"Nc:SimpleKB:Abstractions:Dtos:CategoryItemDto","ParentCategoryId":2265,"TreatAsTopicYN":false,"Description":"","ImageUrl":"","ShortDesc":"","CategoryId":2269,"CategoryName":"iOS"},{"__type":"Nc:SimpleKB:Abstractions:Dtos:CategoryItemDto","ParentCategoryId":2239,"TreatAsTopicYN":false,"Description":"","ImageUrl":"","ShortDesc":"","CategoryId":2286,"CategoryName":"Domains questions"},{"__type":"Nc:SimpleKB:Abstractions:Dtos:CategoryItemDto","ParentCategoryId":2239,"TreatAsTopicYN":false,"Description":"","ImageUrl":"","ShortDesc":"","CategoryId":2288,"CategoryName":"Billing questions"},{"__type":"Nc:SimpleKB:Abstractions:Dtos:CategoryItemDto","ParentCategoryId":2265,"TreatAsTopicYN":false,"Description":"","ImageUrl":"","ShortDesc":"","CategoryId":2271,"CategoryName":"Linux"},{"__type":"Nc:SimpleKB:Abstractions:Dtos:CategoryItemDto","ParentCategoryId":12,"TreatAsTopicYN":false,"Description":"","ImageUrl":"","ShortDesc":"","CategoryId":30,"CategoryName":"WHM questions"},{"__type":"Nc:SimpleKB:Abstractions:Dtos:CategoryItemDto","ParentCategoryId":93,"TreatAsTopicYN":false,"Description":"","ImageUrl":"","ShortDesc":"","CategoryId":31,"CategoryName":"cPanel Email FAQs"},{"__type":"Nc:SimpleKB:Abstractions:Dtos:CategoryItemDto","ParentCategoryId":34,"TreatAsTopicYN":false,"Description":"","ImageUrl":"","ShortDesc":"","CategoryId":51,"CategoryName":"FreeDNS"},{"__type":"Nc:SimpleKB:Abstractions:Dtos:CategoryItemDto","ParentCategoryId":0,"TreatAsTopicYN":false,"Description":"","ImageUrl":"/assets/img/pictograms/150/email-red.png","ShortDesc":"","CategoryId":93,"CategoryName":"Email service","SubCategories":[{"__type":"Nc:SimpleKB:Abstractions:Dtos:CategoryItemDto","ParentCategoryId":93,"TreatAsTopicYN":false,"Description":"","ImageUrl":"","ShortDesc":"","CategoryId":2216,"CategoryName":"Spam Protection"},{"__type":"Nc:SimpleKB:Abstractions:Dtos:CategoryItemDto","ParentCategoryId":93,"TreatAsTopicYN":false,"Description":"","ImageUrl":"","ShortDesc":"","CategoryId":2226,"CategoryName":"Email Migration"},{"__type":"Nc:SimpleKB:Abstractions:Dtos:CategoryItemDto","ParentCategoryId":93,"TreatAsTopicYN":false,"Description":"","ImageUrl":"","ShortDesc":"","CategoryId":2260,"CategoryName":"Private Email Contacts and Calendars Setup"},{"__type":"Nc:SimpleKB:Abstractions:Dtos:CategoryItemDto","ParentCategoryId":93,"TreatAsTopicYN":false,"Description":"","ImageUrl":"","ShortDesc":"","CategoryId":2179,"CategoryName":"Private Email: General Information"},{"__type":"Nc:SimpleKB:Abstractions:Dtos:CategoryItemDto","ParentCategoryId":93,"TreatAsTopicYN":false,"Description":"","ImageUrl":"","ShortDesc":"","CategoryId":2215,"CategoryName":"Private Email: Mailbox Management"},{"__type":"Nc:SimpleKB:Abstractions:Dtos:CategoryItemDto","ParentCategoryId":93,"TreatAsTopicYN":false,"Description":"","ImageUrl":"","ShortDesc":"","CategoryId":2214,"CategoryName":"Email Forwarding"},{"__type":"Nc:SimpleKB:Abstractions:Dtos:CategoryItemDto","ParentCategoryId":93,"TreatAsTopicYN":false,"Description":"","ImageUrl":"","ShortDesc":"","CategoryId":2176,"CategoryName":"Private Email: DNS Settings"},{"__type":"Nc:SimpleKB:Abstractions:Dtos:CategoryItemDto","ParentCategoryId":93,"TreatAsTopicYN":false,"Description":"","ImageUrl":"","ShortDesc":"","CategoryId":2178,"CategoryName":"Private Email: Webmail Features"},{"__type":"Nc:SimpleKB:Abstractions:Dtos:CategoryItemDto","ParentCategoryId":93,"TreatAsTopicYN":false,"Description":"","ImageUrl":"","ShortDesc":"","CategoryId":2175,"CategoryName":"Private Email: Client Setup"},{"__type":"Nc:SimpleKB:Abstractions:Dtos:CategoryItemDto","ParentCategoryId":93,"TreatAsTopicYN":false,"Description":"","ImageUrl":"","ShortDesc":"","CategoryId":2171,"CategoryName":"Private Email: Active Sync (Exchange) Setup"},{"__type":"Nc:SimpleKB:Abstractions:Dtos:CategoryItemDto","ParentCategoryId":93,"TreatAsTopicYN":false,"Description":"","ImageUrl":"","ShortDesc":"","CategoryId":31,"CategoryName":"cPanel Email FAQs"},{"__type":"Nc:SimpleKB:Abstractions:Dtos:CategoryItemDto","ParentCategoryId":93,"TreatAsTopicYN":false,"Description":"","ImageUrl":"","ShortDesc":"","CategoryId":2186,"CategoryName":"cPanel Email: Client Setup"},{"__type":"Nc:SimpleKB:Abstractions:Dtos:CategoryItemDto","ParentCategoryId":93,"TreatAsTopicYN":false,"Description":"","ImageUrl":"","ShortDesc":"","CategoryId":2204,"CategoryName":"Private Email: Video Overview"}]},{"__type":"Nc:SimpleKB:Abstractions:Dtos:CategoryItemDto","ParentCategoryId":12,"TreatAsTopicYN":false,"Description":"","ImageUrl":"","ShortDesc":"","CategoryId":32,"CategoryName":"DNS settings"},{"__type":"Nc:SimpleKB:Abstractions:Dtos:CategoryItemDto","ParentCategoryId":34,"TreatAsTopicYN":false,"Description":"","ImageUrl":"","ShortDesc":"","CategoryId":15,"CategoryName":"Namecheap Market"},{"__type":"Nc:SimpleKB:Abstractions:Dtos:CategoryItemDto","ParentCategoryId":93,"TreatAsTopicYN":false,"Description":"","ImageUrl":"","ShortDesc":"","CategoryId":2186,"CategoryName":"cPanel Email: Client Setup"},{"__type":"Nc:SimpleKB:Abstractions:Dtos:CategoryItemDto","ParentCategoryId":2265,"TreatAsTopicYN":false,"Description":"","ImageUrl":"","ShortDesc":"","CategoryId":2266,"CategoryName":"Windows"},{"__type":"Nc:SimpleKB:Abstractions:Dtos:CategoryItemDto","ParentCategoryId":2239,"TreatAsTopicYN":false,"Description":"","ImageUrl":"","ShortDesc":"","CategoryId":2287,"CategoryName":"SSL questions"},{"__type":"Nc:SimpleKB:Abstractions:Dtos:CategoryItemDto","ParentCategoryId":2265,"TreatAsTopicYN":false,"Description":"","ImageUrl":"","ShortDesc":"","CategoryId":2267,"CategoryName":"Android"},{"__type":"Nc:SimpleKB:Abstractions:Dtos:CategoryItemDto","ParentCategoryId":34,"TreatAsTopicYN":false,"Description":"","ImageUrl":"","ShortDesc":"","CategoryId":2208,"CategoryName":"3rd Party Services Setup"},{"__type":"Nc:SimpleKB:Abstractions:Dtos:CategoryItemDto","ParentCategoryId":93,"TreatAsTopicYN":false,"Description":"","ImageUrl":"","ShortDesc":"","CategoryId":2204,"CategoryName":"Private Email: Video Overview"},{"__type":"Nc:SimpleKB:Abstractions:Dtos:CategoryItemDto","ParentCategoryId":0,"TreatAsTopicYN":false,"Description":"","ImageUrl":"/assets/img/pictograms/150/security-red.png","ShortDesc":"","CategoryId":14,"CategoryName":"SSL Certificates","SubCategories":[{"__type":"Nc:SimpleKB:Abstractions:Dtos:CategoryItemDto","ParentCategoryId":14,"TreatAsTopicYN":false,"Description":"","ImageUrl":"","ShortDesc":"","CategoryId":2217,"CategoryName":"Renewal"},{"__type":"Nc:SimpleKB:Abstractions:Dtos:CategoryItemDto","ParentCategoryId":14,"TreatAsTopicYN":false,"Description":"","ImageUrl":"","ShortDesc":"","CategoryId":2218,"CategoryName":"cPanel SSL Plugin"},{"__type":"Nc:SimpleKB:Abstractions:Dtos:CategoryItemDto","ParentCategoryId":14,"TreatAsTopicYN":false,"Description":"","ImageUrl":"","ShortDesc":"","CategoryId":2221,"CategoryName":"Multi-Domain SSL Certificates"},{"__type":"Nc:SimpleKB:Abstractions:Dtos:CategoryItemDto","ParentCategoryId":14,"TreatAsTopicYN":false,"Description":"","ImageUrl":"","ShortDesc":"","CategoryId":2222,"CategoryName":"Cancellation"},{"__type":"Nc:SimpleKB:Abstractions:Dtos:CategoryItemDto","ParentCategoryId":14,"TreatAsTopicYN":false,"Description":"","ImageUrl":"","ShortDesc":"","CategoryId":2223,"CategoryName":"Browser errors"},{"__type":"Nc:SimpleKB:Abstractions:Dtos:CategoryItemDto","ParentCategoryId":14,"TreatAsTopicYN":false,"Description":"","ImageUrl":"","ShortDesc":"","CategoryId":2224,"CategoryName":"Site Seal, Logo"},{"__type":"Nc:SimpleKB:Abstractions:Dtos:CategoryItemDto","ParentCategoryId":14,"TreatAsTopicYN":false,"Description":"","ImageUrl":"","ShortDesc":"","CategoryId":2238,"CategoryName":"SSL installation errors"},{"__type":"Nc:SimpleKB:Abstractions:Dtos:CategoryItemDto","ParentCategoryId":14,"TreatAsTopicYN":false,"Description":"","ImageUrl":"","ShortDesc":"","CategoryId":2290,"CategoryName":"CSR code"},{"__type":"Nc:SimpleKB:Abstractions:Dtos:CategoryItemDto","ParentCategoryId":14,"TreatAsTopicYN":false,"Description":"","ImageUrl":"","ShortDesc":"","CategoryId":2293,"CategoryName":"Automated SSL management"},{"__type":"Nc:SimpleKB:Abstractions:Dtos:CategoryItemDto","ParentCategoryId":14,"TreatAsTopicYN":false,"Description":"","ImageUrl":"","ShortDesc":"","CategoryId":38,"CategoryName":"SSL General"},{"__type":"Nc:SimpleKB:Abstractions:Dtos:CategoryItemDto","ParentCategoryId":14,"TreatAsTopicYN":false,"Description":"","ImageUrl":"","ShortDesc":"","CategoryId":67,"CategoryName":"Activation"},{"__type":"Nc:SimpleKB:Abstractions:Dtos:CategoryItemDto","ParentCategoryId":14,"TreatAsTopicYN":false,"Description":"","ImageUrl":"","ShortDesc":"","CategoryId":68,"CategoryName":"Validation"},{"__type":"Nc:SimpleKB:Abstractions:Dtos:CategoryItemDto","ParentCategoryId":14,"TreatAsTopicYN":false,"Description":"","ImageUrl":"","ShortDesc":"","CategoryId":69,"CategoryName":"Installation"},{"__type":"Nc:SimpleKB:Abstractions:Dtos:CategoryItemDto","ParentCategoryId":14,"TreatAsTopicYN":false,"Description":"","ImageUrl":"","ShortDesc":"","CategoryId":70,"CategoryName":"Reissuance"}]},{"__type":"Nc:SimpleKB:Abstractions:Dtos:CategoryItemDto","ParentCategoryId":0,"TreatAsTopicYN":true,"Description":"","ImageUrl":"/assets/img/pictograms/150/performance-red.png","ShortDesc":"","CategoryId":9,"CategoryName":"My Account","SubCategories":[{"__type":"Nc:SimpleKB:Abstractions:Dtos:CategoryItemDto","ParentCategoryId":9,"TreatAsTopicYN":false,"Description":"","ImageUrl":"","ShortDesc":"","CategoryId":45,"CategoryName":"Account Security"},{"__type":"Nc:SimpleKB:Abstractions:Dtos:CategoryItemDto","ParentCategoryId":9,"TreatAsTopicYN":false,"Description":"","ImageUrl":"","ShortDesc":"","CategoryId":43,"CategoryName":"Profile Management"},{"__type":"Nc:SimpleKB:Abstractions:Dtos:CategoryItemDto","ParentCategoryId":9,"TreatAsTopicYN":false,"Description":"","ImageUrl":"","ShortDesc":"","CategoryId":44,"CategoryName":"Account Access"}]},{"__type":"Nc:SimpleKB:Abstractions:Dtos:CategoryItemDto","ParentCategoryId":34,"TreatAsTopicYN":false,"Description":"","ImageUrl":"","ShortDesc":"","CategoryId":2278,"CategoryName":"Handshake TLDs"},{"__type":"Nc:SimpleKB:Abstractions:Dtos:CategoryItemDto","ParentCategoryId":12,"TreatAsTopicYN":false,"Description":"","ImageUrl":"","ShortDesc":"","CategoryId":103,"CategoryName":"LVE (CloudLinux)"},{"__type":"Nc:SimpleKB:Abstractions:Dtos:CategoryItemDto","ParentCategoryId":0,"TreatAsTopicYN":false,"Description":"","ImageUrl":"/assets/img/pictograms/150/affiliates-red.png","ShortDesc":"","CategoryId":55,"CategoryName":"Affiliates","SubCategories":[]},{"__type":"Nc:SimpleKB:Abstractions:Dtos:CategoryItemDto","ParentCategoryId":12,"TreatAsTopicYN":false,"Description":"","ImageUrl":"","ShortDesc":"","CategoryId":89,"CategoryName":"SSH Access"},{"__type":"Nc:SimpleKB:Abstractions:Dtos:CategoryItemDto","ParentCategoryId":0,"TreatAsTopicYN":false,"Description":"","ImageUrl":"/assets/img/pictograms/150/tools-red.png","ShortDesc":"","CategoryId":2211,"CategoryName":"API & Resellers","SubCategories":[{"__type":"Nc:SimpleKB:Abstractions:Dtos:CategoryItemDto","ParentCategoryId":2211,"TreatAsTopicYN":false,"Description":"","ImageUrl":"","ShortDesc":"","CategoryId":2227,"CategoryName":"SSL Resellers"},{"__type":"Nc:SimpleKB:Abstractions:Dtos:CategoryItemDto","ParentCategoryId":2211,"TreatAsTopicYN":false,"Description":"","ImageUrl":"","ShortDesc":"","CategoryId":2229,"CategoryName":"Hosting Resellers"},{"__type":"Nc:SimpleKB:Abstractions:Dtos:CategoryItemDto","ParentCategoryId":2211,"TreatAsTopicYN":false,"Description":"","ImageUrl":"","ShortDesc":"","CategoryId":63,"CategoryName":"Namecheap API"},{"__type":"Nc:SimpleKB:Abstractions:Dtos:CategoryItemDto","ParentCategoryId":2211,"TreatAsTopicYN":false,"Description":"","ImageUrl":"","ShortDesc":"","CategoryId":2196,"CategoryName":"WHMCS module for SSL"}]},{"__type":"Nc:SimpleKB:Abstractions:Dtos:CategoryItemDto","ParentCategoryId":0,"TreatAsTopicYN":false,"Description":"","ImageUrl":"/assets/img/pictograms/150/timer-red.png","ShortDesc":"","CategoryId":2212,"CategoryName":"Legacy Products","SubCategories":[]},{"__type":"Nc:SimpleKB:Abstractions:Dtos:CategoryItemDto","ParentCategoryId":12,"TreatAsTopicYN":false,"Description":"","ImageUrl":"","ShortDesc":"","CategoryId":205,"CategoryName":"FTP questions"},{"__type":"Nc:SimpleKB:Abstractions:Dtos:CategoryItemDto","ParentCategoryId":12,"TreatAsTopicYN":false,"Description":"","ImageUrl":"","ShortDesc":"","CategoryId":2180,"CategoryName":"MySQL questions"},{"__type":"Nc:SimpleKB:Abstractions:Dtos:CategoryItemDto","ParentCategoryId":12,"TreatAsTopicYN":false,"Description":"","ImageUrl":"","ShortDesc":"","CategoryId":2199,"CategoryName":"Hosting Migration"},{"__type":"Nc:SimpleKB:Abstractions:Dtos:CategoryItemDto","ParentCategoryId":0,"TreatAsTopicYN":false,"Description":"","ImageUrl":"/assets/img/pictograms/150/premiumdns-red.png","ShortDesc":"","CategoryId":2231,"CategoryName":"PremiumDNS","SubCategories":[]},{"__type":"Nc:SimpleKB:Abstractions:Dtos:CategoryItemDto","ParentCategoryId":12,"TreatAsTopicYN":false,"Description":"","ImageUrl":"","ShortDesc":"","CategoryId":2194,"CategoryName":"Tips & Tricks"},{"__type":"Nc:SimpleKB:Abstractions:Dtos:CategoryItemDto","ParentCategoryId":0,"TreatAsTopicYN":false,"Description":"","ImageUrl":"https://static.nc-img.com/live-resource/icons/knowledgebase/fastVPN_icon-150px.png","ShortDesc":"","CategoryId":2265,"CategoryName":"FastVPN","SubCategories":[{"__type":"Nc:SimpleKB:Abstractions:Dtos:CategoryItemDto","ParentCategoryId":2265,"TreatAsTopicYN":false,"Description":"","ImageUrl":"","ShortDesc":"","CategoryId":2292,"CategoryName":"Browser Extensions"},{"__type":"Nc:SimpleKB:Abstractions:Dtos:CategoryItemDto","ParentCategoryId":2265,"TreatAsTopicYN":false,"Description":"","ImageUrl":"","ShortDesc":"","CategoryId":2274,"CategoryName":"General"},{"__type":"Nc:SimpleKB:Abstractions:Dtos:CategoryItemDto","ParentCategoryId":2265,"TreatAsTopicYN":false,"Description":"","ImageUrl":"","ShortDesc":"","CategoryId":2270,"CategoryName":"Routers"},{"__type":"Nc:SimpleKB:Abstractions:Dtos:CategoryItemDto","ParentCategoryId":2265,"TreatAsTopicYN":false,"Description":"","ImageUrl":"","ShortDesc":"","CategoryId":2272,"CategoryName":"TV"},{"__type":"Nc:SimpleKB:Abstractions:Dtos:CategoryItemDto","ParentCategoryId":2265,"TreatAsTopicYN":false,"Description":"","ImageUrl":"","ShortDesc":"","CategoryId":2273,"CategoryName":"Gaming Consoles"},{"__type":"Nc:SimpleKB:Abstractions:Dtos:CategoryItemDto","ParentCategoryId":2265,"TreatAsTopicYN":false,"Description":"","ImageUrl":"","ShortDesc":"","CategoryId":2268,"CategoryName":"macOS"},{"__type":"Nc:SimpleKB:Abstractions:Dtos:CategoryItemDto","ParentCategoryId":2265,"TreatAsTopicYN":false,"Description":"","ImageUrl":"","ShortDesc":"","CategoryId":2269,"CategoryName":"iOS"},{"__type":"Nc:SimpleKB:Abstractions:Dtos:CategoryItemDto","ParentCategoryId":2265,"TreatAsTopicYN":false,"Description":"","ImageUrl":"","ShortDesc":"","CategoryId":2271,"CategoryName":"Linux"},{"__type":"Nc:SimpleKB:Abstractions:Dtos:CategoryItemDto","ParentCategoryId":2265,"TreatAsTopicYN":false,"Description":"","ImageUrl":"","ShortDesc":"","CategoryId":2266,"CategoryName":"Windows"},{"__type":"Nc:SimpleKB:Abstractions:Dtos:CategoryItemDto","ParentCategoryId":2265,"TreatAsTopicYN":false,"Description":"","ImageUrl":"","ShortDesc":"","CategoryId":2267,"CategoryName":"Android"}]},{"__type":"Nc:SimpleKB:Abstractions:Dtos:CategoryItemDto","ParentCategoryId":12,"TreatAsTopicYN":false,"Description":"","ImageUrl":"","ShortDesc":"","CategoryId":239,"CategoryName":"WHMCS"},{"__type":"Nc:SimpleKB:Abstractions:Dtos:CategoryItemDto","ParentCategoryId":12,"TreatAsTopicYN":false,"Description":"","ImageUrl":"","ShortDesc":"","CategoryId":33,"CategoryName":"SSL Installation"}],"status":200,"statusText":"OK"}}Setting up a DNS zone with Ubuntu
ssh root@<IP> -pPORT
ssh root@1.2.3.4 -p22
apt-get update

apt-get upgrade

apt-get dist-upgrade
apt-get install bind9 bind9utils bind9-doc
nano /etc/bind/named.conf
include "/etc/bind/named.conf.options";
include "/etc/bind/named.conf.local";
include "/etc/bind/named.conf.default-zones";
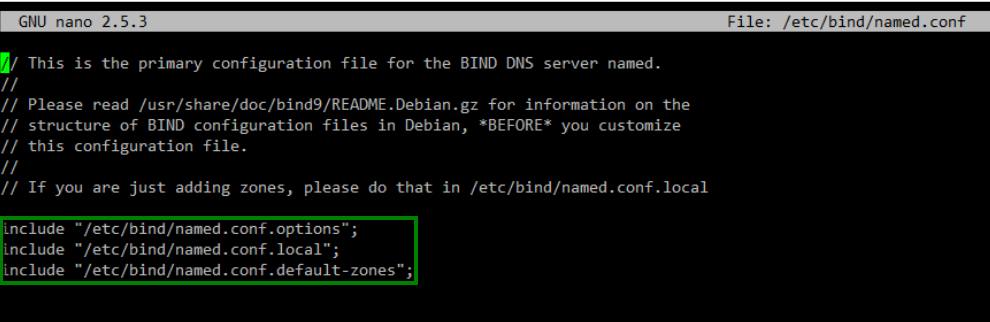
nano /etc/bind/named.conf.local
zone "nctest.info" {
        type master;
        file "/etc/bind/nctest.info";
 };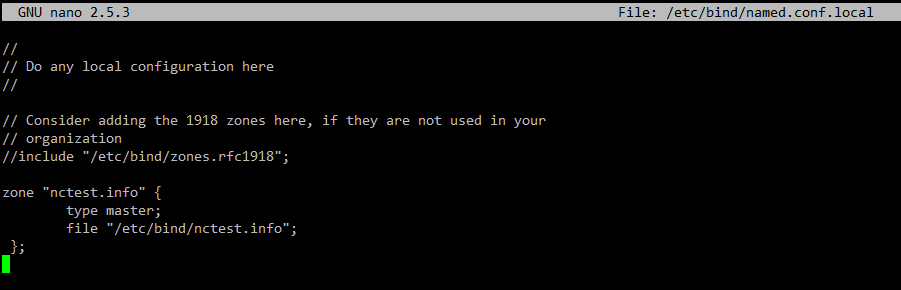
nano /etc/bind/nctest.info
$TTL 86400
@   IN  SOA     ns1.nctest.info. root.nctest.info. (
        2019021501  ;Serial
        3600        ;Refresh
        1800        ;Retry
        604800      ;Expire
        86400       ;Minimum TTL
)
@       IN  NS          ns1.nctest.info.
@       IN  NS          ns2.nctest.info.
ns1     IN  A           1.2.3.4
ns2     IN  A           1.2.3.4
@       IN  A           1.2.3.4
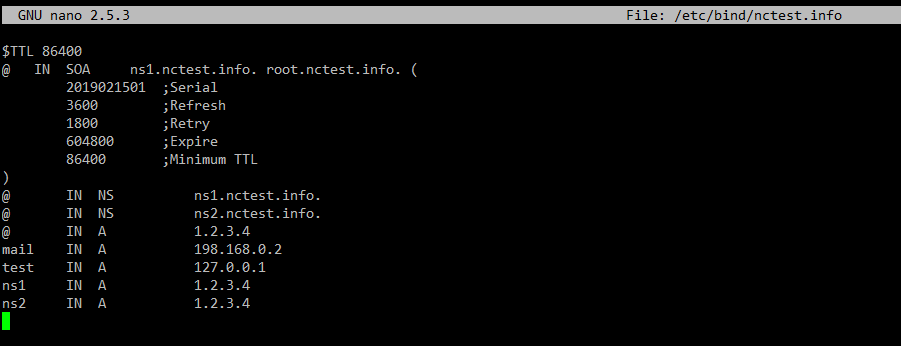
chmod -R 755 /etc/bind
chown -R bind:bind /etc/bind
named-checkconf /etc/bind/named.conf
named-checkconf /etc/bind/named.conf.local
named-checkzone nctest.info /etc/bind/nctest.info
zone nctest.info/IN: loaded serial 2019021501
OK
systemctl restart bind9
Setting up a DNS zone with AlmaLinux
1. First of all, you need to connect to your server via SSH.
On Linux and MacOS, you can use the following command:
ssh root@-pPORT
ssh root@1.2.3.4 -p22
dnf -y update
dnf -y install bind bind-utils
nano /etc/named.conf
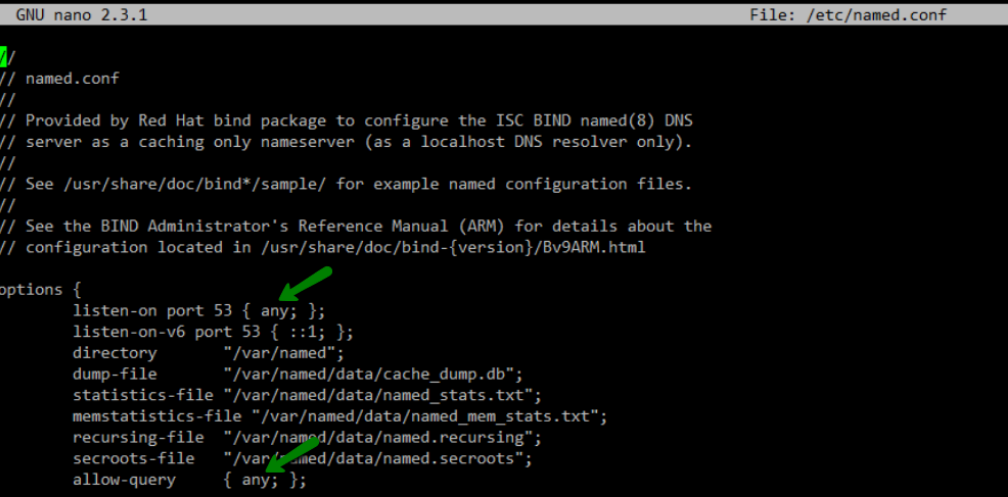
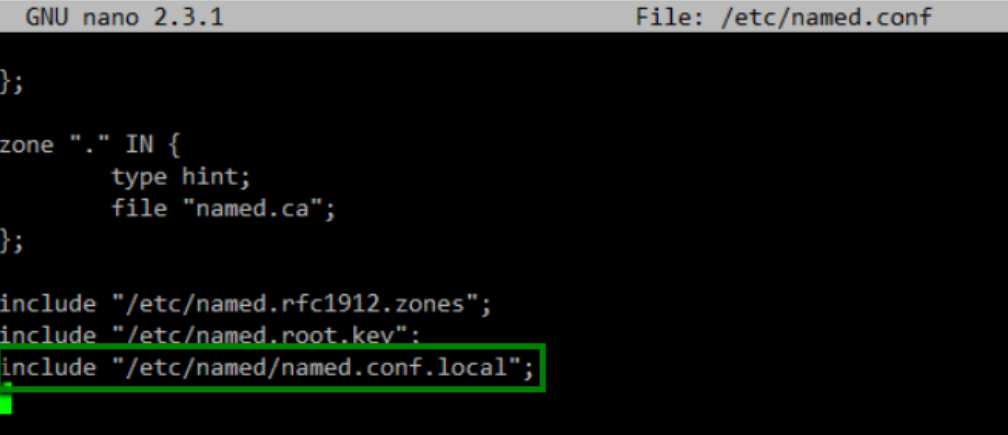
nano /etc/named/named.conf.local
zone "nctest.info" {
        type master;
        file "/etc/named/nctest.info";
 };
nano /etc/named/nctest.info
$TTL 86400
@   IN  SOA     ns1.nctest.info. root.nctest.info. (
        2019021501  ;Serial
        3600        ;Refresh
        1800        ;Retry
        604800      ;Expire
        86400       ;Minimum TTL
)
@       IN  NS          ns1.nctest.info.
@       IN  NS          ns2.nctest.info.
ns1     IN  A           1.2.3.4
ns2     IN  A           1.2.3.4
@       IN  A           1.2.3.4

chmod -R 755 /etc/named
chown -R named:named /etc/named
named-checkconf /etc/named.conf
named-checkconf /etc/named/named.conf.local
named-checkzone nctest.info /etc/named/nctest.info
zone nctest.info/IN: loaded serial 2019021501OK
service named restart
firewall-cmd --add-service=dns --zone=public --permanent
firewall-cmd --reload
Need help? We're always here for you.