$ U.S. Dollar€ Euro£ British PoundC$ Canadian DollarsA$ Australian DollarsRs Indian Rupees¥ China Yuan RMBMore Info
How to set up personal nameservers (Business packages)
If you have a Stellar Business (or our older Business SSD plans), you can set up your own nameservers (ns1.yourdomain.com and ns2.yourdomain.com).
1. Firstly, you’ll need to find the IP address assigned to your hosting account to point your personal nameservers to. Find your IP Address in the Your Hosting Welcome Guide email that was sent when you registered a hosting account. If you no longer have this, you can contact our Customer Support team who are happy to help 24/7.
2. The next step is to register the needed nameservers on the domain registrar end.
If the domain name is registered with us, you can follow this guide to register your own nameservers directly, from inside your Namecheap account.
If your domain is registered with another company, you will need to contact them for assistance.
3. Once the nameservers are successfully registered, you can set them up on your server using the following process:
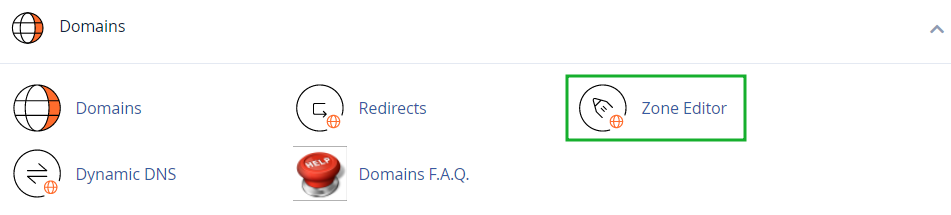
3.1. Access your cPanel account, find the Domains section and choose the Zone Editor menu:
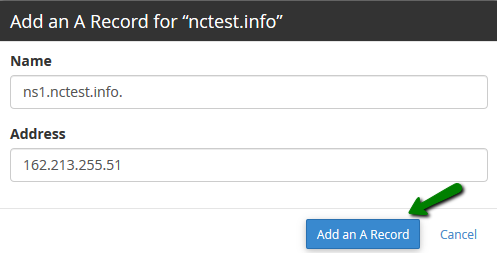
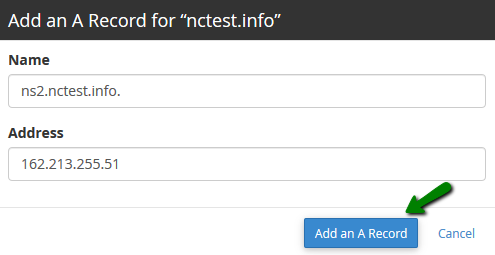
3.2. Click on the +A record icon near your domain name:
3.3. Create two A records for your two personal nameservers with the IP address assigned to your hosting account:
4. As soon as everything is set, please reach out to our Hosting department via Live Chat or email, as we need to update the SOA record and nameservers before it will work.
Don’t forget to point the domain to your new personal nameservers. You can follow this guide if the domain is registered with Namecheap, or contact your domain registrar for the purpose.
Allow 24-72 hours for the DNS changes to propagate worldwide to use your private nameservers.