There are many benefits of using a contact form versus posting an actual email address on your website:
- With a contact form, you can request specific information from your clients (e.g. phone number or company name).
- Customers are more likely to contact you if they can easily find and submit the contact form without having to open their own email program.
- The most important reason for using a contact form is to reduce incoming spam. When you display your email address on your website, there is a good chance that it might end up in the hands of a spammer. For extra security, you can also add reCAPTCHA to your form.
Contact forms can use PHP mail() function or SMTP authentication to send emails. With the PHP mail() function, you send emails directly from your web server without any form of authentication. Unlike PHP mail(), SMTP authentication lets you use the mail server of your choice by specifying the username and password of the email account. If the details are valid, the email is accepted and delivered to the designated recipient.
PHP mail() function
SMTP authentication
Configuring SMTP in WordPress
Using Gmail in a contact form
PHP mail() function
If your script uses
PHP mail() function, you have to configure the
From field of the form with an email account based on the domain hosted on our server. There is no need to create an email account. However, you can also use an email account that was
created in cPanel,
is hosted on our server and
has Local Mail Exchanger. If you want to use a third-party email address in the From field (like Gmail,
Private Email, etc) or avoid via cPanel user@server part, SMTP authentication is required.
If your domain uses a third-party email service, but you still want to configure PHP mail() you can create a
subdomain and an
email account for the subdomain and set it with local email routing.
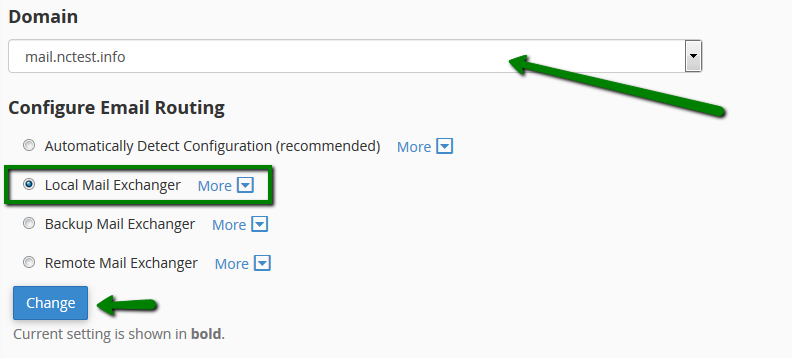
To set email routing to Local, go to cPanel >> the Email section >> the Email Routing menu:
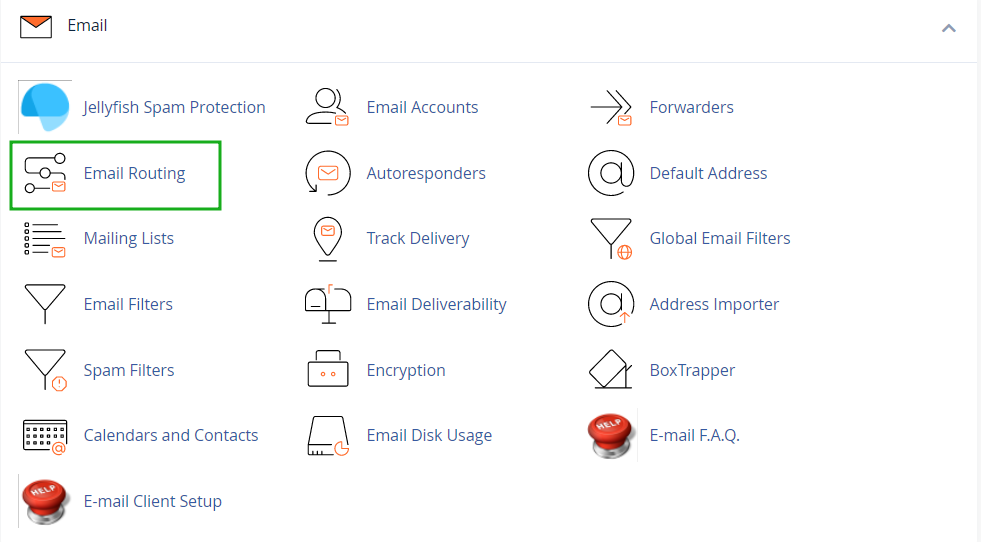
Select your subdomain (or domain) from the drop-down list, select Local Mail Exchanger, and click Change:
An example of simple PHP mail() code:
<?
$mail_to_send_to = "name@anydomain.tld";
$from_email = "from@yourdomain.tld";
$sendflag = $_REQUEST['sendflag'];
$name=$_REQUEST['name'];
if ( $sendflag == "send" )
{
$subject= "Message subject";
$email = $_REQUEST['email'] ;
$message= "\r\n" . "Name: $name" . "\r\n"; //get recipient name in contact form
$message = $message.$_REQUEST['message'] . "\r\n" ;//add message from the contact form to existing message(name of the client)
$headers = "From: $from_email" . "\r\n" . "Reply-To: $email" ;
$a = mail( $mail_to_send_to, $subject, $message, $headers );
if ($a)
{
print("Message was sent, you can send another one");
} else {
print("Message wasn't sent, please check that you have changed emails in the bottom");
}
}
?>
In the code above:
- $mail_to_send_to = "name@anydomain.tld" identifies the email address the message will be sent to. It can be any email address, including third-party services like Gmail, Yahoo, etc.
- $from_email = "from@yourdomain.tld" identifies the email address the message will be sent from. It should be a local email address (created in cPanel)
- Reply-To: $email" is the email address of the site visitor, assuming they specify one in the "Your email" field of the contact form. This email is then assigned as the "Reply To" address.
To make it work, you also need to create an .html file in the website's folder and paste the following:
<form method="POST" action="file_with_php_fucntion.php" id="contact-form">
<h2>Contact us</h2>
<p><label>First Name:</label> <input name="name" type="text" /></p>
<p><label>Email Address:</label> <input style="cursor: pointer;" name="email" type="text" /></p>
<p><label>Message:</label> <textarea name="message"></textarea> </p>
<p><input name="sendflag" type="submit" value="send" /></p>
</form>
Remember to replace
file_with_php_fucntion.php with the name of the file with PHP mail() code.
SMTP authentication
Simple Mail Transfer Protocol is a standard protocol used for sending emails. SMTP uses authentication (a login with a username and password) which increases email deliverability.
To use SMTP authentication you need:
- username (your full email address in most cases);
- password (password from that email account);
- hostname (server from which the emails are sent);
- port (465 with SSL, 587/25 with TLS);
- type of encrypted connection: SSL or TLS.
In order to be able to use SMTP protocol on the
shared hosting servers, you will need to install PHPmailer or a similar framework for your website. Feel free to use the steps below to configure PHPmailer; if you would like to use another framework on Shared hosting, you can apply it on your side as well.
PHPmailer installation
There are two installation methods available on our servers - installation using Composer and manual installation.
If your website is using Composer, you can simply add it to your requirements in the Composer.json file:
phpmailer/phpmailer
Alternatively, you can install it via ssh with the following command:
composer require phpmailer/phpmailer
PLEASE NOTE: Make sure to run the above command from the root directory of your website.
Manual installation
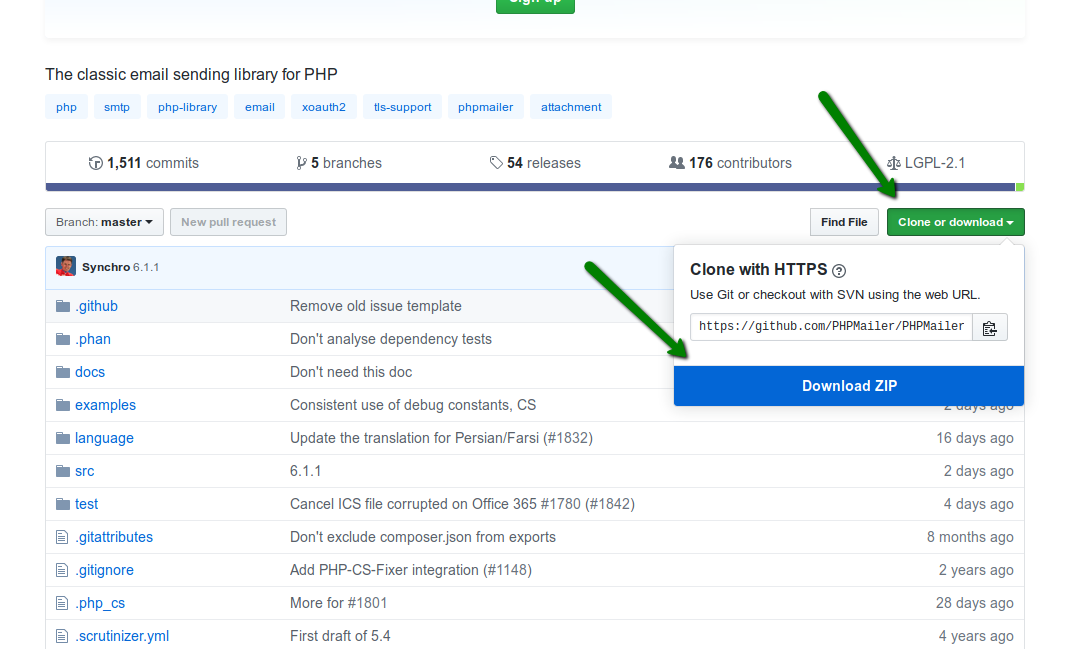
1. Click on Clone or Download >> Download ZIP:
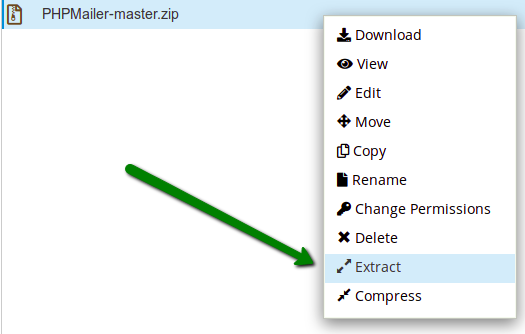
2. Upload the PHPMailer-master.zip archive to your website’s folder and extract it:
3. Include the PHPmailer files in your script as shown in the example below.
SMTP code example
NOTE: replace /home/nctests/public_html/PHPMailer-master/src with the actual path to the PHPMailer-master/src folder if you are doing manual PHPmailer installation:
If you are using composer - load Composer's autoloader:
use PHPMailer\PHPMailer\PHPMailer;
use PHPMailer\PHPMailer\SMTP;
use PHPMailer\PHPMailer\Exception;
require 'vendor/autoload.php';
If you are not using composer - load the PHPmailer class files directly:
use PHPMailer\PHPMailer\PHPMailer;
use PHPMailer\PHPMailer\SMTP;
use PHPMailer\PHPMailer\Exception;
require '/home/nctests/public_html/PHPMailer-master/src/Exception.php';
require '/home/nctests/public_html/PHPMailer-master/src/PHPMailer.php';
require '/home/nctests/public_html/PHPMailer-master/src/SMTP.php';
The SMTP mail code looks like this:
function sendmail($to,$nameto,$subject,$message,$altmess) {
$from = "youremail@domain.tld";
$namefrom = "Your Name";
$mail = new PHPMailer();
$mail->SMTPDebug = 0;
$mail->CharSet = 'UTF-8';
$mail->isSMTP();
$mail->SMTPAuth = true;
$mail->Host = "smtp.host.tld";
$mail->Port = 465;
$mail->Username = $from;
$mail->Password = "pass123";
$mail->SMTPSecure = "ssl";
$mail->setFrom($from,$namefrom);
$mail->addCC($from,$namefrom);
$mail->Subject = $subject;
$mail->isHTML();
$mail->Body = $message;
$mail->AltBody = $altmess;
$mail->addAddress($to, $nameto);
return $mail->send();
}
In the code above:
- $namefrom = Your Name is the name your recipient will see next to your email in the inbox
- $mail->Username is your full email address
- $mail->Password is the password to that email account
- $mail->SMTPAuth - enabling SMTP authentication
- $mail->Host is the hostname of the server that sends the emails
- $mail->Port is the SMTP port
- $mail->SMTPSecure is the type of the encryption
SMTP in WordPress
By default, WordPress uses PHP mail() function to send emails. If you want to send WordPress mail from a third-party mail server or use SMTP authentication with your cPanel email account, you need to install an SMTP plugin. There are several SMTP plugins for WordPress. We will use the
WP Mail SMTP plugin in this example.
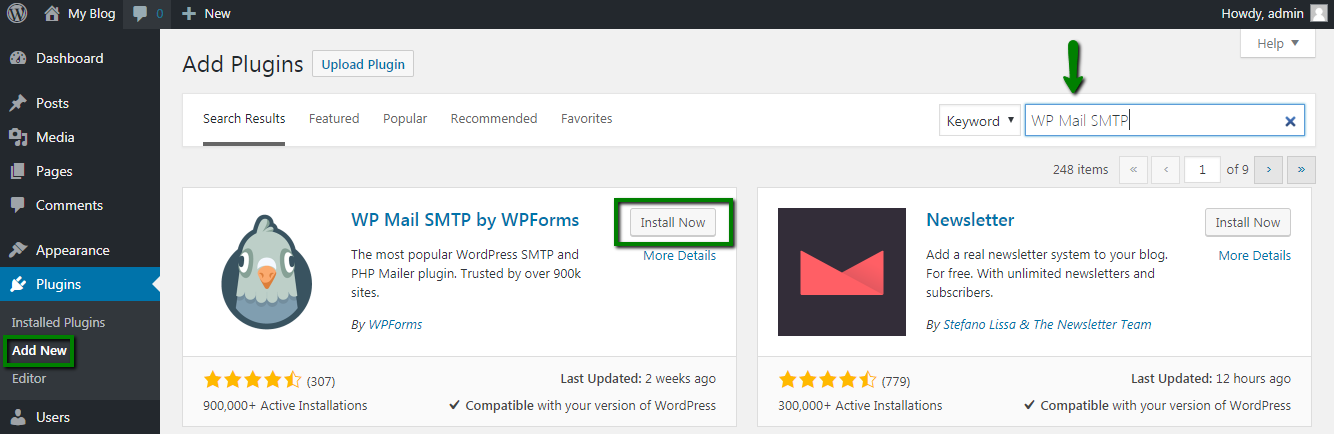
1. Log into your
WordPress admin dashboard and go to
Plugins >>
Add New >> search for the
WP Mail SMTP plugin and click
Install Now:
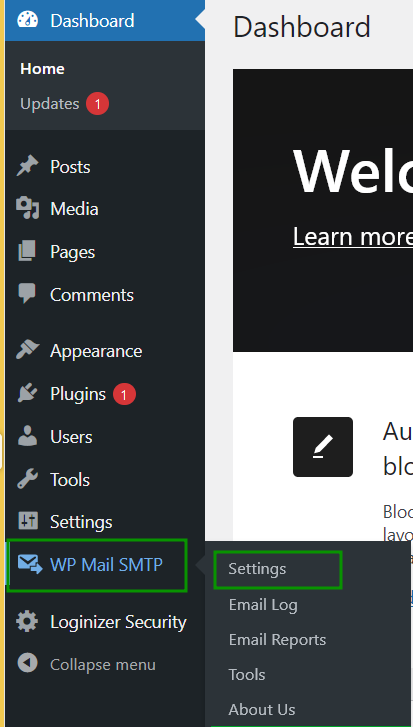
2. Once installed, click
Activate. Then, go to
WP Mail SMTP >>
Settings to configure the plugin settings:
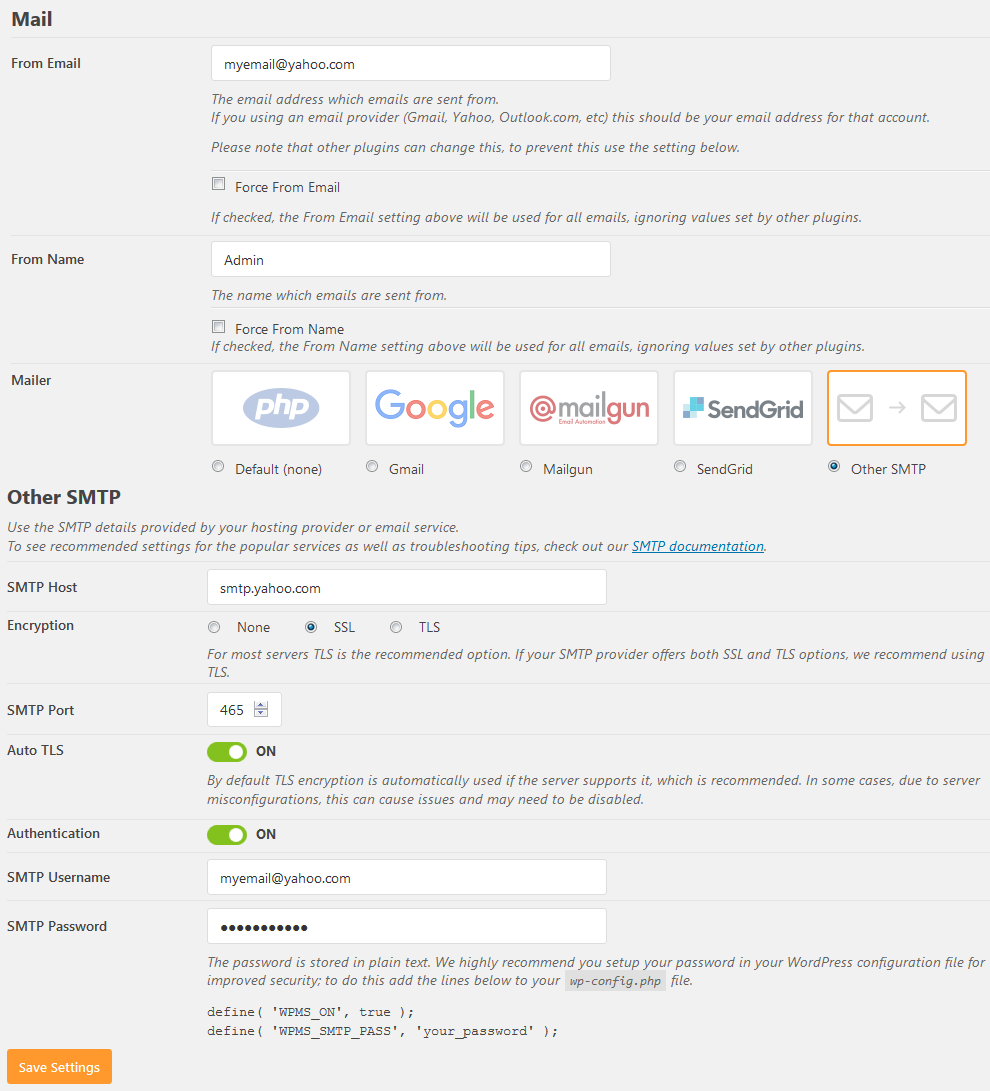
3. You can find an example of the SMTP setup below:
- From Email - the email address you want to use to send all WordPress emails from
- From Name - the name that the emails will be sent from
- Mailer - choose Other
- SMTP Host - hostname of the outgoing mail server (mail.privateemail.com for Private Email; smtp.yahoo.com for Yahoo mail; server your account is hosted on for cPanel email, etc.)
- Encryption - TLS or SSL
- SMTP Port - 465 (SSL) or 587 (TLS)
- Auto TLS - if your server supports TLS encryption, you may enable this option
- Authentication - On
- SMTP Username - full email address
- SMTP Password - password for that email address
NOTE: If you want to use the Yahoo email address with the WP Mail SMTP plugin, it is necessary to use the generated password from the Yahoo account. To do it, please log in to your Yahoo account and go to the
“Account security” page. At the bottom of the page, you will see the “Generate app password” and click on it. Then from the dropdown select “Other app”, give it a name (“WP Mail SMTP” for example), and click on “Generate”.
Copy and use the generated password in the WP Mail SMTP plugin settings (Other SMTP mailer >> password field).
TIP: If you set up a contact form to work with a Private Email mailbox, you didn't spot any obvious misconfiguration (e.g., typos), but the contact form doesn't work, it is worth trying to disable Auto TLS and test again.
Enter all the details and click Save Settings.
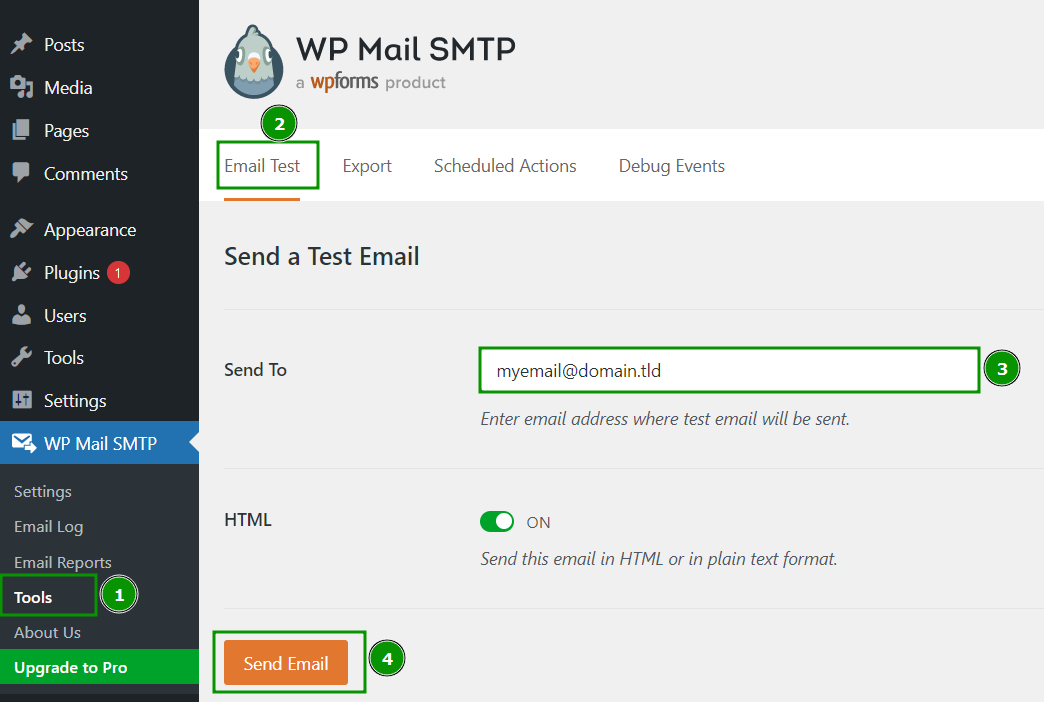
To test the configuration, go to the
WP Mail SMTP >>
Tools >>
Email Test tab, enter your email, and click the
Send Email button. Check your email for the test email:
For more information on how to set up WordPress Contact Form 7, click
here.
Using Gmail in a contact form
If you try to set up the SMTP authentication with the Gmail address, Google may block sign-in attempts from IPs that are located far from the usual geographical location of the mailbox owner. In such case, the “Suspicious sign-in is prevented” email will appear in the Gmail inbox.
To be able to use a Gmail email address in your contact form, it is needed to use the
Gmail API method. This only applies if you want to send
From the Gmail account. Skip this part if you use Gmail only in the
To field.
This method allows sending emails using Gmail’s API instead of just entering the SMTP server details, which also has the benefit of avoiding issues with Google's two-factor authentication.
For this, you will need to generate an app password so that the app can connect. The instructions on the detailed setup can be found in
this guide.
That's it!