| Subtotal | $0.00 |
| Subtotal | $0.00 |
If you just got an issued SSL certificate and are having a hard time finding the corresponding Private key, this article can help you to find that one and only key for your certificate.
Firstly, let’s dive into basics a little. The design of global public key infrastructure, relying on which modern secure negotiation through SSL/TLS is possible, implies that there is always a pair of unique keys.
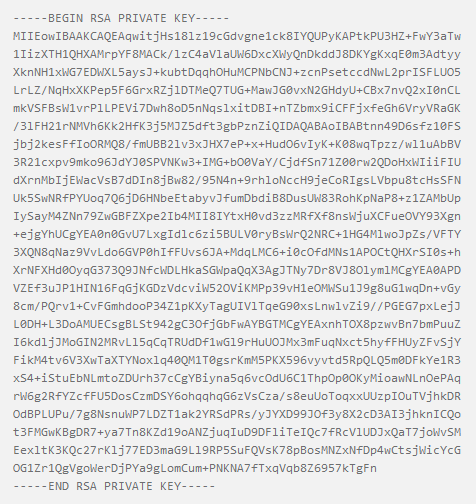
Nonetheless, in most cases, this code won’t come into your sight while generating the CSR. It is usually created in the background and silently saved in the server’s filesystem. And obviously, during the SSL certificate installation the key should be fetched to the certificate automatically. However, some systems do not have such a kind of behavior or sometimes we need to install the certificate on another server. These are the examples of the cases when we really need to know the exact location of the Private key.
Below you can find tips, examples and pieces of advice that you can consider to follow in order to get a missing puzzle and avoid certificate reissue (i.e., repeating the process of activation and validation from scratch).
Linux operating systems (Apache, Nginx, Lighttpd, Heroku)
Traditionally, Private keys on Linux-based operating systems (Ubuntu, Debian, CentOS, RedHat, etc.) are openssl generated keys with the crypto toolkit and saved into files with the .key or .pem extension. However, since specific extensions are not obligatory for simple text files on Linux systems, the Private key code can be put into a file with virtually any name.
If you remember the full or partial name of the .key file, you can try to get its location by running the ‘find’ command as below:
sudo find [search_start_folder] -type f -iname 'private.key'
- [search_start_folder] parameter indicates the directory to start the search from and through all directories inside it, for example, to search from "root", the / sign should be specified;
- to do the search by a partial filename, the assumed name of the file should be specified with an asterisk (*), for example, the "*.key" value allows locating every file with the name ending with ".key".
HINT: Very often, the name of the key file resembles the domain name the certificate is issued for, e.g., "example.com.key", "example_com.key", "example-com.key" etc.
Another way to get the Private key file location is to search inside the files by certain patterns:
grep -r --exclude-dir=log --exclude-dir=ssh --exclude=*history -I -l -e '-----BEGIN PRIVATE*' -e '-----BEGIN RSA*' -e '-----BEGIN EC*' [search_start_folder] 2> /dev/null
This one-liner command prints out an absolute path to the file, which contains a matching expression (------BEGIN header), for example, "/etc/ssl/private.key".
Windows operating systems (IIS, Exchange, Small Business server)
Windows systems do not allow retrieving the Private key in plain text. When an SSL certificate is imported either through Microsoft Management Console (MMC) or IIS, the matching Private key is bound to the certificate automatically, of course, if the certificate is being imported to the same instance the key was generated on. But if we need to get the Private key for example for the certificate installation on another server, there is an option to export the key in a password protected file (PFX or PKCS12 format). To do so, you will need to open MMC Certificates snap-in in the following way:
Win+R > mmc.exe > OK > File > Add/Remove Snap-in > Certificates > Add > Computer account > Next > Local computer > Finish > OK
Then navigate to Certificate Enrollment Requests > Certificates (if the certificate request was not completed) or Personal > Certificates (if the certificate request was already completed) folder, right-click on the certificate entry and click All Tasks > Export to open the export wizard. More details on the export process can be found here.

As a result, you will receive a .pfx file containing the key. To get the key in plain text, you can convert the .pfx into PEM-encoded files using tool (PKCS#12 to PEM option).
Mac OS X
The default "Keychain" tool in the Server app does not allow accessing the generated Private key through the graphic user interface. However, using the command line tools in Terminal, it is possible to navigate to the "/etc/certificates" folder and open the key file, which should be called something like ".key.pem".
Tomcat (using keytool)
Unless the SSL connector on Tomcat is configured in APR style, the Private key is usually stored in a password-protected Java keystore file (.jks or .keystore), which was created prior to the CSR. To extract the key in PEM format, the keystore should be converted into .pfx/.p12 (PKCS#12) file firstly. With the "keytool" utility, it can be done with the help of the following command:
keytool -importkeystore -srckeystore keystore.jks -destkeystore keystore.p12 -deststoretype PKCS12 -srcalias
"keystore.jks" should be replaced with the name of the keystore, containing the required key; "keystore.p12" - with the name of the .pfx/.p12 file the keystore will be converted into;
When the .pfx/.p12 file is created, it can be converted into PEM formatted files either with the help of this tool (PKCS#12 to PEM option) or using OpenSSL. The OpenSSL command would be:
openssl pkcs12 -in keystore.p12 -nocerts -nodes -out private.key
- ‘private.key’ refers to the name of the file the Private key text will be saved to.
cPanel
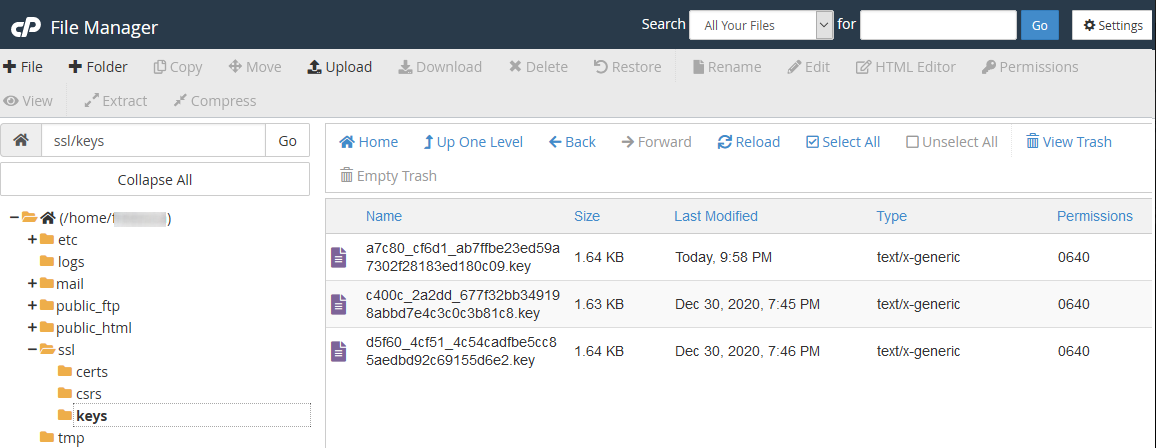
There are 2 ways to get to the Private key in cPanel:
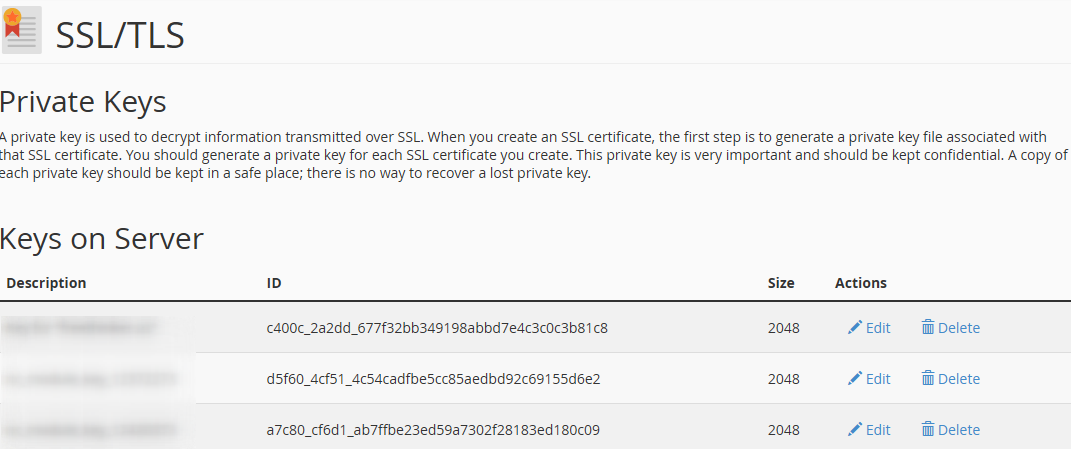
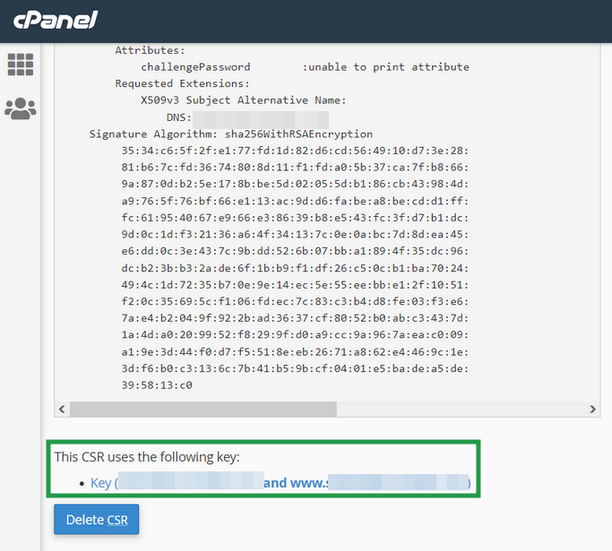
There's another menu in the "SSL/TLS" section that allows to find the matching Private key for the certificate. Click on "Certificate Signing Request (CSR)" and locate your CSR by the domain.
Scroll the next page down, where you can see the "This CSR uses the following key" option and a link below it to obtain the Private key:
WHM
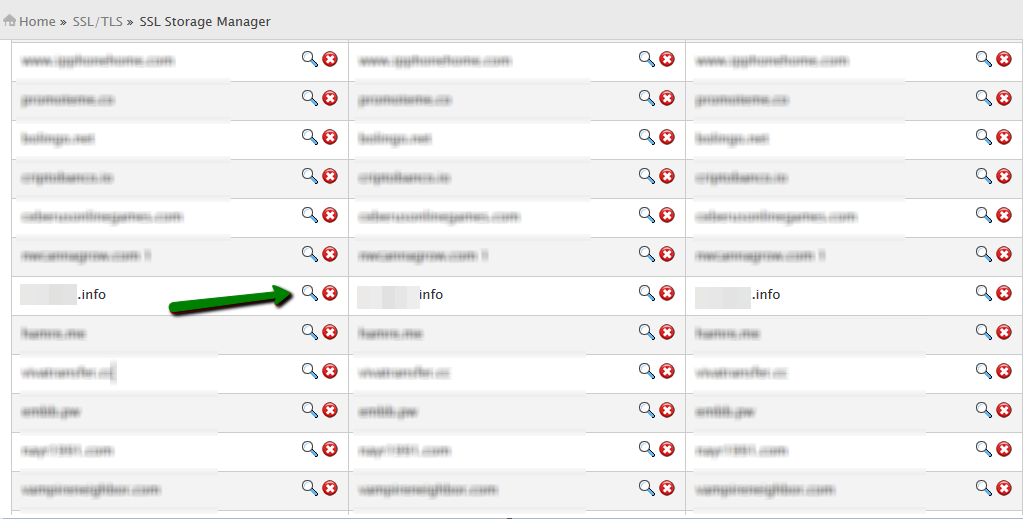
In WHM the Private keys are stored along with the corresponding CSRs and certificates in "SSL Storage manager". To get there, you can click "SSL/TLS" on the home screen and then on the "SSL Storage manager". To open the Private key text, you will need to click on the magnifier button in the first column called "Key".
Plesk
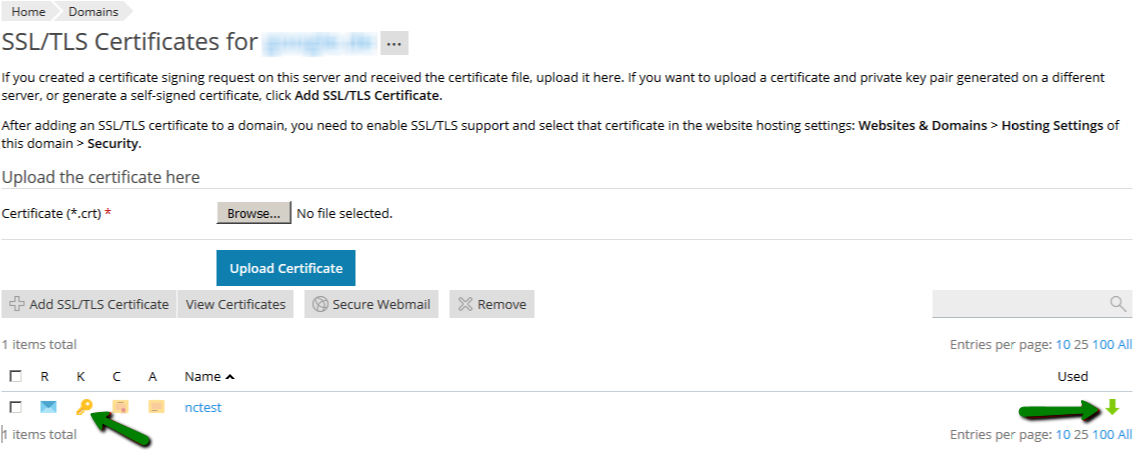
After navigating to Domains > domain.com > SSL/TLS certificates, you should see the page similar to the one on the screenshot below. The key sign with the message "Private key part supplied" indicates the presence of the needed key in the system. To open it in plain text, you will need to click on the name of the entry and scroll down until the key code appears on the screen. Alternatively, you can click on the green arrow sign on the right and download the .pem file containing the key, the CSR and the certificate along with the CA bundle, if they were imported already. The .pem file can be opened with any text editor like Notepad:
Synology NAS DSM
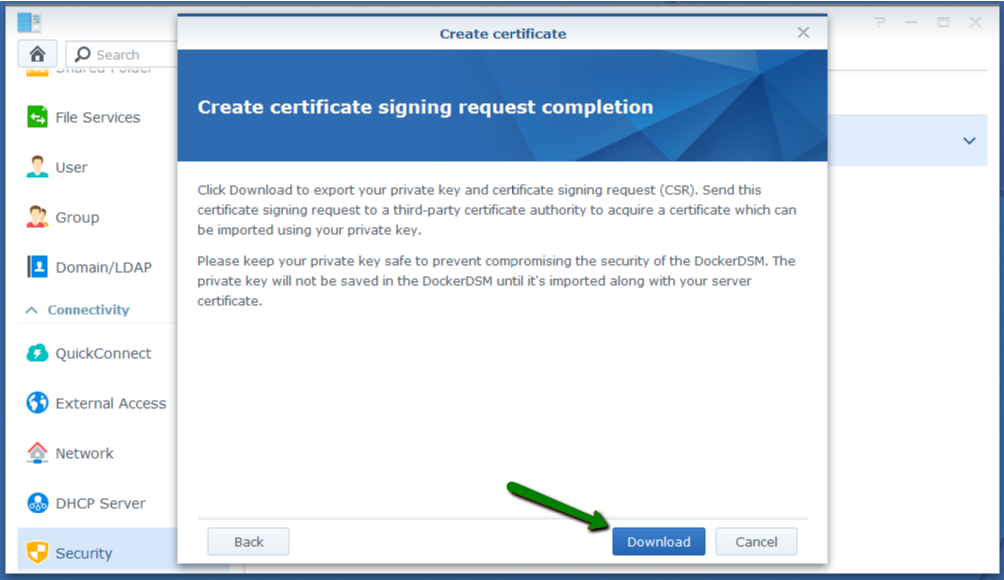
In Synology DSM, the Private key is downloaded in the archive.zip file on the last step of the CSR generation wizard. It is saved in the server.key file inside the .zip archive and can be opened on a local computer with a text editor:
Webmin
The Webmin panel was designed as a graphic user interface on top of the command line tools, although it comes with the File manager (Filemin) which can be used for browsing the file system in order to find the key file, which was created by the OpenSSL command in Command Shell when the CSR was generated.

The other way to find the Private key in Webmin is to open "Command shell" under the "Others" section and run the "Find" or "grep" command from the "Linux operating systems" paragraph of this article.
VestaCP
The Private key on VestaCP is not saved anywhere throughout the user interface; it is necessary to save the key text into a local file during the CSR generation.
However, there is still a chance to find it through SSH. When VestaCP creates a new CSR, the Private key is stored as a temporary file in the "/tmp" directory. The absolute path to the key file might look like "/tmp/tmp.npAnkmWFcu/example.com.key", for example. The main bottleneck here is that the files inside "/tmp" are deleted permanently during each server reboot.
To get the location of the key file on your instance, the following command can be invoked:
find /tmp -type f -iname 'domain.com.key'
- "domain.com" should be replaced with the actual domain name the CSR was generated for.
Alternatively, the same old "grep" can be used as well:
grep -r -I -l -e ‘-----BEGIN PRIVATE*’ -e ‘-----BEGIN RSA*’ /tmp 2> /dev/null
DirectAdmin
In the recent versions of DirectAdmin panel the Private key is usually saved in the system and gets pre-fetched in the "Paste a pre-generated certificate and key" section in the SSL Certificates menu.
If during the certificate installation you are about to paste the certificate text under the auto-populated Private key text but see an empty window, it could mean the CSR code was generated elsewhere or the Private key was not added to this window due to a system glitch. In the latter case, it is possible to retrieve the key via SSH. It is normally saved in the following directory: /usr/local/directadmin/data/users/
Webuzo
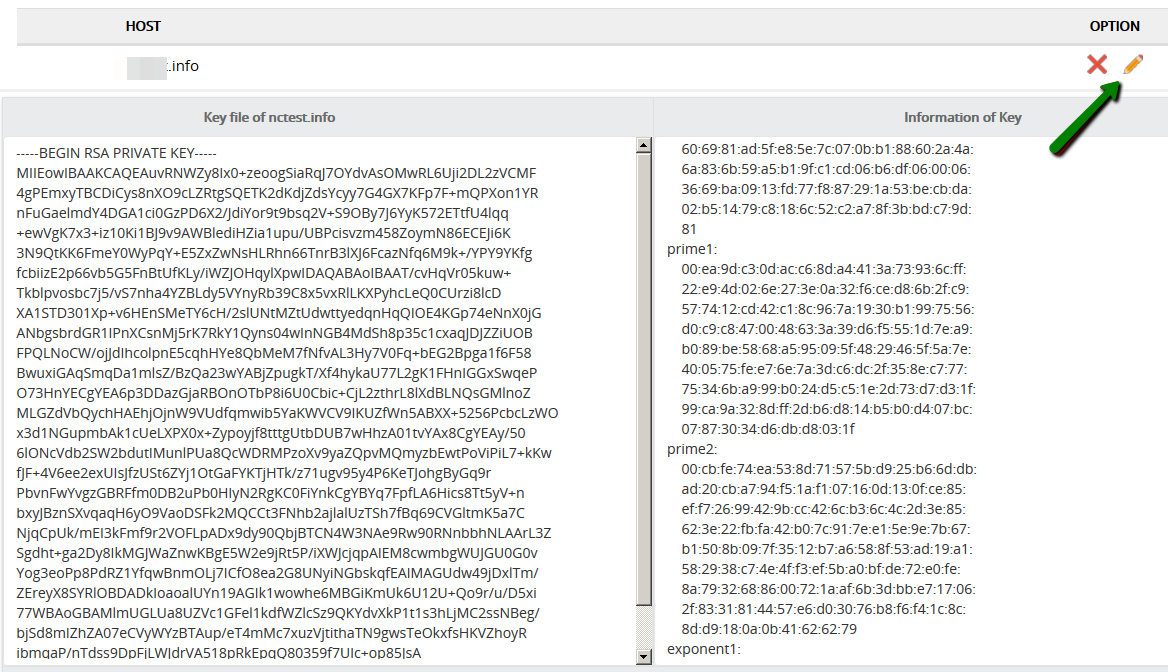
The "SSL" section in Webuzo is located on the home page. Clicking on the "Private keys" button will lead to the list of the generated keys. To see the key text, the pencil button should be clicked on the right side of the list under the "Option" column:
The CSR was generated via an online tool
Online tools like decoder.link do not automatically save the generated codes anywhere. So if you create the CSR code and Private key with this kind of tool, you should save them manually in a plain text file. When you're done, double-check that you have saved both files.
You can check if the file with the Private key is stored with other files on your device. If the file was opened or created recently, it should be shown in the "Recent files" list, which you can find by doing the following:
On Windows:
On Mac:
To complete SSL installation, you should use the Private key that matches the issued SSL certificate. If there are several Private keys in your panel, server, or computer, check which one matches your SSL with this Matcher tool. Follow these steps:
More detailed information on how to use this tool can be found here.
Once you find the matching Private key, you can install your SSL.
In conclusion, if none of the above-mentioned tips were helpful and the original Private key cannot be retrieved, it is necessary to generate the new CSR / Private key pair and reissue the certificate, making sure that the Private key is safe this time.
Need help? We're always here for you.