Steps to get the SSL certificate activated
After your SSL purchase, activate your certificate in order to make it work for your website.
Before you start SSL activation, you'll first need to have a CSR code generated on your server by your hosting provider. You may also generate one yourself by following our guide to generating CSR code.
In either case, be sure to note the following tips before you begin:
Important tips before you activate SSL
- Check with your hosting provider whether they support third-party SSL certificates.
- Some hosting providers may still require a dedicated IP address for SSL installation. Thus, please also double-check this matter with the server provider.
Note: The dedicated IP is not required for SSL installation on Namecheap hosting servers, as we have SNI technology enabled on all our servers.
- Ensure to locate and back up the RSA private key that will arrive with your CSR code, as it will be required for installation. It will not be possible to install the certificate without this code.
- If you are using Namecheap hosting services, please review this article for help.
- If you host your website on cPanel and have a single-domain SSL, you may use our SSL manager for automatic SSL activation and installation.
Note: If you need to activate the renewal certificate, it can be done either from the SSL Certificates list or in Domain List with the All Products option selected at the top.

Here is a how-to video:
Here is the text version of the guide.
Once you have a CSR code generated, log in to your Namecheap account and start activation:
- Go to the SSL Certificates list:

Activate your SSL
-
Click on Activate next to the certificate you wish to activate.

- If you have a single-domain SSL, enter your domain on the first step:

- Choose the preferred management option:
- "Web-based automation" if you are using Supersonic CDN for your website. Here is the guide for further steps.
- "Server-side automation (cPanel or root/admin access)" if you want to have your SSL activated and installed automatically, and if you host your website on cPanel. Here is the guide for further steps.
- "Manage SSL manually" if you want to activate and install your SSL manually, or if your website does not use cPanel. Follow the steps from the guide below.

-
Enter (or copy-and-paste) your CSR code and click Next.
Note: In this step, if you are activating a multi-domain certificate, you need to specify the additional domains you wish to include in the issued certificate. The certificate activation process for the Multi-Domain certificate is described in detail here.

Note: SSL certificates cannot be issued for domains considered unsafe by Google Safe Browsing. All unsafe domains will automatically be removed from Multi-Domain SSL Certificates by the Certificate Authority (CA). Check the Safe Browsing site status here.
- On the next page, select the Domain Control Validation method (DCV) from the drop-down list to confirm your domain ownership.

- For the CNAME-based method, you'll need to create a special record in your domain DNS. This CNAME record will be provided after activation.
- For file-based validation, you will need to upload a certain text file into a particular directory of your website (/.well-known/pki-validation/) to have the certificate issued. You'll then be able to download the certificate file into your account after the order is submitted to the Certificate Authority for activation.
Note: Content of the file shouldn't be changed in any way, as the Sectigo validation system is case-sensitive.
Note: If you have activated the certificate with example.com or www.example.com indicated in your CSR code as Fully Qualified Domain Name (FQDN), please make sure that the file is available via http://example.com/.well-known/pki-validation/file.txt and http://www.example.com/.well-known/pki-validation/file.txt. Thus, example.com and www.example.com are considered to be under your control.
Note: This method is not available for Wildcard SSLs.
- For the Email-based option, select an email address to which the approval email will be sent. For security reasons, the approval email can only be sent to a generic email associated with the domain name (e.g., webmaster@, postmaster@, hostmaster@, administrator@, admin@).
You can find more details about validation methods here.
Once you've selected the appropriate DCV method, click Next.
- On the next step, enter the email address you would like your SSL certificate to be delivered to and proceed further.
If you have an Extended Validated (EV) certificate, please specify your official company email address at this stage.
For either Organization Validated (OV) or Extended Validated (EV) certificates, you'll also be prompted to fill out the company details:

Important: Please ensure to specify the officially registered business email address for the company in the "Representative" section.
Note: The Administrative contact email cannot be changed later, however, the issued SSL can always be downloaded in the Namecheap account.
Note: The "Representative" section is required only for OV certificates.
Note: Please keep in mind that changes to the company details
for OV/EV certificates can be made during reissue, but only within the
first 45 days of certificate issuance.
-
Review information and click Submit to confirm your certificate request.

-
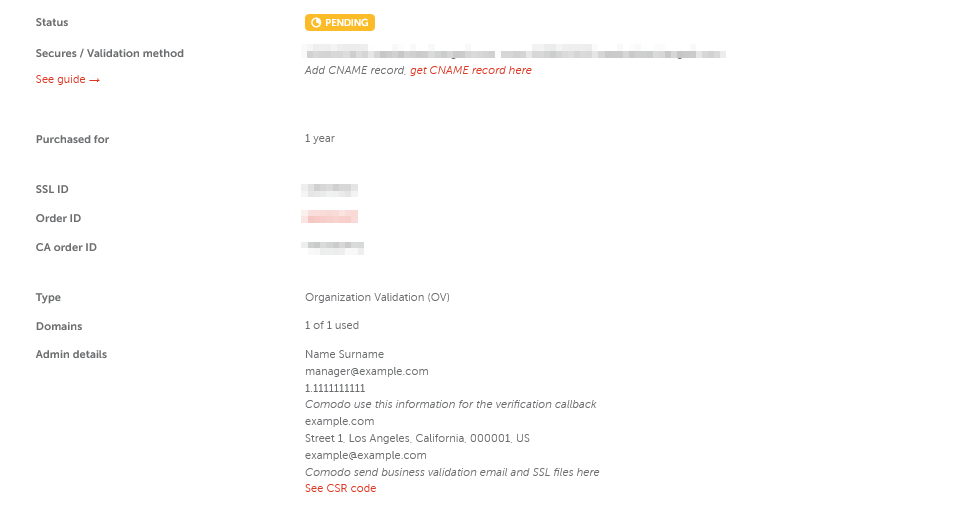
Once done, you will be taken to the certificate Management page where you can view the Order ID, Certificate Authority order ID ('CA order ID'), and other details of the certificate.
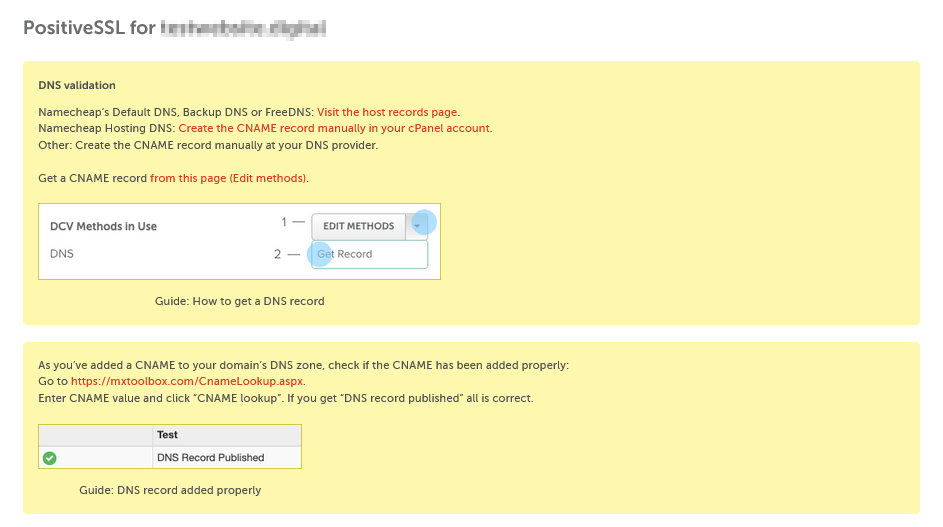
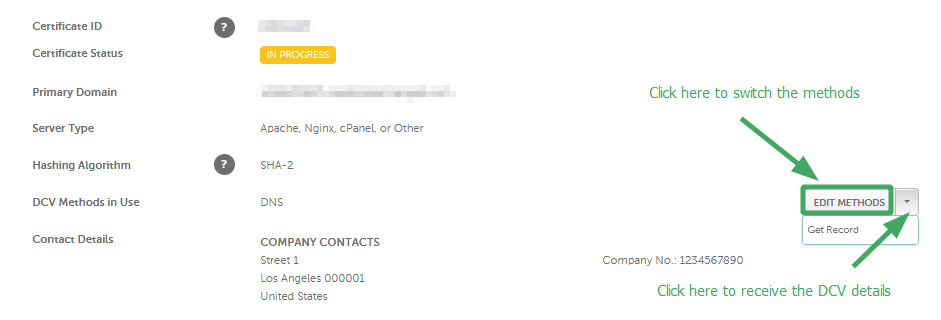
Note: You'll see the instructions on how to switch between the DCV options on the yellow panel at the top of the page. Use the corresponding link to go to the 'Edit methods' page.
By clicking the from this page (Edit methods) link, you'll be redirected to the page where you can review certificate-related information and switch the DCV options.
Confirmation to enable the SSL certificate
- Confirm domain validation and other SSL validation steps, if needed
Confirmation emails are delivered to the approval address within 10 minutes after activation. You must confirm the issuance by clicking the link included in the approval email. The validated certificate will then be sent to the administrative email address selected during activation.
HTTP-based and CNAME-based validation may take longer, as the Certificate Authority will need to locate the file or record. Please make sure that the file is publicly accessible and that there is no firewall blocking the requests behind your server.
The validation system used by a Certificate Authority performs automatic checks of the validation file/record over a certain period of time. If validation fails, double-check that the file/record data is correct and accessible and make the necessary edits. Once the information is correct and accessible, the file/record should be validated when the CA validation system runs its next check.
Sectigo OV/EV certificates will still send a domain validation email prior to the CA's document submission request. If you order an OV/EV certificate, Certificate Authority will send you a list of documents required to verify your business, depending on the type of the certificate. To expedite the certificate issuance, make also sure that Whois for your domain contains the correct contact information. Order processing by Certification Authority may take up to an hour. If you do not receive an approval email within the specified time frame or the certificate has not been issued after one hour, and you have confirmed that the file or record is publicly accessible, please contact our SSL Support Team via Live Chat or email us to sslsupport@namecheap.com.
- Confirm issuance and download SSL
Once your SSL is validated and issued, it is emailed to the administrative contact email address that you fill out in your Namecheap account during the SSL activation process The same certificate files can also be downloaded in your Namecheap account once the certificate status changes to "Active", here's the
how to.
- Confirm that the SSL is installed correctly on the server
The last step to make your website accessible via https:// is to install the SSL files on your Web Hosting server. You can find the corresponding guidelines for the most popular hosting platforms and servers
here.
