Before an SSL certificate can be issued, the certificate applicant should confirm their domain ownership rights. This is called domain control validation (DCV). When you are activating your certificate, you will be presented with three methods of DCV to choose from:
If you need to switch your chosen DCV method, check the following guide:
Add CNAME record
This validation method involves adding a CNAME record to the DNS settings of your domain.

Here is a how-to video:
Here is the text version of the guide:
After you complete SSL activation, you’ll find instructions on completing this DCV method as well as the values you will need for the CNAME record in the SSL Details page of your account:

Click on Get Record to see the CNAME record values.
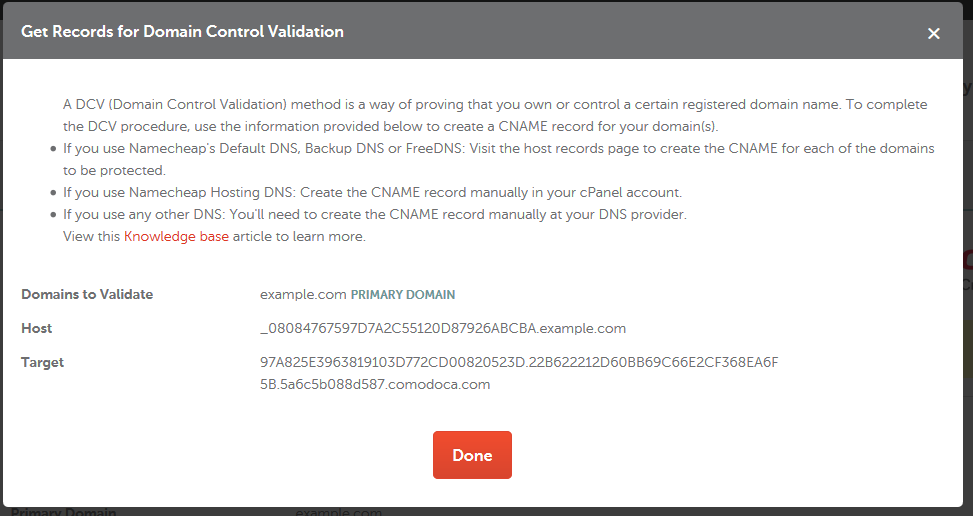
Note: Some DNS systems (including the Namecheap system) have the tendency to automatically add the domain name to the values submitted during record creation. Please make sure that your domain name is not duplicated in the values. If your domain is using Namecheap Basic nameservers or PremiumDNS, remove the ".example.com" part of the provided Host value before adding it to the validation record for the domain. Copy the Host and Target values and paste them into the corresponding fields in your DNS provider account. Set the minimum possible TTL value.
Note: Please keep in mind that if you are activating a Multi-domain certificate, the DNS record created for the bare domain (without www.) will verify this domain and its subdomain(s) included in the certificate. Nevertheless, to get the certificate issued, all domains/subdomains included in the certificate should be verified.
Once the correct values are set up, head to the SSL details page again, click the link beside "Get a CNAME record".

On the new page, click the 'EDIT METHODS' button.
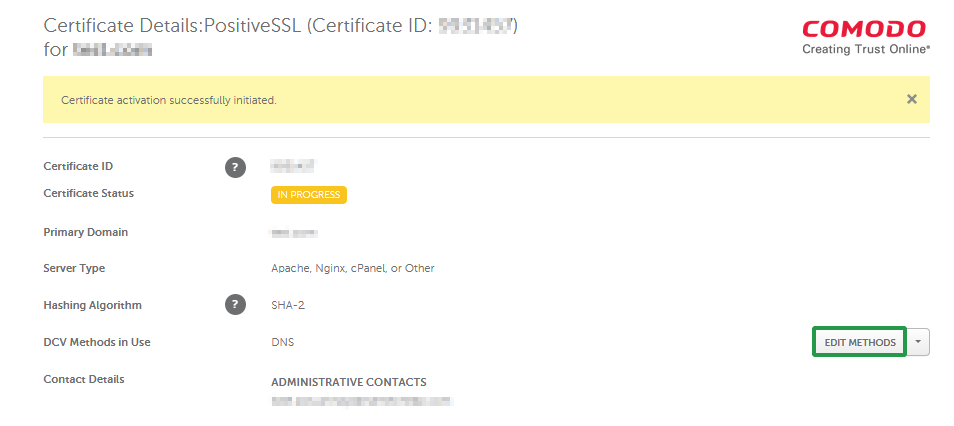
In the pop-up window, please click Save Changes/Retry Alt DCV to speed up the process of domain control validation.

If you are activating a single-domain certificate for a subdomain, feel free to set the DNS record either for the bare domain directly, or for the subdomain. It will work both ways for the domain validation process.
Upload a validation file
This DCV method involves uploading an activation file to your website hosting server.
The validation file is a TXT file with a name featuring a combination of numbers and letters, e.g., AN2D4C5H7F01823KRIDHJ.txt.
Important note: When uploading the file, please do not change the file name or its content.

Here is a how-to video:
Here is the text version of the guide.
When you’ve completed the activation process, you'll be directed to the SSL Details page in your Namecheap account, where you'll find instructions and a link to the Edit methods page where you can download the validation file.
You’ll need to place the file in the document root directory of your domain name in the subfolder of the '.well-known' folder called 'pki-validation'.
Once you place it here, the validation file should be accessible via the following link: http://yourdomainname.com/.well-known/pki-validation/AN2D4C5H7F01823KRIDHJ.txt, where ‘yourdomainname.com’ is the domain name in the certificate, and ‘AN2D4C5H7F01823KRIDHJ.txt’ should be the exact name of the validation file you downloaded from your Namecheap account without any changes.
Single-domain SSLs:
If you have a Single-domain SSL, the file should be accessible both via http://yourdomainname.com/.well-known/pki-validation/AN2D4C5H7F01823KRIDHJ.txt and http://www.yourdomainname.com/.well-known/pki-validation/AN2D4C5H7F01823KRIDHJ.txt.
These requirements also apply to SSLs activated for subdomains. You should make the file accessible both via http://sub.yourdomainname.com/.well-known/pki-validation/AN2D4C5H7F01823KRIDHJ.txt and http://www.sub.yourdomainname.com/.well-known/pki-validation/AN2D4C5H7F01823KRIDHJ.txt
If you activate your SSL for yourdomainname.com and the file is accessible via yourdomainname.com but not accessible via www.yourdomainname.com, then the SSL will secure only yourdomainname.com. At the same time, if your SSL has been activated for www.yourdomainname.com and the file can be accessed via the www subdomain but cannot be accessed via the bare domain (yourdomainname.com), then the SSL will only be issued for www.yourdomainname.com.
Multi-domain SSLs:
For Multi-domain SSLs, the validation file should be accessible for each hostname you specified during the SSL activation process.
For example, if you activated your Multi-domain SSL for yourdomain.com, www.yourdomain.com and domain_2.net, the validation file should be accessible for all of these hostnames.
Once your file is uploaded, you can verify it by clicking on the links in the yellow panel with DCV instructions at the top of the SSL details page:

Note: If you have a Multi-Domain SSL and choose this method of DCV for several domains, no link will appear in the yellow panel as each domain will have a different link. To verify each of the domains, you will need to create the corresponding links by following the instructions in the yellow box and checking each URL in your browser. In most cases, if a simple text line like the one below is shown on the screen, the validation file is accessible.

Once the file is uploaded and accessible externally via the following URL http://your_domain_name.com/.well-known/pki-validation/filename.txt, please click Save Changes/Retry Alt DCV. This will force the Certificate Authority to perform the DCV check.

Note: If you are activating your certificate for a subdomain, you can either upload the text to the domain main directory or the subdomain directory. So the file should be accessible either via http(s)://example.com/.well-known/pki-validation/ or via http(s)://sub.example.com/.well-known/pki-validation/ If you are activating a Multi-domain certificate
for subdomains, the validation file should be placed into the Document root directory of each corresponding domain. We recommend that you upload it for each subdomain as well.
Note: If you have activated the certificate with domain.com indicated as the FQDN (Fully Qualified Domain Name) in your CSR code, please make sure that the file is available via http://domain.com/.well-known/pki-validation/file.txt . In this case, www.domain.com is considered to be under your control as well.
If your CSR code contains www.domain.com as the FQDN, please make sure that the file is available via the link http://domain.com/.well-known/pki-validation/file.txt . The file content shouldn't be changed in any way as the Comodo (now Sectigo) validation system is case sensitive.
Receive an email
This option requires you to have a domain-related email address from the suggested list. The exact email address which will be used for the purpose of DCV is selected during the SSL activation process.
Here is a how-to video:
Note: The email-based validation with WHOIS email is not available due to the upstream provider updates.
Here is the text version of the guide:
Due to
CA/B forum regulations, you can only use one of the following domain-related generic emails to receive the approval email:
- admin@example.com
- administrator@example.com
- postmaster@example.com
- webmaster@example.com
- hostmaster@example.com
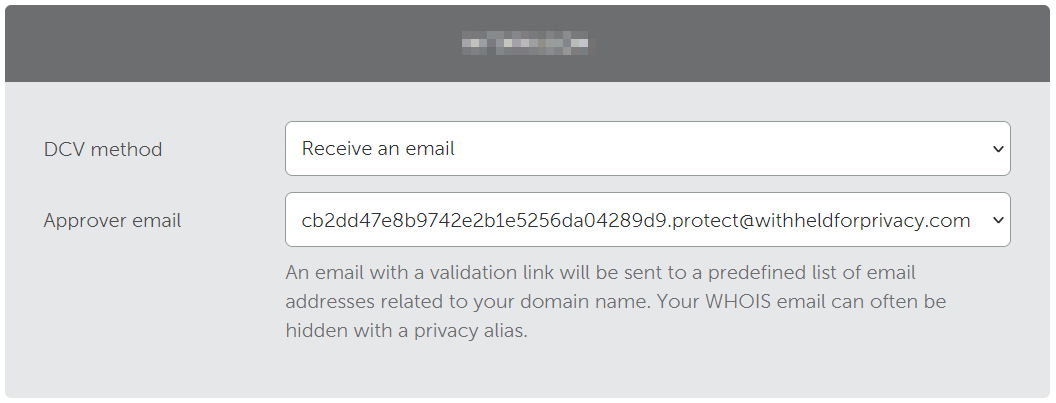
After you complete SSL activation process, the Certificate Authority will email you at the selected address.
Once activation is complete, an email will be sent to you. To confirm the domain ownership rights for your certificate, you need to copy the validation code from the approval email, follow the link, and then paste the validation code into the corresponding field on the new page and click Next.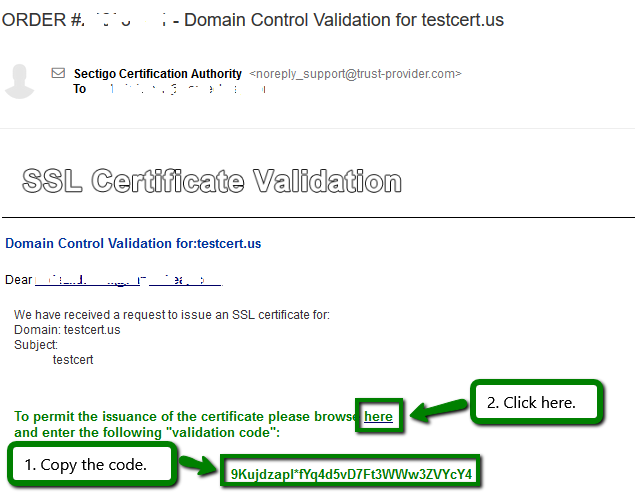
Paste the code from the email and hit Next.

That's it!
If you do not receive the approval email, you can always retry it by clicking Resend email on the Edit methods page. The link to the Edit methods page is available in the validation instructions panel placed on the SSL Details page.

Changing DCV methods
If you chose a particular DCV method during activation but want to switch to a different one later, you can change it on your account page. Log in to your Namecheap account, open the SSL Certificates list, and locate the certificate in question and click Details next to it.
On the next page, click the link in the yellow table with DCV instructions to go to the Edit methods page.
On the Edit methods page, you'll see the following button:
When you click it, you will be presented with the three possible DCV options in a drop-down menu.
Choose the desired method and click Save Changes / Retry Alt DCV.
Then, perform the required steps to complete the DCV.
Note: You can also use this SSL Validation Tool to check your SSL status, switch the validation method, and speed up the SSL certificate issuance.
By the way, in this tool, you have a possibility to switch the order to the "DNS TXT
random value" DCV method presented by Sectigo CA in January 2025. More
details on how to use it are here.
Note: If you have a Domain Validation certificate, it will be emailed to you shortly after DCV is complete.
If you have an OV or an EV certificate, your order should undergo business validation. Once you complete DCV, you will receive an email from Comodo (now Sectigo) with further instructions.


