
Our SSL installation service makes SSL security hassle-free. Learn more.
Once your SSL has been issued, you can download them from your Namecheap Account panel.
Upload the .crt and .ca-bundle files to your server whatever way you prefer. By using an FTP client, for example.
You can also download the Bundle file for each Certificate by following the instructions here.
You need to have all the Certificates (your_domain.crt and your_domain.ca-bundle) combined in a single '.crt' file.
The Certificate for your domain should come first in the file, followed by the chain of Certificates (CA Bundle).
Enter the directory where you uploaded the certificate files. Run the following command to combine the files:
$ cat your_domain.crt your_domain.ca-bundle >> your_domain_chain.crt
Please note that if the certificate files were downloaded from your Namecheap account, the best command to use will be:
$ cat your_domain.crt > your_domain_chain.crt ; echo >>
your_domain_chain.crt ; cat your_domain.ca-bundle >>
your_domain_chain.crt
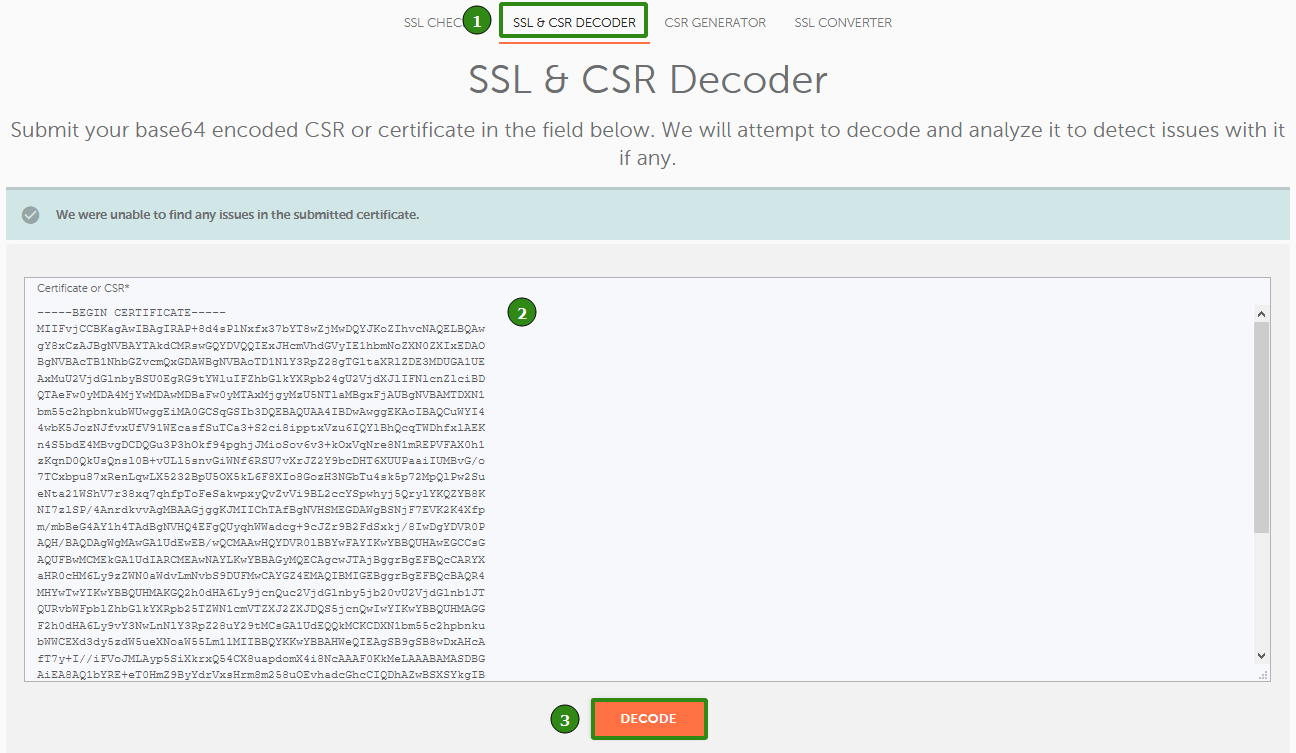
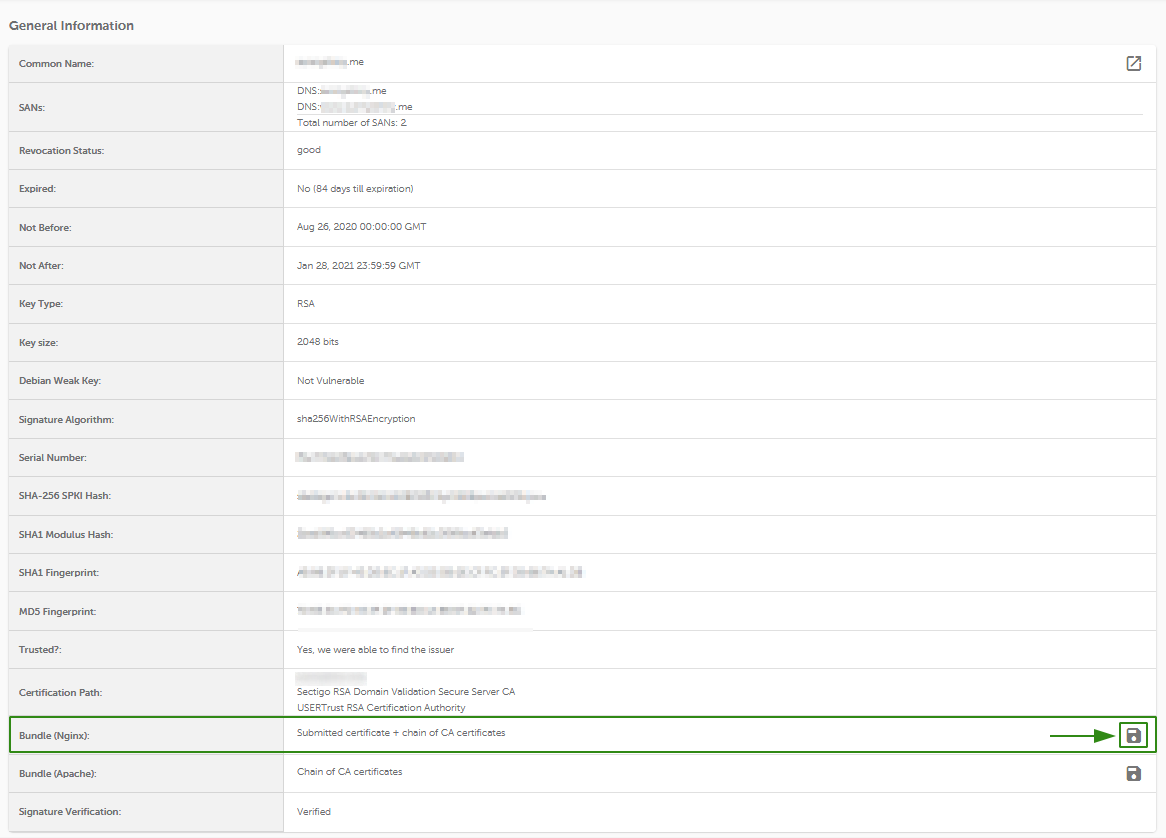
Alternatively, you can combine the files using this online tool and following the steps below:
To install the SSL certificate on Nginx, you need to show the server which files to use, either by a) creating a new configuration file, or b) editing the existing one.
a) By adding a new configuration file for the website you can make sure that there are no issues with the separate configuration file. Furthermore, it will be quite easier to troubleshoot the installation in case of any issues with the new configuration.
We suggest creating a new configuration file in this folder:
/etc/nginx/conf.d
That can be done via this command:
sudo nano /etc/nginx/conf.d/Your_domain*-ssl.conf
Where Your_domain*-ssl.conf is the name of the newly created file.
b) Edit the default configuration file of the web-server, which is named nginx.conf. It should be in one of these folders:
/usr/local/nginx/conf
/etc/nginx
/usr/local/etc/nginx
You can also use this command to find it:
sudo find / -type f -iname "nginx.conf"
Once you find it, open the file with:
sudo nano nginx.conf
Then copy and paste one of the server blocks for the 443 port given below and edit the directories according to your server block for the 80 port (with matching server name, path to webroot, and any important values you need). Alternatively you can copy the server block for 80 port, then paste it below, update the port and add the necessary SSL-related directives.
Below you can find a server block for your Nginx version.
Note: To check your Nginx version, run this command:
sudo nginx -v

Note: Replace the file names values, like your_domain_chain.crt, in the server block with your details, and modify the routes to them using/path/to/.
server {
listen 443;
ssl on;
ssl_certificate /path/to/certificate/your_domain_chain.crt;
ssl_certificate_key /path/to/your_private.key;
root /path/to/webroot;
server_name your_domain.com;
}
Note: You can specify multiple hostnames in such configuration, if needed, e.g.:server {
listen 443;
ssl on;
ssl_certificate /path/to/certificate/your_domain_chain.crt;
ssl_certificate_key /path/to/your_private.key;
root /path/to/webroot;
server_name your_domain.com www.your_domain.com;
}
server {
listen 443 ssl;
ssl_certificate /path/to/certificate/your_domain_chain.crt;
ssl_certificate_key /path/to/your_private.key;
root /path/to/webroot;
server_name your_domain.com;
}
ssl_certificate should be pointed to the file with combined certificates you’ve created earlier.ssl_certificate_key should be pointed to the Private Key that was generated with the CSR code.
Important: For either a Multi-Domain or a Wildcard Certificate, you’ll need to have a separate server block added for each of the domain/subdomain included in the Certificate. Ensure you specify the domain/subdomain in question along with the paths to the same Certificate files in the server block, as described above.
Once the corresponding server block is added to the file, ensure you save the edits. Then, you can double-check the changes made with the following steps.
Run this command to verify that the configuration file syntax is ok:
sudo nginx -t

If you receive errors, double check that you followed the guide properly. Feel free to contact our Support Team if you have any questions.
Here's the tip: to find the error logs for troubleshooting, just run:
sudo nginx -T | grep 'error_log'
In case none of the files mentioned exist, files are commented out or if no error log files are specified, default system log should be checked:
tail /var/log/nginx/error.log -n 20
If the server displays the test successfully, restart Nginx with this command to apply the changes:
sudo nginx -s reload
Now your SSL Certificate is installed. You can check the installation here.
Important notes:
Sometimes, after installing SSL file that was combined using a command line, you may receive 'Nginx/Apache error: 0906D066:PEM routines:PEM_read_bio:bad end line' error message, in this case, the workaround can be found in the reference guide.
Another common issue on this stage is the 'Nginx SSL: error:0B080074:x509 certificate routines: X509_check_private_key:key values mismatch' error message, you can find more details on it and the possible ways out in this article.
We suggest that you install the redirect from HTTP to HTTPS. That way, your website visitors will only be able to access the secure version of your site.
To do this, you’ll need to add one line to the configuration file with the server block for port 80.
Tips:
sudo nginx -T | grep -iw "configuration file"
sudo nginx -T | grep -iw "include"
on RHEL-based Linux OS: /etc/nginx/conf.d/default.conf
on Debian-based Linux OS: /etc/nginx/sites-enabled/default
sudo nano name_of_the_file
Once you find the file that contains the server block for port 80 (the default HTTP port), add in the following line:
return 301 https://$server_name$request_uri;
Note: The above redirect rule should be entered as the last line in the server block.
return
is the main directive to use.
301
is permanent redirect (302 is the temporary one).
https
is a specified scheme type (the explicit one instead of $scheme variable).
$server_name
variable will use the domain specified in the server_name directive.
$request_uri
variable is used to match the paths to the requested pages/parts of the website (everything after the domain name).Here are examples of server blocks with the HTTPS redirect:
server {
listen 80;
server_name your_domain.com www.your_domain.com;
return 301 https://$server_name$request_uri;
}
server {
listen 80;
server_name your_domain.com www.your_domain.com;
return 301 https://your_domain.com$request_uri;
}
server {
listen 80;
server_name your_domain.com www.your_domain.com;
return 301 https://www.your_domain.com$request_uri;
}
server {
listen 80;
server_name your_domain.com www.your_domain.com;
return 302 https://your_domain.com$request_uri;
}
You can find more details about redirect options on Nginx here.
Need help? We're always here for you.