We use KVM technology on our VPS servers for virtualization on our VPS servers. KVM delivers 133% increase in disk speed performance compared to XEN technology.
This article describes the main features of Solus VM with KVM Virtualization Type.
Solus Virtual Manager (SolusVM) is a powerful GUI-based VPS management system which allows you to monitor your VPS status and change basic settings.
You can log in to SolusVM at https://vpspanel.web-hosting.com. The login details are provided in the welcome email along with the server access details. If you haven’t received them, please contact our HelpDesk. Also, you can access SolusVM from your Namecheap account.
Inside SolusVM, you will see all your VPS with us.
Click on Manage next to the VPS in question in order to access its management panel.
How to change the server status
How to change the VPS hostname
How to enable API access to the server
How to check VPS usage statistics
How to get VNC access details
How to change VNC password
How to change root password for VPS
How to manage PTR records on VPS
How to check SolusVM log
How to change the OS
How to enable Rescue Mode
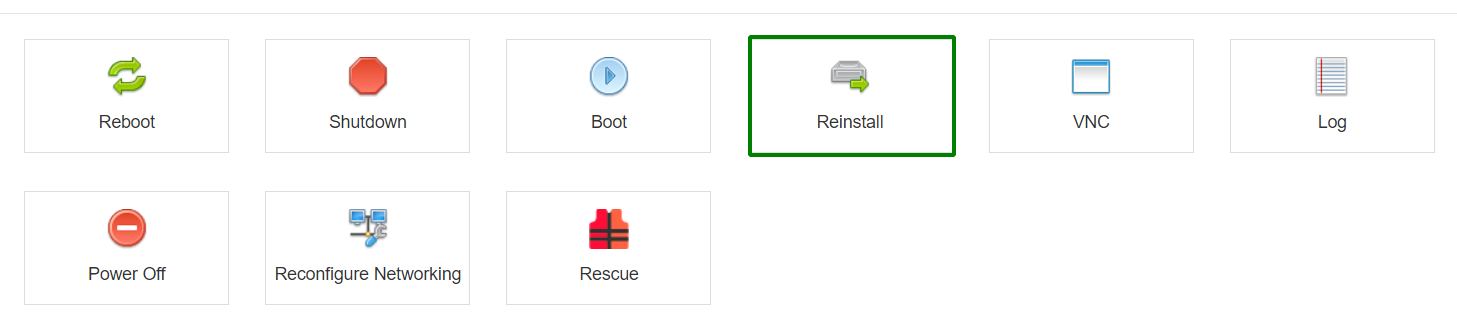
1. How to change the server status:

You can change the server status on the main page:
-
Reboot - reboots your VPS; may be needed if VPS has stopped responding
-
Shutdown - turns off your VPS server
-
Boot - turns on your VPS server
-
Reinstall - reinstalls OS on your VPS
NOTE: The reinstall option will erase all the existing data on your VPS
2. How to change the VPS hostname:

- Select the Hostname tab
- In the New Hostname field, input the new server hostname of your choice and click Change.
NOTE 1: The new hostname must be set in the following format - newname.yourdomain.tld.
NOTE 2: Please note that changing the hostname in SolusVM won't change it on the server. To change the hostname on the server, please follow these steps:
- Log in to WHM as the root user.
- Navigate to: Home >> Networking Setup >> Change Hostname.
- Enter your desired hostname into the box at the bottom of the page.
- Click the blue Change button.
If you have a VPS/Dedicated server with Basic or Complete management, please reach out to our Hosting department via Live Chat or email for changing the hostname.
3. How to enable API access to the server:

- Select the API tab
- Click on Generate in order to generate a new pair of API user/password.
You can check more information about SolusVM API usage here.
4. How to check the VPS usage statistics
Go to the Statistics tab and select a time period from the drop-down list to see the Traffic and Disk Space usage log:

5. How to get VNC access details
You can use any VNC client you prefer or an in-built SolusVM VNC client to access the server.
a. SolusVM VNC client
Click the VNC button:

On the next page, you will see a green button:

Click the button, and the HTML5 client will open in a new tab in your browser.
Enter the root credentials to log in to the server at this screen:

b. External VNC client
To get the connection details, click the VNC button:
On the next page, you will see the VNC address, port, and the password:

To set up a VNC client, please follow the instructions provided here.
6. How to change the VNC password
Go to the VNC password tab:

Enter the new password and click Change.
7. How to change the root password for VPS
Go to the Root/Admin Password tab and click the Change button:

In the pop-up window, click Yes:
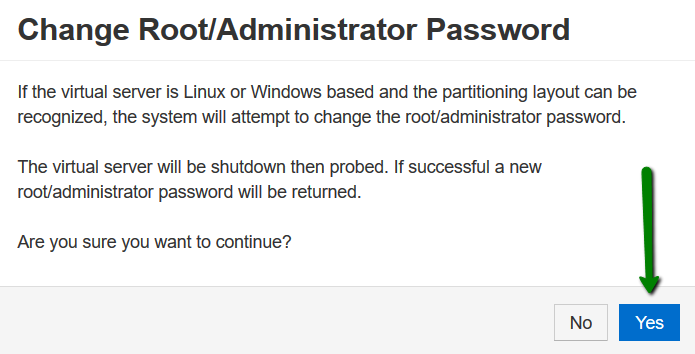
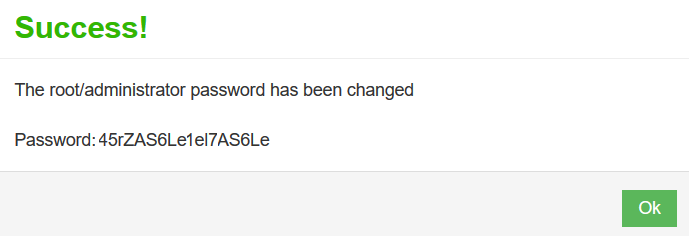
Wait for a few minutes for the password to be reset. Once it is done, you will receive a "Success" message with the new password:
8. How to manage PTR records on a VPS
- Navigate to the Network tab.
Here you can see the list of the IPs assigned to your VPS and the Reverse DNS column.
- Click on [Edit]:

- A pop-up window will show up. Input the hostname of your VPS and click on Update:

Allow 30-60 minutes for the record to propagate. NOTE: No additional update of the PTR record in WHM is required.
9. How to check the SolusVM log
- Click on the Log button on the main page:

- Here you can check certain actions like a VPS reboot or the root password change which were made in the SolusVM panel.
- You can also look up your VPS current disk space usage and remaining bandwidth:

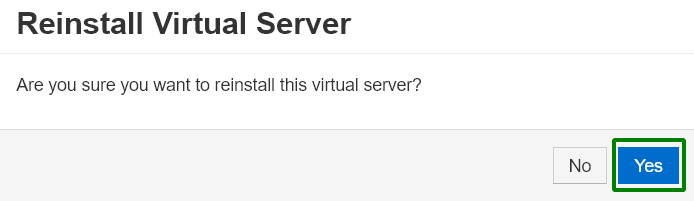
Select the Reinstall menu:
On the next page, you will see the list of available OSes. You can install the following OSes on VPS:
- Ubuntu 20.04 Blank/LAMP 64 Bit
- Ubuntu 22.04 Blank/Webuzo 64 Bit
- Ubuntu 24.04 Blank/cPanel/Webuzo 64 Bit
- Debian 11 Blank 64 Bit
- Debian 12 Blank 64 Bit
- AlmaLinux 8 Blank/cPanel/Webuzo 64 Bit
- AlmaLinux 9 Blank/cPanel/Webuzo 64 Bit
More detailed information about each version can be checked in
this article.
Choose the OS and the version you want to install and click Reinstall:
Confirm your actions in the appeared window:
After confirming, allow the installation up to 10 minutes to complete.
The "Rescue" option (Rescue Mode) is essentially a recovery environment for your VPS. It is mainly used for situations when your VPS is broken or inaccessible, for example, the OS won't boot (kernel issues, bad update, misconfiguration), SSH access is not working, filesystem or disk issues, or network misconfiguration.
In those cases, Rescue Mode allows you to:
-
access your server via SSH again;
-
mount and inspect your disk manually;
-
fix configs, repair filesystem, or recover data;
-
back up files before reinstalling the OS.
Click the Rescue button:

Next, choose which version of the core system (Kernel) to use for the temporary environment and hit Enable Resque Mode:

In the pop-up window, click Yes:

On the next page, you'll receive your temporary SSH connection details:

Make sure to disable Rescue Mode in SolusVM afterwards.
That's it!