This guide will provide you with the basic instructions on how to set up PHP environment on your server and adjust it according to your needs.
NOTE: If you have a VPS or Dedicated server with the Complete management, email us to support@namecheaphosting.com, as without server root access you will not be able to access most of the options mentioned in this article.
How to change the version of PHP environment on the server
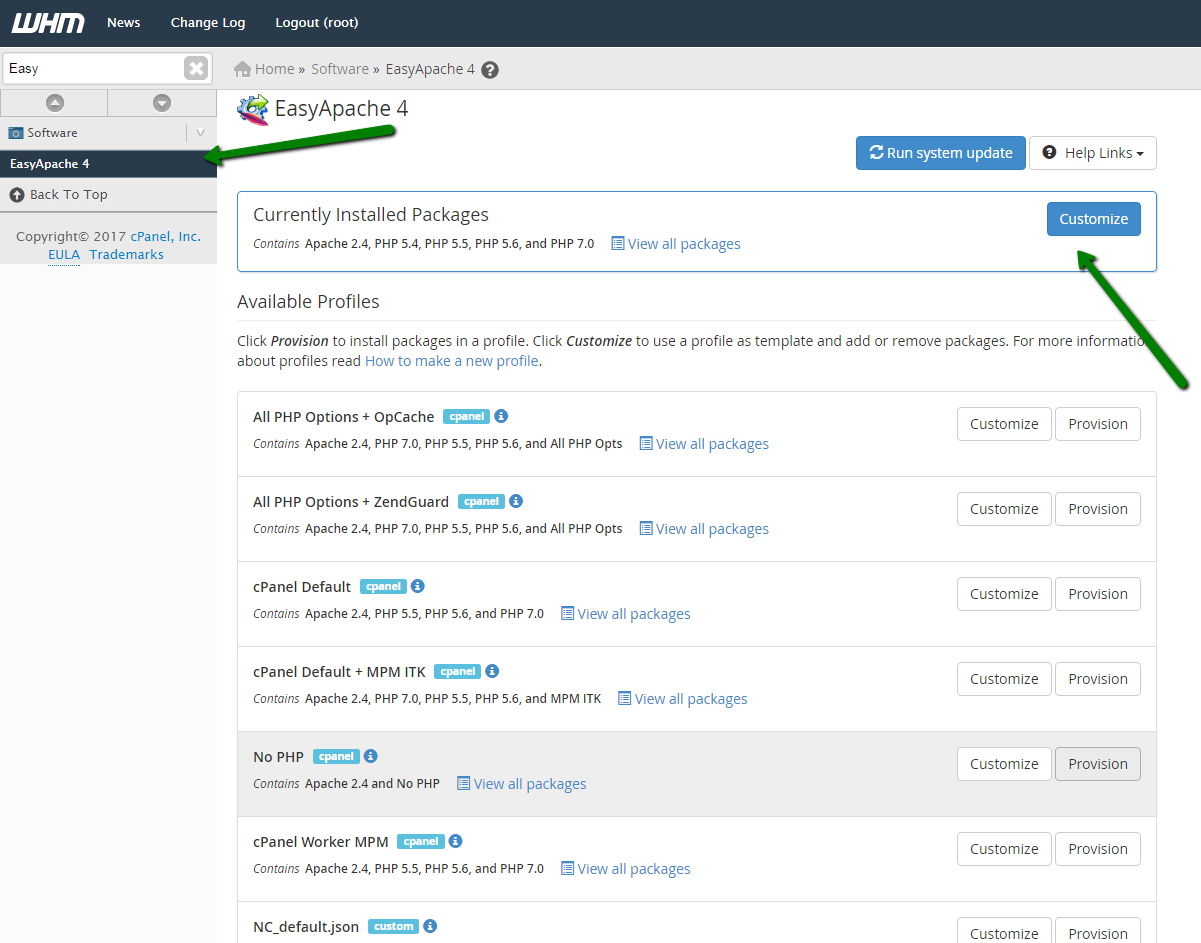
You can change the PHP version on the server using the EasyApache 4 module located in the WHM left-hand menu. There you can select one of default set of modules or click Customize to change your currently used one.
It is also possible to create a separate custom profile, feel free to check corresponding cPanel documentation for instructions on how to do that. For the purpose of this tutorial we will customize the default profile:
1. Apache MPM selection
2. Apache modules selection
3. PHP Versions selection
4. PHP extensions
5. Review and provision
How to adjust server-wide PHP settings/limits
How to adjust single cPanel account PHP settings/limits
How to install and enable custom modules
1. Apache MPM selection
First you will need to select Apache Multi-Processing Module (MPM) which determines how Apache binds to network ports, accepts HTTP requests, and dispatches children processes to handle the HTTP requests:
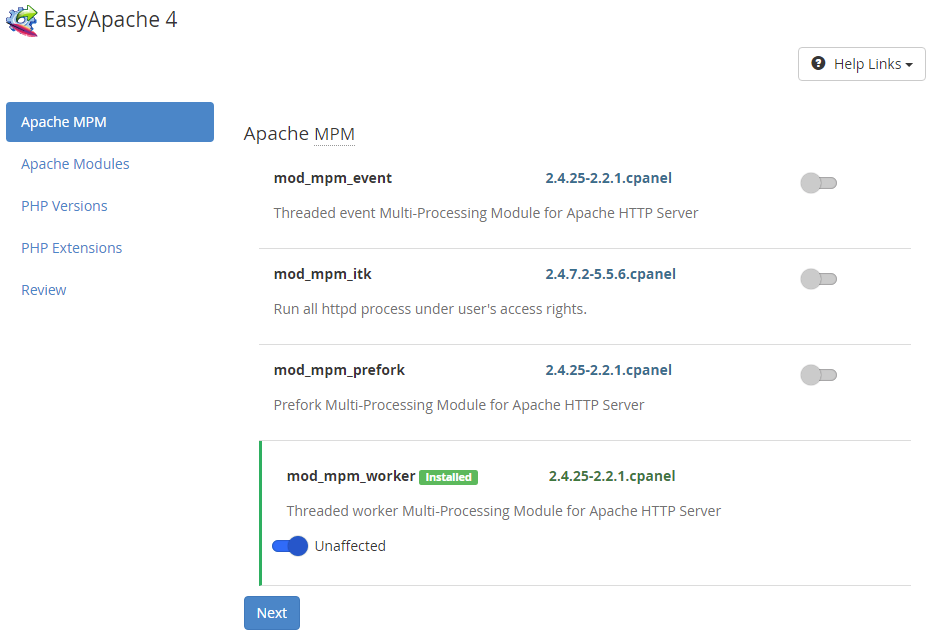
There are currently 4 different MPMs available for selection. Let's discuss them briefly as their selection may significantly impact on your server speed and stability.
PREFORK
Default MPM suggested by cPanel uses multiple child processes with one thread each. Each process handles one connection at a time.
Pros:
- Quick. The prefork MPM causes Apache to branch (fork) into additional processes before the system receives requests. When the server receives requests, it responds quickly to each request since an Apache process already exists to handle it.
- Stable. If a problem occurs with an individual process, the system can kill the process with no effect on other Apache processes.
- Compatibility. Threadless design is safe for non-thread-safe modules, like mod_php.
Cons:- Consumes more RAM than threaded MPMs like Worker or Event.
Scaled child processes may result in the use of a large amount of system RAM.
- Comparatively bad scalability.
This worker may perform poorly on high-traffic servers with many concurrent requests, since requests have to wait until processes are free.
WORKER
The worker MPM uses multiple child processes with many threads each. Each thread handles one connection at a time.
Pros:
- Scalability. Worker generally is a good choice for high-traffic servers since there are more threads than processes, this also means that new connections can immediately take a free thread instead of having to wait for a free process.
- Less RAM-demanding than pre-fork. Worker MPM uses low memory in comparison to Prefork MPM which could help greatly on low tier VPS with lesser RAM available.
Cons:
- Unsafe for use with non-thread-safe modules (mod_php will not be available).
EVENT
Similar to Worker MPM, but also allows more requests to be served simultaneously by passing off some processing work to supporting threads.
Pros and cons are basically the same as Worker ones except for one major improvement. In Event MPM when a client completes the first request then the client can keep the connection open and send further requests using the same socket which reduces connection overload. Idle/kept-alive connections are not consuming many threads and their needed memory, which should reduce server overload with large number of requests.
On the other hand, SSL connections are treated identically to Worker MPM which make this improvement not totally applicable for all kind of websites.
ITK
cPanel recommends using it along with CloudLinux OS as MPM for servers which have shared hosting environment. ITK is based on Prefork MPM and allows you to configure individual Apache vhosts to run as specified users and groups.
Thanks to this scripts and configuration files for one vhost no longer have to be readable for other vhosts.
Pros:
- Security. This MPM allows each user to isolate their files from others with the standard file permission settings which creates an additional level of security.
- Non-threaded MPM. Just like prefork MPM, ITK is not-threaded which means you can run non-thread-aware code without problems.
Cons:
- Performance. It is a bit slower than the original Prefork, both MPMs are sharing the performance issues when dealing with big number of requests.
- Code restrictions. As stated in cPanel documentation for this module:
'Recent versions of the MPM ITK Apache module implemented restrictions on the use of the setuid() function and the setgid() function. As a result, scripts that depend on these functions may encounter problems. This includes scripts that use the mail() function, the shell_exec function, or the sudo command.'
So if some of your websites are dependable on using these functions you should consider using different MPM.
In general we would suggest choosing of MPM based on your own needs:
- For best speed and compatibility with older applications use Prefork MPM.
- For servers which are dealing with big amount of traffic use Worker or Event worker.
For up-to-date information about the available cPanel MPMs check their corresponding knowledgebase page.
Once MPM is selected, click on Next to proceed to apache modules selection.
2. Apache modules selection
On second step you are given an opportunity to select optional apache modules to be installed/removed:
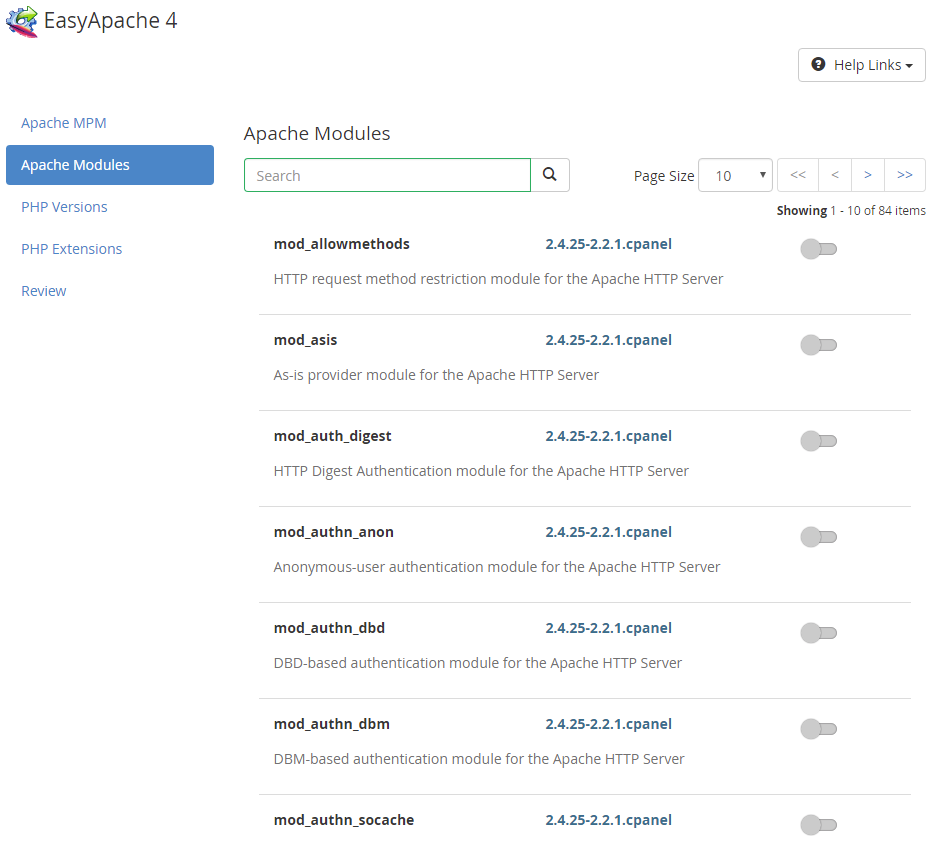
Number of modules may affect memory consumption by Apache processes, so we would suggest using only modules you really need and disable the unneeded ones. If you are not sure which one you need, just keep the default list of selected modules and proceed to the next step.
Feel free to check our related article for more information about Apache modules and brief description of some of them.
Once you're done with selection click on Next to proceed.
3. PHP Versions selection
On this step you can select the PHP versions you need. EasyApache 4 supports multiple PHP versions out of box, so you can install all versions currently supported by cPanel if needed.
NOTE: cPanel does not support releases which reached end-of-life and not longer supported by PHP.net. If you need any legacy PHP versions (for example, PHP 4, 5.2 or 5.5), you may consider switching to CloudLinux OS (available only on Dedicated Servers) which provides hardened versions of them:
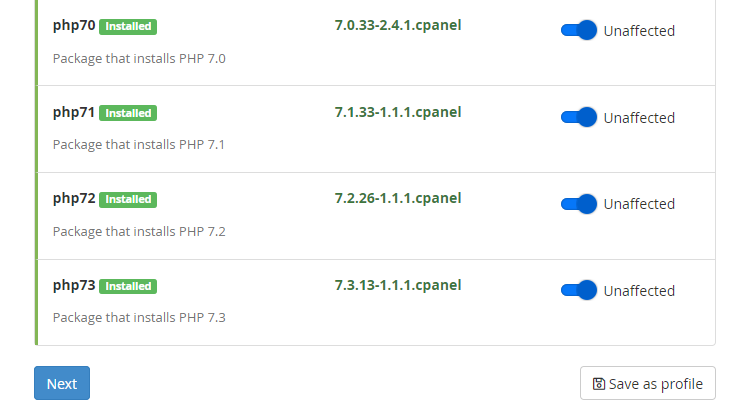
Click Next to proceed with PHP extensions selection phase.
4. PHP extensions
PHP would not be so popular without all modules and packages which extends it greatly. EasyApache allows installing some of them at this stage:
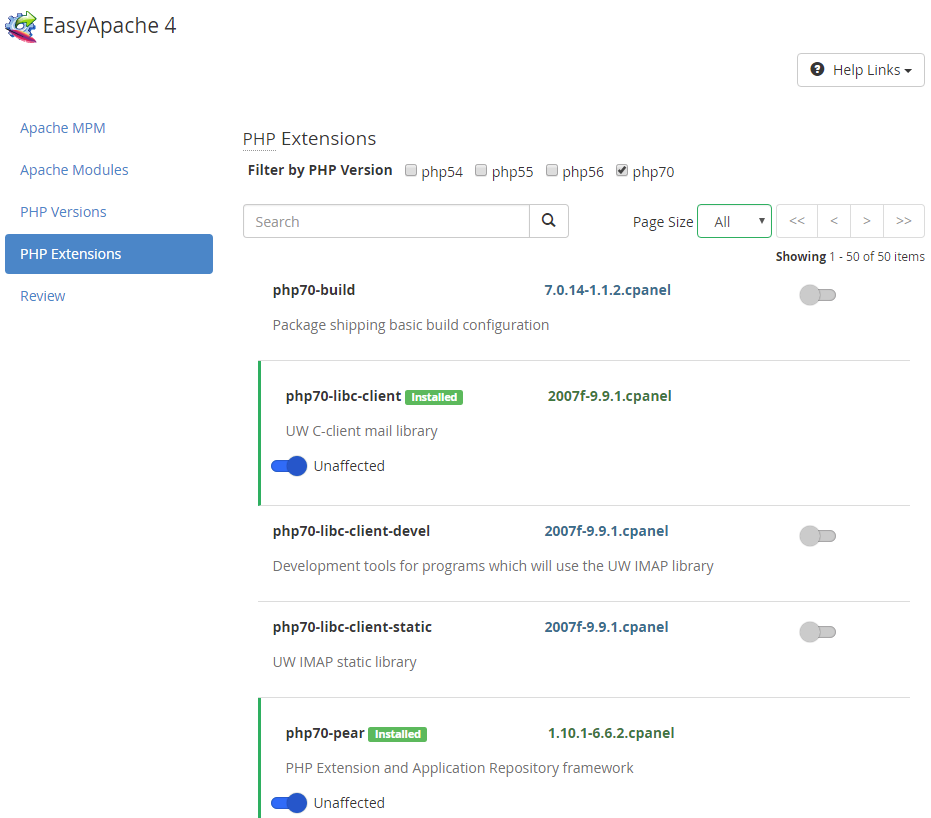
All extensions are installed separately for each version of PHP environment you selected on the previous step, so set the ones you need and proceed to the last step.
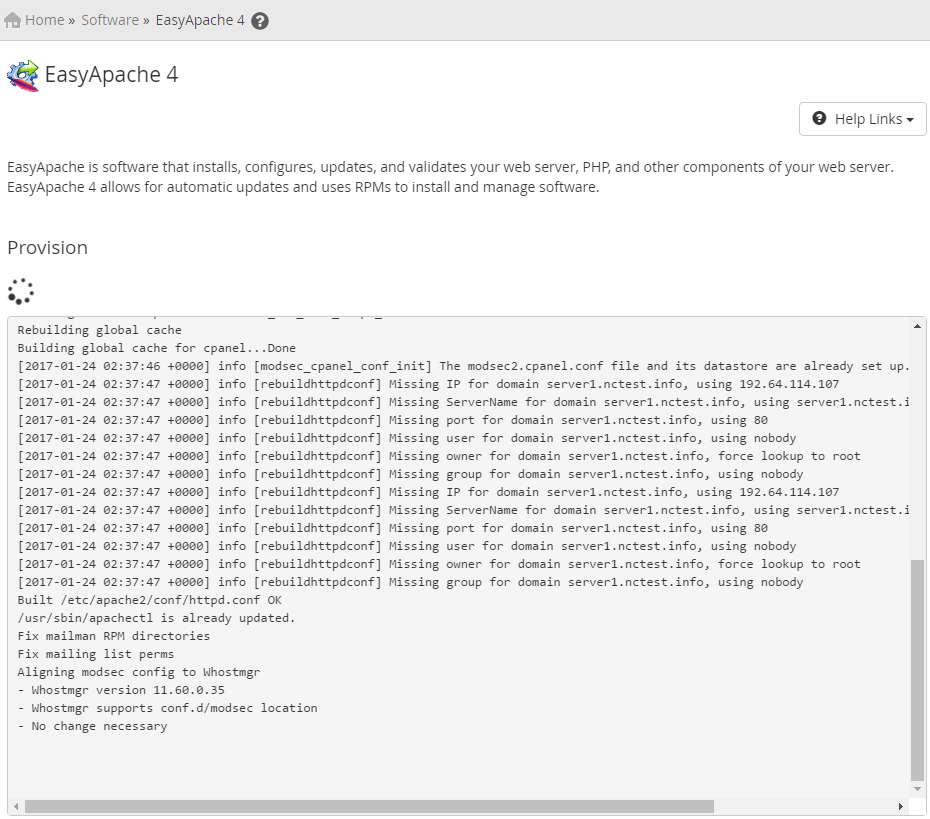
5. Review and provision
On Review stage you can see the exact modules that are to be installed/upgraded. If you are done with the selection, click on Provision button at the bottom to begin implementing the changes on server:

NOTE: Do not interrupt the process as you will have to start from the beginning while your websites can go offline because of the unfinished configuration.
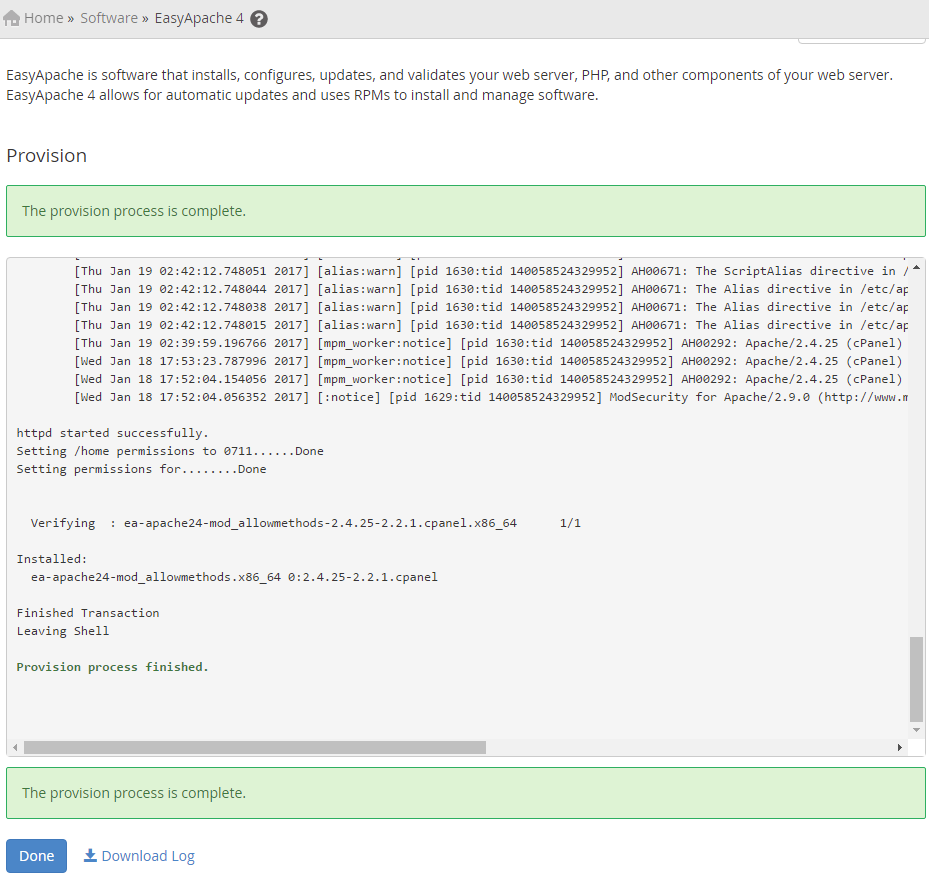
You should see The provision process is complete once everything is done:
How to adjust server-wide PHP settings/limits
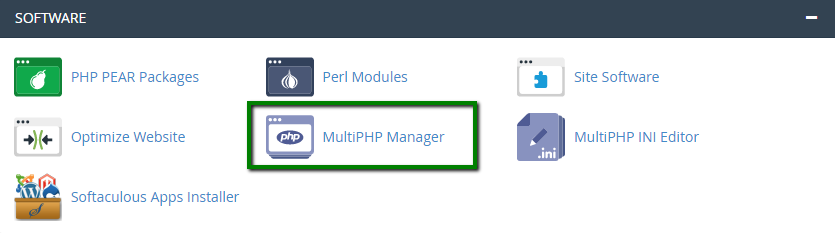
You can change most of the PHP settings in MultiPHP Manager and MultiPHP INI Editor menus in WHM.
Let’s review MultiPHP Manager first:
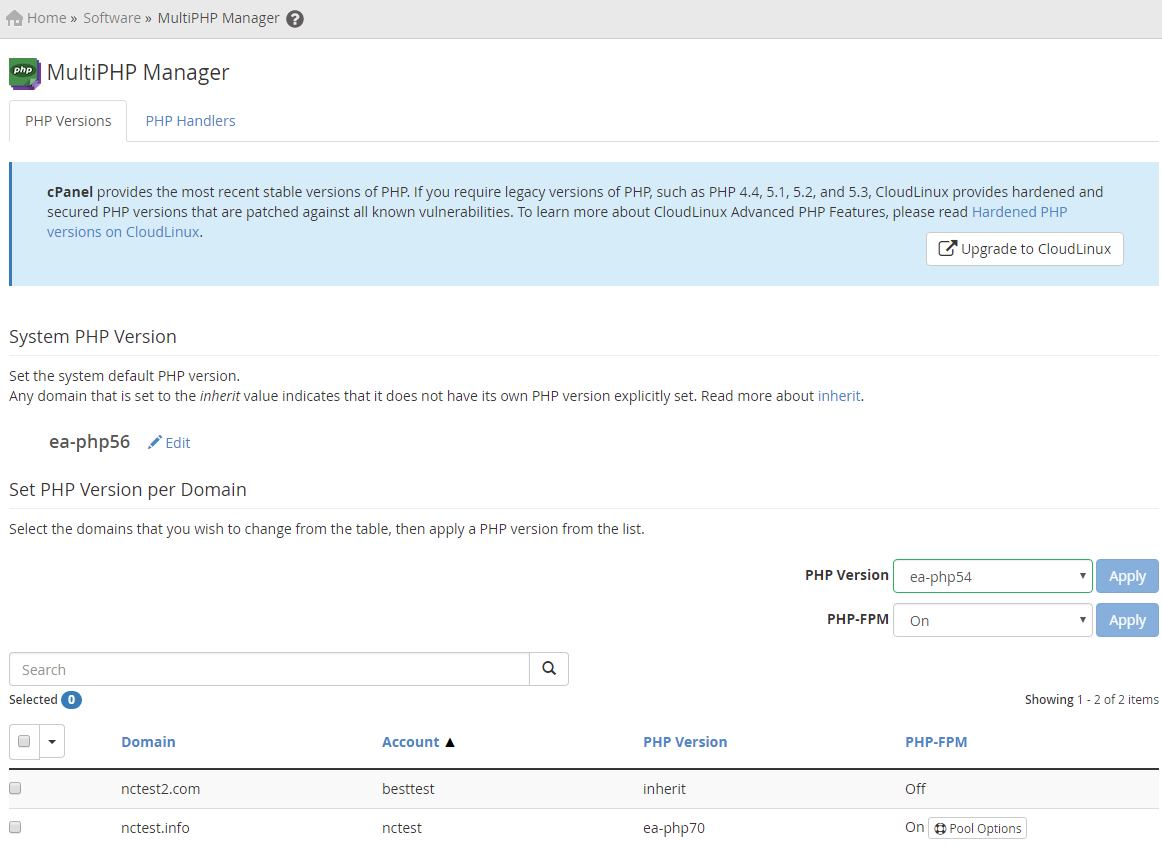
At the first tab here you can specify System PHP version to be set for all accounts created in future and the existing ones which have 'inherit' PHP version set. The selected version will also be used for CLI PHP executable.
If you require one of cPanel accounts to use PHP version different from the system one, you can specify it in the corresponding section below. Just select account for which you wish to make the change and select the required PHP version from the dropdown list on the right. For non-inherit versions you can also enable PHP-FPM which is an alternative to FastCGI daemon for PHP which was designed to allow websites handling strenuous loads.
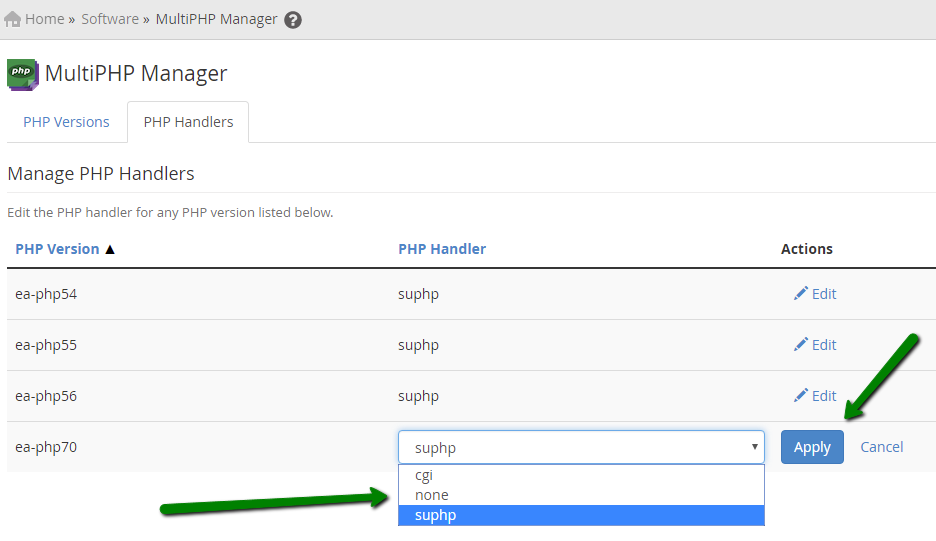
At PHP handlers tab you can specify handlers to be used for each PHP version. Handler is a type of Apache module which contain libraries that the Apache web server uses to interpret and run PHP code. suphp is used by default, but you can switch to other supported handlers if needed at this page as well. List of available handlers and requirements for their installation is provided here.
In order to switch PHP handler select it from the drop-down menu next to PHP version you need and hit click Apply button:
In order to adjust basic PHP versions settings, like max_execution_time or memory_limit, proceed to MultiPHP INI Editor menu.
There are to available editor modes: first is a user-friendly Basic mode which allows editing most commonly used settings; the second one is Editor Mode which is used to edit php.ini files of each PHP versions directly:

Make the changes you need and click Apply/Save button to update PHP configuration.
NOTE: If you have PHP-FPM option enabled, you might also need to rebuild PHP-FPM User Pools in order for changes to take effect. You can do it by enabling/disabling PHP-FPM in MultiPHP Manager or by running the following command via SSH:
/scripts/php_fpm_config --rebuild
How to adjust single cPanel account PHP settings/limits
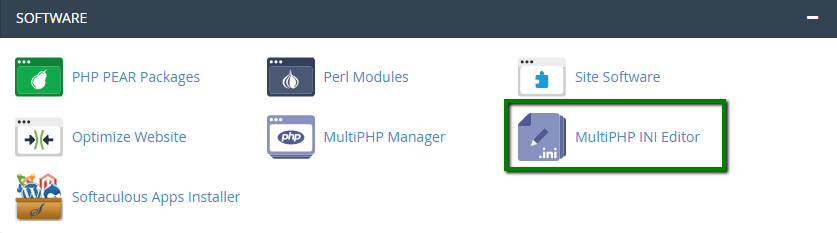
In order to override server-wide PHP settings for some specific websites, you can use MultiPHP Manager and MultiPHP INI Editor in cPanel main menu.
Their functionality is almost the same as the ones in WHM.
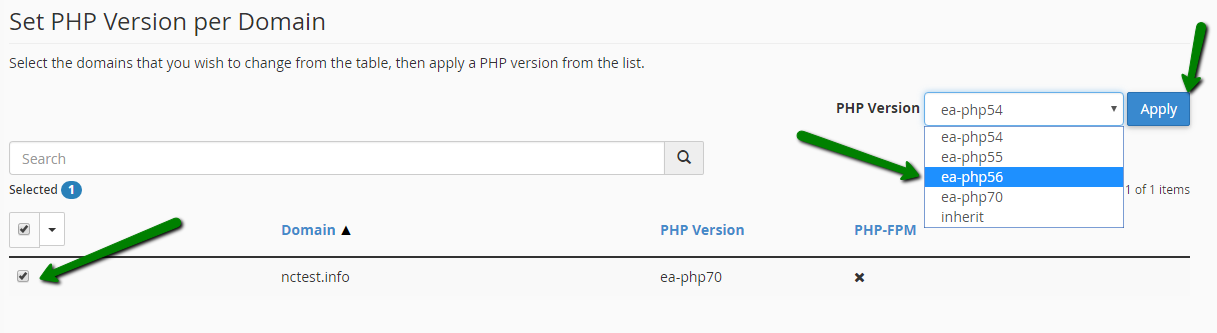
In cPanel MultiPHP Manager you can change PHP version used for each website by checkmarking it, selecting corresponding version from the drop-down list on the right and clicking Apply as shown in screenshot below:
In order to change PHP settings for each website or cPanel account in general navigate to MultiPHP INI Editor. There you can use Basic or Editor version of php.ini editor.
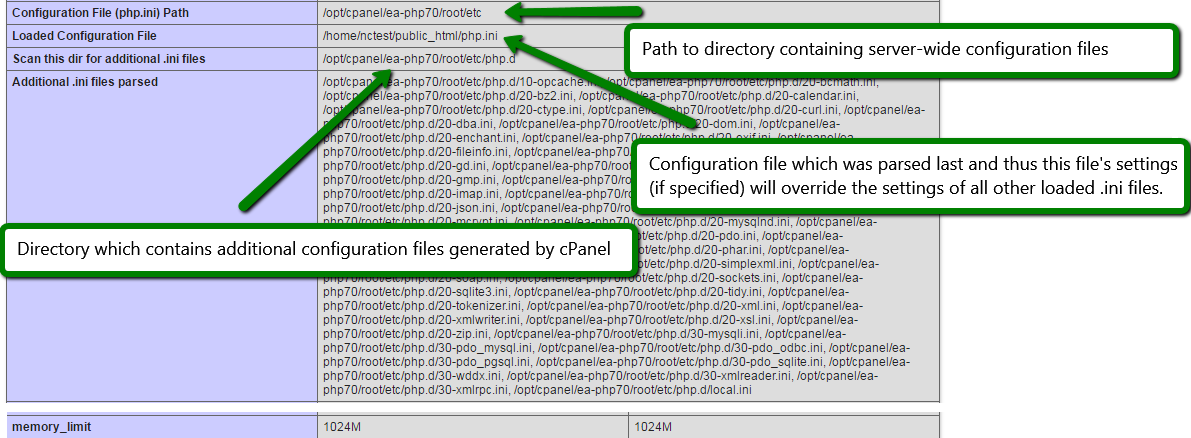
What this plugin does in general – creates php.ini file in the selected website's document root folder and adds your changes there. Any non-specified settings will be taken from server-wide configuration file, so you basically need just to adjust the settings you need for the website in question.
For example, in order to function probably our web-application require 1GB of memory which is defined by memory_limit setting in php.ini. In order to increase it for this single domain we need to select it from drop-down list, add necessary directive to editor field below, click Save then:
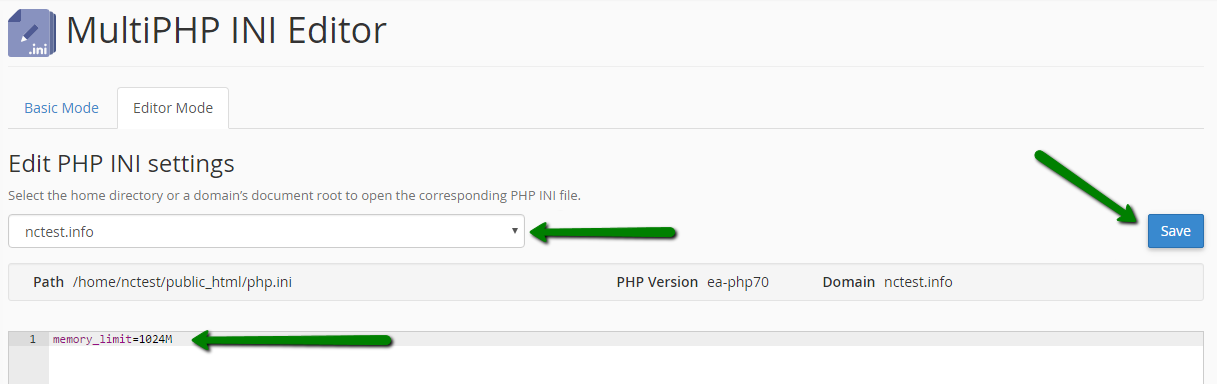
Changes should be noticed immediately once it is done:
How to install and enable custom modules
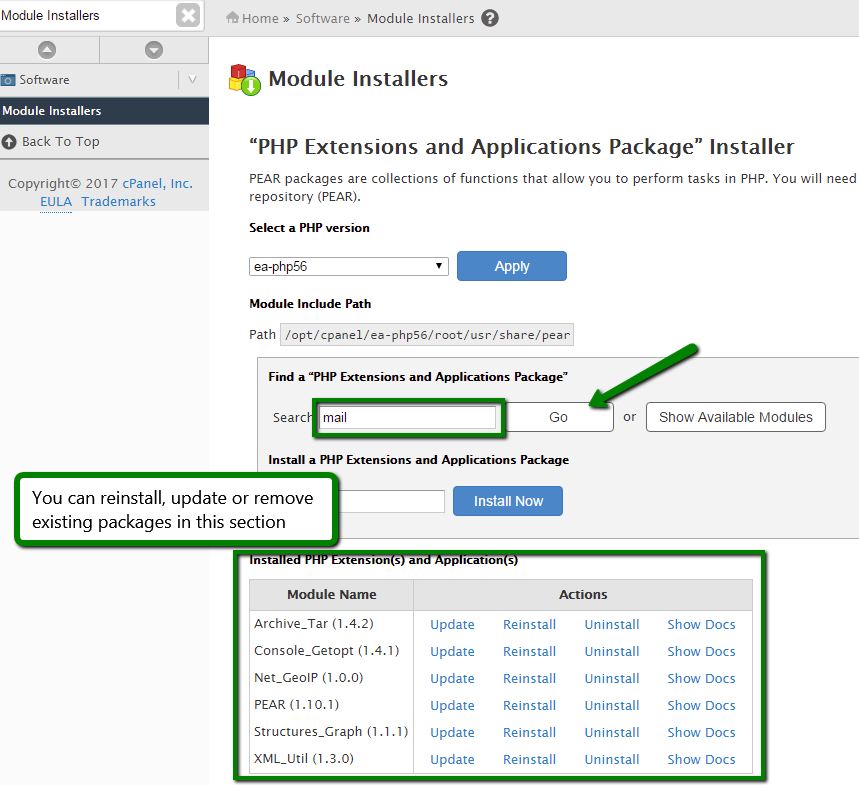
If you require some specific PHP extension which is not included into the default PHP configuration, you can use Module installers menu in WHM which provides access for PEAR and PECL installers.
PEAR installer
In order to install PEAR package, input name of the module you wish to install in Search field and click Go or, if you know the package name, input it in the field next to Install now button and install it right away.
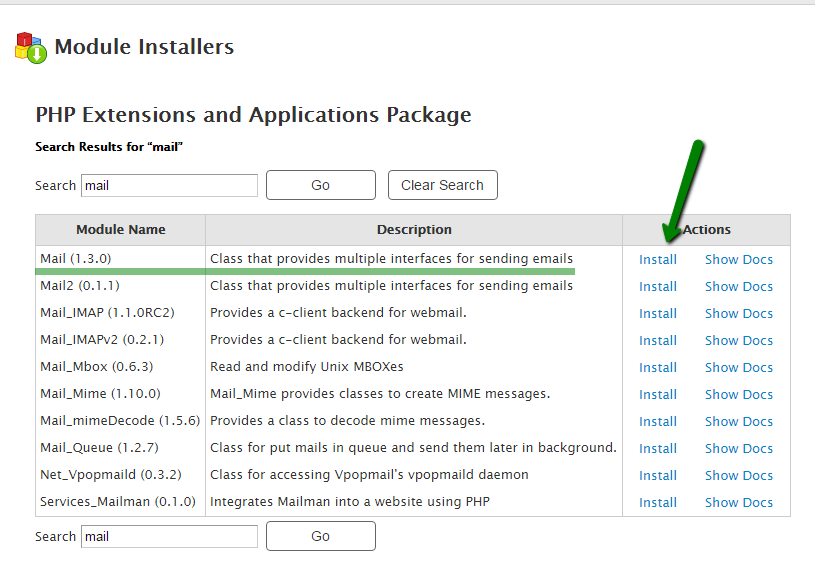
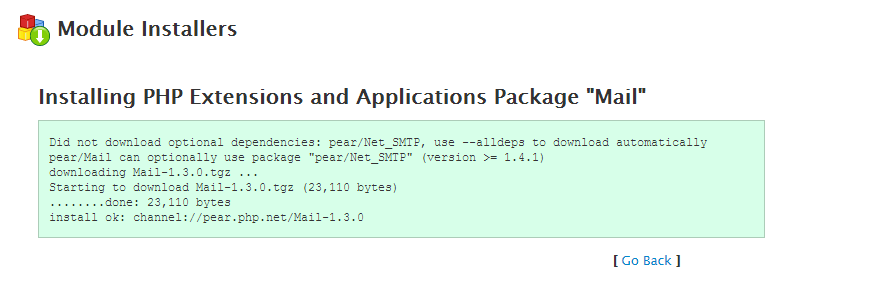
For example, let's install mail PEAR package:
In search result page click on Install next to the needed package to start the installation process:
In next window you should see Install ok message in case of successful package installation:
Manual installation of PEAR modules
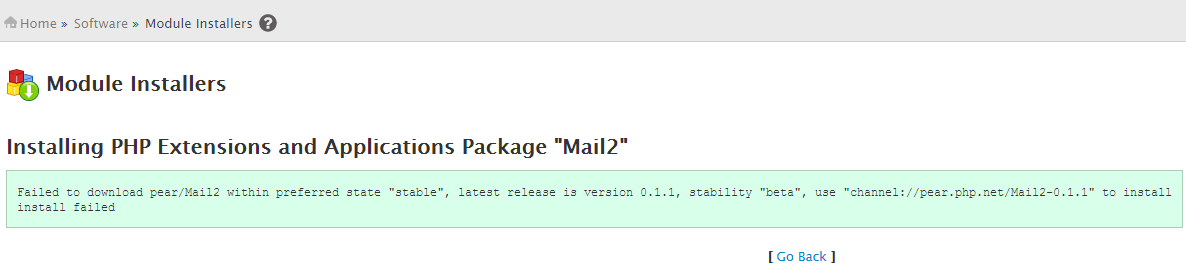
Since PEAR installer in WHM will install only stable releases of PEAR packages, it may not be able to automatically install some of them as they may not have 'stable' release at the moment (for example, such packages could still be in 'beta' despite being widely used).
If you try to install some of these packages, like Mail2, you will get the following error:
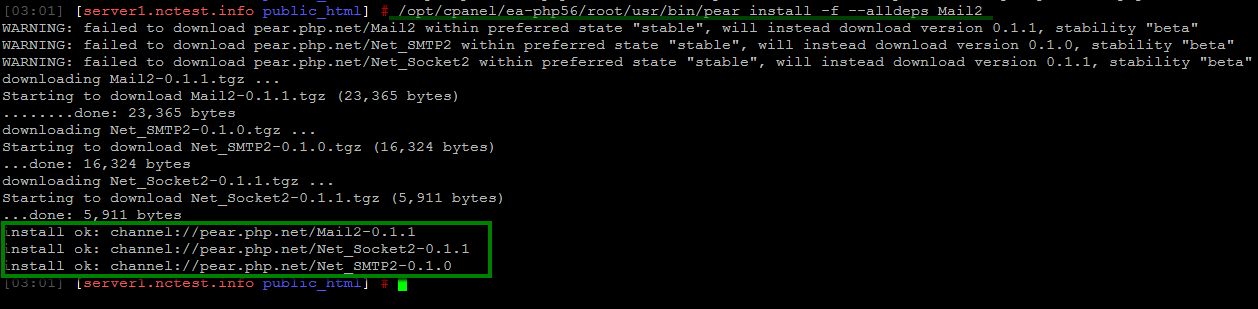
In such cases you will need to install this package manually via SSH. Since all packages are installed for each PHP versions separately, you will need to use PEAR installer from the corresponding folder as well. For example, in order to install Mail2 module for PHP 5.6 the command will be as following:
/opt/cpanel/ea-php56/root/usr/bin/pear install -f --alldeps Mail2
where
/opt/cpanel/ea-php56/root/usr/bin/pear – path to PEAR installer for PHP 5.6 (version is specified in ea-phpXX folder, so for PHP 7.0 the path will be php /opt/cpanel/ea-php70/root/usr/bin/pear)
install – command used to start installation of module
-f – force flag which will force installer to download beta and alpha releases if stable one is not available for some reason including package dependencies
--alldeps – flag used to force installer to download all package dependencies along with the package itself
Mail2 – name of package or link to it (you can copy/paste channel:// link from error message)
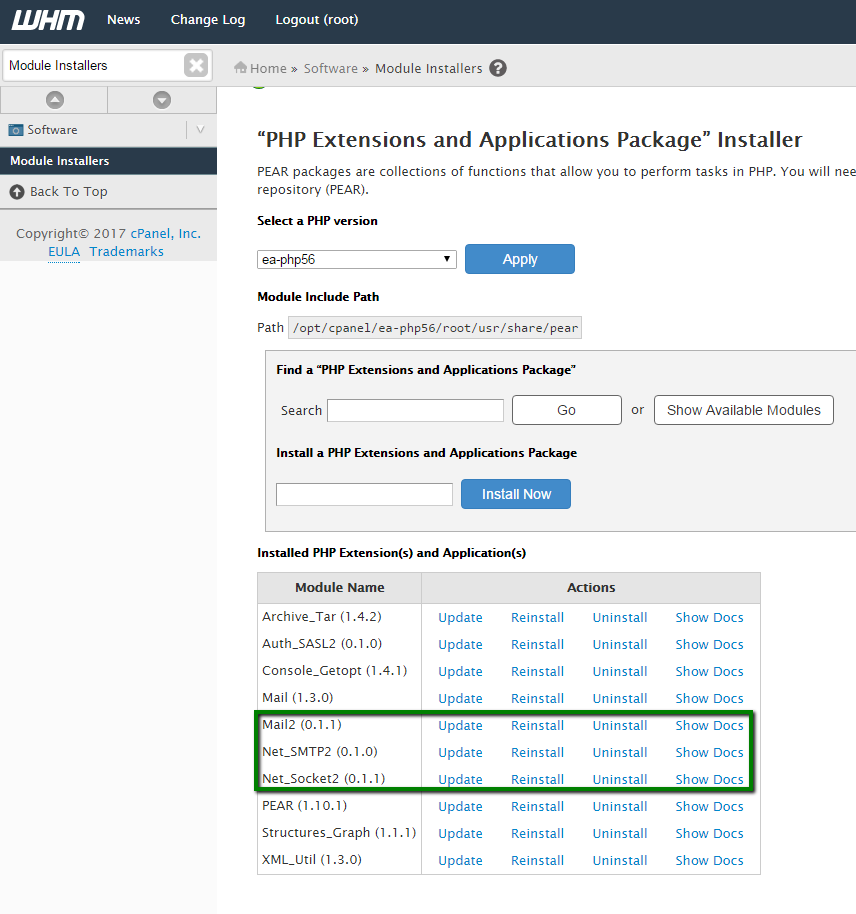
Once done, installed modules should also appear in the list of installer PEAR packages in WHM:
That’s all, you can now start using these packages in scripts without any additional adjustments.
PECL installer
PECL installer usage steps are mostly the same as for PEAR, except for the one specific step. All PECL extensions are being installed as .so file and in most cases should be compiled first. Apart from that you may need additional system packages to be installed first via yum or other package manager.
For example, you will not be able to compile mcrypt extension until you install libmcrypt and libmcrypt-devel packages. For more information about required packages refer to the official documentation of extensions you wish to install.
Also, in order to start using .so extensions, you should first add them to php.ini configuration file via MultiPHP INI Editor menu by adding the following line to the end of the file:
extension = “extension_name_you_wish_to_install.so”
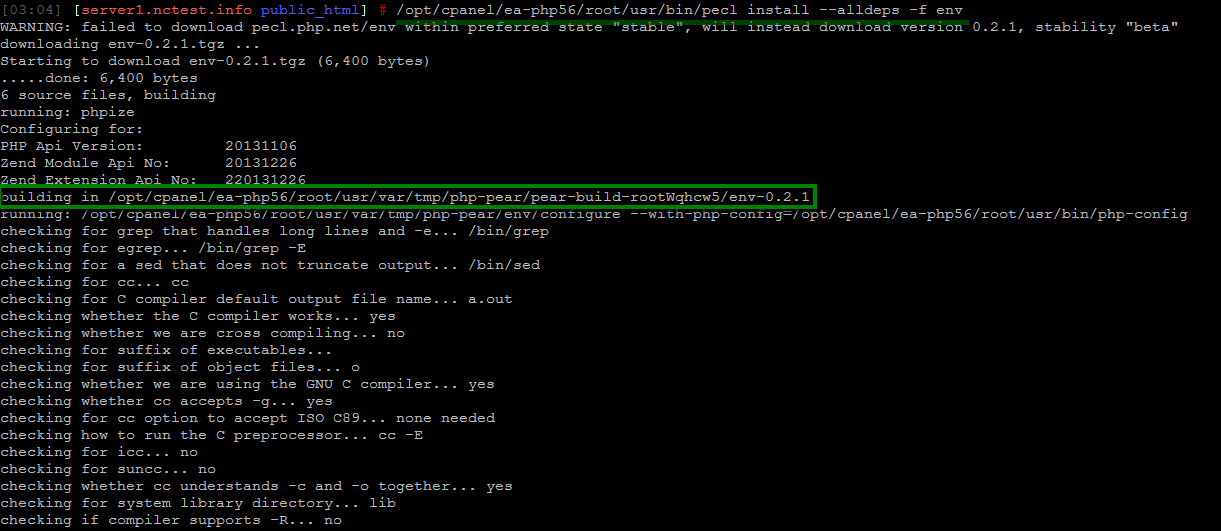
For the purpose of this tutorial we will install env extension via PECL manually for PHP 7.0.
PECL executable is located in the same folder as PEAR, so the command will be:
/opt/cpanel/ea-php70/root/usr/bin/pecl install --alldeps -f env
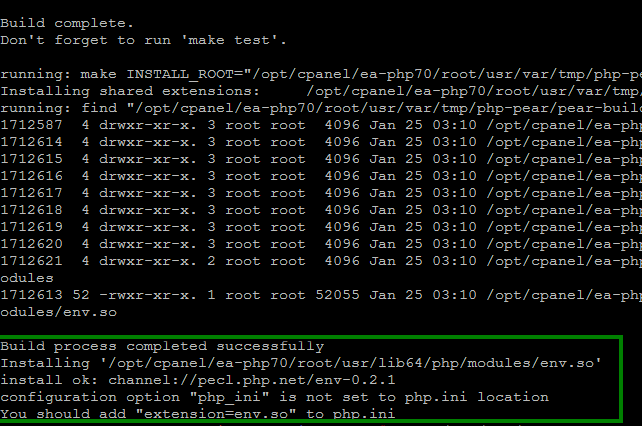
Wait till build process is complete and check the result for any possible errors. If build is successful, you should see the corresponding message like the one in screenshot below:
Once you add extension directive to php.ini, you should be able to check if module is enabled in info.php page or, if you are a console person, by running the following command:
/opt/cpanel/ea-php70/root/usr/bin/php -i | grep env
where
/opt/cpanel/ea-php70/root/usr/bin/php – path to PHP executable (note the PHP version in file path)
-i – infromation flag which displays information about all PHP environment settings in similar way as PHPinfo() function
| grep module_name – find information about your module in output
The output should be similar to the one in the screenshot:

If the output is empty, then most likely the extension was not enabled in the correct php.ini file or you are using wrong version of PHP executable.
For more information about EasyApache 4 check official guides in cPanel Knowledge Base.
That's it!
Need any help? Contact our HelpDesk
