The Exchange Management provides a command-line interface for Exchange server 2013. In fact, when you perform any actions in EAC, the Shell is doing the work behind the scenes.
The Certificate Signing Request (CSR) can be generated both in EAC and by using the command line. In this article, we will explain the commands used to create the CSR for the main domain mail.ncssltest.info and one additional domain autodiscover.ncsstest.info using Exchange Shell.
Open the Exchange Management Shell and type the following command:
New-ExchangeCertificate -GenerateRequest -RequestFile “path_to_csr.txt” -FriendlyName “friendly_name” -SubjectName “c=Country,s=State,l=Locality,o=Organization,ou=Organizational_Unit,cn=Common_Name” -DomainName additional.domain.com -PrivateKeyExportable $true
Here is a short description of the commands:
-
RequestFile: the path to the folder where the .txt or .req file with the text of the CSR will be stored. In our example, we saved the file to the disc C://, folder “certs”.
-
FriendlyName: this field is used by the server administrator to identify the CSR later.
-
SubjectName: these details will be checked by the Certificate Authority before CSR issuance.
-
Country: two-digit code of the country your domain is operating/registered in. You can check the ISO 3166-2 code for your country here or here.
-
State: the full name of the state/province/region inside the country. If there are no states or regions in your country, you can use the city name in this field.
-
Locality: the full name of the city.
-
Organization: the full registered name of your organization. You can enter NA here if you do not have a company, as Certificate Authorities do not verify the company for domain-validated (DV) certificates. Usually, it is enough to use the domain-validated certificate to secure Exchange services.
-
Organizational Unit: the name of the department inside the company. If there is no department in your company, you may enter NA.
-
Common Name
: the domain name you need to secure. This will become the primary domain of your multi-domain certificate.
-
DomainName: any additional domain(s) which will take one of the slots in your certifiacate.
-
PrivateKeyExportable $true: this part of the command means that you allow to export the private key from the server. It should be used if you are going to export the certificate later and install it on the other server. Using “$false” here or excluding this part from the command will not allow the private key to be exported and will cause issues with using the certificate on other servers.
Note
: use only alphanumeric letters and digits and avoid using any special characters like “/”, “&”, “å”, etc.
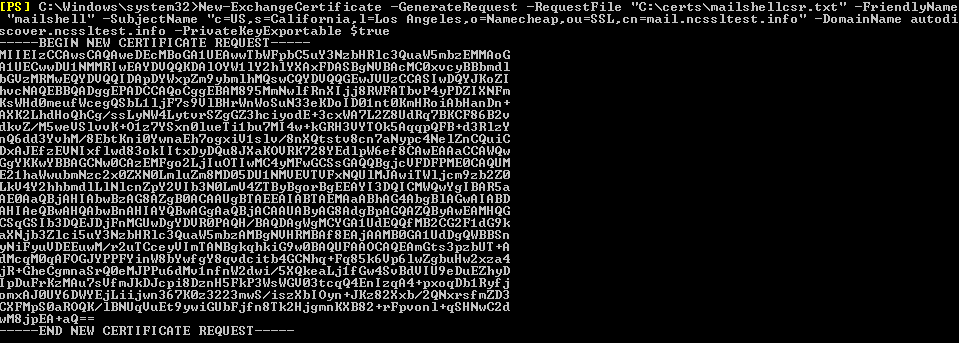
The file is stored on your computer in the folder you specified in the “-RequestFile” command. You may now activate your certificate using the CSR text. Remember that it is necessary to use the whole text, including Begin and End lines.
After the certificate is issued by the Certificate Authority, use this guide for installation.
