
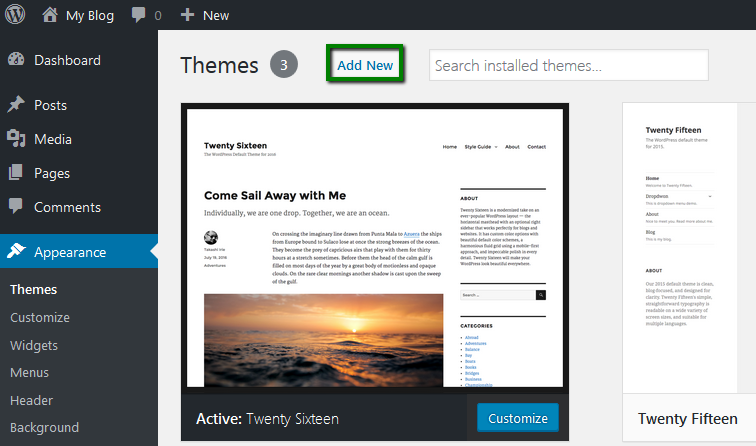
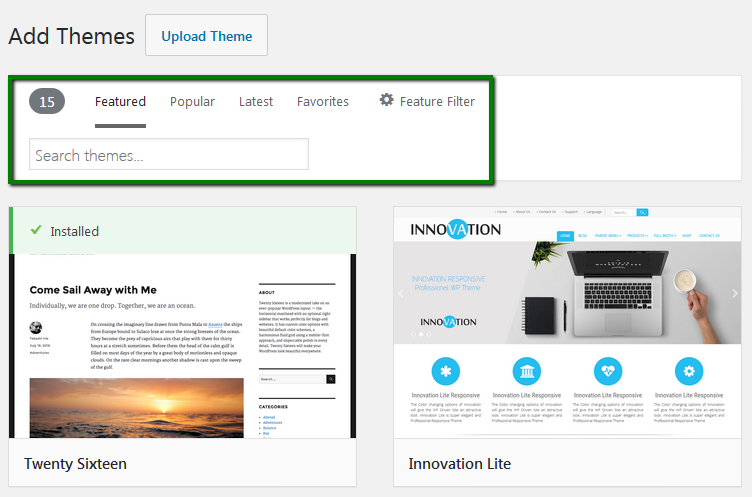
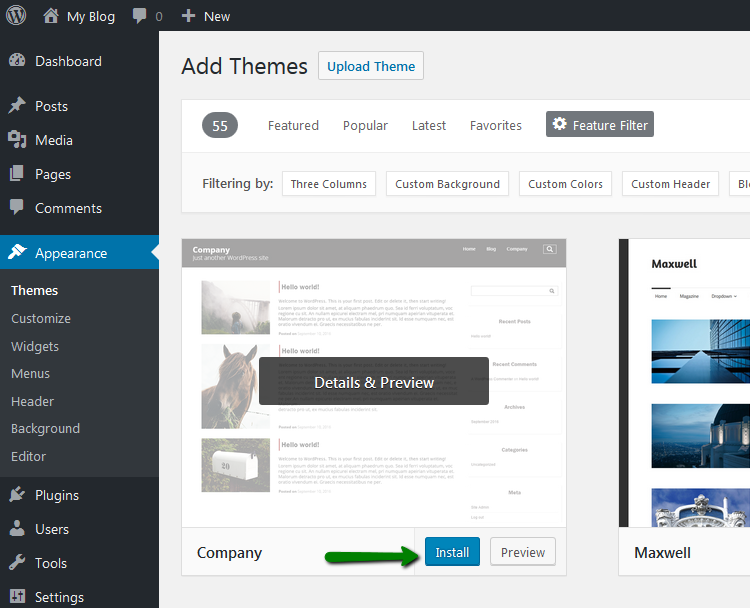
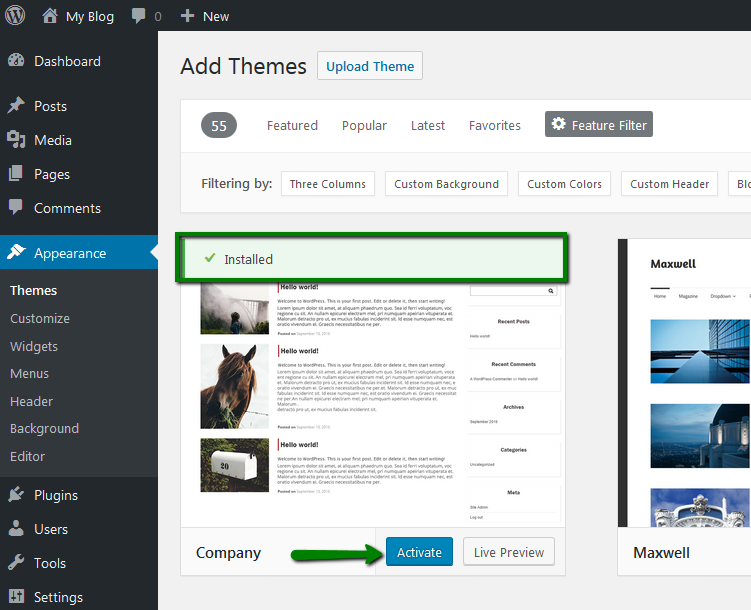
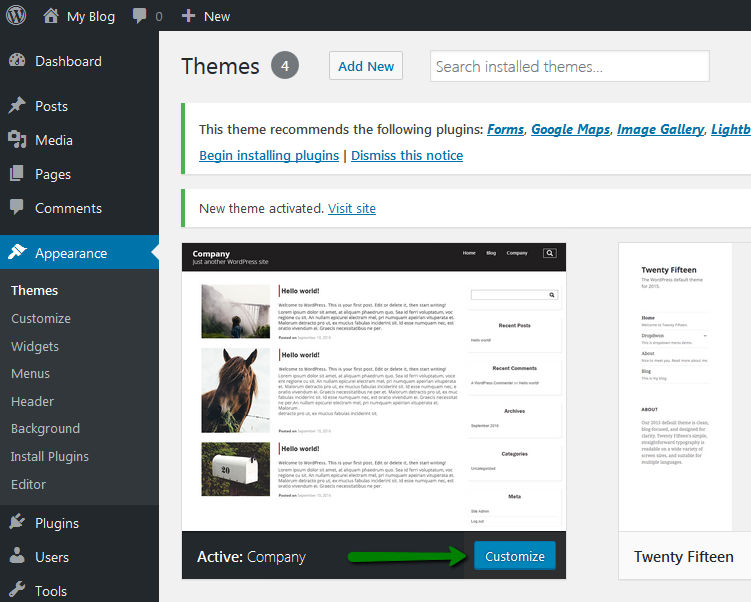
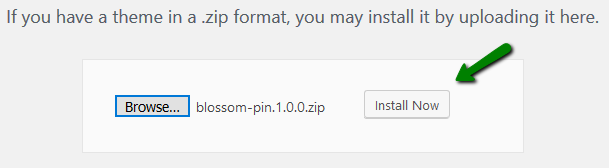
{"/api/v1/ncpl/simplekb/getarticle:\"{\\\"articleId\\\":9328,\\\"categoryId\\\":2187}\"":{"body":{"Id":9328,"FriendlyId":"","ArticleTypeId":3,"Title":"How to install a new theme for WordPress","ArticleName":"How to install a new theme for WordPress","ArticleSummary":null,"PreponedSummary":false,"Approved":true,"Body":"QSB0aGVtZSBpcyBhIGZ1bmRhbWVudGFsIGFzcGVjdCBvZiB0aGUgZGVzaWduIGlmIHlvdXIgc2l0ZSBpcyBidWlsdCBvbiBXb3JkUHJlc3MuIFRoaXMgaXMgd2hhdCB0aGUgZGV2ZWxvcG1lbnQgb2YgeW91ciB3ZWJzaXRlIG9mdGVuIGJlZ2lucyB3aXRoLiBUaGlzIGFydGljbGUgY29udGFpbnMgaW5zdHJ1Y3Rpb25zIG9uIGNoYW5naW5nIHlvdXIgV29yZFByZXNzIHRoZW1lIG9uIE5hbWVjaGVhcCBkZWRpY2F0ZWQgYW5kIHNoYXJlZCBob3N0aW5nLiBUaGVzZSBzdGVwcyBtYXkgYWxzbyBoZWxwIHRob3NlIHJlc2VhcmNoaW5nIGhvdyB0byB1cGRhdGUgYSBXb3JkUHJlc3MgdGhlbWU8Yj4uPC9iPjxiciAvPjxiciAvPjxiPk5PVEU6PC9iPiBCZWZvcmUgcHJvY2VlZGluZyB3aXRoIGFueSBjaGFuZ2VzLCBtYWtlIHN1cmUgdGhhdCB5b3UgZ2VuZXJhdGUgYSBmdWxsIDxhIGhyZWY9Imh0dHBzOi8vd3d3Lm5hbWVjaGVhcC5jb20vc3VwcG9ydC9rbm93bGVkZ2ViYXNlL2FydGljbGUuYXNweC85MzY1LzIxOTkvaG93LXRvLWNyZWF0ZS1hbmQtcmVzdG9yZS1iYWNrdXBzLWluLWNwYW5lbCI+YmFja3VwPC9hPiBvZiB5b3VyIHdlYnNpdGUuIElmIHlvdSd2ZSBjcmVhdGVkIHlvdXIgc2l0ZSB1c2luZyBTb2Z0YWN1bG91cyBzY3JpcHQgaW5zdGFsbGVyLCBmZWVsIGZyZWUgdG8gcmVmZXIgdG8gPGEgaHJlZj0iaHR0cHM6Ly93d3cubmFtZWNoZWFwLmNvbS9zdXBwb3J0L2tub3dsZWRnZWJhc2UvYXJ0aWNsZS5hc3B4LzEyNTgvMjE4Mi9ob3ctdG8td29yay13aXRoLXNjcmlwdHMtaW4tc29mdGFjdWxvdXMiPnRoaXMgZ3VpZGU8L2E+IGFzIHdlbGwgKHN0ZXAgIzQg4oCTIEJhY2t1cCBzb2Z0d2FyZSkuIEZvciBzdWJzY3JpYmVycyB0byBvdXIgRWFzeVdQIGhvc3RpbmcgcGxhbnMsIHJlZmVyIHRvIGluc3RydWN0aW9ucyBjb3ZlcmluZyBob3cgdG8gPGEgaHJlZj0iaHR0cHM6Ly93d3cubmFtZWNoZWFwLmNvbS9zdXBwb3J0L2tub3dsZWRnZWJhc2UvYXJ0aWNsZS5hc3B4Lzk4ODEvMjIzOS9lYXN5d3AtaG93LXRvLWluc3RhbGwtYS1uZXctdGhlbWUtZm9yLXlvdXItd2Vic2l0ZSI+aW5zdGFsbCB0aGVtZXMgb24gTWFuYWdlZCBXb3JkUHJlc3M8L2E+Lg0KDQoNCg0KDQo8YnIgLz48ZGl2PjxiciAvPjwvZGl2PjxiciAvPjx1bD48bGk+PGEgaHJlZj0iI2Rhc2hib2FyZDEiPnRoZW1lIGluc3RhbGxhdGlvbiB2aWEgV29yZFByZXNzIGFkbWluIGRhc2hib2FyZCAoYXV0b21hdGVkKTwvYT48L2xpPjxsaT48YSBocmVmPSIjd3BtYW5hZ2VyIj50aGVtZSBpbnN0YWxsYXRpb24gdmlhIFNvZnRhY3Vsb3VzIFdvcmRQcmVzcyBNYW5hZ2VyPC9hPjwvbGk+PGxpPjxhIGhyZWY9IiNmaWxlbWFuYWdlcjEiPnRoZW1lIGluc3RhbGxhdGlvbiB2aWEgRmlsZSBNYW5hZ2VyIChtYW51YWwpPC9hPjwvbGk+PGxpPjxhIGhyZWY9IiNkYXRhYmFzZTEiPnRoZW1lIGNoYW5nZSB0aHJvdWdoIHdlYnNpdGUgZGF0YWJhc2U8L2E+PC9saT48bGk+PGEgaHJlZj0iI3Rlcm1pbmFsIj50aGVtZSBpbnN0YWxsYXRpb24gdmlhIFRlcm1pbmFsPC9hPjwvbGk+PC91bD48ZGl2PjxiciAvPjwvZGl2PjxkaXY+PGJyIC8+PC9kaXY+PGRpdj48cD48YSBuYW1lPSJkYXNoYm9hcmQxIj48Yj5UaGVtZSBpbnN0YWxsYXRpb24gdmlhIFdvcmRQcmVzcyBkYXNoYm9hcmQgKGF1dG9tYXRlZCk8L2I+PC9hPjwvcD48L2Rpdj48aWZyYW1lIHNyYz0iLy93d3cueW91dHViZS1ub2Nvb2tpZS5jb20vZW1iZWQvQU1YX09rUlZpMk0/ZmVhdHVyZT1wbGF5ZXJfZGV0YWlscGFnZSIgYWxsb3dmdWxsc2NyZWVuPSIiIHdpZHRoPSI2NDAiIGhlaWdodD0iMzYwIiBmcmFtZWJvcmRlcj0iMCI+PC9pZnJhbWU+PGJyIC8+PGJyIC8+PGRpdj5UaGUgZWFzaWVzdCBhbmQgdGhlIG1vc3Qgd2lkZWx5LXVzZWQgbWV0aG9kIGlzIHRvIGRvIHRoYXQgdmlhIHlvdXIgPGI+V29yZFByZXNzIGRhc2hib2FyZDwvYj4uIFlvdSBjYW4gbG9nIGludG8gaXQgdXN1YWxseSB2aWEgPGk+aHR0cDovL3lvdXJkb21haW4uY29tL3dwLWFkbWluPC9pPiBvciB1c2UgPGEgaHJlZj0iaHR0cHM6Ly93d3cubmFtZWNoZWFwLmNvbS9zdXBwb3J0L2tub3dsZWRnZWJhc2UvYXJ0aWNsZS5hc3B4LzEwMTMyLzI3L3doZXJlLWNhbi1pLWxvZy1pbnRvLW15LWNwYW5lbC1ob3N0aW5nLWFjY291bnQjY1BhbmVsJTIwU2hvcnRjdXRzIiBsaW5rdGV4dD0iY1BhbmVsIFNob3J0Y3V0cyIgbGlua3R5cGU9IkN1c3RvbSIgdGFyZ2V0PSJfcGFyZW50Ij5jUGFuZWwgU2hvcnRjdXRzPC9hPiBpbiB0aGUgTmFtZWNoZWFwIGFjY291bnQgZm9yIHF1aWNrIGFjY2Vzcy48YnIgLz48L2Rpdj48ZGl2Pkl0IGlzIHBvc3NpYmxlIHRvIGNob29zZSBzb21lIDxhIGhyZWY9IiNleGlzdGluZyI+ZXhpc3RpbmcgdGhlbWU8L2E+IG9yIDxhIGhyZWY9IiN1cGxvYWQiPnVwbG9hZCB5b3VyIG93biBvbmU8L2E+LjwvZGl2PjxkaXY+PGJyIC8+PC9kaXY+PGRpdj48cD48YSBuYW1lPSJleGlzdGluZyI+Q2hvb3NpbmcgZXhpc3RpbmcgdGhlbWU8L2E+PC9wPjxiciAvPjwvZGl2PjEuIE5hdmlnYXRlIHRvIHRoZSA8Yj5BcHBlYXJhbmNlPC9iPiBtZW51IG9uIHRoZSBsZWZ0IHNpZGUgJmd0OyZndDsgPGI+VGhlbWVzPC9iPjoNCg0KPGJyIC8+PGJyIC8+PGltZyBjbGFzcz0ia2ItaW1hZ2UiIHNyYz0iaHR0cHM6Ly9OYW1lY2hlYXAuc2ltcGxla2IuY29tL1NpdGVDb250ZW50cy8yLTdDMjJENTIzNkE0NTQzRUI4MjdGM0JEODkzNkUxNTNFL21lZGlhL2luc3RhbGx3cHRoZW1lMS5wbmciIGFsdD0iQSBzY3JlZW5zaG90IG9mIHRoZSBXb3JkUHJlc3MgYWRtaW4gZGFzaGJvYXJkIHdpdGggQXBwZWFyYW5jZSBhbmQgVGhlbWVzIHNlbGVjdGVkLiIgLz48YnIgLz48YnIgLz4yLiBPbiB0aGUgbmV4dCBwYWdlLCB5b3UgY2FuIG1hbmFnZSB5b3VyIGluc3RhbGxlZCB0aGVtZXMgb3IgaW5zdGFsbCBhIG5ldyBvbmUuIElmIHlvdSBhcmUgZ29pbmcgdG8gaW5zdGFsbCBhIHRoZW1lLCB5b3UgaGl0IDxiPkFkZCBOZXc8L2I+IGJ1dHRvbjoNCg0KPGJyIC8+PGJyIC8+PGltZyBjbGFzcz0ia2ItaW1hZ2UiIHNyYz0iaHR0cHM6Ly9OYW1lY2hlYXAuc2ltcGxla2IuY29tL1NpdGVDb250ZW50cy8yLTdDMjJENTIzNkE0NTQzRUI4MjdGM0JEODkzNkUxNTNFL21lZGlhL2luc3RhbGx3cHRoZW1lMi5wbmciIGFsdD0iVGhlIEFkbWluIGRhc2hib2FyZCBpcyBzaG93biB3aXRoIGFuIGluZGljYXRpb24gb2Ygd2hlcmUgdG8gY2xpY2sgdG8gYWRkIGEgbmV3IHRoZW1lIiAvPjxiciAvPjxiciAvPjMuIFlvdSB3aWxsIHNlZSB0aGUgbGlzdCBvZiB0aGUgdGhlbWVzIGF2YWlsYWJsZSBmb3IgaW5zdGFsbGF0aW9uLiBJdCBpcyBwb3NzaWJsZSB0byBkbyB0aGUgZm9sbG93aW5nOiA8YnIgLz48cD48L3A+PHVsPjxsaT5TZWxlY3QgPGI+RmVhdHVyZWQ8L2I+LCA8Yj5Qb3B1bGFyPC9iPiwgPGI+TGF0ZXN0PC9iPiBvciA8Yj5GYXZvcml0ZXM8L2I+IG9uZXMgdG8gaW5zdGFsbDwvbGk+PGxpPlVzZSB0aGUgYnVpbHQtaW48Yj4gU2VhcmNoPC9iPiBpZiB5b3UgbmVlZCB0byBmaW5kIGEgY2VydGFpbiB0aGVtZTwvbGk+PGxpPlNldCBjZXJ0YWluIGZpbHRlcnMgYnkgY2xpY2tpbmcgb24gPGI+RmVhdHVyZSBGaWx0ZXI8L2I+PC9saT48L3VsPjxiciAvPjxpbWcgY2xhc3M9ImtiLWltYWdlIiBzcmM9Imh0dHBzOi8vTmFtZWNoZWFwLnNpbXBsZWtiLmNvbS9TaXRlQ29udGVudHMvMi03QzIyRDUyMzZBNDU0M0VCODI3RjNCRDg5MzZFMTUzRS9tZWRpYS9pbnN0YWxsd3B0aGVtZTMucG5nIiAvPjxiciAvPjxiciAvPjQuIEFmdGVyIDxiPkZlYXR1cmUgRmlsdGVyPC9iPiBpcyBzZWxlY3RlZCwgeW91IHdpbGwgYmUgYWJsZSB0byBuYXJyb3cgZG93biB5b3VyIHRoZW1lIHNlYXJjaCBieSBjaGVja2luZyB0aGUgbmVjZXNzYXJ5IHBhcmFtZXRlcnMuIA0KDQo8YnIgLz48YnIgLz5Zb3UgY2FuIHNlYXJjaCBieSA8Yj4gTGF5b3V0PC9iPiAoMSksIDxiPkZlYXR1cmVzIDwvYj4oMikgYW5kIDxiPlN1YmplY3Q8L2I+ICgzKS4gT25jZSBzZWxlY3RlZCwgY2xpY2sgb24gPGI+QXBwbHkgRmlsdGVyczwvYj46DQogDQo8YnIgLz48YnIgLz48aW1nIGNsYXNzPSJrYi1pbWFnZSIgc3JjPSJodHRwczovL05hbWVjaGVhcC5zaW1wbGVrYi5jb20vU2l0ZUNvbnRlbnRzLzItN0MyMkQ1MjM2QTQ1NDNFQjgyN0YzQkQ4OTM2RTE1M0UvbWVkaWEvaW5zdGFsbHdwdGhlbWU0LnBuZyIgLz48YnIgLz48YnIgLz41LiBXaGVuIHRoZSBsaXN0IG9mIHRoZSB0aGVtZXMgeW91IHNlYXJjaCBmb3IgaXMgZGlzcGxheWVkLCB5b3Ugd2lsbCBiZSBhYmxlIHRvIHByZXZpZXcgdGhlIG9uZSB5b3UgbGlrZS4gVG8gc2V0IGl0IHVwLCBjbGljayBvbiB0aGUgPGI+SW5zdGFsbDwvYj4gYnV0dG9uOg0KDQo8YnIgLz48YnIgLz48aW1nIGNsYXNzPSJrYi1pbWFnZSIgc3JjPSJodHRwczovL05hbWVjaGVhcC5zaW1wbGVrYi5jb20vU2l0ZUNvbnRlbnRzLzItN0MyMkQ1MjM2QTQ1NDNFQjgyN0YzQkQ4OTM2RTE1M0UvbWVkaWEvaW5zdGFsbHdwdGhlbWU1LnBuZyIgLz48YnIgLz48YnIgLz42LiBBcyBzb29uIGFzIHRoZSBzZXR1cCBpcyBmaW5pc2hlZCwgeW91IGNhbiBhY3RpdmF0ZSB0aGUgdGhlbWUgYXQgb25jZSBieSBjbGlja2luZyA8Yj5BY3RpdmF0ZTwvYj46IA0KDQo8YnIgLz48YnIgLz48aW1nIGNsYXNzPSJrYi1pbWFnZSIgc3JjPSJodHRwczovL05hbWVjaGVhcC5zaW1wbGVrYi5jb20vU2l0ZUNvbnRlbnRzLzItN0MyMkQ1MjM2QTQ1NDNFQjgyN0YzQkQ4OTM2RTE1M0UvbWVkaWEvaW5zdGFsbHdwdGhlbWU2LnBuZyIgLz48YnIgLz48YnIgLz43LiBBZnRlciB0aGF0LCB5b3UgbWF5IHN0YXJ0IGN1c3RvbWl6aW5nIGl0IGRlcGVuZGluZyBvbiB5b3VyIG5lZWRzOg0KDQo8YnIgLz48YnIgLz48aW1nIGNsYXNzPSJrYi1pbWFnZSIgc3JjPSJodHRwczovL05hbWVjaGVhcC5zaW1wbGVrYi5jb20vU2l0ZUNvbnRlbnRzLzItN0MyMkQ1MjM2QTQ1NDNFQjgyN0YzQkQ4OTM2RTE1M0UvbWVkaWEvaW5zdGFsbHdwdGhlbWU3LnBuZyIgLz48YnIgLz48ZGl2PjxiciAvPjwvZGl2PjxkaXY+PHA+PGEgbmFtZT0idXBsb2FkIj5VcGxvYWRpbmcgeW91ciBvd24gdGhlbWU8L2E+PC9wPjwvZGl2PjxkaXY+PGJyIC8+PC9kaXY+PGRpdj5JZiB5b3UgaGF2ZSBhIHRoZW1lIHNhdmVkIG9uIHlvdXIgUEMsIHlvdSBjYW4gZWFzaWx5IHVwbG9hZCBpdCBpbnRvIHRoZSA8YSBocmVmPSJodHRwczovL3d3dy5uYW1lY2hlYXAuY29tL3dvcmRwcmVzcy93b3JkcHJlc3MtdHV0b3JpYWwvIj5Xb3JkUHJlc3MgRGFzaGJvYXJkPC9hPiBmb2xsb3dpbmcgdGhlIG5leHQgc3RlcHMuPC9kaXY+PGRpdj4xLiBHbyB0byB0aGUgPGI+V29yZFByZXNzIERhc2hib2FyZCAmZ3Q7Jmd0OyBBcHBlYXJhbmNlICZndDsmZ3Q7IFRoZW1lcyAmZ3Q7Jmd0OyBBZGQgTmV3PC9iPi48YnIgLz4yLiBDbGljayB0aGUgPGI+VXBsb2FkIFRoZW1lPC9iPiBidXR0b24gcGljdHVyZWQgYmVsb3cuPC9kaXY+PGRpdj48YnIgLz48L2Rpdj48ZGl2PjxpbWcgY2xhc3M9ImtiLWltYWdlIiBzcmM9Imh0dHBzOi8vTmFtZWNoZWFwLnNpbXBsZWtiLmNvbS9TaXRlQ29udGVudHMvMi03QzIyRDUyMzZBNDU0M0VCODI3RjNCRDg5MzZFMTUzRS9tZWRpYS91cGxvYWRfd3BfdGhlbWUxLnBuZyIgLz48L2Rpdj48ZGl2PjxiciAvPjwvZGl2PjxkaXY+My4gQWZ0ZXIgY2xpY2tpbmcgb24gPGI+VXBsb2FkIFRoZW1lPC9iPiB5b3Ugd2lsbCBiZSBhYmxlIHRvIDxiPkJyb3dzZSBmaWxlczwvYj4gb24geW91ciBkZXZpY2UgYW5kIGNob29zZSB0aGUgdGhlbWUgZmlsZS48L2Rpdj48ZGl2PjxiciAvPjwvZGl2PjxpbWcgY2xhc3M9ImtiLWltYWdlIiBzcmM9Imh0dHBzOi8vTmFtZWNoZWFwLnNpbXBsZWtiLmNvbS9TaXRlQ29udGVudHMvMi03QzIyRDUyMzZBNDU0M0VCODI3RjNCRDg5MzZFMTUzRS9tZWRpYS91cGxvYWRfd3BfdGhlbWUyLnBuZyIgLz48ZGl2PjxiciAvPjwvZGl2PjxkaXY+S2VlcCBpbiBtaW5kIHRoYXQgaXQgaXMgb25seSBwb3NzaWJsZSB0byB1cGxvYWQgLnppcCBmaWxlcy48YnIgLz40LiBBcyBzb29uIGFzIHRoZSB0aGVtZSBpcyBjaG9zZW4sIHlvdSBjYW4gPGI+SW5zdGFsbCA8L2I+aXQuPC9kaXY+PGRpdj48YnIgLz48L2Rpdj48ZGl2PjxpbWcgY2xhc3M9ImtiLWltYWdlIiBzcmM9Imh0dHBzOi8vTmFtZWNoZWFwLnNpbXBsZWtiLmNvbS9TaXRlQ29udGVudHMvMi03QzIyRDUyMzZBNDU0M0VCODI3RjNCRDg5MzZFMTUzRS9tZWRpYS91cGxvYWRfd3BfdGhlbWUzLnBuZyIgLz48L2Rpdj48ZGl2PjxiciAvPjwvZGl2PjxkaXY+NS4gSWYgdGhlcmUgYXJlIG5vIGlzc3VlcyBkdXJpbmcgdGhlIGluc3RhbGxhdGlvbiwgeW91IHdpbGwgZ2V0IGEgbWVzc2FnZSBzYXlpbmcgdGhlIHRoZW1lIHdhcyBpbnN0YWxsZWQgc3VjY2Vzc2Z1bGx5LiA8YnIgLz48L2Rpdj48ZGl2PjxiciAvPjwvZGl2PjxpbWcgY2xhc3M9ImtiLWltYWdlIiBzcmM9Imh0dHBzOi8vTmFtZWNoZWFwLnNpbXBsZWtiLmNvbS9TaXRlQ29udGVudHMvMi03QzIyRDUyMzZBNDU0M0VCODI3RjNCRDg5MzZFMTUzRS9tZWRpYS91cGxvYWRfd3BfdGhlbWU0LnBuZyIgLz48ZGl2PjxiciAvPjwvZGl2PjxkaXY+WW91IGNhbiA8Yj5MaXZlIFByZXZpZXc8L2I+IHRoZSB0aGVtZSwgPGI+QWN0aXZhdGUgPC9iPml0IHJpZ2h0IGF3YXkgb3IgPGI+UmV0dXJuIHRvIFRoZW1lcyBQYWdlPC9iPi48YnIgLz48L2Rpdj48ZGl2PjxiciAvPjwvZGl2PjxkaXY+PGJyIC8+PC9kaXY+PGRpdj48YnIgLz48L2Rpdj48cD48YSBuYW1lPSJ3cG1hbmFnZXIiPjxiPlRoZW1lIGluc3RhbGxhdGlvbiB2aWEgU29mdGFjdWxvdXMgV29yZFByZXNzIE1hbmFnZXI8L2I+PC9hPjwvcD48YnIgLz48ZGl2Pg0KMS4gQWNjZXNzIHlvdXIgPGEgaHJlZj0iaHR0cHM6Ly93d3cubmFtZWNoZWFwLmNvbS9zdXBwb3J0L2tub3dsZWRnZWJhc2UvYXJ0aWNsZS5hc3B4LzEwMTMyLzI3L3doZXJlLWNhbi1pLWxvZy1pbnRvLW15LWNwYW5lbC1ob3N0aW5nLWFjY291bnQiIGxpbmt0ZXh0PSJjUGFuZWwgYWNjb3VudCIgbGlua3R5cGU9IkN1c3RvbSIgdGFyZ2V0PSJfYmxhbmsiPmNQYW5lbCBhY2NvdW50PC9hPiwgbmF2aWdhdGUgdG8gdGhlIDxiPlNvZnR3YXJlPC9iPiBzZWN0aW9uIGFuZCBjbGljayA8Yj5Xb3JkUHJlc3MgTWFuYWdlciBieSBTb2Z0YWN1bG91czwvYj46PGJyIC8+PGJyIC8+PGRpdj48aW1nIGNsYXNzPSJrYi1pbWFnZSIgc3JjPSJodHRwczovL05hbWVjaGVhcC5zaW1wbGVrYi5jb20vU2l0ZUNvbnRlbnRzLzItN0MyMkQ1MjM2QTQ1NDNFQjgyN0YzQkQ4OTM2RTE1M0UvbWVkaWEvc29mdHdhcmUxLnBuZyIgLz48L2Rpdj48ZGl2PjxiciAvPjwvZGl2PjxiciAvPjIuIENsaWNrIHRoZSBhcnJvdy1kb3duIGJ1dHRvbiAoMSkgdG8gb3BlbiB5b3VyIGluc3RhbGxhdGlvbiBkZXRhaWxzLCBhbmQgY2xpY2sgPGI+TWFuYWdlIFRoZW1lczwvYj4gKDIpOg0KPGJyIC8+PGJyIC8+PGltZyBjbGFzcz0ia2ItaW1hZ2UiIHNyYz0iaHR0cHM6Ly9OYW1lY2hlYXAuc2ltcGxla2IuY29tL1NpdGVDb250ZW50cy8yLTdDMjJENTIzNkE0NTQzRUI4MjdGM0JEODkzNkUxNTNFL21lZGlhL3dwX21hbmFnZXJfMDMucG5nIiAvPjxiciAvPjxiciAvPg0KMy4gSW4gdGhlIDxiPkluc3RhbGxlZDwvYj4gdGFiLCB5b3Ugd2lsbCBzZWUgdGhlIGxpc3Qgb2YgdGhlbWVzIHRoYXQgYXJlIGFscmVhZHkgaW5zdGFsbGVkLCBidXQgbm90IGFjdGl2YXRlZCAoZXhjZXB0IG9uZSAtIHlvdXIgY3VycmVudCB0aGVtZSkuIFR1cm4gb24gdGhlIHRvZ2dsZSBpbiB0aGUgPGI+U3RhdHVzPC9iPiBjb2x1bW4gbmV4dCB0byB0aGUgdGhlbWUgeW91IHdhbnQgdG8gZW5hYmxlOjxiciAvPjxiciAvPjxpbWcgY2xhc3M9ImtiLWltYWdlIiBzcmM9Imh0dHBzOi8vTmFtZWNoZWFwLnNpbXBsZWtiLmNvbS9TaXRlQ29udGVudHMvMi03QzIyRDUyMzZBNDU0M0VCODI3RjNCRDg5MzZFMTUzRS9tZWRpYS93cF9tYW5hZ2VyXzA1LnBuZyIgLz48YnIgLz48YnIgLz4gWW91IHdpbGwgc2VlIHRoZSBtZXNzYWdlIDxiPlRoZW1lIGluc3RhbGxlZCBzdWNjZXNzZnVsbHk8L2I+LiBUaGUgb2xkIHRoZW1lIHdpbGwgYmUgZGVhY3RpdmF0ZWQgYXV0b21hdGljYWxseS48YnIgLz48YnIgLz4NCklmIHlvdSB3YW50IHRvIGFkZCBhIG5ldyB0aGVtZSwgZ28gdG8gdGhlIDxiPkFkZCBUaGVtZXM8L2I+IHRhYiwgZW50ZXIgdGhlIG5hbWUgb2YgdGhlIHRoZW1lIHlvdSdkIGxpa2UgdG8gaW5zdGFsbCwgY2xpY2sgRW50ZXIgYW5kIHByZXNzIDxiPkluc3RhbGw8L2I+IG5leHQgdG8gdGhlIGRlc2lyZWQgdGhlbWU6PGJyIC8+PGJyIC8+PGltZyBjbGFzcz0ia2ItaW1hZ2UiIHNyYz0iaHR0cHM6Ly9OYW1lY2hlYXAuc2ltcGxla2IuY29tL1NpdGVDb250ZW50cy8yLTdDMjJENTIzNkE0NTQzRUI4MjdGM0JEODkzNkUxNTNFL21lZGlhL3dwX21hbmFnZXJfMDYucG5nIiAvPjxiciAvPjxiciAvPg0KSW4gY2FzZSB5b3Ugd2lzaCB0byB1cGxvYWQgeW91ciBvd24gdGhlbWUsIHN3aXRjaCB0byB0aGUgPGI+VXBsb2FkIFRoZW1lPC9iPiB0YWIsIGRyYWcgYW5kIGRyb3AgdGhlIGFyY2hpdmUgd2l0aCB5b3VyIHRoZW1lIGFuZCBoaXQgPGI+VXBsb2FkPC9iPjoNCjxiciAvPjxiciAvPjxpbWcgY2xhc3M9ImtiLWltYWdlIiBzcmM9Imh0dHBzOi8vTmFtZWNoZWFwLnNpbXBsZWtiLmNvbS9TaXRlQ29udGVudHMvMi03QzIyRDUyMzZBNDU0M0VCODI3RjNCRDg5MzZFMTUzRS9tZWRpYS93cF9tYW5hZ2VyXzA3LnBuZyIgLz48YnIgLz48YnIgLz5Zb3UgY2FuIG5vdyBhY3RpdmF0ZSB5b3VyIHRoZW1lIGFuZCBpdCB3aWxsIGJlIGluc3RhbGxlZCBvbiB5b3VyIHdlYnNpdGUuPGJyIC8+PGJyIC8+PHA+PGEgbmFtZT0iZmlsZW1hbmFnZXIxIj48Yj5UaGVtZSBpbnN0YWxsYXRpb24gdmlhIEZpbGUgTWFuYWdlciAobWFudWFsKTwvYj48L2E+PC9wPjxiciAvPg0KDQpUaGUgdGhpcmQgd2F5IHRvIGluc3RhbGwgYSB0aGVtZSBmb3IgeW91ciBXb3JkUHJlc3Mgd2Vic2l0ZSBpcyB2aWEgY1BhbmVsIDxiPkZpbGUgTWFuYWdlcjwvYj4uIFlvdSBzaG91bGQgaGF2ZSBhIGZpbGUgb2YgYXJjaGl2ZWQgdGhlbWUgZmlsZXMgb24geW91ciBQQyBzYXZlZCBiZWZvcmVoYW5kLiA8YnIgLz48L2Rpdj48ZGl2PjxiciAvPjxkaXY+PGJyIC8+PC9kaXY+MS4gSW4gb3JkZXIgdG8gdXBsb2FkIGEgdGhlbWUgZmlsZSB0byB5b3VyIGFjY291bnQsIGxvZyBpbnRvIHlvdXIgPGI+Y1BhbmVsPC9iPi4NCjxiciAvPjIuIE5hdmlnYXRlIHRvIHRoZSA8Yj5GaWxlczwvYj4gc2VjdGlvbiAmZ3Q7Jmd0OyB0aGUgPGI+RmlsZSBNYW5hZ2VyPC9iPiBtZW51Og0KDQo8YnIgLz48YnIgLz48aW1nIGNsYXNzPSJrYi1pbWFnZSIgc3JjPSJodHRwczovL05hbWVjaGVhcC5zaW1wbGVrYi5jb20vU2l0ZUNvbnRlbnRzLzItN0MyMkQ1MjM2QTQ1NDNFQjgyN0YzQkQ4OTM2RTE1M0UvbWVkaWEvZmlsZTEuMS5wbmciIC8+PGJyIC8+PGJyIC8+My4gTW92ZSB0byB0aGUgd2Vic2l0ZSBkaXJlY3Rvcnkgcm9vdCBhbmQgbG9jYXRlIDxiPi93cC1jb250ZW50L3RoZW1lcy88L2I+IGZvbGRlci4gQ2xpY2sgdGhlIDxiPlVwbG9hZDwvYj4gYnV0dG9uLCBmaW5kIHlvdXIgdGhlbWUgYXJjaGl2ZSBhbmQgdXBsb2FkIGl0IHRvIHRoZSByZXF1aXJlZCBkaXJlY3Rvcnk6IA0KDQoNCjxiciAvPjxiciAvPjxkaXY+PGltZyBjbGFzcz0ia2ItaW1hZ2UiIHNyYz0iaHR0cHM6Ly9OYW1lY2hlYXAuc2ltcGxla2IuY29tL1NpdGVDb250ZW50cy8yLTdDMjJENTIzNkE0NTQzRUI4MjdGM0JEODkzNkUxNTNFL21lZGlhL3BsX3dwXzkucG5nIiAvPjwvZGl2PjxiciAvPjxpbWcgY2xhc3M9ImtiLWltYWdlIiBzcmM9Imh0dHBzOi8vTmFtZWNoZWFwLnNpbXBsZWtiLmNvbS9TaXRlQ29udGVudHMvMi03QzIyRDUyMzZBNDU0M0VCODI3RjNCRDg5MzZFMTUzRS9tZWRpYS9wbF93cF8xMC5wbmciIC8+PGJyIC8+PGJyIC8+NC4gPGI+RXh0cmFjdDwvYj4gdGhlIHRoZW1lIGZpbGVzIGFuZCBtYWtlIHN1cmUgdGhlIHRoZW1lIGZvbGRlciBpcyBsb2NhdGVkIGluIHRoZSByaWdodCBkaXJlY3Rvcnk6DQo8YnIgLz48YnIgLz48aW1nIGNsYXNzPSJrYi1pbWFnZSIgc3JjPSJodHRwczovL05hbWVjaGVhcC5zaW1wbGVrYi5jb20vU2l0ZUNvbnRlbnRzLzItN0MyMkQ1MjM2QTQ1NDNFQjgyN0YzQkQ4OTM2RTE1M0UvbWVkaWEvcGxfd3BfMTEucG5nIiAvPjxiciAvPjxiciAvPjxkaXY+NS4gQWNjZXNzIHlvdXIgV29yZFByZXNzIEFkbWluIERhc2hib2FyZCB0aGVuIGFuZCBuYXZpZ2F0ZSB0byA8Yj5BcHBlYXJhbmNlPC9iPiAmZ3Q7Jmd0OyA8Yj5UaGVtZXM8L2I+LiBGaW5kIGEgbmV3IHRoZW1lIHlvdSBleHRyYWN0ZWQgYW5kIGFjdGl2YXRlIGl0LiA8YnIgLz48L2Rpdj48ZGl2PjxiciAvPjwvZGl2PjxwPjxhIG5hbWU9ImRhdGFiYXNlMSI+PGI+VGhlbWUgY2hhbmdlIHRocm91Z2ggd2Vic2l0ZSBkYXRhYmFzZTwvYj48L2E+PC9wPjxiciAvPjxkaXY+QW5vdGhlciB3YXkgb2YgPGI+c3dpdGNoaW5nIHRoZSB0aGVtZSB2aWEgZGF0YWJhc2U8L2I+IGlzIHVzdWFsbHkgdXNlZCBpbiBlbWVyZ2VuY3kgY2FzZXMuIEZvciBleGFtcGxlLCB5b3VyIHRoZW1lIGlzIGNvcnJ1cHRlZCBvciBoYWNrZWQsIGFuZCB5b3UgZG8gbm90IGhhdmUgYWNjZXNzIHRvIHlvdXIgV29yZFByZXNzIERhc2hib2FyZC4gU3VjaCBjYXNlcyBjYW4gYmUgcmVzb2x2ZWQgYnkgc3dpdGNoaW5nIHRvIGEgZGVmYXVsdCB0aGVtZSwgYW5kIGFzIHlvdSBkbyBub3QgaGF2ZSBhY2Nlc3MgdG8gdGhlIERhc2hib2FyZCwgeW91IG5lZWQgdG8gZG8gdGhhdCBkaXJlY3RseSBpbiB5b3VyIGRhdGFiYXNlLiA8YnIgLz48L2Rpdj48ZGl2PjxiciAvPjEuIFlvdSBjYW4gY2hlY2sgd2hhdCBkYXRhYmFzZSBpcyB1c2VkIGZvciB5b3VyIFdvcmRQcmVzcyB3ZWJzaXRlIGluIHRoZSA8Yj53cC1jb25maWcucGhwPC9iPiBmaWxlIGxvY2F0ZWQgaW4gPGI+Y1BhbmVsPC9iPiAmZ3Q7Jmd0OyB0aGUgPGI+RmlsZXM8L2I+IHNlY3Rpb24gJmd0OyZndDsgdGhlIDxiPkZpbGUgbWFuYWdlcjwvYj4gbWVudSBpbiB0aGUgcm9vdCBmb2xkZXIgZm9yIHlvdXIgV29yZFByZXNzIGluc3RhbGxhdGlvbjoNCg0KPGJyIC8+PGJyIC8+PGRpdj48aW1nIGNsYXNzPSJrYi1pbWFnZSIgc3JjPSJodHRwczovL05hbWVjaGVhcC5zaW1wbGVrYi5jb20vU2l0ZUNvbnRlbnRzLzItN0MyMkQ1MjM2QTQ1NDNFQjgyN0YzQkQ4OTM2RTE1M0UvbWVkaWEvcGxfd3BfMS5wbmciIC8+PC9kaXY+PGJyIC8+PGltZyBjbGFzcz0ia2ItaW1hZ2UiIHNyYz0iaHR0cHM6Ly9OYW1lY2hlYXAuc2ltcGxla2IuY29tL1NpdGVDb250ZW50cy8yLTdDMjJENTIzNkE0NTQzRUI4MjdGM0JEODkzNkUxNTNFL21lZGlhL3BsX3dwXzEyLnBuZyIgLz48YnIgLz48YnIgLz4yLiBJbiBvcmRlciB0byBhY2Nlc3MgdGhlIGRhdGFiYXNlLCB5b3UgbmVlZCBuYXZpZ2F0ZSB0byA8Yj5EYXRhYmFzZXM8L2I+IHNlY3Rpb24gaW4gY1BhbmVsICZndDsgPGI+cGhwTXlBZG1pbjwvYj4gbWVudTogDQo8YnIgLz48YnIgLz48aW1nIGNsYXNzPSJrYi1pbWFnZSIgc3JjPSJodHRwczovL05hbWVjaGVhcC5zaW1wbGVrYi5jb20vU2l0ZUNvbnRlbnRzLzItN0MyMkQ1MjM2QTQ1NDNFQjgyN0YzQkQ4OTM2RTE1M0UvbWVkaWEvcGhwbXkxLnBuZyIgLz48YnIgLz48YnIgLz4zLiBBZnRlciB0aGF0LCB5b3UgbmVlZCB0byBzZWxlY3QgYSBkYXRhYmFzZSB3aGljaCBpcyBhc3NpZ25lZCB0byB0aGlzIFdvcmRQcmVzcyB3ZWJzaXRlIGluIHRoZSBsZWZ0IHBhcnQgb2YgdGhlIHdpbmRvdyBhbmQgc2VsZWN0IDxiPndwLW9wdGlvbnM8L2I+IHRhYmxlOg0KDQo8YnIgLz48YnIgLz48aW1nIGNsYXNzPSJrYi1pbWFnZSIgc3JjPSJodHRwczovL05hbWVjaGVhcC5zaW1wbGVrYi5jb20vU2l0ZUNvbnRlbnRzLzItN0MyMkQ1MjM2QTQ1NDNFQjgyN0YzQkQ4OTM2RTE1M0UvbWVkaWEvcGxfd3BfMTMucG5nIiAvPjxiciAvPjxiciAvPjQuIFRoZSBjb2x1bW5zICg8Yj50ZW1wbGF0ZTwvYj4gYW5kIDxiPnN0eWxlc2hlZXQ8L2I+KSByZWxhdGVkIHRvIHRoZSBhY3RpdmF0ZWQgdGhlbWUgYXJlIHVzdWFsbHkgbG9jYXRlZCBvbiB0aGUgc2Vjb25kIHBhZ2U6DQoNCjxiciAvPjxiciAvPjxpbWcgY2xhc3M9ImtiLWltYWdlIiBzcmM9Imh0dHBzOi8vTmFtZWNoZWFwLnNpbXBsZWtiLmNvbS9TaXRlQ29udGVudHMvMi03QzIyRDUyMzZBNDU0M0VCODI3RjNCRDg5MzZFMTUzRS9tZWRpYS9wbF93cF8xNC5wbmciIC8+PGJyIC8+PGJyIC8+NS4gWW91IG5lZWQgdG8gY2hhbmdlIHRoZXNlIHZhbHVlcyB0byB0aGUgbmFtZSBvZiBhIGRlZmF1bHQgdGhlbWUuIEZvciBleGFtcGxlLCA8Yj50d2VudHl0d2VudHk8L2I+LCA8Yj50d2VudHl0d2VudHlvbmU8L2I+IG9yIDxiPnR3ZW50eXR3ZW50eXR3bzwvYj46DQoNCjxiciAvPjxiciAvPjxpbWcgY2xhc3M9ImtiLWltYWdlIiBzcmM9Imh0dHBzOi8vTmFtZWNoZWFwLnNpbXBsZWtiLmNvbS9TaXRlQ29udGVudHMvMi03QzIyRDUyMzZBNDU0M0VCODI3RjNCRDg5MzZFMTUzRS9tZWRpYS9pbnN0YWxsX3dwX3RoZW1lMTUucG5nIiAvPjxiciAvPjxiciAvPjxkaXY+VGhpcyB3aWxsIHN3aXRjaCB5b3VyIHRoZW1lIHRvIHRoZSBuZWNlc3Nhcnkgb25lLiA8YnIgLz48L2Rpdj48ZGl2PjxiciAvPjwvZGl2PjxiciAvPjxkaXY+PHA+PGEgbmFtZT0idGVybWluYWwiPjxiPlRoZW1lIGluc3RhbGxhdGlvbiB2aWEgVGVybWluYWw8L2I+PC9hPjwvcD48L2Rpdj48YnIgLz48YnIgLz4NCkJlZm9yZSBwcm9jZWVkaW5nIHdpdGggdGhlc2UgY2hhbmdlcywgbWFrZSBzdXJlIHRoYXQgPGI+U1NIIGFjY2VzczwvYj4gaXMgZW5hYmxlZCBmb3IgeW91ciBhY2NvdW50LiBZb3UgbWF5IGRvIGl0IHVzaW5nIDxhIGhyZWY9Imh0dHBzOi8vd3d3Lm5hbWVjaGVhcC5jb20vc3VwcG9ydC9rbm93bGVkZ2ViYXNlL2FydGljbGUuYXNweC8xMDA0MC8yMjEwL2hvdy10by1lbmFibGUtc3NoLXNoZWxsLWluLWNwYW5lbC8iPiB0aGlzIGd1aWRlPC9hPi48YnIgLz48YnIgLz48b2w+PGxpPkxvZyBpbnRvIHlvdXIgPGI+Y1BhbmVsPC9iPiwgbmF2aWdhdGUgdG8gPGI+QWR2YW5jZWQ8L2I+IHNlY3Rpb24gYW5kIGNsaWNrIG9uIHRoZSA8Yj5UZXJtaW5hbDwvYj4gbWVudTo8L2xpPjxiciAvPjxpbWcgY2xhc3M9ImtiLWltYWdlIiBzcmM9Imh0dHBzOi8vTmFtZWNoZWFwLnNpbXBsZWtiLmNvbS9TaXRlQ29udGVudHMvMi03QzIyRDUyMzZBNDU0M0VCODI3RjNCRDg5MzZFMTUzRS9tZWRpYS90ZXJtaW5hbDEuMS5wbmciIC8+PGJyIC8+PGJyIC8+PGxpPkFsbCBjb21tYW5kcyBzaG91bGQgYmUgZXhlY3V0ZWQgZnJvbSBhIGRvbWFpbmBzIHJvb3QgZm9sZGVyLiBJdCBpcyBuZWVkZWQgdG8gcnVuIHRoZSBjb21tYW5kIDxiPjxpPmNkIGZvbGRlcjwvaT48L2I+LiBUaGUgcGFydCA8Yj48aT5mb2xkZXI8L2k+PC9iPiBzaG91bGQgYmUgcmVwbGFjZWQgd2l0aCB0aGUgbmVjZXNzYXJ5IGRvbWFpbmBzIHJvb3QgZm9sZGVyOjwvbGk+PGJyIC8+PGltZyBjbGFzcz0ia2ItaW1hZ2UiIHNyYz0iaHR0cHM6Ly9OYW1lY2hlYXAuc2ltcGxla2IuY29tL1NpdGVDb250ZW50cy8yLTdDMjJENTIzNkE0NTQzRUI4MjdGM0JEODkzNkUxNTNFL21lZGlhL3Rlcm1pbmFsMi5wbmciIC8+PGJyIC8+PGJyIC8+PGxpPk5vdyB5b3UgY2FuIHJ1biB0aGUgZm9sbG93aW5nIGNvbW1hbmRzOjwvbGk+PGJyIC8+PGI+PGk+d3AgdGhlbWUgbGlzdDwvaT48L2I+IC0gY2hlY2tzIHdoYXQgdGhlbWUgaXMgY3VycmVudGx5IGluc3RhbGxlZCBvbiB0aGUgd2Vic2l0ZS48YnIgLz48YnIgLz48aW1nIGNsYXNzPSJrYi1pbWFnZSIgc3JjPSJodHRwczovL05hbWVjaGVhcC5zaW1wbGVrYi5jb20vU2l0ZUNvbnRlbnRzLzItN0MyMkQ1MjM2QTQ1NDNFQjgyN0YzQkQ4OTM2RTE1M0UvbWVkaWEvdGVybWluYWw2LnBuZyIgLz48YnIgLz48YnIgLz48Yj48aT53cCB0aGVtZSBzZWFyY2ggJHtuYW1lfTwvaT48L2I+IC0gc2VhcmNoZXMgZm9yIGEgbmV3IHRoZW1lIGJ5IGEga2V5d29yZDsgeW91IGNhbiBwYWdlIHRocm91Z2ggdGhlIHJlc3VsdHMgdXNpbmcgdGhlIC0tcGFnZSBmbGFnOyA8Yj48aT4ke25hbWV9PC9pPjwvYj4gIHNob3VsZCBiZSByZXBsYWNlZCB3aXRoIGEga2V5d29yZC9wYXR0ZXJuLjxiciAvPjxiciAvPjxpbWcgY2xhc3M9ImtiLWltYWdlIiBzcmM9Imh0dHBzOi8vTmFtZWNoZWFwLnNpbXBsZWtiLmNvbS9TaXRlQ29udGVudHMvMi03QzIyRDUyMzZBNDU0M0VCODI3RjNCRDg5MzZFMTUzRS9tZWRpYS90ZXJtaW5hbDcucG5nIiAvPjxiciAvPjxiciAvPjxiPjxpPndwIHRoZW1lIGluc3RhbGwgJHtuYW1lL1VSTH0gLS1hY3RpdmF0ZTwvaT48L2I+IC0gaW5zdGFsbHMgYW5kIGFjdGl2YXRlcyBhIHRoZW1lLCB5b3UgY2FuIHNwZWNpZnkgZWl0aGVyIGEgdGhlbWUncyBuYW1lIG9yIGEgbGluayBmcm9tIDxhIGhyZWY9Imh0dHBzOi8vd29yZHByZXNzLm9yZy8iPndvcmRwcmVzcy5vcmc8L2E+IChsaWtlIGh0dHBzOi8vd29yZHByZXNzLm9yZy90aGVtZXMvdHdlbnR5dHdlbnR5dHdvLykuPGJyIC8+PGJyIC8+PGltZyBjbGFzcz0ia2ItaW1hZ2UiIHNyYz0iaHR0cHM6Ly9OYW1lY2hlYXAuc2ltcGxla2IuY29tL1NpdGVDb250ZW50cy8yLTdDMjJENTIzNkE0NTQzRUI4MjdGM0JEODkzNkUxNTNFL21lZGlhL3Rlcm1pbmFsOC5wbmciIC8+PGJyIC8+PGJyIC8+PGI+PGk+d3AgdGhlbWUgdXBkYXRlICR7bmFtZX08L2k+PC9iPiAtIHVwZGF0ZXMgYSB0aGVtZTsgeW91IGNhbiB1cGRhdGUgYWxsIHRoZW1lcyBieSBhcHBlbmRpbmcgdGhlIC0tYWxsIGZsYWcsIDxiPjxpPiR7bmFtZX08L2k+PC9iPiBzaG91bGQgYmUgcmVwbGFjZWQgd2l0aCBhIGtleXdvcmQvcGF0dGVybi48YnIgLz48YnIgLz48aW1nIGNsYXNzPSJrYi1pbWFnZSIgc3JjPSJodHRwczovL05hbWVjaGVhcC5zaW1wbGVrYi5jb20vU2l0ZUNvbnRlbnRzLzItN0MyMkQ1MjM2QTQ1NDNFQjgyN0YzQkQ4OTM2RTE1M0UvbWVkaWEvdGVybWluYWw5LnBuZyIgLz48YnIgLz48YnIgLz48YnIgLz48ZGl2PjxiciAvPjwvZGl2PjxkaXY+PGJyIC8+PC9kaXY+PGJyIC8+VGhhdCdzIGl0ITxiciAvPjxiciAvPg0KwqDCoMKgwqDCoMKgwqDCoMKgwqDCoMKgwqDCoCA8YnIgLz7CoMKgwqDCoMKgwqDCoMKgwqDCoMKgwqDCoMKgwqDCoMKgwqDCoMKgwqAgTmVlZCBhbnkgaGVscD8gQ29udGFjdCBvdXIgPGEgaHJlZj0iaHR0cHM6Ly93d3cubmFtZWNoZWFwLmNvbS9oZWxwLWNlbnRlci8iPkhlbHBEZXNrPC9hPjxiciAvPjxiciAvPjxwPjwvcD48L29sPjwvZGl2PjwvZGl2Pg==","NewTillDate":null,"FeaturedTillDate":null,"ModifiedDateTime":"2024-09-25T11:42:11.0000000","LiveDateTime":"1754-02-02T00:00:00.0000000","CreatedDateTime":"2014-03-18T09:55:42.0000000","ApprovalDatetime":"2014-03-18T10:07:46.0000000","RequestCount":104409,"MarkedAsNew":false,"MarkedAsFeatured":false,"RatingValue":3,"CategoryPaths":[{"__type":"Nc:SimpleKB:Abstractions:Dtos:CategoryPathDto","Level":1,"CategoryId":12,"CategoryName":"Hosting"},{"__type":"Nc:SimpleKB:Abstractions:Dtos:CategoryPathDto","Level":2,"CategoryId":2187,"CategoryName":"cPanel: WordPress"}],"AssociatedCategories":[{"CategoryId":2187,"CategoryName":"cPanel: WordPress","CategoryDisplayName":"HostingcPanel: WordPress"}],"AssociatedTags":[{"TagId":19780,"Tag":"wordpress"},{"TagId":19866,"Tag":" install"},{"TagId":25849,"Tag":" theme"},{"TagId":82368,"Tag":" new theme"}],"RelatedArticles":[],"AssociatedMedias":[],"PreferredCategoryId":0,"RootParentCategoryName":"","RootParentCategoryId":0},"status":200,"statusText":"OK"},"/api/v1/ncpl/simplekb/getcategorybycategoryid:\"{\\\"categoryId\\\":2187}\"":{"body":{"__type":"Nc:SimpleKB:Abstractions:Dtos:CategoryDto","ParentCategoryId":12,"Parent_Category_Name":"Hosting","FriendlyId":null,"ApprovedYN":true,"TreatAsTopicYN":false,"CreatedDateTime":"04/19/2013 16:31:19","CurrentCategoryPaths":[{"__type":"Nc:SimpleKB:Abstractions:Dtos:CategoryPathDto","Level":1,"CategoryId":12,"CategoryName":"Hosting"},{"__type":"Nc:SimpleKB:Abstractions:Dtos:CategoryPathDto","Level":2,"CategoryId":2187,"CategoryName":"cPanel: WordPress"}],"RelatedCategories":[],"AssociatedArticles":[{"ArticleId":10008,"Title":"How to manage WordPress website with iPhone application","ArticleName":"How to manage WordPress website with iPhone application","LiveDateTime":"02/02/1754 00:00:00","NewTillDate":null,"FeaturedTillDate":null,"ModifiedDateTime":"12/10/2021"},{"ArticleId":10076,"Title":"How to Create a WordPress Staging Site","ArticleName":"How to Create a WordPress Staging Site","LiveDateTime":"02/02/1754 00:00:00","NewTillDate":null,"FeaturedTillDate":null,"ModifiedDateTime":"01/18/2022"},{"ArticleId":10115,"Title":"How to fix WordPress blank page (white screen)","ArticleName":"How to fix WordPress blank page (white screen)","LiveDateTime":"02/02/1754 00:00:00","NewTillDate":null,"FeaturedTillDate":null,"ModifiedDateTime":"06/25/2024"},{"ArticleId":10185,"Title":"How to deal with the hacked WordPress website?","ArticleName":"How to deal with the hacked WordPress website?","LiveDateTime":"02/02/1754 00:00:00","NewTillDate":null,"FeaturedTillDate":null,"ModifiedDateTime":"01/31/2025"},{"ArticleId":10316,"Title":"How to change upload filesize limit in WordPress multisite","ArticleName":"How to change upload filesize limit in WordPress multisite","LiveDateTime":"02/02/1754 00:00:00","NewTillDate":null,"FeaturedTillDate":null,"ModifiedDateTime":"09/24/2020"},{"ArticleId":10645,"Title":"How to fix a WordPress critical error","ArticleName":"How to fix a WordPress critical error","LiveDateTime":"02/02/1754 00:00:00","NewTillDate":null,"FeaturedTillDate":null,"ModifiedDateTime":"12/19/2025"},{"ArticleId":10649,"Title":"Extendify Overview","ArticleName":"Extendify Overview","LiveDateTime":"02/02/1754 00:00:00","NewTillDate":null,"FeaturedTillDate":null,"ModifiedDateTime":"10/03/2025"},{"ArticleId":10752,"Title":"How to update WordPress admin email via a database","ArticleName":"How to update WordPress admin email via a database","LiveDateTime":"02/02/1754 00:00:00","NewTillDate":null,"FeaturedTillDate":null,"ModifiedDateTime":"10/09/2025"},{"ArticleId":1255,"Title":"How to install WordPress using Softaculous","ArticleName":"How to install WordPress using Softaculous","LiveDateTime":"02/02/1754 00:00:00","NewTillDate":null,"FeaturedTillDate":null,"ModifiedDateTime":"09/25/2024"},{"ArticleId":9495,"Title":"How to move WordPress from a subfolder","ArticleName":"How to move WordPress from a subfolder","LiveDateTime":"02/02/1754 00:00:00","NewTillDate":null,"FeaturedTillDate":null,"ModifiedDateTime":"12/21/2021"},{"ArticleId":9202,"Title":"How to reset/change WordPress admin password","ArticleName":"How to reset/change WordPress admin password","LiveDateTime":"02/02/1754 00:00:00","NewTillDate":null,"FeaturedTillDate":null,"ModifiedDateTime":"04/27/2025"},{"ArticleId":9972,"Title":"How to log in to WordPress using Softaculous","ArticleName":"How to log in to WordPress using Softaculous","LiveDateTime":"02/02/1754 00:00:00","NewTillDate":null,"FeaturedTillDate":null,"ModifiedDateTime":"12/27/2022"},{"ArticleId":9809,"Title":"How to change your WordPress Admin URL","ArticleName":"How to change your WordPress Admin URL","LiveDateTime":"02/02/1754 00:00:00","NewTillDate":null,"FeaturedTillDate":null,"ModifiedDateTime":"12/21/2021"},{"ArticleId":9451,"Title":"How to manage WordPress user roles","ArticleName":"How to manage WordPress user roles","LiveDateTime":"02/02/1754 00:00:00","NewTillDate":null,"FeaturedTillDate":null,"ModifiedDateTime":"10/23/2024"},{"ArticleId":9328,"Title":"How to install a new theme for WordPress","ArticleName":"How to install a new theme for WordPress","LiveDateTime":"02/02/1754 00:00:00","NewTillDate":null,"FeaturedTillDate":null,"ModifiedDateTime":"09/25/2024"},{"ArticleId":9761,"Title":"How to add a favicon to a WordPress website","ArticleName":"How to add a favicon to a WordPress website","LiveDateTime":"02/02/1754 00:00:00","NewTillDate":null,"FeaturedTillDate":null,"ModifiedDateTime":"12/10/2021"},{"ArticleId":9433,"Title":"How to manage plugins in WordPress","ArticleName":"How to manage plugins in WordPress","LiveDateTime":"02/02/1754 00:00:00","NewTillDate":null,"FeaturedTillDate":null,"ModifiedDateTime":"09/25/2024"},{"ArticleId":9555,"Title":"How to disable WordPress plugins","ArticleName":"How to disable WordPress plugins","LiveDateTime":"02/02/1754 00:00:00","NewTillDate":null,"FeaturedTillDate":null,"ModifiedDateTime":"09/25/2024"},{"ArticleId":9516,"Title":"How to flush WordPress caching plugins","ArticleName":"How to flush WordPress caching plugins","LiveDateTime":"02/02/1754 00:00:00","NewTillDate":null,"FeaturedTillDate":null,"ModifiedDateTime":"12/15/2021"},{"ArticleId":9201,"Title":"How to change WordPress site address (URL)","ArticleName":"How to change WordPress site address (URL)","LiveDateTime":"02/02/1754 00:00:00","NewTillDate":null,"FeaturedTillDate":null,"ModifiedDateTime":"09/25/2024"},{"ArticleId":9452,"Title":"How to set up WordPress Contact Form 7","ArticleName":"How to set up WordPress Contact Form 7","LiveDateTime":"02/02/1754 00:00:00","NewTillDate":null,"FeaturedTillDate":null,"ModifiedDateTime":"09/25/2024"},{"ArticleId":1414,"Title":"How to back up a WordPress site using CodeGuard","ArticleName":"How to back up a WordPress site using CodeGuard","LiveDateTime":"02/02/1754 00:00:00","NewTillDate":null,"FeaturedTillDate":null,"ModifiedDateTime":"07/08/2019"},{"ArticleId":9948,"Title":"What is WordPress cron and how to work with it","ArticleName":"What is WordPress cron and how to work with it","LiveDateTime":"02/02/1754 00:00:00","NewTillDate":null,"FeaturedTillDate":null,"ModifiedDateTime":"05/30/2024"},{"ArticleId":9971,"Title":"What is WordPress heartbeat and how to deal with admin-ajax.php usage","ArticleName":"What is WordPress heartbeat and how to deal with admin-ajax.php usage","LiveDateTime":"02/02/1754 00:00:00","NewTillDate":null,"FeaturedTillDate":null,"ModifiedDateTime":"04/24/2020"},{"ArticleId":9491,"Title":"How to set up HTTPS for WordPress","ArticleName":"How to set up HTTPS for WordPress","LiveDateTime":"02/02/1754 00:00:00","NewTillDate":null,"FeaturedTillDate":null,"ModifiedDateTime":"04/04/2022"},{"ArticleId":9937,"Title":"How to create temporary login details for WordPress","ArticleName":"How to create temporary login details for WordPress","LiveDateTime":"02/02/1754 00:00:00","NewTillDate":null,"FeaturedTillDate":null,"ModifiedDateTime":"12/10/2021"},{"ArticleId":9941,"Title":"How to manually add an admin user to the WordPress database via phpMyAdmin","ArticleName":"How to manually add an admin user to the WordPress database via phpMyAdmin","LiveDateTime":"02/02/1754 00:00:00","NewTillDate":null,"FeaturedTillDate":null,"ModifiedDateTime":"05/20/2024"},{"ArticleId":9951,"Title":"Maintenance mode for different CMS","ArticleName":"Maintenance mode for different CMS","LiveDateTime":"02/02/1754 00:00:00","NewTillDate":null,"FeaturedTillDate":null,"ModifiedDateTime":"10/21/2022"},{"ArticleId":9399,"Title":"How to speed up and optimize a WordPress website","ArticleName":"How to speed up and optimize a WordPress website","LiveDateTime":"02/02/1754 00:00:00","NewTillDate":null,"FeaturedTillDate":null,"ModifiedDateTime":"01/14/2025"},{"ArticleId":9564,"Title":"How to create a mobile version of a WordPress website","ArticleName":"How to create a mobile version of a WordPress website","LiveDateTime":"02/02/1754 00:00:00","NewTillDate":null,"FeaturedTillDate":null,"ModifiedDateTime":"11/30/2021"},{"ArticleId":9892,"Title":"How to edit wp-config.php file in WordPress","ArticleName":"How to edit wp-config.php file in WordPress","LiveDateTime":"02/02/1754 00:00:00","NewTillDate":null,"FeaturedTillDate":null,"ModifiedDateTime":"06/24/2025"},{"ArticleId":9959,"Title":"How to add Google AdSense to your WordPress website","ArticleName":"How to add Google AdSense to your WordPress website","LiveDateTime":"02/02/1754 00:00:00","NewTillDate":null,"FeaturedTillDate":null,"ModifiedDateTime":"11/22/2021"},{"ArticleId":9663,"Title":"How to fix Error Establishing A Database Connection in WordPress","ArticleName":"How to fix Error Establishing A Database Connection in WordPress","LiveDateTime":"02/02/1754 00:00:00","NewTillDate":null,"FeaturedTillDate":null,"ModifiedDateTime":"09/25/2024"},{"ArticleId":9947,"Title":"How to increase WordPress memory limit","ArticleName":"How to increase WordPress memory limit","LiveDateTime":"02/02/1754 00:00:00","NewTillDate":null,"FeaturedTillDate":null,"ModifiedDateTime":"11/29/2021"},{"ArticleId":9463,"Title":"What is the robots.txt file and how to use it","ArticleName":"What is the robots.txt file and how to use it","LiveDateTime":"02/02/1754 00:00:00","NewTillDate":null,"FeaturedTillDate":null,"ModifiedDateTime":"01/09/2024"},{"ArticleId":9156,"Title":"How to improve WordPress website security","ArticleName":"How to improve WordPress website security","LiveDateTime":"02/02/1754 00:00:00","NewTillDate":null,"FeaturedTillDate":null,"ModifiedDateTime":"11/23/2023"},{"ArticleId":9411,"Title":"How to set up and manage WordPress Multisite (WPMU)","ArticleName":"How to set up and manage WordPress Multisite (WPMU)","LiveDateTime":"02/02/1754 00:00:00","NewTillDate":null,"FeaturedTillDate":null,"ModifiedDateTime":"08/03/2022"},{"ArticleId":9427,"Title":"How to transfer WordPress Multisite (WPMU)","ArticleName":"How to transfer WordPress Multisite (WPMU)","LiveDateTime":"02/02/1754 00:00:00","NewTillDate":null,"FeaturedTillDate":null,"ModifiedDateTime":"05/30/2024"},{"ArticleId":9243,"Title":"How to transfer a WordPress website to Namecheap manually","ArticleName":"How to transfer a WordPress website to Namecheap manually","LiveDateTime":"02/02/1754 00:00:00","NewTillDate":null,"FeaturedTillDate":null,"ModifiedDateTime":"05/10/2025"},{"ArticleId":9359,"Title":"How to migrate website from wordpress.com to Namecheap","ArticleName":"How to migrate website from wordpress.com to Namecheap","LiveDateTime":"02/02/1754 00:00:00","NewTillDate":null,"FeaturedTillDate":null,"ModifiedDateTime":"12/10/2021"},{"ArticleId":9950,"Title":"How to move a website from Wix to WordPress","ArticleName":"How to move a website from Wix to WordPress","LiveDateTime":"02/02/1754 00:00:00","NewTillDate":null,"FeaturedTillDate":null,"ModifiedDateTime":"12/28/2020"},{"ArticleId":9949,"Title":"How to move a website from Squarespace to WordPress","ArticleName":"How to move a website from Squarespace to WordPress","LiveDateTime":"02/02/1754 00:00:00","NewTillDate":null,"FeaturedTillDate":null,"ModifiedDateTime":"12/14/2021"},{"ArticleId":9714,"Title":"How to move from Blogger to WordPress hosted with us","ArticleName":"How to move from Blogger to WordPress hosted with us","LiveDateTime":"02/02/1754 00:00:00","NewTillDate":null,"FeaturedTillDate":null,"ModifiedDateTime":"12/10/2021"}],"AssociatedTags":[],"CategoryId":2187,"CategoryName":"cPanel: WordPress"},"status":200,"statusText":"OK"},"/api/v1/ncpl/simplekb/getcategories:\"{\\\"parentCategoryId\\\":0,\\\"getTree\\\":true}\"":{"body":[{"__type":"Nc:SimpleKB:Abstractions:Dtos:CategoryItemDto","ParentCategoryId":93,"TreatAsTopicYN":false,"Description":"","ImageUrl":"","ShortDesc":"","CategoryId":2216,"CategoryName":"Spam Protection"},{"__type":"Nc:SimpleKB:Abstractions:Dtos:CategoryItemDto","ParentCategoryId":14,"TreatAsTopicYN":false,"Description":"","ImageUrl":"","ShortDesc":"","CategoryId":2217,"CategoryName":"Renewal"},{"__type":"Nc:SimpleKB:Abstractions:Dtos:CategoryItemDto","ParentCategoryId":14,"TreatAsTopicYN":false,"Description":"","ImageUrl":"","ShortDesc":"","CategoryId":2218,"CategoryName":"cPanel SSL Plugin"},{"__type":"Nc:SimpleKB:Abstractions:Dtos:CategoryItemDto","ParentCategoryId":12,"TreatAsTopicYN":false,"Description":"","ImageUrl":"","ShortDesc":"","CategoryId":2219,"CategoryName":"PHP Configuration"},{"__type":"Nc:SimpleKB:Abstractions:Dtos:CategoryItemDto","ParentCategoryId":14,"TreatAsTopicYN":false,"Description":"","ImageUrl":"","ShortDesc":"","CategoryId":2221,"CategoryName":"Multi-Domain SSL Certificates"},{"__type":"Nc:SimpleKB:Abstractions:Dtos:CategoryItemDto","ParentCategoryId":14,"TreatAsTopicYN":false,"Description":"","ImageUrl":"","ShortDesc":"","CategoryId":2222,"CategoryName":"Cancellation"},{"__type":"Nc:SimpleKB:Abstractions:Dtos:CategoryItemDto","ParentCategoryId":14,"TreatAsTopicYN":false,"Description":"","ImageUrl":"","ShortDesc":"","CategoryId":2223,"CategoryName":"Browser errors"},{"__type":"Nc:SimpleKB:Abstractions:Dtos:CategoryItemDto","ParentCategoryId":14,"TreatAsTopicYN":false,"Description":"","ImageUrl":"","ShortDesc":"","CategoryId":2224,"CategoryName":"Site Seal, Logo"},{"__type":"Nc:SimpleKB:Abstractions:Dtos:CategoryItemDto","ParentCategoryId":12,"TreatAsTopicYN":false,"Description":"","ImageUrl":"","ShortDesc":"","CategoryId":2225,"CategoryName":"SEO"},{"__type":"Nc:SimpleKB:Abstractions:Dtos:CategoryItemDto","ParentCategoryId":93,"TreatAsTopicYN":false,"Description":"","ImageUrl":"","ShortDesc":"","CategoryId":2226,"CategoryName":"Email Migration"},{"__type":"Nc:SimpleKB:Abstractions:Dtos:CategoryItemDto","ParentCategoryId":2211,"TreatAsTopicYN":false,"Description":"","ImageUrl":"","ShortDesc":"","CategoryId":2227,"CategoryName":"SSL Resellers"},{"__type":"Nc:SimpleKB:Abstractions:Dtos:CategoryItemDto","ParentCategoryId":0,"TreatAsTopicYN":true,"Description":"","ImageUrl":"/assets/img/pictograms/150/cloud-red.png","ShortDesc":"","CategoryId":2228,"CategoryName":"Apps","SubCategories":[{"__type":"Nc:SimpleKB:Abstractions:Dtos:CategoryItemDto","ParentCategoryId":2228,"TreatAsTopicYN":false,"Description":"","ImageUrl":"","ShortDesc":"","CategoryId":2251,"CategoryName":"Supersonic CDN"},{"__type":"Nc:SimpleKB:Abstractions:Dtos:CategoryItemDto","ParentCategoryId":2228,"TreatAsTopicYN":false,"Description":"","ImageUrl":"","ShortDesc":"","CategoryId":2298,"CategoryName":"Site Maker"},{"__type":"Nc:SimpleKB:Abstractions:Dtos:CategoryItemDto","ParentCategoryId":2228,"TreatAsTopicYN":false,"Description":"","ImageUrl":"","ShortDesc":"","CategoryId":177,"CategoryName":"Google Workspace (formerly G Suite)"}]},{"__type":"Nc:SimpleKB:Abstractions:Dtos:CategoryItemDto","ParentCategoryId":2211,"TreatAsTopicYN":false,"Description":"","ImageUrl":"","ShortDesc":"","CategoryId":2229,"CategoryName":"Hosting Resellers"},{"__type":"Nc:SimpleKB:Abstractions:Dtos:CategoryItemDto","ParentCategoryId":34,"TreatAsTopicYN":false,"Description":"","ImageUrl":"","ShortDesc":"","CategoryId":2232,"CategoryName":"DNSSEC"},{"__type":"Nc:SimpleKB:Abstractions:Dtos:CategoryItemDto","ParentCategoryId":34,"TreatAsTopicYN":false,"Description":"","ImageUrl":"","ShortDesc":"","CategoryId":2234,"CategoryName":"Google Workspace (formerly G Suite)"},{"__type":"Nc:SimpleKB:Abstractions:Dtos:CategoryItemDto","ParentCategoryId":34,"TreatAsTopicYN":false,"Description":"","ImageUrl":"","ShortDesc":"","CategoryId":2237,"CategoryName":"Host records setup"},{"__type":"Nc:SimpleKB:Abstractions:Dtos:CategoryItemDto","ParentCategoryId":14,"TreatAsTopicYN":false,"Description":"","ImageUrl":"","ShortDesc":"","CategoryId":2238,"CategoryName":"SSL installation errors"},{"__type":"Nc:SimpleKB:Abstractions:Dtos:CategoryItemDto","ParentCategoryId":0,"TreatAsTopicYN":false,"Description":"","ImageUrl":"/assets/img/pictograms/150/easywp-red.png","ShortDesc":"","CategoryId":2239,"CategoryName":"EasyWP","SubCategories":[{"__type":"Nc:SimpleKB:Abstractions:Dtos:CategoryItemDto","ParentCategoryId":2239,"TreatAsTopicYN":false,"Description":"","ImageUrl":"","ShortDesc":"","CategoryId":2280,"CategoryName":"Getting Started"},{"__type":"Nc:SimpleKB:Abstractions:Dtos:CategoryItemDto","ParentCategoryId":2239,"TreatAsTopicYN":false,"Description":"","ImageUrl":"","ShortDesc":"","CategoryId":2279,"CategoryName":"General Information"},{"__type":"Nc:SimpleKB:Abstractions:Dtos:CategoryItemDto","ParentCategoryId":2239,"TreatAsTopicYN":false,"Description":"","ImageUrl":"","ShortDesc":"","CategoryId":2281,"CategoryName":"WordPress Migration"},{"__type":"Nc:SimpleKB:Abstractions:Dtos:CategoryItemDto","ParentCategoryId":2239,"TreatAsTopicYN":false,"Description":"","ImageUrl":"","ShortDesc":"","CategoryId":2282,"CategoryName":"Plugins and Themes"},{"__type":"Nc:SimpleKB:Abstractions:Dtos:CategoryItemDto","ParentCategoryId":2239,"TreatAsTopicYN":false,"Description":"","ImageUrl":"","ShortDesc":"","CategoryId":2284,"CategoryName":"WordPress Management"},{"__type":"Nc:SimpleKB:Abstractions:Dtos:CategoryItemDto","ParentCategoryId":2239,"TreatAsTopicYN":false,"Description":"","ImageUrl":"","ShortDesc":"","CategoryId":2285,"CategoryName":"SFTP and Database access"},{"__type":"Nc:SimpleKB:Abstractions:Dtos:CategoryItemDto","ParentCategoryId":2239,"TreatAsTopicYN":false,"Description":"","ImageUrl":"","ShortDesc":"","CategoryId":2286,"CategoryName":"Domains questions"},{"__type":"Nc:SimpleKB:Abstractions:Dtos:CategoryItemDto","ParentCategoryId":2239,"TreatAsTopicYN":false,"Description":"","ImageUrl":"","ShortDesc":"","CategoryId":2288,"CategoryName":"Billing questions"},{"__type":"Nc:SimpleKB:Abstractions:Dtos:CategoryItemDto","ParentCategoryId":2239,"TreatAsTopicYN":false,"Description":"","ImageUrl":"","ShortDesc":"","CategoryId":2287,"CategoryName":"SSL questions"}]},{"__type":"Nc:SimpleKB:Abstractions:Dtos:CategoryItemDto","ParentCategoryId":2228,"TreatAsTopicYN":false,"Description":"","ImageUrl":"","ShortDesc":"","CategoryId":2251,"CategoryName":"Supersonic CDN"},{"__type":"Nc:SimpleKB:Abstractions:Dtos:CategoryItemDto","ParentCategoryId":12,"TreatAsTopicYN":false,"Description":"","ImageUrl":"","ShortDesc":"","CategoryId":2252,"CategoryName":"InterWorx questions"},{"__type":"Nc:SimpleKB:Abstractions:Dtos:CategoryItemDto","ParentCategoryId":2253,"TreatAsTopicYN":false,"Description":"","ImageUrl":"","ShortDesc":"","CategoryId":2254,"CategoryName":"Domains How-To"},{"__type":"Nc:SimpleKB:Abstractions:Dtos:CategoryItemDto","ParentCategoryId":2253,"TreatAsTopicYN":false,"Description":"","ImageUrl":"","ShortDesc":"","CategoryId":2255,"CategoryName":"Hosting How-To"},{"__type":"Nc:SimpleKB:Abstractions:Dtos:CategoryItemDto","ParentCategoryId":2253,"TreatAsTopicYN":false,"Description":"","ImageUrl":"","ShortDesc":"","CategoryId":2257,"CategoryName":"Sales & Payments How-To"},{"__type":"Nc:SimpleKB:Abstractions:Dtos:CategoryItemDto","ParentCategoryId":2253,"TreatAsTopicYN":false,"Description":"","ImageUrl":"","ShortDesc":"","CategoryId":2258,"CategoryName":"cPanel Email How-To"},{"__type":"Nc:SimpleKB:Abstractions:Dtos:CategoryItemDto","ParentCategoryId":93,"TreatAsTopicYN":false,"Description":"","ImageUrl":"","ShortDesc":"","CategoryId":2260,"CategoryName":"Private Email Contacts and Calendars Setup"},{"__type":"Nc:SimpleKB:Abstractions:Dtos:CategoryItemDto","ParentCategoryId":2253,"TreatAsTopicYN":false,"Description":"","ImageUrl":"","ShortDesc":"","CategoryId":2262,"CategoryName":"EasyWP How-To"},{"__type":"Nc:SimpleKB:Abstractions:Dtos:CategoryItemDto","ParentCategoryId":0,"TreatAsTopicYN":false,"Description":"","ImageUrl":"https://download.namecheap.com/assets/img/domainvault-red@2x.png","ShortDesc":"","CategoryId":2289,"CategoryName":"Domain Vault","SubCategories":[]},{"__type":"Nc:SimpleKB:Abstractions:Dtos:CategoryItemDto","ParentCategoryId":14,"TreatAsTopicYN":false,"Description":"","ImageUrl":"","ShortDesc":"","CategoryId":2290,"CategoryName":"CSR code"},{"__type":"Nc:SimpleKB:Abstractions:Dtos:CategoryItemDto","ParentCategoryId":12,"TreatAsTopicYN":false,"Description":"","ImageUrl":"","ShortDesc":"","CategoryId":2291,"CategoryName":"Webuzo questions"},{"__type":"Nc:SimpleKB:Abstractions:Dtos:CategoryItemDto","ParentCategoryId":2265,"TreatAsTopicYN":false,"Description":"","ImageUrl":"","ShortDesc":"","CategoryId":2292,"CategoryName":"Browser Extensions"},{"__type":"Nc:SimpleKB:Abstractions:Dtos:CategoryItemDto","ParentCategoryId":14,"TreatAsTopicYN":false,"Description":"","ImageUrl":"","ShortDesc":"","CategoryId":2293,"CategoryName":"Automated SSL management"},{"__type":"Nc:SimpleKB:Abstractions:Dtos:CategoryItemDto","ParentCategoryId":2228,"TreatAsTopicYN":false,"Description":"","ImageUrl":"","ShortDesc":"","CategoryId":2298,"CategoryName":"Site Maker"},{"__type":"Nc:SimpleKB:Abstractions:Dtos:CategoryItemDto","ParentCategoryId":12,"TreatAsTopicYN":false,"Description":"","ImageUrl":"","ShortDesc":"","CategoryId":27,"CategoryName":"Getting Started"},{"__type":"Nc:SimpleKB:Abstractions:Dtos:CategoryItemDto","ParentCategoryId":0,"TreatAsTopicYN":false,"Description":"","ImageUrl":"/assets/img/pictograms/150/support-red.png","ShortDesc":"","CategoryId":5,"CategoryName":"General & Support","SubCategories":[]},{"__type":"Nc:SimpleKB:Abstractions:Dtos:CategoryItemDto","ParentCategoryId":2200,"TreatAsTopicYN":false,"Description":"","ImageUrl":"","ShortDesc":"","CategoryId":7,"CategoryName":"Billing FAQ"},{"__type":"Nc:SimpleKB:Abstractions:Dtos:CategoryItemDto","ParentCategoryId":2209,"TreatAsTopicYN":false,"Description":"","ImageUrl":"","ShortDesc":"","CategoryId":8,"CategoryName":"Transfer Information"},{"__type":"Nc:SimpleKB:Abstractions:Dtos:CategoryItemDto","ParentCategoryId":12,"TreatAsTopicYN":false,"Description":"","ImageUrl":"","ShortDesc":"","CategoryId":22,"CategoryName":"Hosting Information"},{"__type":"Nc:SimpleKB:Abstractions:Dtos:CategoryItemDto","ParentCategoryId":14,"TreatAsTopicYN":false,"Description":"","ImageUrl":"","ShortDesc":"","CategoryId":38,"CategoryName":"SSL General"},{"__type":"Nc:SimpleKB:Abstractions:Dtos:CategoryItemDto","ParentCategoryId":9,"TreatAsTopicYN":false,"Description":"","ImageUrl":"","ShortDesc":"","CategoryId":45,"CategoryName":"Account Security"},{"__type":"Nc:SimpleKB:Abstractions:Dtos:CategoryItemDto","ParentCategoryId":34,"TreatAsTopicYN":false,"Description":"","ImageUrl":"","ShortDesc":"","CategoryId":46,"CategoryName":"Domain Management"},{"__type":"Nc:SimpleKB:Abstractions:Dtos:CategoryItemDto","ParentCategoryId":2211,"TreatAsTopicYN":false,"Description":"","ImageUrl":"","ShortDesc":"","CategoryId":63,"CategoryName":"Namecheap API"},{"__type":"Nc:SimpleKB:Abstractions:Dtos:CategoryItemDto","ParentCategoryId":2228,"TreatAsTopicYN":false,"Description":"","ImageUrl":"","ShortDesc":"","CategoryId":177,"CategoryName":"Google Workspace (formerly G Suite)"},{"__type":"Nc:SimpleKB:Abstractions:Dtos:CategoryItemDto","ParentCategoryId":93,"TreatAsTopicYN":false,"Description":"","ImageUrl":"","ShortDesc":"","CategoryId":2179,"CategoryName":"Private Email: General Information"},{"__type":"Nc:SimpleKB:Abstractions:Dtos:CategoryItemDto","ParentCategoryId":2265,"TreatAsTopicYN":false,"Description":"","ImageUrl":"","ShortDesc":"","CategoryId":2274,"CategoryName":"General"},{"__type":"Nc:SimpleKB:Abstractions:Dtos:CategoryItemDto","ParentCategoryId":2239,"TreatAsTopicYN":false,"Description":"","ImageUrl":"","ShortDesc":"","CategoryId":2280,"CategoryName":"Getting Started"},{"__type":"Nc:SimpleKB:Abstractions:Dtos:CategoryItemDto","ParentCategoryId":2239,"TreatAsTopicYN":false,"Description":"","ImageUrl":"","ShortDesc":"","CategoryId":2279,"CategoryName":"General Information"},{"__type":"Nc:SimpleKB:Abstractions:Dtos:CategoryItemDto","ParentCategoryId":93,"TreatAsTopicYN":false,"Description":"","ImageUrl":"","ShortDesc":"","CategoryId":2215,"CategoryName":"Private Email: Mailbox Management"},{"__type":"Nc:SimpleKB:Abstractions:Dtos:CategoryItemDto","ParentCategoryId":2211,"TreatAsTopicYN":false,"Description":"","ImageUrl":"","ShortDesc":"","CategoryId":2196,"CategoryName":"WHMCS module for SSL"},{"__type":"Nc:SimpleKB:Abstractions:Dtos:CategoryItemDto","ParentCategoryId":0,"TreatAsTopicYN":false,"Description":"","ImageUrl":"/assets/img/pictograms/150/savings-red.png","ShortDesc":"","CategoryId":2200,"CategoryName":"Checkout & Billing","SubCategories":[{"__type":"Nc:SimpleKB:Abstractions:Dtos:CategoryItemDto","ParentCategoryId":2200,"TreatAsTopicYN":false,"Description":"","ImageUrl":"","ShortDesc":"","CategoryId":7,"CategoryName":"Billing FAQ"},{"__type":"Nc:SimpleKB:Abstractions:Dtos:CategoryItemDto","ParentCategoryId":2200,"TreatAsTopicYN":false,"Description":"","ImageUrl":"","ShortDesc":"","CategoryId":2201,"CategoryName":"Domains Billing"},{"__type":"Nc:SimpleKB:Abstractions:Dtos:CategoryItemDto","ParentCategoryId":2200,"TreatAsTopicYN":false,"Description":"","ImageUrl":"","ShortDesc":"","CategoryId":21,"CategoryName":"Hosting Billing"},{"__type":"Nc:SimpleKB:Abstractions:Dtos:CategoryItemDto","ParentCategoryId":2200,"TreatAsTopicYN":false,"Description":"","ImageUrl":"","ShortDesc":"","CategoryId":71,"CategoryName":"SSL Certificates Billing"},{"__type":"Nc:SimpleKB:Abstractions:Dtos:CategoryItemDto","ParentCategoryId":2200,"TreatAsTopicYN":false,"Description":"","ImageUrl":"","ShortDesc":"","CategoryId":2177,"CategoryName":"Private Email"}]},{"__type":"Nc:SimpleKB:Abstractions:Dtos:CategoryItemDto","ParentCategoryId":2200,"TreatAsTopicYN":false,"Description":"","ImageUrl":"","ShortDesc":"","CategoryId":2201,"CategoryName":"Domains Billing"},{"__type":"Nc:SimpleKB:Abstractions:Dtos:CategoryItemDto","ParentCategoryId":14,"TreatAsTopicYN":false,"Description":"","ImageUrl":"","ShortDesc":"","CategoryId":67,"CategoryName":"Activation"},{"__type":"Nc:SimpleKB:Abstractions:Dtos:CategoryItemDto","ParentCategoryId":2209,"TreatAsTopicYN":false,"Description":"","ImageUrl":"","ShortDesc":"","CategoryId":83,"CategoryName":"Transfer to Namecheap"},{"__type":"Nc:SimpleKB:Abstractions:Dtos:CategoryItemDto","ParentCategoryId":9,"TreatAsTopicYN":false,"Description":"","ImageUrl":"","ShortDesc":"","CategoryId":43,"CategoryName":"Profile Management"},{"__type":"Nc:SimpleKB:Abstractions:Dtos:CategoryItemDto","ParentCategoryId":34,"TreatAsTopicYN":false,"Description":"","ImageUrl":"","ShortDesc":"","CategoryId":10,"CategoryName":"DNS Questions"},{"__type":"Nc:SimpleKB:Abstractions:Dtos:CategoryItemDto","ParentCategoryId":12,"TreatAsTopicYN":false,"Description":"","ImageUrl":"","ShortDesc":"","CategoryId":29,"CategoryName":"cPanel questions"},{"__type":"Nc:SimpleKB:Abstractions:Dtos:CategoryItemDto","ParentCategoryId":2200,"TreatAsTopicYN":false,"Description":"","ImageUrl":"","ShortDesc":"","CategoryId":21,"CategoryName":"Hosting Billing"},{"__type":"Nc:SimpleKB:Abstractions:Dtos:CategoryItemDto","ParentCategoryId":34,"TreatAsTopicYN":false,"Description":"","ImageUrl":"","ShortDesc":"","CategoryId":11,"CategoryName":"Dynamic DNS"},{"__type":"Nc:SimpleKB:Abstractions:Dtos:CategoryItemDto","ParentCategoryId":9,"TreatAsTopicYN":false,"Description":"","ImageUrl":"","ShortDesc":"","CategoryId":44,"CategoryName":"Account Access"},{"__type":"Nc:SimpleKB:Abstractions:Dtos:CategoryItemDto","ParentCategoryId":2209,"TreatAsTopicYN":false,"Description":"","ImageUrl":"","ShortDesc":"","CategoryId":84,"CategoryName":"Transfer to another provider"},{"__type":"Nc:SimpleKB:Abstractions:Dtos:CategoryItemDto","ParentCategoryId":14,"TreatAsTopicYN":false,"Description":"","ImageUrl":"","ShortDesc":"","CategoryId":68,"CategoryName":"Validation"},{"__type":"Nc:SimpleKB:Abstractions:Dtos:CategoryItemDto","ParentCategoryId":12,"TreatAsTopicYN":false,"Description":"","ImageUrl":"","ShortDesc":"","CategoryId":2182,"CategoryName":"cPanel: Software Management"},{"__type":"Nc:SimpleKB:Abstractions:Dtos:CategoryItemDto","ParentCategoryId":93,"TreatAsTopicYN":false,"Description":"","ImageUrl":"","ShortDesc":"","CategoryId":2214,"CategoryName":"Email Forwarding"},{"__type":"Nc:SimpleKB:Abstractions:Dtos:CategoryItemDto","ParentCategoryId":2265,"TreatAsTopicYN":false,"Description":"","ImageUrl":"","ShortDesc":"","CategoryId":2270,"CategoryName":"Routers"},{"__type":"Nc:SimpleKB:Abstractions:Dtos:CategoryItemDto","ParentCategoryId":2239,"TreatAsTopicYN":false,"Description":"","ImageUrl":"","ShortDesc":"","CategoryId":2281,"CategoryName":"WordPress Migration"},{"__type":"Nc:SimpleKB:Abstractions:Dtos:CategoryItemDto","ParentCategoryId":2239,"TreatAsTopicYN":false,"Description":"","ImageUrl":"","ShortDesc":"","CategoryId":2282,"CategoryName":"Plugins and Themes"},{"__type":"Nc:SimpleKB:Abstractions:Dtos:CategoryItemDto","ParentCategoryId":2265,"TreatAsTopicYN":false,"Description":"","ImageUrl":"","ShortDesc":"","CategoryId":2272,"CategoryName":"TV"},{"__type":"Nc:SimpleKB:Abstractions:Dtos:CategoryItemDto","ParentCategoryId":12,"TreatAsTopicYN":false,"Description":"","ImageUrl":"","ShortDesc":"","CategoryId":2187,"CategoryName":"cPanel: WordPress"},{"__type":"Nc:SimpleKB:Abstractions:Dtos:CategoryItemDto","ParentCategoryId":2209,"TreatAsTopicYN":false,"Description":"","ImageUrl":"","ShortDesc":"","CategoryId":219,"CategoryName":"Canceled Transfers"},{"__type":"Nc:SimpleKB:Abstractions:Dtos:CategoryItemDto","ParentCategoryId":2200,"TreatAsTopicYN":false,"Description":"","ImageUrl":"","ShortDesc":"","CategoryId":71,"CategoryName":"SSL Certificates Billing"},{"__type":"Nc:SimpleKB:Abstractions:Dtos:CategoryItemDto","ParentCategoryId":93,"TreatAsTopicYN":false,"Description":"","ImageUrl":"","ShortDesc":"","CategoryId":2176,"CategoryName":"Private Email: DNS Settings"},{"__type":"Nc:SimpleKB:Abstractions:Dtos:CategoryItemDto","ParentCategoryId":14,"TreatAsTopicYN":false,"Description":"","ImageUrl":"","ShortDesc":"","CategoryId":69,"CategoryName":"Installation"},{"__type":"Nc:SimpleKB:Abstractions:Dtos:CategoryItemDto","ParentCategoryId":0,"TreatAsTopicYN":false,"Description":"","ImageUrl":"/assets/img/pictograms/150/reseller-red.png","ShortDesc":"","CategoryId":34,"CategoryName":"Domains","SubCategories":[{"__type":"Nc:SimpleKB:Abstractions:Dtos:CategoryItemDto","ParentCategoryId":34,"TreatAsTopicYN":false,"Description":"","ImageUrl":"","ShortDesc":"","CategoryId":2232,"CategoryName":"DNSSEC"},{"__type":"Nc:SimpleKB:Abstractions:Dtos:CategoryItemDto","ParentCategoryId":34,"TreatAsTopicYN":false,"Description":"","ImageUrl":"","ShortDesc":"","CategoryId":2234,"CategoryName":"Google Workspace (formerly G Suite)"},{"__type":"Nc:SimpleKB:Abstractions:Dtos:CategoryItemDto","ParentCategoryId":34,"TreatAsTopicYN":false,"Description":"","ImageUrl":"","ShortDesc":"","CategoryId":2237,"CategoryName":"Host records setup"},{"__type":"Nc:SimpleKB:Abstractions:Dtos:CategoryItemDto","ParentCategoryId":34,"TreatAsTopicYN":false,"Description":"","ImageUrl":"","ShortDesc":"","CategoryId":46,"CategoryName":"Domain Management"},{"__type":"Nc:SimpleKB:Abstractions:Dtos:CategoryItemDto","ParentCategoryId":34,"TreatAsTopicYN":false,"Description":"","ImageUrl":"","ShortDesc":"","CategoryId":10,"CategoryName":"DNS Questions"},{"__type":"Nc:SimpleKB:Abstractions:Dtos:CategoryItemDto","ParentCategoryId":34,"TreatAsTopicYN":false,"Description":"","ImageUrl":"","ShortDesc":"","CategoryId":11,"CategoryName":"Dynamic DNS"},{"__type":"Nc:SimpleKB:Abstractions:Dtos:CategoryItemDto","ParentCategoryId":34,"TreatAsTopicYN":false,"Description":"","ImageUrl":"","ShortDesc":"","CategoryId":35,"CategoryName":"Registrations"},{"__type":"Nc:SimpleKB:Abstractions:Dtos:CategoryItemDto","ParentCategoryId":34,"TreatAsTopicYN":false,"Description":"","ImageUrl":"","ShortDesc":"","CategoryId":2207,"CategoryName":"Renewal questions"},{"__type":"Nc:SimpleKB:Abstractions:Dtos:CategoryItemDto","ParentCategoryId":34,"TreatAsTopicYN":false,"Description":"","ImageUrl":"","ShortDesc":"","CategoryId":36,"CategoryName":"Domains with extended attributes"},{"__type":"Nc:SimpleKB:Abstractions:Dtos:CategoryItemDto","ParentCategoryId":34,"TreatAsTopicYN":false,"Description":"","ImageUrl":"","ShortDesc":"","CategoryId":51,"CategoryName":"FreeDNS"},{"__type":"Nc:SimpleKB:Abstractions:Dtos:CategoryItemDto","ParentCategoryId":34,"TreatAsTopicYN":false,"Description":"","ImageUrl":"","ShortDesc":"","CategoryId":15,"CategoryName":"Namecheap Market"},{"__type":"Nc:SimpleKB:Abstractions:Dtos:CategoryItemDto","ParentCategoryId":34,"TreatAsTopicYN":false,"Description":"","ImageUrl":"","ShortDesc":"","CategoryId":2208,"CategoryName":"3rd Party Services Setup"},{"__type":"Nc:SimpleKB:Abstractions:Dtos:CategoryItemDto","ParentCategoryId":34,"TreatAsTopicYN":false,"Description":"","ImageUrl":"","ShortDesc":"","CategoryId":2278,"CategoryName":"Handshake TLDs"}]},{"__type":"Nc:SimpleKB:Abstractions:Dtos:CategoryItemDto","ParentCategoryId":34,"TreatAsTopicYN":false,"Description":"","ImageUrl":"","ShortDesc":"","CategoryId":35,"CategoryName":"Registrations"},{"__type":"Nc:SimpleKB:Abstractions:Dtos:CategoryItemDto","ParentCategoryId":14,"TreatAsTopicYN":false,"Description":"","ImageUrl":"","ShortDesc":"","CategoryId":70,"CategoryName":"Reissuance"},{"__type":"Nc:SimpleKB:Abstractions:Dtos:CategoryItemDto","ParentCategoryId":0,"TreatAsTopicYN":false,"Description":"","ImageUrl":"/assets/img/pictograms/150/protection-red.png","ShortDesc":"","CategoryId":37,"CategoryName":"Domain Privacy Protection","SubCategories":[]},{"__type":"Nc:SimpleKB:Abstractions:Dtos:CategoryItemDto","ParentCategoryId":2200,"TreatAsTopicYN":false,"Description":"","ImageUrl":"","ShortDesc":"","CategoryId":2177,"CategoryName":"Private Email"},{"__type":"Nc:SimpleKB:Abstractions:Dtos:CategoryItemDto","ParentCategoryId":93,"TreatAsTopicYN":false,"Description":"","ImageUrl":"","ShortDesc":"","CategoryId":2178,"CategoryName":"Private Email: Webmail Features"},{"__type":"Nc:SimpleKB:Abstractions:Dtos:CategoryItemDto","ParentCategoryId":34,"TreatAsTopicYN":false,"Description":"","ImageUrl":"","ShortDesc":"","CategoryId":2207,"CategoryName":"Renewal questions"},{"__type":"Nc:SimpleKB:Abstractions:Dtos:CategoryItemDto","ParentCategoryId":12,"TreatAsTopicYN":false,"Description":"","ImageUrl":"","ShortDesc":"","CategoryId":2210,"CategoryName":"cPanel Add-ons"},{"__type":"Nc:SimpleKB:Abstractions:Dtos:CategoryItemDto","ParentCategoryId":2265,"TreatAsTopicYN":false,"Description":"","ImageUrl":"","ShortDesc":"","CategoryId":2273,"CategoryName":"Gaming Consoles"},{"__type":"Nc:SimpleKB:Abstractions:Dtos:CategoryItemDto","ParentCategoryId":2239,"TreatAsTopicYN":false,"Description":"","ImageUrl":"","ShortDesc":"","CategoryId":2284,"CategoryName":"WordPress Management"},{"__type":"Nc:SimpleKB:Abstractions:Dtos:CategoryItemDto","ParentCategoryId":2239,"TreatAsTopicYN":false,"Description":"","ImageUrl":"","ShortDesc":"","CategoryId":2285,"CategoryName":"SFTP and Database access"},{"__type":"Nc:SimpleKB:Abstractions:Dtos:CategoryItemDto","ParentCategoryId":2265,"TreatAsTopicYN":false,"Description":"","ImageUrl":"","ShortDesc":"","CategoryId":2268,"CategoryName":"macOS"},{"__type":"Nc:SimpleKB:Abstractions:Dtos:CategoryItemDto","ParentCategoryId":93,"TreatAsTopicYN":false,"Description":"","ImageUrl":"","ShortDesc":"","CategoryId":2175,"CategoryName":"Private Email: Client Setup"},{"__type":"Nc:SimpleKB:Abstractions:Dtos:CategoryItemDto","ParentCategoryId":0,"TreatAsTopicYN":false,"Description":"","ImageUrl":"/assets/img/pictograms/150/status-red.png","ShortDesc":"","CategoryId":2209,"CategoryName":"Domain Transfers","SubCategories":[{"__type":"Nc:SimpleKB:Abstractions:Dtos:CategoryItemDto","ParentCategoryId":2209,"TreatAsTopicYN":false,"Description":"","ImageUrl":"","ShortDesc":"","CategoryId":8,"CategoryName":"Transfer Information"},{"__type":"Nc:SimpleKB:Abstractions:Dtos:CategoryItemDto","ParentCategoryId":2209,"TreatAsTopicYN":false,"Description":"","ImageUrl":"","ShortDesc":"","CategoryId":83,"CategoryName":"Transfer to Namecheap"},{"__type":"Nc:SimpleKB:Abstractions:Dtos:CategoryItemDto","ParentCategoryId":2209,"TreatAsTopicYN":false,"Description":"","ImageUrl":"","ShortDesc":"","CategoryId":84,"CategoryName":"Transfer to another provider"},{"__type":"Nc:SimpleKB:Abstractions:Dtos:CategoryItemDto","ParentCategoryId":2209,"TreatAsTopicYN":false,"Description":"","ImageUrl":"","ShortDesc":"","CategoryId":219,"CategoryName":"Canceled Transfers"}]},{"__type":"Nc:SimpleKB:Abstractions:Dtos:CategoryItemDto","ParentCategoryId":12,"TreatAsTopicYN":false,"Description":"","ImageUrl":"","ShortDesc":"","CategoryId":48,"CategoryName":"VPS"},{"__type":"Nc:SimpleKB:Abstractions:Dtos:CategoryItemDto","ParentCategoryId":34,"TreatAsTopicYN":false,"Description":"","ImageUrl":"","ShortDesc":"","CategoryId":36,"CategoryName":"Domains with extended attributes"},{"__type":"Nc:SimpleKB:Abstractions:Dtos:CategoryItemDto","ParentCategoryId":0,"TreatAsTopicYN":true,"Description":"","ImageUrl":"/assets/img/pictograms/150/server-red.png","ShortDesc":"","CategoryId":12,"CategoryName":"Hosting","SubCategories":[{"__type":"Nc:SimpleKB:Abstractions:Dtos:CategoryItemDto","ParentCategoryId":12,"TreatAsTopicYN":false,"Description":"","ImageUrl":"","ShortDesc":"","CategoryId":2219,"CategoryName":"PHP Configuration"},{"__type":"Nc:SimpleKB:Abstractions:Dtos:CategoryItemDto","ParentCategoryId":12,"TreatAsTopicYN":false,"Description":"","ImageUrl":"","ShortDesc":"","CategoryId":2225,"CategoryName":"SEO"},{"__type":"Nc:SimpleKB:Abstractions:Dtos:CategoryItemDto","ParentCategoryId":12,"TreatAsTopicYN":false,"Description":"","ImageUrl":"","ShortDesc":"","CategoryId":2252,"CategoryName":"InterWorx questions"},{"__type":"Nc:SimpleKB:Abstractions:Dtos:CategoryItemDto","ParentCategoryId":12,"TreatAsTopicYN":false,"Description":"","ImageUrl":"","ShortDesc":"","CategoryId":2291,"CategoryName":"Webuzo questions"},{"__type":"Nc:SimpleKB:Abstractions:Dtos:CategoryItemDto","ParentCategoryId":12,"TreatAsTopicYN":false,"Description":"","ImageUrl":"","ShortDesc":"","CategoryId":27,"CategoryName":"Getting Started"},{"__type":"Nc:SimpleKB:Abstractions:Dtos:CategoryItemDto","ParentCategoryId":12,"TreatAsTopicYN":false,"Description":"","ImageUrl":"","ShortDesc":"","CategoryId":22,"CategoryName":"Hosting Information"},{"__type":"Nc:SimpleKB:Abstractions:Dtos:CategoryItemDto","ParentCategoryId":12,"TreatAsTopicYN":false,"Description":"","ImageUrl":"","ShortDesc":"","CategoryId":29,"CategoryName":"cPanel questions"},{"__type":"Nc:SimpleKB:Abstractions:Dtos:CategoryItemDto","ParentCategoryId":12,"TreatAsTopicYN":false,"Description":"","ImageUrl":"","ShortDesc":"","CategoryId":2182,"CategoryName":"cPanel: Software Management"},{"__type":"Nc:SimpleKB:Abstractions:Dtos:CategoryItemDto","ParentCategoryId":12,"TreatAsTopicYN":false,"Description":"","ImageUrl":"","ShortDesc":"","CategoryId":2187,"CategoryName":"cPanel: WordPress"},{"__type":"Nc:SimpleKB:Abstractions:Dtos:CategoryItemDto","ParentCategoryId":12,"TreatAsTopicYN":false,"Description":"","ImageUrl":"","ShortDesc":"","CategoryId":2210,"CategoryName":"cPanel Add-ons"},{"__type":"Nc:SimpleKB:Abstractions:Dtos:CategoryItemDto","ParentCategoryId":12,"TreatAsTopicYN":false,"Description":"","ImageUrl":"","ShortDesc":"","CategoryId":48,"CategoryName":"VPS"},{"__type":"Nc:SimpleKB:Abstractions:Dtos:CategoryItemDto","ParentCategoryId":12,"TreatAsTopicYN":false,"Description":"","ImageUrl":"","ShortDesc":"","CategoryId":2188,"CategoryName":"Dedicated Server"},{"__type":"Nc:SimpleKB:Abstractions:Dtos:CategoryItemDto","ParentCategoryId":12,"TreatAsTopicYN":false,"Description":"","ImageUrl":"","ShortDesc":"","CategoryId":30,"CategoryName":"WHM questions"},{"__type":"Nc:SimpleKB:Abstractions:Dtos:CategoryItemDto","ParentCategoryId":12,"TreatAsTopicYN":false,"Description":"","ImageUrl":"","ShortDesc":"","CategoryId":32,"CategoryName":"DNS settings"},{"__type":"Nc:SimpleKB:Abstractions:Dtos:CategoryItemDto","ParentCategoryId":12,"TreatAsTopicYN":false,"Description":"","ImageUrl":"","ShortDesc":"","CategoryId":103,"CategoryName":"LVE (CloudLinux)"},{"__type":"Nc:SimpleKB:Abstractions:Dtos:CategoryItemDto","ParentCategoryId":12,"TreatAsTopicYN":false,"Description":"","ImageUrl":"","ShortDesc":"","CategoryId":89,"CategoryName":"SSH Access"},{"__type":"Nc:SimpleKB:Abstractions:Dtos:CategoryItemDto","ParentCategoryId":12,"TreatAsTopicYN":false,"Description":"","ImageUrl":"","ShortDesc":"","CategoryId":205,"CategoryName":"FTP questions"},{"__type":"Nc:SimpleKB:Abstractions:Dtos:CategoryItemDto","ParentCategoryId":12,"TreatAsTopicYN":false,"Description":"","ImageUrl":"","ShortDesc":"","CategoryId":2180,"CategoryName":"MySQL questions"},{"__type":"Nc:SimpleKB:Abstractions:Dtos:CategoryItemDto","ParentCategoryId":12,"TreatAsTopicYN":false,"Description":"","ImageUrl":"","ShortDesc":"","CategoryId":2199,"CategoryName":"Hosting Migration"},{"__type":"Nc:SimpleKB:Abstractions:Dtos:CategoryItemDto","ParentCategoryId":12,"TreatAsTopicYN":false,"Description":"","ImageUrl":"","ShortDesc":"","CategoryId":2194,"CategoryName":"Tips & Tricks"},{"__type":"Nc:SimpleKB:Abstractions:Dtos:CategoryItemDto","ParentCategoryId":12,"TreatAsTopicYN":false,"Description":"","ImageUrl":"","ShortDesc":"","CategoryId":239,"CategoryName":"WHMCS"},{"__type":"Nc:SimpleKB:Abstractions:Dtos:CategoryItemDto","ParentCategoryId":12,"TreatAsTopicYN":false,"Description":"","ImageUrl":"","ShortDesc":"","CategoryId":33,"CategoryName":"SSL Installation"}]},{"__type":"Nc:SimpleKB:Abstractions:Dtos:CategoryItemDto","ParentCategoryId":93,"TreatAsTopicYN":false,"Description":"","ImageUrl":"","ShortDesc":"","CategoryId":2171,"CategoryName":"Private Email: Active Sync (Exchange) Setup"},{"__type":"Nc:SimpleKB:Abstractions:Dtos:CategoryItemDto","ParentCategoryId":12,"TreatAsTopicYN":false,"Description":"","ImageUrl":"","ShortDesc":"","CategoryId":2188,"CategoryName":"Dedicated Server"},{"__type":"Nc:SimpleKB:Abstractions:Dtos:CategoryItemDto","ParentCategoryId":2265,"TreatAsTopicYN":false,"Description":"","ImageUrl":"","ShortDesc":"","CategoryId":2269,"CategoryName":"iOS"},{"__type":"Nc:SimpleKB:Abstractions:Dtos:CategoryItemDto","ParentCategoryId":2239,"TreatAsTopicYN":false,"Description":"","ImageUrl":"","ShortDesc":"","CategoryId":2286,"CategoryName":"Domains questions"},{"__type":"Nc:SimpleKB:Abstractions:Dtos:CategoryItemDto","ParentCategoryId":2239,"TreatAsTopicYN":false,"Description":"","ImageUrl":"","ShortDesc":"","CategoryId":2288,"CategoryName":"Billing questions"},{"__type":"Nc:SimpleKB:Abstractions:Dtos:CategoryItemDto","ParentCategoryId":2265,"TreatAsTopicYN":false,"Description":"","ImageUrl":"","ShortDesc":"","CategoryId":2271,"CategoryName":"Linux"},{"__type":"Nc:SimpleKB:Abstractions:Dtos:CategoryItemDto","ParentCategoryId":12,"TreatAsTopicYN":false,"Description":"","ImageUrl":"","ShortDesc":"","CategoryId":30,"CategoryName":"WHM questions"},{"__type":"Nc:SimpleKB:Abstractions:Dtos:CategoryItemDto","ParentCategoryId":93,"TreatAsTopicYN":false,"Description":"","ImageUrl":"","ShortDesc":"","CategoryId":31,"CategoryName":"cPanel Email FAQs"},{"__type":"Nc:SimpleKB:Abstractions:Dtos:CategoryItemDto","ParentCategoryId":34,"TreatAsTopicYN":false,"Description":"","ImageUrl":"","ShortDesc":"","CategoryId":51,"CategoryName":"FreeDNS"},{"__type":"Nc:SimpleKB:Abstractions:Dtos:CategoryItemDto","ParentCategoryId":0,"TreatAsTopicYN":false,"Description":"","ImageUrl":"/assets/img/pictograms/150/email-red.png","ShortDesc":"","CategoryId":93,"CategoryName":"Email service","SubCategories":[{"__type":"Nc:SimpleKB:Abstractions:Dtos:CategoryItemDto","ParentCategoryId":93,"TreatAsTopicYN":false,"Description":"","ImageUrl":"","ShortDesc":"","CategoryId":2216,"CategoryName":"Spam Protection"},{"__type":"Nc:SimpleKB:Abstractions:Dtos:CategoryItemDto","ParentCategoryId":93,"TreatAsTopicYN":false,"Description":"","ImageUrl":"","ShortDesc":"","CategoryId":2226,"CategoryName":"Email Migration"},{"__type":"Nc:SimpleKB:Abstractions:Dtos:CategoryItemDto","ParentCategoryId":93,"TreatAsTopicYN":false,"Description":"","ImageUrl":"","ShortDesc":"","CategoryId":2260,"CategoryName":"Private Email Contacts and Calendars Setup"},{"__type":"Nc:SimpleKB:Abstractions:Dtos:CategoryItemDto","ParentCategoryId":93,"TreatAsTopicYN":false,"Description":"","ImageUrl":"","ShortDesc":"","CategoryId":2179,"CategoryName":"Private Email: General Information"},{"__type":"Nc:SimpleKB:Abstractions:Dtos:CategoryItemDto","ParentCategoryId":93,"TreatAsTopicYN":false,"Description":"","ImageUrl":"","ShortDesc":"","CategoryId":2215,"CategoryName":"Private Email: Mailbox Management"},{"__type":"Nc:SimpleKB:Abstractions:Dtos:CategoryItemDto","ParentCategoryId":93,"TreatAsTopicYN":false,"Description":"","ImageUrl":"","ShortDesc":"","CategoryId":2214,"CategoryName":"Email Forwarding"},{"__type":"Nc:SimpleKB:Abstractions:Dtos:CategoryItemDto","ParentCategoryId":93,"TreatAsTopicYN":false,"Description":"","ImageUrl":"","ShortDesc":"","CategoryId":2176,"CategoryName":"Private Email: DNS Settings"},{"__type":"Nc:SimpleKB:Abstractions:Dtos:CategoryItemDto","ParentCategoryId":93,"TreatAsTopicYN":false,"Description":"","ImageUrl":"","ShortDesc":"","CategoryId":2178,"CategoryName":"Private Email: Webmail Features"},{"__type":"Nc:SimpleKB:Abstractions:Dtos:CategoryItemDto","ParentCategoryId":93,"TreatAsTopicYN":false,"Description":"","ImageUrl":"","ShortDesc":"","CategoryId":2175,"CategoryName":"Private Email: Client Setup"},{"__type":"Nc:SimpleKB:Abstractions:Dtos:CategoryItemDto","ParentCategoryId":93,"TreatAsTopicYN":false,"Description":"","ImageUrl":"","ShortDesc":"","CategoryId":2171,"CategoryName":"Private Email: Active Sync (Exchange) Setup"},{"__type":"Nc:SimpleKB:Abstractions:Dtos:CategoryItemDto","ParentCategoryId":93,"TreatAsTopicYN":false,"Description":"","ImageUrl":"","ShortDesc":"","CategoryId":31,"CategoryName":"cPanel Email FAQs"},{"__type":"Nc:SimpleKB:Abstractions:Dtos:CategoryItemDto","ParentCategoryId":93,"TreatAsTopicYN":false,"Description":"","ImageUrl":"","ShortDesc":"","CategoryId":2186,"CategoryName":"cPanel Email: Client Setup"},{"__type":"Nc:SimpleKB:Abstractions:Dtos:CategoryItemDto","ParentCategoryId":93,"TreatAsTopicYN":false,"Description":"","ImageUrl":"","ShortDesc":"","CategoryId":2204,"CategoryName":"Private Email: Video Overview"}]},{"__type":"Nc:SimpleKB:Abstractions:Dtos:CategoryItemDto","ParentCategoryId":12,"TreatAsTopicYN":false,"Description":"","ImageUrl":"","ShortDesc":"","CategoryId":32,"CategoryName":"DNS settings"},{"__type":"Nc:SimpleKB:Abstractions:Dtos:CategoryItemDto","ParentCategoryId":34,"TreatAsTopicYN":false,"Description":"","ImageUrl":"","ShortDesc":"","CategoryId":15,"CategoryName":"Namecheap Market"},{"__type":"Nc:SimpleKB:Abstractions:Dtos:CategoryItemDto","ParentCategoryId":93,"TreatAsTopicYN":false,"Description":"","ImageUrl":"","ShortDesc":"","CategoryId":2186,"CategoryName":"cPanel Email: Client Setup"},{"__type":"Nc:SimpleKB:Abstractions:Dtos:CategoryItemDto","ParentCategoryId":2265,"TreatAsTopicYN":false,"Description":"","ImageUrl":"","ShortDesc":"","CategoryId":2266,"CategoryName":"Windows"},{"__type":"Nc:SimpleKB:Abstractions:Dtos:CategoryItemDto","ParentCategoryId":2239,"TreatAsTopicYN":false,"Description":"","ImageUrl":"","ShortDesc":"","CategoryId":2287,"CategoryName":"SSL questions"},{"__type":"Nc:SimpleKB:Abstractions:Dtos:CategoryItemDto","ParentCategoryId":2265,"TreatAsTopicYN":false,"Description":"","ImageUrl":"","ShortDesc":"","CategoryId":2267,"CategoryName":"Android"},{"__type":"Nc:SimpleKB:Abstractions:Dtos:CategoryItemDto","ParentCategoryId":34,"TreatAsTopicYN":false,"Description":"","ImageUrl":"","ShortDesc":"","CategoryId":2208,"CategoryName":"3rd Party Services Setup"},{"__type":"Nc:SimpleKB:Abstractions:Dtos:CategoryItemDto","ParentCategoryId":93,"TreatAsTopicYN":false,"Description":"","ImageUrl":"","ShortDesc":"","CategoryId":2204,"CategoryName":"Private Email: Video Overview"},{"__type":"Nc:SimpleKB:Abstractions:Dtos:CategoryItemDto","ParentCategoryId":0,"TreatAsTopicYN":false,"Description":"","ImageUrl":"/assets/img/pictograms/150/security-red.png","ShortDesc":"","CategoryId":14,"CategoryName":"SSL Certificates","SubCategories":[{"__type":"Nc:SimpleKB:Abstractions:Dtos:CategoryItemDto","ParentCategoryId":14,"TreatAsTopicYN":false,"Description":"","ImageUrl":"","ShortDesc":"","CategoryId":2217,"CategoryName":"Renewal"},{"__type":"Nc:SimpleKB:Abstractions:Dtos:CategoryItemDto","ParentCategoryId":14,"TreatAsTopicYN":false,"Description":"","ImageUrl":"","ShortDesc":"","CategoryId":2218,"CategoryName":"cPanel SSL Plugin"},{"__type":"Nc:SimpleKB:Abstractions:Dtos:CategoryItemDto","ParentCategoryId":14,"TreatAsTopicYN":false,"Description":"","ImageUrl":"","ShortDesc":"","CategoryId":2221,"CategoryName":"Multi-Domain SSL Certificates"},{"__type":"Nc:SimpleKB:Abstractions:Dtos:CategoryItemDto","ParentCategoryId":14,"TreatAsTopicYN":false,"Description":"","ImageUrl":"","ShortDesc":"","CategoryId":2222,"CategoryName":"Cancellation"},{"__type":"Nc:SimpleKB:Abstractions:Dtos:CategoryItemDto","ParentCategoryId":14,"TreatAsTopicYN":false,"Description":"","ImageUrl":"","ShortDesc":"","CategoryId":2223,"CategoryName":"Browser errors"},{"__type":"Nc:SimpleKB:Abstractions:Dtos:CategoryItemDto","ParentCategoryId":14,"TreatAsTopicYN":false,"Description":"","ImageUrl":"","ShortDesc":"","CategoryId":2224,"CategoryName":"Site Seal, Logo"},{"__type":"Nc:SimpleKB:Abstractions:Dtos:CategoryItemDto","ParentCategoryId":14,"TreatAsTopicYN":false,"Description":"","ImageUrl":"","ShortDesc":"","CategoryId":2238,"CategoryName":"SSL installation errors"},{"__type":"Nc:SimpleKB:Abstractions:Dtos:CategoryItemDto","ParentCategoryId":14,"TreatAsTopicYN":false,"Description":"","ImageUrl":"","ShortDesc":"","CategoryId":2290,"CategoryName":"CSR code"},{"__type":"Nc:SimpleKB:Abstractions:Dtos:CategoryItemDto","ParentCategoryId":14,"TreatAsTopicYN":false,"Description":"","ImageUrl":"","ShortDesc":"","CategoryId":2293,"CategoryName":"Automated SSL management"},{"__type":"Nc:SimpleKB:Abstractions:Dtos:CategoryItemDto","ParentCategoryId":14,"TreatAsTopicYN":false,"Description":"","ImageUrl":"","ShortDesc":"","CategoryId":38,"CategoryName":"SSL General"},{"__type":"Nc:SimpleKB:Abstractions:Dtos:CategoryItemDto","ParentCategoryId":14,"TreatAsTopicYN":false,"Description":"","ImageUrl":"","ShortDesc":"","CategoryId":67,"CategoryName":"Activation"},{"__type":"Nc:SimpleKB:Abstractions:Dtos:CategoryItemDto","ParentCategoryId":14,"TreatAsTopicYN":false,"Description":"","ImageUrl":"","ShortDesc":"","CategoryId":68,"CategoryName":"Validation"},{"__type":"Nc:SimpleKB:Abstractions:Dtos:CategoryItemDto","ParentCategoryId":14,"TreatAsTopicYN":false,"Description":"","ImageUrl":"","ShortDesc":"","CategoryId":69,"CategoryName":"Installation"},{"__type":"Nc:SimpleKB:Abstractions:Dtos:CategoryItemDto","ParentCategoryId":14,"TreatAsTopicYN":false,"Description":"","ImageUrl":"","ShortDesc":"","CategoryId":70,"CategoryName":"Reissuance"}]},{"__type":"Nc:SimpleKB:Abstractions:Dtos:CategoryItemDto","ParentCategoryId":0,"TreatAsTopicYN":true,"Description":"","ImageUrl":"/assets/img/pictograms/150/performance-red.png","ShortDesc":"","CategoryId":9,"CategoryName":"My Account","SubCategories":[{"__type":"Nc:SimpleKB:Abstractions:Dtos:CategoryItemDto","ParentCategoryId":9,"TreatAsTopicYN":false,"Description":"","ImageUrl":"","ShortDesc":"","CategoryId":45,"CategoryName":"Account Security"},{"__type":"Nc:SimpleKB:Abstractions:Dtos:CategoryItemDto","ParentCategoryId":9,"TreatAsTopicYN":false,"Description":"","ImageUrl":"","ShortDesc":"","CategoryId":43,"CategoryName":"Profile Management"},{"__type":"Nc:SimpleKB:Abstractions:Dtos:CategoryItemDto","ParentCategoryId":9,"TreatAsTopicYN":false,"Description":"","ImageUrl":"","ShortDesc":"","CategoryId":44,"CategoryName":"Account Access"}]},{"__type":"Nc:SimpleKB:Abstractions:Dtos:CategoryItemDto","ParentCategoryId":34,"TreatAsTopicYN":false,"Description":"","ImageUrl":"","ShortDesc":"","CategoryId":2278,"CategoryName":"Handshake TLDs"},{"__type":"Nc:SimpleKB:Abstractions:Dtos:CategoryItemDto","ParentCategoryId":12,"TreatAsTopicYN":false,"Description":"","ImageUrl":"","ShortDesc":"","CategoryId":103,"CategoryName":"LVE (CloudLinux)"},{"__type":"Nc:SimpleKB:Abstractions:Dtos:CategoryItemDto","ParentCategoryId":0,"TreatAsTopicYN":false,"Description":"","ImageUrl":"/assets/img/pictograms/150/affiliates-red.png","ShortDesc":"","CategoryId":55,"CategoryName":"Affiliates","SubCategories":[]},{"__type":"Nc:SimpleKB:Abstractions:Dtos:CategoryItemDto","ParentCategoryId":12,"TreatAsTopicYN":false,"Description":"","ImageUrl":"","ShortDesc":"","CategoryId":89,"CategoryName":"SSH Access"},{"__type":"Nc:SimpleKB:Abstractions:Dtos:CategoryItemDto","ParentCategoryId":0,"TreatAsTopicYN":false,"Description":"","ImageUrl":"/assets/img/pictograms/150/tools-red.png","ShortDesc":"","CategoryId":2211,"CategoryName":"API & Resellers","SubCategories":[{"__type":"Nc:SimpleKB:Abstractions:Dtos:CategoryItemDto","ParentCategoryId":2211,"TreatAsTopicYN":false,"Description":"","ImageUrl":"","ShortDesc":"","CategoryId":2227,"CategoryName":"SSL Resellers"},{"__type":"Nc:SimpleKB:Abstractions:Dtos:CategoryItemDto","ParentCategoryId":2211,"TreatAsTopicYN":false,"Description":"","ImageUrl":"","ShortDesc":"","CategoryId":2229,"CategoryName":"Hosting Resellers"},{"__type":"Nc:SimpleKB:Abstractions:Dtos:CategoryItemDto","ParentCategoryId":2211,"TreatAsTopicYN":false,"Description":"","ImageUrl":"","ShortDesc":"","CategoryId":63,"CategoryName":"Namecheap API"},{"__type":"Nc:SimpleKB:Abstractions:Dtos:CategoryItemDto","ParentCategoryId":2211,"TreatAsTopicYN":false,"Description":"","ImageUrl":"","ShortDesc":"","CategoryId":2196,"CategoryName":"WHMCS module for SSL"}]},{"__type":"Nc:SimpleKB:Abstractions:Dtos:CategoryItemDto","ParentCategoryId":0,"TreatAsTopicYN":false,"Description":"","ImageUrl":"/assets/img/pictograms/150/timer-red.png","ShortDesc":"","CategoryId":2212,"CategoryName":"Legacy Products","SubCategories":[]},{"__type":"Nc:SimpleKB:Abstractions:Dtos:CategoryItemDto","ParentCategoryId":12,"TreatAsTopicYN":false,"Description":"","ImageUrl":"","ShortDesc":"","CategoryId":205,"CategoryName":"FTP questions"},{"__type":"Nc:SimpleKB:Abstractions:Dtos:CategoryItemDto","ParentCategoryId":12,"TreatAsTopicYN":false,"Description":"","ImageUrl":"","ShortDesc":"","CategoryId":2180,"CategoryName":"MySQL questions"},{"__type":"Nc:SimpleKB:Abstractions:Dtos:CategoryItemDto","ParentCategoryId":12,"TreatAsTopicYN":false,"Description":"","ImageUrl":"","ShortDesc":"","CategoryId":2199,"CategoryName":"Hosting Migration"},{"__type":"Nc:SimpleKB:Abstractions:Dtos:CategoryItemDto","ParentCategoryId":0,"TreatAsTopicYN":false,"Description":"","ImageUrl":"/assets/img/pictograms/150/premiumdns-red.png","ShortDesc":"","CategoryId":2231,"CategoryName":"PremiumDNS","SubCategories":[]},{"__type":"Nc:SimpleKB:Abstractions:Dtos:CategoryItemDto","ParentCategoryId":12,"TreatAsTopicYN":false,"Description":"","ImageUrl":"","ShortDesc":"","CategoryId":2194,"CategoryName":"Tips & Tricks"},{"__type":"Nc:SimpleKB:Abstractions:Dtos:CategoryItemDto","ParentCategoryId":0,"TreatAsTopicYN":false,"Description":"","ImageUrl":"https://static.nc-img.com/live-resource/icons/knowledgebase/fastVPN_icon-150px.png","ShortDesc":"","CategoryId":2265,"CategoryName":"FastVPN","SubCategories":[{"__type":"Nc:SimpleKB:Abstractions:Dtos:CategoryItemDto","ParentCategoryId":2265,"TreatAsTopicYN":false,"Description":"","ImageUrl":"","ShortDesc":"","CategoryId":2292,"CategoryName":"Browser Extensions"},{"__type":"Nc:SimpleKB:Abstractions:Dtos:CategoryItemDto","ParentCategoryId":2265,"TreatAsTopicYN":false,"Description":"","ImageUrl":"","ShortDesc":"","CategoryId":2274,"CategoryName":"General"},{"__type":"Nc:SimpleKB:Abstractions:Dtos:CategoryItemDto","ParentCategoryId":2265,"TreatAsTopicYN":false,"Description":"","ImageUrl":"","ShortDesc":"","CategoryId":2270,"CategoryName":"Routers"},{"__type":"Nc:SimpleKB:Abstractions:Dtos:CategoryItemDto","ParentCategoryId":2265,"TreatAsTopicYN":false,"Description":"","ImageUrl":"","ShortDesc":"","CategoryId":2272,"CategoryName":"TV"},{"__type":"Nc:SimpleKB:Abstractions:Dtos:CategoryItemDto","ParentCategoryId":2265,"TreatAsTopicYN":false,"Description":"","ImageUrl":"","ShortDesc":"","CategoryId":2273,"CategoryName":"Gaming Consoles"},{"__type":"Nc:SimpleKB:Abstractions:Dtos:CategoryItemDto","ParentCategoryId":2265,"TreatAsTopicYN":false,"Description":"","ImageUrl":"","ShortDesc":"","CategoryId":2268,"CategoryName":"macOS"},{"__type":"Nc:SimpleKB:Abstractions:Dtos:CategoryItemDto","ParentCategoryId":2265,"TreatAsTopicYN":false,"Description":"","ImageUrl":"","ShortDesc":"","CategoryId":2269,"CategoryName":"iOS"},{"__type":"Nc:SimpleKB:Abstractions:Dtos:CategoryItemDto","ParentCategoryId":2265,"TreatAsTopicYN":false,"Description":"","ImageUrl":"","ShortDesc":"","CategoryId":2271,"CategoryName":"Linux"},{"__type":"Nc:SimpleKB:Abstractions:Dtos:CategoryItemDto","ParentCategoryId":2265,"TreatAsTopicYN":false,"Description":"","ImageUrl":"","ShortDesc":"","CategoryId":2266,"CategoryName":"Windows"},{"__type":"Nc:SimpleKB:Abstractions:Dtos:CategoryItemDto","ParentCategoryId":2265,"TreatAsTopicYN":false,"Description":"","ImageUrl":"","ShortDesc":"","CategoryId":2267,"CategoryName":"Android"}]},{"__type":"Nc:SimpleKB:Abstractions:Dtos:CategoryItemDto","ParentCategoryId":12,"TreatAsTopicYN":false,"Description":"","ImageUrl":"","ShortDesc":"","CategoryId":239,"CategoryName":"WHMCS"},{"__type":"Nc:SimpleKB:Abstractions:Dtos:CategoryItemDto","ParentCategoryId":12,"TreatAsTopicYN":false,"Description":"","ImageUrl":"","ShortDesc":"","CategoryId":33,"CategoryName":"SSL Installation"}],"status":200,"statusText":"OK"}}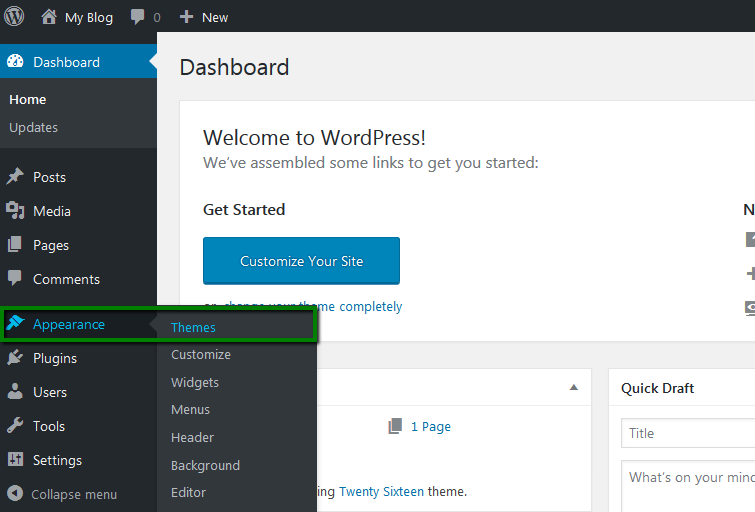


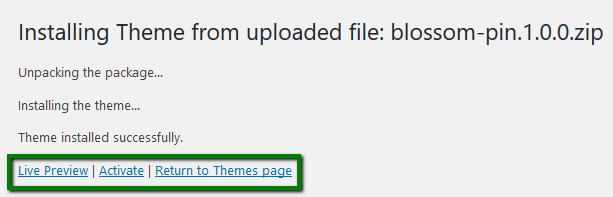
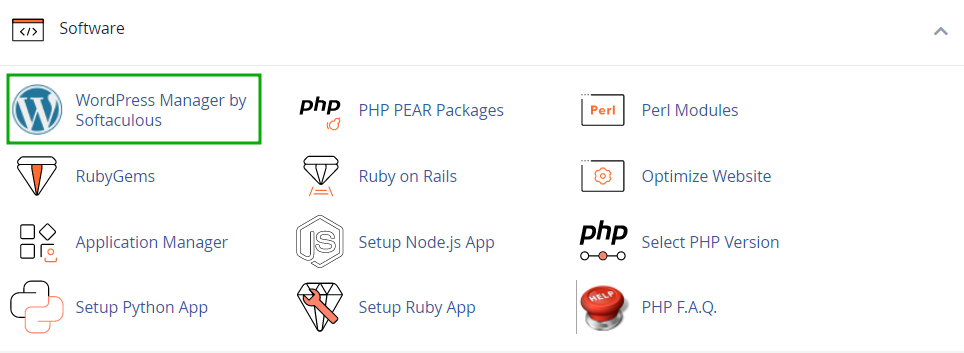
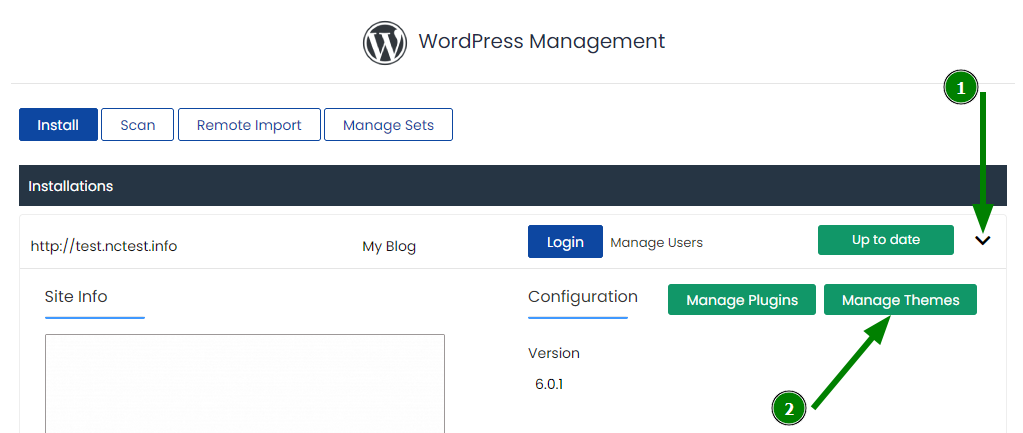
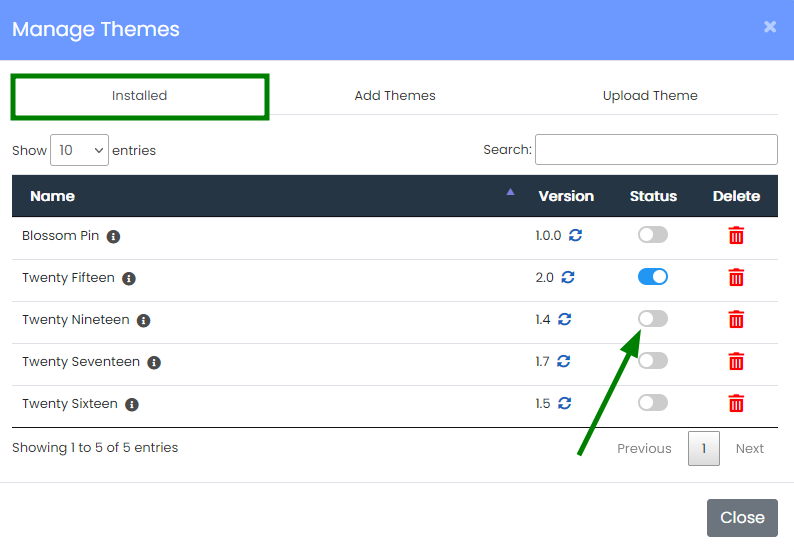
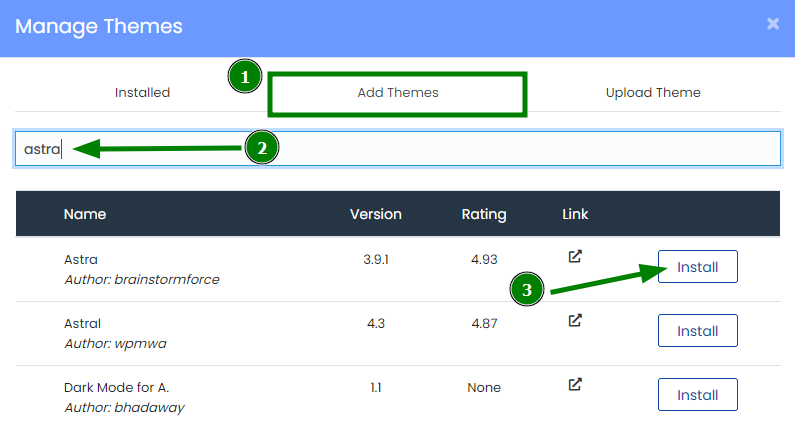
Theme installation via Softaculous WordPress Manager

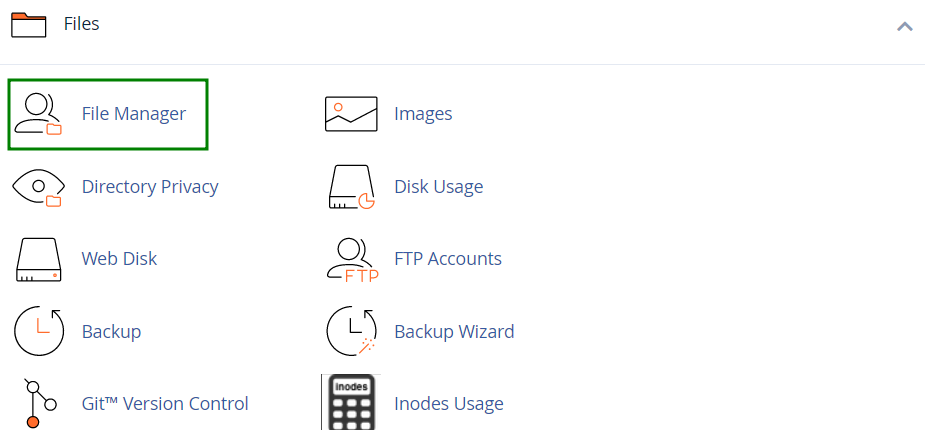
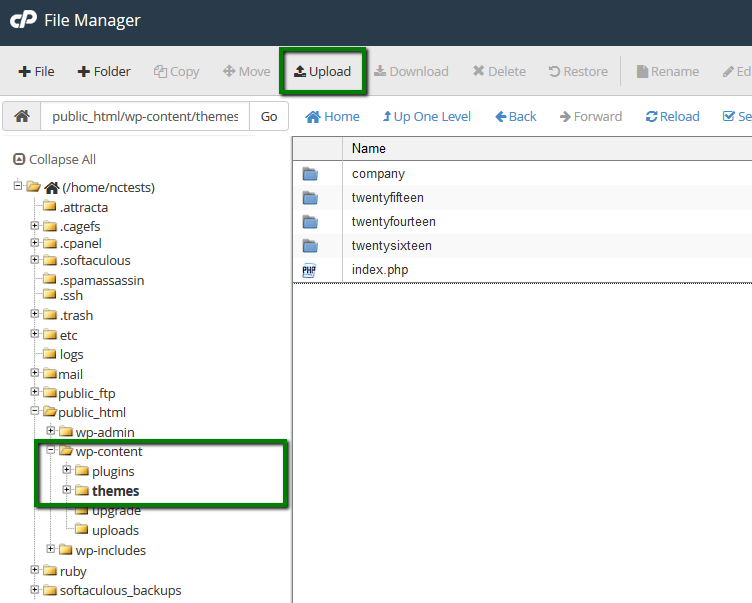
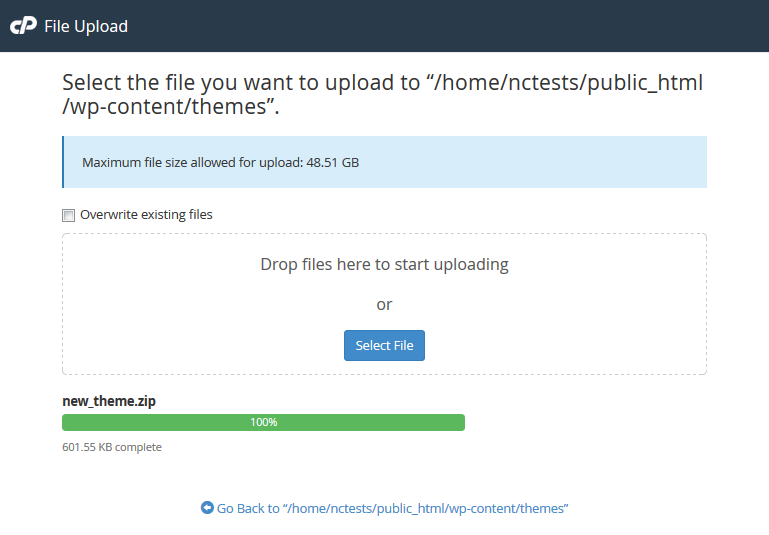
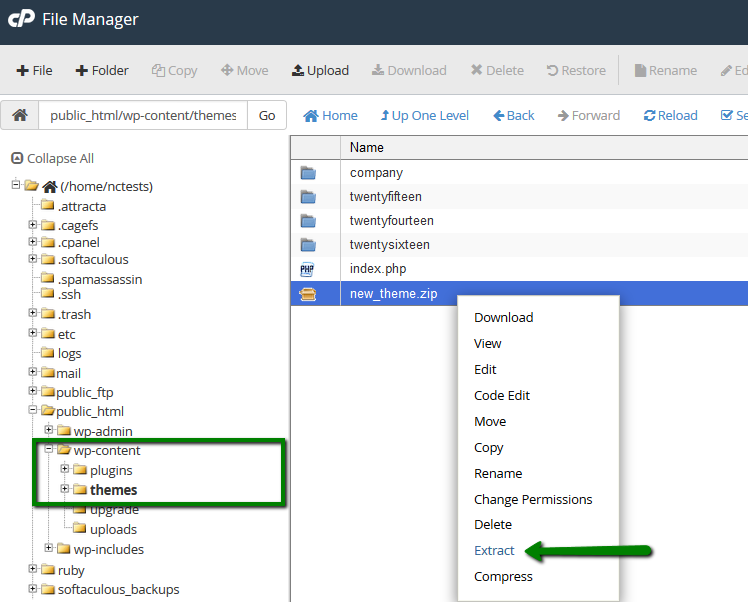
Theme installation via File Manager (manual)
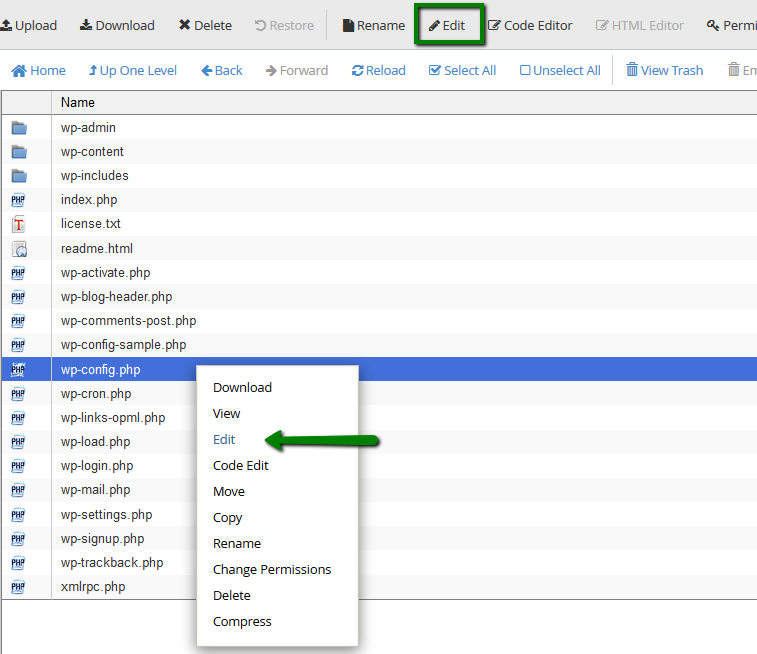
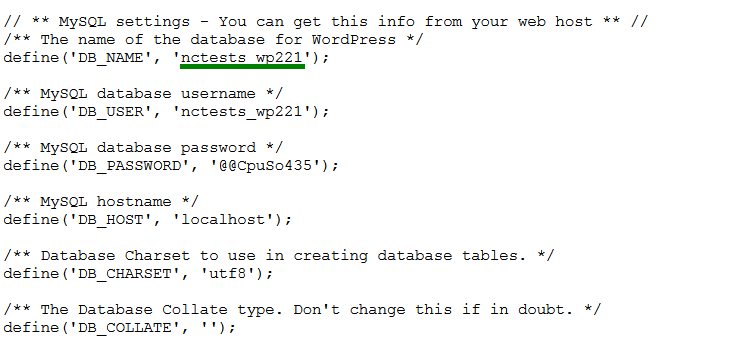
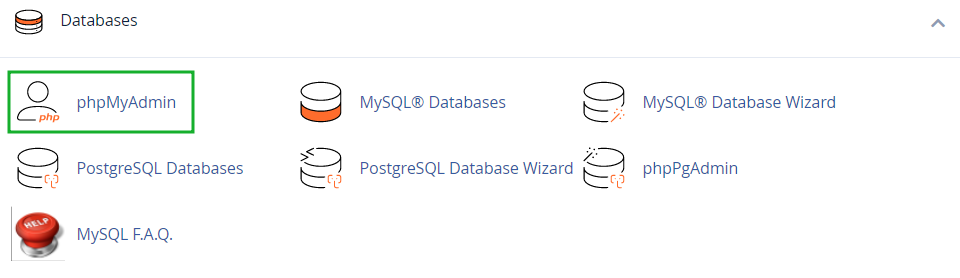
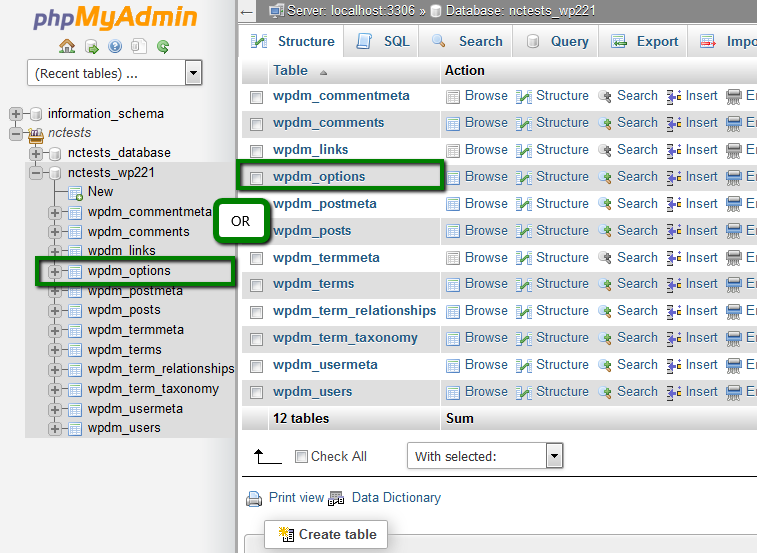
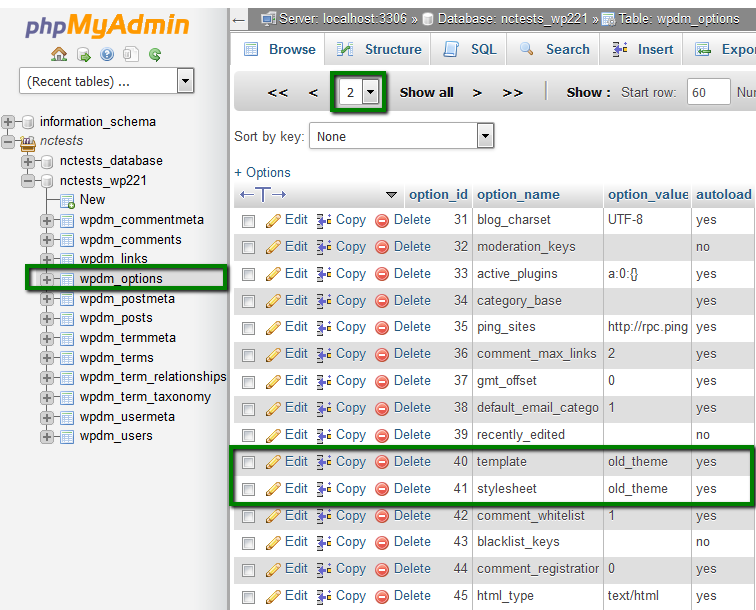
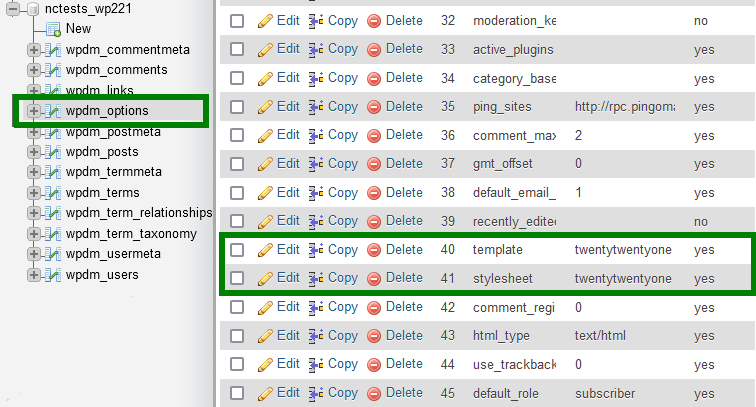
Theme change through website database


Need help? We're always here for you.