Limits & IP Justification form
Outlet (Clearance) Dedicated Servers are provided with 1 IP by default, additional IP address(es) cannot be ordered with this server type.
Our Entry Level Servers are provided with 1 IP address by default and 1 more IP can be ordered by contacting our Billing/Sales department via Live Chat or billing@namecheap.com.
Also, 2 more IPs can be ordered by filling in the IP justification form.
Medium Level and Advanced Level Servers are provided with 2 IPs by default. It is possible to order 2 additional IPs by contacting our Billing/Sales department and starting from the 5th and up to 16th IP, it is required to fill in the IP justification form.
In case your Server type is not listed in this article or if you are interested in the exact amount of IPs, please contact the Billing/Sales department.
Please notice that in some cases it will be required to fill in the IP justification form by using the instructions provided below:
1. Fill out the document to show us the purpose you require additional IPs for. IP justification form is required by ARIN (American Registry for Internet Numbers) to make sure that the IP addresses are not misused by Internet users.
2. Contact our Billing/Sales department with your request and the IP justification form attached.
PLEASE NOTE: It is very important to provide valid information in the justification form. The requested amount of IP addresses will be assigned to your server only if the justification is approved. Additional IP can be ordered at the price of $4 per month.
Once your request is received and the IP justification form is approved, the pro-rated difference for the IPs will be issued to you. The billing cycle for your dedicated IP will be automatically adjusted to match the current billing period of your hosting plan. Once the payment is provided, the necessary number of IP addresses will be assigned to your Dedicated Server.
Root password vs MAC address
To assign an IP address for User-responsible Dedicated servers, we’ll need either your dedicated server root password or MAC address.
If you provide a root password, all settings can be completed by us. If you can only provide your MAC address, we can apply the initial settings, but after that, setting up the IP on the server will have to be done by you. While this process should be simple, please bear in mind that there is a risk of losing access to the server with incorrect settings.
Checking your MAC address on AlmaLinux 8/Ubuntu
1. Connect to a dedicated server via SSH.
2. Now run the following command:
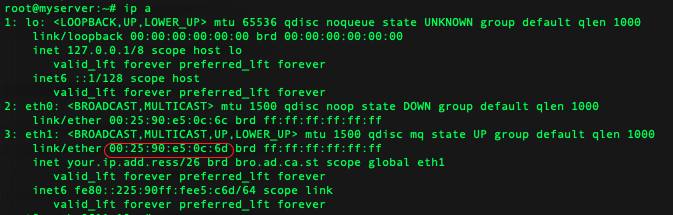
ip a
3. This will display sections starting with "eth0", "eth1", etc. Please take a look at the one containing your main IP, going after the word "inet".
4. Find the line starting with the words "link/ether" and copy all characters after it until the next space. It should be 6 pairs of symbols separated by a semicolon. That is your MAC address, it might look like this:
Adding a new IP address on AlmaLinux 8
1. After purchasing a dedicated IP, you will receive it along with the network information. It looks like AA.BB.CC.DD/XX, where XX is the network mask. You’ll need to convert it to the form you can use later. Please refer to the following table for conversion:
| aa.bb.cc.dd/24 | NETMASK=255.255.255.0 |
| aa.bb.cc.dd/25 | NETMASK=255.255.255.128 |
| aa.bb.cc.dd/26 | NETMASK=255.255.255.192 |
| aa.bb.cc.dd/27 | NETMASK=255.255.255.224 |
| aa.bb.cc.dd/28 | NETMASK=255.255.255.240 |
| aa.bb.cc.dd/29 | NETMASK=255.255.255.248 |
| aa.bb.cc.dd/30 | NETMASK=255.255.255.252 |
2. Please connect to your server via SSH.
3. Now check the naming of your network interfaces. For that, run the command:
ip a
Continue by locating the section which contains your main IP. It can be named "eth0" or "eth1". If you have more than one public IP address, there could be other virtual network interfaces named sequentially after the main one — "eth1:1", "eth1:2" and so on.
4. Create the configuration file for your new network interface. According to the previous step, you should name it with the NEXT number after the last one, containing your public IP(s). For example, you will see only "eth1", so you’ll need to create "eth1:1". At this step, we will navigate to the directory with network configurations and run the editor for this new file (adjust the command with the editor of your choice and name of the file):
cd /etc/sysconfig/network-scripts/
nano ifcfg-eth1:1
If the file isn’t empty, please check the previous step. You may have missed the already existing interface with the name "eth1:1". If this is the case, take the next number, "eth1:2".
5. Fill the file with the data from previous steps like this. DEVICE should contain the name of your interface, IPADDR should contain just your new IP, and NETMASK is from step 1. You can leave the last three lines as is:
DEVICE=eth1:1
IPADDR=aa.bb.cc.dd
NETMASK=255.255.255.XX
BOOTPROTO=none
TYPE=Ethernet
ONPARENT=yes
6. Now we need to restart the network service. AlmaLinux is equipped with Network Manager, so it can do this task for us without the need to reboot the whole server. Please run the following:
service NetworkManager restart
You can also try to do that this way:
/bin/systemctl restart NetworkManager.service
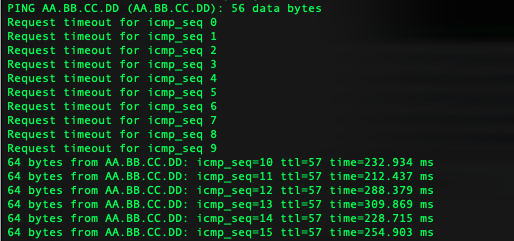
7. It is good to start running pings in the other console tab before the network restart. If you’ve done everything right, the new IP should appear in the output of “ifconfig” and pings will start receiving replies like this:

Adding a new IP address on Ubuntu
1. After purchasing an additional IP you will receive it along with the network information. It looks like AA.BB.CC.DD/XX, where XX is the network mask. We will use it as is.
2. Please connect to your server via SSH.
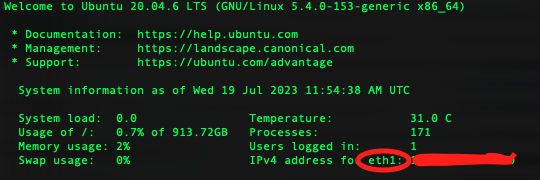
3. Now check the name of the network interface holding your current IP address. You can see it in the welcome message printed by your server once you log in (marked with the red circle. The IP should be next to it, it's hidden in this screenshot):
4. If you don't see the welcome message, you can always check network interfaces and IP addresses via the “ip” utility. Run the following command:
ip a
Continue by finding the section containing your main IP address. It will be named either "eth0" or "eth1". Please remember this name, we will use it later.
5. Modern Ubuntu servers are equipped with “netplan” utility which will help us to add the new IP address to the system. We need to search the configuration of your interface within netplan files like this:
grep eth1 /etc/netplan/* -H
Put “eth0” or “eth1” in the command above according to the previous step, where you found out the name of your main network interface. The command should return the name of the config file you will need to edit.
If netplan isn’t installed, and the command above resulted with the message of “file not found”, please reach out to our support team via Live Chat or email.
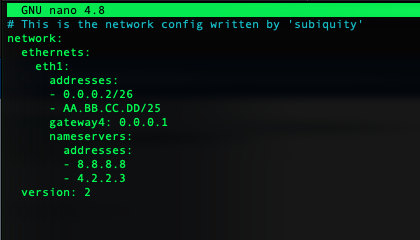
6. If the search (grep) resulted with your file being named, use a text editor of your choice to modify it. For example:

7. Now we need to add our IP address along with netmask to this file. Please copy it in the format AA.BB.CC.DD/XX from your IP assignment email (as shown in step 1) and put in the addresses section, like this (note the minus and the space in the beginning, they are necessary):
8. NOTE: read to the end before taking actions.
To apply your new network config, run “netplan try”. It’s recommended to open the second console tab or window on your local machine and run 'ping AA.BB.CC.DD' (your new IP address). The ping won't go, but this is expected. Just leave it running. Now type “netplan try” in your server's console and you wil see something like this:
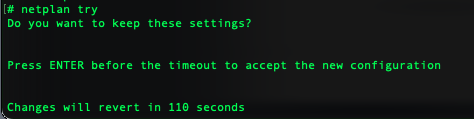
If something goes wrong you may lose your connectivity, and this is where netplan makes sure you have "Plan B". If the ping you started in the previous step sees replies - just hit enter, your IP should be applied and working. If not - just wait, and netplan will revert the changes you made to the config.
Successfully running ping in your other console might look like this:
That’s it!
