Softaculous is a great tool in cPanel that allows installing different scripts like WordPress, Joomla, Magento, etc. in a click of a button.
However, Softaculous is not just a script installer, it has a number of features, which can make managing your website much easier. So, taking a few minutes to look through this article will definitely show you how to manage your websites in a more efficient way.
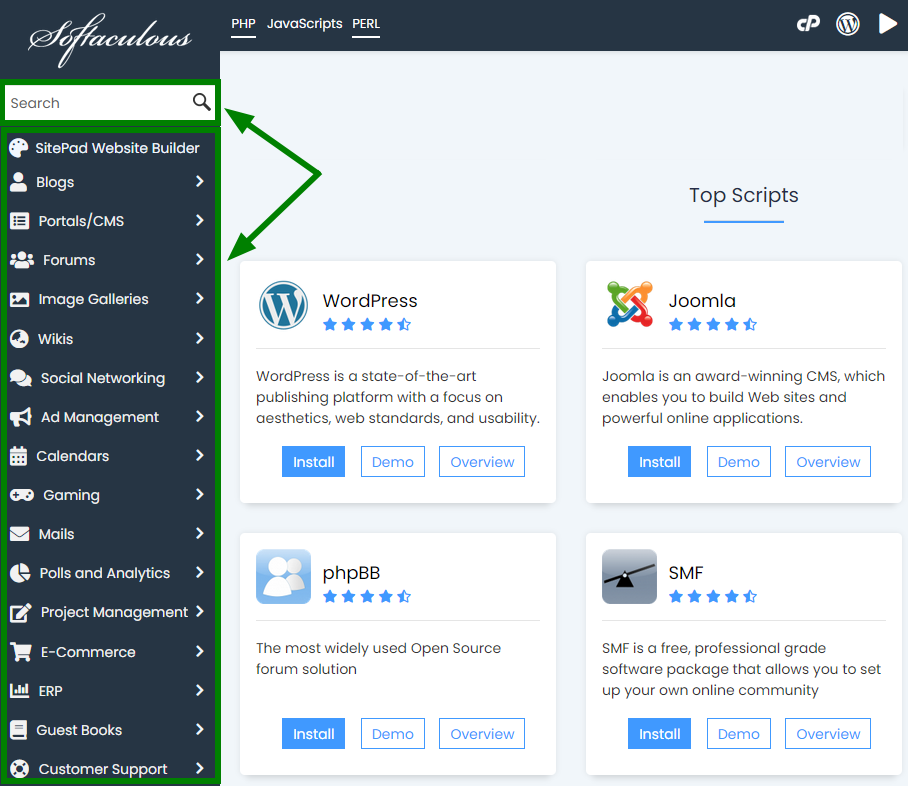
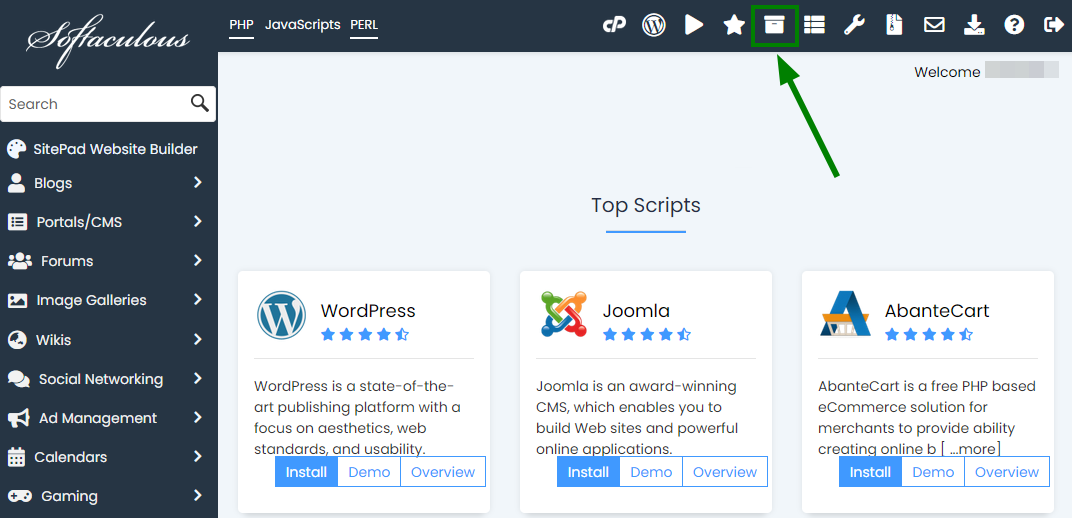
First of all, to locate
Softaculous, open your
cPanel >> navigate to the
Exclusive for Namecheap customers section >> click on
Softaculous Apps Installer:

Then you can start managing your scripts through Softaculous using this guidance. It will teach you how to:
1. Install software2. Import an installation3. WordPress Manager4. Set up auto-backups and auto-upgrades5. Backup software6. Restore backups7. Upgrade software10. Remove an installationInstall a software
You can install different software on your site in several clicks using the Softaculous auto-installer following
this article.
Import an installation
If you are using one of CMS scripts available in Softaculous, but the initial installation was performed in a different way, you can import the installation to Softaculous. For this, you need to know the name of the installed script, and then you are ready to proceed with these steps to import it:
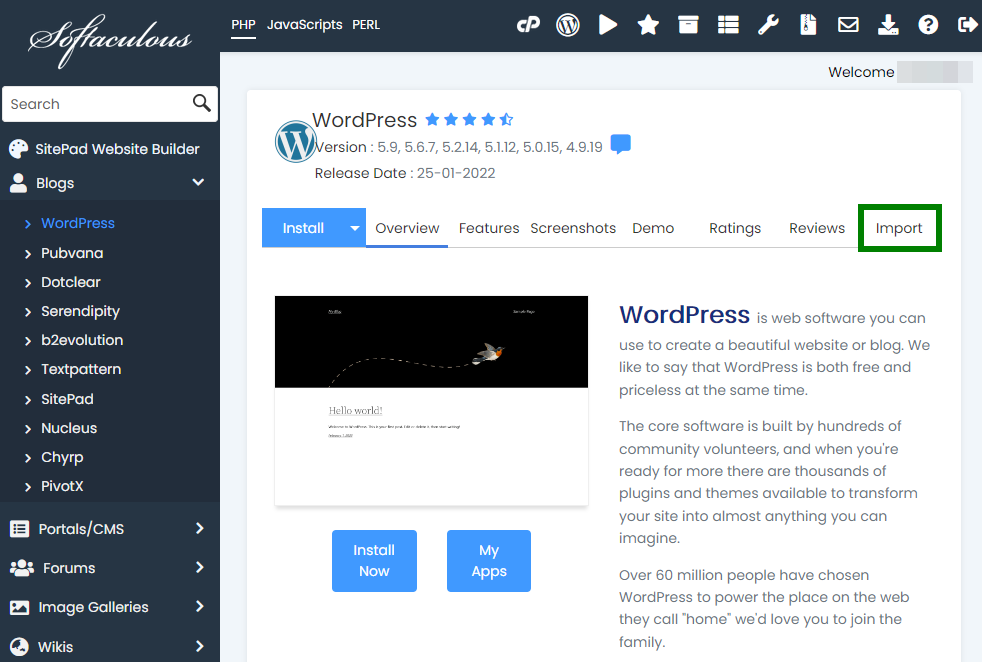
- Find a script you would like to import using Search or Categories in Softaculous:
- After you click on the name of the script you wish to import, you will see the main page of that script in Softaculous. Navigate to the Import tab:
- Select a domain name from the drop-down menu and type in a directory where the installation is currently located.
In our example we have the WordPress installation in the root folder of nctest.info, so we will keep the In Directory field empty. If you have an installation in a subdirectory of your domain, like in nctest.info/wordpress, you will need to type wordpress:
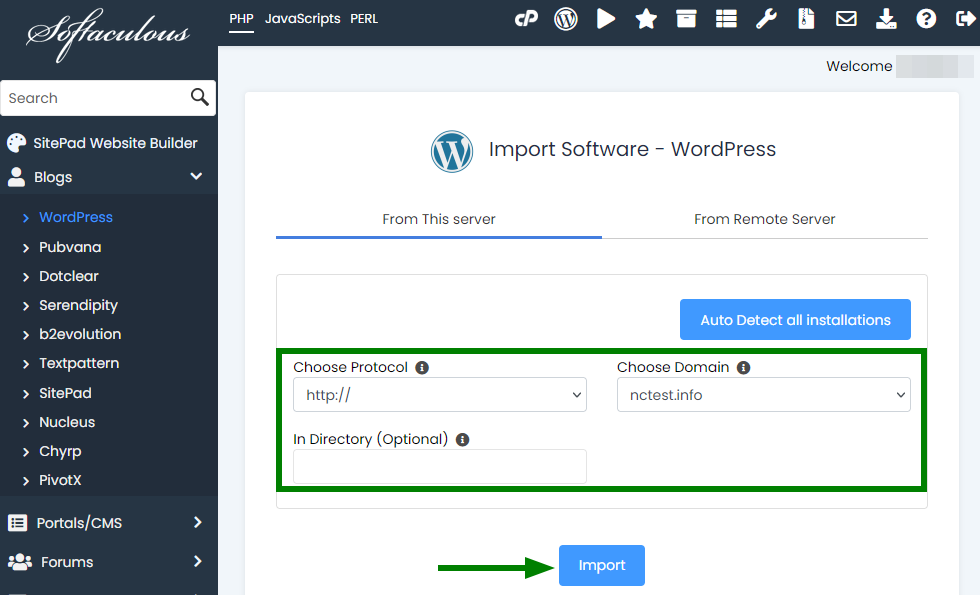
- Click on the Import button. You will see the Congratulations page if everything is properly.
WordPress Manager
WordPress Manager is a utility to manage all WordPress installations in one place. It allows you to update several settings for the WordPress installation without even having to log in to the WordPress admin panel.
To locate it, follow the steps below:
-
Open the WordPress Manager tab of Softaculous:

- Select the necessary WordPress installation:

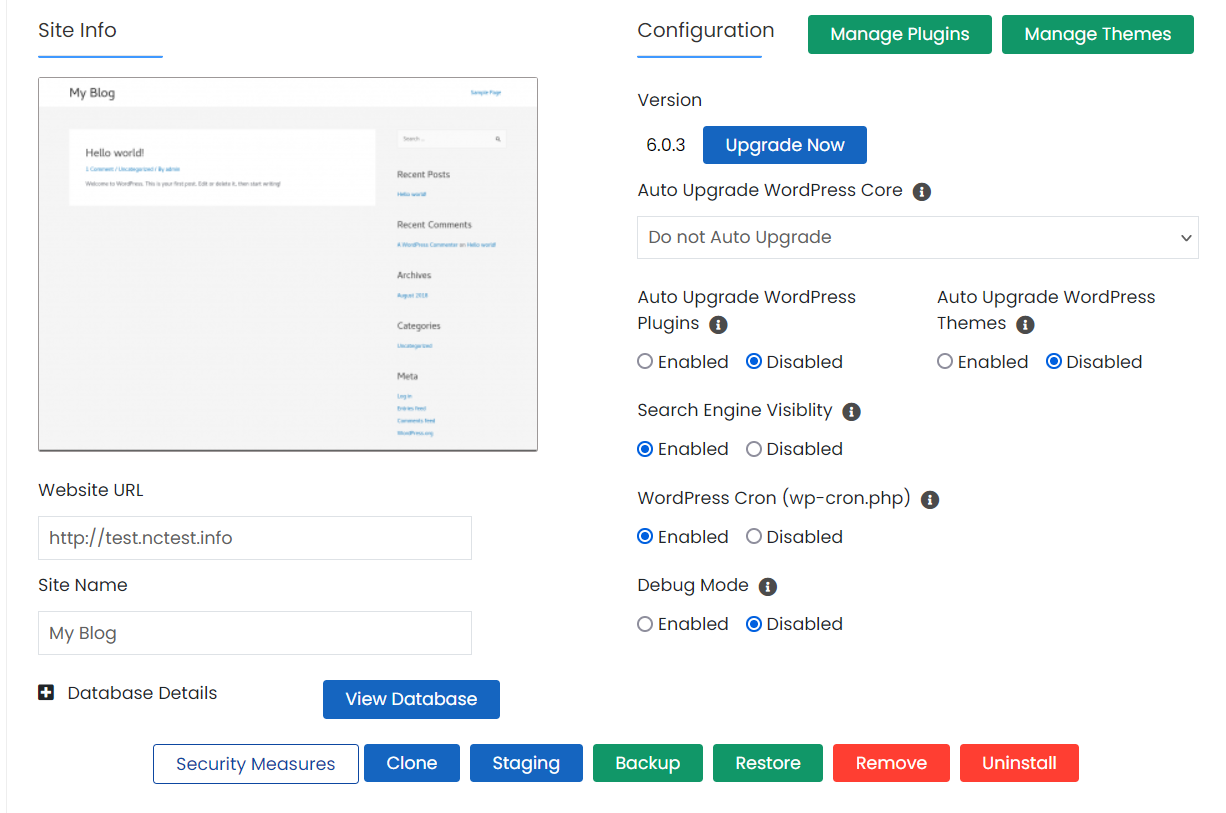
- It is possible to do the following using the WordPress Manager tab:
- access WordPress admin panel;
- upgrade an installation;
- upgrade core settings;
- upgrade plugins/themes settings
- enable/disable search engine visibility;
- enable/disable WordPress CRON;
- enable/disable WordPress debug mode;
- change website URL;
- change site name;
- change password;
- manage plugins;
- manage themes.
Set up auto-backups and auto-upgrades
It is possible to set up auto-backups and auto-upgrades of your script on the installation stage. However, if you forgot to do it, you can enable these options at any other moment by following these steps:
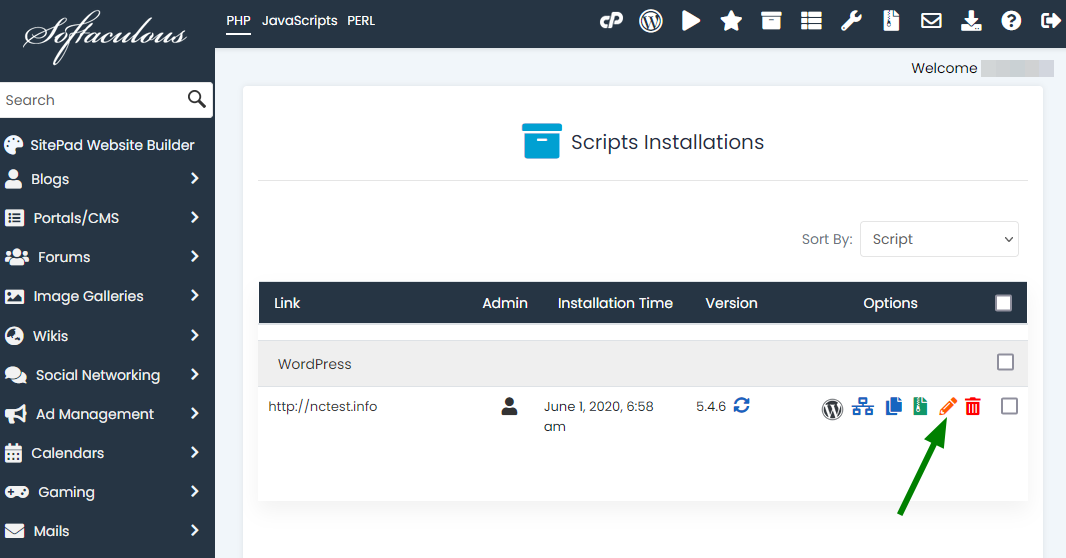
- Open the All Installations page of Softaculous:
- Locate the required installation and click on the Edit icon:
- There, you need to put checkmarks in a few checkboxes (example is shown in the screenshot below) in order to manage auto-backups and auto-upgrades of your website installation:
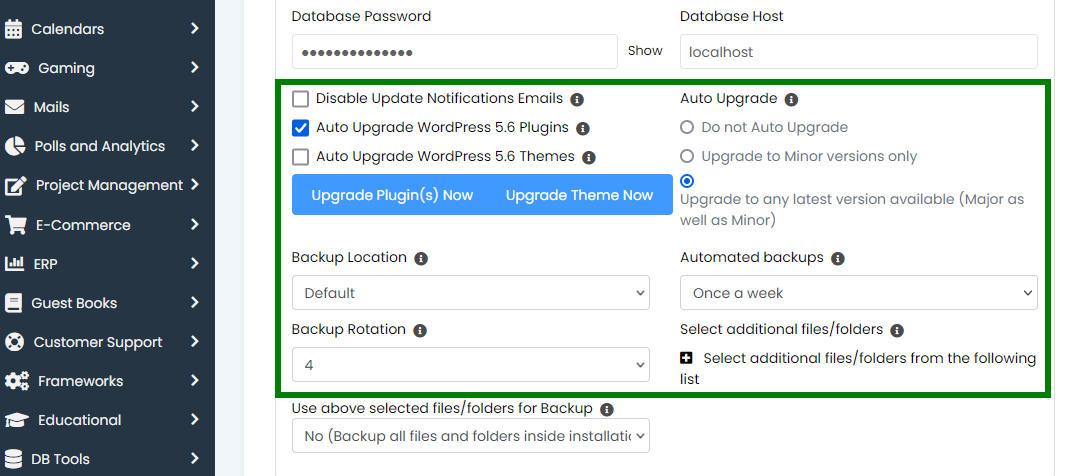
- Click on Save Installation Details at the bottom of the page.
Also, please check the notes below carefully:
NOTE 1: Auto-upgrades may fail or break your website, but Softaculous always makes a backup of your installation right before performing an auto-upgrade, so you will be able to return back to a working version of your website by restoring that backup.
NOTE 2: When using the Backup Rotation option, you are allowed to set
maximum 10 automatic backup copies per each script you have installed using Softaculous. Thus, when the eleventh copy of your site is generated, it will replace the earliest backup file, the first one, generated for the website installation.
NOTE 3: It is not recommended setting Backup Rotation to more than 4 copies in order not to violate
Namecheap Acceptable Use Policy, which states:
NO more than 10 GB of a shared hosting account can be allocated to any archive files.
NOTE 4: Such backups will be stored for
28 days. Once this period is over, the backup copy will be removed from the server. Since our hosting service is not intended for storing backup files and other data not related to website operations, it is recommended to download backup files to your local device if you need to store them for more than 28 days.
Backup software
Creating a current backup of your website installation is a very simple process with Softaculous.
NOTE: If your installation is not created in Softaculous, you should import it to Softaculous first by following
these steps. After that, you can proceed with creating a backup.
To create a backup, it is enough to do the following:
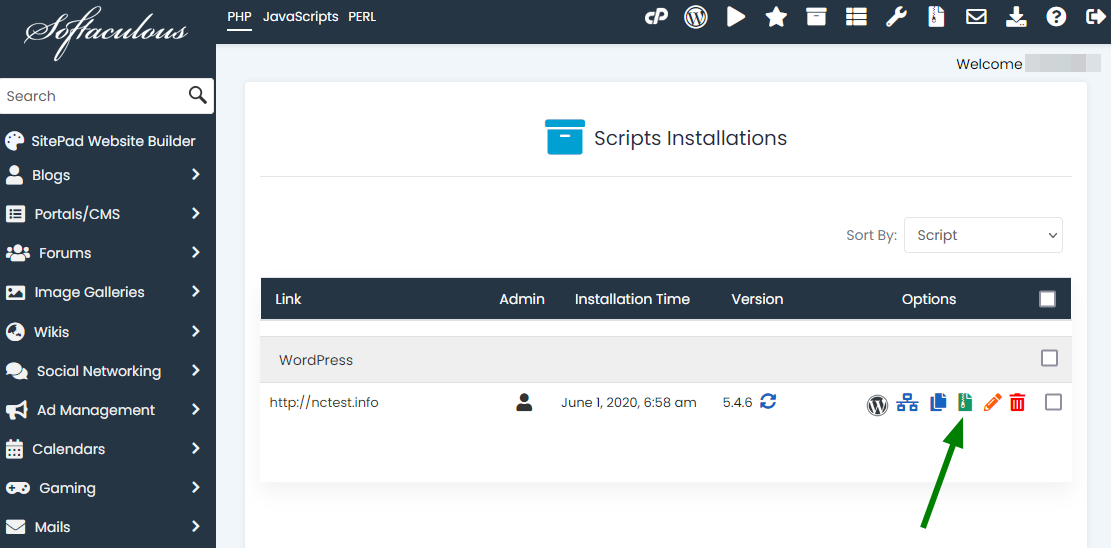
- Click on the All Installations icon:
- Locate the required installation and click on the Backup icon:
- Choose whether you would like to back up the entire installation, database or directory with files. Also, you can add a note to your backup, choose the backup location and see some general info about your installation:
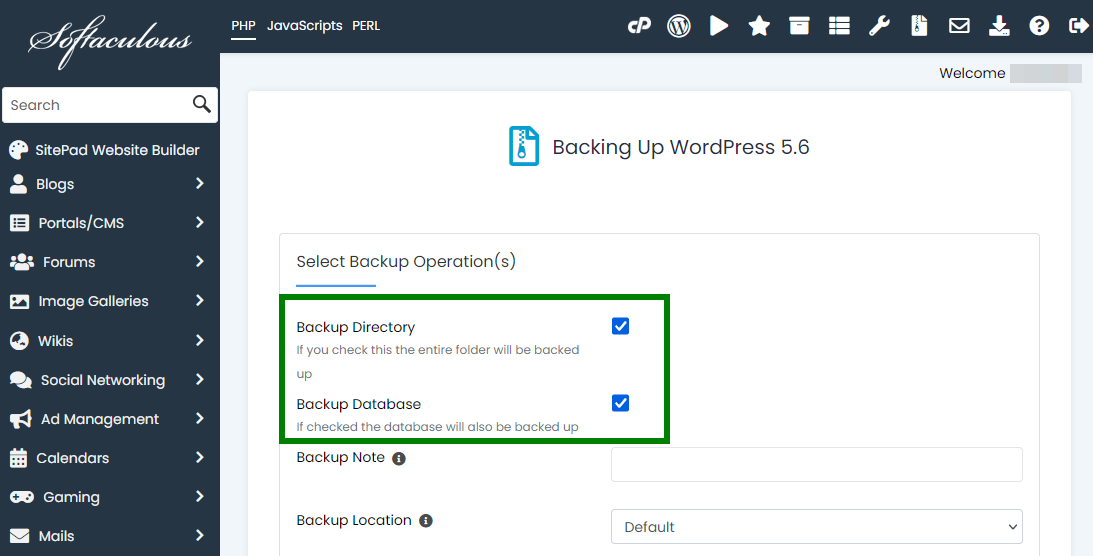
- Click on Backup Installation at the bottom of the page to start generating the backup.
Restore backups
Backup restoration allows returning the website to its previous state. You can do it by following these steps:
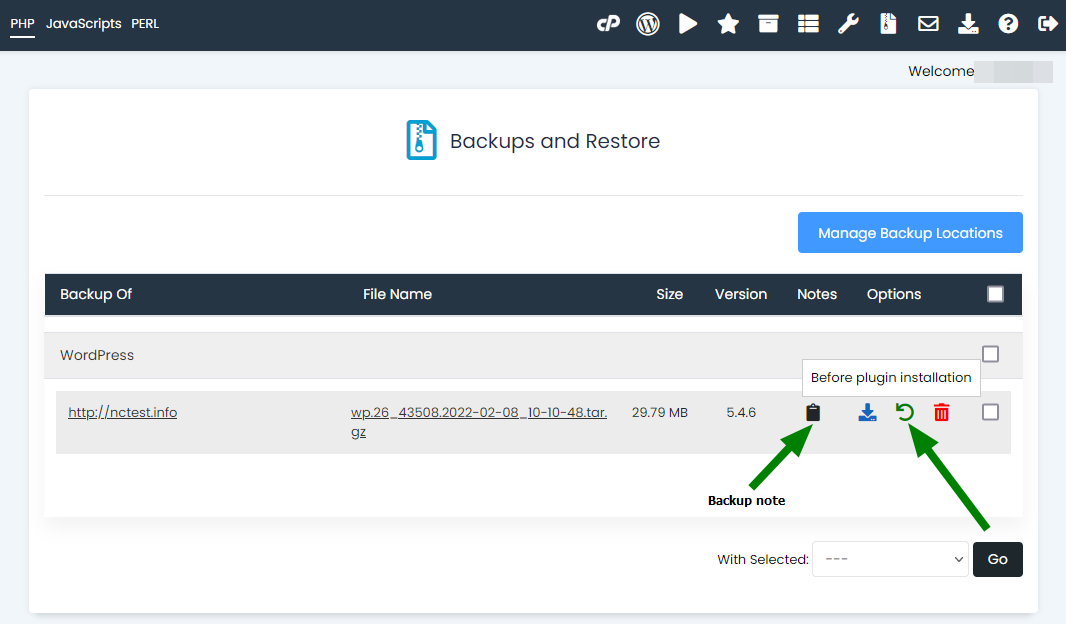
- Navigate to the Backups and Restore section in Softaculous:
- There, you can find all available backups of all your websites installations. You can choose any of those backups to restore, download or remove using appropriate icons.
Also, you can check notes left at the moment of the backup creation. For this, you need to mouse over the notepad icon to see them:
- After clicking on the Restore icon, you may choose whether you would like to restore a database or directory with files, or both:
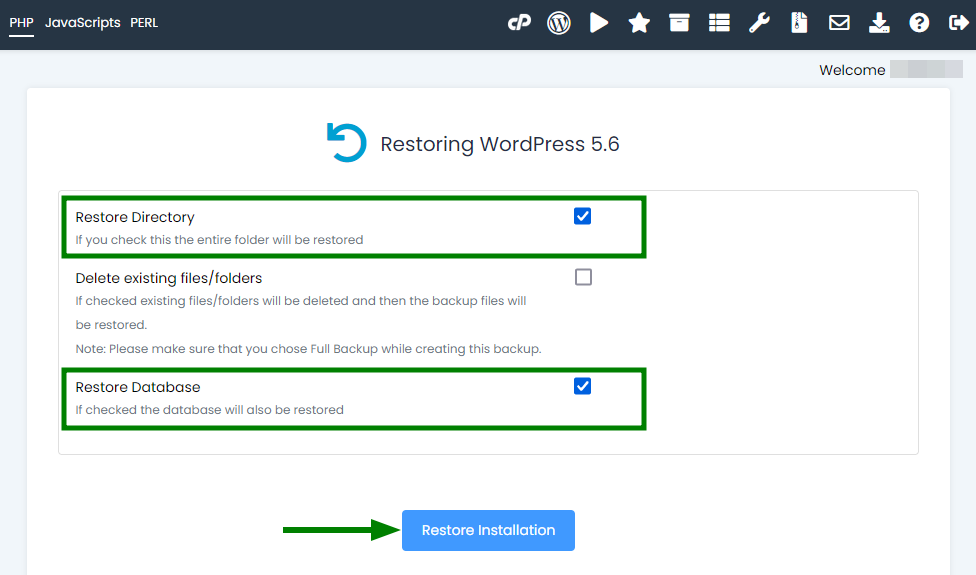
- Once you are ready, click Restore Installation. It will take several minutes for your installation to be returned to its previous state.
Upgrade software
With Softaculous, it is possible to upgrade software with just one click. If auto-upgrade is not set up for your installation, you can follow these simple steps to perform an upgrade:
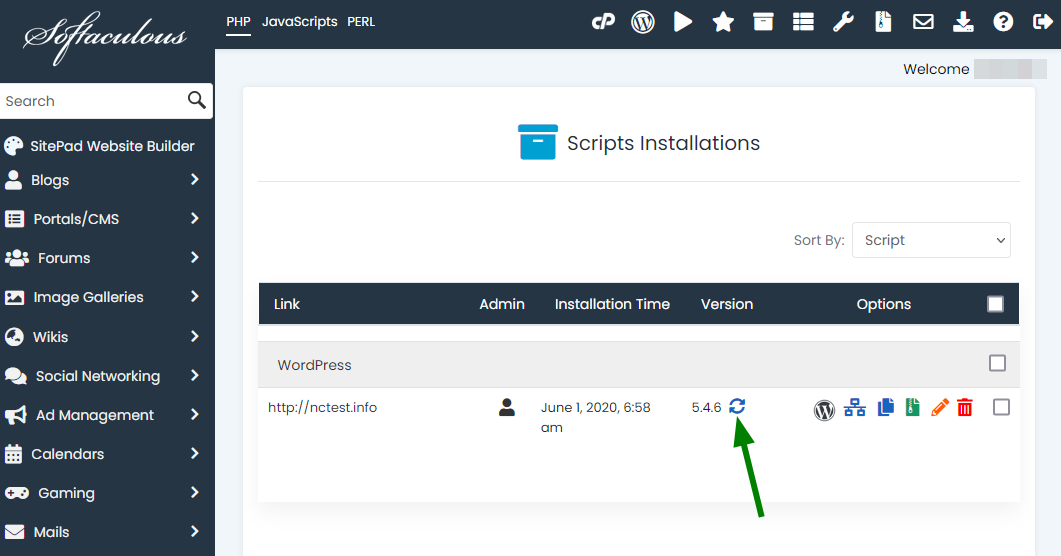
- Open the All Installations page in Softaculous:
- If a new version of your software is available, you will see a small Upgrade icon under the Version section. Click on it:
- On the next page, it is necessary to check the Create Backup box. It is critical since such automatic upgrades may break your website.
Moreover, before performing an upgrade it is recommended to create a full backup (default option) or backup of your installation as shown below:
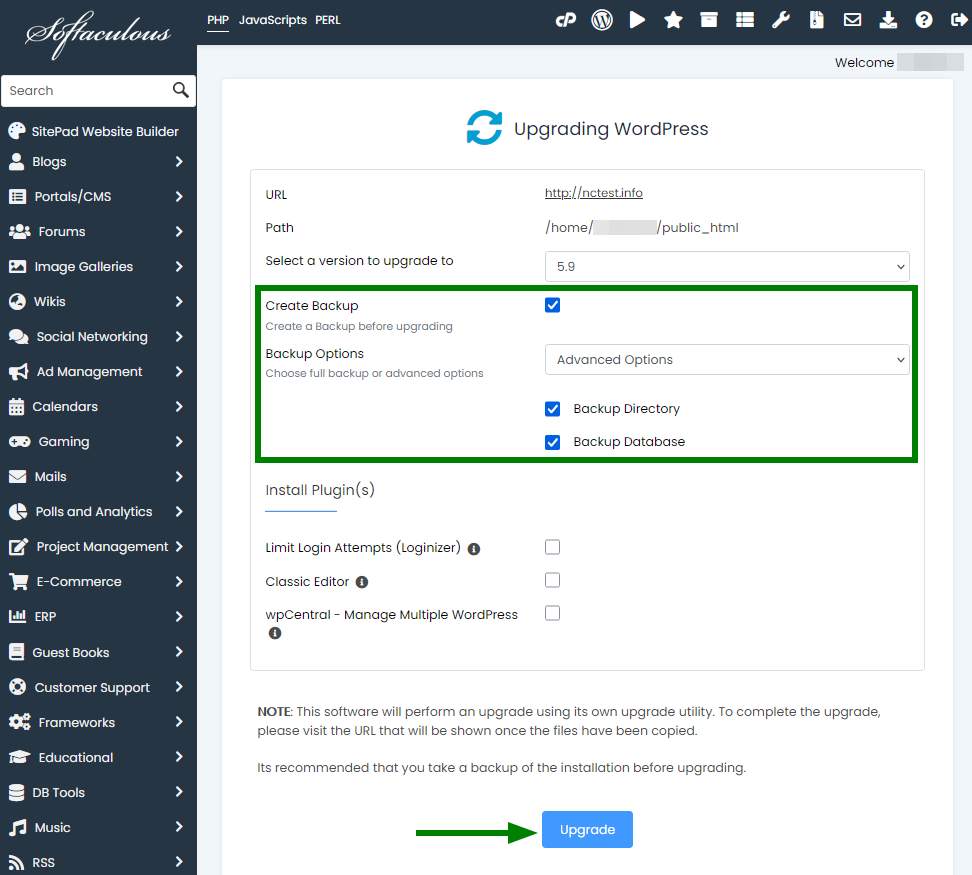
4. Then click Upgrade to start the process.
It can take a few minutes to complete the process. Once done, you'll get the Congratulations message. It is recommended to check the installation of your website to make sure the upgrade has not broken your website.
If it has broken your website, you will need to restore the backup following the instructions from the Restore backups section of this article.
Clone an installation
If you would like to move/copy the current installation to another directory or even domain, the Clone option is exactly what you need.
NOTE 1: Clone option is available for a few scripts only at the moment.
NOTE 2: It may be necessary to update some links/paths in the database of your installation after cloning. Not all of them may be re-assigned to the new domain/directory automatically.
Let’s say you have mistakenly installed WordPress to the /wp subfolder instead of the root folder of your domain. In this case, you will need to do the following:
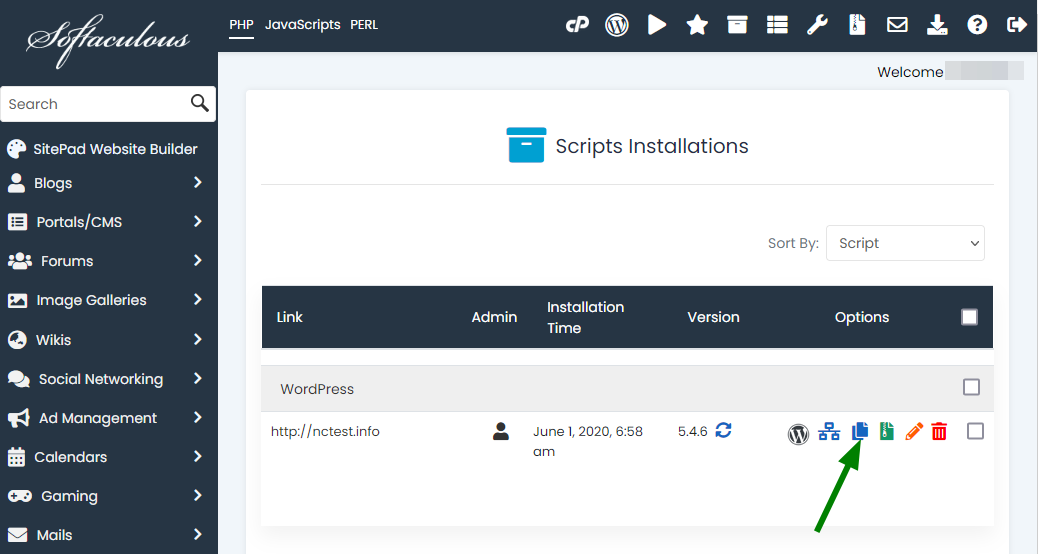
- Open the All Installations page of Softaculous:
- Click on the Clone button:
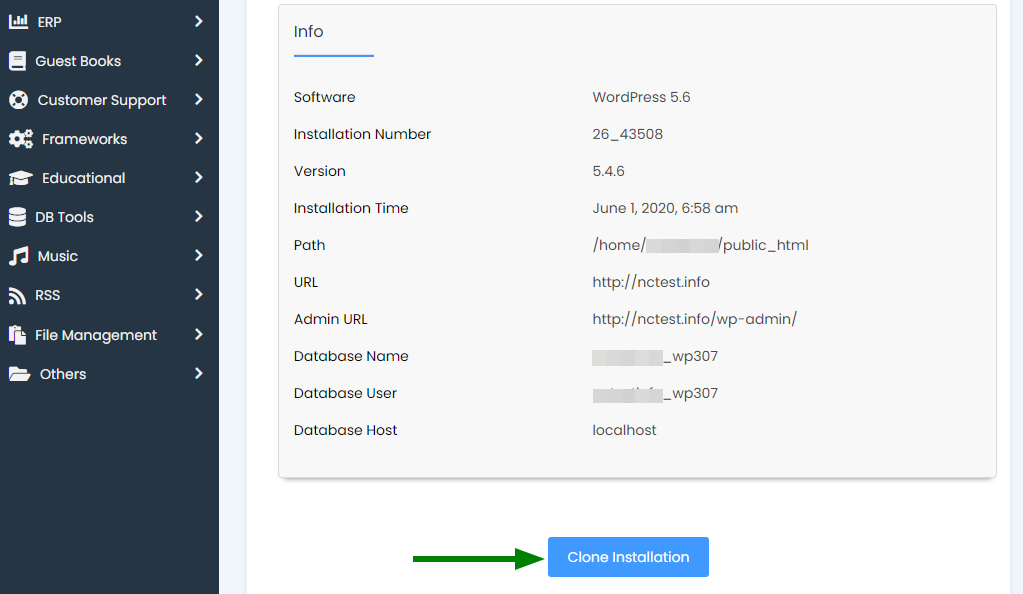
- On the next screen, you will see information about the current installation you are cloning.
You will need to specify a domain name where you are trying to clone the installation, select the In Directory field and set some other options (e.g., disable Search Engine visibility or choose another Site Name):
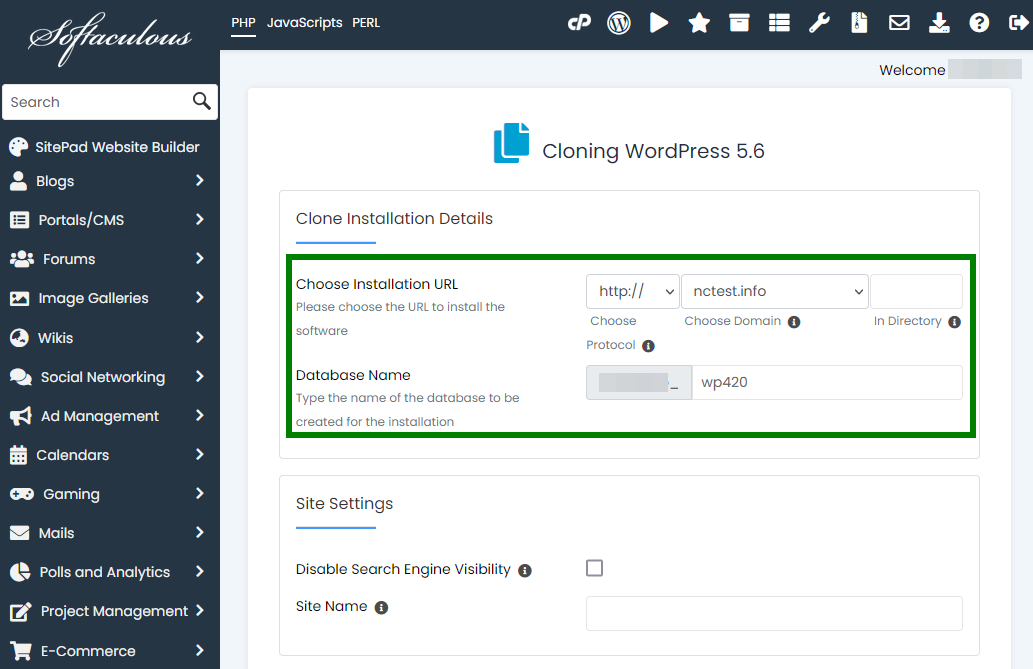
NOTE: The In Directory field should be empty if you would like to clone the installation to the root directory of your domain.
- Click on Clone Installation when you are ready:
Create Staging
As the name suggests, the Create Staging option allows testing of upgrades and/or other changes before pushing it to live installation.
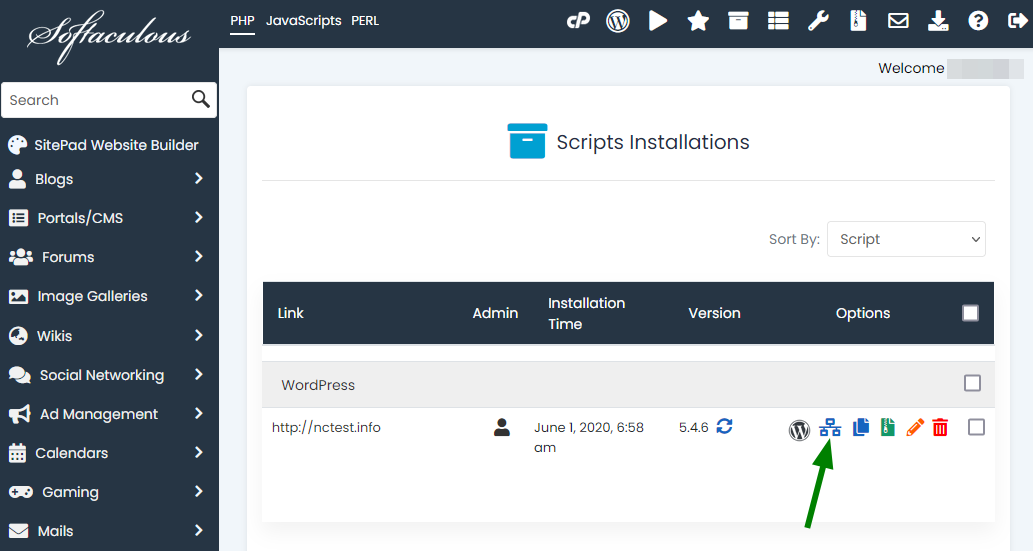
- First, open the All Installations page to see your current website installations:
- Find the installation you want to create staging for and click on Create Staging:
- Fill in the respective details for your staging installation:
- a protocol;
- a domain name in question;
- a directory you wish to set for the installation;
- a database name.
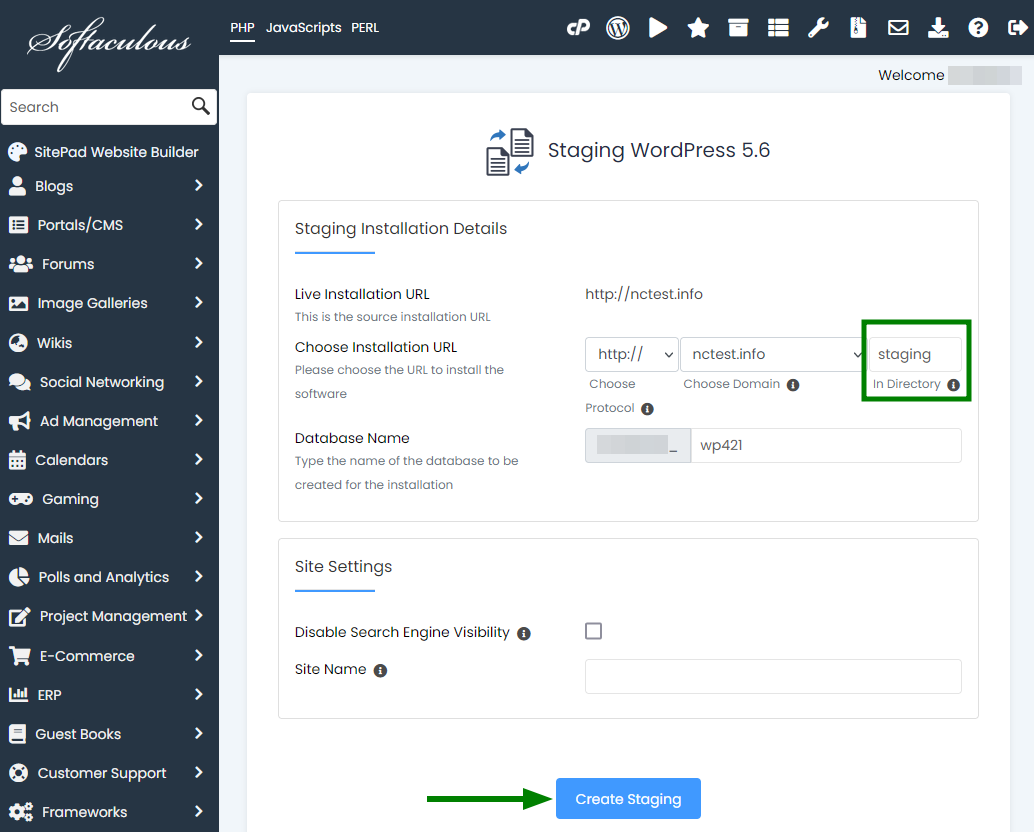
- Click on the Create Staging button.
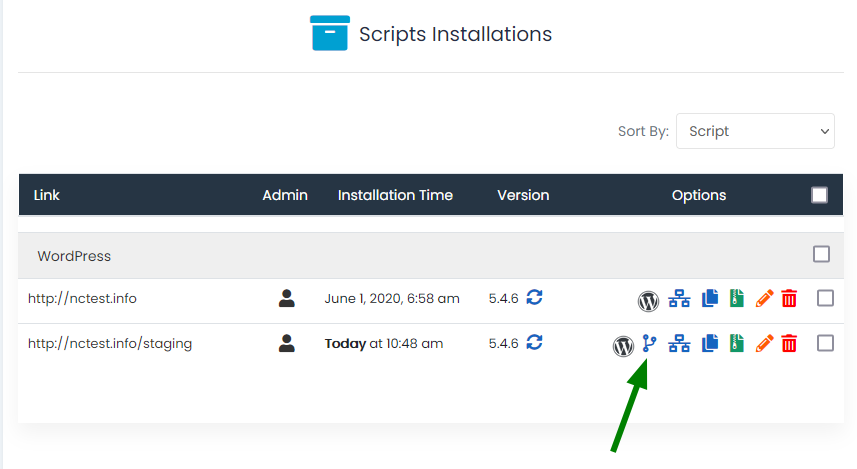
- On the next page, you will see the website URL and the respective link to the website dashboard.
PLEASE NOTE: The admin/user account login details will be the same as the ones you used for the source installation.
- As soon as your staging installation is ready, you can click on Push to Live:
PLEASE NOTE: Every time you select Push to Live, Softaculous automatically creates a backup.
- On the next page, you will see two ways to push installation:
- by default;
- by customization.
The Default Push will replace all the files of your live installation with the staging installation ones, effectively erasing the live database import from your staging installation.
With the Custom Push, you will be given an opportunity to select those files, databases, table structures, and table data you would like to push.
- Once you’ve selected your chosen way, click on the Push to Live button. Depending on the size of your installation, the time it takes to go live will vary.
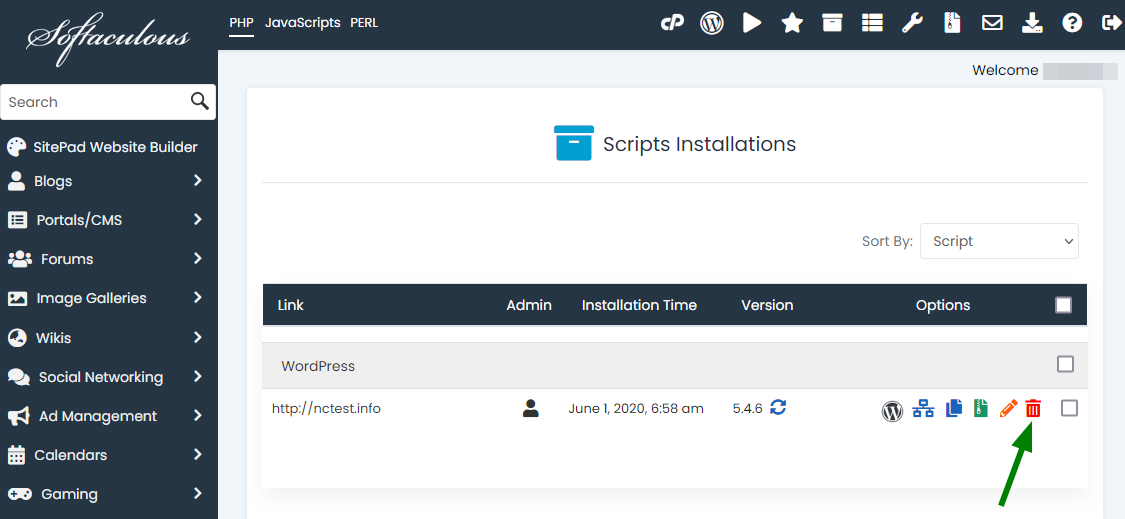
Remove an installation
Deleting an installation is an easy process:
- Open the All Installations page to see your current website installations:
- Find the installation you would like to remove and click on the red button:
- On the next screen, you will see general information about the installation you are removing and can choose whether all data of this installation should be removed or not:
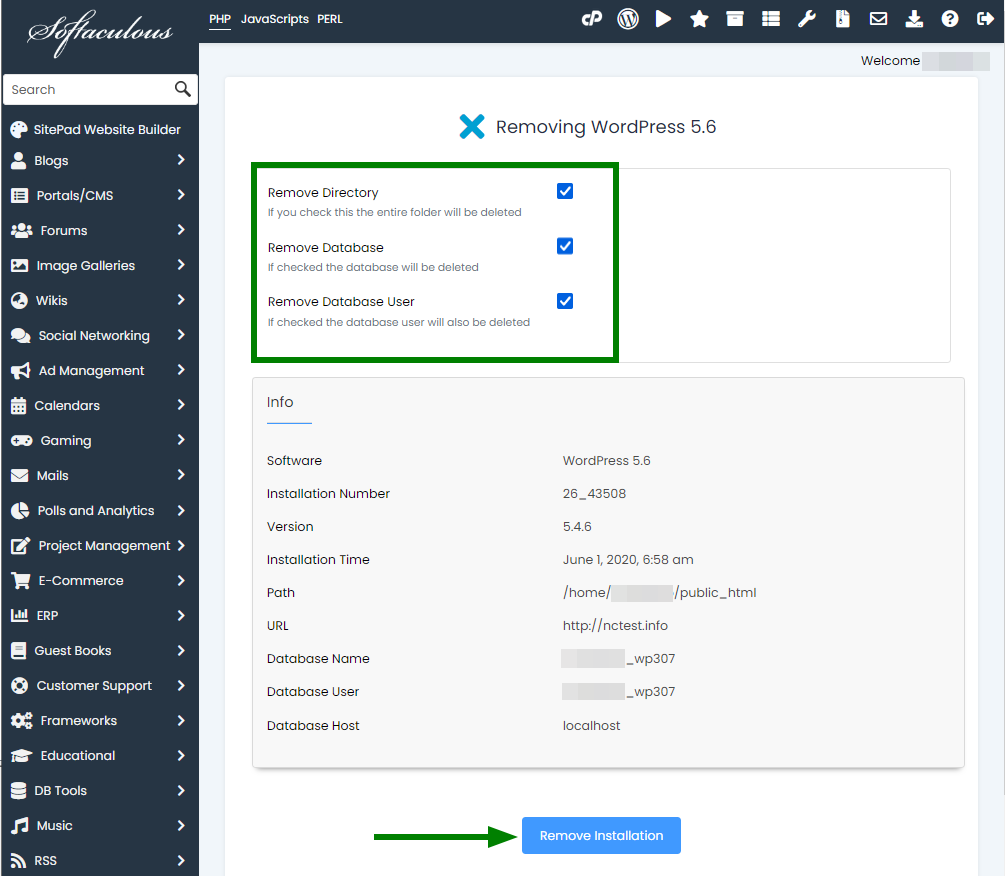
- Click on the Remove Installation button.
That's it!
Need any help? Contact our HelpDesk