How to set up FastVPN on pfSense router

To ensure a proper work of FastVPN with a pfSense router, you will need:

  • A secure FastVPN connection (Don’t have one? Sign up here!);
  • An internet connection;
  • Access to you FastVPN Account Panel.
  • pfSense hardware (this guide uses pfSense v2.4.5 version for demonstration purposes).
1. Create CA Certificate:

  • In your PfSense device click on System >> Cert manager >> CAs and then click on +Add
  • Give the CA a name (it can be whatever you want, lets say “CA_NCVPN_CERT”).
  • Chose to Import an existing Certificate Authority. Copy and paste the certificate from here into the Certificate data field.
  • Click on Save.
2. Add a VPN connection:

  • In this example, we'll create the VPN connection to Phoenix server (phx-a01.wlvpn.com). You can find domain names of other locations from your FastVPN Account Panel here.
  • Click on VPN >> OpenVPN >> Clients >> +Add & enter the following configuration:
  • General Information:

    • Server Mode: Peer to Peer (SSL/TLS)
    • Protocol: UPD on IPv4 only
    • Device mode: tun
    • Interface: WAN
    • Server host: phx-a01.wlvpn.com  (pick any other location server location from the FastVPN Account Panel)
    • Server port: 1194
    • Description: CA_NCVPN_CERT

  • User Authentication Settings:

    • Enter your FastVPN Network Credentials, available from the FastVPN Account Panel, username & Password
    • unchecked -> checked

  • Cryptographic Settings:

    • TLS Authentication leave unchecked
    • Peer certificate authority: CA_NCVPN_CERT (certificate we created at step1)
    • Client Certificate: None
    • Encryption Algorithm: AES-256-CBC
    • Enable NCP: unchecked -> checked
    • NCP Algorithms: [none] -> AES-128-GCM, AES-256-GCM, AES-256-CBC
    • Auth digest algorithm: SHA256
    • Hardware Crypto: No Hardware Crypto Acceleration

  • Tunnel Settings:

    • IPv6 Tunnel Network:  leave blank
    • IPv6 Remote Network(s):  leave blank
    • Limit outgoing bandwidth:  leave blank
    • Compression: LZO Compression [compress lzo, equivalent to comp-lzo)
    • Topology: Subnet – One IP-address per client in a common subnet
    • Type-of-Service: Should not be selected
    • Don't pull routes: Should not be selected
    • Don't add/remove routes: Should not be selected

  • Advanced pfSense router configuration:

    • Custom options:

                   persist-remote-ip     
                   remote-cert-tls server
                   keysize 256
                   tls-cipher TLS-DHE-RSA-WITH-AES-256-CBC-SHA:TLS-DHE-DSS-WITH-AES-256-CBC-SHA:TLS-RSA-WITH-  AES-256-CBC-SHA

    • UDP fast I/O: Should not be selected
    • Send/Receive buffer: Default
    • Verbosity level: 3 (Recommended)

    • Click Save.
3. Firewall setup

pfSense is a system with good security level; for this reason you have to set some rules to enable users to connect with vpn and to the other systems in lan:

  • Move to Firewall –> Rules –> WAN
  • Add this rule:
    Protocol IPv4 TCP
    Source *
    Port 1194
    Destination This Firewall
    Port 1194
    Gw *
    Queue none
  • To enable OpenVPN clients to connect to LAN ip move to Firewall –> Rules –> OpenVPN
  • Add this rule:
    Protocol IPv4 TCP
    Source *
    Port *
    Destination *
    Port *
    Gw *
    Queue none
Since OpenVPN is not the default router, it’s mandatory that every connected 
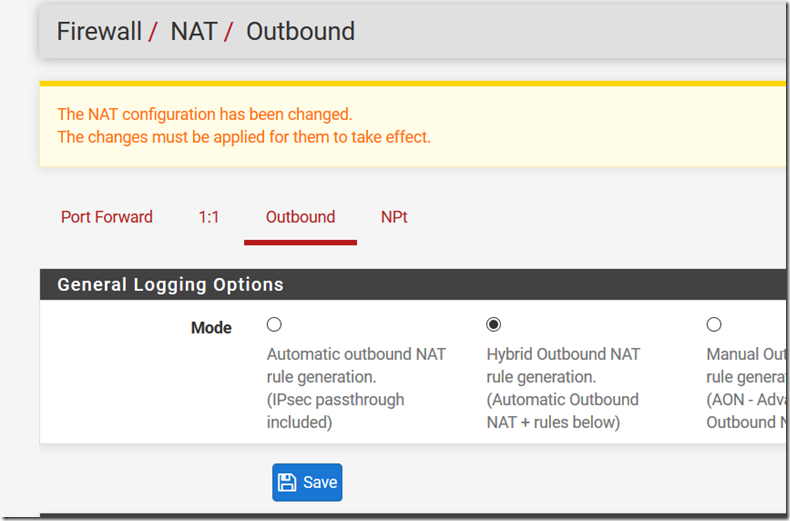
client must be masquerade by firewall IP. Move to Firewall –> NAT –> OpenVPN then configure Outbound Mode Hybrid.
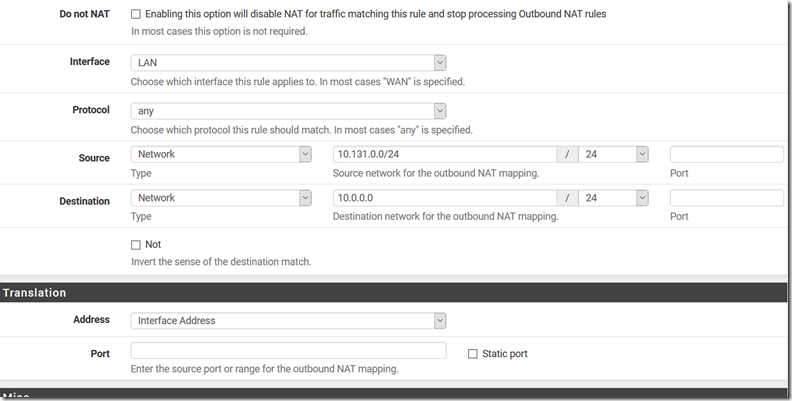

Add masquerading rules from every client connecting. This is because every server in LAN has a default gw rule pointing to the edge. For this reason the only way to connect is using the pfSense IP which has a LAN IP.


The simplest way to distribute client-to-lan vpn to users is:

1. Issue new user in System -> User manager -> Users.

2. Share configuration data for OpenVPN client.

We suggest to install opnevpn-client-export package to speed-up VPN client delivery process

Test the VPN simply downloading OpenVPN client and export configuration (or download a packaged version directly from VPN –> OpenVPN –> Client Export) and connecting with it’s option under OpenVPN client connection option.

That’s it! pfSense VPN setup is complete, and you should now have a FastVPN connection.

If you need any further assistance, please contact our Support Team.
Updated
Viewed
9111 times

Need help? We're always here for you.

notmyip