Installation
Initial basic configuration
Configuring firewall daemon
Step 2. MariaDB
Installation
Running initial secure configuration script
Logging into MariaDB and creating basic database
Step 3. PHP
Installing recent PHP version
Adding most common PHP extensions
Step 4. Testing LAMP
Step 5. Installation of a WordPress script on a http://domain.tld
Creating website directory
Editing Apache configuration
Installing latest version of WordPress script
A LAMP (Linux, Apache, MariaDB, PHP) stack is commonly used to prepare servers for hosting web content. This detailed guide will come in handy if you are planning to manage the server without a cPanel (control panel) installed. We will show how to install LAMP on the server with AlmaLinux 8 and AlmaLinux 9. Unfortunately, we do not provide technical assistance with VPS/Dedicated Servers without cPanel. However, this detailed guide will be useful if you are planning to manage the server without a cPanel (control panel) installed.
AlmaLinux 8 and 9 use the package manager
dnf by default. It has been developed as a successor for yum and resolves issues with poor performance, excessive memory usage, slowdown for dependency resolution, etc.
In this guide we will
set up recent versions of Apache, MariaDB, and PHP on a server with the
hostname server1.ncsupport.info. Additionally, we will set up a basic configuration of LAMP to host a
WordPress content management system and install its latest version at
http://domain.tld/.
- AlmaLinux 8 or AlmaLinux 9 blank version. If you have a VPS with us, one of these operating systems can be installed using your access to
the SolusVM management tool.
- Internal server account with root access (#) or the one with sudo privileges. For simplicity, the following steps will be illustrated using the “root” account. Therefore, commands to be executed starting with the “#” sign, which should not be copied.
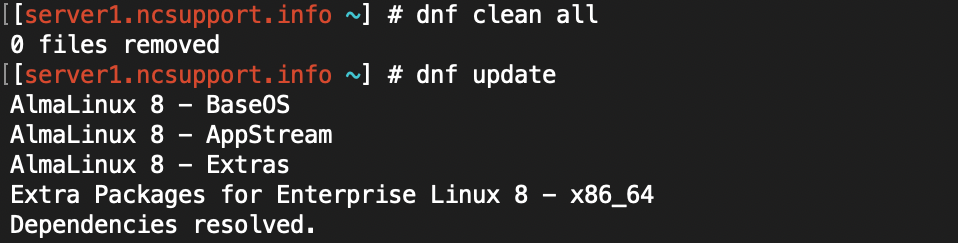
We recommend updating the operating system (OS) before proceeding with further steps.
dnf clean all
dnf update
If you see Complete! at the end when running the yum update, everything is good to go.
It may be required to review and confirm/deny certain changes during the process. To answer “Yes” automatically, you can use the option “-y” with “dnf -y update”.
Another optional step is to reboot the server and check its current configuration.
reboot
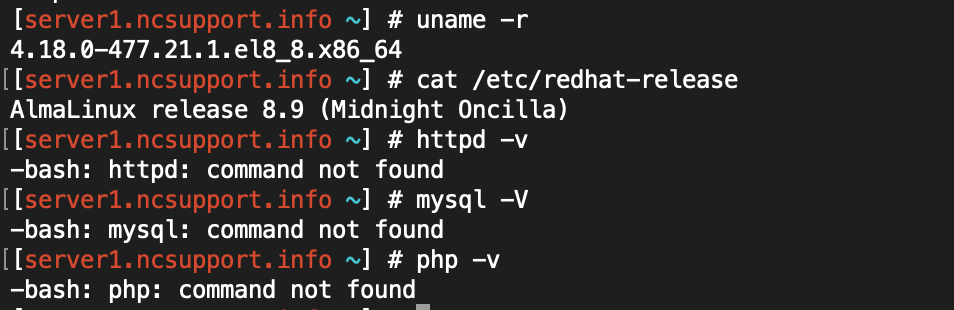
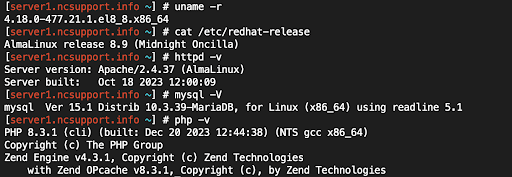
uname -r
cat /etc/redhat-release
httpd -v
mysql -V
php -v
Above is a simple confirmation that our test environment does not have any Apache, MariaDB and PHP modules installed yet.
The process is as simple as running a single command below:
yum install -y httpd httpd-tools
This time we need to edit the main Apache configuration file and finally start it. We will use the text editor "
nano" but you can use any other of your choice.
dnf -y install nano
Apache main configuration file is /etc/httpd/conf/httpd.conf. Therefore, we can open it using the following command:
nano /etc/httpd/conf/httpd.conf
Use keyboard arrows to scroll down the file. The section you need is Main server configuration. Change two lines: ServerAdmin and ServerName. ServerAdmin can be any email address you wish to send server notifications to. ServerName should be the hostname you set with HTTP port 80. Make sure that there is no comment (# sign) at the beginning of either ServerAdmin or ServerName lines.
We are ready to start the Apache server and enable its autoloading during the server startup.
systemctl start httpd
systemctl enable httpd
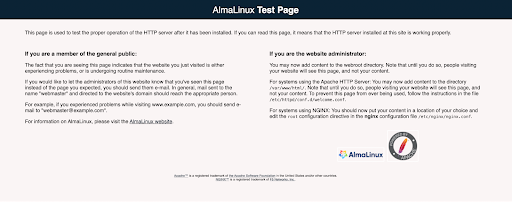
In case a domain name is pointed to the server you can check the Apache start page. (Visiting http://ncsupport.info/ also works.) Feel free to use your own domain name. Alternatively, you should be able to see the start page of the Apache server when entering the IP address of the server in your web browser.
If you do not remember the IP address assigned to the server, this command will come in handy:
ip addr show eth0 | grep inet | awk '{ print $2; }' | sed 's/\/.*$//'
Configuring firewall daemon
AlmaLinux comes bundled with a default firewall that is why AlmaLinux –
firewalld. It provides a dynamically-managed firewall with support for network/firewall zones to define the trust level of network connections or interfaces.
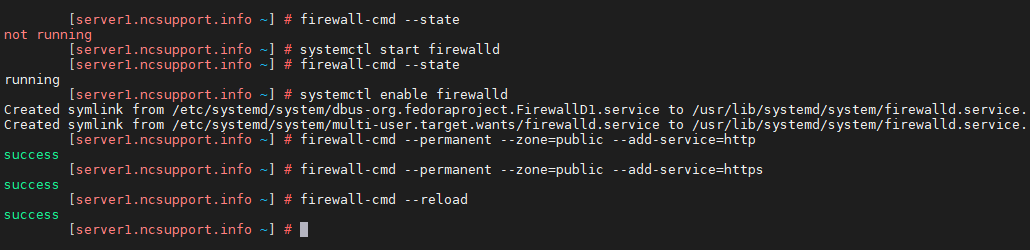
If the server environment is fresh, the firewall is deactivated by default. Let’s start the service, enable its autostart, and allow incoming TCP traffic to ports 80 (HTTP), 443 (HTTPS). We will use the firewall-cmd utility for such a configuration.
firewall-cmd --state
systemctl start firewalld
systemctl enable firewalld
firewall-cmd --permanent --zone=public --add-service=http
firewall-cmd --permanent --zone=public --add-service=https
firewall-cmd --reload
NOTE: Any changes to the firewalld configuration require its reload.
Step 2. MariaDB
Installation
On AlmaLinux 8 and 9, it is recommended to install the native
MariaDB
package instead of standard MySQL. The goal for MariaDB is for it to be a drop-in replacement for MySQL, with more features and better performance:
dnf install -y mariadb-server mariadb

mysql -V
Similar to other services, MariaDB has to be started. Having it auto-started will come in handy here as well:
systemctl start mariadb
systemctl enable mariadb
Running the initial secure configuration script
The MariaDB server comes with a security script that should be run as a part of the initial configuration. The script will go through the reset of MariaDB's own root password, removal of anonymous users and the test database, as well as the disabling of remote root login, etc.
mysql_secure_installation
In the end, you should see the message: Thanks for using MariaDB!.
Logging into MariaDB and creating the basic database
You can launch the MariaDB command line interface using this command:
mysql -u root -p
The prompt will request a password. It must be the one that has just been set for root database access after going through the secure installation script. Afterward, the command line will allow us to manage the MariaDB server. Let’s create a basic database named “foo_db” and grant full access to this database for the MariaDB user “foo_user” with the password “foo_password”:
MariaDB> CREATE DATABASE foo_db; GRANT ALL ON foo_db.* TO 'foo_user'@'localhost' IDENTIFIED BY 'foo_password';
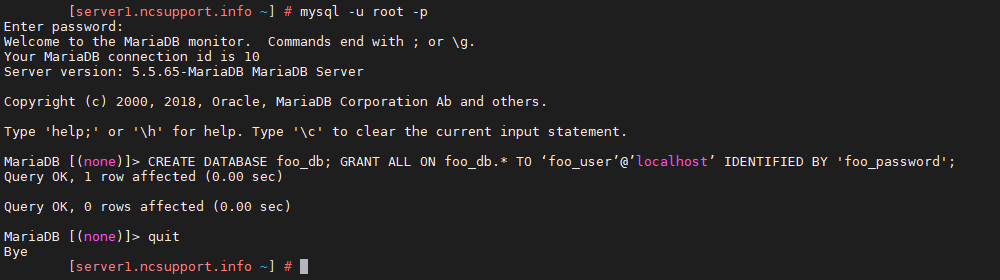
You can double-check the list of existing databases with “show databases;” prior to leaving the MySQL/MariaDB server with “quit.”
Step 3. PHP
Installing the recent PHP version
Although it’s possible to install PHP with “dnf install php”, you will get the outdated PHP 7.2 only. This version is far behind today’s
active support time frames for PHP
and is not considered as secure.
Instead, we will focus on the most recent PHP environment version, 8.3. Side note:
developers of WordPress recommend the use of PHP 7.4 or above.
To get up-to-date versions of PHP, we will need to to install extra repositories:
Extra Packages for Enterprise Linux
(EPEL) and
Remi's RPM repository:
dnf -y install https://dl.fedoraproject.org/pub/epel/epel-release-latest-8.noarch.rpm

For AlmaLinux 8:
dnf -y install https://rpms.remirepo.net/enterprise/remi-release-8.rpm

For AlmaLinux 9:
dnf -y install https://rpms.remirepo.net/enterprise/remi-release-9.2.rpm
Continue with the following for both systems:
dnf -y install yum-utils
dnf module reset php
dnf module install php:remi-8.3
dnf -y update
dnf -y install php
php -v

Adding the most common PHP extensions
PHP 8.3 itself is not enough. For instance, WordPress requires at least
14 essential PHP extensions. In other words, you will need to double-check the presence of these and a few other popular PHP extensions with the following command (missing extensions will get installed):
dnf -y install curl php-dom php-gd php-hash php-imagick php-json php-ldap php-mbstring php-mysql libsodium php-odbc php-openssl php-pcre php-pdo php-pear php-soap php-xml php-xmlrpc php-zip
Step 4. Testing LAMP
At this point, the LAMP stack is set up and ready to resolve content on the Internet. You can rerun our initial checks from the “
Prerequisites” section of this article. Additionally, we will reboot the server to make sure that all changes are applied.
reboot
uname -r
cat /etc/redhat-release
httpd -v
mysql -V
php -v
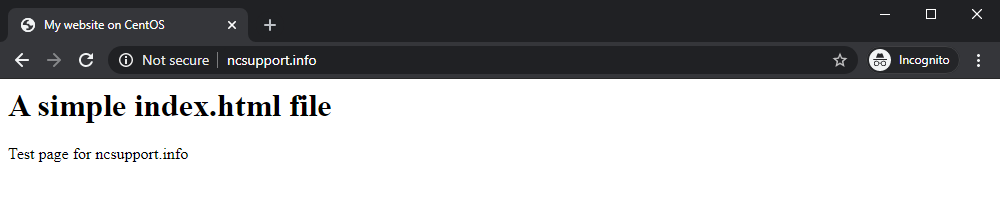
By default, the server is set up to resolve the content of /var/www/html/ when accessed via IP address or the server’s domain name. To test this, let’s create a simple index.html file:
nano /var/www/html/index.html
<html>
<head>
<title>My website on CentOS</title>
</head>
<body>
<h1>A simple index.html file</h1>
<p>Test page for ncsupport.info</p>
</body>
</html>
The combination of Ctrl+O and Ctrl+X will save the file and exit the “nano” text editor. Now, visiting our test http://ncsupport.info/ domain (please use your own for testing) should resolve the content of the index.html file that’s just been created:
You can also check your PHP environment with a simple PHPinfo() function.echo '<?php phpinfo(); ?>' > /var/www/html/info.php

If the PHP page displays the code instead of the phpinfo page, try restarting Apache with:
systemctl restart httpd
Everything looks good! Keeping the PHPinfo() function file present on the server is not secure, however. Therefore, let’s prevent exposing sensitive information by removing it:
rm /var/www/html/info.php
Step 5. Installation of a WordPress script on a http://domain.tld
Going through steps 1-4 will ensure that any domain name pointed to the server’s IP address will resolve the content of /var/www/html/. In most cases, this is not the ideal setup. Hosting separate content of several domain names, independently, will require a bit of extra tweaking.
Creating a website directory
Basically, you need to create a folder to upload specific website files and tell Apache where specific hosted files are located. Let’s try hosting a WordPress website at http://domain.tld/. Replace “domain.tld” in each command listed below with your actual domain name in order to match your own setup.
To start with, let’s create a folder that will store files for your new website. Once done, you need to change ownership permissions to the Apache user (each service has its own user) and set the appropriate www folder permissions to 755.
mkdir -p /var/www/domain.tld

chown -R apache:apache /var/www/domain.tld

chmod 755 /var/www/domain.tld

Editing Apache configuration
We will need to modify virtual hosts and edit the main Apache configuration file /etc/httpd/conf/httpd.conf accordingly. These two directories are useful to keep your virtual hosts stored and organized:
mkdir /etc/httpd/sites-available
mkdir /etc/httpd/sites-enabled
To make sure that such a setup works, it’s required to edit /etc/httpd/conf/httpd.conf, adding IncludeOptional sites-enabled/*.conf to the very end of the file. This configuration file is large enough to get easily lost. Nevertheless, we can use Ctrl+W to search for the required sequence of words:
nano /etc/httpd/conf/httpd.conf
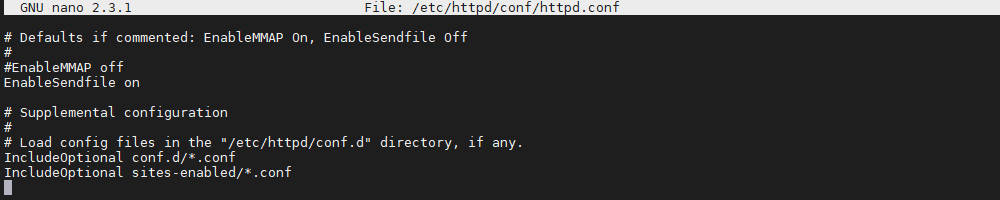
Besides, we suggest enabling the .htaccess file. To do so, you need to find these lines at the beginning of the same file /etc/httpd/conf/httpd.conf and change "none" to "All":<Directory />
AllowOverride All
Require all denied
</Directory>

Now, we need to create a configuration file for a new domain name. Please remember to replace “domain.tld” with the actual domain name of yours:
nano /etc/httpd/sites-available/domain.tld.conf
<VirtualHost *:80>
  ServerAdmin admin@domain.tld
  DocumentRoot /var/www/domain.tld
  ServerName domain.tld
  ErrorLog /var/www/domain.tld/error_log
  CustomLog /var/www/domain.tld/access_log common
</VirtualHost>

The last configuration step enables a new virtual host by creating a symbolic link:
ln -s /etc/httpd/sites-available/domain.tld.conf /etc/httpd/sites-enabled/domain.tld.conf
In case you would like to add another virtual host, you must create a virtual host file once again, along with another symbolic link. Finally, to apply the change to the Apache configuration, this service should be restarted:
systemctl restart httpd
Installing the latest version of WordPress script
Install the following packages necessary for working with the archives:
dnf install -y tar gzip
Currently, our http://domain.tld is pointed to the content of the directory /var/www/domain.tld and should resolve the test page of Apache (or files stored in the directory, if any). The next batch of commands will allow to download and extract WordPress files:
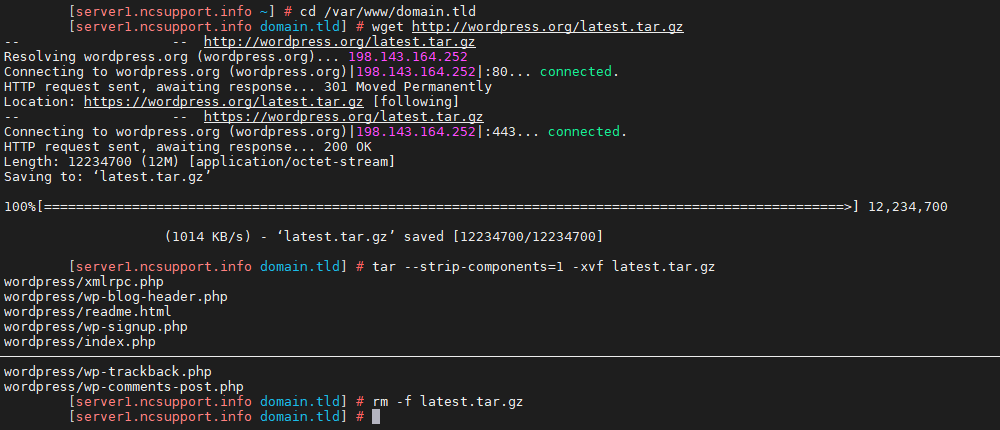
cd /var/www/domain.tld

wget http://wordpress.org/latest.tar.gz

tar --strip-components=1 -xvf latest.tar.gz

rm -f latest.tar.gz
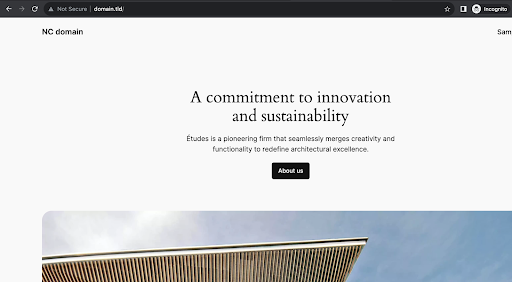
If everything goes well, refreshing http://domain.tld in the web browser should lead you to the default installation sequence of WordPress at http://domain.tld/wp-admin/setup-config.php. Using the details of a previously set up database “foo_db”, we can finish the initial configuration and check out your fresh WordPress website:
That’s it! You can host and build websites based on a server with AlmaLinux and LAMP stack.