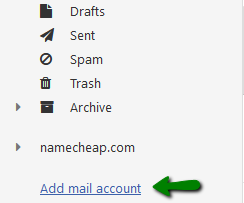
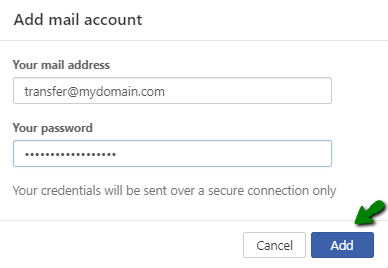
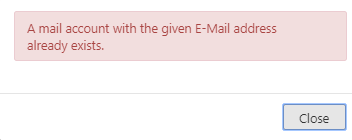
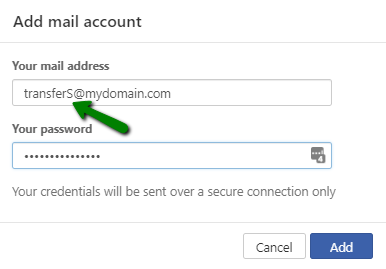
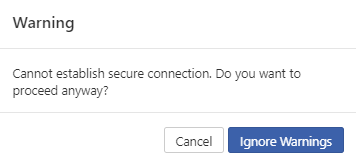
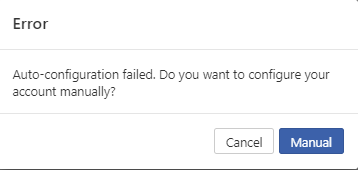
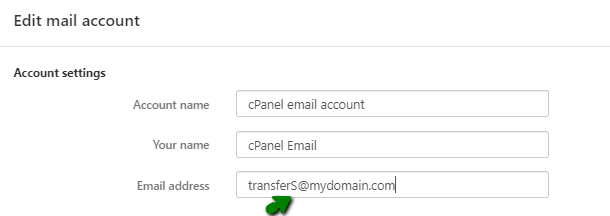
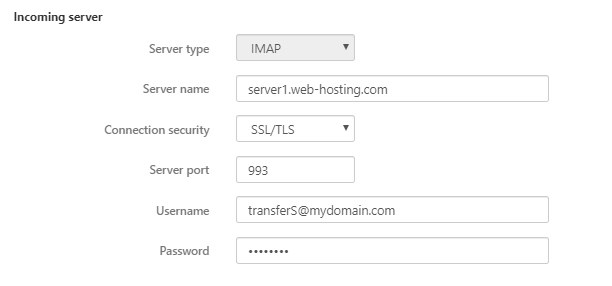
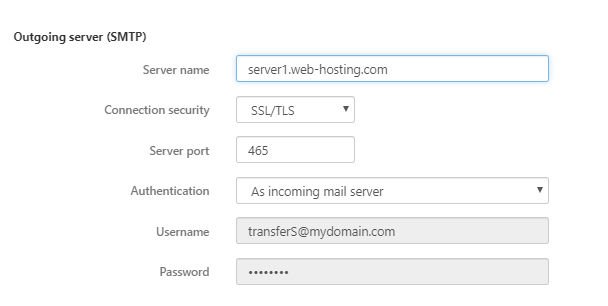
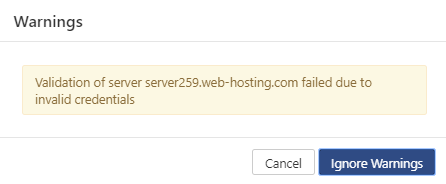
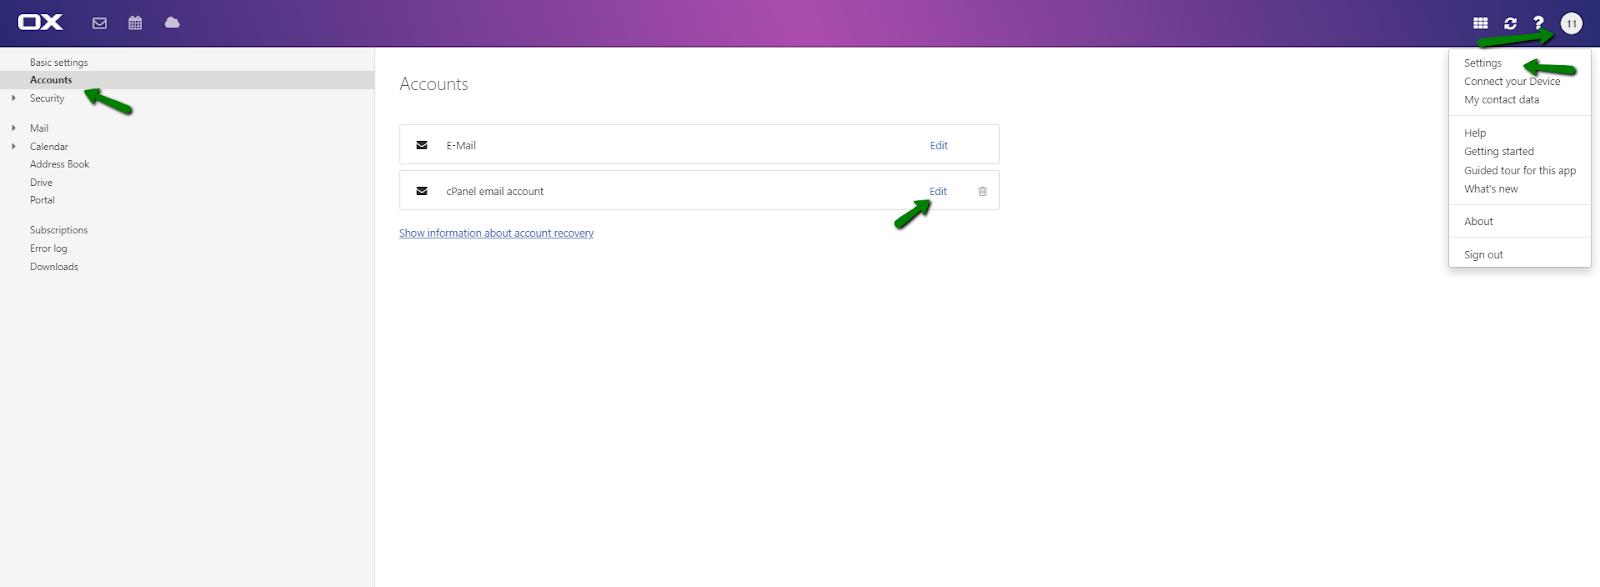
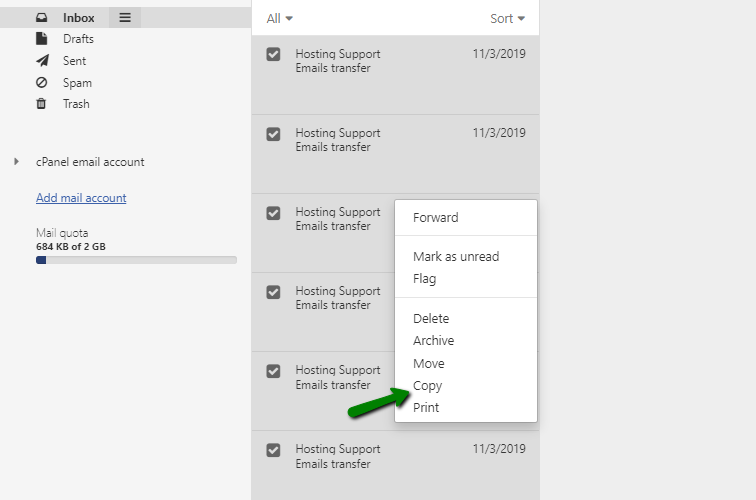
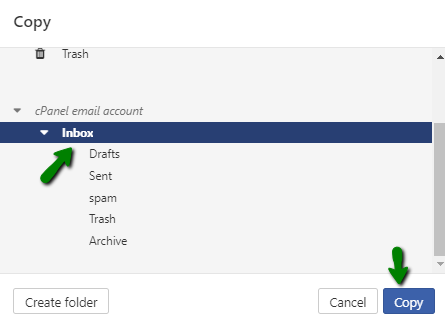
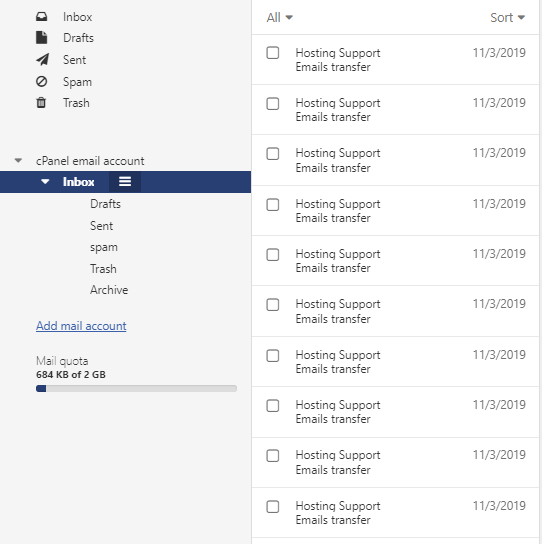
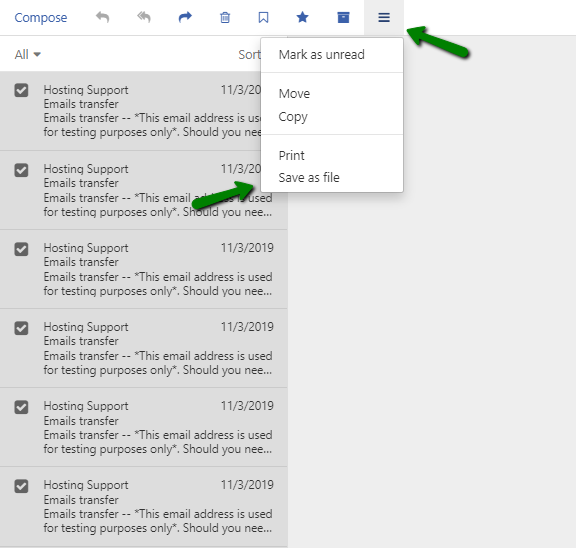
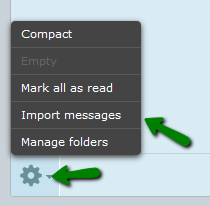
{"/api/v1/ncpl/simplekb/getarticle:\"{\\\"articleId\\\":10196,\\\"categoryId\\\":2226}\"":{"body":{"Id":10196,"FriendlyId":"","ArticleTypeId":0,"Title":"How to transfer emails from Private Email to cPanel","ArticleName":"How to transfer emails from Private Email to cPanel","ArticleSummary":null,"PreponedSummary":false,"Approved":true,"Body":"TmFtZWNoZWFwIHdlYiBob3N0aW5nIHBsYW5zIGNvbWUgYnVuZGxlZCB3aXRoIGNQYW5lbCBlbWFpbC4gSWYgeW91IHVzZSBvbmUgb2Ygb3VyIGhvc3RpbmcgcGFja2FnZXMsIHlvdSBtYXkgZmluZCBjUGFuZWwgZW1haWwgdG8gYmUgbW9yZSBjb252ZW5pZW50IHRoYW4gYSBQcml2YXRlIEVtYWlsIGVtYWlsIHNlcnZpY2UuIEluIHRoaXMgY2FzZSwgeW91IGNhbiBtb3ZlIGVtYWlscyBmcm9tIGEgUHJpdmF0ZSBFbWFpbCBhY2NvdW50IHRvIHlvdXIgY1BhbmVsIGVtYWlsIGFjY291bnQgaW4ganVzdCBhIGZldyBzdGVwcy4gPGJyIC8+PGJyIC8+SW4gdGhpcyBhcnRpY2xlLCB3ZeKAmWxsIGNvdmVyIHR3byBwb3NzaWJsZSB3YXlzIHRvIGRvIHRoYXQuIDxiciAvPjxiciAvPjxwPjxhIGhyZWY9IiNBZGQgbWFpbCBhY2NvdW50IG9wdGlvbiI+VXNpbmcgdGhlIEFkZCBtYWlsIGFjY291bnQgb3B0aW9uPC9hPjwvcD48cD48YSBocmVmPSIjYmFja3VwIG9mIGVtYWlscyI+Q3JlYXRpbmcgYSBiYWNrdXAgb2YgZW1haWxzPC9hPjwvcD48YnIgLz48YnIgLz5Zb3UgbmVlZCBhIGNQYW5lbCBlbWFpbCBhY2NvdW50IGJlZm9yZSB5b3UgY2FuIGJlZ2luIHNlbmRpbmcgZW1haWxzIHRoZXJlLiBJZiB5b3UgZG9u4oCZdCBoYXZlIG9uZSBhbHJlYWR5LCA8YSBocmVmPSJodHRwczovL3d3dy5uYW1lY2hlYXAuY29tL3N1cHBvcnQva25vd2xlZGdlYmFzZS9hcnRpY2xlLmFzcHgvMTEwLzMxL2hvdy10by1jcmVhdGUtYW4tZW1haWwtYWNjb3VudC1pbi1jcGFuZWwiIGxpbmt0ZXh0PSJjbGljayBoZXJlIiBsaW5rdHlwZT0iQ3VzdG9tIiB0YXJnZXQ9Il9wYXJlbnQiPmNsaWNrIGhlcmU8L2E+IHRvIHNldCBpdCB1cC48YnIgLz48YnIgLz48ZGl2PjxiciAvPjwvZGl2PjxkaXY+PGJyIC8+PC9kaXY+PHA+PGEgbmFtZT0iQWRkIG1haWwgYWNjb3VudCBvcHRpb24iPjxiPlVzaW5nIHRoZSBBZGQgbWFpbCBhY2NvdW50IG9wdGlvbjwvYj48L2E+PC9wPjxiciAvPlRoZSA8Yj5BZGQgbWFpbCBhY2NvdW50PC9iPiBvcHRpb24gYWxsb3dzIHVzIGFkZGluZyBhIGNQYW5lbCBlbWFpbCBhY2NvdW50IHRvIHRoZSB3ZWIgaW50ZXJmYWNlIG9mIHlvdXIgUHJpdmF0ZSBFbWFpbCBlbWFpbCBhY2NvdW50OjxiciAvPjxiciAvPjEuIDxhIGhyZWY9Imh0dHBzOi8vcHJpdmF0ZWVtYWlsLmNvbS8iIGxpbmt0ZXh0PSJMb2cgaW50byIgbGlua3R5cGU9IkN1c3RvbSIgdGFyZ2V0PSJfcGFyZW50Ij5Mb2cgaW50bzwvYT4geW91ciBQcml2YXRlIEVtYWlsIFdlYm1haWwuPGJyIC8+Mi4gUHJlc3Mgb24gdGhlIDxiPkFkZCBtYWlsIGFjY291bnQ8L2I+IGJ1dHRvbjo8YnIgLz48YnIgLz48ZGl2PjxpbWcgY2xhc3M9ImtiLWltYWdlIiBzcmM9Imh0dHBzOi8vTmFtZWNoZWFwLnNpbXBsZWtiLmNvbS9TaXRlQ29udGVudHMvMi03QzIyRDUyMzZBNDU0M0VCODI3RjNCRDg5MzZFMTUzRS9tZWRpYS90cmFuc2ZlcmUxLnBuZyIgLz48L2Rpdj48ZGl2PjxiciAvPjwvZGl2PjxkaXY+My4gRW50ZXIgeW91ciBjUGFuZWwgZW1haWwgYWNjb3VudCBjcmVkZW50aWFscyBhbmQgY2xpY2sgPGI+QWRkPC9iPi48YnIgLz48YnIgLz48L2Rpdj48cD48L3A+PGRpdj48aW1nIGNsYXNzPSJrYi1pbWFnZSIgc3JjPSJodHRwczovL05hbWVjaGVhcC5zaW1wbGVrYi5jb20vU2l0ZUNvbnRlbnRzLzItN0MyMkQ1MjM2QTQ1NDNFQjgyN0YzQkQ4OTM2RTE1M0UvbWVkaWEvdHJhbnNmZXJlMi5wbmciIC8+PC9kaXY+PGRpdj48YnIgLz48L2Rpdj48ZGl2PlRoaXMgZmVhdHVyZSB3b27igJl0IHdvcmsgaWYgeW91ciBjUGFuZWwgZW1haWwgYWRkcmVzcyBpcyB0aGUgc2FtZSBhcyB5b3VyIFByaXZhdGUgRW1haWwgZW1haWwgYWRkcmVzcy4gSW4gdGhpcyBjYXNlLCB5b3XigJlsbCBnZXQgdGhlIGZvbGxvd2luZyB3YXJuaW5nIG1lc3NhZ2U8YnIgLz48YnIgLz48Yj5BIG1haWwgYWNjb3VudCB3aXRoIHRoZSBnaXZlbiBFLU1haWwgYWRkcmVzcyBhbHJlYWR5IGV4aXN0cy48L2I+PGJyIC8+wqA8YnIgLz5BcyBhIHdvcmthcm91bmQsIGFkZCBhIGRpZmZlcmVudCBlbWFpbCBhZGRyZXNzIG9yIGluY2x1ZGUgYW4gZXh0cmEgY2hhcmFjdGVyIHRvIHlvdXIgY3VycmVudCBlbWFpbCBhZGRyZXNzLiBGb3IgZXhhbXBsZSwgdG8gcHJvY2VlZCB3aXRoIDxpPnRyYW5zZmVyQG15ZG9tYWluLmNvbTwvaT4sIHlvdSBjb3VsZCBhZGQgdGhlIGVtYWlsIDxpPnRyYW5zZmVyU0BteWRvbWFpbi5jb20gPC9pPm9yIGFueSBvdGhlci4gPGJyIC8+PC9kaXY+PGRpdj48YnIgLz48L2Rpdj48ZGl2PlRoZSBtYWluIGlkZWEgaXMgdGhhdCBhbiBlbWFpbCBhZGRyZXNzIHNob3VsZCBkaWZmZXIgZnJvbSB0aGUgb25lIHlvdSB3YW50IHRvIGFkZCAoaWYgaXQgaXMgdGhlIHNhbWUpLjxiciAvPjxiciAvPjwvZGl2PjxwPjwvcD48ZGl2PjxpbWcgY2xhc3M9ImtiLWltYWdlIiBzcmM9Imh0dHBzOi8vTmFtZWNoZWFwLnNpbXBsZWtiLmNvbS9TaXRlQ29udGVudHMvMi03QzIyRDUyMzZBNDU0M0VCODI3RjNCRDg5MzZFMTUzRS9tZWRpYS90cmFuc2ZlcmUzLnBuZyIgLz48L2Rpdj48YnIgLz48cD48L3A+PGRpdj48aW1nIGNsYXNzPSJrYi1pbWFnZSIgc3JjPSJodHRwczovL05hbWVjaGVhcC5zaW1wbGVrYi5jb20vU2l0ZUNvbnRlbnRzLzItN0MyMkQ1MjM2QTQ1NDNFQjgyN0YzQkQ4OTM2RTE1M0UvbWVkaWEvdHJhbnNmZXJlNC5wbmciIC8+PC9kaXY+PGRpdj48YnIgLz48L2Rpdj48Yj5OT1RFPC9iPjogVGhlIHdvcmthcm91bmQgdGhhdCBpbnZvbHZlcyB1c2luZyBhbiBhZGRpdGlvbmFsIGNoYXJhY3RlciBpcyBvbmx5IA0KbmVjZXNzYXJ5IHdoZW4gdGhlIGVtYWlsIGFkZHJlc3Mgb2YgYSBQcml2YXRlIEVtYWlsIGVtYWlsIGFjY291bnQgYW5kIA0KdGhlIGVtYWlsIGFkZHJlc3Mgb2YgYSBjUGFuZWwgZW1haWwgYWNjb3VudCBpcyB0aGUgc2FtZS4gSWYgdGhlIGVtYWlsIA0KYWRkcmVzcyBvZiB5b3VyIGNQYW5lbCBlbWFpbCBhY2NvdW50IGlzIGRpZmZlcmVudCBmcm9tIHlvdXIgUHJpdmF0ZSANCkVtYWlsIGVtYWlsIGFkZHJlc3MsIHlvdSBjYW4gc2tpcCB0aGUgc3RlcHMgZGVzY3JpYmVkIGFib3ZlLjxiciAvPjxiciAvPjxiciAvPjxkaXY+QWZ0ZXIgdGhlIHN5c3RlbSB3aWxsIGF1dG9tYXRpY2FsbHkgYmVnaW4gY29uZmlndXJpbmcgYW4gZW1haWwgYWNjb3VudC4gQXQgdGhpcyBwb2ludCwgeW91IHdpbGwgcmVjZWl2ZSB0aGUgZm9sbG93aW5nIHdhcm5pbmdzOjwvZGl2PjxkaXY+PGJyIC8+PC9kaXY+PHA+PC9wPjxkaXY+PGltZyBjbGFzcz0ia2ItaW1hZ2UiIHNyYz0iaHR0cHM6Ly9OYW1lY2hlYXAuc2ltcGxla2IuY29tL1NpdGVDb250ZW50cy8yLTdDMjJENTIzNkE0NTQzRUI4MjdGM0JEODkzNkUxNTNFL21lZGlhL3RyYW5zZmVyZTUucG5nIiAvPjwvZGl2PjxkaXY+PGJyIC8+PC9kaXY+PGRpdj5UbyBmaW5hbGl6ZSB0aGUgZW1haWwgc2V0dXAsIHNlbGVjdCB0aGUgPGI+SWdub3JlIFdhcm5pbmdzPC9iPiBidXR0b24gZm9sbG93ZWQgYnkgdGhlIDxiPk1hbnVhbDwvYj4gYnV0dG9uIGluIHRoZSBFcnJvciBub3RpZmljYXRpb246PGJyIC8+PGJyIC8+PC9kaXY+PHA+PC9wPjxkaXY+PGltZyBjbGFzcz0ia2ItaW1hZ2UiIHNyYz0iaHR0cHM6Ly9OYW1lY2hlYXAuc2ltcGxla2IuY29tL1NpdGVDb250ZW50cy8yLTdDMjJENTIzNkE0NTQzRUI4MjdGM0JEODkzNkUxNTNFL21lZGlhL3RyYW5zZmVyZTYucG5nIiAvPjwvZGl2PjxkaXY+PGJyIC8+PC9kaXY+PGRpdj5JdCdzIG5vdyB0aW1lIHRvIHNldCB1cCB5b3VyIGNQYW5lbCBlbWFpbCBhY2NvdW50LiBVbmRlciA8Yj5BY2NvdW50IHNldHRpbmc8L2I+LCBmaWxsIGluIHRoZSBmb2xsb3dpbmcgZGV0YWlscy48YnIgLz48YnIgLz48Yj5BY2NvdW50IG5hbWU8L2I+OiBhbnkgbmFtZSBvZiB5b3VyIGNob2ljZTxiciAvPjxiPllvdXIgbmFtZTwvYj46IHRoZSBzYW1lIGlzIGFwcGxpZWQgaGVyZTxiciAvPjxiPkVtYWlsIGFkZHJlc3M8L2I+OiB0aGUgZW1haWwgYWRkcmVzcyBvZiB5b3VyIGNQYW5lbCBlbWFpbCBhY2NvdW50ICh0aGUgZXhhY3Qgc2FtZSBvbmUgeW91IHVzZWQgaW4gU3RlcCAzIGluY2x1ZGluZyBhbnkgYWRkaXRpb25hbCBjaGFyYWN0ZXJzKS4g4oCUV2XigJlsbCBkZWxldGUgYW55IGFkZGl0aW9uYWwgY2hhcmFjdGVycyBhdCB0aGUgZW5kIG9mIHRoZSBwcm9jZXNzLjxiciAvPjxiciAvPjwvZGl2PjxwPjwvcD48ZGl2PjxpbWcgY2xhc3M9ImtiLWltYWdlIiBzcmM9Imh0dHBzOi8vTmFtZWNoZWFwLnNpbXBsZWtiLmNvbS9TaXRlQ29udGVudHMvMi03QzIyRDUyMzZBNDU0M0VCODI3RjNCRDg5MzZFMTUzRS9tZWRpYS90cmFuc2ZlcmU3LnBuZyIgLz48L2Rpdj48ZGl2PjxiciAvPjwvZGl2PjxkaXY+QXQgdGhpcyBzdGFnZSwgeW91IG5lZWQgdG8gYWRkIGNQYW5lbCBlbWFpbCBhY2NvdW50IGNyZWRlbnRpYWxzIGFuZCBzZXJ2ZXIgc2V0dGluZ3MuIDxiciAvPjxiciAvPlRoZSA8Yj5JbmNvbWluZyBzZXJ2ZXI8L2I+IHNlY3Rpb24gY29tZXMgZmlyc3Q6PGJyIC8+PGJyIC8+PGI+U2VydmVyIHR5cGU8L2I+OiBJTUFQPGJyIC8+PGI+U2VydmVyIG5hbWU8L2I+OiB0aGUgc2VydmVyIDxhIGhyZWY9Imh0dHBzOi8vd3d3Lm5hbWVjaGVhcC5jb20vc3VwcG9ydC9rbm93bGVkZ2ViYXNlL2FydGljbGUuYXNweC8xNDI1LzI3L3doYXQtc2VydmVyLWlzLW15LWFjY291bnQtaG9zdGVkLW9uIiBsaW5rdGV4dD0ieW91ciBhY2NvdW50IGlzIGhvc3RlZCBvbiIgbGlua3R5cGU9IkN1c3RvbSIgdGFyZ2V0PSJfcGFyZW50Ij55b3VyIGFjY291bnQgaXMgaG9zdGVkIG9uPC9hPi4gSXQgY2FuIGJlIGZvdW5kIGVpdGhlciBpbiBhIGhvc3Rpbmcgd2VsY29tZSBlbWFpbCBvciBhZnRlciBhY2Nlc3NpbmcgY1BhbmVsIGF0IHRoZSBVUkwgYmFyLiBJdCBsb29rcyBsaWtlIDxpPnNlcnZlcjEud2ViLWhvc3RpbmcuY29tPC9pPjxiciAvPjxiPkNvbm5lY3Rpb24gc2VjdXJpdHk8L2I+OiBTU0wvVExTPGJyIC8+PGI+U2VydmVyIHBvcnQ8L2I+OiA5OTM8YnIgLz48Yj5Vc2VybmFtZTwvYj46IHlvdXIgY1BhbmVsIGVtYWlsIGFkZHJlc3MgKGl0IHdpbGwgYmUgZmlsbGVkIGluIGF1dG9tYXRpY2FsbHkgd2l0aCBhbiBlbWFpbCBhZGRyZXNzIHNwZWNpZmllZCBhdCB0aGUgRW1haWwgYWRkcmVzcyBmaWVsZCk8YnIgLz48Yj5QYXNzd29yZDwvYj46IHBhc3N3b3JkIGZvciBhIGNQYW5lbCBlbWFpbCBhY2NvdW50LjxiciAvPjxiciAvPjwvZGl2PjxwPjwvcD48ZGl2PjxpbWcgY2xhc3M9ImtiLWltYWdlIiBzcmM9Imh0dHBzOi8vTmFtZWNoZWFwLnNpbXBsZWtiLmNvbS9TaXRlQ29udGVudHMvMi03QzIyRDUyMzZBNDU0M0VCODI3RjNCRDg5MzZFMTUzRS9tZWRpYS90cmFuc2ZlcmU4LnBuZyIgLz48L2Rpdj48ZGl2PjxiciAvPjwvZGl2PkFuZCB0aGUgPGI+T3V0Z29pbmcgc2VydmVyIChTTVRQKTwvYj4gc2VjdGlvbjo8YnIgLz48YnIgLz48Yj5TZXJ2ZXIgbmFtZTwvYj46IGhvc3RuYW1lIG9mIGEgaG9zdGluZyBzZXJ2ZXIgd2hlcmUgYW4gZW1haWwgYWNjb3VudCBpcyBjcmVhdGVkLiA8YnIgLz48Yj5Db25uZWN0aW9uIHNlY3VyaXR5PC9iPjogU1NML1RMUzxiciAvPjxiPlNlcnZlciBwb3J0PC9iPjogNDY1PGJyIC8+PGI+QXV0aGVudGljYXRpb248L2I+OiBBcyBpbmNvbWluZyBtYWlsIHNlcnZlcjxiciAvPjxiPlVzZXJuYW1lPC9iPiBhbmQgPGI+UGFzc3dvcmQ8L2I+IHdpbGwgYmUgZmV0Y2hlZCBhdXRvbWF0aWNhbGx5ICh0aGUgb25lcyBhbHJlYWR5IHNwZWNpZmllZCBpbiB0aGUgSW5jb21pbmcgc2VydmVyIHNldHRpbmdzKTxiciAvPjxiciAvPjxwPjwvcD48ZGl2PjxpbWcgY2xhc3M9ImtiLWltYWdlIiBzcmM9Imh0dHBzOi8vTmFtZWNoZWFwLnNpbXBsZWtiLmNvbS9TaXRlQ29udGVudHMvMi03QzIyRDUyMzZBNDU0M0VCODI3RjNCRDg5MzZFMTUzRS9tZWRpYS90cmFuc2ZlcmU5LnBuZyIgLz48L2Rpdj48ZGl2PjxiciAvPjwvZGl2PjxkaXY+VGhlbiwgY2xpY2sgb24gdGhlIDxiPlNhdmU8L2I+IGJ1dHRvbiBhbmQgdGhlIDxiPkFjY291bnQgYWRkZWQgc3VjY2Vzc2Z1bGw8L2I+eSBwb3AtdXAgbm90aWZpY2F0aW9uIHdpbGwgYXBwZWFyOjxiciAvPjxiciAvPjwvZGl2PjxwPjwvcD48ZGl2PjxpbWcgY2xhc3M9ImtiLWltYWdlIiBzcmM9Imh0dHBzOi8vTmFtZWNoZWFwLnNpbXBsZWtiLmNvbS9TaXRlQ29udGVudHMvMi03QzIyRDUyMzZBNDU0M0VCODI3RjNCRDg5MzZFMTUzRS9tZWRpYS90cmFuc2ZlcmUxMC5wbmciIC8+PC9kaXY+PGRpdj48YnIgLz48L2Rpdj5PciwgaWYgeW91IGFkZGVkIGFuIGV4dHJhIGNoYXJhY3RlciB0byB5b3VyIGVtYWlsIGFkZHJlc3MgaW4gU3RlcCAzLCB0aGUgZm9sbG93aW5nIHdhcm5pbmcgaXMgZGlzcGxheWVkOjxiciAvPjxiciAvPjxwPjwvcD48ZGl2PjxpbWcgY2xhc3M9ImtiLWltYWdlIiBzcmM9Imh0dHBzOi8vTmFtZWNoZWFwLnNpbXBsZWtiLmNvbS9TaXRlQ29udGVudHMvMi03QzIyRDUyMzZBNDU0M0VCODI3RjNCRDg5MzZFMTUzRS9tZWRpYS90cmFuc2ZlcmUxMS5wbmciIC8+PC9kaXY+PGRpdj48YnIgLz48L2Rpdj48ZGl2PlRvIHNraXAgdGhpcyB3YXJuaW5nIGFuZCBjb250aW51ZSwgY2xpY2sgdGhlIDxiPklnbm9yZSBXYXJuaW5nczwvYj4gYnV0dG9uIG9uZSBtb3JlIHRpbWUgYW5kIHRyeSBzYXZpbmcgdGhlIGNoYW5nZXMgd2l0aG91dCBlZGl0aW5nIHRoZSA8Yj5FbWFpbCBhZGRyZXNzPC9iPiBmaWVsZC4gSWYgdGhlIHNhbWUgd2FybmluZyBhcHBlYXJzIGFnYWluLCBza2lwIGl0IGluIHRoZSBzYW1lIHdheSBhbmQgc2F2ZSB0aGUgY2hhbmdlcy48YnIgLz5PbmNlIGRvbmUsIG5hdmlnYXRlIHRvIHRoZSA8Yj5BY2NvdW50czwvYj4gc2VjdGlvbjogPGI+U2V0dGluZ3M8L2I+ICZndDsmZ3Q7IDxiPk1haWw8L2I+ICZndDsmZ3Q7IDxiPkFjY291bnRzPC9iPi48YnIgLz48L2Rpdj48ZGl2PjxiciAvPjwvZGl2PjxkaXY+UHJlc3Mgb24gdGhlIDxiPkVkaXQ8L2I+IGJ1dHRvbiBvcHBvc2l0ZSB0byBhIGNQYW5lbCBlbWFpbCBhY2NvdW50IGFuZCBjb3JyZWN0IHRoZSA8Yj5FbWFpbCBhZGRyZXNzPC9iPiBieSBkZWxldGluZyB0aGUgYWRkaXRpb25hbCBjaGFyYWN0ZXIuIDxiciAvPkl04oCZcyBub3cgdGltZSB0byBzYXZlIHlvdXIgY2hhbmdlcy4gVGhlIDxiPkFjY291bnQgdXBkYXRlZDwvYj4gcG9wLXVwIHNob3VsZCBhcHBlYXI6PGJyIC8+PGJyIC8+PC9kaXY+PHA+PC9wPjxpbWcgY2xhc3M9ImtiLWltYWdlIiBzcmM9Imh0dHBzOi8vTmFtZWNoZWFwLnNpbXBsZWtiLmNvbS9TaXRlQ29udGVudHMvMi03QzIyRDUyMzZBNDU0M0VCODI3RjNCRDg5MzZFMTUzRS9tZWRpYS90cmFuc2ZlcmUxMi5wbmciIC8+PHA+PC9wPjxkaXY+PGJyIC8+PC9kaXY+PGRpdj48aW1nIGNsYXNzPSJrYi1pbWFnZSIgc3JjPSJodHRwczovL05hbWVjaGVhcC5zaW1wbGVrYi5jb20vU2l0ZUNvbnRlbnRzLzItN0MyMkQ1MjM2QTQ1NDNFQjgyN0YzQkQ4OTM2RTE1M0UvbWVkaWEvdHJhbnNmZXJlMTMucG5nIiAvPjwvZGl2PjxkaXY+PGI+PGJyIC8+PC9iPjwvZGl2PjxkaXY+PGI+Tk9URTwvYj46IFRoZSB3b3JrYXJvdW5kIHRoYXQgaW52b2x2ZXMgdXNpbmcgYW4gYWRkaXRpb25hbCBjaGFyYWN0ZXIgaXMgb25seSBuZWNlc3Nhcnkgd2hlbiB0aGUgZW1haWwgYWRkcmVzcyBvZiBhIFByaXZhdGUgRW1haWwgZW1haWwgYWNjb3VudCBhbmQgdGhlIGVtYWlsIGFkZHJlc3Mgb2YgYSBjUGFuZWwgZW1haWwgYWNjb3VudCBpcyB0aGUgc2FtZS4gSW4gYW55IG90aGVyIGNhc2UsIHlvdSBjYW4gZmlsbCBpbiBhIHJlYWwgZW1haWwgYWRkcmVzcywgYW5kIGFuIGVtYWlsIGFjY291bnQgd2lsbCBiZSBhZGRlZCB3aXRob3V0IGFueSBleHRyYSBhY3Rpb25zLjxiciAvPjxiciAvPkNvbmdyYXR1bGF0aW9ucyEgWW91IGNhbiBzdGFydCBtb3ZpbmcgZW1haWxzIGZyb20gZm9sZGVycyBvZiBhIFByaXZhdGUgRW1haWwgYWNjb3VudCB0byBjb3JyZXNwb25kaW5nIGZvbGRlcnMgb2YgYSBjUGFuZWwgZW1haWwgYWNjb3VudDo8YnIgLz48YnIgLz4xLiBOYXZpZ2F0ZSB0byB5b3VyIDxiPlByaXZhdGUgRW1haWwgSW5ib3g8L2I+OiA8YnIgLz48YnIgLz48L2Rpdj48cD48L3A+PGRpdj48aW1nIGNsYXNzPSJrYi1pbWFnZSIgc3JjPSJodHRwczovL05hbWVjaGVhcC5zaW1wbGVrYi5jb20vU2l0ZUNvbnRlbnRzLzItN0MyMkQ1MjM2QTQ1NDNFQjgyN0YzQkQ4OTM2RTE1M0UvbWVkaWEvdHJhbnNmZXJlMTQucG5nIiAvPjwvZGl2PjxkaXY+PGJyIC8+PC9kaXY+Mi4gQ2hvb3NlIGEgZm9sZGVyIHlvdSB3aXNoIHRvIHRyYW5zZmVyIGVtYWlscyBmcm9tLjxiciAvPjxiciAvPjMuIFNjcm9sbCBkb3duIHVudGlsIHlvdSByZWFjaCB0aGUgZW5kIG9mIHRoZSBmb2xkZXIgc2luY2UgYnkgZGVmYXVsdCBpdCBpcyBwb3NzaWJsZSB0byBzZWxlY3Qgb25seSB2aXNpYmxlIGVtYWlscy48YnIgLz48YnIgLz40LiBUbyBzZWxlY3QgYWxsIGVtYWlsIG1lc3NhZ2VzLCBjbGljayBvbiBhIHJhbmRvbSBtZXNzYWdlIGFuZCBwcmVzcyB0aGUga2V5Ym9hcmQgY29tYmluYXRpb24gPGI+Q3RybCtBPC9iPi48YnIgLz48YnIgLz48ZGl2PjUuIE9wZW4gdGhlIDxiPmNvbnRleHQgbWVudTwvYj4gdmlhIHJpZ2h0LWNsaWNrIGFuZCBjbGljayA8Yj5Db3B5PC9iPjo8L2Rpdj48ZGl2PjxiciAvPjwvZGl2PjxwPjwvcD48ZGl2PjxpbWcgY2xhc3M9ImtiLWltYWdlIiBzcmM9Imh0dHBzOi8vTmFtZWNoZWFwLnNpbXBsZWtiLmNvbS9TaXRlQ29udGVudHMvMi03QzIyRDUyMzZBNDU0M0VCODI3RjNCRDg5MzZFMTUzRS9tZWRpYS90cmFuc2ZlcmUxNS5wbmciIC8+PC9kaXY+PGRpdj48YnIgLz48L2Rpdj48ZGl2PjcuIFlvdSBub3cgbmVlZCB0byBjaG9vc2Ugd2hlcmUgdG8gc2VuZCB0aGUgY29waWVkIG1lc3NhZ2VzLiBJbiB5b3VyIG5ldyBlbWFpbCBhY2NvdW50LCBzZWxlY3QgdGhlIGRlc2lyZWQgZm9sZGVyLiBOb3cgY2xpY2sgb24gdGhlIDxiPkNvcHk8L2I+IGJ1dHRvbiB0byBjb21wbGV0ZSB0aGUgYWN0aW9uOjwvZGl2PjxkaXY+PGJyIC8+PC9kaXY+PHA+PC9wPjxkaXY+PGltZyBjbGFzcz0ia2ItaW1hZ2UiIHNyYz0iaHR0cHM6Ly9OYW1lY2hlYXAuc2ltcGxla2IuY29tL1NpdGVDb250ZW50cy8yLTdDMjJENTIzNkE0NTQzRUI4MjdGM0JEODkzNkUxNTNFL21lZGlhL3RyYW5zZmVyZTE2LnBuZyIgLz48L2Rpdj48ZGl2PjxiciAvPjwvZGl2PjxkaXY+WW91IGNhbiBub3cgc2VlIHlvdSBlbWFpbHMgY29waWVkIHRvIHRoZSBkZXNpcmVkIGZvbGRlciBpbiBjUGFuZWwgZW1haWw6PGJyIC8+PC9kaXY+PGJyIC8+PHA+PC9wPjxkaXY+PGltZyBjbGFzcz0ia2ItaW1hZ2UiIHNyYz0iaHR0cHM6Ly9OYW1lY2hlYXAuc2ltcGxla2IuY29tL1NpdGVDb250ZW50cy8yLTdDMjJENTIzNkE0NTQzRUI4MjdGM0JEODkzNkUxNTNFL21lZGlhL3RyYW5zZmVyZTE3LnBuZyIgLz48L2Rpdj48ZGl2PjxiciAvPjwvZGl2PjxkaXY+VG8gY2hlY2sgdGhhdCB5b3VyIGVtYWlscyBoYXZlIGJlZW4gc3VjY2Vzc2Z1bGx5IGNvcGllZCwgbG9nIGludG8gY1BhbmVsIGVtYWlsIGFjY291bnQgdGhyb3VnaCB0aGUgY1BhbmVsIGVtYWlsIHdlYm1haWw6IDxiciAvPjxiciAvPjwvZGl2PjxwPjwvcD48aW1nIGNsYXNzPSJrYi1pbWFnZSIgc3JjPSJodHRwczovL05hbWVjaGVhcC5zaW1wbGVrYi5jb20vU2l0ZUNvbnRlbnRzLzItN0MyMkQ1MjM2QTQ1NDNFQjgyN0YzQkQ4OTM2RTE1M0UvbWVkaWEvdHJhbnNmZXJlMTgucG5nIiAvPjxwPjwvcD48ZGl2PjxiciAvPjwvZGl2PjxkaXY+PHA+PGEgbmFtZT0iYmFja3VwIG9mIGVtYWlscyI+PGI+Q3JlYXRpbmcgYSBiYWNrdXAgb2YgZW1haWxzPC9iPjwvYT48L3A+DQrCoCA8L2Rpdj48YnIgLz5Bbm90aGVyIHdheSB0byB0cmFuc2ZlciBlbWFpbHMgdG8gYSBjUGFuZWwgZW1haWwgYWNjb3VudCBpcyBieSBjcmVhdGluZyBhIGJhY2t1cCBvZiBlbWFpbHMgYW5kIHJlc3RvcmluZyBpdCB0aHJvdWdoIHRoZSBjUGFuZWwgd2VibWFpbDo8YnIgLz48YnIgLz4xLiBOYXZpZ2F0ZSB0byB0aGUgPGI+SW5ib3g8L2I+IG9mIGEgUHJpdmF0ZSBFbWFpbCBlbWFpbCBhY2NvdW50LjxiciAvPjIuIENob29zZSBhIGZvbGRlciB5b3Ugd2lzaCB0byB0cmFuc2ZlciBlbWFpbHMgZnJvbS48YnIgLz4zLiBTZWxlY3QgYWxsIHRoZSBleGlzdGluZyBlbWFpbHMgdXNpbmcgdGhlIDxiPkN0cmwrQTwvYj4gY29tYmluYXRpb24uPGJyIC8+NC4gUHJlc3Mgb24gdGhlIHRocmVlIGRhc2hlcyBpY29uIGF0IHRoZSB0b29sYmFyLjxiciAvPjUuIENsaWNrIHRoZSA8Yj5TYXZlIGFzIGZpbGU8L2I+IGJ1dHRvbiB0byBkb3dubG9hZCBhbiBhcmNoaXZlIG9mIHRoZSBlbWFpbHM6PGJyIC8+PGJyIC8+PGRpdj48aW1nIGNsYXNzPSJrYi1pbWFnZSIgc3JjPSJodHRwczovL05hbWVjaGVhcC5zaW1wbGVrYi5jb20vU2l0ZUNvbnRlbnRzLzItN0MyMkQ1MjM2QTQ1NDNFQjgyN0YzQkQ4OTM2RTE1M0UvbWVkaWEvdHJhbnNmZXJlMTkucG5nIiAvPjwvZGl2PjxkaXY+PGJyIC8+PC9kaXY+PHA+PC9wPjxkaXY+PGltZyBjbGFzcz0ia2ItaW1hZ2UiIHNyYz0iaHR0cHM6Ly9OYW1lY2hlYXAuc2ltcGxla2IuY29tL1NpdGVDb250ZW50cy8yLTdDMjJENTIzNkE0NTQzRUI4MjdGM0JEODkzNkUxNTNFL21lZGlhL3RyYW5zZmVyZTIwLnBuZyIgLz48L2Rpdj48ZGl2PjxiciAvPjwvZGl2PjxkaXY+VG8gdXBsb2FkIHRoZXNlIGVtYWlscywgeW91IG11c3QgZmlyc3QgZXh0cmFjdCB0aGVtIG9uIHRvIHlvdXIgY29tcHV0ZXIgYXMgYSAuZW1sIGZvcm1hdHRlZCBhcmNoaXZlIGZpbGUuIFRoZW4gYWNjZXNzIGNQYW5lbCB3ZWJtYWlsIHRocm91Z2ggPGI+SG9yZGU8L2I+IG9yIDxiPlJvdW5kY3ViZTwvYj4gYW5kIGZvbGxvdyB0aGVzZSBzdGVwczo8YnIgLz48YnIgLz48YnIgLz48Yj5Ib3JkZTwvYj46PGJyIC8+PGJyIC8+MS4gU2VsZWN0IHRoZSBmb2xkZXIgeW91IHdpc2ggdG8gdXBsb2FkIGVtYWlscyB0byB1c2luZyB0aGUgcmlnaHQtY2xpY2sgYnV0dG9uIHRvIGV4cGFuZCB0aGUgY29udGV4dCBtZW51IGFuZCBjaG9vc2UgPGI+SW1wb3J0PC9iPjo8YnIgLz48YnIgLz48L2Rpdj48cD48L3A+PGltZyBjbGFzcz0ia2ItaW1hZ2UiIHNyYz0iaHR0cHM6Ly9OYW1lY2hlYXAuc2ltcGxla2IuY29tL1NpdGVDb250ZW50cy8yLTdDMjJENTIzNkE0NTQzRUI4MjdGM0JEODkzNkUxNTNFL21lZGlhL3RyYW5zZmVyZTIxLnBuZyIgLz48cD48L3A+PGRpdj48YnIgLz48L2Rpdj48ZGl2PjIuIFVzZSB0aGUgPGI+QnJvd3NlPC9iPiBvcHRpb24gdG8gZmluZCB5b3VyIGZvbGRlciBvZiBleHRyYWN0ZWQgZW1haWxzIGZyb20gYSBQcml2YXRlIEVtYWlsIGVtYWlsIGFjY291bnQuIENob29zZSBhbiBlbWFpbCBhbmQgY2xpY2sgb24gdGhlIDxiPk9LPC9iPiBidXR0b24gdG8gYmVnaW4gdGhlIHRyYW5zZmVyOjwvZGl2PjxiciAvPjxkaXY+PGltZyBjbGFzcz0ia2ItaW1hZ2UiIHNyYz0iaHR0cHM6Ly9OYW1lY2hlYXAuc2ltcGxla2IuY29tL1NpdGVDb250ZW50cy8yLTdDMjJENTIzNkE0NTQzRUI4MjdGM0JEODkzNkUxNTNFL21lZGlhL3RyYW5zZmVyZTIyLnBuZyIgLz48L2Rpdj48ZGl2PjxiciAvPjwvZGl2PjxkaXY+My4gQXQgdGhlIGJvdHRvbSBvZiB0aGUgcmlnaHQtaGFuZCBjb3JuZXIsIHRoZSBmb2xsb3dpbmcgZ3JlZW4gbm90aWZpY2F0aW9uIHdpbGwgYXBwZWFyOjxiciAvPjxiciAvPjwvZGl2PjxwPjwvcD48ZGl2PjxpbWcgY2xhc3M9ImtiLWltYWdlIiBzcmM9Imh0dHBzOi8vTmFtZWNoZWFwLnNpbXBsZWtiLmNvbS9TaXRlQ29udGVudHMvMi03QzIyRDUyMzZBNDU0M0VCODI3RjNCRDg5MzZFMTUzRS9tZWRpYS90cmFuc2ZlcmUyMy5wbmciIC8+PGJyIC8+PC9kaXY+PGRpdj48YnIgLz48L2Rpdj48ZGl2PlRoZSBtYWluIGRpc2FkdmFudGFnZSBvZiBtb3ZpbmcgZW1haWxzIHVzaW5nIEhvcmRlIGlzIHRoYXQgeW91IGFyZSBsaW1pdGVkIHRvIG9uZSBlbWFpbCBhdCBhIHRpbWUuIDxiciAvPjwvZGl2PjxkaXY+PGJyIC8+PC9kaXY+PGRpdj5UaHVzLCB0byBtb3ZlIGFsbCB0aGUgZW1haWxzIGV4dHJhY3RlZCBmcm9tIGFuIGFyY2hpdmUgZm9sZGVyLCB3ZSB3b3VsZCByZWNvbW1lbmQgdXNpbmcgPGI+Um91bmRjdWJlPC9iPiB0byBtb3ZlIGFsbCB0aGUgZW1haWxzIGV4dHJhY3RlZCBmcm9tIGFuIGFyY2hpdmUgZm9sZGVyOjxiciAvPjxiciAvPjEuIEhpdCB0aGUgPGI+R2VhcjwvYj4gYnV0dG9uIGF0IHRoZSBib3R0b20gbGVmdCBjb3JuZXIgb2YgeW91ciBzY3JlZW4uPGJyIC8+Mi4gQ2xpY2sgb24gdGhlIDxiPkltcG9ydCBtZXNzYWdlczwvYj4gYnV0dG9uOjxiciAvPjxiciAvPjwvZGl2PjxwPjwvcD48ZGl2PjxpbWcgY2xhc3M9ImtiLWltYWdlIiBzcmM9Imh0dHBzOi8vTmFtZWNoZWFwLnNpbXBsZWtiLmNvbS9TaXRlQ29udGVudHMvMi03QzIyRDUyMzZBNDU0M0VCODI3RjNCRDg5MzZFMTUzRS9tZWRpYS90cmFuc2ZlcmUyNC5wbmciIC8+PC9kaXY+PGRpdj48YnIgLz48L2Rpdj4zLiBMb2NhdGUgdGhlIGZvbGRlciBjb250YWluaW5nIHlvdXIgLmVtbCBlbWFpbHM8YnIgLz40LiBTZWxlY3QgPGI+bm8gbW9yZSB0aGFuIDIwIGVtYWlsczwvYj4gYXQgb25jZSBhbmQgcHJvY2VlZCB3aXRoIHVwbG9hZGluZy48YnIgLz48YnIgLz5UbyBjb25maXJtIHlvdXIgZW1haWxzIGhhdmUgdXBsb2FkZWQsIHRoZSBmb2xsb3dpbmcgbm90aWZpY2F0aW9uIGlzIGRpc3BsYXllZDo8YnIgLz48YnIgLz48cD48L3A+PGRpdj48aW1nIGNsYXNzPSJrYi1pbWFnZSIgc3JjPSJodHRwczovL05hbWVjaGVhcC5zaW1wbGVrYi5jb20vU2l0ZUNvbnRlbnRzLzItN0MyMkQ1MjM2QTQ1NDNFQjgyN0YzQkQ4OTM2RTE1M0UvbWVkaWEvdHJhbnNmZXJlMjUucG5nIiAvPjwvZGl2PjxkaXY+PGJyIC8+PC9kaXY+PGRpdj5Db25ncmF0dWxhdGlvbnMhIFRoZSBlbWFpbCBtZXNzYWdlcyBmcm9tIHlvdXIgUHJpdmF0ZSBFbWFpbCBlbWFpbCBhY2NvdW50IGhhdmUgc3VjY2Vzc2Z1bGx5IG1vdmVkIHRvIHlvdXIgY1BhbmVsIGVtYWlsIGFjY291bnQuIDxiciAvPjxiciAvPjxiciAvPlRoYXTigJlzIGl0ITwvZGl2PjxkaXY+PGJyIC8+PC9kaXY+PGRpdiBhbGlnbj0iY2VudGVyIj48YnIgLz48L2Rpdj48ZGl2IGFsaWduPSJjZW50ZXIiPk5lZWQgYW55IGhlbHA/IENvbnRhY3Qgb3VyIDxhIGhyZWY9Imh0dHBzOi8vd3d3Lm5hbWVjaGVhcC5jb20vaGVscC1jZW50ZXIvIiBsaW5rdGV4dD0iSGVscGRlc2siIGxpbmt0eXBlPSJDdXN0b20iIHRhcmdldD0iX3BhcmVudCI+SGVscGRlc2s8L2E+PGJyIC8+PC9kaXY+PHA+PC9wPg==","NewTillDate":null,"FeaturedTillDate":null,"ModifiedDateTime":"2021-11-22T16:58:52.0000000","LiveDateTime":"1754-02-02T00:00:00.0000000","CreatedDateTime":"2019-12-19T16:10:06.0000000","ApprovalDatetime":"2019-12-27T14:42:06.0000000","RequestCount":29274,"MarkedAsNew":false,"MarkedAsFeatured":false,"RatingValue":0,"CategoryPaths":[{"__type":"Nc:SimpleKB:Abstractions:Dtos:CategoryPathDto","Level":1,"CategoryId":93,"CategoryName":"Email service"},{"__type":"Nc:SimpleKB:Abstractions:Dtos:CategoryPathDto","Level":2,"CategoryId":2226,"CategoryName":"Email Migration"}],"AssociatedCategories":[{"CategoryId":2226,"CategoryName":"Email Migration","CategoryDisplayName":"Email serviceEmail Migration"}],"AssociatedTags":[{"TagId":51,"Tag":"email"},{"TagId":19130,"Tag":" transfer"},{"TagId":19330,"Tag":" Private email"},{"TagId":21049,"Tag":" migrate"},{"TagId":21433,"Tag":" pe"}],"RelatedArticles":[],"AssociatedMedias":[],"PreferredCategoryId":0,"RootParentCategoryName":"","RootParentCategoryId":0},"status":200,"statusText":"OK"},"/api/v1/ncpl/simplekb/getcategorybycategoryid:\"{\\\"categoryId\\\":2226}\"":{"body":{"__type":"Nc:SimpleKB:Abstractions:Dtos:CategoryDto","ParentCategoryId":93,"Parent_Category_Name":"Email service","FriendlyId":null,"ApprovedYN":true,"TreatAsTopicYN":false,"CreatedDateTime":"02/18/2015 14:44:07","CurrentCategoryPaths":[{"__type":"Nc:SimpleKB:Abstractions:Dtos:CategoryPathDto","Level":1,"CategoryId":93,"CategoryName":"Email service"},{"__type":"Nc:SimpleKB:Abstractions:Dtos:CategoryPathDto","Level":2,"CategoryId":2226,"CategoryName":"Email Migration"}],"RelatedCategories":[],"AssociatedArticles":[{"ArticleId":10196,"Title":"How to transfer emails from Private Email to cPanel","ArticleName":"How to transfer emails from Private Email to cPanel","LiveDateTime":"02/02/1754 00:00:00","NewTillDate":null,"FeaturedTillDate":null,"ModifiedDateTime":"11/22/2021"},{"ArticleId":10746,"Title":"How to transfer emails to a Private Email account using eM Client","ArticleName":"How to transfer emails to a Private Email account using eM Client","LiveDateTime":"02/02/1754 00:00:00","NewTillDate":null,"FeaturedTillDate":null,"ModifiedDateTime":"09/04/2025"},{"ArticleId":9455,"Title":"How to back up and restore emails in cPanel Webmail","ArticleName":"How to back up and restore emails in cPanel Webmail","LiveDateTime":"02/02/1754 00:00:00","NewTillDate":null,"FeaturedTillDate":null,"ModifiedDateTime":"12/16/2025"},{"ArticleId":9454,"Title":"How to back up and restore emails in Private Email webmail","ArticleName":"How to back up and restore emails in Private Email webmail","LiveDateTime":"02/02/1754 00:00:00","NewTillDate":null,"FeaturedTillDate":null,"ModifiedDateTime":"11/15/2019"},{"ArticleId":9548,"Title":"How to back up emails in mail clients","ArticleName":"How to back up emails in mail clients","LiveDateTime":"02/02/1754 00:00:00","NewTillDate":null,"FeaturedTillDate":null,"ModifiedDateTime":"11/29/2021"},{"ArticleId":9566,"Title":"How to transfer emails to Namecheap Private Email account","ArticleName":"How to transfer emails to Namecheap Private Email account","LiveDateTime":"02/02/1754 00:00:00","NewTillDate":null,"FeaturedTillDate":null,"ModifiedDateTime":"12/16/2021"},{"ArticleId":9403,"Title":"How to transfer emails to cPanel mail account using Outlook","ArticleName":"How to transfer emails to cPanel mail account using Outlook","LiveDateTime":"02/02/1754 00:00:00","NewTillDate":null,"FeaturedTillDate":null,"ModifiedDateTime":"12/16/2021"},{"ArticleId":9404,"Title":"How to transfer emails to cPanel mail account using Thunderbird","ArticleName":"How to transfer emails to cPanel mail account using Thunderbird","LiveDateTime":"02/02/1754 00:00:00","NewTillDate":null,"FeaturedTillDate":null,"ModifiedDateTime":"12/16/2021"},{"ArticleId":9405,"Title":"How to transfer emails to cPanel mail account using MacMail","ArticleName":"How to transfer emails to cPanel mail account using MacMail","LiveDateTime":"02/02/1754 00:00:00","NewTillDate":null,"FeaturedTillDate":null,"ModifiedDateTime":"12/21/2021"}],"AssociatedTags":[{"TagId":51,"Tag":"email"},{"TagId":1466,"Tag":" mail"},{"TagId":19130,"Tag":" transfer"},{"TagId":21048,"Tag":" move"},{"TagId":21049,"Tag":" migrate"}],"CategoryId":2226,"CategoryName":"Email Migration"},"status":200,"statusText":"OK"},"/api/v1/ncpl/simplekb/getcategories:\"{\\\"parentCategoryId\\\":0,\\\"getTree\\\":true}\"":{"body":[{"__type":"Nc:SimpleKB:Abstractions:Dtos:CategoryItemDto","ParentCategoryId":93,"TreatAsTopicYN":false,"Description":"","ImageUrl":"","ShortDesc":"","CategoryId":2216,"CategoryName":"Spam Protection"},{"__type":"Nc:SimpleKB:Abstractions:Dtos:CategoryItemDto","ParentCategoryId":14,"TreatAsTopicYN":false,"Description":"","ImageUrl":"","ShortDesc":"","CategoryId":2217,"CategoryName":"Renewal"},{"__type":"Nc:SimpleKB:Abstractions:Dtos:CategoryItemDto","ParentCategoryId":14,"TreatAsTopicYN":false,"Description":"","ImageUrl":"","ShortDesc":"","CategoryId":2218,"CategoryName":"cPanel SSL Plugin"},{"__type":"Nc:SimpleKB:Abstractions:Dtos:CategoryItemDto","ParentCategoryId":12,"TreatAsTopicYN":false,"Description":"","ImageUrl":"","ShortDesc":"","CategoryId":2219,"CategoryName":"PHP Configuration"},{"__type":"Nc:SimpleKB:Abstractions:Dtos:CategoryItemDto","ParentCategoryId":14,"TreatAsTopicYN":false,"Description":"","ImageUrl":"","ShortDesc":"","CategoryId":2221,"CategoryName":"Multi-Domain SSL Certificates"},{"__type":"Nc:SimpleKB:Abstractions:Dtos:CategoryItemDto","ParentCategoryId":14,"TreatAsTopicYN":false,"Description":"","ImageUrl":"","ShortDesc":"","CategoryId":2222,"CategoryName":"Cancellation"},{"__type":"Nc:SimpleKB:Abstractions:Dtos:CategoryItemDto","ParentCategoryId":14,"TreatAsTopicYN":false,"Description":"","ImageUrl":"","ShortDesc":"","CategoryId":2223,"CategoryName":"Browser errors"},{"__type":"Nc:SimpleKB:Abstractions:Dtos:CategoryItemDto","ParentCategoryId":14,"TreatAsTopicYN":false,"Description":"","ImageUrl":"","ShortDesc":"","CategoryId":2224,"CategoryName":"Site Seal, Logo"},{"__type":"Nc:SimpleKB:Abstractions:Dtos:CategoryItemDto","ParentCategoryId":12,"TreatAsTopicYN":false,"Description":"","ImageUrl":"","ShortDesc":"","CategoryId":2225,"CategoryName":"SEO"},{"__type":"Nc:SimpleKB:Abstractions:Dtos:CategoryItemDto","ParentCategoryId":93,"TreatAsTopicYN":false,"Description":"","ImageUrl":"","ShortDesc":"","CategoryId":2226,"CategoryName":"Email Migration"},{"__type":"Nc:SimpleKB:Abstractions:Dtos:CategoryItemDto","ParentCategoryId":2211,"TreatAsTopicYN":false,"Description":"","ImageUrl":"","ShortDesc":"","CategoryId":2227,"CategoryName":"SSL Resellers"},{"__type":"Nc:SimpleKB:Abstractions:Dtos:CategoryItemDto","ParentCategoryId":0,"TreatAsTopicYN":true,"Description":"","ImageUrl":"/assets/img/pictograms/150/cloud-red.png","ShortDesc":"","CategoryId":2228,"CategoryName":"Apps","SubCategories":[{"__type":"Nc:SimpleKB:Abstractions:Dtos:CategoryItemDto","ParentCategoryId":2228,"TreatAsTopicYN":false,"Description":"","ImageUrl":"","ShortDesc":"","CategoryId":2251,"CategoryName":"Supersonic CDN"},{"__type":"Nc:SimpleKB:Abstractions:Dtos:CategoryItemDto","ParentCategoryId":2228,"TreatAsTopicYN":false,"Description":"","ImageUrl":"","ShortDesc":"","CategoryId":2298,"CategoryName":"Site Maker"},{"__type":"Nc:SimpleKB:Abstractions:Dtos:CategoryItemDto","ParentCategoryId":2228,"TreatAsTopicYN":false,"Description":"","ImageUrl":"","ShortDesc":"","CategoryId":177,"CategoryName":"Google Workspace (formerly G Suite)"}]},{"__type":"Nc:SimpleKB:Abstractions:Dtos:CategoryItemDto","ParentCategoryId":2211,"TreatAsTopicYN":false,"Description":"","ImageUrl":"","ShortDesc":"","CategoryId":2229,"CategoryName":"Hosting Resellers"},{"__type":"Nc:SimpleKB:Abstractions:Dtos:CategoryItemDto","ParentCategoryId":34,"TreatAsTopicYN":false,"Description":"","ImageUrl":"","ShortDesc":"","CategoryId":2232,"CategoryName":"DNSSEC"},{"__type":"Nc:SimpleKB:Abstractions:Dtos:CategoryItemDto","ParentCategoryId":34,"TreatAsTopicYN":false,"Description":"","ImageUrl":"","ShortDesc":"","CategoryId":2234,"CategoryName":"Google Workspace (formerly G Suite)"},{"__type":"Nc:SimpleKB:Abstractions:Dtos:CategoryItemDto","ParentCategoryId":34,"TreatAsTopicYN":false,"Description":"","ImageUrl":"","ShortDesc":"","CategoryId":2237,"CategoryName":"Host records setup"},{"__type":"Nc:SimpleKB:Abstractions:Dtos:CategoryItemDto","ParentCategoryId":14,"TreatAsTopicYN":false,"Description":"","ImageUrl":"","ShortDesc":"","CategoryId":2238,"CategoryName":"SSL installation errors"},{"__type":"Nc:SimpleKB:Abstractions:Dtos:CategoryItemDto","ParentCategoryId":0,"TreatAsTopicYN":false,"Description":"","ImageUrl":"/assets/img/pictograms/150/easywp-red.png","ShortDesc":"","CategoryId":2239,"CategoryName":"EasyWP","SubCategories":[{"__type":"Nc:SimpleKB:Abstractions:Dtos:CategoryItemDto","ParentCategoryId":2239,"TreatAsTopicYN":false,"Description":"","ImageUrl":"","ShortDesc":"","CategoryId":2280,"CategoryName":"Getting Started"},{"__type":"Nc:SimpleKB:Abstractions:Dtos:CategoryItemDto","ParentCategoryId":2239,"TreatAsTopicYN":false,"Description":"","ImageUrl":"","ShortDesc":"","CategoryId":2279,"CategoryName":"General Information"},{"__type":"Nc:SimpleKB:Abstractions:Dtos:CategoryItemDto","ParentCategoryId":2239,"TreatAsTopicYN":false,"Description":"","ImageUrl":"","ShortDesc":"","CategoryId":2281,"CategoryName":"WordPress Migration"},{"__type":"Nc:SimpleKB:Abstractions:Dtos:CategoryItemDto","ParentCategoryId":2239,"TreatAsTopicYN":false,"Description":"","ImageUrl":"","ShortDesc":"","CategoryId":2282,"CategoryName":"Plugins and Themes"},{"__type":"Nc:SimpleKB:Abstractions:Dtos:CategoryItemDto","ParentCategoryId":2239,"TreatAsTopicYN":false,"Description":"","ImageUrl":"","ShortDesc":"","CategoryId":2284,"CategoryName":"WordPress Management"},{"__type":"Nc:SimpleKB:Abstractions:Dtos:CategoryItemDto","ParentCategoryId":2239,"TreatAsTopicYN":false,"Description":"","ImageUrl":"","ShortDesc":"","CategoryId":2285,"CategoryName":"SFTP and Database access"},{"__type":"Nc:SimpleKB:Abstractions:Dtos:CategoryItemDto","ParentCategoryId":2239,"TreatAsTopicYN":false,"Description":"","ImageUrl":"","ShortDesc":"","CategoryId":2286,"CategoryName":"Domains questions"},{"__type":"Nc:SimpleKB:Abstractions:Dtos:CategoryItemDto","ParentCategoryId":2239,"TreatAsTopicYN":false,"Description":"","ImageUrl":"","ShortDesc":"","CategoryId":2288,"CategoryName":"Billing questions"},{"__type":"Nc:SimpleKB:Abstractions:Dtos:CategoryItemDto","ParentCategoryId":2239,"TreatAsTopicYN":false,"Description":"","ImageUrl":"","ShortDesc":"","CategoryId":2287,"CategoryName":"SSL questions"}]},{"__type":"Nc:SimpleKB:Abstractions:Dtos:CategoryItemDto","ParentCategoryId":2228,"TreatAsTopicYN":false,"Description":"","ImageUrl":"","ShortDesc":"","CategoryId":2251,"CategoryName":"Supersonic CDN"},{"__type":"Nc:SimpleKB:Abstractions:Dtos:CategoryItemDto","ParentCategoryId":12,"TreatAsTopicYN":false,"Description":"","ImageUrl":"","ShortDesc":"","CategoryId":2252,"CategoryName":"InterWorx questions"},{"__type":"Nc:SimpleKB:Abstractions:Dtos:CategoryItemDto","ParentCategoryId":2253,"TreatAsTopicYN":false,"Description":"","ImageUrl":"","ShortDesc":"","CategoryId":2254,"CategoryName":"Domains How-To"},{"__type":"Nc:SimpleKB:Abstractions:Dtos:CategoryItemDto","ParentCategoryId":2253,"TreatAsTopicYN":false,"Description":"","ImageUrl":"","ShortDesc":"","CategoryId":2255,"CategoryName":"Hosting How-To"},{"__type":"Nc:SimpleKB:Abstractions:Dtos:CategoryItemDto","ParentCategoryId":2253,"TreatAsTopicYN":false,"Description":"","ImageUrl":"","ShortDesc":"","CategoryId":2257,"CategoryName":"Sales & Payments How-To"},{"__type":"Nc:SimpleKB:Abstractions:Dtos:CategoryItemDto","ParentCategoryId":2253,"TreatAsTopicYN":false,"Description":"","ImageUrl":"","ShortDesc":"","CategoryId":2258,"CategoryName":"cPanel Email How-To"},{"__type":"Nc:SimpleKB:Abstractions:Dtos:CategoryItemDto","ParentCategoryId":93,"TreatAsTopicYN":false,"Description":"","ImageUrl":"","ShortDesc":"","CategoryId":2260,"CategoryName":"Private Email Contacts and Calendars Setup"},{"__type":"Nc:SimpleKB:Abstractions:Dtos:CategoryItemDto","ParentCategoryId":2253,"TreatAsTopicYN":false,"Description":"","ImageUrl":"","ShortDesc":"","CategoryId":2262,"CategoryName":"EasyWP How-To"},{"__type":"Nc:SimpleKB:Abstractions:Dtos:CategoryItemDto","ParentCategoryId":0,"TreatAsTopicYN":false,"Description":"","ImageUrl":"https://download.namecheap.com/assets/img/domainvault-red@2x.png","ShortDesc":"","CategoryId":2289,"CategoryName":"Domain Vault","SubCategories":[]},{"__type":"Nc:SimpleKB:Abstractions:Dtos:CategoryItemDto","ParentCategoryId":14,"TreatAsTopicYN":false,"Description":"","ImageUrl":"","ShortDesc":"","CategoryId":2290,"CategoryName":"CSR code"},{"__type":"Nc:SimpleKB:Abstractions:Dtos:CategoryItemDto","ParentCategoryId":12,"TreatAsTopicYN":false,"Description":"","ImageUrl":"","ShortDesc":"","CategoryId":2291,"CategoryName":"Webuzo questions"},{"__type":"Nc:SimpleKB:Abstractions:Dtos:CategoryItemDto","ParentCategoryId":2265,"TreatAsTopicYN":false,"Description":"","ImageUrl":"","ShortDesc":"","CategoryId":2292,"CategoryName":"Browser Extensions"},{"__type":"Nc:SimpleKB:Abstractions:Dtos:CategoryItemDto","ParentCategoryId":14,"TreatAsTopicYN":false,"Description":"","ImageUrl":"","ShortDesc":"","CategoryId":2293,"CategoryName":"Automated SSL management"},{"__type":"Nc:SimpleKB:Abstractions:Dtos:CategoryItemDto","ParentCategoryId":2228,"TreatAsTopicYN":false,"Description":"","ImageUrl":"","ShortDesc":"","CategoryId":2298,"CategoryName":"Site Maker"},{"__type":"Nc:SimpleKB:Abstractions:Dtos:CategoryItemDto","ParentCategoryId":12,"TreatAsTopicYN":false,"Description":"","ImageUrl":"","ShortDesc":"","CategoryId":27,"CategoryName":"Getting Started"},{"__type":"Nc:SimpleKB:Abstractions:Dtos:CategoryItemDto","ParentCategoryId":0,"TreatAsTopicYN":false,"Description":"","ImageUrl":"/assets/img/pictograms/150/support-red.png","ShortDesc":"","CategoryId":5,"CategoryName":"General & Support","SubCategories":[]},{"__type":"Nc:SimpleKB:Abstractions:Dtos:CategoryItemDto","ParentCategoryId":2200,"TreatAsTopicYN":false,"Description":"","ImageUrl":"","ShortDesc":"","CategoryId":7,"CategoryName":"Billing FAQ"},{"__type":"Nc:SimpleKB:Abstractions:Dtos:CategoryItemDto","ParentCategoryId":2209,"TreatAsTopicYN":false,"Description":"","ImageUrl":"","ShortDesc":"","CategoryId":8,"CategoryName":"Transfer Information"},{"__type":"Nc:SimpleKB:Abstractions:Dtos:CategoryItemDto","ParentCategoryId":12,"TreatAsTopicYN":false,"Description":"","ImageUrl":"","ShortDesc":"","CategoryId":22,"CategoryName":"Hosting Information"},{"__type":"Nc:SimpleKB:Abstractions:Dtos:CategoryItemDto","ParentCategoryId":14,"TreatAsTopicYN":false,"Description":"","ImageUrl":"","ShortDesc":"","CategoryId":38,"CategoryName":"SSL General"},{"__type":"Nc:SimpleKB:Abstractions:Dtos:CategoryItemDto","ParentCategoryId":9,"TreatAsTopicYN":false,"Description":"","ImageUrl":"","ShortDesc":"","CategoryId":45,"CategoryName":"Account Security"},{"__type":"Nc:SimpleKB:Abstractions:Dtos:CategoryItemDto","ParentCategoryId":34,"TreatAsTopicYN":false,"Description":"","ImageUrl":"","ShortDesc":"","CategoryId":46,"CategoryName":"Domain Management"},{"__type":"Nc:SimpleKB:Abstractions:Dtos:CategoryItemDto","ParentCategoryId":2211,"TreatAsTopicYN":false,"Description":"","ImageUrl":"","ShortDesc":"","CategoryId":63,"CategoryName":"Namecheap API"},{"__type":"Nc:SimpleKB:Abstractions:Dtos:CategoryItemDto","ParentCategoryId":2228,"TreatAsTopicYN":false,"Description":"","ImageUrl":"","ShortDesc":"","CategoryId":177,"CategoryName":"Google Workspace (formerly G Suite)"},{"__type":"Nc:SimpleKB:Abstractions:Dtos:CategoryItemDto","ParentCategoryId":93,"TreatAsTopicYN":false,"Description":"","ImageUrl":"","ShortDesc":"","CategoryId":2179,"CategoryName":"Private Email: General Information"},{"__type":"Nc:SimpleKB:Abstractions:Dtos:CategoryItemDto","ParentCategoryId":2265,"TreatAsTopicYN":false,"Description":"","ImageUrl":"","ShortDesc":"","CategoryId":2274,"CategoryName":"General"},{"__type":"Nc:SimpleKB:Abstractions:Dtos:CategoryItemDto","ParentCategoryId":2239,"TreatAsTopicYN":false,"Description":"","ImageUrl":"","ShortDesc":"","CategoryId":2280,"CategoryName":"Getting Started"},{"__type":"Nc:SimpleKB:Abstractions:Dtos:CategoryItemDto","ParentCategoryId":2239,"TreatAsTopicYN":false,"Description":"","ImageUrl":"","ShortDesc":"","CategoryId":2279,"CategoryName":"General Information"},{"__type":"Nc:SimpleKB:Abstractions:Dtos:CategoryItemDto","ParentCategoryId":93,"TreatAsTopicYN":false,"Description":"","ImageUrl":"","ShortDesc":"","CategoryId":2215,"CategoryName":"Private Email: Mailbox Management"},{"__type":"Nc:SimpleKB:Abstractions:Dtos:CategoryItemDto","ParentCategoryId":2211,"TreatAsTopicYN":false,"Description":"","ImageUrl":"","ShortDesc":"","CategoryId":2196,"CategoryName":"WHMCS module for SSL"},{"__type":"Nc:SimpleKB:Abstractions:Dtos:CategoryItemDto","ParentCategoryId":0,"TreatAsTopicYN":false,"Description":"","ImageUrl":"/assets/img/pictograms/150/savings-red.png","ShortDesc":"","CategoryId":2200,"CategoryName":"Checkout & Billing","SubCategories":[{"__type":"Nc:SimpleKB:Abstractions:Dtos:CategoryItemDto","ParentCategoryId":2200,"TreatAsTopicYN":false,"Description":"","ImageUrl":"","ShortDesc":"","CategoryId":7,"CategoryName":"Billing FAQ"},{"__type":"Nc:SimpleKB:Abstractions:Dtos:CategoryItemDto","ParentCategoryId":2200,"TreatAsTopicYN":false,"Description":"","ImageUrl":"","ShortDesc":"","CategoryId":2201,"CategoryName":"Domains Billing"},{"__type":"Nc:SimpleKB:Abstractions:Dtos:CategoryItemDto","ParentCategoryId":2200,"TreatAsTopicYN":false,"Description":"","ImageUrl":"","ShortDesc":"","CategoryId":21,"CategoryName":"Hosting Billing"},{"__type":"Nc:SimpleKB:Abstractions:Dtos:CategoryItemDto","ParentCategoryId":2200,"TreatAsTopicYN":false,"Description":"","ImageUrl":"","ShortDesc":"","CategoryId":71,"CategoryName":"SSL Certificates Billing"},{"__type":"Nc:SimpleKB:Abstractions:Dtos:CategoryItemDto","ParentCategoryId":2200,"TreatAsTopicYN":false,"Description":"","ImageUrl":"","ShortDesc":"","CategoryId":2177,"CategoryName":"Private Email"}]},{"__type":"Nc:SimpleKB:Abstractions:Dtos:CategoryItemDto","ParentCategoryId":2200,"TreatAsTopicYN":false,"Description":"","ImageUrl":"","ShortDesc":"","CategoryId":2201,"CategoryName":"Domains Billing"},{"__type":"Nc:SimpleKB:Abstractions:Dtos:CategoryItemDto","ParentCategoryId":14,"TreatAsTopicYN":false,"Description":"","ImageUrl":"","ShortDesc":"","CategoryId":67,"CategoryName":"Activation"},{"__type":"Nc:SimpleKB:Abstractions:Dtos:CategoryItemDto","ParentCategoryId":2209,"TreatAsTopicYN":false,"Description":"","ImageUrl":"","ShortDesc":"","CategoryId":83,"CategoryName":"Transfer to Namecheap"},{"__type":"Nc:SimpleKB:Abstractions:Dtos:CategoryItemDto","ParentCategoryId":9,"TreatAsTopicYN":false,"Description":"","ImageUrl":"","ShortDesc":"","CategoryId":43,"CategoryName":"Profile Management"},{"__type":"Nc:SimpleKB:Abstractions:Dtos:CategoryItemDto","ParentCategoryId":34,"TreatAsTopicYN":false,"Description":"","ImageUrl":"","ShortDesc":"","CategoryId":10,"CategoryName":"DNS Questions"},{"__type":"Nc:SimpleKB:Abstractions:Dtos:CategoryItemDto","ParentCategoryId":12,"TreatAsTopicYN":false,"Description":"","ImageUrl":"","ShortDesc":"","CategoryId":29,"CategoryName":"cPanel questions"},{"__type":"Nc:SimpleKB:Abstractions:Dtos:CategoryItemDto","ParentCategoryId":2200,"TreatAsTopicYN":false,"Description":"","ImageUrl":"","ShortDesc":"","CategoryId":21,"CategoryName":"Hosting Billing"},{"__type":"Nc:SimpleKB:Abstractions:Dtos:CategoryItemDto","ParentCategoryId":34,"TreatAsTopicYN":false,"Description":"","ImageUrl":"","ShortDesc":"","CategoryId":11,"CategoryName":"Dynamic DNS"},{"__type":"Nc:SimpleKB:Abstractions:Dtos:CategoryItemDto","ParentCategoryId":9,"TreatAsTopicYN":false,"Description":"","ImageUrl":"","ShortDesc":"","CategoryId":44,"CategoryName":"Account Access"},{"__type":"Nc:SimpleKB:Abstractions:Dtos:CategoryItemDto","ParentCategoryId":2209,"TreatAsTopicYN":false,"Description":"","ImageUrl":"","ShortDesc":"","CategoryId":84,"CategoryName":"Transfer to another provider"},{"__type":"Nc:SimpleKB:Abstractions:Dtos:CategoryItemDto","ParentCategoryId":14,"TreatAsTopicYN":false,"Description":"","ImageUrl":"","ShortDesc":"","CategoryId":68,"CategoryName":"Validation"},{"__type":"Nc:SimpleKB:Abstractions:Dtos:CategoryItemDto","ParentCategoryId":12,"TreatAsTopicYN":false,"Description":"","ImageUrl":"","ShortDesc":"","CategoryId":2182,"CategoryName":"cPanel: Software Management"},{"__type":"Nc:SimpleKB:Abstractions:Dtos:CategoryItemDto","ParentCategoryId":93,"TreatAsTopicYN":false,"Description":"","ImageUrl":"","ShortDesc":"","CategoryId":2214,"CategoryName":"Email Forwarding"},{"__type":"Nc:SimpleKB:Abstractions:Dtos:CategoryItemDto","ParentCategoryId":2265,"TreatAsTopicYN":false,"Description":"","ImageUrl":"","ShortDesc":"","CategoryId":2270,"CategoryName":"Routers"},{"__type":"Nc:SimpleKB:Abstractions:Dtos:CategoryItemDto","ParentCategoryId":2239,"TreatAsTopicYN":false,"Description":"","ImageUrl":"","ShortDesc":"","CategoryId":2281,"CategoryName":"WordPress Migration"},{"__type":"Nc:SimpleKB:Abstractions:Dtos:CategoryItemDto","ParentCategoryId":2239,"TreatAsTopicYN":false,"Description":"","ImageUrl":"","ShortDesc":"","CategoryId":2282,"CategoryName":"Plugins and Themes"},{"__type":"Nc:SimpleKB:Abstractions:Dtos:CategoryItemDto","ParentCategoryId":2265,"TreatAsTopicYN":false,"Description":"","ImageUrl":"","ShortDesc":"","CategoryId":2272,"CategoryName":"TV"},{"__type":"Nc:SimpleKB:Abstractions:Dtos:CategoryItemDto","ParentCategoryId":12,"TreatAsTopicYN":false,"Description":"","ImageUrl":"","ShortDesc":"","CategoryId":2187,"CategoryName":"cPanel: WordPress"},{"__type":"Nc:SimpleKB:Abstractions:Dtos:CategoryItemDto","ParentCategoryId":2209,"TreatAsTopicYN":false,"Description":"","ImageUrl":"","ShortDesc":"","CategoryId":219,"CategoryName":"Canceled Transfers"},{"__type":"Nc:SimpleKB:Abstractions:Dtos:CategoryItemDto","ParentCategoryId":2200,"TreatAsTopicYN":false,"Description":"","ImageUrl":"","ShortDesc":"","CategoryId":71,"CategoryName":"SSL Certificates Billing"},{"__type":"Nc:SimpleKB:Abstractions:Dtos:CategoryItemDto","ParentCategoryId":93,"TreatAsTopicYN":false,"Description":"","ImageUrl":"","ShortDesc":"","CategoryId":2176,"CategoryName":"Private Email: DNS Settings"},{"__type":"Nc:SimpleKB:Abstractions:Dtos:CategoryItemDto","ParentCategoryId":14,"TreatAsTopicYN":false,"Description":"","ImageUrl":"","ShortDesc":"","CategoryId":69,"CategoryName":"Installation"},{"__type":"Nc:SimpleKB:Abstractions:Dtos:CategoryItemDto","ParentCategoryId":0,"TreatAsTopicYN":false,"Description":"","ImageUrl":"/assets/img/pictograms/150/reseller-red.png","ShortDesc":"","CategoryId":34,"CategoryName":"Domains","SubCategories":[{"__type":"Nc:SimpleKB:Abstractions:Dtos:CategoryItemDto","ParentCategoryId":34,"TreatAsTopicYN":false,"Description":"","ImageUrl":"","ShortDesc":"","CategoryId":2232,"CategoryName":"DNSSEC"},{"__type":"Nc:SimpleKB:Abstractions:Dtos:CategoryItemDto","ParentCategoryId":34,"TreatAsTopicYN":false,"Description":"","ImageUrl":"","ShortDesc":"","CategoryId":2234,"CategoryName":"Google Workspace (formerly G Suite)"},{"__type":"Nc:SimpleKB:Abstractions:Dtos:CategoryItemDto","ParentCategoryId":34,"TreatAsTopicYN":false,"Description":"","ImageUrl":"","ShortDesc":"","CategoryId":2237,"CategoryName":"Host records setup"},{"__type":"Nc:SimpleKB:Abstractions:Dtos:CategoryItemDto","ParentCategoryId":34,"TreatAsTopicYN":false,"Description":"","ImageUrl":"","ShortDesc":"","CategoryId":46,"CategoryName":"Domain Management"},{"__type":"Nc:SimpleKB:Abstractions:Dtos:CategoryItemDto","ParentCategoryId":34,"TreatAsTopicYN":false,"Description":"","ImageUrl":"","ShortDesc":"","CategoryId":10,"CategoryName":"DNS Questions"},{"__type":"Nc:SimpleKB:Abstractions:Dtos:CategoryItemDto","ParentCategoryId":34,"TreatAsTopicYN":false,"Description":"","ImageUrl":"","ShortDesc":"","CategoryId":11,"CategoryName":"Dynamic DNS"},{"__type":"Nc:SimpleKB:Abstractions:Dtos:CategoryItemDto","ParentCategoryId":34,"TreatAsTopicYN":false,"Description":"","ImageUrl":"","ShortDesc":"","CategoryId":35,"CategoryName":"Registrations"},{"__type":"Nc:SimpleKB:Abstractions:Dtos:CategoryItemDto","ParentCategoryId":34,"TreatAsTopicYN":false,"Description":"","ImageUrl":"","ShortDesc":"","CategoryId":2207,"CategoryName":"Renewal questions"},{"__type":"Nc:SimpleKB:Abstractions:Dtos:CategoryItemDto","ParentCategoryId":34,"TreatAsTopicYN":false,"Description":"","ImageUrl":"","ShortDesc":"","CategoryId":36,"CategoryName":"Domains with extended attributes"},{"__type":"Nc:SimpleKB:Abstractions:Dtos:CategoryItemDto","ParentCategoryId":34,"TreatAsTopicYN":false,"Description":"","ImageUrl":"","ShortDesc":"","CategoryId":51,"CategoryName":"FreeDNS"},{"__type":"Nc:SimpleKB:Abstractions:Dtos:CategoryItemDto","ParentCategoryId":34,"TreatAsTopicYN":false,"Description":"","ImageUrl":"","ShortDesc":"","CategoryId":15,"CategoryName":"Namecheap Market"},{"__type":"Nc:SimpleKB:Abstractions:Dtos:CategoryItemDto","ParentCategoryId":34,"TreatAsTopicYN":false,"Description":"","ImageUrl":"","ShortDesc":"","CategoryId":2208,"CategoryName":"3rd Party Services Setup"},{"__type":"Nc:SimpleKB:Abstractions:Dtos:CategoryItemDto","ParentCategoryId":34,"TreatAsTopicYN":false,"Description":"","ImageUrl":"","ShortDesc":"","CategoryId":2278,"CategoryName":"Handshake TLDs"}]},{"__type":"Nc:SimpleKB:Abstractions:Dtos:CategoryItemDto","ParentCategoryId":34,"TreatAsTopicYN":false,"Description":"","ImageUrl":"","ShortDesc":"","CategoryId":35,"CategoryName":"Registrations"},{"__type":"Nc:SimpleKB:Abstractions:Dtos:CategoryItemDto","ParentCategoryId":14,"TreatAsTopicYN":false,"Description":"","ImageUrl":"","ShortDesc":"","CategoryId":70,"CategoryName":"Reissuance"},{"__type":"Nc:SimpleKB:Abstractions:Dtos:CategoryItemDto","ParentCategoryId":0,"TreatAsTopicYN":false,"Description":"","ImageUrl":"/assets/img/pictograms/150/protection-red.png","ShortDesc":"","CategoryId":37,"CategoryName":"Domain Privacy Protection","SubCategories":[]},{"__type":"Nc:SimpleKB:Abstractions:Dtos:CategoryItemDto","ParentCategoryId":2200,"TreatAsTopicYN":false,"Description":"","ImageUrl":"","ShortDesc":"","CategoryId":2177,"CategoryName":"Private Email"},{"__type":"Nc:SimpleKB:Abstractions:Dtos:CategoryItemDto","ParentCategoryId":93,"TreatAsTopicYN":false,"Description":"","ImageUrl":"","ShortDesc":"","CategoryId":2178,"CategoryName":"Private Email: Webmail Features"},{"__type":"Nc:SimpleKB:Abstractions:Dtos:CategoryItemDto","ParentCategoryId":34,"TreatAsTopicYN":false,"Description":"","ImageUrl":"","ShortDesc":"","CategoryId":2207,"CategoryName":"Renewal questions"},{"__type":"Nc:SimpleKB:Abstractions:Dtos:CategoryItemDto","ParentCategoryId":12,"TreatAsTopicYN":false,"Description":"","ImageUrl":"","ShortDesc":"","CategoryId":2210,"CategoryName":"cPanel Add-ons"},{"__type":"Nc:SimpleKB:Abstractions:Dtos:CategoryItemDto","ParentCategoryId":2265,"TreatAsTopicYN":false,"Description":"","ImageUrl":"","ShortDesc":"","CategoryId":2273,"CategoryName":"Gaming Consoles"},{"__type":"Nc:SimpleKB:Abstractions:Dtos:CategoryItemDto","ParentCategoryId":2239,"TreatAsTopicYN":false,"Description":"","ImageUrl":"","ShortDesc":"","CategoryId":2284,"CategoryName":"WordPress Management"},{"__type":"Nc:SimpleKB:Abstractions:Dtos:CategoryItemDto","ParentCategoryId":2239,"TreatAsTopicYN":false,"Description":"","ImageUrl":"","ShortDesc":"","CategoryId":2285,"CategoryName":"SFTP and Database access"},{"__type":"Nc:SimpleKB:Abstractions:Dtos:CategoryItemDto","ParentCategoryId":2265,"TreatAsTopicYN":false,"Description":"","ImageUrl":"","ShortDesc":"","CategoryId":2268,"CategoryName":"macOS"},{"__type":"Nc:SimpleKB:Abstractions:Dtos:CategoryItemDto","ParentCategoryId":93,"TreatAsTopicYN":false,"Description":"","ImageUrl":"","ShortDesc":"","CategoryId":2175,"CategoryName":"Private Email: Client Setup"},{"__type":"Nc:SimpleKB:Abstractions:Dtos:CategoryItemDto","ParentCategoryId":0,"TreatAsTopicYN":false,"Description":"","ImageUrl":"/assets/img/pictograms/150/status-red.png","ShortDesc":"","CategoryId":2209,"CategoryName":"Domain Transfers","SubCategories":[{"__type":"Nc:SimpleKB:Abstractions:Dtos:CategoryItemDto","ParentCategoryId":2209,"TreatAsTopicYN":false,"Description":"","ImageUrl":"","ShortDesc":"","CategoryId":8,"CategoryName":"Transfer Information"},{"__type":"Nc:SimpleKB:Abstractions:Dtos:CategoryItemDto","ParentCategoryId":2209,"TreatAsTopicYN":false,"Description":"","ImageUrl":"","ShortDesc":"","CategoryId":83,"CategoryName":"Transfer to Namecheap"},{"__type":"Nc:SimpleKB:Abstractions:Dtos:CategoryItemDto","ParentCategoryId":2209,"TreatAsTopicYN":false,"Description":"","ImageUrl":"","ShortDesc":"","CategoryId":84,"CategoryName":"Transfer to another provider"},{"__type":"Nc:SimpleKB:Abstractions:Dtos:CategoryItemDto","ParentCategoryId":2209,"TreatAsTopicYN":false,"Description":"","ImageUrl":"","ShortDesc":"","CategoryId":219,"CategoryName":"Canceled Transfers"}]},{"__type":"Nc:SimpleKB:Abstractions:Dtos:CategoryItemDto","ParentCategoryId":12,"TreatAsTopicYN":false,"Description":"","ImageUrl":"","ShortDesc":"","CategoryId":48,"CategoryName":"VPS"},{"__type":"Nc:SimpleKB:Abstractions:Dtos:CategoryItemDto","ParentCategoryId":34,"TreatAsTopicYN":false,"Description":"","ImageUrl":"","ShortDesc":"","CategoryId":36,"CategoryName":"Domains with extended attributes"},{"__type":"Nc:SimpleKB:Abstractions:Dtos:CategoryItemDto","ParentCategoryId":0,"TreatAsTopicYN":true,"Description":"","ImageUrl":"/assets/img/pictograms/150/server-red.png","ShortDesc":"","CategoryId":12,"CategoryName":"Hosting","SubCategories":[{"__type":"Nc:SimpleKB:Abstractions:Dtos:CategoryItemDto","ParentCategoryId":12,"TreatAsTopicYN":false,"Description":"","ImageUrl":"","ShortDesc":"","CategoryId":2219,"CategoryName":"PHP Configuration"},{"__type":"Nc:SimpleKB:Abstractions:Dtos:CategoryItemDto","ParentCategoryId":12,"TreatAsTopicYN":false,"Description":"","ImageUrl":"","ShortDesc":"","CategoryId":2225,"CategoryName":"SEO"},{"__type":"Nc:SimpleKB:Abstractions:Dtos:CategoryItemDto","ParentCategoryId":12,"TreatAsTopicYN":false,"Description":"","ImageUrl":"","ShortDesc":"","CategoryId":2252,"CategoryName":"InterWorx questions"},{"__type":"Nc:SimpleKB:Abstractions:Dtos:CategoryItemDto","ParentCategoryId":12,"TreatAsTopicYN":false,"Description":"","ImageUrl":"","ShortDesc":"","CategoryId":2291,"CategoryName":"Webuzo questions"},{"__type":"Nc:SimpleKB:Abstractions:Dtos:CategoryItemDto","ParentCategoryId":12,"TreatAsTopicYN":false,"Description":"","ImageUrl":"","ShortDesc":"","CategoryId":27,"CategoryName":"Getting Started"},{"__type":"Nc:SimpleKB:Abstractions:Dtos:CategoryItemDto","ParentCategoryId":12,"TreatAsTopicYN":false,"Description":"","ImageUrl":"","ShortDesc":"","CategoryId":22,"CategoryName":"Hosting Information"},{"__type":"Nc:SimpleKB:Abstractions:Dtos:CategoryItemDto","ParentCategoryId":12,"TreatAsTopicYN":false,"Description":"","ImageUrl":"","ShortDesc":"","CategoryId":29,"CategoryName":"cPanel questions"},{"__type":"Nc:SimpleKB:Abstractions:Dtos:CategoryItemDto","ParentCategoryId":12,"TreatAsTopicYN":false,"Description":"","ImageUrl":"","ShortDesc":"","CategoryId":2182,"CategoryName":"cPanel: Software Management"},{"__type":"Nc:SimpleKB:Abstractions:Dtos:CategoryItemDto","ParentCategoryId":12,"TreatAsTopicYN":false,"Description":"","ImageUrl":"","ShortDesc":"","CategoryId":2187,"CategoryName":"cPanel: WordPress"},{"__type":"Nc:SimpleKB:Abstractions:Dtos:CategoryItemDto","ParentCategoryId":12,"TreatAsTopicYN":false,"Description":"","ImageUrl":"","ShortDesc":"","CategoryId":2210,"CategoryName":"cPanel Add-ons"},{"__type":"Nc:SimpleKB:Abstractions:Dtos:CategoryItemDto","ParentCategoryId":12,"TreatAsTopicYN":false,"Description":"","ImageUrl":"","ShortDesc":"","CategoryId":48,"CategoryName":"VPS"},{"__type":"Nc:SimpleKB:Abstractions:Dtos:CategoryItemDto","ParentCategoryId":12,"TreatAsTopicYN":false,"Description":"","ImageUrl":"","ShortDesc":"","CategoryId":2188,"CategoryName":"Dedicated Server"},{"__type":"Nc:SimpleKB:Abstractions:Dtos:CategoryItemDto","ParentCategoryId":12,"TreatAsTopicYN":false,"Description":"","ImageUrl":"","ShortDesc":"","CategoryId":30,"CategoryName":"WHM questions"},{"__type":"Nc:SimpleKB:Abstractions:Dtos:CategoryItemDto","ParentCategoryId":12,"TreatAsTopicYN":false,"Description":"","ImageUrl":"","ShortDesc":"","CategoryId":32,"CategoryName":"DNS settings"},{"__type":"Nc:SimpleKB:Abstractions:Dtos:CategoryItemDto","ParentCategoryId":12,"TreatAsTopicYN":false,"Description":"","ImageUrl":"","ShortDesc":"","CategoryId":103,"CategoryName":"LVE (CloudLinux)"},{"__type":"Nc:SimpleKB:Abstractions:Dtos:CategoryItemDto","ParentCategoryId":12,"TreatAsTopicYN":false,"Description":"","ImageUrl":"","ShortDesc":"","CategoryId":89,"CategoryName":"SSH Access"},{"__type":"Nc:SimpleKB:Abstractions:Dtos:CategoryItemDto","ParentCategoryId":12,"TreatAsTopicYN":false,"Description":"","ImageUrl":"","ShortDesc":"","CategoryId":205,"CategoryName":"FTP questions"},{"__type":"Nc:SimpleKB:Abstractions:Dtos:CategoryItemDto","ParentCategoryId":12,"TreatAsTopicYN":false,"Description":"","ImageUrl":"","ShortDesc":"","CategoryId":2180,"CategoryName":"MySQL questions"},{"__type":"Nc:SimpleKB:Abstractions:Dtos:CategoryItemDto","ParentCategoryId":12,"TreatAsTopicYN":false,"Description":"","ImageUrl":"","ShortDesc":"","CategoryId":2199,"CategoryName":"Hosting Migration"},{"__type":"Nc:SimpleKB:Abstractions:Dtos:CategoryItemDto","ParentCategoryId":12,"TreatAsTopicYN":false,"Description":"","ImageUrl":"","ShortDesc":"","CategoryId":2194,"CategoryName":"Tips & Tricks"},{"__type":"Nc:SimpleKB:Abstractions:Dtos:CategoryItemDto","ParentCategoryId":12,"TreatAsTopicYN":false,"Description":"","ImageUrl":"","ShortDesc":"","CategoryId":239,"CategoryName":"WHMCS"},{"__type":"Nc:SimpleKB:Abstractions:Dtos:CategoryItemDto","ParentCategoryId":12,"TreatAsTopicYN":false,"Description":"","ImageUrl":"","ShortDesc":"","CategoryId":33,"CategoryName":"SSL Installation"}]},{"__type":"Nc:SimpleKB:Abstractions:Dtos:CategoryItemDto","ParentCategoryId":93,"TreatAsTopicYN":false,"Description":"","ImageUrl":"","ShortDesc":"","CategoryId":2171,"CategoryName":"Private Email: Active Sync (Exchange) Setup"},{"__type":"Nc:SimpleKB:Abstractions:Dtos:CategoryItemDto","ParentCategoryId":12,"TreatAsTopicYN":false,"Description":"","ImageUrl":"","ShortDesc":"","CategoryId":2188,"CategoryName":"Dedicated Server"},{"__type":"Nc:SimpleKB:Abstractions:Dtos:CategoryItemDto","ParentCategoryId":2265,"TreatAsTopicYN":false,"Description":"","ImageUrl":"","ShortDesc":"","CategoryId":2269,"CategoryName":"iOS"},{"__type":"Nc:SimpleKB:Abstractions:Dtos:CategoryItemDto","ParentCategoryId":2239,"TreatAsTopicYN":false,"Description":"","ImageUrl":"","ShortDesc":"","CategoryId":2286,"CategoryName":"Domains questions"},{"__type":"Nc:SimpleKB:Abstractions:Dtos:CategoryItemDto","ParentCategoryId":2239,"TreatAsTopicYN":false,"Description":"","ImageUrl":"","ShortDesc":"","CategoryId":2288,"CategoryName":"Billing questions"},{"__type":"Nc:SimpleKB:Abstractions:Dtos:CategoryItemDto","ParentCategoryId":2265,"TreatAsTopicYN":false,"Description":"","ImageUrl":"","ShortDesc":"","CategoryId":2271,"CategoryName":"Linux"},{"__type":"Nc:SimpleKB:Abstractions:Dtos:CategoryItemDto","ParentCategoryId":12,"TreatAsTopicYN":false,"Description":"","ImageUrl":"","ShortDesc":"","CategoryId":30,"CategoryName":"WHM questions"},{"__type":"Nc:SimpleKB:Abstractions:Dtos:CategoryItemDto","ParentCategoryId":93,"TreatAsTopicYN":false,"Description":"","ImageUrl":"","ShortDesc":"","CategoryId":31,"CategoryName":"cPanel Email FAQs"},{"__type":"Nc:SimpleKB:Abstractions:Dtos:CategoryItemDto","ParentCategoryId":34,"TreatAsTopicYN":false,"Description":"","ImageUrl":"","ShortDesc":"","CategoryId":51,"CategoryName":"FreeDNS"},{"__type":"Nc:SimpleKB:Abstractions:Dtos:CategoryItemDto","ParentCategoryId":0,"TreatAsTopicYN":false,"Description":"","ImageUrl":"/assets/img/pictograms/150/email-red.png","ShortDesc":"","CategoryId":93,"CategoryName":"Email service","SubCategories":[{"__type":"Nc:SimpleKB:Abstractions:Dtos:CategoryItemDto","ParentCategoryId":93,"TreatAsTopicYN":false,"Description":"","ImageUrl":"","ShortDesc":"","CategoryId":2216,"CategoryName":"Spam Protection"},{"__type":"Nc:SimpleKB:Abstractions:Dtos:CategoryItemDto","ParentCategoryId":93,"TreatAsTopicYN":false,"Description":"","ImageUrl":"","ShortDesc":"","CategoryId":2226,"CategoryName":"Email Migration"},{"__type":"Nc:SimpleKB:Abstractions:Dtos:CategoryItemDto","ParentCategoryId":93,"TreatAsTopicYN":false,"Description":"","ImageUrl":"","ShortDesc":"","CategoryId":2260,"CategoryName":"Private Email Contacts and Calendars Setup"},{"__type":"Nc:SimpleKB:Abstractions:Dtos:CategoryItemDto","ParentCategoryId":93,"TreatAsTopicYN":false,"Description":"","ImageUrl":"","ShortDesc":"","CategoryId":2179,"CategoryName":"Private Email: General Information"},{"__type":"Nc:SimpleKB:Abstractions:Dtos:CategoryItemDto","ParentCategoryId":93,"TreatAsTopicYN":false,"Description":"","ImageUrl":"","ShortDesc":"","CategoryId":2215,"CategoryName":"Private Email: Mailbox Management"},{"__type":"Nc:SimpleKB:Abstractions:Dtos:CategoryItemDto","ParentCategoryId":93,"TreatAsTopicYN":false,"Description":"","ImageUrl":"","ShortDesc":"","CategoryId":2214,"CategoryName":"Email Forwarding"},{"__type":"Nc:SimpleKB:Abstractions:Dtos:CategoryItemDto","ParentCategoryId":93,"TreatAsTopicYN":false,"Description":"","ImageUrl":"","ShortDesc":"","CategoryId":2176,"CategoryName":"Private Email: DNS Settings"},{"__type":"Nc:SimpleKB:Abstractions:Dtos:CategoryItemDto","ParentCategoryId":93,"TreatAsTopicYN":false,"Description":"","ImageUrl":"","ShortDesc":"","CategoryId":2178,"CategoryName":"Private Email: Webmail Features"},{"__type":"Nc:SimpleKB:Abstractions:Dtos:CategoryItemDto","ParentCategoryId":93,"TreatAsTopicYN":false,"Description":"","ImageUrl":"","ShortDesc":"","CategoryId":2175,"CategoryName":"Private Email: Client Setup"},{"__type":"Nc:SimpleKB:Abstractions:Dtos:CategoryItemDto","ParentCategoryId":93,"TreatAsTopicYN":false,"Description":"","ImageUrl":"","ShortDesc":"","CategoryId":2171,"CategoryName":"Private Email: Active Sync (Exchange) Setup"},{"__type":"Nc:SimpleKB:Abstractions:Dtos:CategoryItemDto","ParentCategoryId":93,"TreatAsTopicYN":false,"Description":"","ImageUrl":"","ShortDesc":"","CategoryId":31,"CategoryName":"cPanel Email FAQs"},{"__type":"Nc:SimpleKB:Abstractions:Dtos:CategoryItemDto","ParentCategoryId":93,"TreatAsTopicYN":false,"Description":"","ImageUrl":"","ShortDesc":"","CategoryId":2186,"CategoryName":"cPanel Email: Client Setup"},{"__type":"Nc:SimpleKB:Abstractions:Dtos:CategoryItemDto","ParentCategoryId":93,"TreatAsTopicYN":false,"Description":"","ImageUrl":"","ShortDesc":"","CategoryId":2204,"CategoryName":"Private Email: Video Overview"}]},{"__type":"Nc:SimpleKB:Abstractions:Dtos:CategoryItemDto","ParentCategoryId":12,"TreatAsTopicYN":false,"Description":"","ImageUrl":"","ShortDesc":"","CategoryId":32,"CategoryName":"DNS settings"},{"__type":"Nc:SimpleKB:Abstractions:Dtos:CategoryItemDto","ParentCategoryId":34,"TreatAsTopicYN":false,"Description":"","ImageUrl":"","ShortDesc":"","CategoryId":15,"CategoryName":"Namecheap Market"},{"__type":"Nc:SimpleKB:Abstractions:Dtos:CategoryItemDto","ParentCategoryId":93,"TreatAsTopicYN":false,"Description":"","ImageUrl":"","ShortDesc":"","CategoryId":2186,"CategoryName":"cPanel Email: Client Setup"},{"__type":"Nc:SimpleKB:Abstractions:Dtos:CategoryItemDto","ParentCategoryId":2265,"TreatAsTopicYN":false,"Description":"","ImageUrl":"","ShortDesc":"","CategoryId":2266,"CategoryName":"Windows"},{"__type":"Nc:SimpleKB:Abstractions:Dtos:CategoryItemDto","ParentCategoryId":2239,"TreatAsTopicYN":false,"Description":"","ImageUrl":"","ShortDesc":"","CategoryId":2287,"CategoryName":"SSL questions"},{"__type":"Nc:SimpleKB:Abstractions:Dtos:CategoryItemDto","ParentCategoryId":2265,"TreatAsTopicYN":false,"Description":"","ImageUrl":"","ShortDesc":"","CategoryId":2267,"CategoryName":"Android"},{"__type":"Nc:SimpleKB:Abstractions:Dtos:CategoryItemDto","ParentCategoryId":34,"TreatAsTopicYN":false,"Description":"","ImageUrl":"","ShortDesc":"","CategoryId":2208,"CategoryName":"3rd Party Services Setup"},{"__type":"Nc:SimpleKB:Abstractions:Dtos:CategoryItemDto","ParentCategoryId":93,"TreatAsTopicYN":false,"Description":"","ImageUrl":"","ShortDesc":"","CategoryId":2204,"CategoryName":"Private Email: Video Overview"},{"__type":"Nc:SimpleKB:Abstractions:Dtos:CategoryItemDto","ParentCategoryId":0,"TreatAsTopicYN":false,"Description":"","ImageUrl":"/assets/img/pictograms/150/security-red.png","ShortDesc":"","CategoryId":14,"CategoryName":"SSL Certificates","SubCategories":[{"__type":"Nc:SimpleKB:Abstractions:Dtos:CategoryItemDto","ParentCategoryId":14,"TreatAsTopicYN":false,"Description":"","ImageUrl":"","ShortDesc":"","CategoryId":2217,"CategoryName":"Renewal"},{"__type":"Nc:SimpleKB:Abstractions:Dtos:CategoryItemDto","ParentCategoryId":14,"TreatAsTopicYN":false,"Description":"","ImageUrl":"","ShortDesc":"","CategoryId":2218,"CategoryName":"cPanel SSL Plugin"},{"__type":"Nc:SimpleKB:Abstractions:Dtos:CategoryItemDto","ParentCategoryId":14,"TreatAsTopicYN":false,"Description":"","ImageUrl":"","ShortDesc":"","CategoryId":2221,"CategoryName":"Multi-Domain SSL Certificates"},{"__type":"Nc:SimpleKB:Abstractions:Dtos:CategoryItemDto","ParentCategoryId":14,"TreatAsTopicYN":false,"Description":"","ImageUrl":"","ShortDesc":"","CategoryId":2222,"CategoryName":"Cancellation"},{"__type":"Nc:SimpleKB:Abstractions:Dtos:CategoryItemDto","ParentCategoryId":14,"TreatAsTopicYN":false,"Description":"","ImageUrl":"","ShortDesc":"","CategoryId":2223,"CategoryName":"Browser errors"},{"__type":"Nc:SimpleKB:Abstractions:Dtos:CategoryItemDto","ParentCategoryId":14,"TreatAsTopicYN":false,"Description":"","ImageUrl":"","ShortDesc":"","CategoryId":2224,"CategoryName":"Site Seal, Logo"},{"__type":"Nc:SimpleKB:Abstractions:Dtos:CategoryItemDto","ParentCategoryId":14,"TreatAsTopicYN":false,"Description":"","ImageUrl":"","ShortDesc":"","CategoryId":2238,"CategoryName":"SSL installation errors"},{"__type":"Nc:SimpleKB:Abstractions:Dtos:CategoryItemDto","ParentCategoryId":14,"TreatAsTopicYN":false,"Description":"","ImageUrl":"","ShortDesc":"","CategoryId":2290,"CategoryName":"CSR code"},{"__type":"Nc:SimpleKB:Abstractions:Dtos:CategoryItemDto","ParentCategoryId":14,"TreatAsTopicYN":false,"Description":"","ImageUrl":"","ShortDesc":"","CategoryId":2293,"CategoryName":"Automated SSL management"},{"__type":"Nc:SimpleKB:Abstractions:Dtos:CategoryItemDto","ParentCategoryId":14,"TreatAsTopicYN":false,"Description":"","ImageUrl":"","ShortDesc":"","CategoryId":38,"CategoryName":"SSL General"},{"__type":"Nc:SimpleKB:Abstractions:Dtos:CategoryItemDto","ParentCategoryId":14,"TreatAsTopicYN":false,"Description":"","ImageUrl":"","ShortDesc":"","CategoryId":67,"CategoryName":"Activation"},{"__type":"Nc:SimpleKB:Abstractions:Dtos:CategoryItemDto","ParentCategoryId":14,"TreatAsTopicYN":false,"Description":"","ImageUrl":"","ShortDesc":"","CategoryId":68,"CategoryName":"Validation"},{"__type":"Nc:SimpleKB:Abstractions:Dtos:CategoryItemDto","ParentCategoryId":14,"TreatAsTopicYN":false,"Description":"","ImageUrl":"","ShortDesc":"","CategoryId":69,"CategoryName":"Installation"},{"__type":"Nc:SimpleKB:Abstractions:Dtos:CategoryItemDto","ParentCategoryId":14,"TreatAsTopicYN":false,"Description":"","ImageUrl":"","ShortDesc":"","CategoryId":70,"CategoryName":"Reissuance"}]},{"__type":"Nc:SimpleKB:Abstractions:Dtos:CategoryItemDto","ParentCategoryId":0,"TreatAsTopicYN":true,"Description":"","ImageUrl":"/assets/img/pictograms/150/performance-red.png","ShortDesc":"","CategoryId":9,"CategoryName":"My Account","SubCategories":[{"__type":"Nc:SimpleKB:Abstractions:Dtos:CategoryItemDto","ParentCategoryId":9,"TreatAsTopicYN":false,"Description":"","ImageUrl":"","ShortDesc":"","CategoryId":45,"CategoryName":"Account Security"},{"__type":"Nc:SimpleKB:Abstractions:Dtos:CategoryItemDto","ParentCategoryId":9,"TreatAsTopicYN":false,"Description":"","ImageUrl":"","ShortDesc":"","CategoryId":43,"CategoryName":"Profile Management"},{"__type":"Nc:SimpleKB:Abstractions:Dtos:CategoryItemDto","ParentCategoryId":9,"TreatAsTopicYN":false,"Description":"","ImageUrl":"","ShortDesc":"","CategoryId":44,"CategoryName":"Account Access"}]},{"__type":"Nc:SimpleKB:Abstractions:Dtos:CategoryItemDto","ParentCategoryId":34,"TreatAsTopicYN":false,"Description":"","ImageUrl":"","ShortDesc":"","CategoryId":2278,"CategoryName":"Handshake TLDs"},{"__type":"Nc:SimpleKB:Abstractions:Dtos:CategoryItemDto","ParentCategoryId":12,"TreatAsTopicYN":false,"Description":"","ImageUrl":"","ShortDesc":"","CategoryId":103,"CategoryName":"LVE (CloudLinux)"},{"__type":"Nc:SimpleKB:Abstractions:Dtos:CategoryItemDto","ParentCategoryId":0,"TreatAsTopicYN":false,"Description":"","ImageUrl":"/assets/img/pictograms/150/affiliates-red.png","ShortDesc":"","CategoryId":55,"CategoryName":"Affiliates","SubCategories":[]},{"__type":"Nc:SimpleKB:Abstractions:Dtos:CategoryItemDto","ParentCategoryId":12,"TreatAsTopicYN":false,"Description":"","ImageUrl":"","ShortDesc":"","CategoryId":89,"CategoryName":"SSH Access"},{"__type":"Nc:SimpleKB:Abstractions:Dtos:CategoryItemDto","ParentCategoryId":0,"TreatAsTopicYN":false,"Description":"","ImageUrl":"/assets/img/pictograms/150/tools-red.png","ShortDesc":"","CategoryId":2211,"CategoryName":"API & Resellers","SubCategories":[{"__type":"Nc:SimpleKB:Abstractions:Dtos:CategoryItemDto","ParentCategoryId":2211,"TreatAsTopicYN":false,"Description":"","ImageUrl":"","ShortDesc":"","CategoryId":2227,"CategoryName":"SSL Resellers"},{"__type":"Nc:SimpleKB:Abstractions:Dtos:CategoryItemDto","ParentCategoryId":2211,"TreatAsTopicYN":false,"Description":"","ImageUrl":"","ShortDesc":"","CategoryId":2229,"CategoryName":"Hosting Resellers"},{"__type":"Nc:SimpleKB:Abstractions:Dtos:CategoryItemDto","ParentCategoryId":2211,"TreatAsTopicYN":false,"Description":"","ImageUrl":"","ShortDesc":"","CategoryId":63,"CategoryName":"Namecheap API"},{"__type":"Nc:SimpleKB:Abstractions:Dtos:CategoryItemDto","ParentCategoryId":2211,"TreatAsTopicYN":false,"Description":"","ImageUrl":"","ShortDesc":"","CategoryId":2196,"CategoryName":"WHMCS module for SSL"}]},{"__type":"Nc:SimpleKB:Abstractions:Dtos:CategoryItemDto","ParentCategoryId":0,"TreatAsTopicYN":false,"Description":"","ImageUrl":"/assets/img/pictograms/150/timer-red.png","ShortDesc":"","CategoryId":2212,"CategoryName":"Legacy Products","SubCategories":[]},{"__type":"Nc:SimpleKB:Abstractions:Dtos:CategoryItemDto","ParentCategoryId":12,"TreatAsTopicYN":false,"Description":"","ImageUrl":"","ShortDesc":"","CategoryId":205,"CategoryName":"FTP questions"},{"__type":"Nc:SimpleKB:Abstractions:Dtos:CategoryItemDto","ParentCategoryId":12,"TreatAsTopicYN":false,"Description":"","ImageUrl":"","ShortDesc":"","CategoryId":2180,"CategoryName":"MySQL questions"},{"__type":"Nc:SimpleKB:Abstractions:Dtos:CategoryItemDto","ParentCategoryId":12,"TreatAsTopicYN":false,"Description":"","ImageUrl":"","ShortDesc":"","CategoryId":2199,"CategoryName":"Hosting Migration"},{"__type":"Nc:SimpleKB:Abstractions:Dtos:CategoryItemDto","ParentCategoryId":0,"TreatAsTopicYN":false,"Description":"","ImageUrl":"/assets/img/pictograms/150/premiumdns-red.png","ShortDesc":"","CategoryId":2231,"CategoryName":"PremiumDNS","SubCategories":[]},{"__type":"Nc:SimpleKB:Abstractions:Dtos:CategoryItemDto","ParentCategoryId":12,"TreatAsTopicYN":false,"Description":"","ImageUrl":"","ShortDesc":"","CategoryId":2194,"CategoryName":"Tips & Tricks"},{"__type":"Nc:SimpleKB:Abstractions:Dtos:CategoryItemDto","ParentCategoryId":0,"TreatAsTopicYN":false,"Description":"","ImageUrl":"https://static.nc-img.com/live-resource/icons/knowledgebase/fastVPN_icon-150px.png","ShortDesc":"","CategoryId":2265,"CategoryName":"FastVPN","SubCategories":[{"__type":"Nc:SimpleKB:Abstractions:Dtos:CategoryItemDto","ParentCategoryId":2265,"TreatAsTopicYN":false,"Description":"","ImageUrl":"","ShortDesc":"","CategoryId":2292,"CategoryName":"Browser Extensions"},{"__type":"Nc:SimpleKB:Abstractions:Dtos:CategoryItemDto","ParentCategoryId":2265,"TreatAsTopicYN":false,"Description":"","ImageUrl":"","ShortDesc":"","CategoryId":2274,"CategoryName":"General"},{"__type":"Nc:SimpleKB:Abstractions:Dtos:CategoryItemDto","ParentCategoryId":2265,"TreatAsTopicYN":false,"Description":"","ImageUrl":"","ShortDesc":"","CategoryId":2270,"CategoryName":"Routers"},{"__type":"Nc:SimpleKB:Abstractions:Dtos:CategoryItemDto","ParentCategoryId":2265,"TreatAsTopicYN":false,"Description":"","ImageUrl":"","ShortDesc":"","CategoryId":2272,"CategoryName":"TV"},{"__type":"Nc:SimpleKB:Abstractions:Dtos:CategoryItemDto","ParentCategoryId":2265,"TreatAsTopicYN":false,"Description":"","ImageUrl":"","ShortDesc":"","CategoryId":2273,"CategoryName":"Gaming Consoles"},{"__type":"Nc:SimpleKB:Abstractions:Dtos:CategoryItemDto","ParentCategoryId":2265,"TreatAsTopicYN":false,"Description":"","ImageUrl":"","ShortDesc":"","CategoryId":2268,"CategoryName":"macOS"},{"__type":"Nc:SimpleKB:Abstractions:Dtos:CategoryItemDto","ParentCategoryId":2265,"TreatAsTopicYN":false,"Description":"","ImageUrl":"","ShortDesc":"","CategoryId":2269,"CategoryName":"iOS"},{"__type":"Nc:SimpleKB:Abstractions:Dtos:CategoryItemDto","ParentCategoryId":2265,"TreatAsTopicYN":false,"Description":"","ImageUrl":"","ShortDesc":"","CategoryId":2271,"CategoryName":"Linux"},{"__type":"Nc:SimpleKB:Abstractions:Dtos:CategoryItemDto","ParentCategoryId":2265,"TreatAsTopicYN":false,"Description":"","ImageUrl":"","ShortDesc":"","CategoryId":2266,"CategoryName":"Windows"},{"__type":"Nc:SimpleKB:Abstractions:Dtos:CategoryItemDto","ParentCategoryId":2265,"TreatAsTopicYN":false,"Description":"","ImageUrl":"","ShortDesc":"","CategoryId":2267,"CategoryName":"Android"}]},{"__type":"Nc:SimpleKB:Abstractions:Dtos:CategoryItemDto","ParentCategoryId":12,"TreatAsTopicYN":false,"Description":"","ImageUrl":"","ShortDesc":"","CategoryId":239,"CategoryName":"WHMCS"},{"__type":"Nc:SimpleKB:Abstractions:Dtos:CategoryItemDto","ParentCategoryId":12,"TreatAsTopicYN":false,"Description":"","ImageUrl":"","ShortDesc":"","CategoryId":33,"CategoryName":"SSL Installation"}],"status":200,"statusText":"OK"}}Using the Add mail account option
Using the Add mail account option








Need help? We're always here for you.