Installing an SSL certificate on Ubiquiti Unifi

Having trouble with your SSL? We have an installation service for that.


Unifi Dream Machine (UDM)
is the latest version of network management hardware created by UniFi. It usually comes with UniFi OS (a version of a Debian-based Linux Operating System). It has two variations: UDM-base, which is technically a modification of older UniFi controllers, and UDM-Pro, which has its own graphical interface for added ease of use.

Installing SSL on UDM-base

Official documentation for the UniFi controller includes one method of installing an SSL. This method is relatively simple; however, there is a common issue involving an error message that doesn’t indicate the actual root.

This guide outlines various alternative installation methods, shows how to fix common errors, and provides useful security enhancement tips.


Important note
: Sometimes, a default certificate on the server might be used instead of the one you install, which may cause security warnings in browsers. To avoid this issue, regardless of what installation method you use, please complete the below steps first:
  • Connect to UniFi.
  • Stop UniFi Controller by running:

    unifi-os stop

  • Remove the symbolic link to the default certificate file and copy the actual certificate file via:

    rm /usr/lib/unifi/data/keystore && cp /etc/ssl/private/unifi.keystore.jks /usr/lib/unifi/data/keystore

  • Comment out or remove the following line in /etc/default/unifi
    UNIFI_SSL_KEYSTORE=/etc/ssl/private/unifi.keystore.jks

  • Restart UniFI Controller using this command:

    unifi-os restart

  • Proceed with SSL setup using one of the below methods

Please note, that the part /etc/ssl/private/unifi.keystore.jks should be replaced with the path to your new Keystore where the new certificate files are located.


Standard method with ace.jar

This method is generally recommended, although it has some peculiarities, so it isn't always the most reliable.

The certificate should be installed in the folder where the CSR code was generated. Follow the steps below to complete the SSL installation using ace.jar:

  1. Connect to your server through the command prompt.
    • On Linux-based or Windows-based servers, you can use Putty or a similar application.
    • On MacOS, run the Terminal application.
    • On the Windows server, run cmd or PowerShell (connected via remote desktop if needed).

    Important: Make sure to start the application with administrator rights on Windows. To do this, right-click on the program icon and choose the Run as administrator option or do it this way:
    Properties >> Compatibility >> mark the Run this program as an administrator >> OK.

    On Linux/MacOS, you should have root or sudo user access. For this, run the following command:

    sudo su -

  2. To start the installation, open the UniFi shell to access the UDM files:

    unifi-os shell

  3. Go to the UDM-base main folder by running:

    cd
     /usr/lib/unifi/

  4. Upload the following files from your received SSL archive in the UniFi base folder:

    • Security certificate file in PEM format (the .crt file received from the Certificate Authority);
    • Root certificate;
    • Intermediate certificates.

    Use the following command:

    java -jar lib/ace.jar import_cert *your certificate*.crt SectigoRSADomainValidationSecureServerCA.crt USERTrustRSAAddTrustCA.crt addtrustexternalcaroot.crt

    Where *your certificate* is replaced with your actual file name.

    If you received the intermediate and root certificates in one bundled file (.ca-bundle), you can download them separately here.

    Note: that the example command above contains intermediate certificates for the standard Domain Validation type SSL.

  5. After you run the command, UniFi will ask you to enter the keystore password. Use "aircontrolenterprise" (unless you changed it manually in your UniFi settings) and confirm the certificate's import.

    Keep in mind that some server versions may require the whole CA Bundle to be uploaded as a single file. In such a case, you can download the corresponding bundle following the instructions in this article and use the following command:

    java -jar lib/ace.jar import_cert *your certificate*.crt bundle.crt

  6. Restart UDM-base to apply the changes:

    unifi-os restart

    You can check the installation here.


    Important: There is a known bug on some common modern UniFi versions: after importing the files to the server, the error, "Unable to import the certificate into keystore" appears.

    This is because on some UniFi versions, ace.jar is unable to parse the new string (\n) symbol.

    On Linux and MacOS, this issue can be resolved by removing these symbols with a simple command:

    tr -d '\n\r' < *file name* > *temporary file name* && mv *temporary file name* *file name*

    Solution: Replace the *file name* with the actual name of the required file. Apply the command to your certificate, to each of the intermediate certificates, and the root certificate.

    The *temporary file name* value is required as a temporary file because the command does not allow it to save the modified content in the same file directly. Therefore it’s necessary to save it in a temporary place and then replace the old one with it.

    Alternatively, you can use this command:

    tr -d '\n\r' < *file name* | echo $(cat -) > *file name*

    On Windows, the certificate files can be fixed by using Notepad++:

    • Open the file with a text editor.

    • Click ctrl+F and go to the tab Replace .

    • Mark the option Extended to replace the service symbols.


    • Type \n in the form and click Replace All.


    • Repeat it with the parameter \r .

    • Save the file.


Installation with keytool

This option does not have parsing issues and allows for some flexibility. Importing with a keytool is very similar to installation on a Tomcat server.


Importing PKCS7

Inside the keystore, import the file in the PKCS#7 format (with a .p7b or .cer extension).

Follow Steps 1-3 in the Standard ace.jar method.

Save the certificate's Private key to the /data/keystore file in the default UniFi keystore after you generate the CSR code.

  1. Upload the security certificate file the SSL archive you received from the CA in the PKCS#7 format (.cer or .p7b) to the UniFi base folder.


  2. To import the uploaded file into the keystore, run:

    keytool -import -trustcacerts -alias unifi -file *your certificate*.p7b -keystore /data/keystore

    Enter the keystore password "aircontrolenterprise" (unless it was changed in your UniFi settings) and press Enter to complete the import.

  3. Restart the UDM-base to apply the changes:

    unifi-os restart

And now you're done! You can check the installation here.

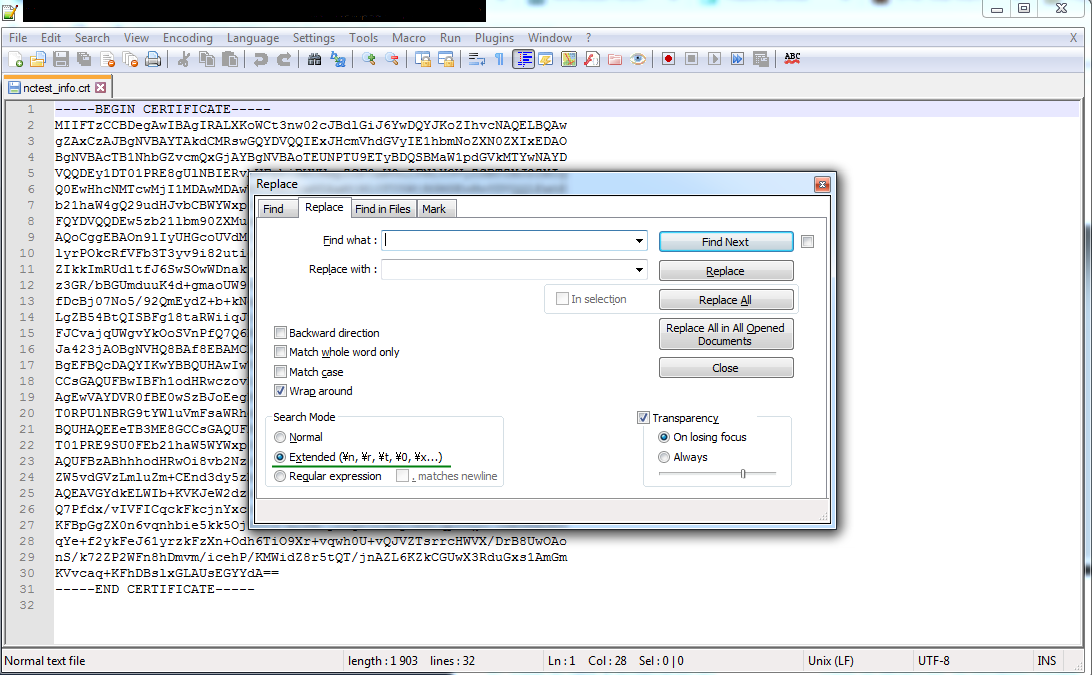
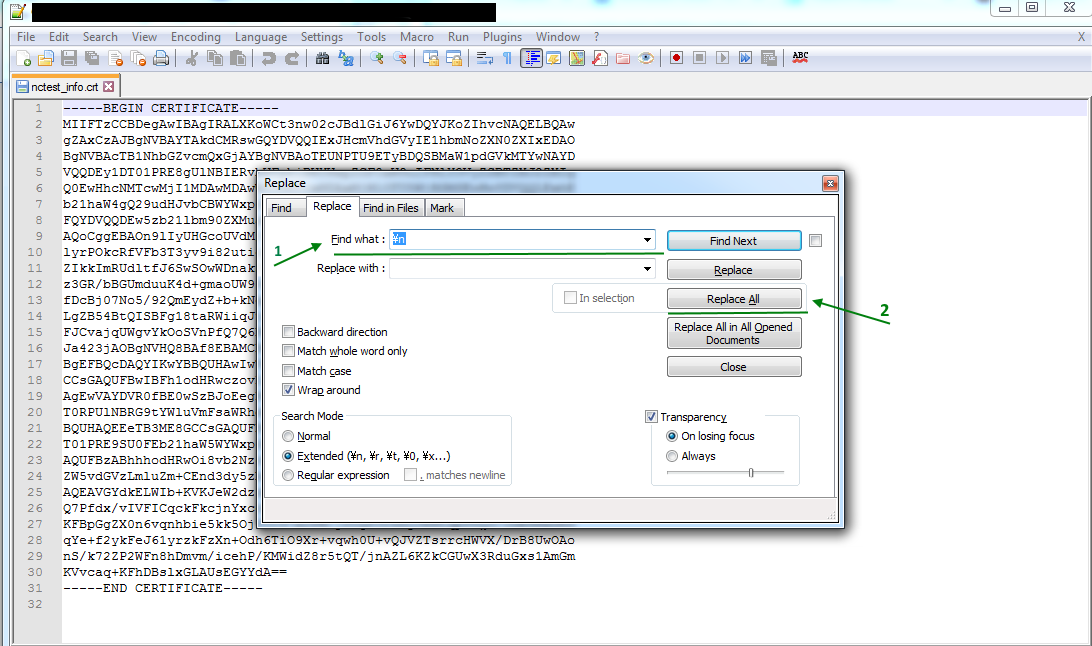
Warning: You may receive the error "Input not an X.509 certificate" while importing the SSL in the PKCS#7 format. It may be related to the extra empty strings in the file or other formatting issues. If editing the file in a text editor does not help, importing the SSL as PEM files is best.

On Windows, you can also use this solution:

  • Change the certificate file extension to .cer.
  • Right-click on the file and choose Install certificate. Keep clicking through the options until you locate the Finish button.
    TIP: Within the Internet Explorer browser, click on Tools >> Internet Options to install it.
  • Open the Content tab and click on Certificates.
  • Choose your certificate out of the Other tab and click Export.
  • Click Next.
  • Select "Cryptographic Message Syntax Standard - PKCS#7 Certificates (.P7B)" and check the "Include all certificates in the certification path if possible" box.
  • Click Next >> Browse . Enter the file name and path for the new combined file to be saved.
    TIP: You can save the file with a .cer extension.
  • Click Next and then Finish.
  • Use this newly-created file during installation in the keystore.


Importing PEM

Alternatively, you can import the SSL file in PEM format (.crt).

The example below uses files for a Domain Validation certificate. The process is similar for other SSL types. Find the corresponding files here.

  1. Import the root certificate:

    keytool -import -trustcacerts -alias root -file addtrustexternalcaroot.crt -keystore /data/keystore

  2. Import intermediate certificates one by one using separate aliases:

    keytool -import -trustcacerts -alias intermediate2 -file USERTrustRSAAddTrustCA.crt -keystore /data/keystore

    keytool -import -trustcacerts -alias intermediate1 -file SectigoRSADomainValidationSecureServerCA.crt -keystore /data/keystore

  3. Import the actual certificate with the alias unifi:

    keytool -import -trustcacerts -alias unifi -file *your certificate*.crt -keystore /data/keystore


    PLEASE NOTE
    : You must enter the keystore password for each import and press Enter to complete the process.

    TIP
    : To avoid this, add the argument -storepass *password* at the end of the command. Replace the *password* with your actual password for the UniFi keystore.

  4. Restart UDM-base to apply the changes:

    unifi-os restart

The files are the same as for the Standard installation method with ace.jar.


PFX file import via command line

You can use this option if the CSR was generated elsewhere or the OpenSSL method was used instead of the default UniFi tool during the process.

In this case, a private key (.key) is created separately. You need to import the key file into the keystore along with the certificate (.crt) and chain (.ca-bundle ) files.

Steps 1-3 are the same as in the Standard method with ace.jar.

If you prefer carrying out the process through command line, follow these steps:

  1. Upload the PEM security certificate file (.crt), and chain file (.ca-bundle) you received in an archive from the Certificate Authority to the UniFi base folder. Move or upload the previously generated private key file to the same folder for your convenience.

    Technically, you can put them in different folders; if you do, add the full paths to the files in the commands in the following steps where these files are used.

  2. Generate the PKCS#12 (PFX) file using the OpenSSL command:

    openssl pkcs12 -export -out *your certificate*.pfx -inkey *your certificate*.key -in *your certificate*.crt -certfile *your certificate*.ca-bundle -name "unifi"


  3. Import the created PFX file into the keystore:

    keytool -importkeystore -srckeystore *your certificate*.pfx -srcstoretype PKCS12 -destkeystore /data/keystore -deststoretype jks -deststorepass *password*


    Replace the *password* value with your actual password for the UniFi keystore.

  4. Restart UDM-base to apply the changes:

    unifi-os restart


If you prefer generating the PFX elsewhere (e.g. our converter), do the following:

  1. Generate the PKCS#12 (PFX) file using any convenient tool.


  2. Upload the PFX file to the server where the UniFi controller is installed (in the UniFi base folder).


  3. Import the created PFX file into the keystore:

    keytool -importkeystore -srckeystore *your certificate*.pfx -srcstoretype pkcs12 -srcalias 1 -destkeystore /data/keystore -deststoretype jks -destalias unifi -deststorepass *password*

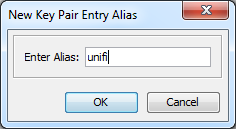
    PLEASE NOTE: For the PFX file without an alias assigned, 1 is used as the default alias. Also, ensure you include -srcalias and -destalias in the command to avoid the error, "Alias unifi does not exist". The *password* value should be replaced with your actual password for the UniFi keystore.

  4. Restart UDM-base to apply the changes:

    unifi-os restart

There is a small chance that the default alias is different. If you encounter an error, you can check the alias with any of the following commands:

openssl pkcs12 -in *your certificate*.pfx -info

keytool -list -storetype pkcs12 -keystore *your certificate*.pfx -v


Installing SSL on UDM-pro

For UDM-pro you only need to replace the default private key and self-signed certificate and restart UDM.

  1. Make sure to enable the Secure Shell (SSH) for UDM-pro:

    Settings >> Network Settings >> Device Authentication >> Turn it on and set up the username and password (or generate an access key, which is an alternative option that you will be offered at the last step).

  2. Connect via SSH and go to the configuration folder for UDM-pro:

    cd /mnt/data/unifi-os/unifi-core/config/


  3. Prepare the installation files:

    There are two files inside the folder:unifi-core.crt and unifi-core.key. These are a self-signed certificate and a Private key, respectively.

    To install the valid SSL they should be replaced with an actual certificate received from the CA and a corresponding Private key

    • unifi-core.crt should contain your certificate (the .crt file from CA) combined with the intermediate and root certificates (the .ca-bundle file from CA) in a single file;
    • unifi-core.key should contain the Private key file.

    You can combine the .crt and .ca-bundle files you received from the CA in multiple ways:

    • Upload both files to /mnt/data/unifi-os/unifi-core/config/ and run this command:

      cat example.crt >> unifi-core.crt ; echo >> unifi-core.crt ; cat example.ca-bundle >> unifi-core.crt

    • Or open both files with any plain text editor (Notepad, Notepad++, TextEdit, Text), and create a combined unifi-core.crt (certificate first, CA-bundle below it) file on your PC and upload it to the UDM.
    • Or copy and paste both files'; content to unifi-core.crt (in the same order as above: certificate first, CA-bundle below it).

    To open it in the command line, use any provided Linux editor like nano or vi (for example, run nano unifi-core.crt ).

  4. Once both files are replaced, restart your UDM-pro:

    unifi-os restart


SSL installation for UniFI services not based on UDM

All installation methods described for UDM-base work similarly on older UniFi controller versions. However, a few methods cannot be used for UDM even though they were valid in the past. They are described below.

Installation with keytool (for Windows)

The process is generally the same as on Linux: you upload the files to the server and run the keytool commands to install them in the keystore. However, there is one difference. Unlike Linux-based servers, Windows requires a full path to be specified when you are running an application. Because keytool.exe, certificate files, and the keystore may be located in different folders, make sure to use the full path unless the file is in the folder where you run the command.

To import the files in the PKCS#7 format by running this command:

"*Java base folder*\bin\keytool.exe" -import -trustcacerts -alias unifi -file *your certificate*.p7b -keystore "C:\Users\*account username*\Ubiquiti UniFi\data\keystore

*Java base folder* is specified during the Java installation on the server. By default, it is something like "C:\Program Files\Java\*Java version*\".

Alternatively, run the command below to switch to the Java base folder:

cd *Java base folder*

and then import the file by running:

keytool -import -trustcacerts -alias unifi -file "C:\Users\*account username*\Ubiquiti UniFi\*your certificate*.p7b" -keystore "C:\Users\*account username*\Ubiquiti UniFi\data\keystore"


Close the UniFi application and start it again using the application icon.

If UniFi is configured as a Windows service, run these commands:

net stop "UniFi Controller"
net start "UniFi Controller"

The certificate should now be installed.

Importing PEM certificates can be performed as described in the Importing PEM section, specifying the full path to the files in all commands.


PFX file import using Keystore Explorer

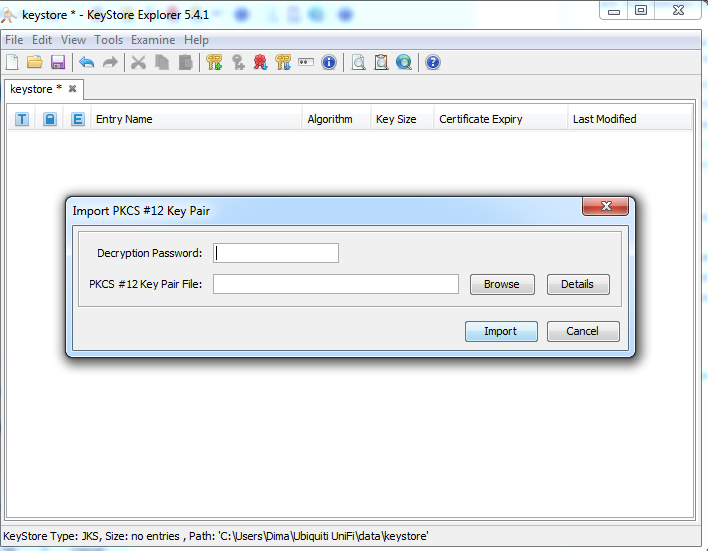
The easiest way to import the PFX on UniFi on Windows is with the help of "Keystore Explorer". (It can also be used for Linux/Mac OS, though it is best suited for Windows).

  1. Open the current keystore file in Keystore Explorer using the default password "aircontrolenterprise" or the one used by the controller.

    TIP: You can open the system.properties file and add your custom password to it:

      app.keystore.pass=*password*

    The file is located in the in the data subfolder of UniFi base folder.


  2. This option requires generating the PFX (PKCS#12) format file using any method described in the certificate installation in PFX format section or any online tool (e.g. our converter).

    Choose your own password for this. It can be different from the password used in the UniFi controller.


  3. Once the PFX file is created, switch back to Keystore Explorer and delete the unifi entry.


  4. Click-through: Tools >> Import Key Pair >> PKCS12.

    There, locate your PFX file and use the password you set during its creation.


  5. The Key Pair Entry Alias should be set as unifi.


  6. Provide the password. It should be the keystore password ("aircontrolenterprise" unless it was changed in your UniFi settings).


  7. Save the keystore file using File >> Save (or simply click on the related icon).

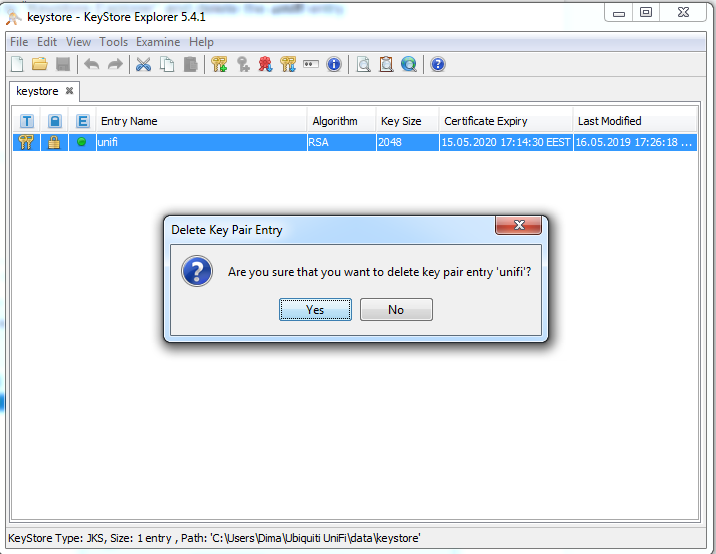
  8. Restart the controller to apply the changes.

    On Linux:
    service unifi restart


    On Windows, close the UniFi application and start it again using the application icon or, if UniFi is configured as a Windows service, use the commands:

    net stop "UniFi Controller"
    net start "UniFi Controller"

    WARNING: Sometimes, the keystore may get corrupted because of multiple imports. If the process does not work properly, delete the initial keystore file and restart UniFi to create a new one, and only proceed with the PFX import when this is done.


PFX file import (Windows) via command line

This process is similar to installation on Linux. The PFX file can be generated by doing the following:

  • Save both the certificate and the private key files in one folder using the same file names and corresponding extensions: example.p7b, example.key. Run this command in cmd or PowerShell:

    certutil -mergepfx *your certificate*.p7b *your certificate*.pfx


    Alternatively, you can put the certificate, private key and CA-bundle in one folder and generate it with OpenSSL:


    *OpenSSL path* pkcs12 -export -out *your certificate*.pfx -inkey *your certificate*.key -in *your certificate*.crt -certfile *your certificate*.ca-bundle -name "unifi"

    Default OpenSSL path on Windows (if you have it installed) is "C:\*OpenSSL version*\bin\OpenSSL.exe".

  • Import the created PFX file into the keystore:

    "*Java base folder*\bin\keytool.exe" -importkeystore -srckeystore *your certificate*.pfx -srcstoretype pkcs12 -srcalias 1 -destkeystore "C:\Users\*account username*\Ubiquiti UniFi\data\keystore" -deststoretype jks -destalias unifi -deststorepass *password*


    *Java base folder* is specified during the Java installation on server. By default, it is something like "C:\Program Files\Java\*Java version*\".

  • Close the UniFi application and start it again using the application icon or, if UniFi is configured as a Windows service, with the commands:

    net stop "UniFi Controller"

    net start "UniFi Controller"

The SSL should now be installed.


Unify SSL security features

The following list includes features not directly related to SSL setup but related to site security and different ways to configure it.

    • The ECC certificates won't work even though these files can be successfully imported to the server.


    • Server Name Indication (SNI) is not supported.


    • HTTPS redirect is enabled on newer versions of UniFi by default. Access the UniFi admin panel using the http:// link (by default, *hostname*:8080 in system.properties). Then, if the SSL is already installed on UniFi, you'll be forwarded to the https:// link (by default, https://*hostname*:8443).
      This option works on all UniFi versions starting from 4.x.


    • HSTS can be enabled on UniFi in the system.properties file by modifying these parameters:

      unifi.https.hsts=false - set to true to enable HSTS
      unifi.https.hsts.max_age=*value* - you can specify the duration for how long HSTS is cached (in seconds)
      unifi.https.hsts.preload=false - set to true only if you do not plan to remove the HSTS, as it will add your UniFi hostname to the preload list, deletion from which should be requested specifically
      unifi.https.hsts.subdomain=false - set to true if you would like to apply an HSTS policy for the subdomains of your domain name, as well as for the main domain name

      Uncomment the corresponding (above-mentioned) strings, save the file, and restart UniFi to complete the process.


    • Permitted cipher suites and SSL/TLS versions can be enabled on UniFi in the system.properties file using the following parameters:

      unifi.https.ciphers=cipher1, cipher2, etc. - replace the values with the actual cipher names you want to enable
      unifi.https.sslEnabledProtocols=protocol1, protocol2, etc. - replace the values with the actual protocol names you want to enable

      Uncomment the corresponding (above-mentioned) strings, save the file, and restart UniFi to complete the process.

      Check the optimal configurations for UniFi here.

Updated
Viewed
33045 times

Need help? We're always here for you.

notmyip