To automatically create a backup of the website(s) hosted in your account, you can take advantage of various tools which Linux systems provide. In order to be able to set up automatic backups, it is necessary to have:
This article is for the following scenario:
1. You are backing up a single website, which is located in the /public_html directory of your account.
2. The website uses a database.
3. A folder will be created for each backup. Two files db.sql and files.tar.gz will be created inside the folder.
4. The backup file will be generated on the server and downloaded to your local machine using scp.
Preparing hosting files
Preparing hosting files
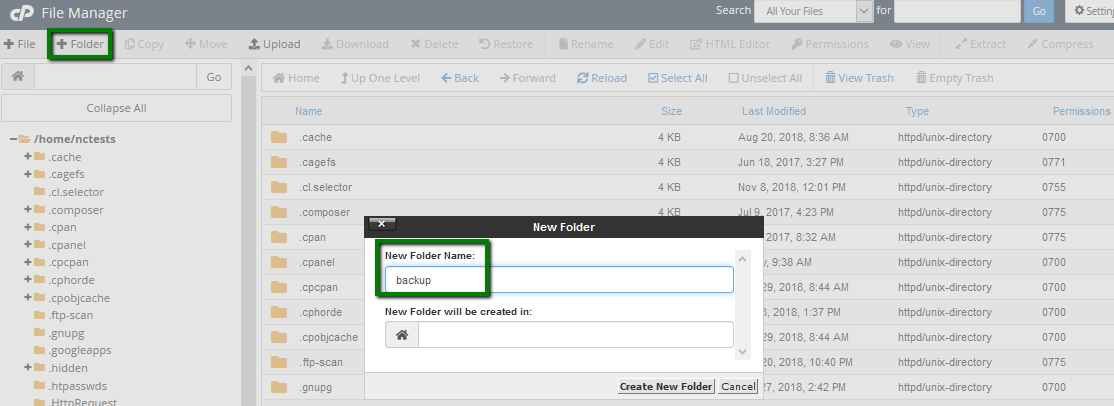
Then, create a file called backup_server.sh inside:
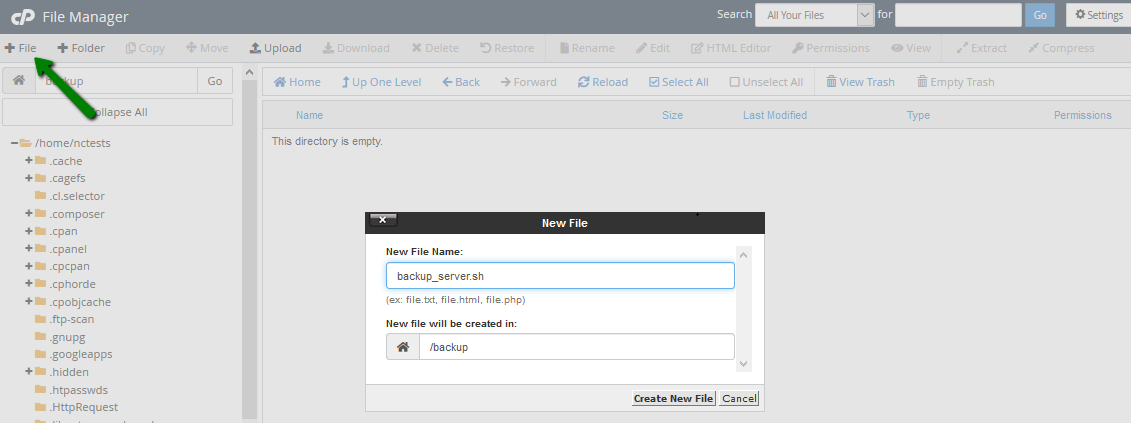
The file must be executable, so don’t forget to set the permissions to 0755
following these steps.
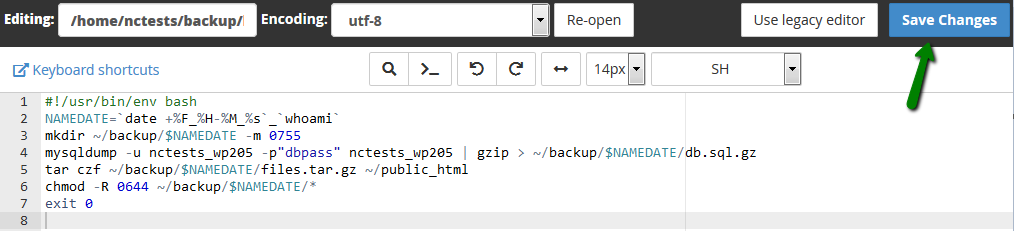
Once done,
Edit the
backup_server.sh file and paste the following code inside:
#!/usr/bin/env bash
NAMEDATE=`date +%F_%H-%M_%s`_`whoami`
mkdir ~/backup/$NAMEDATE -m 0755
mysqldump -u dbusername -p"dbpassword" dbname | gzip > ~/backup/$NAMEDATE/db.sql.gz
tar czf ~/backup/$NAMEDATE/files.tar.gz ~/public_html
chmod -R 0644 ~/backup/$NAMEDATE/*
exit 0
The
database parameters are to be adjusted, namely:
- Replace dbusername with the actual database username (we’ve used nctest_production as an example). This can be checked in your website’s config file or in the MySQL Databases menu.
- Replace dbpassword with the actual password for the selected database user. Note that there is no space between -p and the password itself.
- Replace dbname with the name of the database.
You can also use the absolute paths (e.g.,
/home/username/…), specifying a different directory to be backed up and/or a different one to store your backups. Don’t forget to double-check if all the paths are correct.
Once you have edited the file to have the correct parameters, save it:
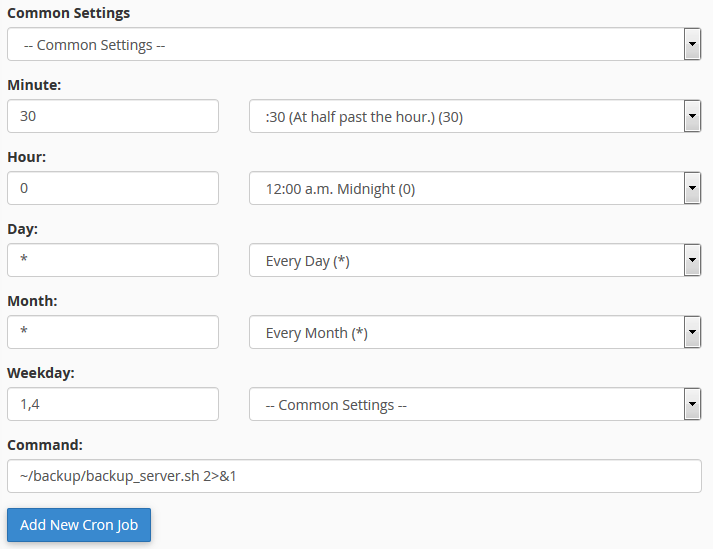
Open the
Cron Jobs menu in your cPanel account and
add a cron:
With these settings, the backups will be created at 12:30 AM EDT every Monday and Thursday.
Minute,
Hour,
Day,
Month, and
Weekday can be adjusted according to your needs.
Do not forget to change the script path in the
Command line if you’ve placed it in a different folder and/or under a different name.
The script creates a folder with the name that contains the date and time of the backup creation; it looks like this: /home/nctests/backup/2018-07-25_18-54_1532559254_nctests
The folder contains two .qz files inside - the backups of the website files and database.

To avoid overusing your account’s disk space, let’s set up another cron job which will
clean up the backups older than one week. Acting similarly to the way described above, create the following job:
This job will run every Sunday at midnight EDT and will remove all backups older than 7 days. You can adjust these settings according to your needs.
Follow the steps below in order to set up the backup script via SSH:
1. Connect to your account
via SSH (
for macOS). Start with creating the folder which will store your backups. To do this, run these commands one by one:
mkdir ~/backup
touch ~/backup/backup_server.sh
2. The file must be executable, so don’t forget to set the permissions:
chmod 0755 ~/backup/backup_server.sh
3. Once done, navigate to the
/backup folder, and open the
/backup_server.sh file for editing (for example, with
nano):
cd backup
nano backup_server.sh
Paste the following code inside the file:
#!/usr/bin/env bash
NAMEDATE=`date +%F_%H-%M_%s`_`whoami`
mkdir ~/backup/$NAMEDATE -m 0755
mysqldump -u dbusername -p"dbpassword" dbname | gzip > ~/backup/$NAMEDATE/db.sql.gz
tar czf ~/backup/$NAMEDATE/files.tar.gz ~/public_html
chmod -R 0644 ~/backup/$NAMEDATE/*
exit 0
The
database parameters need to be adjusted:
- dbusername - replace it with the actual database username (we’ve used nctest_production as an example). It can be checked in your website’s config file or in the MySQL Databases menu.
- dbpassword - replace it with the actual password for the aforementioned database user. Note that there is no space between -p and the password itself.
- dbname - replace it with the name of the database.
4. Execute the following command to have a cron job created:
(crontab -l ; echo "30 0 * * 1,4 ~/backup/backup_server.sh > /dev/null 2>&1") | sort - | uniq - | crontab -
5. To automatically clean up older backups, add another job:
(crontab -l ; echo "0 0 * * 0 cd ~/backup; find . -type d -mtime +7 -exec rm -rf {} \; >/dev/null 2>&1") | sort - | uniq - | crontab -6. To execute the backup script manually, you can simply run this command via SSH in the folder where the file is stored:
sh backup_server.sh
In order to configure automatic download of the backups to your PC, you will need to create an SSH key without a passphrase so that the local script can access your account. Unfortunately, cPanel does not allow you to create a key without a passphrase via the SSH Access menu, so you will need to manually create the key via Terminal.
2. Type the following command:
ssh-keygen
3. You will be prompted for the name of the key first. We will leave it blank for this example, and a default
id_rsa key will be created in this case, however, you can select a custom name for your key if you already use the
id_rsa key for some other purpose (Please note that you will need to prepend your key with a path to the .ssh folder, as highlighted on the screenshot below).
4. You will then be prompted to enter the Passphrase and then repeated. Just hit
Enter twice, without entering anything there, so that the key will be created without the passphrase:
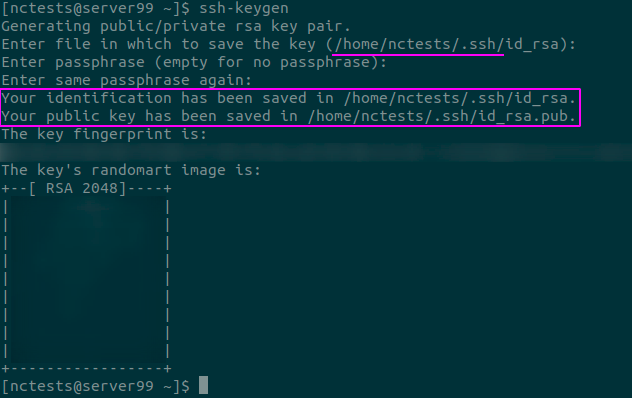
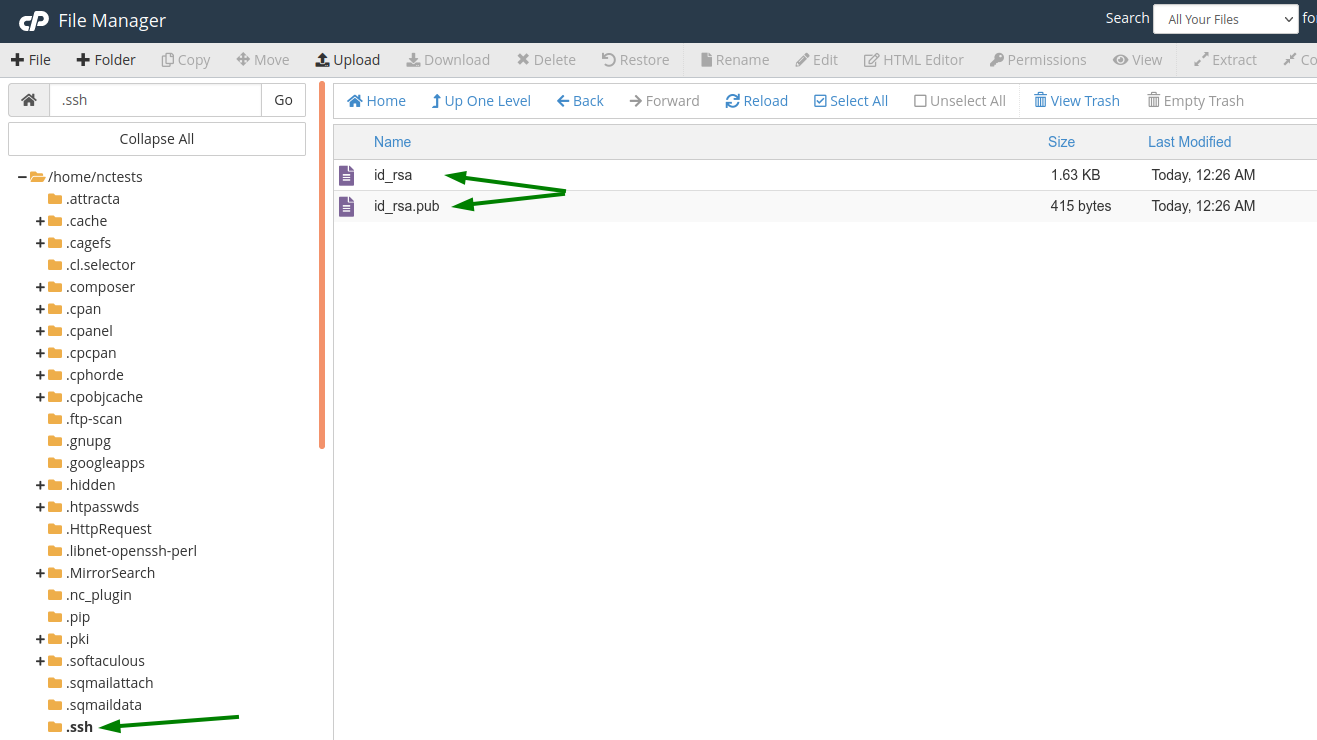
You have now successfully created a pair of keys:
/home/nctests/.ssh/id_rsa - a private (identification) key;
/home/nctests/.ssh/id_rsa.pub - a public key:
The next step is to authorize the public key (id_rsa.pub) to allow access to your cPanel. You can do it from the "SSH Access" menu in your cPanel:
1. Open the SSH Access menu.
2. Click on the Manage SSH Keys button.
3. Find the newly created key in the
Public Keys section and click
Manage next to it:
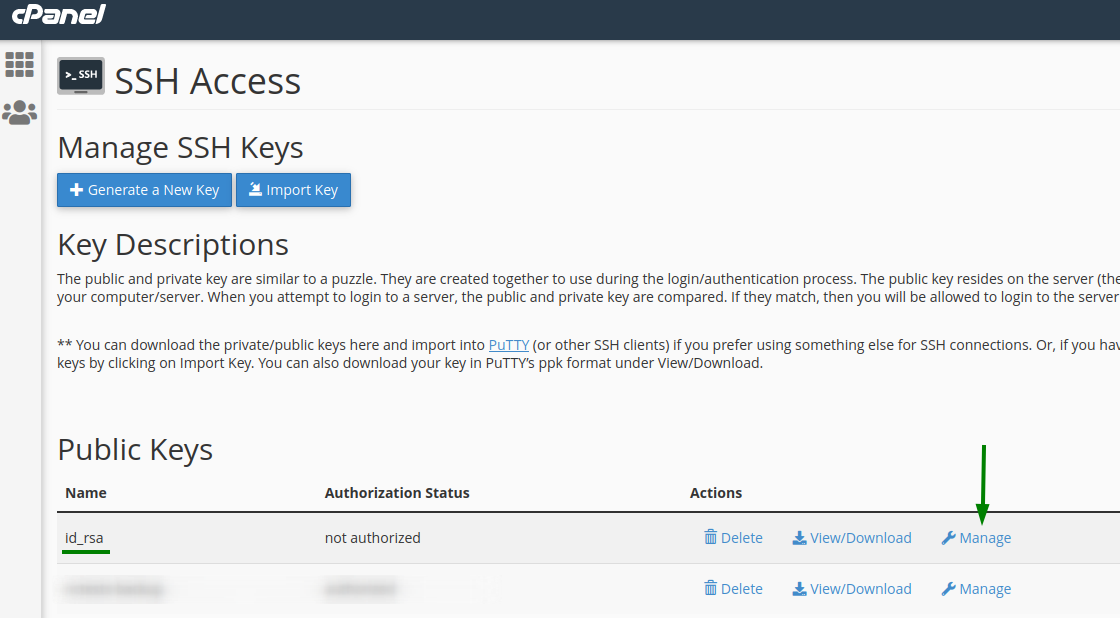
4. Click the
Authorize button to authorize the key.
Once the Public key is authorized, its Private counterpart can be used to access your account without a password. You will need to download the Private Key (id_rsa) to your PC, and remove it from the hosting account afterwards, for security considerations.
If you are running Mac or Linux on your Local PC, you will simply need to save the private key to the ".ssh" folder inside the home folder of your local account. For Windows users, the process is a bit more involved, and you can check a detailed guide on how to add an SSH key to PuTTy in
this guide.
Now, let's see how to create backups on Windows, Linux and MacOS operating systems.
Requirements:
- PuTTY should be installed on your machine to the default path (Program Files).
- You should have your private SSH key converted to a PPK format (the one PuTTY understands) and stored locally. This key should not have a passphrase.
- You should connect to your account via SSH at least once so PuTTY remembers the server’s fingerprint. Otherwise, the backup script will fail.
Pick a directory on your computer or laptop to store the backups, create a TXT file (you can use Notepad) called
backup_client.bat inside the directory. Then, paste the following content into the file:
@ECHO OFF
SET PATH=”%PROGRAMFILES%”\PuTTY;%PATH%
SET PKEY=\path\to\private\key.ppk
>backup_client.temp plink.exe -i %PKEY% -t -P 21098 username@servername "ls -thl ~/backup | grep ^d | head -n 1 | awk '{print $9}'"
FOR /f "delims=" %%x IN (backup_client.temp) DO SET DTNM=%%x
pscp.exe -q -scp -batch -r -i %PKEY% -P 21098 username@servername:/home/username/backup/%DTNM% .
del /f backup_client.temp
You will need to modify some parameters to match your local environment:
- Replace the \path\to\private\key.ppk with the actual value, including the .ppk file extension (we’ve used C:\Users\user\private.ppk as an example).
- username and servername are to be changed to the actual ones throughout the script.
- If PuTTY is installed to a non-default path, change %PROGRAMFILES%\PuTTY to the actual directory.
In order to manually start the execution of the script and download the backup, simply run the
backup_client.bat file.
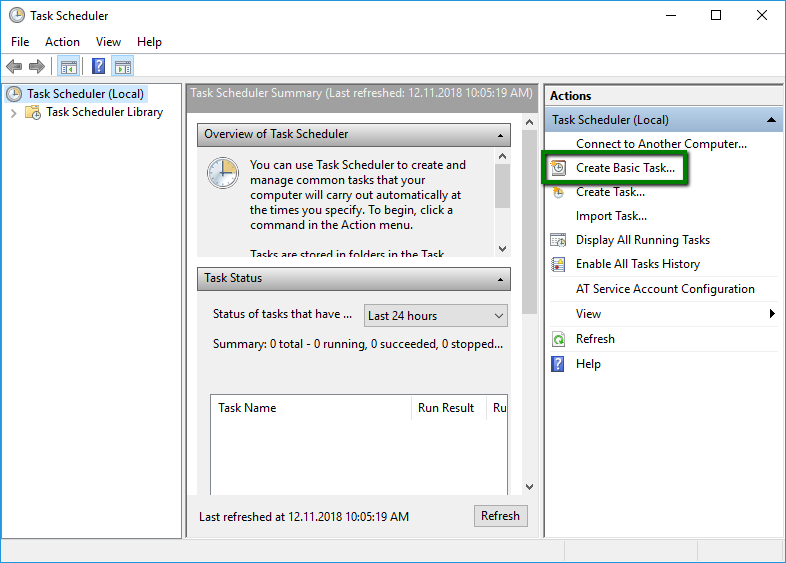
To execute the script automatically at a given time, we’ll use the
Task Scheduler app. To open it, either search for it in the Start menu or execute the following command via the
Run menu:
C:\Windows\System32\taskschd.msc
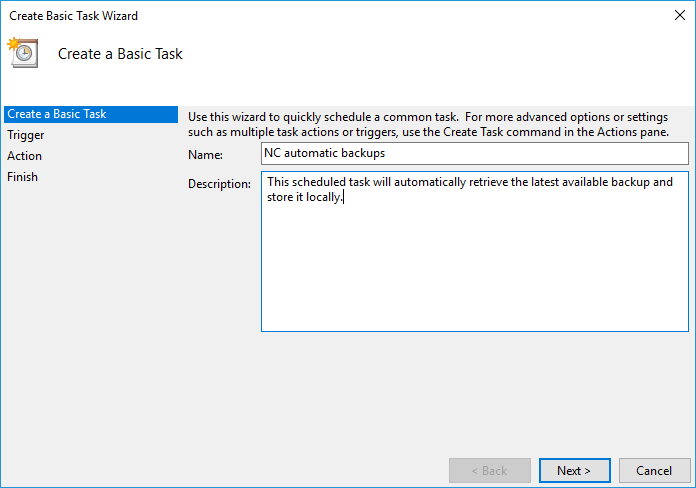
Once opened, click on
Create Basic Task… in the
Actions menu:
Start with naming the task and optionally describing it and click Next:
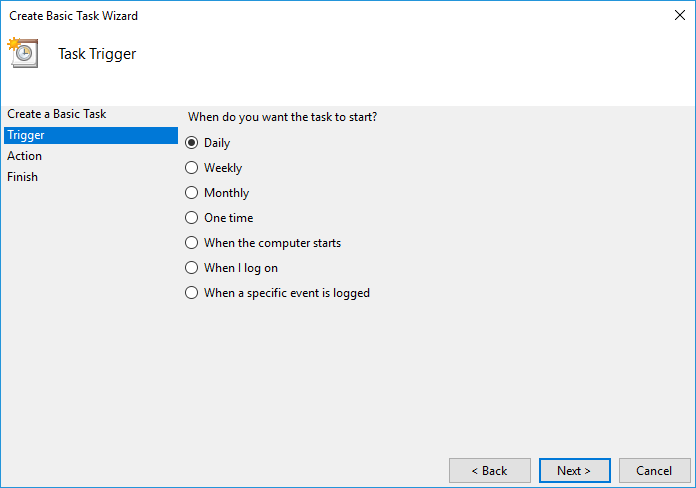
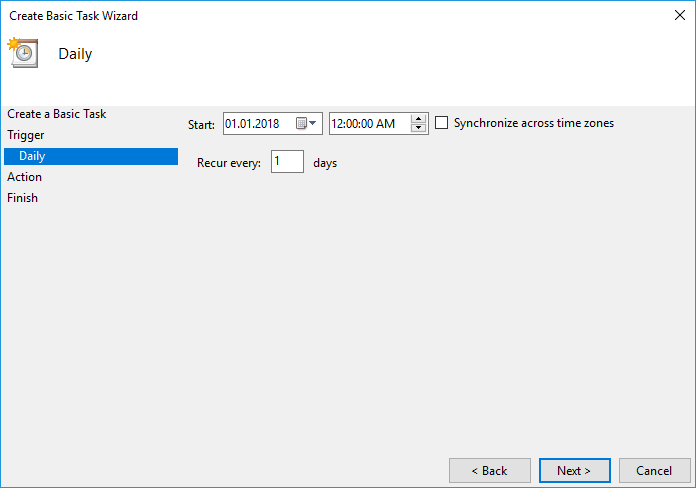
Then, select the Daily option and click Next:
Set the starting date and time for the task to run (the date should be earlier than the present day) and click Next. Keep in mind that your time may (or may not) be the same as the server time and adjust the time settings accordingly.
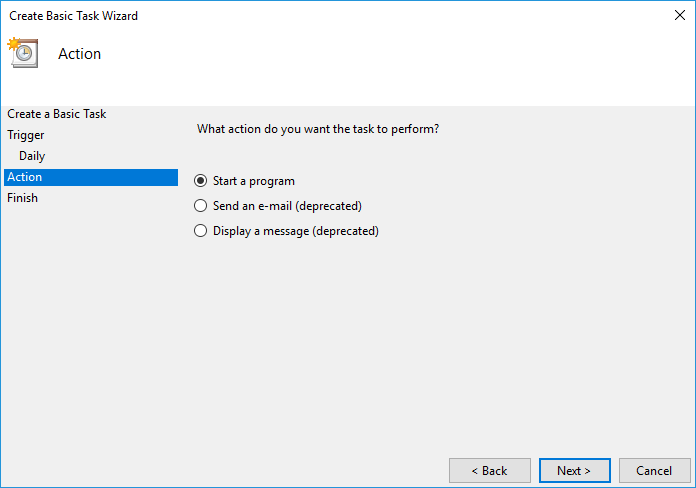
In the next menu, select the Start a program option and click Next:
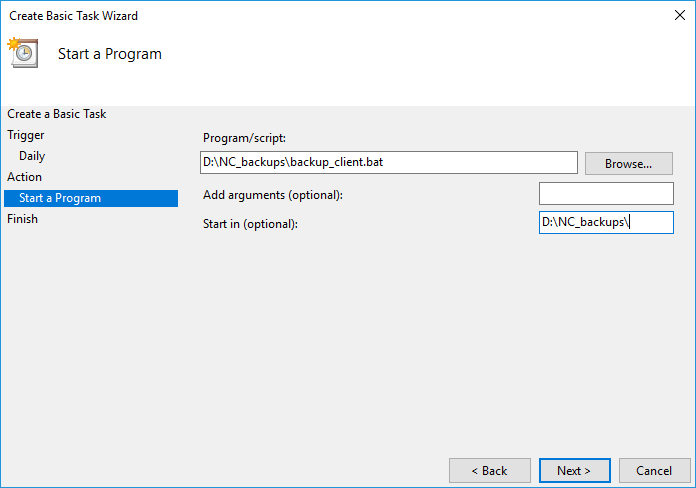
Specify the path to the script (you can also click the Browse… button and pick the location). Also, copy the full path before the script name (e.g., D:\NC_backups\ in our case) and paste it into the Start in box. Once this is done, click Next:
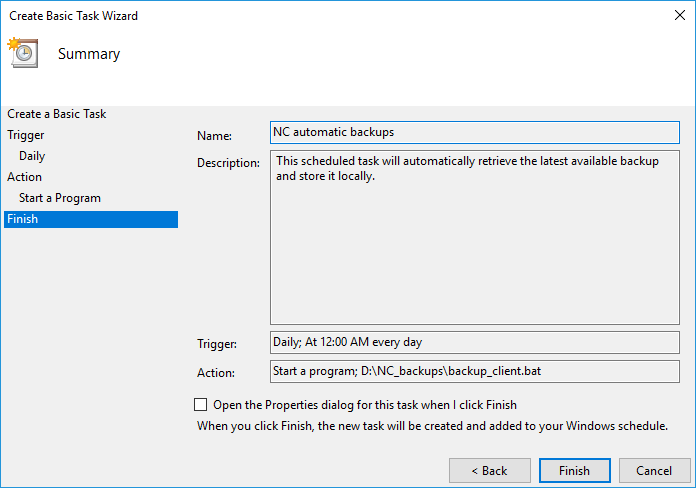
Now all the settings for the task are specified. Review, and if everything looks correct, click Finish:
That’s it. The task will be executed daily at the specified time if your machine is switched on.
It is also worth noting that a blank command prompt window will appear when the task is executed and will automatically close when it is done.
NOTE: All scripts included in this article are provided for your reference only and come with absolutely no warranty. Use these at your own discretion, as we cannot be responsible for damages.
Pick a directory on your local machine to store the backups, create a file called
backup_client.sh inside and paste the following content into the file:
#!/usr/bin/env bash
ssh -i ~/.ssh/id_rsa -t -p21098 username@servername "ls -thl ~/backup" > backup_client.temp 2>&1
scp -r -i ~/.ssh/id_rsa -P 21098 username@servername:~/backup/`grep ^d backup_client.temp | head -n 1 | awk '{print $9}'` .
rm -f backup_client.temp
Replace
username with your cPanel username, and
servername with the full name of the server your account is hosted on (we’ve used
server99.web-hosting.com as an example). If your private key is located in a different place, don’t forget to adjust the path.

The script will download the latest generated backup file.
Once the details are filled, save the file and make sure it has executive permissions. You can use any capable file manager:
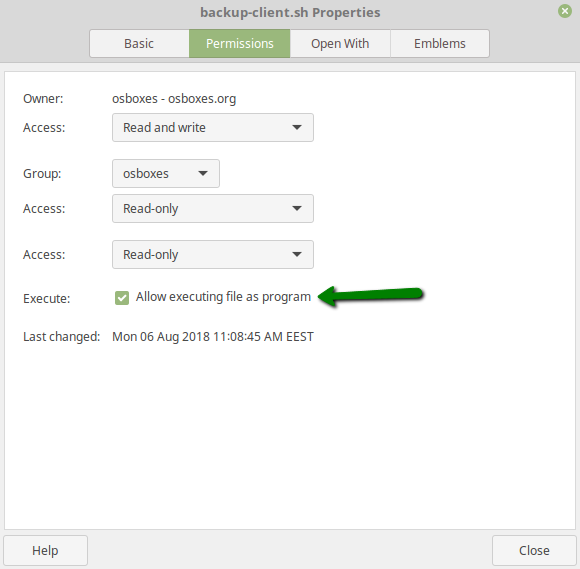
Or you can use the Terminal:
chmod +x ~/backup/backup_client.sh
Now, when the script is invoked, it will list the contents of the
/backup folder on the server, find the most recent backup, and download the website’s database and compressed files. Please note that the script will fail if the
/backup directory on the server is empty.
You can automate the backup retrieval by creating a cron job on your local machine. To do this, run the following command in your Terminal:
(crontab -l ; echo "30 1 * * 1,4 /path/to/backup/dir/backup_client.sh > /dev/null 2>&1") | sort - | uniq - | crontab -
Replace the
/path/to/backup/dir/backup_client.sh with the actual path to the backup script. This particular Cron will run every Monday and Thursday at 01:30 AM if your local machine is powered on. Please keep in mind that your local time zone may differ from the server one and adjust it accordingly.
NOTE: All scripts included in this article are provided for your reference only and come with absolutely no warranty. Use these at your own discretion, as we cannot be responsible for damages.
That's it!