
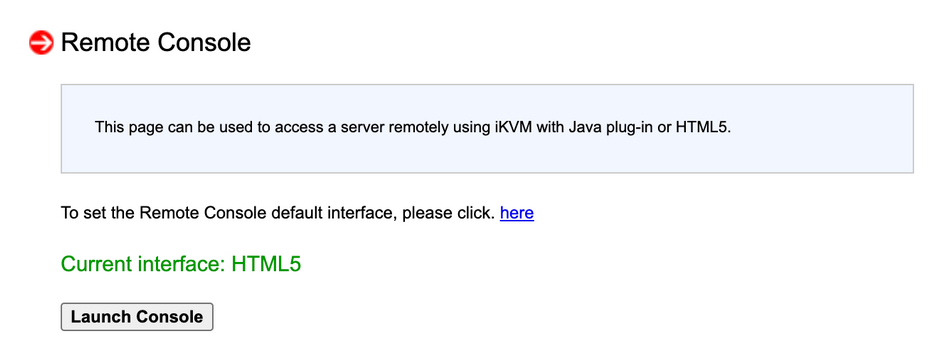
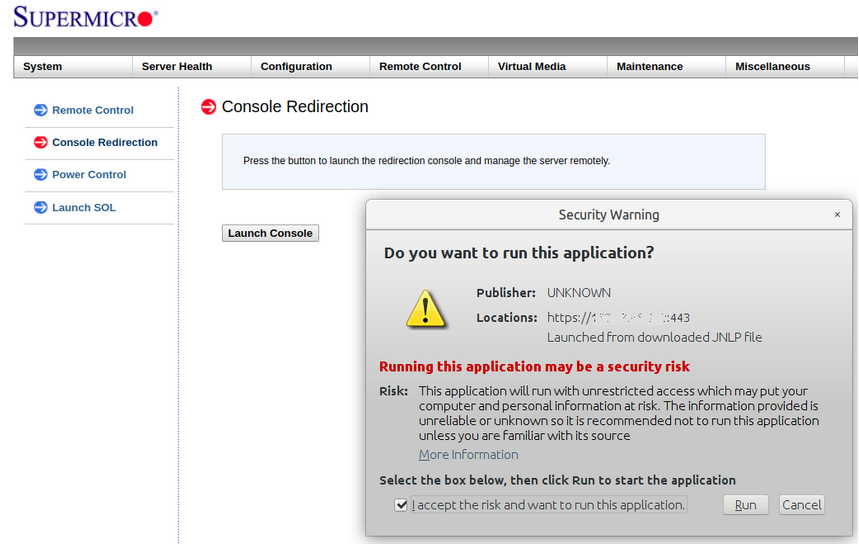
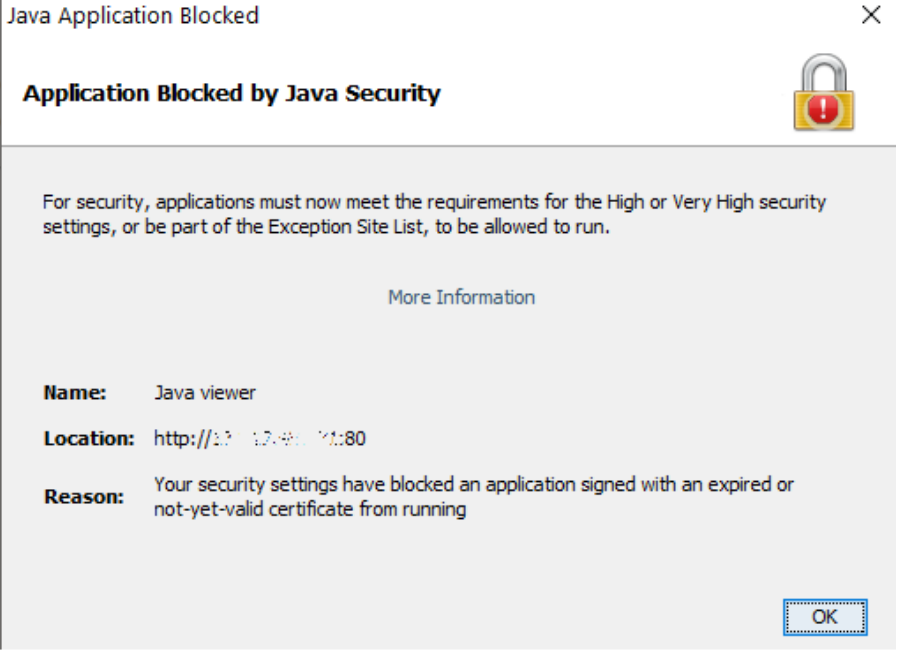
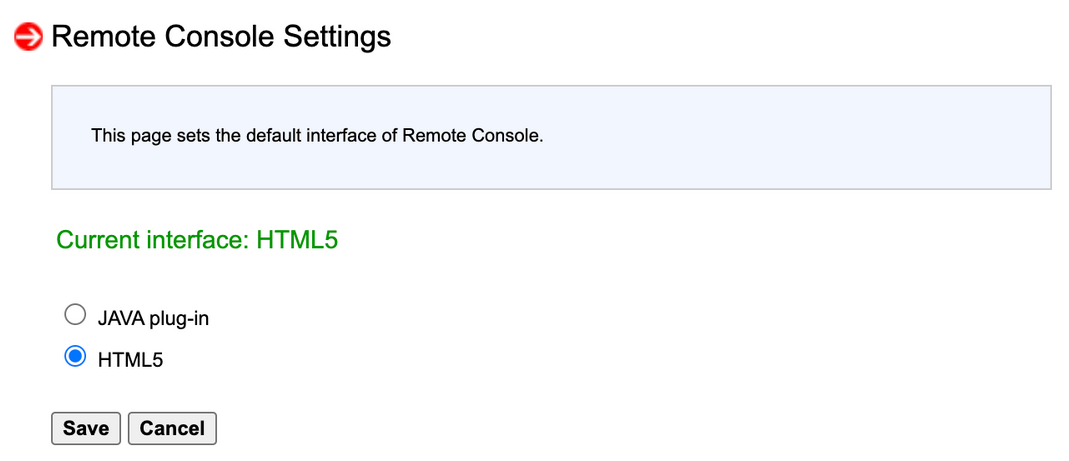
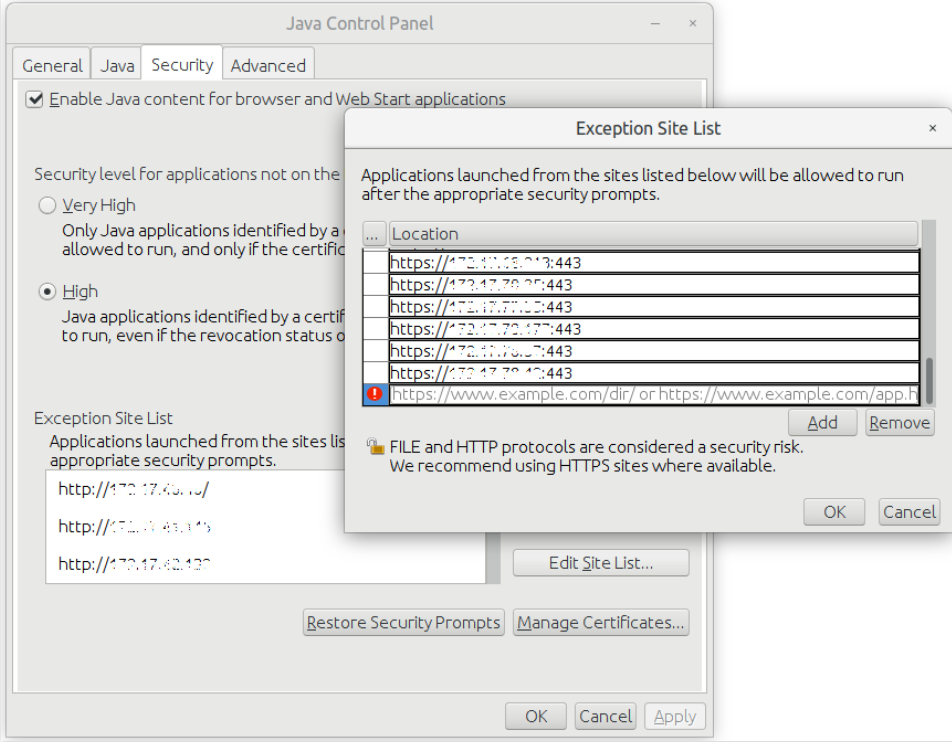
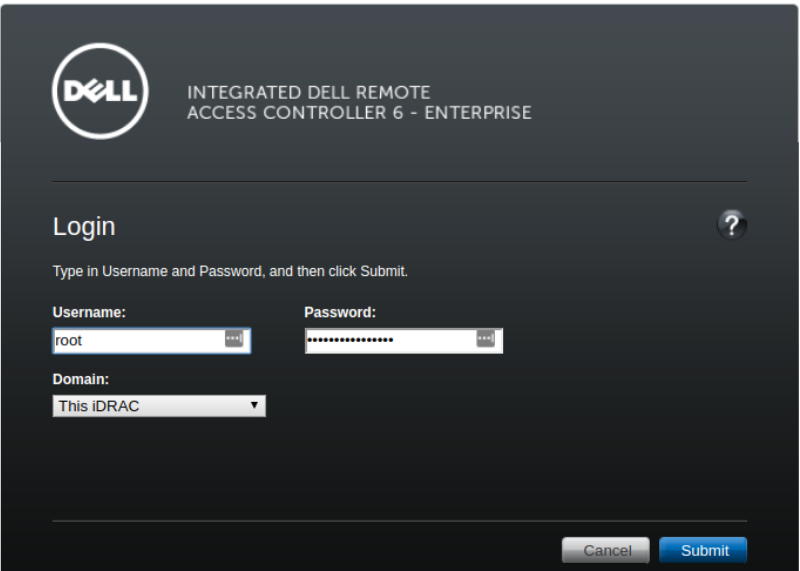
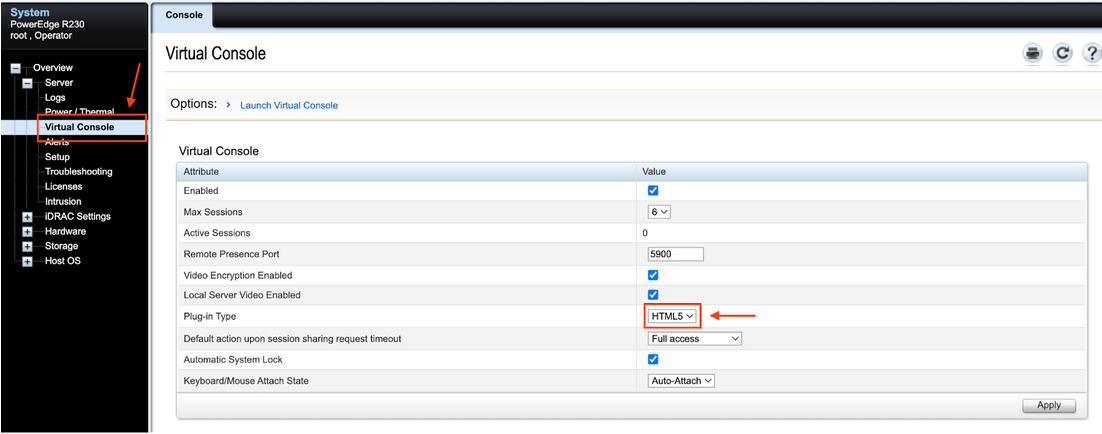
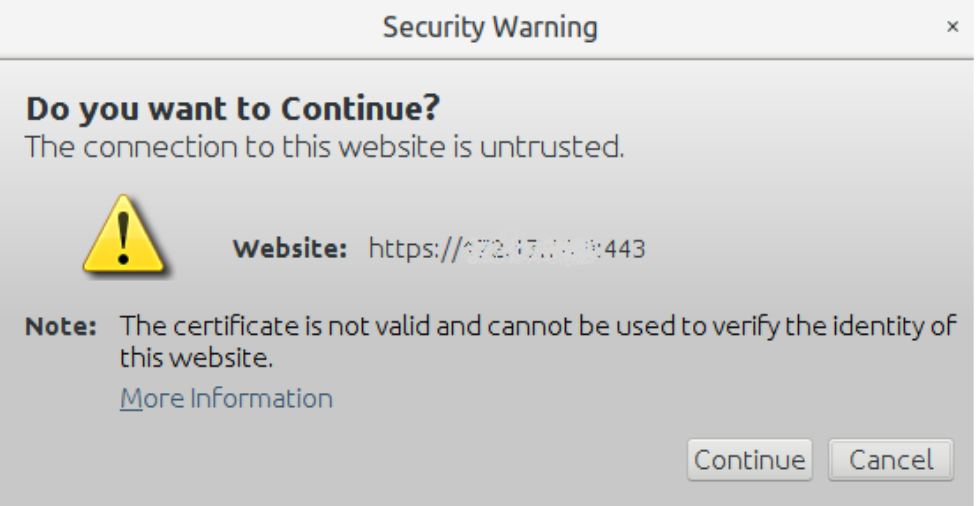
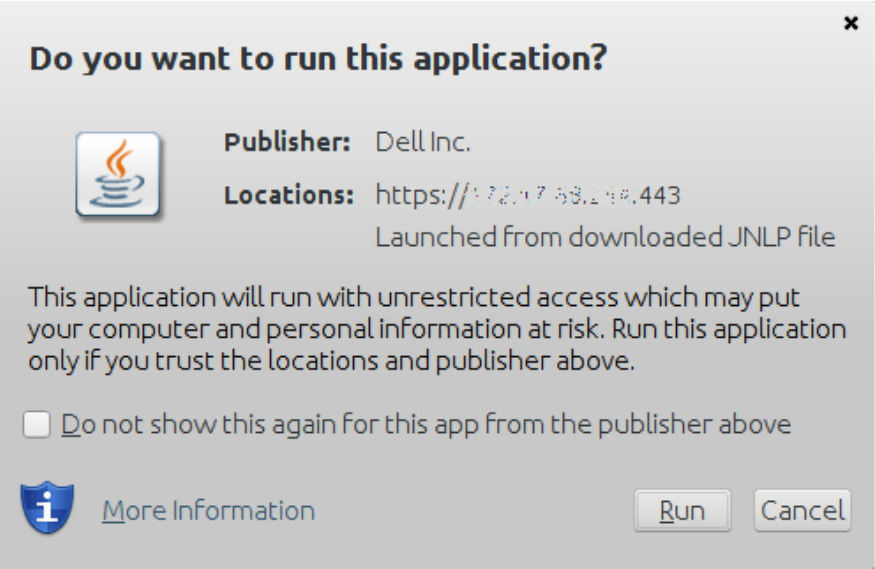
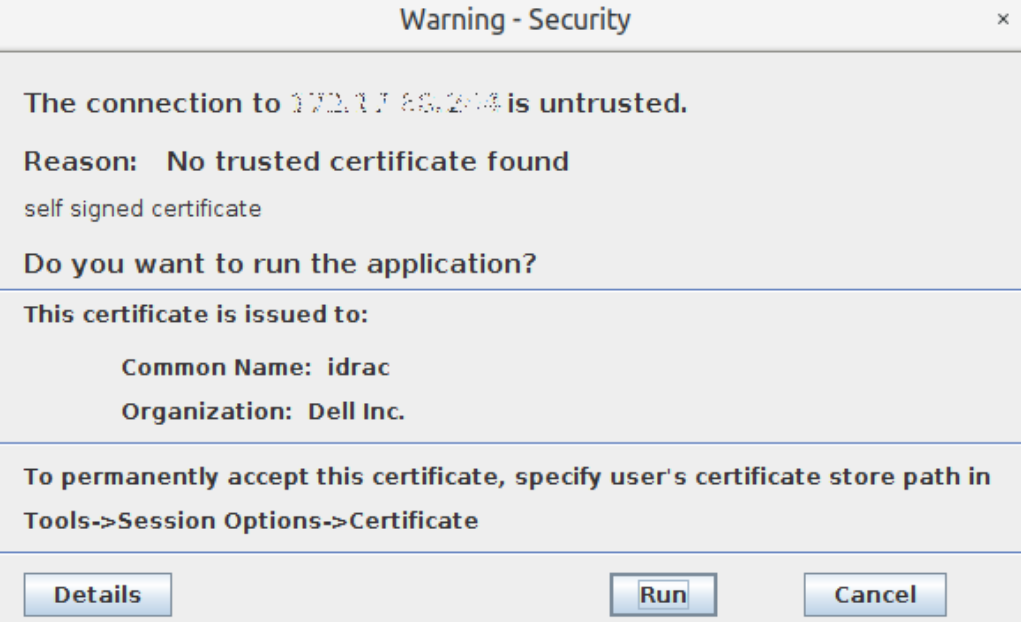
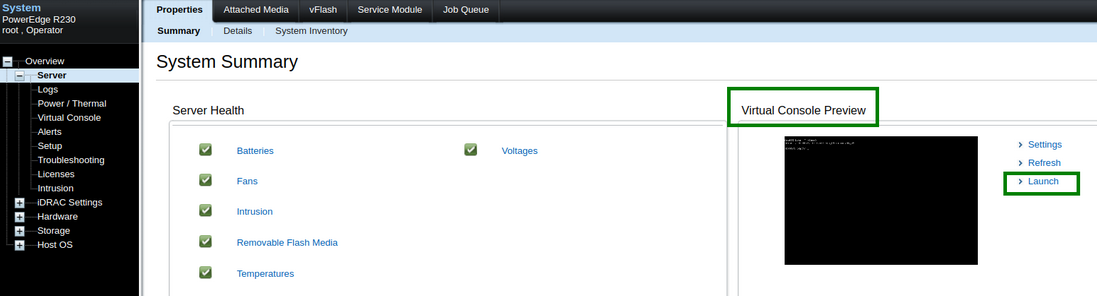
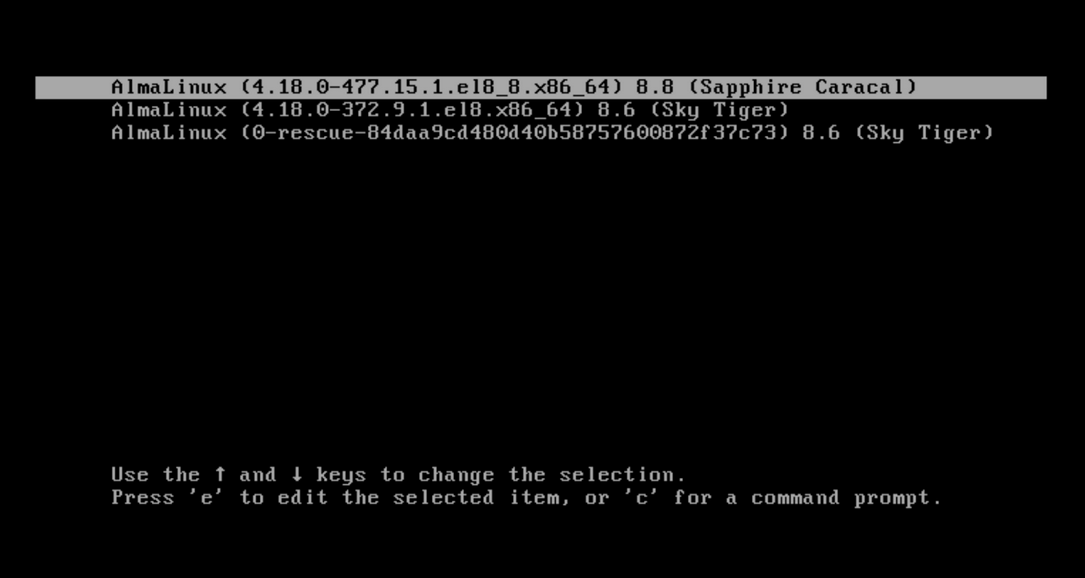
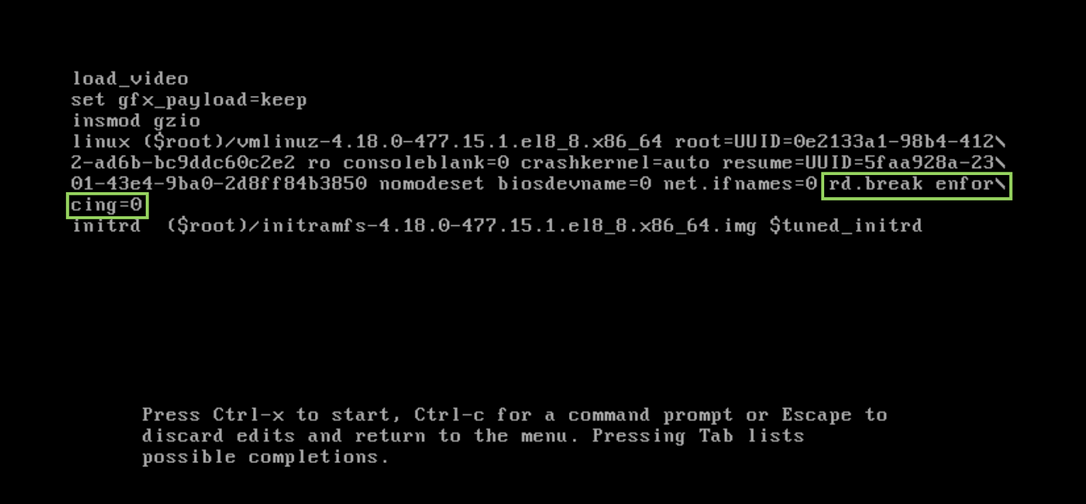
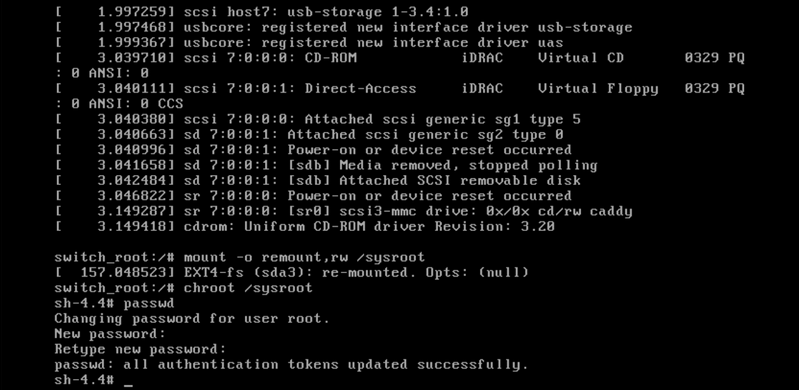
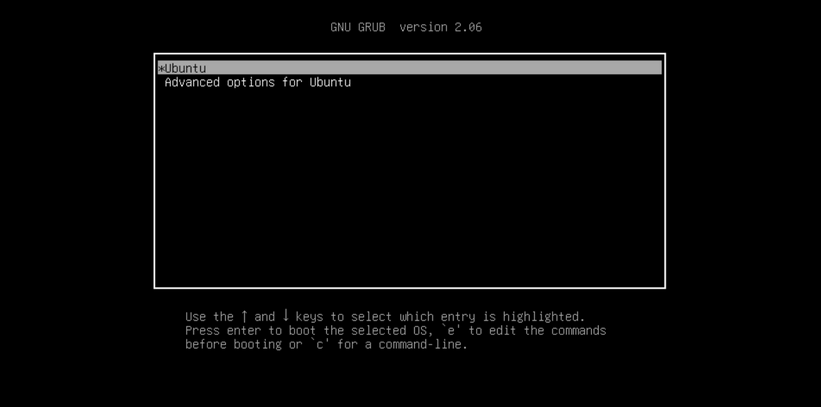
{"/api/v1/ncpl/simplekb/getarticle:\"{\\\"articleId\\\":10084,\\\"categoryId\\\":2188}\"":{"body":{"Id":10084,"FriendlyId":"","ArticleTypeId":0,"Title":"Resetting Dedicated server root password via Virtual Console","ArticleName":"Resetting Dedicated server root password via Virtual Console","ArticleSummary":null,"PreponedSummary":false,"Approved":true,"Body":"DQoJCTxwPg0KCQkJCTxhIGhyZWY9IiNsYXVuY2hfdmMiPg0KCQkJCQkJPGI+TGF1bmNoaW5nIHZpcnR1YWwgY29uc29sZTwvYj4NCgkJCQk8L2E+DQoJCTwvcD4NCgkJPHVsPg0KCQkJCTxsaT4NCgkJCQkJCTxwPg0KCQkJCQkJCQk8YSBocmVmPSIjc3VwZXJtaWNyb192YyI+U3VwZXJtaWNybyB2aXJ0dWFsIGNvbnNvbGU8L2E+DQoJCQkJCQk8L3A+DQoJCQkJPC9saT4NCgkJCQk8bGk+DQoJCQkJCQk8cD4NCgkJCQkJCQkJPGEgaHJlZj0iI2phdmFfY29uc29sZSI+SmF2YSBjb25zb2xlPC9hPg0KCQkJCQkJPC9wPg0KCQkJCTwvbGk+DQoJCQkJPGxpPg0KCQkJCQkJPHA+DQoJCQkJCQkJCTxhIGhyZWY9IiNodG1sNV9jb25zb2xlIj5IVE1MNSBjb25zb2xlPC9hPg0KCQkJCQkJPC9wPg0KCQkJCTwvbGk+DQoJCQkJPGxpPg0KCQkJCQkJPHA+DQoJCQkJCQkJCTxhIGhyZWY9IiNleGNlcHRpb25fc2l0ZV9saXN0Ij5BZGp1c3RpbmcgRXhjZXB0aW9uIFNpdGUgTGlzdDwvYT4NCgkJCQkJCTwvcD4NCgkJCQk8L2xpPg0KCQk8L3VsPg0KCQk8YnIgLz4NCgkJPHA+DQoJCQkJPGEgaHJlZj0iI2lEUkFDX3ZjIj4NCgkJCQkJCTxiPmlEUkFDIHZpcnR1YWwgY29uc29sZTwvYj4NCgkJCQk8L2E+DQoJCTwvcD4NCgkJPHVsPg0KCQkJCTxsaT4NCgkJCQkJCTxwPg0KCQkJCQkJCQk8YSBocmVmPSIjamF2YV9jb25zb2xlMiI+SmF2YSBjb25zb2xlPC9hPg0KCQkJCQkJPC9wPg0KCQkJCTwvbGk+DQoJCQkJPGxpPg0KCQkJCQkJPHA+DQoJCQkJCQkJCTxhIGhyZWY9IiNodG1sNV9jb25zb2xlMiI+SFRNTDUgY29uc29sZTwvYT4NCgkJCQkJCTwvcD4NCgkJCQk8L2xpPg0KCQk8L3VsPg0KCQk8YnIgLz4NCgkJPHA+DQoJCQkJPGEgaHJlZj0iI2FsbWFsaW51eDgiPg0KCQkJCQkJPGI+QWxtYWxpbnV4IDgvOTwvYj4NCgkJCQk8L2E+DQoJCTwvcD4NCgkJPHA+DQoJCQkJPGEgaHJlZj0iI3VidW50dTIyIj4NCgkJCQkJCTxiPlVidW50dSAyMjwvYj4NCgkJCQk8L2E+DQoJCTwvcD4NCgkJPGJyIC8+DQoJCTxiciAvPg0KCQk8cD4NCgkJCQk8YSBuYW1lPSJsYXVuY2hfdmMiPg0KCQkJCQkJPGI+TGF1bmNoaW5nIHZpcnR1YWwgY29uc29sZTwvYj4NCgkJCQk8L2E+DQoJCTwvcD4NCgkJPGJyIC8+DQoJCTxwPg0KCQkJCTxhIG5hbWU9InN1cGVybWljcm9fdmMiPg0KCQkJCQkJPGI+U3VwZXJtaWNybyB2aXJ0dWFsIGNvbnNvbGU8L2I+DQoJCQkJPC9hPg0KCQk8L3A+DQoJCTxiciAvPg0KCQk8YnIgLz4NCkluIGEgd2ViIGJyb3dzZXIsIHR5cGUgdGhlIDE5OC4xOS4xOS4yMCBJUCBhZGRyZXNzLCBhbmQgbG9nIGluIHVzaW5nIHRoZSBJUE1JIGFjY2VzcyBjcmVkZW50aWFscyBmcm9tIHlvdXIgV2VsY29tZSBlbWFpbC48YnIgLz48YnIgLz48aW1nIGNsYXNzPSJrYi1pbWFnZSIgc3JjPSJodHRwczovL05hbWVjaGVhcC5zaW1wbGVrYi5jb20vU2l0ZUNvbnRlbnRzLzItN0MyMkQ1MjM2QTQ1NDNFQjgyN0YzQkQ4OTM2RTE1M0UvbWVkaWEvZGVkaWMxLnBuZyIgLz48YnIgLz48YnIgLz4NCkRlcGVuZGluZyBvbiB0aGUgSVBNSSB2ZXJzaW9uLCB5b3Ugd2lsbCBoYXZlIHRoZSBvcHRpb24gdG8gbGF1bmNoIGEgSmF2YSBjb25zb2xlIG9yIGNob29zZSBiZXR3ZWVuIEphdmEgYW5kIEhUTUw1IGNvbnNvbGUuIFRoZSBkaWZmZXJlbmNlIGJldHdlZW4gdGhlc2UgdHdvIGlzIHRoZSBmb2xsb3dpbmc6PGJyIC8+PHVsPjxsaT5mb3IgdGhlIEphdmEgY29uc29sZSB0byB3b3JrIHByb3Blcmx5IHlvdSB3aWxsIG5lZWQgdG8gaGF2ZSBKYXZhIGluc3RhbGxlZCBvbiB5b3VyIGNvbXB1dGVyLCBhbmQgdGhlIGNvbnNvbGUgd2lsbCBiZSBsYXVuY2hlZCBpbiBhIHNlcGFyYXRlIHdpbmRvdzs8L2xpPjxsaT5IVE1MNSBjb25zb2xlIGlzIGxhdW5jaGVkIGluIGEgbmV3IGJyb3dzZXIgdGFiIGFuZCBpdCByZXF1aXJlcyBubyBhZGRpdGlvbmFsIHNvZnR3YXJlIGluc3RhbGxlZCBsb2NhbGx5LjwvbGk+PC91bD48YnIgLz4NClRvIGNoZWNrIHdoaWNoIGNvbnNvbGUgaXMgYXZhaWxhYmxlLCBnbyB0byA8Yj5SZW1vdGUgQ29udHJvbDwvYj4gwrsgPGI+Q29uc29sZSByZWRpcmVjdGlvbiAob3IgUmVtb3RlIENvbnNvbGUpPC9iPi4gSWYgdGhlcmUgaXMgb25seSBhIEphdmEgY29uc29sZSBhdmFpbGFibGUsIHlvdSB3aWxsIHNlZSBvbmx5IHRoZSBidXR0b24g4oCcTGF1bmNoIENvbnNvbGXigJ0uIElmIEhUTUw1IGlzIGFsc28gYXZhaWxhYmxlLCB5b3Ugd2lsbCBzZWUgdGhlIGZvbGxvd2luZyB0ZXh0IGFuZCB0aGUgb3B0aW9uIHRvIHN3aXRjaCBiZXR3ZWVuIGludGVyZmFjZXM6PGJyIC8+PGJyIC8+PGltZyBjbGFzcz0ia2ItaW1hZ2UiIHNyYz0iaHR0cHM6Ly9OYW1lY2hlYXAuc2ltcGxla2IuY29tL1NpdGVDb250ZW50cy8yLTdDMjJENTIzNkE0NTQzRUI4MjdGM0JEODkzNkUxNTNFL21lZGlhL2RlZGljMi5wbmciIC8+PGJyIC8+PGJyIC8+PHA+PGEgbmFtZT0iamF2YV9jb25zb2xlIj48Yj5KYXZhIGNvbnNvbGU8L2I+PC9hPjwvcD48YnIgLz4NClRvIGxhdW5jaCB0aGUgY29uc29sZSBjbGljayBvbiBhIGJsYWNrIHNjcmVlbiBpbnNpZGUgdGhlIDxiPlJlbW90ZSBjb25zb2xlIHByZXZpZXc8L2I+IGFyZWEgKG9uIHRoZSBtYWluIHBhZ2UpLCBvciBuYXZpZ2F0ZSB0byB0aGUgdXBwZXIgbWVudTogPGI+UmVtb3RlIENvbnRyb2w8L2I+IMK7IDxiPkNvbnNvbGUgcmVkaXJlY3Rpb24ob3IgUmVtb3RlIENvbnNvbGUpPC9iPiBhbmQgY2xpY2sgdGhlIDxiPkxhdW5jaCBDb25zb2xlPC9iPiBidXR0b24uPGJyIC8+PGJyIC8+DQpBIDxiPjxpPmxhdW5jaC5qbmxwPC9pPjwvYj4gZmlsZSB3aWxsIGJlIGRvd25sb2FkZWQgdG8geW91ciB3b3Jrc3RhdGlvbi4gT3BlbiBpdCB3aGVuIHRoZSBkb3dubG9hZCBoYXMgZmluaXNoZWQsIGNoZWNrIHRoZSA8Yj48aT5JIGFjY2VwdCB0aGUgcmlzayBhbmQgd2FudCB0byBydW4gdGhpcyBhcHBsaWNhdGlvbjwvaT48L2I+IGNoZWNrYm94LCBhbmQgaGl0IDxiPlJ1bjwvYj4uPGJyIC8+PGJyIC8+PGltZyBjbGFzcz0ia2ItaW1hZ2UiIHNyYz0iaHR0cHM6Ly9OYW1lY2hlYXAuc2ltcGxla2IuY29tL1NpdGVDb250ZW50cy8yLTdDMjJENTIzNkE0NTQzRUI4MjdGM0JEODkzNkUxNTNFL21lZGlhL2RlZGljMy5wbmciIC8+PGJyIC8+PGJyIC8+DQpJZiB5b3Ugc2VlIHRoZSBmb2xsb3dpbmcgc2VjdXJpdHkgbWVzc2FnZTo8YnIgLz48YnIgLz48aW1nIGNsYXNzPSJrYi1pbWFnZSIgc3JjPSJodHRwczovL05hbWVjaGVhcC5zaW1wbGVrYi5jb20vU2l0ZUNvbnRlbnRzLzItN0MyMkQ1MjM2QTQ1NDNFQjgyN0YzQkQ4OTM2RTE1M0UvbWVkaWEvZGVkaWM0LnBuZyIgLz48YnIgLz48YnIgLz4NCllvdSdsbCBuZWVkIHRvIDxhIGhyZWY9Imh0dHBzOi8vd3d3Lm5hbWVjaGVhcC5jb20vc3VwcG9ydC9rbm93bGVkZ2ViYXNlL2FydGljbGUuYXNweC8xMDA4NC8yMTg4L3Jlc2V0dGluZy1kZWRpY2F0ZWQtc2VydmVyLXJvb3QtcGFzc3dvcmQtdmlhLXZpcnR1YWwtY29uc29sZS8jZXhjZXB0aW9uX3NpdGVfbGlzdCI+Y29uZmlndXJlIHlvdXIgPGI+RXhjZXB0aW9uIFNpdGUgTGlzdDwvYj48L2E+IGFuZCA8Yj5TZWN1cml0eSBsZXZlbHM8L2I+IHRocm91Z2ggdGhlIDxiPkphdmEgQ29udHJvbCBQYW5lbDwvYj4uPGJyIC8+PGJyIC8+DQpUaGVuLCB5b3Ugc2hvdWxkIGJlIGFibGUgdG8gbGF1bmNoIDxiPlZpcnR1YWwgQ29uc29sZTwvYj4uPGJyIC8+PGJyIC8+PHA+PGEgbmFtZT0iaHRtbDVfY29uc29sZSI+PGI+SFRNTDUgY29uc29sZTwvYj48L2E+PC9wPjxiciAvPg0KTmF2aWdhdGUgdG8gdGhlIHVwcGVyIG1lbnU6IDxiPlJlbW90ZSBDb250cm9sPC9iPiDCuyA8Yj5Db25zb2xlIHJlZGlyZWN0aW9uIChvciBSZW1vdGUgQ29uc29sZSk8L2I+LjxiciAvPg0KVmVyaWZ5IHRoYXQgdGhlIGN1cnJlbnQgaW50ZXJmYWNlIGlzIGluZGljYXRlZCBhcyBIVE1MNS4gSWYgbm90LCBjbGljayB0aGUgbGluayBvbiB0aGlzIHBhZ2UgdG8gc3dpdGNoIGl0IGFuZCBzYXZlIHRoZSBjaGFuZ2VzLjxiciAvPjxiciAvPjxpbWcgY2xhc3M9ImtiLWltYWdlIiBzcmM9Imh0dHBzOi8vTmFtZWNoZWFwLnNpbXBsZWtiLmNvbS9TaXRlQ29udGVudHMvMi03QzIyRDUyMzZBNDU0M0VCODI3RjNCRDg5MzZFMTUzRS9tZWRpYS9kZWRpYzUucG5nIiAvPjxiciAvPjxiciAvPg0KQ2xpY2sgdGhlIDxiPkxhdW5jaCBDb25zb2xlPC9iPiBidXR0b24uIFRoZSBjb25zb2xlIHdpbGwgYmUgb3BlbmVkIGluIGEgbmV3IHRhYi48YnIgLz48YnIgLz48cD48YSBuYW1lPSJleGNlcHRpb25fc2l0ZV9saXN0Ij48Yj5BZGp1c3RpbmcgRXhjZXB0aW9uIFNpdGUgTGlzdDwvYj48L2E+PC9wPjxiciAvPg0KVGhlIDxiPkV4Y2VwdGlvbiBTaXRlIExpc3Q8L2I+IHByb3ZpZGVzIHVzZXJzIHdpdGggdGhlIG9wdGlvbiBvZiBhbGxvd2luZyBhcHBsZXRzIG9uIGEgc2l0ZS1ieS1zaXRlIGJhc2lzLCB0aGVyZWZvcmUgbWluaW1pemluZyB0aGUgcmlzayBvZiB1c2luZyBtb3JlIHBlcm1pc3NpdmUgc2V0dGluZ3MuPGJyIC8+PGJyIC8+DQpGb2xsb3cgdGhlIHN0ZXBzIGJlbG93IHRvIGNvbmZpZ3VyZSB0aGUgZXhjZXB0aW9uIHNpdGUgbGlzdDoNCjx1bD48bGk+T3BlbiB0aGUgPGI+SmF2YSBDb250cm9sIFBhbmVsPC9iPiBhcHAuPC9saT48bGk+TmF2aWdhdGUgdG8gdGhlIDxiPlNlY3VyaXR5PC9iPiB0YWIuPC9saT48bGk+SWYgdGhlIDxiPlNlY3VyaXR5IExldmVsPC9iPiBpcyBzZXQgdG8gPGI+VmVyeSBIaWdoPC9iPiwgcmVkdWNlIGl0IHRvIDxiPkhpZ2g8L2I+LiBDbGljayA8Yj5BcHBseTwvYj4uPC9saT48bGk+Q2xpY2sgPGI+RWRpdCBTaXRlIExpc3Q8L2I+IHRvIGdldCB0aGUgZGlhbG9nIHRoYXQgd2lsbCBhbGxvdyB5b3UgdG8gYWRkIHRoZSBhcHBsaWNhdGlvbidzIFVSTCB0byB0aGUgPGI+RXhjZXB0aW9uIFNpdGUgTGlzdDwvYj4uPC9saT48bGk+Q2xpY2sgPGI+QWRkPC9iPiBpbiB0aGUgPGI+RXhjZXB0aW9uIFNpdGUgTGlzdDwvYj4gd2luZG93LjwvbGk+PGxpPkNsaWNrIGluIHRoZSBlbXB0eSBmaWVsZCB1bmRlciB0aGUgPGI+TG9jYXRpb248L2I+IGZpZWxkIHRvIGVudGVyIHRoZSBVUkwuIChUaGUgVVJMIHNob3VsZCBiZWdpbiB3aXRoIGh0dHA6Ly8gb3IgaHR0cHM6Ly8pLjwvbGk+PGxpPkNsaWNrIDxiPkNvbnRpbnVlPC9iPiBvbiB0aGUgPGI+U2VjdXJpdHkgV2FybmluZzwvYj4gZGlhbG9nLjwvbGk+PGxpPkNsaWNrIDxiPk9LPC9iPiB0byBzYXZlIGNoYW5nZXMgbWFkZSB0byB0aGUgSmF2YSBDb250cm9sIFBhbmVsLjwvbGk+PC91bD48YnIgLz48YnIgLz48YnIgLz48aW1nIGNsYXNzPSJrYi1pbWFnZSIgc3JjPSJodHRwczovL05hbWVjaGVhcC5zaW1wbGVrYi5jb20vU2l0ZUNvbnRlbnRzLzItN0MyMkQ1MjM2QTQ1NDNFQjgyN0YzQkQ4OTM2RTE1M0UvbWVkaWEvZGVkaWMyMi5wbmciIC8+PGJyIC8+PGJyIC8+PHA+PGEgbmFtZT0iaURSQUNfdmMiPjxiPmlEUkFDIHZpcnR1YWwgY29uc29sZTwvYj48L2E+PC9wPjxiciAvPg0KSW4gYSB3ZWIgYnJvd3NlciwgdHlwZSAxOTguMTguMTkuMjAgSVAgYWRkcmVzcywgYW5kIGxvZyBpbiB1c2luZyBJUE1JIGFjY2VzcyBjcmVkZW50aWFscyBmcm9tIHlvdXIgV2VsY29tZSBlbWFpbC48YnIgLz48YnIgLz48aW1nIGNsYXNzPSJrYi1pbWFnZSIgc3JjPSJodHRwczovL05hbWVjaGVhcC5zaW1wbGVrYi5jb20vU2l0ZUNvbnRlbnRzLzItN0MyMkQ1MjM2QTQ1NDNFQjgyN0YzQkQ4OTM2RTE1M0UvbWVkaWEvZGVkaWM2LnBuZyIgLz48YnIgLz48YnIgLz4NCkRlcGVuZGluZyBvbiB0aGUgSVBNSSB2ZXJzaW9uLCB5b3Ugd2lsbCBiZSBhYmxlIHRvIGNob29zZSBiZXR3ZWVuIEphdmEgYW5kIEhUTUw1IGNvbnNvbGVzLiBUaGUgZGlmZmVyZW5jZSBiZXR3ZWVuIHRoZXNlIHR3byBpcyB0aGUgZm9sbG93aW5nOjxiciAvPjx1bD48bGk+Zm9yIHRoZSBKYXZhIGNvbnNvbGUgdG8gd29yayBwcm9wZXJseSB5b3Ugd2lsbCBuZWVkIHRvIGhhdmUgSmF2YSBpbnN0YWxsZWQgb24geW91ciBjb21wdXRlciwgYW5kIHRoZSBjb25zb2xlIHdpbGwgYmUgbGF1bmNoZWQgaW4gYSBzZXBhcmF0ZSB3aW5kb3c7PC9saT48bGk+SFRNTDUgY29uc29sZSBpcyBsYXVuY2hlZCBpbiBhIG5ldyBicm93c2VyIHRhYiBhbmQgZG9lcyBub3QgcmVxdWlyZSBhbnkgYWRkaXRpb25hbCBzb2Z0d2FyZSBpbnN0YWxsZWQgbG9jYWxseS48L2xpPjwvdWw+PGJyIC8+DQpJbiBtb3N0IGNhc2VzLCBIVE1MNSBpcyB0aGUgZGVmYXVsdCBvbmUuPGJyIC8+DQpUbyBjaGFuZ2UgdGhlIGludGVyZmFjZSBvciB2ZXJpZnkgaXQgZ28gdG8gPGI+VmlydHVhbCBDb25zb2xlPC9iPiAob24gdGhlIGxlZnQgcGFuZWwpLiBDaGVjayBhbmQgc2VsZWN0IHRoZSBuZWNlc3NhcnkgdmVyc2lvbiBmb3IgPGI+4oCcUGx1Zy1pbiBUeXBl4oCdPC9iPiwgYW5kIGNsaWNrIDxiPuKAnEFwcGx54oCdPC9iPiB0byBzYXZlIHRoZSBjaGFuZ2VzLjxiciAvPjxiciAvPjxpbWcgY2xhc3M9ImtiLWltYWdlIiBzcmM9Imh0dHBzOi8vTmFtZWNoZWFwLnNpbXBsZWtiLmNvbS9TaXRlQ29udGVudHMvMi03QzIyRDUyMzZBNDU0M0VCODI3RjNCRDg5MzZFMTUzRS9tZWRpYS9kZWRpYzcucG5nIiAvPjxiciAvPjxiciAvPg0KQ2xpY2sgPGI+4oCcU2VydmVy4oCdPC9iPiBvbiB0aGUgbGVmdCBwYW5lbCB0byByZXR1cm4gdG8gdGhlIG1haW4gcGFnZS48YnIgLz48YnIgLz48cD48YSBuYW1lPSJqYXZhX2NvbnNvbGUyIj48Yj5KYXZhIGNvbnNvbGU8L2I+PC9hPjwvcD48YnIgLz4NCkNsaWNrIHRoZSA8Yj5MYXVuY2g8L2I+IGJ1dHRvbjo8YnIgLz48YnIgLz48aW1nIGNsYXNzPSJrYi1pbWFnZSIgc3JjPSJodHRwczovL05hbWVjaGVhcC5zaW1wbGVrYi5jb20vU2l0ZUNvbnRlbnRzLzItN0MyMkQ1MjM2QTQ1NDNFQjgyN0YzQkQ4OTM2RTE1M0UvbWVkaWEvZGVkaWM4LnBuZyIgLz48YnIgLz48YnIgLz4NCkEgPGI+PGk+dmlld2VyLmpubHA8L2k+PC9iPiBmaWxlIHdpbGwgYmUgZG93bmxvYWRlZC4gT3BlbiBpdCBhbmQgY2xpY2sgPGI+Q29udGludWU8L2I+IG9uIGEgc2VjdXJpdHkgd2FybmluZyB3aW5kb3c6PGJyIC8+PGJyIC8+PGltZyBjbGFzcz0ia2ItaW1hZ2UiIHNyYz0iaHR0cHM6Ly9OYW1lY2hlYXAuc2ltcGxla2IuY29tL1NpdGVDb250ZW50cy8yLTdDMjJENTIzNkE0NTQzRUI4MjdGM0JEODkzNkUxNTNFL21lZGlhL2RlZGljOS5wbmciIC8+PGJyIC8+PGJyIC8+DQpZb3UgbWF5IG5lZWQgdG8gPGEgaHJlZj0iaHR0cHM6Ly93d3cubmFtZWNoZWFwLmNvbS9zdXBwb3J0L2tub3dsZWRnZWJhc2UvYXJ0aWNsZS5hc3B4LzEwMDg0LzIxODgvcmVzZXR0aW5nLWRlZGljYXRlZC1zZXJ2ZXItcm9vdC1wYXNzd29yZC12aWEtdmlydHVhbC1jb25zb2xlLyNleGNlcHRpb25fc2l0ZV9saXN0Ij5hZGQgdGhlIGxpbmsgdG8gdGhlIDxiPkV4Y2VwdGlvbiBTaXRlIExpc3Q8L2I+PC9hPiBpbiBKYXZhIENvbmZpZ3VyYXRpb24uPGJyIC8+DQpXaGVuIHRoZSBKYXZhIGFwcGxldCBmaW5pc2hlcyBpbnN0YWxsaW5nLCBjbGljayA8Yj5SdW48L2I+LjxiciAvPjxiciAvPjxpbWcgY2xhc3M9ImtiLWltYWdlIiBzcmM9Imh0dHBzOi8vTmFtZWNoZWFwLnNpbXBsZWtiLmNvbS9TaXRlQ29udGVudHMvMi03QzIyRDUyMzZBNDU0M0VCODI3RjNCRDg5MzZFMTUzRS9tZWRpYS9kZWRpYzEwLnBuZyIgLz48YnIgLz48YnIgLz4NCkFuZCBhY2NlcHQgc2VjdXJpdHkgd2FybmluZzo8YnIgLz48YnIgLz48aW1nIGNsYXNzPSJrYi1pbWFnZSIgc3JjPSJodHRwczovL05hbWVjaGVhcC5zaW1wbGVrYi5jb20vU2l0ZUNvbnRlbnRzLzItN0MyMkQ1MjM2QTQ1NDNFQjgyN0YzQkQ4OTM2RTE1M0UvbWVkaWEvZGVkaWMxMS5wbmciIC8+PGJyIC8+PGJyIC8+PHA+PGEgbmFtZT0iaHRtbDVfY29uc29sZTIiPjxiPkhUTUw1IGNvbnNvbGU8L2I+PC9hPjwvcD48YnIgLz4NCkNsaWNrIHRoZSA8Yj5MYXVuY2g8L2I+IGJ1dHRvbjo8YnIgLz48YnIgLz48aW1nIGNsYXNzPSJrYi1pbWFnZSIgc3JjPSJodHRwczovL05hbWVjaGVhcC5zaW1wbGVrYi5jb20vU2l0ZUNvbnRlbnRzLzItN0MyMkQ1MjM2QTQ1NDNFQjgyN0YzQkQ4OTM2RTE1M0UvbWVkaWEvZGVkaWMxMi5wbmciIC8+PGJyIC8+PGJyIC8+DQpUaGUgY29uc29sZSB3aWxsIGJlIG9wZW5lZCBpbiBhIG5ldyBicm93c2VyIHRhYi48YnIgLz48YnIgLz48YnIgLz48cD48YSBuYW1lPSJhbG1hbGludXg4Ij48Yj5BbG1hbGludXggOC85PC9iPjwvYT48L3A+PGJyIC8+DQpJbiB0aGUgVmlydHVhbCBDb25zb2xlIHdpbmRvdyBuYXZpZ2F0ZSB0byB0aGUgdXBwZXIgbWVudSBhbmQgaGl0IDxiPk1hY3JvPC9iPiDCuyA8Yj5DdHJsICsgQWx0ICsgRGVsZXRlPC9iPiB0byByZWJvb3QgdGhlIHNlcnZlci4gQWZ0ZXIgdGhlIGluc3RhbGxhdGlvbiByZWJvb3RzLCBpdCB3aWxsIGNvbWUgdXAgdG8gYSBib290IGNvdW50ZG93bi4gSGVyZSwgeW91IGNhbiBwcmVzcyBhbnkga2V5IHRvIGdldCB0byB0aGUgPGEgaHJlZj0iaHR0cHM6Ly9lbi53aWtpcGVkaWEub3JnL3dpa2kvR05VX0dSVUIiPjxiPkdSVUI8L2I+IG1lbnU8L2E+LiBZb3Ugd2lsbCBzZWUgYSA8Yj5HUlVCPC9iPiBib290IHByb21wdC4gUHJlc3MgPGI+ZTwvYj4gb24gdGhlIGtleWJvYXJkIHRvIGVkaXQgdGhlIGZpcnN0IGJvb3Qgb3B0aW9uLjxiciAvPjxiciAvPjxpbWcgY2xhc3M9ImtiLWltYWdlIiBzcmM9Imh0dHBzOi8vTmFtZWNoZWFwLnNpbXBsZWtiLmNvbS9TaXRlQ29udGVudHMvMi03QzIyRDUyMzZBNDU0M0VCODI3RjNCRDg5MzZFMTUzRS9tZWRpYS9kZWRpYzE2LnBuZyIgLz48YnIgLz48YnIgLz4NClVzaW5nIGFycm93IGtleXMgZmluZCB0aGUga2VybmVsIGxpbmUgdGhhdCBzdGFydHMgd2l0aCA8Yj48aT5saW51eDwvaT48L2I+IGFuZCBlZGl0IGl0LiBZb3Ugd2lsbCBuZWVkIHRvIGRlbGV0ZSA8Yj48aT5yaGdiIHF1aWV0PC9pPjwvYj4gYXQgdGhlIGVuZCBvZiB0aGUgbGluZSBhbmQgYWRkIDxiPjxpPnJkLmJyZWFrIGVuZm9yY2luZz0wPC9pPjwvYj4gaW5zdGVhZC48YnIgLz48YnIgLz48aW1nIGNsYXNzPSJrYi1pbWFnZSIgc3JjPSJodHRwczovL05hbWVjaGVhcC5zaW1wbGVrYi5jb20vU2l0ZUNvbnRlbnRzLzItN0MyMkQ1MjM2QTQ1NDNFQjgyN0YzQkQ4OTM2RTE1M0UvbWVkaWEvZGVkaWMxNy5wbmciIC8+PGJyIC8+PGJyIC8+DQpQcmVzcyA8Yj5DdHJsICsgWDwvYj4gdG8gYm9vdCBzaW5nbGUtdXNlciBtb2RlLiBGaXJzdCwgd2UgbmVlZCB0byBhZGQgdGhlIHJlYWQgYW5kIHdyaXRlIGFjY2VzcyB0byB0aGUgc3lzcm9vdCBmaWxlc3lzdGVtOjxiciAvPjxiciAvPm1vdW50IC1vIHJlbW91bnQscncgL3N5c3Jvb3Q8YnIgLz48YnIgLz5NYWtlIHN1cmUgdG8gYWRkIGEgc3BhY2UgYmV0d2VlbiB0aGUgPGI+PGk+bW91bnQ8L2k+PC9iPiBhbmQgPGI+PGk+LW88L2k+PC9iPiBhbmQgYmV0d2VlbiA8Yj48aT5ydzwvaT48L2I+IGFuZCA8Yj4vPC9iPi48YnIgLz48YnIgLz4NCk5vdyB5b3UgY2FuIGFjY2VzcyB0aGUgc3lzdGVtIHdpdGggdGhlIGNvbW1hbmQ6PGJyIC8+PGJyIC8+Y2hyb290IC9zeXNyb290PGJyIC8+PGJyIC8+DQpBbmQgdXNlIHRoZSA8Yj48aT5wYXNzd2Q8L2k+PC9iPiBjb21tYW5kIHR5cGluZyB0aGUgbmV3IHBhc3N3b3JkIHR3aWNlIHRvIHNldCBhIG5ldyBwYXNzd29yZC48YnIgLz48YnIgLz48Yj5QTEVBU0UgTk9URTo8L2I+IEl0IGlzIG5vdCBwb3NzaWJsZSB0byBjb3B5L3Bhc3RlIGluIHRoaXMgd2luZG93LjxiciAvPjxiciAvPjxpbWcgY2xhc3M9ImtiLWltYWdlIiBzcmM9Imh0dHBzOi8vTmFtZWNoZWFwLnNpbXBsZWtiLmNvbS9TaXRlQ29udGVudHMvMi03QzIyRDUyMzZBNDU0M0VCODI3RjNCRDg5MzZFMTUzRS9tZWRpYS9kZWRpYzE4LnBuZyIgLz48YnIgLz48YnIgLz48aW1nIGNsYXNzPSJrYi1pbWFnZSIgc3JjPSJodHRwczovL05hbWVjaGVhcC5zaW1wbGVrYi5jb20vU2l0ZUNvbnRlbnRzLzItN0MyMkQ1MjM2QTQ1NDNFQjgyN0YzQkQ4OTM2RTE1M0UvbWVkaWEvZGVkaWMxOS5wbmciIC8+PGJyIC8+PGJyIC8+VHlwZSA8Yj48aT5leGl0PC9pPjwvYj4gdG8gZXhpdCBzeXNyb290LjxiciAvPg0KUmVib290IHRoZSBzZXJ2ZXIgdXNpbmcgdGhlIDxiPjxpPnJlYm9vdCAtZiA8L2k+PC9iPiBjb21tYW5kLiBOb3cgdGhhdCB5b3UgY2FuIGxvZyBpbnRvIHRoZSBzZXJ2ZXIgb3ZlciBTU0ggb3IgYSBjb250cm9sIHBhbmVsLCB5b3XigJlsbCBiZSBhYmxlIHRvIHNldCB1cCBhIG5ldyBtb3JlIHNlY3VyZSByb290IHBhc3N3b3JkLjxiciAvPjxiciAvPjxiciAvPjxwPjxhIG5hbWU9InVidW50dTIyIj48Yj5VYnVudHUgMjI8L2I+PC9hPjwvcD48YnIgLz4NCkluIHRoZSBWaXJ0dWFsIENvbnNvbGUgd2luZG93IG5hdmlnYXRlIHRvIHRoZSB1cHBlciBtZW51IGFuZCBoaXQgPGI+TWFjcm88L2I+IMK7IDxiPkN0cmwgKyBBbHQgKyBEZWxldGU8L2I+IHRvIHJlYm9vdCB0aGUgc2VydmVyLiBBZnRlciB0aGUgaW5zdGFsbGF0aW9uIHJlYm9vdHMsIGtlZXAgaGl0dGluZyB0aGUgPGI+RVNDPC9iPiBrZXkgdG8gZ2V0IHRvIHRoZSA8YSBocmVmPSJodHRwczovL2VuLndpa2lwZWRpYS5vcmcvd2lraS9HTlVfR1JVQiI+PGI+R1JVQjwvYj4gbWVudTwvYT4uIFlvdSB3aWxsIHNlZSBhIDxiPkdSVUI8L2I+IGJvb3QgcHJvbXB0LiBQcmVzcyA8Yj5lPC9iPiBvbiB5b3VyIGtleWJvYXJkIHRvIGVkaXQgdGhlIGZpcnN0IGJvb3Qgb3B0aW9uLjxiciAvPjxiciAvPjxpbWcgY2xhc3M9ImtiLWltYWdlIiBzcmM9Imh0dHBzOi8vTmFtZWNoZWFwLnNpbXBsZWtiLmNvbS9TaXRlQ29udGVudHMvMi03QzIyRDUyMzZBNDU0M0VCODI3RjNCRDg5MzZFMTUzRS9tZWRpYS9kZWRpYzIwLnBuZyIgLz48YnIgLz48YnIgLz4NClVzaW5nIGFycm93IGtleXMgZmluZCB0aGUga2VybmVsIGxpbmUgdGhhdCBzdGFydHMgd2l0aCA8Yj48aT5saW51eDwvaT48L2I+IGFuZCBlZGl0IGl0LiBBZGQgPGI+cncgaW5pdD0vYmluL2Jhc2g8L2I+IHRvIHRoZSBlbmQgb2YgdGhlIGxpbmUuPGJyIC8+UHJlc3MgPGI+Q3RybCArIFg8L2I+IHRvIGJvb3Qgc2luZ2xlLXVzZXIgbW9kZS48YnIgLz48YnIgLz5GaXJzdCBvZiBhbGwsIG1ha2Ugc3VyZSB0aGF0IHlvdXIgdXNlciBoYXMgcmVhZCBhbmQgd3JpdGUgYWNjZXNzIHRvIHRoZSBmaWxlIHN5c3RlbSB3aXRoIHRoZSBmb2xsb3dpbmcgY29tbWFuZDo8YnIgLz48YnIgLz5tb3VudCB8IGdyZXAgLXcgLzxiciAvPjxiciAvPg0KSWYgdGhlIG91dHB1dCBpbmNsdWRlcyA8Yj4ocncscmVhbHRpbWUpPC9iPiwgdGhlbiBldmVyeXRoaW5nIGlzIG9rYXkgYW5kIHlvdSBjYW4gcHJvY2VlZCB3aXRoIHRoZSBwYXNzd29yZCByZXNldC4gVHlwZSA8Yj5wYXNzd2Q8L2I+IHRvIGVudGVyIGEgbmV3IHBhc3N3b3JkLjxiciAvPjxiciAvPjxpbWcgY2xhc3M9ImtiLWltYWdlIiBzcmM9Imh0dHBzOi8vTmFtZWNoZWFwLnNpbXBsZWtiLmNvbS9TaXRlQ29udGVudHMvMi03QzIyRDUyMzZBNDU0M0VCODI3RjNCRDg5MzZFMTUzRS9tZWRpYS9kZWRpYzIxLnBuZyIgLz48YnIgLz48YnIgLz4NClJlYm9vdCB0aGUgc2VydmVyIHdpdGggdGhlIGZvbGxvd2luZyBjb21tYW5kOjxiciAvPjxiciAvPmV4ZWMgL3NiaW4vaW5pdDxiciAvPjxiciAvPg0KTm93IHlvdSBjYW4gYWNjZXNzIHRoZSBzZXJ2ZXIgd2l0aCB0aGUgbmV3IHJvb3QgY3JlZGVudGlhbHMu","NewTillDate":null,"FeaturedTillDate":null,"ModifiedDateTime":"2025-10-17T11:51:15.0000000","LiveDateTime":"1754-02-02T00:00:00.0000000","CreatedDateTime":"2018-11-26T13:21:05.0000000","ApprovalDatetime":"2018-11-26T14:46:50.0000000","RequestCount":31280,"MarkedAsNew":false,"MarkedAsFeatured":false,"RatingValue":3,"CategoryPaths":[{"__type":"Nc:SimpleKB:Abstractions:Dtos:CategoryPathDto","Level":1,"CategoryId":12,"CategoryName":"Hosting"},{"__type":"Nc:SimpleKB:Abstractions:Dtos:CategoryPathDto","Level":2,"CategoryId":2188,"CategoryName":"Dedicated Server"}],"AssociatedCategories":[{"CategoryId":2188,"CategoryName":"Dedicated Server","CategoryDisplayName":"HostingDedicated Server"}],"AssociatedTags":[{"TagId":21177,"Tag":" password"},{"TagId":25774,"Tag":" dedicated server"},{"TagId":30653,"Tag":" reset"},{"TagId":83319,"Tag":"root"},{"TagId":83320,"Tag":" virtual console"}],"RelatedArticles":[],"AssociatedMedias":[],"PreferredCategoryId":0,"RootParentCategoryName":"","RootParentCategoryId":0},"status":200,"statusText":"OK"},"/api/v1/ncpl/simplekb/getcategorybycategoryid:\"{\\\"categoryId\\\":2188}\"":{"body":{"__type":"Nc:SimpleKB:Abstractions:Dtos:CategoryDto","ParentCategoryId":12,"Parent_Category_Name":"Hosting","FriendlyId":null,"ApprovedYN":true,"TreatAsTopicYN":false,"CreatedDateTime":"04/25/2013 17:59:30","CurrentCategoryPaths":[{"__type":"Nc:SimpleKB:Abstractions:Dtos:CategoryPathDto","Level":1,"CategoryId":12,"CategoryName":"Hosting"},{"__type":"Nc:SimpleKB:Abstractions:Dtos:CategoryPathDto","Level":2,"CategoryId":2188,"CategoryName":"Dedicated Server"}],"RelatedCategories":[],"AssociatedArticles":[{"ArticleId":9979,"Title":"What operating systems are available with a VPS/Dedicated Server","ArticleName":"What operating systems are available with a VPS/Dedicated Server","LiveDateTime":"02/02/1754 00:00:00","NewTillDate":null,"FeaturedTillDate":null,"ModifiedDateTime":"04/14/2026"},{"ArticleId":9989,"Title":"What is the difference between Shared Hosting and Dedicated server","ArticleName":"What is the difference between Shared Hosting and Dedicated server","LiveDateTime":"02/02/1754 00:00:00","NewTillDate":null,"FeaturedTillDate":null,"ModifiedDateTime":"12/24/2024"},{"ArticleId":10054,"Title":"What is an Outlet (Clearance) Dedicated server?","ArticleName":"What is an Outlet (Clearance) Dedicated server?","LiveDateTime":"02/02/1754 00:00:00","NewTillDate":null,"FeaturedTillDate":null,"ModifiedDateTime":"12/19/2019"},{"ArticleId":10084,"Title":"Resetting Dedicated server root password via Virtual Console","ArticleName":"Resetting Dedicated server root password via Virtual Console","LiveDateTime":"02/02/1754 00:00:00","NewTillDate":null,"FeaturedTillDate":null,"ModifiedDateTime":"10/17/2025"},{"ArticleId":10085,"Title":"How to set up automated backups for VPS and Dedicated server","ArticleName":"How to set up automated backups for VPS and Dedicated server","LiveDateTime":"02/02/1754 00:00:00","NewTillDate":null,"FeaturedTillDate":null,"ModifiedDateTime":"02/18/2022"},{"ArticleId":10107,"Title":"How to set up a DNS zone on a server without cPanel","ArticleName":"How to set up a DNS zone on a server without cPanel","LiveDateTime":"02/02/1754 00:00:00","NewTillDate":null,"FeaturedTillDate":null,"ModifiedDateTime":"02/07/2025"},{"ArticleId":10108,"Title":"Resolving Disk Space issues on a VPS/Dedicated server","ArticleName":"Resolving Disk Space issues on a VPS/Dedicated server","LiveDateTime":"02/02/1754 00:00:00","NewTillDate":null,"FeaturedTillDate":null,"ModifiedDateTime":"04/04/2019"},{"ArticleId":10202,"Title":"How to install Node.js on a VPS or a Dedicated server","ArticleName":"How to install Node.js on a VPS or a Dedicated server","LiveDateTime":"02/02/1754 00:00:00","NewTillDate":null,"FeaturedTillDate":null,"ModifiedDateTime":"05/20/2024"},{"ArticleId":10220,"Title":"What is a Dedicated Server?","ArticleName":"What is a Dedicated Server?","LiveDateTime":"02/02/1754 00:00:00","NewTillDate":null,"FeaturedTillDate":null,"ModifiedDateTime":"04/29/2020"},{"ArticleId":10221,"Title":"Private Network on Dedicated servers","ArticleName":"Private Network on Dedicated servers","LiveDateTime":"02/02/1754 00:00:00","NewTillDate":null,"FeaturedTillDate":null,"ModifiedDateTime":"02/07/2025"},{"ArticleId":10231,"Title":"Is there any downtime when I change between Shared Hosting plans and/or Reseller Hosting plans?","ArticleName":"Is there any downtime when I change between Shared Hosting plans and/or Reseller Hosting plans?","LiveDateTime":"02/02/1754 00:00:00","NewTillDate":null,"FeaturedTillDate":null,"ModifiedDateTime":"05/09/2025"},{"ArticleId":10232,"Title":"How can I change the operating system on my VPS/Dedicated Server","ArticleName":"How can I change the operating system on my VPS/Dedicated Server","LiveDateTime":"02/02/1754 00:00:00","NewTillDate":null,"FeaturedTillDate":null,"ModifiedDateTime":"07/19/2024"},{"ArticleId":10295,"Title":"SATA 3 vs M.2 vs NVMe SSD - Faster future for everyone","ArticleName":"SATA 3 vs M.2 vs NVMe SSD - Faster future for everyone","LiveDateTime":"02/02/1754 00:00:00","NewTillDate":null,"FeaturedTillDate":null,"ModifiedDateTime":"08/28/2020"},{"ArticleId":10319,"Title":"How to install VestaCP on a VPS/Dedicated Server","ArticleName":"How to install VestaCP on a VPS/Dedicated Server","LiveDateTime":"02/02/1754 00:00:00","NewTillDate":null,"FeaturedTillDate":null,"ModifiedDateTime":"02/07/2025"},{"ArticleId":10328,"Title":"How to install Linux, Apache, MariaDB, PHP stack (LAMP) on AlmaLinux and host a website","ArticleName":"How to install Linux, Apache, MariaDB, PHP stack (LAMP) on AlmaLinux and host a website","LiveDateTime":"02/02/1754 00:00:00","NewTillDate":null,"FeaturedTillDate":null,"ModifiedDateTime":"07/21/2025"},{"ArticleId":10330,"Title":"How to install Linux, Apache, MariaDB, PHP stack (LAMP) on Ubuntu and host a website","ArticleName":"How to install Linux, Apache, MariaDB, PHP stack (LAMP) on Ubuntu and host a website","LiveDateTime":"02/02/1754 00:00:00","NewTillDate":null,"FeaturedTillDate":null,"ModifiedDateTime":"11/09/2020"},{"ArticleId":10596,"Title":"How does a dedicated server work?","ArticleName":"How does a dedicated server work?","LiveDateTime":"02/02/1754 00:00:00","NewTillDate":null,"FeaturedTillDate":null,"ModifiedDateTime":"04/09/2024"},{"ArticleId":10768,"Title":"What is Proxmox VE?","ArticleName":"What is Proxmox VE?","LiveDateTime":"02/02/1754 00:00:00","NewTillDate":null,"FeaturedTillDate":null,"ModifiedDateTime":"01/16/2026"},{"ArticleId":9409,"Title":"How to configure initial WHM settings (VPS and Dedicated server)","ArticleName":"How to configure initial WHM settings (VPS and Dedicated server)","LiveDateTime":"02/02/1754 00:00:00","NewTillDate":null,"FeaturedTillDate":null,"ModifiedDateTime":"12/15/2021"},{"ArticleId":9661,"Title":"How to manage features in WHM","ArticleName":"How to manage features in WHM","LiveDateTime":"02/02/1754 00:00:00","NewTillDate":null,"FeaturedTillDate":null,"ModifiedDateTime":"05/12/2022"},{"ArticleId":9309,"Title":"How to access IPMI for dedicated servers","ArticleName":"How to access IPMI for dedicated servers","LiveDateTime":"02/02/1754 00:00:00","NewTillDate":null,"FeaturedTillDate":null,"ModifiedDateTime":"02/07/2025"},{"ArticleId":207,"Title":"How to set up personal nameservers (VPS and Dedicated servers)","ArticleName":"How to set up personal nameservers (VPS and Dedicated servers)","LiveDateTime":"02/02/1754 00:00:00","NewTillDate":null,"FeaturedTillDate":null,"ModifiedDateTime":"07/01/2022"},{"ArticleId":9211,"Title":"How to order cPanel/WHM for a VPS/Dedicated server","ArticleName":"How to order cPanel/WHM for a VPS/Dedicated server","LiveDateTime":"02/02/1754 00:00:00","NewTillDate":null,"FeaturedTillDate":null,"ModifiedDateTime":"04/22/2026"},{"ArticleId":9212,"Title":"How to order Softaculous for a dedicated server/VPS","ArticleName":"How to order Softaculous for a dedicated server/VPS","LiveDateTime":"02/02/1754 00:00:00","NewTillDate":null,"FeaturedTillDate":null,"ModifiedDateTime":"05/09/2025"},{"ArticleId":9213,"Title":"What Dedicated Server Management options do you provide?","ArticleName":"What Dedicated Server Management options do you provide?","LiveDateTime":"02/02/1754 00:00:00","NewTillDate":null,"FeaturedTillDate":null,"ModifiedDateTime":"12/30/2025"},{"ArticleId":9215,"Title":"How to upgrade RAM/bandwidth/disk space on a VPS/Dedicated server","ArticleName":"How to upgrade RAM/bandwidth/disk space on a VPS/Dedicated server","LiveDateTime":"02/02/1754 00:00:00","NewTillDate":null,"FeaturedTillDate":null,"ModifiedDateTime":"04/20/2026"},{"ArticleId":9223,"Title":"How to order additional IP addresses for a Dedicated Server","ArticleName":"How to order additional IP addresses for a Dedicated Server","LiveDateTime":"02/02/1754 00:00:00","NewTillDate":null,"FeaturedTillDate":null,"ModifiedDateTime":"02/06/2025"},{"ArticleId":9227,"Title":"How to increase port speed on a Dedicated server","ArticleName":"How to increase port speed on a Dedicated server","LiveDateTime":"02/02/1754 00:00:00","NewTillDate":null,"FeaturedTillDate":null,"ModifiedDateTime":"09/13/2024"},{"ArticleId":9224,"Title":"How to order additional bandwidth for a Dedicated Server","ArticleName":"How to order additional bandwidth for a Dedicated Server","LiveDateTime":"02/02/1754 00:00:00","NewTillDate":null,"FeaturedTillDate":null,"ModifiedDateTime":"02/06/2025"},{"ArticleId":9221,"Title":"How much does it cost to transfer the content of my account to a Dedicated server?","ArticleName":"How much does it cost to transfer the content of my account to a Dedicated server?","LiveDateTime":"02/02/1754 00:00:00","NewTillDate":null,"FeaturedTillDate":null,"ModifiedDateTime":"05/09/2025"},{"ArticleId":9225,"Title":"Backups for Dedicated servers with Complete management","ArticleName":"Backups for Dedicated servers with Complete management","LiveDateTime":"02/02/1754 00:00:00","NewTillDate":null,"FeaturedTillDate":null,"ModifiedDateTime":"03/07/2023"},{"ArticleId":9942,"Title":"How to reboot VPS or dedicated server through WHM","ArticleName":"How to reboot VPS or dedicated server through WHM","LiveDateTime":"02/02/1754 00:00:00","NewTillDate":null,"FeaturedTillDate":null,"ModifiedDateTime":"12/16/2021"},{"ArticleId":9944,"Title":"How to change the root password via WHM","ArticleName":"How to change the root password via WHM","LiveDateTime":"02/02/1754 00:00:00","NewTillDate":null,"FeaturedTillDate":null,"ModifiedDateTime":"02/07/2025"},{"ArticleId":9849,"Title":"How to change PHP configuration on a VPS/Dedicated server (for EasyApache 4)","ArticleName":"How to change PHP configuration on a VPS/Dedicated server (for EasyApache 4)","LiveDateTime":"02/02/1754 00:00:00","NewTillDate":null,"FeaturedTillDate":null,"ModifiedDateTime":"07/23/2024"},{"ArticleId":9742,"Title":"What is a CXS License?","ArticleName":"What is a CXS License?","LiveDateTime":"02/02/1754 00:00:00","NewTillDate":null,"FeaturedTillDate":null,"ModifiedDateTime":"08/18/2025"},{"ArticleId":9660,"Title":"How to work with cPHulk","ArticleName":"How to work with cPHulk","LiveDateTime":"02/02/1754 00:00:00","NewTillDate":null,"FeaturedTillDate":null,"ModifiedDateTime":"11/30/2021"},{"ArticleId":9662,"Title":"How to work with the CSF plugin","ArticleName":"How to work with the CSF plugin","LiveDateTime":"02/02/1754 00:00:00","NewTillDate":null,"FeaturedTillDate":null,"ModifiedDateTime":"12/26/2024"},{"ArticleId":9670,"Title":"How to install Softaculous on a VPS/Dedicated server with cPanel/WHM","ArticleName":"How to install Softaculous on a VPS/Dedicated server with cPanel/WHM","LiveDateTime":"02/02/1754 00:00:00","NewTillDate":null,"FeaturedTillDate":null,"ModifiedDateTime":"12/21/2021"},{"ArticleId":9672,"Title":"How to install the Vade Retro Plugin on VPS/Dedicated server with cPanel/WHM","ArticleName":"How to install the Vade Retro Plugin on VPS/Dedicated server with cPanel/WHM","LiveDateTime":"02/02/1754 00:00:00","NewTillDate":null,"FeaturedTillDate":null,"ModifiedDateTime":"12/14/2021"},{"ArticleId":9549,"Title":"RAID technology – Explained","ArticleName":"RAID technology – Explained","LiveDateTime":"02/02/1754 00:00:00","NewTillDate":null,"FeaturedTillDate":null,"ModifiedDateTime":"02/06/2025"}],"AssociatedTags":[{"TagId":27348,"Tag":"cxs"}],"CategoryId":2188,"CategoryName":"Dedicated Server"},"status":200,"statusText":"OK"},"/api/v1/ncpl/simplekb/getcategories:\"{\\\"parentCategoryId\\\":0,\\\"getTree\\\":true}\"":{"body":[{"__type":"Nc:SimpleKB:Abstractions:Dtos:CategoryItemDto","ParentCategoryId":93,"TreatAsTopicYN":false,"Description":"","ImageUrl":"","ShortDesc":"","CategoryId":2216,"CategoryName":"Spam Protection"},{"__type":"Nc:SimpleKB:Abstractions:Dtos:CategoryItemDto","ParentCategoryId":14,"TreatAsTopicYN":false,"Description":"","ImageUrl":"","ShortDesc":"","CategoryId":2217,"CategoryName":"Renewal"},{"__type":"Nc:SimpleKB:Abstractions:Dtos:CategoryItemDto","ParentCategoryId":14,"TreatAsTopicYN":false,"Description":"","ImageUrl":"","ShortDesc":"","CategoryId":2218,"CategoryName":"cPanel SSL Plugin"},{"__type":"Nc:SimpleKB:Abstractions:Dtos:CategoryItemDto","ParentCategoryId":12,"TreatAsTopicYN":false,"Description":"","ImageUrl":"","ShortDesc":"","CategoryId":2219,"CategoryName":"PHP Configuration"},{"__type":"Nc:SimpleKB:Abstractions:Dtos:CategoryItemDto","ParentCategoryId":14,"TreatAsTopicYN":false,"Description":"","ImageUrl":"","ShortDesc":"","CategoryId":2221,"CategoryName":"Multi-Domain SSL Certificates"},{"__type":"Nc:SimpleKB:Abstractions:Dtos:CategoryItemDto","ParentCategoryId":14,"TreatAsTopicYN":false,"Description":"","ImageUrl":"","ShortDesc":"","CategoryId":2222,"CategoryName":"Cancellation"},{"__type":"Nc:SimpleKB:Abstractions:Dtos:CategoryItemDto","ParentCategoryId":14,"TreatAsTopicYN":false,"Description":"","ImageUrl":"","ShortDesc":"","CategoryId":2223,"CategoryName":"Browser errors"},{"__type":"Nc:SimpleKB:Abstractions:Dtos:CategoryItemDto","ParentCategoryId":14,"TreatAsTopicYN":false,"Description":"","ImageUrl":"","ShortDesc":"","CategoryId":2224,"CategoryName":"Site Seal, Logo"},{"__type":"Nc:SimpleKB:Abstractions:Dtos:CategoryItemDto","ParentCategoryId":12,"TreatAsTopicYN":false,"Description":"","ImageUrl":"","ShortDesc":"","CategoryId":2225,"CategoryName":"SEO"},{"__type":"Nc:SimpleKB:Abstractions:Dtos:CategoryItemDto","ParentCategoryId":93,"TreatAsTopicYN":false,"Description":"","ImageUrl":"","ShortDesc":"","CategoryId":2226,"CategoryName":"Email Migration"},{"__type":"Nc:SimpleKB:Abstractions:Dtos:CategoryItemDto","ParentCategoryId":2211,"TreatAsTopicYN":false,"Description":"","ImageUrl":"","ShortDesc":"","CategoryId":2227,"CategoryName":"SSL Resellers"},{"__type":"Nc:SimpleKB:Abstractions:Dtos:CategoryItemDto","ParentCategoryId":0,"TreatAsTopicYN":true,"Description":"","ImageUrl":"/assets/img/pictograms/150/cloud-red.png","ShortDesc":"","CategoryId":2228,"CategoryName":"Apps","SubCategories":[{"__type":"Nc:SimpleKB:Abstractions:Dtos:CategoryItemDto","ParentCategoryId":2228,"TreatAsTopicYN":false,"Description":"","ImageUrl":"","ShortDesc":"","CategoryId":2251,"CategoryName":"Supersonic CDN"},{"__type":"Nc:SimpleKB:Abstractions:Dtos:CategoryItemDto","ParentCategoryId":2228,"TreatAsTopicYN":false,"Description":"","ImageUrl":"","ShortDesc":"","CategoryId":2298,"CategoryName":"Site Maker"},{"__type":"Nc:SimpleKB:Abstractions:Dtos:CategoryItemDto","ParentCategoryId":2228,"TreatAsTopicYN":false,"Description":"","ImageUrl":"","ShortDesc":"","CategoryId":177,"CategoryName":"Google Workspace (formerly G Suite)"}]},{"__type":"Nc:SimpleKB:Abstractions:Dtos:CategoryItemDto","ParentCategoryId":2211,"TreatAsTopicYN":false,"Description":"","ImageUrl":"","ShortDesc":"","CategoryId":2229,"CategoryName":"Hosting Resellers"},{"__type":"Nc:SimpleKB:Abstractions:Dtos:CategoryItemDto","ParentCategoryId":34,"TreatAsTopicYN":false,"Description":"","ImageUrl":"","ShortDesc":"","CategoryId":2232,"CategoryName":"DNSSEC"},{"__type":"Nc:SimpleKB:Abstractions:Dtos:CategoryItemDto","ParentCategoryId":34,"TreatAsTopicYN":false,"Description":"","ImageUrl":"","ShortDesc":"","CategoryId":2234,"CategoryName":"Google Workspace (formerly G Suite)"},{"__type":"Nc:SimpleKB:Abstractions:Dtos:CategoryItemDto","ParentCategoryId":34,"TreatAsTopicYN":false,"Description":"","ImageUrl":"","ShortDesc":"","CategoryId":2237,"CategoryName":"Host records setup"},{"__type":"Nc:SimpleKB:Abstractions:Dtos:CategoryItemDto","ParentCategoryId":14,"TreatAsTopicYN":false,"Description":"","ImageUrl":"","ShortDesc":"","CategoryId":2238,"CategoryName":"SSL installation errors"},{"__type":"Nc:SimpleKB:Abstractions:Dtos:CategoryItemDto","ParentCategoryId":0,"TreatAsTopicYN":false,"Description":"","ImageUrl":"/assets/img/pictograms/150/easywp-red.png","ShortDesc":"","CategoryId":2239,"CategoryName":"EasyWP","SubCategories":[{"__type":"Nc:SimpleKB:Abstractions:Dtos:CategoryItemDto","ParentCategoryId":2239,"TreatAsTopicYN":false,"Description":"","ImageUrl":"","ShortDesc":"","CategoryId":2280,"CategoryName":"Getting Started"},{"__type":"Nc:SimpleKB:Abstractions:Dtos:CategoryItemDto","ParentCategoryId":2239,"TreatAsTopicYN":false,"Description":"","ImageUrl":"","ShortDesc":"","CategoryId":2279,"CategoryName":"General Information"},{"__type":"Nc:SimpleKB:Abstractions:Dtos:CategoryItemDto","ParentCategoryId":2239,"TreatAsTopicYN":false,"Description":"","ImageUrl":"","ShortDesc":"","CategoryId":2281,"CategoryName":"WordPress Migration"},{"__type":"Nc:SimpleKB:Abstractions:Dtos:CategoryItemDto","ParentCategoryId":2239,"TreatAsTopicYN":false,"Description":"","ImageUrl":"","ShortDesc":"","CategoryId":2282,"CategoryName":"Plugins and Themes"},{"__type":"Nc:SimpleKB:Abstractions:Dtos:CategoryItemDto","ParentCategoryId":2239,"TreatAsTopicYN":false,"Description":"","ImageUrl":"","ShortDesc":"","CategoryId":2284,"CategoryName":"WordPress Management"},{"__type":"Nc:SimpleKB:Abstractions:Dtos:CategoryItemDto","ParentCategoryId":2239,"TreatAsTopicYN":false,"Description":"","ImageUrl":"","ShortDesc":"","CategoryId":2285,"CategoryName":"SFTP and Database access"},{"__type":"Nc:SimpleKB:Abstractions:Dtos:CategoryItemDto","ParentCategoryId":2239,"TreatAsTopicYN":false,"Description":"","ImageUrl":"","ShortDesc":"","CategoryId":2286,"CategoryName":"Domains questions"},{"__type":"Nc:SimpleKB:Abstractions:Dtos:CategoryItemDto","ParentCategoryId":2239,"TreatAsTopicYN":false,"Description":"","ImageUrl":"","ShortDesc":"","CategoryId":2288,"CategoryName":"Billing questions"},{"__type":"Nc:SimpleKB:Abstractions:Dtos:CategoryItemDto","ParentCategoryId":2239,"TreatAsTopicYN":false,"Description":"","ImageUrl":"","ShortDesc":"","CategoryId":2287,"CategoryName":"SSL questions"}]},{"__type":"Nc:SimpleKB:Abstractions:Dtos:CategoryItemDto","ParentCategoryId":2228,"TreatAsTopicYN":false,"Description":"","ImageUrl":"","ShortDesc":"","CategoryId":2251,"CategoryName":"Supersonic CDN"},{"__type":"Nc:SimpleKB:Abstractions:Dtos:CategoryItemDto","ParentCategoryId":12,"TreatAsTopicYN":false,"Description":"","ImageUrl":"","ShortDesc":"","CategoryId":2252,"CategoryName":"InterWorx questions"},{"__type":"Nc:SimpleKB:Abstractions:Dtos:CategoryItemDto","ParentCategoryId":2253,"TreatAsTopicYN":false,"Description":"","ImageUrl":"","ShortDesc":"","CategoryId":2254,"CategoryName":"Domains How-To"},{"__type":"Nc:SimpleKB:Abstractions:Dtos:CategoryItemDto","ParentCategoryId":2253,"TreatAsTopicYN":false,"Description":"","ImageUrl":"","ShortDesc":"","CategoryId":2255,"CategoryName":"Hosting How-To"},{"__type":"Nc:SimpleKB:Abstractions:Dtos:CategoryItemDto","ParentCategoryId":2253,"TreatAsTopicYN":false,"Description":"","ImageUrl":"","ShortDesc":"","CategoryId":2257,"CategoryName":"Sales & Payments How-To"},{"__type":"Nc:SimpleKB:Abstractions:Dtos:CategoryItemDto","ParentCategoryId":2253,"TreatAsTopicYN":false,"Description":"","ImageUrl":"","ShortDesc":"","CategoryId":2258,"CategoryName":"cPanel Email How-To"},{"__type":"Nc:SimpleKB:Abstractions:Dtos:CategoryItemDto","ParentCategoryId":93,"TreatAsTopicYN":false,"Description":"","ImageUrl":"","ShortDesc":"","CategoryId":2260,"CategoryName":"Private Email Contacts and Calendars Setup"},{"__type":"Nc:SimpleKB:Abstractions:Dtos:CategoryItemDto","ParentCategoryId":2253,"TreatAsTopicYN":false,"Description":"","ImageUrl":"","ShortDesc":"","CategoryId":2262,"CategoryName":"EasyWP How-To"},{"__type":"Nc:SimpleKB:Abstractions:Dtos:CategoryItemDto","ParentCategoryId":0,"TreatAsTopicYN":false,"Description":"","ImageUrl":"https://download.namecheap.com/assets/img/domainvault-red@2x.png","ShortDesc":"","CategoryId":2289,"CategoryName":"Domain Vault","SubCategories":[]},{"__type":"Nc:SimpleKB:Abstractions:Dtos:CategoryItemDto","ParentCategoryId":14,"TreatAsTopicYN":false,"Description":"","ImageUrl":"","ShortDesc":"","CategoryId":2290,"CategoryName":"CSR code"},{"__type":"Nc:SimpleKB:Abstractions:Dtos:CategoryItemDto","ParentCategoryId":12,"TreatAsTopicYN":false,"Description":"","ImageUrl":"","ShortDesc":"","CategoryId":2291,"CategoryName":"Webuzo questions"},{"__type":"Nc:SimpleKB:Abstractions:Dtos:CategoryItemDto","ParentCategoryId":2265,"TreatAsTopicYN":false,"Description":"","ImageUrl":"","ShortDesc":"","CategoryId":2292,"CategoryName":"Browser Extensions"},{"__type":"Nc:SimpleKB:Abstractions:Dtos:CategoryItemDto","ParentCategoryId":14,"TreatAsTopicYN":false,"Description":"","ImageUrl":"","ShortDesc":"","CategoryId":2293,"CategoryName":"Automated SSL management"},{"__type":"Nc:SimpleKB:Abstractions:Dtos:CategoryItemDto","ParentCategoryId":2228,"TreatAsTopicYN":false,"Description":"","ImageUrl":"","ShortDesc":"","CategoryId":2298,"CategoryName":"Site Maker"},{"__type":"Nc:SimpleKB:Abstractions:Dtos:CategoryItemDto","ParentCategoryId":2175,"TreatAsTopicYN":false,"Description":"","ImageUrl":"","ShortDesc":"","CategoryId":2299,"CategoryName":"Common"},{"__type":"Nc:SimpleKB:Abstractions:Dtos:CategoryItemDto","ParentCategoryId":12,"TreatAsTopicYN":false,"Description":"","ImageUrl":"","ShortDesc":"","CategoryId":27,"CategoryName":"Getting Started"},{"__type":"Nc:SimpleKB:Abstractions:Dtos:CategoryItemDto","ParentCategoryId":0,"TreatAsTopicYN":false,"Description":"","ImageUrl":"/assets/img/pictograms/150/support-red.png","ShortDesc":"","CategoryId":5,"CategoryName":"General & Support","SubCategories":[]},{"__type":"Nc:SimpleKB:Abstractions:Dtos:CategoryItemDto","ParentCategoryId":2200,"TreatAsTopicYN":false,"Description":"","ImageUrl":"","ShortDesc":"","CategoryId":7,"CategoryName":"Billing FAQ"},{"__type":"Nc:SimpleKB:Abstractions:Dtos:CategoryItemDto","ParentCategoryId":2209,"TreatAsTopicYN":false,"Description":"","ImageUrl":"","ShortDesc":"","CategoryId":8,"CategoryName":"Transfer Information"},{"__type":"Nc:SimpleKB:Abstractions:Dtos:CategoryItemDto","ParentCategoryId":12,"TreatAsTopicYN":false,"Description":"","ImageUrl":"","ShortDesc":"","CategoryId":22,"CategoryName":"Hosting Information"},{"__type":"Nc:SimpleKB:Abstractions:Dtos:CategoryItemDto","ParentCategoryId":14,"TreatAsTopicYN":false,"Description":"","ImageUrl":"","ShortDesc":"","CategoryId":38,"CategoryName":"SSL General"},{"__type":"Nc:SimpleKB:Abstractions:Dtos:CategoryItemDto","ParentCategoryId":9,"TreatAsTopicYN":false,"Description":"","ImageUrl":"","ShortDesc":"","CategoryId":45,"CategoryName":"Account Security"},{"__type":"Nc:SimpleKB:Abstractions:Dtos:CategoryItemDto","ParentCategoryId":34,"TreatAsTopicYN":false,"Description":"","ImageUrl":"","ShortDesc":"","CategoryId":46,"CategoryName":"Domain Management"},{"__type":"Nc:SimpleKB:Abstractions:Dtos:CategoryItemDto","ParentCategoryId":2211,"TreatAsTopicYN":false,"Description":"","ImageUrl":"","ShortDesc":"","CategoryId":63,"CategoryName":"Namecheap API"},{"__type":"Nc:SimpleKB:Abstractions:Dtos:CategoryItemDto","ParentCategoryId":2228,"TreatAsTopicYN":false,"Description":"","ImageUrl":"","ShortDesc":"","CategoryId":177,"CategoryName":"Google Workspace (formerly G Suite)"},{"__type":"Nc:SimpleKB:Abstractions:Dtos:CategoryItemDto","ParentCategoryId":93,"TreatAsTopicYN":false,"Description":"","ImageUrl":"","ShortDesc":"","CategoryId":2179,"CategoryName":"Private Email: General Information"},{"__type":"Nc:SimpleKB:Abstractions:Dtos:CategoryItemDto","ParentCategoryId":2265,"TreatAsTopicYN":false,"Description":"","ImageUrl":"","ShortDesc":"","CategoryId":2274,"CategoryName":"General"},{"__type":"Nc:SimpleKB:Abstractions:Dtos:CategoryItemDto","ParentCategoryId":2239,"TreatAsTopicYN":false,"Description":"","ImageUrl":"","ShortDesc":"","CategoryId":2280,"CategoryName":"Getting Started"},{"__type":"Nc:SimpleKB:Abstractions:Dtos:CategoryItemDto","ParentCategoryId":2239,"TreatAsTopicYN":false,"Description":"","ImageUrl":"","ShortDesc":"","CategoryId":2279,"CategoryName":"General Information"},{"__type":"Nc:SimpleKB:Abstractions:Dtos:CategoryItemDto","ParentCategoryId":93,"TreatAsTopicYN":false,"Description":"","ImageUrl":"","ShortDesc":"","CategoryId":2215,"CategoryName":"Private Email: Mailbox Management"},{"__type":"Nc:SimpleKB:Abstractions:Dtos:CategoryItemDto","ParentCategoryId":2211,"TreatAsTopicYN":false,"Description":"","ImageUrl":"","ShortDesc":"","CategoryId":2196,"CategoryName":"WHMCS module for SSL"},{"__type":"Nc:SimpleKB:Abstractions:Dtos:CategoryItemDto","ParentCategoryId":0,"TreatAsTopicYN":false,"Description":"","ImageUrl":"/assets/img/pictograms/150/savings-red.png","ShortDesc":"","CategoryId":2200,"CategoryName":"Checkout & Billing","SubCategories":[{"__type":"Nc:SimpleKB:Abstractions:Dtos:CategoryItemDto","ParentCategoryId":2200,"TreatAsTopicYN":false,"Description":"","ImageUrl":"","ShortDesc":"","CategoryId":7,"CategoryName":"Billing FAQ"},{"__type":"Nc:SimpleKB:Abstractions:Dtos:CategoryItemDto","ParentCategoryId":2200,"TreatAsTopicYN":false,"Description":"","ImageUrl":"","ShortDesc":"","CategoryId":2201,"CategoryName":"Domains Billing"},{"__type":"Nc:SimpleKB:Abstractions:Dtos:CategoryItemDto","ParentCategoryId":2200,"TreatAsTopicYN":false,"Description":"","ImageUrl":"","ShortDesc":"","CategoryId":21,"CategoryName":"Hosting Billing"},{"__type":"Nc:SimpleKB:Abstractions:Dtos:CategoryItemDto","ParentCategoryId":2200,"TreatAsTopicYN":false,"Description":"","ImageUrl":"","ShortDesc":"","CategoryId":71,"CategoryName":"SSL Certificates Billing"},{"__type":"Nc:SimpleKB:Abstractions:Dtos:CategoryItemDto","ParentCategoryId":2200,"TreatAsTopicYN":false,"Description":"","ImageUrl":"","ShortDesc":"","CategoryId":2177,"CategoryName":"Private Email"}]},{"__type":"Nc:SimpleKB:Abstractions:Dtos:CategoryItemDto","ParentCategoryId":2200,"TreatAsTopicYN":false,"Description":"","ImageUrl":"","ShortDesc":"","CategoryId":2201,"CategoryName":"Domains Billing"},{"__type":"Nc:SimpleKB:Abstractions:Dtos:CategoryItemDto","ParentCategoryId":14,"TreatAsTopicYN":false,"Description":"","ImageUrl":"","ShortDesc":"","CategoryId":67,"CategoryName":"Activation"},{"__type":"Nc:SimpleKB:Abstractions:Dtos:CategoryItemDto","ParentCategoryId":2209,"TreatAsTopicYN":false,"Description":"","ImageUrl":"","ShortDesc":"","CategoryId":83,"CategoryName":"Transfer to Namecheap"},{"__type":"Nc:SimpleKB:Abstractions:Dtos:CategoryItemDto","ParentCategoryId":9,"TreatAsTopicYN":false,"Description":"","ImageUrl":"","ShortDesc":"","CategoryId":43,"CategoryName":"Profile Management"},{"__type":"Nc:SimpleKB:Abstractions:Dtos:CategoryItemDto","ParentCategoryId":34,"TreatAsTopicYN":false,"Description":"","ImageUrl":"","ShortDesc":"","CategoryId":10,"CategoryName":"DNS Questions"},{"__type":"Nc:SimpleKB:Abstractions:Dtos:CategoryItemDto","ParentCategoryId":12,"TreatAsTopicYN":false,"Description":"","ImageUrl":"","ShortDesc":"","CategoryId":29,"CategoryName":"cPanel questions"},{"__type":"Nc:SimpleKB:Abstractions:Dtos:CategoryItemDto","ParentCategoryId":2200,"TreatAsTopicYN":false,"Description":"","ImageUrl":"","ShortDesc":"","CategoryId":21,"CategoryName":"Hosting Billing"},{"__type":"Nc:SimpleKB:Abstractions:Dtos:CategoryItemDto","ParentCategoryId":34,"TreatAsTopicYN":false,"Description":"","ImageUrl":"","ShortDesc":"","CategoryId":11,"CategoryName":"Dynamic DNS"},{"__type":"Nc:SimpleKB:Abstractions:Dtos:CategoryItemDto","ParentCategoryId":9,"TreatAsTopicYN":false,"Description":"","ImageUrl":"","ShortDesc":"","CategoryId":44,"CategoryName":"Account Access"},{"__type":"Nc:SimpleKB:Abstractions:Dtos:CategoryItemDto","ParentCategoryId":2209,"TreatAsTopicYN":false,"Description":"","ImageUrl":"","ShortDesc":"","CategoryId":84,"CategoryName":"Transfer to another provider"},{"__type":"Nc:SimpleKB:Abstractions:Dtos:CategoryItemDto","ParentCategoryId":14,"TreatAsTopicYN":false,"Description":"","ImageUrl":"","ShortDesc":"","CategoryId":68,"CategoryName":"Validation"},{"__type":"Nc:SimpleKB:Abstractions:Dtos:CategoryItemDto","ParentCategoryId":12,"TreatAsTopicYN":false,"Description":"","ImageUrl":"","ShortDesc":"","CategoryId":2182,"CategoryName":"cPanel: Software Management"},{"__type":"Nc:SimpleKB:Abstractions:Dtos:CategoryItemDto","ParentCategoryId":93,"TreatAsTopicYN":false,"Description":"","ImageUrl":"","ShortDesc":"","CategoryId":2214,"CategoryName":"Email Forwarding"},{"__type":"Nc:SimpleKB:Abstractions:Dtos:CategoryItemDto","ParentCategoryId":2265,"TreatAsTopicYN":false,"Description":"","ImageUrl":"","ShortDesc":"","CategoryId":2270,"CategoryName":"Routers"},{"__type":"Nc:SimpleKB:Abstractions:Dtos:CategoryItemDto","ParentCategoryId":2239,"TreatAsTopicYN":false,"Description":"","ImageUrl":"","ShortDesc":"","CategoryId":2281,"CategoryName":"WordPress Migration"},{"__type":"Nc:SimpleKB:Abstractions:Dtos:CategoryItemDto","ParentCategoryId":2239,"TreatAsTopicYN":false,"Description":"","ImageUrl":"","ShortDesc":"","CategoryId":2282,"CategoryName":"Plugins and Themes"},{"__type":"Nc:SimpleKB:Abstractions:Dtos:CategoryItemDto","ParentCategoryId":2265,"TreatAsTopicYN":false,"Description":"","ImageUrl":"","ShortDesc":"","CategoryId":2272,"CategoryName":"TV"},{"__type":"Nc:SimpleKB:Abstractions:Dtos:CategoryItemDto","ParentCategoryId":12,"TreatAsTopicYN":false,"Description":"","ImageUrl":"","ShortDesc":"","CategoryId":2187,"CategoryName":"cPanel: WordPress"},{"__type":"Nc:SimpleKB:Abstractions:Dtos:CategoryItemDto","ParentCategoryId":2209,"TreatAsTopicYN":false,"Description":"","ImageUrl":"","ShortDesc":"","CategoryId":219,"CategoryName":"Canceled Transfers"},{"__type":"Nc:SimpleKB:Abstractions:Dtos:CategoryItemDto","ParentCategoryId":2200,"TreatAsTopicYN":false,"Description":"","ImageUrl":"","ShortDesc":"","CategoryId":71,"CategoryName":"SSL Certificates Billing"},{"__type":"Nc:SimpleKB:Abstractions:Dtos:CategoryItemDto","ParentCategoryId":93,"TreatAsTopicYN":false,"Description":"","ImageUrl":"","ShortDesc":"","CategoryId":2176,"CategoryName":"Private Email: DNS Settings"},{"__type":"Nc:SimpleKB:Abstractions:Dtos:CategoryItemDto","ParentCategoryId":14,"TreatAsTopicYN":false,"Description":"","ImageUrl":"","ShortDesc":"","CategoryId":69,"CategoryName":"Installation"},{"__type":"Nc:SimpleKB:Abstractions:Dtos:CategoryItemDto","ParentCategoryId":0,"TreatAsTopicYN":false,"Description":"","ImageUrl":"/assets/img/pictograms/150/reseller-red.png","ShortDesc":"","CategoryId":34,"CategoryName":"Domains","SubCategories":[{"__type":"Nc:SimpleKB:Abstractions:Dtos:CategoryItemDto","ParentCategoryId":34,"TreatAsTopicYN":false,"Description":"","ImageUrl":"","ShortDesc":"","CategoryId":2232,"CategoryName":"DNSSEC"},{"__type":"Nc:SimpleKB:Abstractions:Dtos:CategoryItemDto","ParentCategoryId":34,"TreatAsTopicYN":false,"Description":"","ImageUrl":"","ShortDesc":"","CategoryId":2234,"CategoryName":"Google Workspace (formerly G Suite)"},{"__type":"Nc:SimpleKB:Abstractions:Dtos:CategoryItemDto","ParentCategoryId":34,"TreatAsTopicYN":false,"Description":"","ImageUrl":"","ShortDesc":"","CategoryId":2237,"CategoryName":"Host records setup"},{"__type":"Nc:SimpleKB:Abstractions:Dtos:CategoryItemDto","ParentCategoryId":34,"TreatAsTopicYN":false,"Description":"","ImageUrl":"","ShortDesc":"","CategoryId":46,"CategoryName":"Domain Management"},{"__type":"Nc:SimpleKB:Abstractions:Dtos:CategoryItemDto","ParentCategoryId":34,"TreatAsTopicYN":false,"Description":"","ImageUrl":"","ShortDesc":"","CategoryId":10,"CategoryName":"DNS Questions"},{"__type":"Nc:SimpleKB:Abstractions:Dtos:CategoryItemDto","ParentCategoryId":34,"TreatAsTopicYN":false,"Description":"","ImageUrl":"","ShortDesc":"","CategoryId":11,"CategoryName":"Dynamic DNS"},{"__type":"Nc:SimpleKB:Abstractions:Dtos:CategoryItemDto","ParentCategoryId":34,"TreatAsTopicYN":false,"Description":"","ImageUrl":"","ShortDesc":"","CategoryId":35,"CategoryName":"Registrations"},{"__type":"Nc:SimpleKB:Abstractions:Dtos:CategoryItemDto","ParentCategoryId":34,"TreatAsTopicYN":false,"Description":"","ImageUrl":"","ShortDesc":"","CategoryId":2207,"CategoryName":"Renewal questions"},{"__type":"Nc:SimpleKB:Abstractions:Dtos:CategoryItemDto","ParentCategoryId":34,"TreatAsTopicYN":false,"Description":"","ImageUrl":"","ShortDesc":"","CategoryId":36,"CategoryName":"Domains with extended attributes"},{"__type":"Nc:SimpleKB:Abstractions:Dtos:CategoryItemDto","ParentCategoryId":34,"TreatAsTopicYN":false,"Description":"","ImageUrl":"","ShortDesc":"","CategoryId":51,"CategoryName":"FreeDNS"},{"__type":"Nc:SimpleKB:Abstractions:Dtos:CategoryItemDto","ParentCategoryId":34,"TreatAsTopicYN":false,"Description":"","ImageUrl":"","ShortDesc":"","CategoryId":15,"CategoryName":"Namecheap Market"},{"__type":"Nc:SimpleKB:Abstractions:Dtos:CategoryItemDto","ParentCategoryId":34,"TreatAsTopicYN":false,"Description":"","ImageUrl":"","ShortDesc":"","CategoryId":2208,"CategoryName":"3rd Party Services Setup"},{"__type":"Nc:SimpleKB:Abstractions:Dtos:CategoryItemDto","ParentCategoryId":34,"TreatAsTopicYN":false,"Description":"","ImageUrl":"","ShortDesc":"","CategoryId":2278,"CategoryName":"Handshake TLDs"}]},{"__type":"Nc:SimpleKB:Abstractions:Dtos:CategoryItemDto","ParentCategoryId":34,"TreatAsTopicYN":false,"Description":"","ImageUrl":"","ShortDesc":"","CategoryId":35,"CategoryName":"Registrations"},{"__type":"Nc:SimpleKB:Abstractions:Dtos:CategoryItemDto","ParentCategoryId":14,"TreatAsTopicYN":false,"Description":"","ImageUrl":"","ShortDesc":"","CategoryId":70,"CategoryName":"Reissuance"},{"__type":"Nc:SimpleKB:Abstractions:Dtos:CategoryItemDto","ParentCategoryId":0,"TreatAsTopicYN":false,"Description":"","ImageUrl":"/assets/img/pictograms/150/protection-red.png","ShortDesc":"","CategoryId":37,"CategoryName":"Domain Privacy Protection","SubCategories":[]},{"__type":"Nc:SimpleKB:Abstractions:Dtos:CategoryItemDto","ParentCategoryId":2200,"TreatAsTopicYN":false,"Description":"","ImageUrl":"","ShortDesc":"","CategoryId":2177,"CategoryName":"Private Email"},{"__type":"Nc:SimpleKB:Abstractions:Dtos:CategoryItemDto","ParentCategoryId":93,"TreatAsTopicYN":false,"Description":"","ImageUrl":"","ShortDesc":"","CategoryId":2178,"CategoryName":"Private Email: Webmail Features"},{"__type":"Nc:SimpleKB:Abstractions:Dtos:CategoryItemDto","ParentCategoryId":34,"TreatAsTopicYN":false,"Description":"","ImageUrl":"","ShortDesc":"","CategoryId":2207,"CategoryName":"Renewal questions"},{"__type":"Nc:SimpleKB:Abstractions:Dtos:CategoryItemDto","ParentCategoryId":12,"TreatAsTopicYN":false,"Description":"","ImageUrl":"","ShortDesc":"","CategoryId":2210,"CategoryName":"cPanel Add-ons"},{"__type":"Nc:SimpleKB:Abstractions:Dtos:CategoryItemDto","ParentCategoryId":2265,"TreatAsTopicYN":false,"Description":"","ImageUrl":"","ShortDesc":"","CategoryId":2273,"CategoryName":"Gaming Consoles"},{"__type":"Nc:SimpleKB:Abstractions:Dtos:CategoryItemDto","ParentCategoryId":2239,"TreatAsTopicYN":false,"Description":"","ImageUrl":"","ShortDesc":"","CategoryId":2284,"CategoryName":"WordPress Management"},{"__type":"Nc:SimpleKB:Abstractions:Dtos:CategoryItemDto","ParentCategoryId":2239,"TreatAsTopicYN":false,"Description":"","ImageUrl":"","ShortDesc":"","CategoryId":2285,"CategoryName":"SFTP and Database access"},{"__type":"Nc:SimpleKB:Abstractions:Dtos:CategoryItemDto","ParentCategoryId":2265,"TreatAsTopicYN":false,"Description":"","ImageUrl":"","ShortDesc":"","CategoryId":2268,"CategoryName":"macOS"},{"__type":"Nc:SimpleKB:Abstractions:Dtos:CategoryItemDto","ParentCategoryId":93,"TreatAsTopicYN":false,"Description":"","ImageUrl":"","ShortDesc":"","CategoryId":2175,"CategoryName":"Private Email: Client Setup"},{"__type":"Nc:SimpleKB:Abstractions:Dtos:CategoryItemDto","ParentCategoryId":0,"TreatAsTopicYN":false,"Description":"","ImageUrl":"/assets/img/pictograms/150/status-red.png","ShortDesc":"","CategoryId":2209,"CategoryName":"Domain Transfers","SubCategories":[{"__type":"Nc:SimpleKB:Abstractions:Dtos:CategoryItemDto","ParentCategoryId":2209,"TreatAsTopicYN":false,"Description":"","ImageUrl":"","ShortDesc":"","CategoryId":8,"CategoryName":"Transfer Information"},{"__type":"Nc:SimpleKB:Abstractions:Dtos:CategoryItemDto","ParentCategoryId":2209,"TreatAsTopicYN":false,"Description":"","ImageUrl":"","ShortDesc":"","CategoryId":83,"CategoryName":"Transfer to Namecheap"},{"__type":"Nc:SimpleKB:Abstractions:Dtos:CategoryItemDto","ParentCategoryId":2209,"TreatAsTopicYN":false,"Description":"","ImageUrl":"","ShortDesc":"","CategoryId":84,"CategoryName":"Transfer to another provider"},{"__type":"Nc:SimpleKB:Abstractions:Dtos:CategoryItemDto","ParentCategoryId":2209,"TreatAsTopicYN":false,"Description":"","ImageUrl":"","ShortDesc":"","CategoryId":219,"CategoryName":"Canceled Transfers"}]},{"__type":"Nc:SimpleKB:Abstractions:Dtos:CategoryItemDto","ParentCategoryId":12,"TreatAsTopicYN":false,"Description":"","ImageUrl":"","ShortDesc":"","CategoryId":48,"CategoryName":"VPS"},{"__type":"Nc:SimpleKB:Abstractions:Dtos:CategoryItemDto","ParentCategoryId":34,"TreatAsTopicYN":false,"Description":"","ImageUrl":"","ShortDesc":"","CategoryId":36,"CategoryName":"Domains with extended attributes"},{"__type":"Nc:SimpleKB:Abstractions:Dtos:CategoryItemDto","ParentCategoryId":0,"TreatAsTopicYN":true,"Description":"","ImageUrl":"/assets/img/pictograms/150/server-red.png","ShortDesc":"","CategoryId":12,"CategoryName":"Hosting","SubCategories":[{"__type":"Nc:SimpleKB:Abstractions:Dtos:CategoryItemDto","ParentCategoryId":12,"TreatAsTopicYN":false,"Description":"","ImageUrl":"","ShortDesc":"","CategoryId":2219,"CategoryName":"PHP Configuration"},{"__type":"Nc:SimpleKB:Abstractions:Dtos:CategoryItemDto","ParentCategoryId":12,"TreatAsTopicYN":false,"Description":"","ImageUrl":"","ShortDesc":"","CategoryId":2225,"CategoryName":"SEO"},{"__type":"Nc:SimpleKB:Abstractions:Dtos:CategoryItemDto","ParentCategoryId":12,"TreatAsTopicYN":false,"Description":"","ImageUrl":"","ShortDesc":"","CategoryId":2252,"CategoryName":"InterWorx questions"},{"__type":"Nc:SimpleKB:Abstractions:Dtos:CategoryItemDto","ParentCategoryId":12,"TreatAsTopicYN":false,"Description":"","ImageUrl":"","ShortDesc":"","CategoryId":2291,"CategoryName":"Webuzo questions"},{"__type":"Nc:SimpleKB:Abstractions:Dtos:CategoryItemDto","ParentCategoryId":12,"TreatAsTopicYN":false,"Description":"","ImageUrl":"","ShortDesc":"","CategoryId":27,"CategoryName":"Getting Started"},{"__type":"Nc:SimpleKB:Abstractions:Dtos:CategoryItemDto","ParentCategoryId":12,"TreatAsTopicYN":false,"Description":"","ImageUrl":"","ShortDesc":"","CategoryId":22,"CategoryName":"Hosting Information"},{"__type":"Nc:SimpleKB:Abstractions:Dtos:CategoryItemDto","ParentCategoryId":12,"TreatAsTopicYN":false,"Description":"","ImageUrl":"","ShortDesc":"","CategoryId":29,"CategoryName":"cPanel questions"},{"__type":"Nc:SimpleKB:Abstractions:Dtos:CategoryItemDto","ParentCategoryId":12,"TreatAsTopicYN":false,"Description":"","ImageUrl":"","ShortDesc":"","CategoryId":2182,"CategoryName":"cPanel: Software Management"},{"__type":"Nc:SimpleKB:Abstractions:Dtos:CategoryItemDto","ParentCategoryId":12,"TreatAsTopicYN":false,"Description":"","ImageUrl":"","ShortDesc":"","CategoryId":2187,"CategoryName":"cPanel: WordPress"},{"__type":"Nc:SimpleKB:Abstractions:Dtos:CategoryItemDto","ParentCategoryId":12,"TreatAsTopicYN":false,"Description":"","ImageUrl":"","ShortDesc":"","CategoryId":2210,"CategoryName":"cPanel Add-ons"},{"__type":"Nc:SimpleKB:Abstractions:Dtos:CategoryItemDto","ParentCategoryId":12,"TreatAsTopicYN":false,"Description":"","ImageUrl":"","ShortDesc":"","CategoryId":48,"CategoryName":"VPS"},{"__type":"Nc:SimpleKB:Abstractions:Dtos:CategoryItemDto","ParentCategoryId":12,"TreatAsTopicYN":false,"Description":"","ImageUrl":"","ShortDesc":"","CategoryId":2188,"CategoryName":"Dedicated Server"},{"__type":"Nc:SimpleKB:Abstractions:Dtos:CategoryItemDto","ParentCategoryId":12,"TreatAsTopicYN":false,"Description":"","ImageUrl":"","ShortDesc":"","CategoryId":30,"CategoryName":"WHM questions"},{"__type":"Nc:SimpleKB:Abstractions:Dtos:CategoryItemDto","ParentCategoryId":12,"TreatAsTopicYN":false,"Description":"","ImageUrl":"","ShortDesc":"","CategoryId":32,"CategoryName":"DNS settings"},{"__type":"Nc:SimpleKB:Abstractions:Dtos:CategoryItemDto","ParentCategoryId":12,"TreatAsTopicYN":false,"Description":"","ImageUrl":"","ShortDesc":"","CategoryId":103,"CategoryName":"LVE (CloudLinux)"},{"__type":"Nc:SimpleKB:Abstractions:Dtos:CategoryItemDto","ParentCategoryId":12,"TreatAsTopicYN":false,"Description":"","ImageUrl":"","ShortDesc":"","CategoryId":89,"CategoryName":"SSH Access"},{"__type":"Nc:SimpleKB:Abstractions:Dtos:CategoryItemDto","ParentCategoryId":12,"TreatAsTopicYN":false,"Description":"","ImageUrl":"","ShortDesc":"","CategoryId":205,"CategoryName":"FTP questions"},{"__type":"Nc:SimpleKB:Abstractions:Dtos:CategoryItemDto","ParentCategoryId":12,"TreatAsTopicYN":false,"Description":"","ImageUrl":"","ShortDesc":"","CategoryId":2180,"CategoryName":"MySQL questions"},{"__type":"Nc:SimpleKB:Abstractions:Dtos:CategoryItemDto","ParentCategoryId":12,"TreatAsTopicYN":false,"Description":"","ImageUrl":"","ShortDesc":"","CategoryId":2199,"CategoryName":"Hosting Migration"},{"__type":"Nc:SimpleKB:Abstractions:Dtos:CategoryItemDto","ParentCategoryId":12,"TreatAsTopicYN":false,"Description":"","ImageUrl":"","ShortDesc":"","CategoryId":2194,"CategoryName":"Tips & Tricks"},{"__type":"Nc:SimpleKB:Abstractions:Dtos:CategoryItemDto","ParentCategoryId":12,"TreatAsTopicYN":false,"Description":"","ImageUrl":"","ShortDesc":"","CategoryId":239,"CategoryName":"WHMCS"},{"__type":"Nc:SimpleKB:Abstractions:Dtos:CategoryItemDto","ParentCategoryId":12,"TreatAsTopicYN":false,"Description":"","ImageUrl":"","ShortDesc":"","CategoryId":33,"CategoryName":"SSL Installation"}]},{"__type":"Nc:SimpleKB:Abstractions:Dtos:CategoryItemDto","ParentCategoryId":93,"TreatAsTopicYN":false,"Description":"","ImageUrl":"","ShortDesc":"","CategoryId":2171,"CategoryName":"Private Email: Active Sync (Exchange) Setup"},{"__type":"Nc:SimpleKB:Abstractions:Dtos:CategoryItemDto","ParentCategoryId":12,"TreatAsTopicYN":false,"Description":"","ImageUrl":"","ShortDesc":"","CategoryId":2188,"CategoryName":"Dedicated Server"},{"__type":"Nc:SimpleKB:Abstractions:Dtos:CategoryItemDto","ParentCategoryId":2265,"TreatAsTopicYN":false,"Description":"","ImageUrl":"","ShortDesc":"","CategoryId":2269,"CategoryName":"iOS"},{"__type":"Nc:SimpleKB:Abstractions:Dtos:CategoryItemDto","ParentCategoryId":2239,"TreatAsTopicYN":false,"Description":"","ImageUrl":"","ShortDesc":"","CategoryId":2286,"CategoryName":"Domains questions"},{"__type":"Nc:SimpleKB:Abstractions:Dtos:CategoryItemDto","ParentCategoryId":2239,"TreatAsTopicYN":false,"Description":"","ImageUrl":"","ShortDesc":"","CategoryId":2288,"CategoryName":"Billing questions"},{"__type":"Nc:SimpleKB:Abstractions:Dtos:CategoryItemDto","ParentCategoryId":2265,"TreatAsTopicYN":false,"Description":"","ImageUrl":"","ShortDesc":"","CategoryId":2271,"CategoryName":"Linux"},{"__type":"Nc:SimpleKB:Abstractions:Dtos:CategoryItemDto","ParentCategoryId":12,"TreatAsTopicYN":false,"Description":"","ImageUrl":"","ShortDesc":"","CategoryId":30,"CategoryName":"WHM questions"},{"__type":"Nc:SimpleKB:Abstractions:Dtos:CategoryItemDto","ParentCategoryId":93,"TreatAsTopicYN":false,"Description":"","ImageUrl":"","ShortDesc":"","CategoryId":31,"CategoryName":"cPanel Email FAQs"},{"__type":"Nc:SimpleKB:Abstractions:Dtos:CategoryItemDto","ParentCategoryId":34,"TreatAsTopicYN":false,"Description":"","ImageUrl":"","ShortDesc":"","CategoryId":51,"CategoryName":"FreeDNS"},{"__type":"Nc:SimpleKB:Abstractions:Dtos:CategoryItemDto","ParentCategoryId":0,"TreatAsTopicYN":false,"Description":"","ImageUrl":"/assets/img/pictograms/150/email-red.png","ShortDesc":"","CategoryId":93,"CategoryName":"Email service","SubCategories":[{"__type":"Nc:SimpleKB:Abstractions:Dtos:CategoryItemDto","ParentCategoryId":93,"TreatAsTopicYN":false,"Description":"","ImageUrl":"","ShortDesc":"","CategoryId":2216,"CategoryName":"Spam Protection"},{"__type":"Nc:SimpleKB:Abstractions:Dtos:CategoryItemDto","ParentCategoryId":93,"TreatAsTopicYN":false,"Description":"","ImageUrl":"","ShortDesc":"","CategoryId":2226,"CategoryName":"Email Migration"},{"__type":"Nc:SimpleKB:Abstractions:Dtos:CategoryItemDto","ParentCategoryId":93,"TreatAsTopicYN":false,"Description":"","ImageUrl":"","ShortDesc":"","CategoryId":2260,"CategoryName":"Private Email Contacts and Calendars Setup"},{"__type":"Nc:SimpleKB:Abstractions:Dtos:CategoryItemDto","ParentCategoryId":93,"TreatAsTopicYN":false,"Description":"","ImageUrl":"","ShortDesc":"","CategoryId":2179,"CategoryName":"Private Email: General Information"},{"__type":"Nc:SimpleKB:Abstractions:Dtos:CategoryItemDto","ParentCategoryId":93,"TreatAsTopicYN":false,"Description":"","ImageUrl":"","ShortDesc":"","CategoryId":2215,"CategoryName":"Private Email: Mailbox Management"},{"__type":"Nc:SimpleKB:Abstractions:Dtos:CategoryItemDto","ParentCategoryId":93,"TreatAsTopicYN":false,"Description":"","ImageUrl":"","ShortDesc":"","CategoryId":2214,"CategoryName":"Email Forwarding"},{"__type":"Nc:SimpleKB:Abstractions:Dtos:CategoryItemDto","ParentCategoryId":93,"TreatAsTopicYN":false,"Description":"","ImageUrl":"","ShortDesc":"","CategoryId":2176,"CategoryName":"Private Email: DNS Settings"},{"__type":"Nc:SimpleKB:Abstractions:Dtos:CategoryItemDto","ParentCategoryId":93,"TreatAsTopicYN":false,"Description":"","ImageUrl":"","ShortDesc":"","CategoryId":2178,"CategoryName":"Private Email: Webmail Features"},{"__type":"Nc:SimpleKB:Abstractions:Dtos:CategoryItemDto","ParentCategoryId":93,"TreatAsTopicYN":false,"Description":"","ImageUrl":"","ShortDesc":"","CategoryId":2175,"CategoryName":"Private Email: Client Setup"},{"__type":"Nc:SimpleKB:Abstractions:Dtos:CategoryItemDto","ParentCategoryId":93,"TreatAsTopicYN":false,"Description":"","ImageUrl":"","ShortDesc":"","CategoryId":2171,"CategoryName":"Private Email: Active Sync (Exchange) Setup"},{"__type":"Nc:SimpleKB:Abstractions:Dtos:CategoryItemDto","ParentCategoryId":93,"TreatAsTopicYN":false,"Description":"","ImageUrl":"","ShortDesc":"","CategoryId":31,"CategoryName":"cPanel Email FAQs"},{"__type":"Nc:SimpleKB:Abstractions:Dtos:CategoryItemDto","ParentCategoryId":93,"TreatAsTopicYN":false,"Description":"","ImageUrl":"","ShortDesc":"","CategoryId":2186,"CategoryName":"cPanel Email: Client Setup"},{"__type":"Nc:SimpleKB:Abstractions:Dtos:CategoryItemDto","ParentCategoryId":93,"TreatAsTopicYN":false,"Description":"","ImageUrl":"","ShortDesc":"","CategoryId":2204,"CategoryName":"Private Email: Video Overview"}]},{"__type":"Nc:SimpleKB:Abstractions:Dtos:CategoryItemDto","ParentCategoryId":12,"TreatAsTopicYN":false,"Description":"","ImageUrl":"","ShortDesc":"","CategoryId":32,"CategoryName":"DNS settings"},{"__type":"Nc:SimpleKB:Abstractions:Dtos:CategoryItemDto","ParentCategoryId":34,"TreatAsTopicYN":false,"Description":"","ImageUrl":"","ShortDesc":"","CategoryId":15,"CategoryName":"Namecheap Market"},{"__type":"Nc:SimpleKB:Abstractions:Dtos:CategoryItemDto","ParentCategoryId":93,"TreatAsTopicYN":false,"Description":"","ImageUrl":"","ShortDesc":"","CategoryId":2186,"CategoryName":"cPanel Email: Client Setup"},{"__type":"Nc:SimpleKB:Abstractions:Dtos:CategoryItemDto","ParentCategoryId":2265,"TreatAsTopicYN":false,"Description":"","ImageUrl":"","ShortDesc":"","CategoryId":2266,"CategoryName":"Windows"},{"__type":"Nc:SimpleKB:Abstractions:Dtos:CategoryItemDto","ParentCategoryId":2239,"TreatAsTopicYN":false,"Description":"","ImageUrl":"","ShortDesc":"","CategoryId":2287,"CategoryName":"SSL questions"},{"__type":"Nc:SimpleKB:Abstractions:Dtos:CategoryItemDto","ParentCategoryId":2265,"TreatAsTopicYN":false,"Description":"","ImageUrl":"","ShortDesc":"","CategoryId":2267,"CategoryName":"Android"},{"__type":"Nc:SimpleKB:Abstractions:Dtos:CategoryItemDto","ParentCategoryId":34,"TreatAsTopicYN":false,"Description":"","ImageUrl":"","ShortDesc":"","CategoryId":2208,"CategoryName":"3rd Party Services Setup"},{"__type":"Nc:SimpleKB:Abstractions:Dtos:CategoryItemDto","ParentCategoryId":93,"TreatAsTopicYN":false,"Description":"","ImageUrl":"","ShortDesc":"","CategoryId":2204,"CategoryName":"Private Email: Video Overview"},{"__type":"Nc:SimpleKB:Abstractions:Dtos:CategoryItemDto","ParentCategoryId":0,"TreatAsTopicYN":false,"Description":"","ImageUrl":"/assets/img/pictograms/150/security-red.png","ShortDesc":"","CategoryId":14,"CategoryName":"SSL Certificates","SubCategories":[{"__type":"Nc:SimpleKB:Abstractions:Dtos:CategoryItemDto","ParentCategoryId":14,"TreatAsTopicYN":false,"Description":"","ImageUrl":"","ShortDesc":"","CategoryId":2217,"CategoryName":"Renewal"},{"__type":"Nc:SimpleKB:Abstractions:Dtos:CategoryItemDto","ParentCategoryId":14,"TreatAsTopicYN":false,"Description":"","ImageUrl":"","ShortDesc":"","CategoryId":2218,"CategoryName":"cPanel SSL Plugin"},{"__type":"Nc:SimpleKB:Abstractions:Dtos:CategoryItemDto","ParentCategoryId":14,"TreatAsTopicYN":false,"Description":"","ImageUrl":"","ShortDesc":"","CategoryId":2221,"CategoryName":"Multi-Domain SSL Certificates"},{"__type":"Nc:SimpleKB:Abstractions:Dtos:CategoryItemDto","ParentCategoryId":14,"TreatAsTopicYN":false,"Description":"","ImageUrl":"","ShortDesc":"","CategoryId":2222,"CategoryName":"Cancellation"},{"__type":"Nc:SimpleKB:Abstractions:Dtos:CategoryItemDto","ParentCategoryId":14,"TreatAsTopicYN":false,"Description":"","ImageUrl":"","ShortDesc":"","CategoryId":2223,"CategoryName":"Browser errors"},{"__type":"Nc:SimpleKB:Abstractions:Dtos:CategoryItemDto","ParentCategoryId":14,"TreatAsTopicYN":false,"Description":"","ImageUrl":"","ShortDesc":"","CategoryId":2224,"CategoryName":"Site Seal, Logo"},{"__type":"Nc:SimpleKB:Abstractions:Dtos:CategoryItemDto","ParentCategoryId":14,"TreatAsTopicYN":false,"Description":"","ImageUrl":"","ShortDesc":"","CategoryId":2238,"CategoryName":"SSL installation errors"},{"__type":"Nc:SimpleKB:Abstractions:Dtos:CategoryItemDto","ParentCategoryId":14,"TreatAsTopicYN":false,"Description":"","ImageUrl":"","ShortDesc":"","CategoryId":2290,"CategoryName":"CSR code"},{"__type":"Nc:SimpleKB:Abstractions:Dtos:CategoryItemDto","ParentCategoryId":14,"TreatAsTopicYN":false,"Description":"","ImageUrl":"","ShortDesc":"","CategoryId":2293,"CategoryName":"Automated SSL management"},{"__type":"Nc:SimpleKB:Abstractions:Dtos:CategoryItemDto","ParentCategoryId":14,"TreatAsTopicYN":false,"Description":"","ImageUrl":"","ShortDesc":"","CategoryId":38,"CategoryName":"SSL General"},{"__type":"Nc:SimpleKB:Abstractions:Dtos:CategoryItemDto","ParentCategoryId":14,"TreatAsTopicYN":false,"Description":"","ImageUrl":"","ShortDesc":"","CategoryId":67,"CategoryName":"Activation"},{"__type":"Nc:SimpleKB:Abstractions:Dtos:CategoryItemDto","ParentCategoryId":14,"TreatAsTopicYN":false,"Description":"","ImageUrl":"","ShortDesc":"","CategoryId":68,"CategoryName":"Validation"},{"__type":"Nc:SimpleKB:Abstractions:Dtos:CategoryItemDto","ParentCategoryId":14,"TreatAsTopicYN":false,"Description":"","ImageUrl":"","ShortDesc":"","CategoryId":69,"CategoryName":"Installation"},{"__type":"Nc:SimpleKB:Abstractions:Dtos:CategoryItemDto","ParentCategoryId":14,"TreatAsTopicYN":false,"Description":"","ImageUrl":"","ShortDesc":"","CategoryId":70,"CategoryName":"Reissuance"}]},{"__type":"Nc:SimpleKB:Abstractions:Dtos:CategoryItemDto","ParentCategoryId":0,"TreatAsTopicYN":true,"Description":"","ImageUrl":"/assets/img/pictograms/150/performance-red.png","ShortDesc":"","CategoryId":9,"CategoryName":"My Account","SubCategories":[{"__type":"Nc:SimpleKB:Abstractions:Dtos:CategoryItemDto","ParentCategoryId":9,"TreatAsTopicYN":false,"Description":"","ImageUrl":"","ShortDesc":"","CategoryId":45,"CategoryName":"Account Security"},{"__type":"Nc:SimpleKB:Abstractions:Dtos:CategoryItemDto","ParentCategoryId":9,"TreatAsTopicYN":false,"Description":"","ImageUrl":"","ShortDesc":"","CategoryId":43,"CategoryName":"Profile Management"},{"__type":"Nc:SimpleKB:Abstractions:Dtos:CategoryItemDto","ParentCategoryId":9,"TreatAsTopicYN":false,"Description":"","ImageUrl":"","ShortDesc":"","CategoryId":44,"CategoryName":"Account Access"}]},{"__type":"Nc:SimpleKB:Abstractions:Dtos:CategoryItemDto","ParentCategoryId":34,"TreatAsTopicYN":false,"Description":"","ImageUrl":"","ShortDesc":"","CategoryId":2278,"CategoryName":"Handshake TLDs"},{"__type":"Nc:SimpleKB:Abstractions:Dtos:CategoryItemDto","ParentCategoryId":12,"TreatAsTopicYN":false,"Description":"","ImageUrl":"","ShortDesc":"","CategoryId":103,"CategoryName":"LVE (CloudLinux)"},{"__type":"Nc:SimpleKB:Abstractions:Dtos:CategoryItemDto","ParentCategoryId":0,"TreatAsTopicYN":false,"Description":"","ImageUrl":"/assets/img/pictograms/150/affiliates-red.png","ShortDesc":"","CategoryId":55,"CategoryName":"Affiliates","SubCategories":[]},{"__type":"Nc:SimpleKB:Abstractions:Dtos:CategoryItemDto","ParentCategoryId":12,"TreatAsTopicYN":false,"Description":"","ImageUrl":"","ShortDesc":"","CategoryId":89,"CategoryName":"SSH Access"},{"__type":"Nc:SimpleKB:Abstractions:Dtos:CategoryItemDto","ParentCategoryId":0,"TreatAsTopicYN":false,"Description":"","ImageUrl":"/assets/img/pictograms/150/tools-red.png","ShortDesc":"","CategoryId":2211,"CategoryName":"API & Resellers","SubCategories":[{"__type":"Nc:SimpleKB:Abstractions:Dtos:CategoryItemDto","ParentCategoryId":2211,"TreatAsTopicYN":false,"Description":"","ImageUrl":"","ShortDesc":"","CategoryId":2227,"CategoryName":"SSL Resellers"},{"__type":"Nc:SimpleKB:Abstractions:Dtos:CategoryItemDto","ParentCategoryId":2211,"TreatAsTopicYN":false,"Description":"","ImageUrl":"","ShortDesc":"","CategoryId":2229,"CategoryName":"Hosting Resellers"},{"__type":"Nc:SimpleKB:Abstractions:Dtos:CategoryItemDto","ParentCategoryId":2211,"TreatAsTopicYN":false,"Description":"","ImageUrl":"","ShortDesc":"","CategoryId":63,"CategoryName":"Namecheap API"},{"__type":"Nc:SimpleKB:Abstractions:Dtos:CategoryItemDto","ParentCategoryId":2211,"TreatAsTopicYN":false,"Description":"","ImageUrl":"","ShortDesc":"","CategoryId":2196,"CategoryName":"WHMCS module for SSL"}]},{"__type":"Nc:SimpleKB:Abstractions:Dtos:CategoryItemDto","ParentCategoryId":0,"TreatAsTopicYN":false,"Description":"","ImageUrl":"/assets/img/pictograms/150/timer-red.png","ShortDesc":"","CategoryId":2212,"CategoryName":"Legacy Products","SubCategories":[]},{"__type":"Nc:SimpleKB:Abstractions:Dtos:CategoryItemDto","ParentCategoryId":12,"TreatAsTopicYN":false,"Description":"","ImageUrl":"","ShortDesc":"","CategoryId":205,"CategoryName":"FTP questions"},{"__type":"Nc:SimpleKB:Abstractions:Dtos:CategoryItemDto","ParentCategoryId":12,"TreatAsTopicYN":false,"Description":"","ImageUrl":"","ShortDesc":"","CategoryId":2180,"CategoryName":"MySQL questions"},{"__type":"Nc:SimpleKB:Abstractions:Dtos:CategoryItemDto","ParentCategoryId":12,"TreatAsTopicYN":false,"Description":"","ImageUrl":"","ShortDesc":"","CategoryId":2199,"CategoryName":"Hosting Migration"},{"__type":"Nc:SimpleKB:Abstractions:Dtos:CategoryItemDto","ParentCategoryId":0,"TreatAsTopicYN":false,"Description":"","ImageUrl":"/assets/img/pictograms/150/premiumdns-red.png","ShortDesc":"","CategoryId":2231,"CategoryName":"PremiumDNS","SubCategories":[]},{"__type":"Nc:SimpleKB:Abstractions:Dtos:CategoryItemDto","ParentCategoryId":12,"TreatAsTopicYN":false,"Description":"","ImageUrl":"","ShortDesc":"","CategoryId":2194,"CategoryName":"Tips & Tricks"},{"__type":"Nc:SimpleKB:Abstractions:Dtos:CategoryItemDto","ParentCategoryId":0,"TreatAsTopicYN":false,"Description":"","ImageUrl":"https://static.nc-img.com/live-resource/icons/knowledgebase/fastVPN_icon-150px.png","ShortDesc":"","CategoryId":2265,"CategoryName":"FastVPN","SubCategories":[{"__type":"Nc:SimpleKB:Abstractions:Dtos:CategoryItemDto","ParentCategoryId":2265,"TreatAsTopicYN":false,"Description":"","ImageUrl":"","ShortDesc":"","CategoryId":2292,"CategoryName":"Browser Extensions"},{"__type":"Nc:SimpleKB:Abstractions:Dtos:CategoryItemDto","ParentCategoryId":2265,"TreatAsTopicYN":false,"Description":"","ImageUrl":"","ShortDesc":"","CategoryId":2274,"CategoryName":"General"},{"__type":"Nc:SimpleKB:Abstractions:Dtos:CategoryItemDto","ParentCategoryId":2265,"TreatAsTopicYN":false,"Description":"","ImageUrl":"","ShortDesc":"","CategoryId":2270,"CategoryName":"Routers"},{"__type":"Nc:SimpleKB:Abstractions:Dtos:CategoryItemDto","ParentCategoryId":2265,"TreatAsTopicYN":false,"Description":"","ImageUrl":"","ShortDesc":"","CategoryId":2272,"CategoryName":"TV"},{"__type":"Nc:SimpleKB:Abstractions:Dtos:CategoryItemDto","ParentCategoryId":2265,"TreatAsTopicYN":false,"Description":"","ImageUrl":"","ShortDesc":"","CategoryId":2273,"CategoryName":"Gaming Consoles"},{"__type":"Nc:SimpleKB:Abstractions:Dtos:CategoryItemDto","ParentCategoryId":2265,"TreatAsTopicYN":false,"Description":"","ImageUrl":"","ShortDesc":"","CategoryId":2268,"CategoryName":"macOS"},{"__type":"Nc:SimpleKB:Abstractions:Dtos:CategoryItemDto","ParentCategoryId":2265,"TreatAsTopicYN":false,"Description":"","ImageUrl":"","ShortDesc":"","CategoryId":2269,"CategoryName":"iOS"},{"__type":"Nc:SimpleKB:Abstractions:Dtos:CategoryItemDto","ParentCategoryId":2265,"TreatAsTopicYN":false,"Description":"","ImageUrl":"","ShortDesc":"","CategoryId":2271,"CategoryName":"Linux"},{"__type":"Nc:SimpleKB:Abstractions:Dtos:CategoryItemDto","ParentCategoryId":2265,"TreatAsTopicYN":false,"Description":"","ImageUrl":"","ShortDesc":"","CategoryId":2266,"CategoryName":"Windows"},{"__type":"Nc:SimpleKB:Abstractions:Dtos:CategoryItemDto","ParentCategoryId":2265,"TreatAsTopicYN":false,"Description":"","ImageUrl":"","ShortDesc":"","CategoryId":2267,"CategoryName":"Android"}]},{"__type":"Nc:SimpleKB:Abstractions:Dtos:CategoryItemDto","ParentCategoryId":12,"TreatAsTopicYN":false,"Description":"","ImageUrl":"","ShortDesc":"","CategoryId":239,"CategoryName":"WHMCS"},{"__type":"Nc:SimpleKB:Abstractions:Dtos:CategoryItemDto","ParentCategoryId":12,"TreatAsTopicYN":false,"Description":"","ImageUrl":"","ShortDesc":"","CategoryId":33,"CategoryName":"SSL Installation"}],"status":200,"statusText":"OK"}}


Need help? We're always here for you.