This article is valid for both new plans (purchased on or after June 2, 2026) and legacy Private Email plans (purchased before June 2, 2026).
If your domain is registered with GoDaddy and uses GoDaddy's nameservers (e.g. nsXX.domaincontrol.com/nsYY.domaincontrol.com), follow these steps to configure Private Email DNS records:
1. Sign into your GoDaddy account.
2. Click DNS next to the domain name in question:

3. Look for the existing MX records in the Records table. If you find any MX records, click the Trash button next to the existing MX record and Delete Record to confirm.
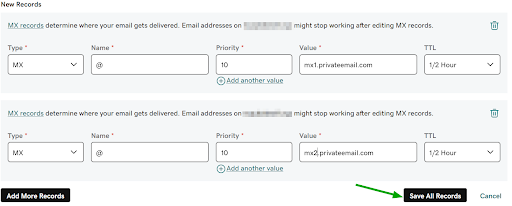
4. To direct email to your Private Email account, you have to add new MX records for your domain. Use Add New Record at the top of the Records section to add the following MX records:
Type: MX | Name: @ | Value: mx1.privateemail.com | Priority: 10 | TTL: 1/2 Hour
Type: MX | Name: @ | Value: mx2.privateemail.com | Priority: 10 | TTL: 1/2 Hour
5. Next, add SPF, DKIM and DMARC records. SPF (Sender Policy Framework) DNS record is used to protect a domain name from email forging and impersonating by preventing spammers from sending emails on one's behalf.
SPF
Type: TXT | Name: @ | Value: v=spf1 include:spf.privateemail.com ~all | TTL: 1/2 Hour

DKIM
DKIM (DomainKeys Identified Mail) should be considered a method to verify that the content of the messages is trustworthy, meaning that it hasn't changed from the moment the message left the initial mail server.
NOTE: DKIM record is a mandatory entry to ensure outgoing mail works correctly. It can be generated only after a mailbox has been created.
Type: TXT |
Name: default._domainkey |
Value: should be generated and copied using
this guide |
TTL: 1/2 Hour
NOTE: For Private Email subscriptions purchased on or after June 2, 2026, DKIM record's name is privateemail._domainkey.This DKIM record is available immediately upon ordering the PE subscription - creating a mailbox is no longer required.
DMARC
Modern email providers (including Microsoft Outlook, Hotmail, Gmail, and Yahoo) increasingly rely on DMARC as part of their sender reputation and anti-spam validation systems. Domains without a properly configured DMARC record are more likely to experience deliverability issues, spam folder placement, or reputation-based restrictions.
To configure DMARC, you will first need to generate a DMARC record using an online DMARC generator tool (for example,
MXToolbox DMARC Record Generator) and then add it as a TXT record to your domain’s DNS zone.
Type: TXT |
Name: _dmarc |
Value: v=DMARC1; p=reject; rua=mailto@yourdomain.com |
TTL: default
NOTE: The DMARC policy can later be adjusted depending on your email setup and monitoring preferences.
1. Type: CNAME | Name: mail | Value: privateemail.com | TTL: default
2. Type: CNAME | Name: autoconfig | Value: privateemail.com | TTL: default
3. Type: CNAME | Name: autodiscover | Value: privateemail.com | TTL: default
4. Type: SRV | Service: _autodiscover | Protocol: _tcp
Name: @ | Value: privateemail.com | Priority: 0
Weight: 0 | Port: 443 | TTL: 1/2 Hour

Save the changes.
Allow up to 30-40 minutes for the records to propagate.
That's it!

