
{"/api/v1/ncpl/simplekb/getarticle:\"{\\\"articleId\\\":9892,\\\"categoryId\\\":2187}\"":{"body":{"Id":9892,"FriendlyId":"","ArticleTypeId":3,"Title":"How to edit wp-config.php file in WordPress","ArticleName":"How to edit wp-config.php file in WordPress","ArticleSummary":null,"PreponedSummary":false,"Approved":true,"Body":"VGhlIGZpbGUgY2FsbGVkIHdwLWNvbmZpZy5waHAgaXMgdGhlIG1haW4gY29uZmlndXJhdGlvbiBmaWxlIGZvciBhbnkgPGEgaHJlZj0iaHR0cHM6Ly93d3cubmFtZWNoZWFwLmNvbS93b3JkcHJlc3MvIj5Xb3JkUHJlc3Mgd2Vic2l0ZTwvYT4uIEl04oCZcyBhbHdheXMgbG9jYXRlZCBpbiB0aGUgcm9vdCBmb2xkZXIgb2YgdGhlIGRvbWFpbuKAmXMgV29yZFByZXNzIGluc3RhbGxhdGlvbi4gVW5saWtlIG90aGVyIGJhc2ljIFdvcmRQcmVzcyBmaWxlcywgaXQncyBnZW5lcmF0ZWQgc3BlY2lmaWNhbGx5IGZvciB5b3VyIHdlYnNpdGUgZHVyaW5nIHRoZSBpbnN0YWxsYXRpb24uIEl0IGtlZXBzIGluZm9ybWF0aW9uIGFib3V0IHRoZSBkYXRhYmFzZSBmb3IgeW91ciB3ZWJzaXRlIGFuZCBzb21lIG90aGVyIGVzc2VudGlhbCBzZXR0aW5ncy4gIDxiciAvPjxiciAvPg0KQXMgaXQgY29udGFpbnPCoCBpbXBvcnRhbnQgaW5mb3JtYXRpb24sIHdlIGRvIG5vdCByZWNvbW1lbmQgZWRpdGluZyBpdCB3aXRob3V0IG1ha2luZyBhIGJhY2t1cCBvZiB0aGUgZmlsZSBvciBldmVuIHRoZSB3ZWJzaXRlLiAgPGJyIC8+PGJyIC8+DQpZb3UgY2FuIGZpbmQgaXQgaW48Yj4gY1BhbmVsPC9iPiAmZ3Q7IDxiPkZpbGVzPC9iPiBzZWN0aW9uICZndDsgIDxiPkZpbGUgTWFuYWdlcjwvYj4gbWVudSAmZ3Q7IHJvb3QgZm9sZGVyIG9mIHRoZSBXb3JkUHJlc3MgaW5zdGFsbGF0aW9uOjxiciAvPjxiciAvPjxpbWcgY2xhc3M9ImtiLWltYWdlIiBzcmM9Imh0dHBzOi8vTmFtZWNoZWFwLnNpbXBsZWtiLmNvbS9TaXRlQ29udGVudHMvMi03QzIyRDUyMzZBNDU0M0VCODI3RjNCRDg5MzZFMTUzRS9tZWRpYS93cC1jb25maWcxLnBuZyIgLz48YnIgLz48YnIgLz5UaGVyZSBhcmUgc2V2ZXJhbCB3YXlzIHRvIGVkaXQgaXQ6ICA8YnIgLz48YnIgLz4NCjEuwqAgVmlhIDxiPmNQYW5lbCA8L2I+RmlsZSBNYW5hZ2VyIG1lbnUgJmd0OyBzZWxlY3QgdGhlIG5lZWRlZCB3cC1jb25maWcucGhwIGZpbGUgJmd0OyBjbGljayBvbiA8Yj5Db2RlIEVkaXRvciA8L2I+YnV0dG9uOg0KPGJyIC8+PGJyIC8+PGltZyBjbGFzcz0ia2ItaW1hZ2UiIHNyYz0iaHR0cHM6Ly9OYW1lY2hlYXAuc2ltcGxla2IuY29tL1NpdGVDb250ZW50cy8yLTdDMjJENTIzNkE0NTQzRUI4MjdGM0JEODkzNkUxNTNFL21lZGlhL3dwLWNvbmZpZzIucG5nIiAvPjxiciAvPjxiciAvPg0KMi7CoCBEb3dubG9hZCB0aGUgZmlsZSB0byB5b3VyIGRldmljZSBhbmQgdXNlIGFueSB0ZXh0IGVkaXRvciwgbGlrZSBOb3RlcGFkIG9yIFRleHRFZGl0LCB0byBtYWtlIHRoZSBjaGFuZ2VzLiBPbmNlIGRvbmUsIHlvdSB3aWxsIG5lZWQgdG8gcmV1cGxvYWQgdGhlIGZpbGUgdG8gdGhlIGhvc3RpbmcgYWNjb3VudC48YnIgLz48YnIgLz48YnIgLz48Yj5VbmRlcnN0YW5kaW5nIHdwLWNvbmZpZy5waHAgZmlsZTwvYj48YnIgLz48YnIgLz4NCkJlZm9yZSB3ZSBnZXQgdG8gdGhlIGFjdHVhbCBlZGl0aW5nIG9mIHRoZSBmaWxlLCBsZXTigJlzIHRha2UgYSBsb29rIGF0IHRoZSBiYXNpYyB3cC1jb25maWcucGhwIGZpbGUgY29kZS48YnIgLz5IZXJl4oCZcyBhbiBleGFtcGxlIG9mIHRoZSBkZWZhdWx0IFdvcmRQcmVzcyB3cC1jb25maWcucGhwIGZpbGU6IA0KPGJyIC8+PGJyIC8+PGltZyBjbGFzcz0ia2ItaW1hZ2UiIHNyYz0iaHR0cHM6Ly9OYW1lY2hlYXAuc2ltcGxla2IuY29tL1NpdGVDb250ZW50cy8yLTdDMjJENTIzNkE0NTQzRUI4MjdGM0JEODkzNkUxNTNFL21lZGlhL3dwLWNvbmZpZzMuMS5wbmciIC8+PGJyIC8+PGltZyBjbGFzcz0ia2ItaW1hZ2UiIHNyYz0iaHR0cHM6Ly9OYW1lY2hlYXAuc2ltcGxla2IuY29tL1NpdGVDb250ZW50cy8yLTdDMjJENTIzNkE0NTQzRUI4MjdGM0JEODkzNkUxNTNFL21lZGlhL3dwLWNvbmZpZzMuMi5wbmciIC8+PGJyIC8+PGltZyBjbGFzcz0ia2ItaW1hZ2UiIHNyYz0iaHR0cHM6Ly9OYW1lY2hlYXAuc2ltcGxla2IuY29tL1NpdGVDb250ZW50cy8yLTdDMjJENTIzNkE0NTQzRUI4MjdGM0JEODkzNkUxNTNFL21lZGlhL3dwLWNvbmZpZzMuMy5wbmciIC8+PGJyIC8+PGJyIC8+DQpFYWNoIHNlY3Rpb24gb2YgdGhpcyBmaWxlIGlzIHdlbGwgZG9jdW1lbnRlZCBpbiB0aGUgZmlsZSBpdHNlbGYuIEFsbW9zdCBhbGwgdGhlIHNldHRpbmdzIGFyZSBkZWZpbmVkIGJ5IHVzaW5nIFBIUCBjb25zdGFudHM6IDxiciAvPjxiciAvPjxwcmUgY2xhc3M9InByZXR0eXByaW50IGxpbmVudW1zIj4gZGVmaW5lKCAnY29uc3RhbnRfbmFtZScgLCAndmFsdWUnKTsgPC9wcmU+PGJyIC8+DQpMZXTigJlzIHRha2UgYSBsb29rIGF0IGVhY2ggc2VjdGlvbi48YnIgLz48YnIgLz48YnIgLz48Yj5NeVNRTCBkYXRhYmFzZSBzZXR0aW5ncyBpbiB3cC1jb25maWcucGhwIGZpbGU8L2I+PGJyIC8+PGJyIC8+VGhlIGNvbm5lY3Rpb24gb2YgeW91ciBXb3JkUHJlc3Mgd2Vic2l0ZSB3aXRoIHRoZSBkYXRhYmFzZSBpcyBjb25maWd1cmVkIGluIGEgc2VjdGlvbiA8Yj5NeVNRTCBTZXR0aW5nczwvYj46DQo8YnIgLz48YnIgLz48cHJlIGNsYXNzPSJwcmV0dHlwcmludCBsaW5lbnVtcyI+Ly8gKiogTXlTUUwgc2V0dGluZ3MgLSBZb3UgY2FuIGdldCB0aGlzIGluZm8gZnJvbSB5b3VyIHdlYiBob3N0ICoqIC8vPGJyIC8+LyoqIFRoZSBuYW1lIG9mIHRoZSBkYXRhYmFzZSBmb3IgV29yZFByZXNzICovPGJyIC8+ZGVmaW5lKCdEQl9OQU1FJywgJ2NQYW5lbHVzZXJuYW1lX3dwNzkyJyk7PGJyIC8+wqA8YnIgLz4vKiogTXlTUUwgZGF0YWJhc2UgdXNlcm5hbWUgKi88YnIgLz5kZWZpbmUoJ0RCX1VTRVInLCAnY1BhbmVsdXNlcm5hbWVfd3A3OTInKTs8YnIgLz7CoDxiciAvPi8qKiBNeVNRTCBkYXRhYmFzZSBwYXNzd29yZCAqLzxiciAvPmRlZmluZSgnREJfUEFTU1dPUkQnLCAncXAwQFAwWzI0UycpOzxiciAvPsKgPGJyIC8+LyoqIE15U1FMIGhvc3RuYW1lICovPGJyIC8+ZGVmaW5lKCdEQl9IT1NUJywgJ2xvY2FsaG9zdCcpOzxiciAvPsKgPGJyIC8+LyoqIERhdGFiYXNlIENoYXJzZXQgdG8gdXNlIGluIGNyZWF0aW5nIGRhdGFiYXNlIHRhYmxlcy4gKi88YnIgLz5kZWZpbmUoJ0RCX0NIQVJTRVQnLCAndXRmOG1iNCcpOzxiciAvPsKgPGJyIC8+LyoqIFRoZSBEYXRhYmFzZSBDb2xsYXRlIHR5cGUuIERvbid0IGNoYW5nZSB0aGlzIGlmIGluIGRvdWJ0LiAqLzxiciAvPmRlZmluZSgnREJfQ09MTEFURScsICcnKTs8L3ByZT48YnIgLz4NCklmIHlvdSBhcmUgaW5zdGFsbGluZyBXb3JkUHJlc3MgdXNpbmcgPGI+U29mdGFjdWxvdXMgU2NyaXB0IEluc3RhbGxlcjwvYj4sIHRoZXNlIHNldHRpbmdzIGFyZSBmaWxsZWQgaW4gYXV0b21hdGljYWxseSB3aXRob3V0IGEgbmVlZCB0byBtYWtlIGFueSBjaGFuZ2VzIGZyb20geW91ciBzaWRlLg0KPGJyIC8+PGJyIC8+SG93ZXZlciwgaWYgeW91IGFyZSBpbnN0YWxsaW5nIFdvcmRQcmVzcyA8Yj5tYW51YWxseTwvYj4sIHlvdSB3aWxsIG5lZWQgdG8gZmlsbCBpbiB0aGUgZm9sbG93aW5nIGxpbmVzOg0KPGJyIC8+PGJyIC8+PGI+REJfTkFNRTwvYj4g4oCTIG5hbWUgb2YgdGhlIGRhdGFiYXNlIHlvdSBhcmUgdXNpbmcgZm9yIHRoZSB3ZWJzaXRlLjxiciAvPjxiPkRCX1VTRVI8L2I+IOKAkyBuYW1lIG9mIHRoZSB1c2VyIGFzc2lnbmVkIHRvIHRoaXMgZGF0YWJhc2UuPGJyIC8+PGI+REJfUEFTU1dPUkQ8L2I+IOKAkyBwYXNzd29yZCBmb3IgdGhlIHVzZXIgYXNzaWduZWQgdG8gdGhlIGRhdGFiYXNlLjxiciAvPjxiPkRCX0hPU1Q8L2I+IOKAkyB5b3UgbmVlZCB0byB1c2UgZXhhY3RseSAnbG9jYWxob3N0JyBvciAnMTI3LjAuMC4xJy48YnIgLz48YnIgLz4NClRoaXMgaW5mb3JtYXRpb24gY2FuIGJlIGNoZWNrZWQgaW4gPGI+Y1BhbmVsPC9iPiAmZ3Q7IDxiPiBEYXRhYmFzZXMgPC9iPiBzZWN0aW9uICZndDsgPGI+TXlTUUwgRGF0YWJhc2VzPC9iPiBtZW51OjxiciAvPjxiciAvPjxpbWcgY2xhc3M9ImtiLWltYWdlIiBzcmM9Imh0dHBzOi8vTmFtZWNoZWFwLnNpbXBsZWtiLmNvbS9TaXRlQ29udGVudHMvMi03QzIyRDUyMzZBNDU0M0VCODI3RjNCRDg5MzZFMTUzRS9tZWRpYS93cC1jb25maWc0LnBuZyIgLz48YnIgLz48YnIgLz48YnIgLz48Yj5BdXRoZW50aWNhdGlvbiBLZXlzIGFuZCBTYWx0czwvYj48YnIgLz48YnIgLz5VbmlxdWUgPGI+QXV0aGVudGljYXRpb24gS2V5cyBhbmQgU2FsdHM8L2I+IGhlbHAgdG8gaW1wcm92ZSB0aGUgc2VjdXJpdHkgb2YgeW91ciBXb3JkUHJlc3Mgd2Vic2l0ZS4gVGhleSBwcm92aWRlIHN0cm9uZyBlbmNyeXB0aW9uIGZvciB1c2VyIHNlc3Npb25zIGFuZCBjb29raWVzIGdlbmVyYXRlZCBieSBXb3JkUHJlc3MuICANCjxiciAvPjxiciAvPjxwcmUgY2xhc3M9InByZXR0eXByaW50IGxpbmVudW1zIj4vKiojQCvCoCogQXV0aGVudGljYXRpb24gVW5pcXVlIEtleXMgYW5kIFNhbHRzLjxiciAvPsKgKjxiciAvPsKgKiBDaGFuZ2UgdGhlc2UgdG8gZGlmZmVyZW50IHVuaXF1ZSBwaHJhc2VzITxiciAvPsKgKiANCllvdSBjYW4gZ2VuZXJhdGUgdGhlc2UgdXNpbmcgdGhlIHtAbGluayBodHRwczovL2FwaS53b3JkcHJlc3Mub3JnL3NlY3JldC1rZXkvMS4xL3NhbHQvIFdvcmRQcmVzcy5vcmcgc2VjcmV0LWtleSBzZXJ2aWNlfQ0KPGJyIC8+wqAqIFlvdSBjYW4gY2hhbmdlIHRoZXNlIGF0IGFueSBwb2ludCBpbiB0aW1lIHRvIGludmFsaWRhdGUgYWxsIGV4aXN0aW5nIGNvb2tpZXMuIFRoaXMgd2lsbCBmb3JjZSBhbGwgdXNlcnMgdG8gaGF2ZSB0byBsb2cgaW4gYWdhaW4uPGJyIC8+wqAqPGJyIC8+wqAqIEBzaW5jZSAyLjYuMDxiciAvPsKgKi88YnIgLz5kZWZpbmUoJ0FVVEhfS0VZJyzCoMKgwqDCoMKgwqDCoMKgICdzbDR0amRua2xtYmE3eTVzbGttYnRtamxwaXE1c2t0cWY1YXRra3lmNGxxY2h5NnhxZGZtZHE4cThmZmZxZXR3Jyk7PGJyIC8+ZGVmaW5lKCdTRUNVUkVfQVVUSF9LRVknLMKgICd2NTNpbDczcWxhaDE2ZGIyMWk3Y2ZrM3pkcmd4eG0zb2Z2M2VsZmFxbm5maHZpNXoxYWVtcXIweHlkY3V4OW13Jyk7PGJyIC8+ZGVmaW5lKCdMT0dHRURfSU5fS0VZJyzCoMKgwqAgJ203ZW5tY2lpbDlqbjN6NGtucnA5ZWRvM2U0aWhsMTZyZjVubzFucmFkdjhrZDdoN3pmdnIzbnA5b3QyOWV3MnQnKTs8YnIgLz5kZWZpbmUoJ05PTkNFX0tFWScswqDCoMKgwqDCoMKgwqAgJ2tyZXFqd3FiM3o2d2VybHY1Y3gxMGp5a3NrcGUzeW9ncTUwbHNqc3pza21hYnl1YWtzbThtZ2Q3dnNrbDVoaWQnKTs8YnIgLz5kZWZpbmUoJ0FVVEhfU0FMVCcswqDCoMKgwqDCoMKgwqAgJ3RyaWppbGlhemZpYzJkYm9panVnZGJvbHlmajlzM2l1NHN4aWRib29hdmNkbWVqcWU2eHY5b2JtcnlkenFnN2MnKTs8YnIgLz5kZWZpbmUoJ1NFQ1VSRV9BVVRIX1NBTFQnLCAncDJkNmIxaHVud2lqM2Zva21rZWppYTNsb3l2enJsdm9ueHNsZ3pieHVzejR5dGJtYWpmeTMwdmZ3aG9mb3BocycpOzxiciAvPmRlZmluZSgnTE9HR0VEX0lOX1NBTFQnLMKgwqAgJzlsdW9hNDFpcnZhZnJvZ2d5OXhxZWRkNHFlbHR5b3V4cHFyYWpreTlwMnkzamVjZHVhYnBieDl2anBvdXpmYWInKTs8YnIgLz5kZWZpbmUoJ05PTkNFX1NBTFQnLMKgwqDCoMKgwqDCoCAnYmVsYjVva25wYXBkMHBnaWlmamdyc2Jpem9ya2VkeWplZDUwb212amhscnU2NWlvaHNrOTBsNGRvamlzYmRxYScpOzxiciAvPsKgPGJyIC8+LyoqI0AtKi88L3ByZT48YnIgLz5JbiB0aGUgZXhhbXBsZSBhYm92ZSB5b3UgY2FuIHNlZSB0aGF0IGtleXMgaGF2ZSBiZWVuIGFscmVhZHkgaW5zdGFsbGVkIGFuZCB5b3UgY2FuIHNpbXBseSB1cGRhdGUgdGhlbSBpZiBpdOKAmXMgbmVlZGVkLiBIb3dldmVyLCB5b3UgY2FuIGFsc28gY29tZSBhY3Jvc3MgPGI+J3B1dCB5b3VyIHVuaXF1ZSBwaHJhc2UgaGVyZScgPC9iPm1lc3NhZ2UgaW4gdGhlIHNldHRpbmdzLCB3aGljaCBtZWFucyB0aGF0IGtleXMgaGF2ZSBub3QgYmVlbiBpbnN0YWxsZWQgeWV0IGFuZCB5b3UgbmVlZCB0byBhZGQgdGhlbToNCjxiciAvPjxiciAvPjxwcmUgY2xhc3M9InByZXR0eXByaW50IGxpbmVudW1zIj4vKiojQCs8YnIgLz7CoCogQXV0aGVudGljYXRpb24gVW5pcXVlIEtleXMgYW5kIFNhbHRzLjxiciAvPsKgKjxiciAvPsKgKiBDaGFuZ2UgdGhlc2UgdG8gZGlmZmVyZW50IHVuaXF1ZSBwaHJhc2VzITxiciAvPsKgKiBZb3UgY2FuIGdlbmVyYXRlIHRoZXNlIHVzaW5nIHRoZSB7QGxpbmsgaHR0cHM6Ly9hcGkud29yZHByZXNzLm9yZy9zZWNyZXQta2V5LzEuMS9zYWx0LyBXb3JkUHJlc3Mub3JnIHNlY3JldC1rZXkgc2VydmljZX0NCjxiciAvPsKgKiBZb3UgY2FuIGNoYW5nZSB0aGVzZSBhdCBhbnkgcG9pbnQgaW4gdGltZSB0byBpbnZhbGlkYXRlIGFsbCBleGlzdGluZyBjb29raWVzLiBUaGlzIHdpbGwgZm9yY2UgYWxsIHVzZXJzIHRvIGhhdmUgdG8gbG9nIGluIGFnYWluLg0KPGJyIC8+wqAqPGJyIC8+wqAqIEBzaW5jZSAyLjYuMDxiciAvPsKgKi88YnIgLz5kZWZpbmUoJ0FVVEhfS0VZJyzCoMKgwqDCoMKgwqDCoMKgICdwdXQgeW91ciB1bmlxdWUgcGhyYXNlIGhlcmUnKTs8YnIgLz5kZWZpbmUoJ1NFQ1VSRV9BVVRIX0tFWScswqAgJ3B1dCB5b3VyIHVuaXF1ZSBwaHJhc2UgaGVyZScpOzxiciAvPmRlZmluZSgnTE9HR0VEX0lOX0tFWScswqDCoMKgICdwdXQgeW91ciB1bmlxdWUgcGhyYXNlIGhlcmUnKTs8YnIgLz5kZWZpbmUoJ05PTkNFX0tFWScswqDCoMKgwqDCoMKgwqAgJ3B1dCB5b3VyIHVuaXF1ZSBwaHJhc2UgaGVyZScpOzxiciAvPmRlZmluZSgnQVVUSF9TQUxUJyzCoMKgwqDCoMKgwqDCoCAncHV0IHlvdXIgdW5pcXVlIHBocmFzZSBoZXJlJyk7PGJyIC8+ZGVmaW5lKCdTRUNVUkVfQVVUSF9TQUxUJywgJ3B1dCB5b3VyIHVuaXF1ZSBwaHJhc2UgaGVyZScpOzxiciAvPmRlZmluZSgnTE9HR0VEX0lOX1NBTFQnLMKgwqAgJ3B1dCB5b3VyIHVuaXF1ZSBwaHJhc2UgaGVyZScpOzxiciAvPmRlZmluZSgnTk9OQ0VfU0FMVCcswqDCoMKgwqDCoMKgICdwdXQgeW91ciB1bmlxdWUgcGhyYXNlIGhlcmUnKTs8YnIgLz7CoDxiciAvPi8qKiNALSovPC9wcmU+PGJyIC8+WW91IGNhbiBnZW5lcmF0ZSBuZXcga2V5cyBieSB2aXNpdGluZyB0aGlzIGxpbmsgPGEgaHJlZj0iaHR0cHM6Ly9hcGkud29yZHByZXNzLm9yZy9zZWNyZXQta2V5LzEuMS9zYWx0LyI+aHR0cHM6Ly9hcGkud29yZHByZXNzLm9yZy9zZWNyZXQta2V5LzEuMS9zYWx0LzwvYT4uIEp1c3QgY29weSBhbmQgcGFzdGUga2V5cyB0byB0aGUgd3AtY29uZmlnLnBocCBmaWxlLjxiciAvPjxiciAvPg0KVXBkYXRpbmcgdGhlc2Uga2V5cyBpcyByYXRoZXIgaW1wb3J0YW50IGlmIHlvdSBzdXNwZWN0IHlvdXIgV29yZFByZXNzIGluc3RhbGxhdGlvbiB3YXMgaGFja2VkLiBDaGFuZ2luZyBhdXRoZW50aWNhdGlvbiBrZXlzIHdpbGwgbG9nIG91dCBhbGwgYXV0aG9yaXplZCB1c2VycyBmcm9tIHRoZSBzeXN0ZW0gYW5kIG1ha2UgdGhlbSBsb2cgaW4gb25jZSBhZ2Fpbi4NCjxiciAvPjxiciAvPjxiciAvPjxiPldvcmRQcmVzcyBEYXRhYmFzZSBUYWJsZSBQcmVmaXg8L2I+PGJyIC8+PGJyIC8+QnkgZGVmYXVsdCBXb3JkUHJlc3MgYWRkcyA8Yj53cF8gcHJlZml4PC9iPiB0byBhbGwgdGFibGVzIGNyZWF0ZWQgYnkgdGhlIGluc3RhbGxhdGlvbjogDQo8YnIgLz48YnIgLz48cHJlIGNsYXNzPSJwcmV0dHlwcmludCBsaW5lbnVtcyI+LyoqPGJyIC8+wqAqIFdvcmRQcmVzcyBEYXRhYmFzZSBUYWJsZSBwcmVmaXguPGJyIC8+wqAqPGJyIC8+wqAqIFlvdSBjYW4gaGF2ZSBtdWx0aXBsZSBpbnN0YWxsYXRpb25zIGluIG9uZSBkYXRhYmFzZSBpZiB5b3UgZ2l2ZSBlYWNoPGJyIC8+wqAqIGEgdW5pcXVlIHByZWZpeC4gT25seSBudW1iZXJzLCBsZXR0ZXJzLCBhbmQgdW5kZXJzY29yZXMgcGxlYXNlITxiciAvPsKgKi88YnIgLz4kdGFibGVfcHJlZml4wqAgPSAnd3BfJzsgPC9wcmU+PGJyIC8+SXTigJlzIHJlY29tbWVuZGVkIGNoYW5naW5nIHRoaXMgcHJlZml4IHRvIGEgY3VzdG9tIG9uZSBmb3Igc2VjdXJpdHkgcmVhc29ucy4gVGhpcyBjYW4gcHJldmVudCBoYWNrZXIgYXR0YWNrcyB0byB5b3VyIHdlYnNpdGUgYXMgaXQgcHJvdGVjdHMgKHByZXZlbnRzIGlzIHVzZWQgdHdvIHRpbWVzIGluIHRoZSBzYW1lIHNlbnRlbmNlKSBmcm9tIGd1ZXNzaW5nIHlvdXIgV29yZFByZXNzIHRhYmxlIG5hbWVzLg0KPGJyIC8+PGJyIC8+SXTigJlzIHF1aXRlIGVhc3kgdG8gY2hhbmdlIHRoZSBwcmVmaXggd2hpbGUgaW5zdGFsbGluZyBXb3JkUHJlc3MuIEhvd2V2ZXIsIGl0IHdpbGwgcmVxdWlyZSBzZXZlcmFsIHN0ZXBzIGZyb20geW91IGluIG9yZGVyIHRvIG1ha2UgdGhlIGNoYW5nZXMgZm9yIGV4aXN0aW5nIHdlYnNpdGVzLg0KPGJyIC8+PGJyIC8+R28gdG8gPGI+Y1BhbmVsIDwvYj4mZ3Q7IDxiPiBEYXRhYmFzZXMgPC9iPiBzZWN0aW9uICZndDsgPGI+cGhwTXlBZG1pbiA8L2I+IG1lbnUgJmd0OyBjaG9vc2UgdGhlIG5lY2Vzc2FyeSA8Yj5kYXRhYmFzZSA8L2I+ZnJvbSB0aGUgbGVmdCBzaWRlICZndDsgY2xpY2sgb24gPGI+U1FMIDwvYj5vcHRpb24gYWJvdmU6IA0KPGJyIC8+PGJyIC8+PGltZyBjbGFzcz0ia2ItaW1hZ2UiIHNyYz0iaHR0cHM6Ly9OYW1lY2hlYXAuc2ltcGxla2IuY29tL1NpdGVDb250ZW50cy8yLTdDMjJENTIzNkE0NTQzRUI4MjdGM0JEODkzNkUxNTNFL21lZGlhL3dwLWNvbmZpZzUucG5nIiAvPjxiciAvPjxpbWcgY2xhc3M9ImtiLWltYWdlIiBzcmM9Imh0dHBzOi8vTmFtZWNoZWFwLnNpbXBsZWtiLmNvbS9TaXRlQ29udGVudHMvMi03QzIyRDUyMzZBNDU0M0VCODI3RjNCRDg5MzZFMTUzRS9tZWRpYS93cC1jb25maWc2LnBuZyIgLz48YnIgLz48YnIgLz5IZXJlIHlvdSBuZWVkIHRvIHJ1biBxdWVyaWVzwqAgPGI+UkVOQU1FIFNRTCA8L2I+b24gdGFibGVzIGluIHlvdXIgV29yZFByZXNzIGRhdGFiYXNlOiANCiA8YnIgLz48YnIgLz48cHJlIGNsYXNzPSJwcmV0dHlwcmludCBsaW5lbnVtcyI+UkVOQU1FIHRhYmxlIGB3cF9jb21tZW50bWV0YWAgVE8gYG5ld3ByZWZpeF9jb21tZW50bWV0YWA7IDxiciAvPlJFTkFNRSB0YWJsZSBgd3BfY29tbWVudHNgIFRPIGBuZXdwcmVmaXhfY29tbWVudHNgOyA8YnIgLz5SRU5BTUUgdGFibGUgYHdwX2xpbmtzYCBUTyBgbmV3cHJlZml4X2xpbmtzYDsgPGJyIC8+UkVOQU1FIHRhYmxlIGB3cF9vcHRpb25zYCBUTyBgbmV3cHJlZml4X29wdGlvbnNgOyA8YnIgLz5SRU5BTUUgdGFibGUgYHdwX3Bvc3RtZXRhYCBUTyBgbmV3cHJlZml4X3Bvc3RtZXRhYDsgPGJyIC8+UkVOQU1FIHRhYmxlIGB3cF9wb3N0c2AgVE8gYG5ld3ByZWZpeF9wb3N0c2A7IDxiciAvPlJFTkFNRSB0YWJsZSBgd3BfdGVybXNgIFRPIGBuZXdwcmVmaXhfdGVybXNgOyA8YnIgLz5SRU5BTUUgdGFibGUgYHdwX3Rlcm1fcmVsYXRpb25zaGlwc2AgVE8gYG5ld3ByZWZpeF90ZXJtX3JlbGF0aW9uc2hpcHNgOyA8YnIgLz5SRU5BTUUgdGFibGUgYHdwX3Rlcm1fdGF4b25vbXlgIFRPIGBuZXdwcmVmaXhfdGVybV90YXhvbm9teWA7IDxiciAvPlJFTkFNRSB0YWJsZSBgd3BfdXNlcm1ldGFgIFRPIGBuZXdwcmVmaXhfdXNlcm1ldGFgOyA8YnIgLz5SRU5BTUUgdGFibGUgYHdwX3VzZXJzYCBUTyBgbmV3cHJlZml4X3VzZXJzYDsgPC9wcmU+PGJyIC8+PGI+Tk9URTo8L2I+IG5ld3ByZWZpeF8gc2hvdWxkIGJlIHJlcGxhY2VkIHdpdGggdGhlIG5ldyBkYXRhYmFzZSBwcmVmaXggeW91IHdpc2ggdG8gaGF2ZSBpbnN0ZWFkIG9mIHdwXy4NCjxiciAvPjxiciAvPkhpdCA8Yj5HbyA8L2I+dG8gcHJvY2VlZCB3aXRoIHRoaXMgY2hhbmdlczogDQo8YnIgLz48YnIgLz48aW1nIGNsYXNzPSJrYi1pbWFnZSIgc3JjPSJodHRwczovL05hbWVjaGVhcC5zaW1wbGVrYi5jb20vU2l0ZUNvbnRlbnRzLzItN0MyMkQ1MjM2QTQ1NDNFQjgyN0YzQkQ4OTM2RTE1M0UvbWVkaWEvd3AtY29uZmlnNy5wbmciIC8+PGJyIC8+PGJyIC8+DQpPbmNlIGRvbmUsIHlvdSB3aWxsIHNlZSB0aGUgbmV3IGRhdGFiYXNlIHByZWZpeCBoYXMgYmVlbiBhcHBsaWVkIHRvIHlvdXIgV29yZFByZXNzIGRhdGFiYXNlOg0KPGJyIC8+PGJyIC8+PGltZyBjbGFzcz0ia2ItaW1hZ2UiIHNyYz0iaHR0cHM6Ly9OYW1lY2hlYXAuc2ltcGxla2IuY29tL1NpdGVDb250ZW50cy8yLTdDMjJENTIzNkE0NTQzRUI4MjdGM0JEODkzNkUxNTNFL21lZGlhL3dwLWNvbmZpZzgucG5nIiAvPjxiciAvPjxiciAvPg0KQWZ0ZXIgdGhhdCB5b3Ugd2lsbCBuZWVkIHRvIHNlYXJjaCB0aGUgPGI+b3B0aW9ucyA8L2I+dGFibGUgZm9yIGFueSBvdGhlciBmaWVsZHMgdGhhdCBhcmUgdXNpbmcgd3BfIGFzIGEgcHJlZml4IGluIG9yZGVyIHRvIHJlcGxhY2UgdGhlbS4gSXQgaXMgbmVjZXNzYXJ5IHRvIHJ1biB0aGUgZm9sbG93aW5nIHF1ZXJ5IGluIHRoZSBzYW1lIHdheTogDQogPGJyIC8+PGJyIC8+PHByZSBjbGFzcz0icHJldHR5cHJpbnQgbGluZW51bXMiPlNFTEVDVCAqIEZST00gJ25ld3ByZWZpeF9vcHRpb25zJyBXSEVSRSAnb3B0aW9uX25hbWUnIExJS0UgJyV3cF8lJzwvcHJlPjxiciAvPjxpbWcgY2xhc3M9ImtiLWltYWdlIiBzcmM9Imh0dHBzOi8vTmFtZWNoZWFwLnNpbXBsZWtiLmNvbS9TaXRlQ29udGVudHMvMi03QzIyRDUyMzZBNDU0M0VCODI3RjNCRDg5MzZFMTUzRS9tZWRpYS93cC1jb25maWc5LnBuZyIgLz48YnIgLz48YnIgLz5UaGVuIGNsaWNrIDxiPkdvPC9iPiBhbmQgeW91IHdpbGwgZ2V0IHRoZSBhIHJlc3VsdCBhcyBvbiBpbiB0aGUgc2NyZWVuc2hvdCBiZWxvdzogDQo8YnIgLz48YnIgLz48aW1nIGNsYXNzPSJrYi1pbWFnZSIgc3JjPSJodHRwczovL05hbWVjaGVhcC5zaW1wbGVrYi5jb20vU2l0ZUNvbnRlbnRzLzItN0MyMkQ1MjM2QTQ1NDNFQjgyN0YzQkQ4OTM2RTE1M0UvbWVkaWEvd3AtY29uZmlnMTAucG5nIiAvPjxiciAvPjxiciAvPg0KSGVyZSB5b3Ugd2lsbCBuZWVkIHRvIGdvIG9uZSBieSBvbmUgdG8gY2hhbmdlIHRoZXNlIGxpbmVzIGFuZCByZXBsYWNlIHRoZSBvbGQgZGF0YWJhc2UgcHJlZml4IHdpdGggdGhlIG5ldyBvbmUuIE9uY2UgZG9uZSwgd2UgbmVlZCB0byBzZWFyY2ggZm9yIDxiPnVzZXJtZXRhIDwvYj5mb3IgYWxsIGZpZWxkcyB0aGF0IGFyZSBoYXZpbmfCoCBoYXZlIHdwXyBhcyBhIHByZWZpeCB3aXRoIHRoZSBoZWxwIG9mIHRoaXMgU1FMIHF1ZXJ5OiANCjxiciAvPjxiciAvPjxwcmUgY2xhc3M9InByZXR0eXByaW50IGxpbmVudW1zIj7CoDxiciAvPlNFTEVDVCAqIEZST00gYG5ld3ByZWZpeF91c2VybWV0YWAgV0hFUkUgYG1ldGFfa2V5YCBMSUtFICcld3BfJSc8L3ByZT48YnIgLz5BZnRlciB0aGF0IGNsaWNrIDxiPkdvIDwvYj5hbmQgdGhlIGZvbGxvd2luZyByZXN1bHRzIHdpbGwgYXBwZWFyOiANCjxiciAvPjxiciAvPjxpbWcgY2xhc3M9ImtiLWltYWdlIiBzcmM9Imh0dHBzOi8vTmFtZWNoZWFwLnNpbXBsZWtiLmNvbS9TaXRlQ29udGVudHMvMi03QzIyRDUyMzZBNDU0M0VCODI3RjNCRDg5MzZFMTUzRS9tZWRpYS93cC1jb25maWcxMS5wbmciIC8+PGJyIC8+PGltZyBjbGFzcz0ia2ItaW1hZ2UiIHNyYz0iaHR0cHM6Ly9OYW1lY2hlYXAuc2ltcGxla2IuY29tL1NpdGVDb250ZW50cy8yLTdDMjJENTIzNkE0NTQzRUI4MjdGM0JEODkzNkUxNTNFL21lZGlhL3dwLWNvbmZpZzEyLnBuZyIgLz48YnIgLz48YnIgLz4NClRoZSBudW1iZXIgb2YgZW50cmllcyBtYXkgdmFyeSBkZXBlbmRpbmcgb24gaG93IG1hbnkgcGx1Z2lucyB5b3UgYXJlIHVzaW5nIGFuZCBzdWNoLiBIZXJlIHlvdSBuZWVkIHRvIGNoYW5nZSBldmVyeXRoaW5nIHdpdGggd3BfIHRvIHRoZSBuZXcgcHJlZml4IGFzIHdlbGwuIA0KPGJyIC8+PGJyIC8+T25jZSBkb25lLCBtYWtlIHN1cmUgdGhhdCB5b3UgdXBkYXRlIHlvdXIgd3AtY29uZmlnLnBocCBmaWxlIHdpdGggdGhlIG5ldyBkYXRhYmFzZSBwcmVmaXg6IA0KPGJyIC8+PGJyIC8+PGltZyBjbGFzcz0ia2ItaW1hZ2UiIHNyYz0iaHR0cHM6Ly9OYW1lY2hlYXAuc2ltcGxla2IuY29tL1NpdGVDb250ZW50cy8yLTdDMjJENTIzNkE0NTQzRUI4MjdGM0JEODkzNkUxNTNFL21lZGlhL3dwLWNvbmZpZzEzLnBuZyIgLz48YnIgLz48YnIgLz4NCiBBbHNvLCB5b3UgY2FuIGNoYW5nZSB0aGUgZGF0YWJhc2UgcHJlZml4IHVzaW5nIHNwZWNpYWwgPGI+cGx1Z2lucyA8L2I+bGlrZSBDaGFuZ2UgREIgcHJlZml4IG9yIENoYW5nZSB0YWJsZSBwcmVmaXguPGJyIC8+PGJyIC8+PGJyIC8+PGI+V29yZFByZXNzIGRlYnVnIG1vZGUgPC9iPjxiciAvPjxiciAvPg0KIFRoaXMgZmVhdHVyZSBjYW4gYmUgdXNlZnVsIGZvciB1c2VycywgdGhhdCBhcmUgbGVhcm5pbmcgV29yZFByZXNzIGRldmVsb3BtZW50IG9yIHRyeWluZyB0byB1c2Ugc29tZSBleHBlcmltZW50YWwgZnVuY3Rpb25zIGFuZCBvcHRpb25zLiBCeSBkZWZhdWx0IFdvcmRQcmVzcyBoaWRlcyBub3RpZmljYXRpb25zLCB3aGljaCBhcmUgZ2VuZXJhdGVkIGJ5IFBIUCBkdXJpbmcgY29kZSBleGVjdXRpb24uDQo8YnIgLz48YnIgLz48cHJlIGNsYXNzPSJwcmV0dHlwcmludCBsaW5lbnVtcyI+IA0KLyoqPGJyIC8+wqAqIEZvciBkZXZlbG9wZXJzOiBXb3JkUHJlc3MgZGVidWdnaW5nIG1vZGUuPGJyIC8+wqAqPGJyIC8+wqAqIENoYW5nZSB0aGlzIHRvIHRydWUgdG8gZW5hYmxlIHRoZSBkaXNwbGF5IG9mIG5vdGljZXMgZHVyaW5nIGRldmVsb3BtZW50LjxiciAvPsKgKiBJdCBpcyBzdHJvbmdseSByZWNvbW1lbmRlZCB0aGF0IHBsdWdpbiBhbmQgdGhlbWUgZGV2ZWxvcGVycyB1c2UgV1BfREVCVUc8YnIgLz7CoCogaW4gdGhlaXIgZGV2ZWxvcG1lbnQgZW52aXJvbm1lbnRzLjxiciAvPsKgKjxiciAvPsKgKiBGb3IgaW5mb3JtYXRpb24gb24gb3RoZXIgY29uc3RhbnRzIHRoYXQgY2FuIGJlIHVzZWQgZm9yIGRlYnVnZ2luZyw8YnIgLz7CoCogdmlzaXQgdGhlIENvZGV4LjxiciAvPsKgKjxiciAvPsKgKiBAbGluayBodHRwczovL2NvZGV4LndvcmRwcmVzcy5vcmcvRGVidWdnaW5nX2luX1dvcmRQcmVzczxiciAvPsKgKi88YnIgLz5kZWZpbmUoJ1dQX0RFQlVHJywgZmFsc2UpOzxiciAvPsKgPGJyIC8+LyogVGhhdCdzIGFsbCwgc3RvcCBlZGl0aW5nISBIYXBweSBibG9nZ2luZy4gKi88YnIgLz7CoDxiciAvPklmIHlvdSBjaGFuZ2UgdGhlIGZvbGxvd2luZyBsaW5lIGZyb20gZmFsc2UgdG8gdHJ1ZSwgV29yZFByZXNzIHdpbGwgc2hvdyBhbGwgUEhQIG5vdGlmaWNhdGlvbnMuPGJyIC8+ZGVmaW5lKCdXUF9ERUJVRycsIHRydWUpOzwvcHJlPjxiciAvPg0KVGhlIGxhc3QgcGFydCBvZiB0aGUgd3AtY29uZmlnLnBocCBmaWxlIGRlZmluZXMgdGhlIDxiPmFic29sdXRlIHBhdGg8L2I+LCB3aGljaCBpcyB1c2VkIGZvciBzZXR0aW5ncyBvZiBXb3JkUHJlc3MgdmFycyBhbmQgaW5jbHVkZWQgZmlsZXMuIFRoZXJlIGlzIG5vIG5lZWQgdG8gY2hhbmdlIGFueXRoaW5nIGhlcmU6DQogPGJyIC8+PGJyIC8+PHByZSBjbGFzcz0icHJldHR5cHJpbnQgbGluZW51bXMiPi8qKiBBYnNvbHV0ZSBwYXRoIHRvIHRoZSBXb3JkUHJlc3MgZGlyZWN0b3J5LiAqLzxiciAvPmlmICggIWRlZmluZWQoJ0FCU1BBVEgnKSApPGJyIC8+wqDCoCDCoGRlZmluZSgnQUJTUEFUSCcsIGRpcm5hbWUoX19GSUxFX18pIC4gJy8nKTs8YnIgLz7CoDxiciAvPi8qKiBTZXRzIHVwIFdvcmRQcmVzcyB2YXJzIGFuZCBpbmNsdWRlZCBmaWxlcy4gKi88YnIgLz5yZXF1aXJlX29uY2UoQUJTUEFUSCAuICd3cC1zZXR0aW5ncy5waHAnKTs8L3ByZT48YnIgLz48YnIgLz48Yj5Nb3N0IGNvbW1vbiBjaGFuZ2VzLCB3aGljaCBjYW4gYmUgYXBwbGllZCB2aWEgd3AtY29uZmlnLnBocCBmaWxlPC9iPjxiciAvPjxiciAvPkFsbCBhZGRpdGlvbmFsIGxpbmVzIGluIHRoZSB3cC1jb25maWcucGhwIGZpbGUgc2hvdWxkIGJlIGFkZGVkIDxiPmJlZm9yZTwvYj4gdGhlIGZvbGxvd2luZyBsaW5lOg0KPGJyIC8+PGJyIC8+PHByZSBjbGFzcz0icHJldHR5cHJpbnQgbGluZW51bXMiPiAvKiBUaGF0J3MgYWxsLCBzdG9wIGVkaXRpbmchIEhhcHB5IGJsb2dnaW5nLiAqLzwvcHJlPjxiciAvPjxiciAvPjxiPkNoYW5naW5nIE15U1FMIHBvcnQgYW5kIHNvY2tldHMgaW4gV29yZFByZXNzPC9iPjxiciAvPjxiciAvPkJ5IGRlZmF1bHQgd2UgYXJlIHVzaW5nIDxiPnBvcnQgMzMwNjwvYj4gZm9yIE15U1FMIGhvc3QuIEhvd2V2ZXIsIGlmIGZvciBzb21lIHJlYXNvbiBpdCBzaG91bGQgYmUgY2hhbmdlZCAoZm9yIGV4YW1wbGUsIG9uIGEgVlBTIG9yIGEgZGVkaWNhdGVkIHNlcnZlciksIHlvdSB3aWxsIG5lZWQgdG8gY2hhbmdlIDxiPkRCX0hPU1Q8L2I+IGxpbmUgc28gaXQgaW5jbHVkZXMgcG9ydCBudW1iZXIgYXMgd2VsbC4gRm9yIGV4YW1wbGU6DQo8YnIgLz48YnIgLz48cHJlIGNsYXNzPSJwcmV0dHlwcmludCBsaW5lbnVtcyI+ZGVmaW5lKCAnREJfSE9TVCcsICdsb2NhbGhvc3Q6NTA2NycgKTs8L3ByZT48YnIgLz5JbiB0aGlzIGV4YW1wbGUsIHlvdSBjYW4gc2VlIHBvcnQgNTA2Ny4gSG93ZXZlciwgaXQgY2FuIGJlIGNoYW5nZWQgYWNjb3JkaW5nIHRvIHRoZSBzZXR0aW5ncyB5b3UgbmVlZCB0byBhcHBseS4gU28gZG8gbm90IGZvcmdldCB0byBtYWtlIHRoZSBuZWNlc3NhcnkgY2hhbmdlcy4NCjxiciAvPjxiciAvPklmIHRoZSBob3N0IHVzZXMgPGI+c29ja2V0cyBvciBwaXBlczwvYj4gZm9yIE15U1FMLCB5b3Ugd2lsbCBuZWVkIHRvIGNoYW5nZSA8Yj5EQl9IT1NUPC9iPiBsaW5lIGluIGEgc2ltaWxhciB3YXk6DQo8YnIgLz48YnIgLz48cHJlIGNsYXNzPSJwcmV0dHlwcmludCBsaW5lbnVtcyI+ZGVmaW5lKCAnREJfSE9TVCcsICdsb2NhbGhvc3Q6L3Zhci9ydW4vbXlzcWxkL215c3FsZC5zb2NrJyApOzwvcHJlPjxiciAvPlRoZSBleGFjdCBjaGFuZ2VzIG11c3QgY2hlY2tlZCB3aXRoIHlvdXIgaG9zdGluZyBwcm92aWRlci4NCjxiciAvPjxiciAvPjxiciAvPjxiPkNoYW5naW5nIFdvcmRQcmVzcyBVUkxzPC9iPjxiciAvPjxiciAvPlNvbWV0aW1lcyBpdCBpcyByZXF1aXJlZCB0byBjaGFuZ2UgV29yZFByZXNzIDxiPlVSTHM8L2I+LiBGb3IgZXhhbXBsZSwgeW91IGhhdmUgY2hhbmdlZCB0aGUgZG9tYWluIG9mIDxhIGhyZWY9Imh0dHBzOi8vd3d3Lm5hbWVjaGVhcC5jb20vaG9zdGluZy9zaGFyZWQuYXNweCI+d2ViIGhvc3Rpbmcgc2VydmljZTwvYT4uIFlvdSBjYW4gYXBwbHkgdGhlIGNoYW5nZSBpbiBhIFdvcmRQcmVzcyBhZG1pbiBkYXNoYm9hcmQgb3IgYSBkYXRhYmFzZSBhc3NpZ25lZCB0byB0aGUgd2Vic2l0ZS4gSG93ZXZlciwgeW91IGNhbiBhbHNvIG1ha2UgdGhlc2UgY2hhbmdlcyB2aWEgdGhlIHdwLWNvbmZpZy5waHAgZmlsZS4gVGhpcyBjYW4gYmUgcXVpdGUgdXNlZnVsLCB3aGVuIHlvdSBjYW7igJl0IGFjY2VzcyB5b3VyIFdvcmRQcmVzcyBhZG1pbiBkYXNoYm9hcmQuIA0KPGJyIC8+SW4gb3JkZXIgdG8gYXBwbHkgdGhlIGNoYW5nZXMsIHlvdSB3aWxsIG5lZWQgdG8gYWRkIHRoZSBmb2xsb3dpbmcgbGluZXM6DQo8YnIgLz48YnIgLz48cHJlIGNsYXNzPSJwcmV0dHlwcmludCBsaW5lbnVtcyI+ZGVmaW5lKCdXUF9IT01FJywnaHR0cDovL2V4YW1wbGUuY29tJyk7PGJyIC8+ZGVmaW5lKCdXUF9TSVRFVVJMJywnaHR0cDovL2V4YW1wbGUuY29tJyk7PC9wcmU+wqA8YnIgLz5EbyBub3QgZm9yZ2V0IHRvIGNoYW5nZSAnaHR0cDovL2V4YW1wbGUuY29tJyB0byB5b3VyIHJlYWwgd2Vic2l0ZSdzIGRvbWFpbiwgd2hpY2ggY2FuIGFsc28gY29udGFpbiBodHRwcyBvciB3d3cuIA0KPGJyIC8+PGJyIC8+PGJyIC8+PGI+Q2hhbmdpbmcgdXBsb2FkIGRpcmVjdG9yeTwvYj48YnIgLz48YnIgLz5CeSBkZWZhdWx0IFdvcmRQcmVzcyBzdG9yZXMgYWxsIHlvdXIgbWVkaWEgdXBsb2FkcyBpbiAvd3AtY29udGVudC91cGxvYWRzLyBmb2xkZXIuIElmIHlvdSBsaWtlIHRvIHN0b3JlIHRoZSBmaWxlcyBpbiBvdGhlciBwbGFjZSwgeW91IGNhbiBhZGQgdGhlIGZvbGxvd2luZyBsaW5lcyB0byB0aGUgd3AtY29uZmlnLnBocCBmaWxlOiANCjxiciAvPjxiciAvPjxwcmUgY2xhc3M9InByZXR0eXByaW50IGxpbmVudW1zIj5kZWZpbmUoICdVUExPQURTJywgJ3dwLWNvbnRlbnQvbmV3Zm9sZGVyJyApOyA8L3ByZT48YnIgLz48Yj4nbmV3Zm9sZGVyJzwvYj4gY2FuIGJlIGNoYW5nZWQgdG8gYW55IGZvbGRlciBuYW1lIHlvdSBhcmUgZ29pbmcgdG8gc3RvcmUgdGhlIGZpbGVzIGluLg0KPGJyIC8+PGJyIC8+PGJyIC8+PGI+RGlzYWJsaW5nIGF1dG9tYXRpYyBXb3JkUHJlc3MgdXBkYXRlczwvYj48YnIgLz48YnIgLz5TdGFydGluZyBmcm9tIFdvcmRwcmVzcyBXb3JkUHJlc3MgdmVyc2lvbiAzLjcgZGV2ZWxvcGVycyBoYXZlIGFkZGVkIGFuIDxiPmF1dG9tYXRpYyB1cGRhdGU8L2I+IG9wdGlvbi4gSXTigJlzIGdvb2QgZm9yIHRoZSBzZWN1cml0eSBvZiB5b3VyIHdlYnNpdGUgZm9yIHN1cmUuIEhvd2V2ZXIsIHRoZSB1cGRhdGUgY2FuIHNpbXBseSBicmVhayB5b3VyIHdlYnNpdGUgYW5kIG1ha2UgaXQgdW5yZWFjaGFibGUuIElmIHlvdSBhZGQgdGhpcyBzaW1wbGUgY29kZSB0byB5b3VyIHdwLWNvbmZpZy5waHAgZmlsZSB5b3Ugd2lsbCBkaXNhYmxlIHRoZSBhdXRvbWF0aWMgdXBkYXRlcyBmb3IgdGhlIGluc3RhbGxhdGlvbjoNCjxiciAvPjxiciAvPjxwcmUgY2xhc3M9InByZXR0eXByaW50IGxpbmVudW1zIj5kZWZpbmUoICdXUF9BVVRPX1VQREFURV9DT1JFJywgZmFsc2UgKTs8L3ByZT48YnIgLz48YnIgLz48Yj5DaGFuZ2luZyB0aGUgbGltaXQgb2YgcG9zdCByZXZpc2lvbiBpbiBXb3JkUHJlc3M8L2I+PGJyIC8+PGJyIC8+DQpXb3JkUHJlc3MgcGxhdGZvcm0gaGFzIGEgYnVpbHQtaW4gb3B0aW9uIGZvciA8Yj5hdXRvc2F2ZSA8L2I+YW5kIDxiPnJldmlzaW9ucyBvZiB0aGUgcG9zdHM8L2I+LiBJZiB5b3UgaGF2ZSBhIGxhcmdlIHdlYnNpdGUsIHJldmlzaW9ucyBjYW4gc2lnbmlmaWNhbnRseSBpbmNyZWFzZSB0aGUgc2l6ZSBvZiB5b3VyIGRhdGFiYXNlLiBZb3UgY2FuIGNoYW5nZSB0aGUgbnVtYmVyIG9mIHRoZSByZXZpc2lvbnMgc3RvcmVkIGZvciBhIHBvc3QgYnkgYWRkaW5nIHRoZSBmb2xsb3dpbmcgbGluZSB0byB0aGUgd3AtY29uZmlnLnBocCBmaWxlOiANCjxiciAvPjxiciAvPjxwcmUgY2xhc3M9InByZXR0eXByaW50IGxpbmVudW1zIj5kZWZpbmUoICdXUF9QT1NUX1JFVklTSU9OUycsIDMgKTs8L3ByZT48YnIgLz5OdW1iZXIgJzMnIHNob3VsZCBiZSBjaGFuZ2VkIHRvIG51bWJlciBvZiByZXZpc2lvbnMgeW91IHdvdWxkIGxpa2UgdG8gc3RvcmUuDQo8YnIgLz48YnIgLz48YnIgLz48Yj5DaGFuZ2luZyBXUF9NRU1PUllfTElNSVQ8L2I+PGJyIC8+PGJyIC8+U29tZXRpbWVzIGFmdGVyIGEgcGx1Z2luIGFjdGl2YXRpb24gb3Igc29tZSBhY3Rpb25zIGluIFdvcmRQcmVzcywgeW91IGNhbiBnZXQgYSBtZXNzYWdlIHRoYXQgeW91IG5lZWQgdG8gaW5jcmVhc2UgPGI+d3BfbWVtb3J5IGxpbWl0PC9iPi4gSW4gb3JkZXIgdG8gZG8gc28sIGFkZCB0aGUgZm9sbG93aW5nIGxpbmUgdG8gdGhlIHdwLWNvbmZpZy5waHAgZmlsZTogDQo8YnIgLz48YnIgLz48cHJlIGNsYXNzPSJwcmV0dHlwcmludCBsaW5lbnVtcyI+ZGVmaW5lKCdXUF9NRU1PUllfTElNSVQnLCAnNjRNJyk7PC9wcmU+PGJyIC8+DQpMaW1pdCAnNjRNJyBpbiB0aGlzIGV4YW1wbGUgY2FuIGJlIGNoYW5nZWQgdG8gdGhlIGxpbWl0IHlvdSBuZWVkLg0KPGJyIC8+PGJyIC8+PGJyIC8+VGhhdOKAmXMgaXQhPGJyIC8+PGJyIC8+PGJyIC8+DQpOZWVkIGFueSBoZWxwPyBDb250YWN0IG91ciA8YSBocmVmPSJodHRwczovL3d3dy5uYW1lY2hlYXAuY29tL2hlbHAtY2VudGVyLyI+SGVscERlc2s8L2E+PGJyIC8+PGJyIC8+","NewTillDate":null,"FeaturedTillDate":null,"ModifiedDateTime":"2025-06-24T15:24:00.0000000","LiveDateTime":"1754-02-02T00:00:00.0000000","CreatedDateTime":"2017-05-31T14:08:58.0000000","ApprovalDatetime":"2017-05-31T14:08:58.0000000","RequestCount":52838,"MarkedAsNew":false,"MarkedAsFeatured":false,"RatingValue":2,"CategoryPaths":[{"__type":"Nc:SimpleKB:Abstractions:Dtos:CategoryPathDto","Level":1,"CategoryId":12,"CategoryName":"Hosting"},{"__type":"Nc:SimpleKB:Abstractions:Dtos:CategoryPathDto","Level":2,"CategoryId":2187,"CategoryName":"cPanel: WordPress"}],"AssociatedCategories":[{"CategoryId":2187,"CategoryName":"cPanel: WordPress","CategoryDisplayName":"HostingcPanel: WordPress"}],"AssociatedTags":[{"TagId":19780,"Tag":"wordpress"},{"TagId":30038,"Tag":" wp-config"},{"TagId":83121,"Tag":" edit wp config"},{"TagId":83122,"Tag":" configuration file wordpress "}],"RelatedArticles":[],"AssociatedMedias":[],"PreferredCategoryId":0,"RootParentCategoryName":"","RootParentCategoryId":0},"status":200,"statusText":"OK"},"/api/v1/ncpl/simplekb/getcategorybycategoryid:\"{\\\"categoryId\\\":2187}\"":{"body":{"__type":"Nc:SimpleKB:Abstractions:Dtos:CategoryDto","ParentCategoryId":12,"Parent_Category_Name":"Hosting","FriendlyId":null,"ApprovedYN":true,"TreatAsTopicYN":false,"CreatedDateTime":"04/19/2013 16:31:19","CurrentCategoryPaths":[{"__type":"Nc:SimpleKB:Abstractions:Dtos:CategoryPathDto","Level":1,"CategoryId":12,"CategoryName":"Hosting"},{"__type":"Nc:SimpleKB:Abstractions:Dtos:CategoryPathDto","Level":2,"CategoryId":2187,"CategoryName":"cPanel: WordPress"}],"RelatedCategories":[],"AssociatedArticles":[{"ArticleId":10008,"Title":"How to manage WordPress website with iPhone application","ArticleName":"How to manage WordPress website with iPhone application","LiveDateTime":"02/02/1754 00:00:00","NewTillDate":null,"FeaturedTillDate":null,"ModifiedDateTime":"12/10/2021"},{"ArticleId":10076,"Title":"How to Create a WordPress Staging Site","ArticleName":"How to Create a WordPress Staging Site","LiveDateTime":"02/02/1754 00:00:00","NewTillDate":null,"FeaturedTillDate":null,"ModifiedDateTime":"01/18/2022"},{"ArticleId":10115,"Title":"How to fix WordPress blank page (white screen)","ArticleName":"How to fix WordPress blank page (white screen)","LiveDateTime":"02/02/1754 00:00:00","NewTillDate":null,"FeaturedTillDate":null,"ModifiedDateTime":"06/25/2024"},{"ArticleId":10185,"Title":"How to deal with the hacked WordPress website?","ArticleName":"How to deal with the hacked WordPress website?","LiveDateTime":"02/02/1754 00:00:00","NewTillDate":null,"FeaturedTillDate":null,"ModifiedDateTime":"01/31/2025"},{"ArticleId":10316,"Title":"How to change upload filesize limit in WordPress multisite","ArticleName":"How to change upload filesize limit in WordPress multisite","LiveDateTime":"02/02/1754 00:00:00","NewTillDate":null,"FeaturedTillDate":null,"ModifiedDateTime":"09/24/2020"},{"ArticleId":10645,"Title":"How to fix a WordPress critical error","ArticleName":"How to fix a WordPress critical error","LiveDateTime":"02/02/1754 00:00:00","NewTillDate":null,"FeaturedTillDate":null,"ModifiedDateTime":"12/19/2025"},{"ArticleId":10649,"Title":"Extendify Overview","ArticleName":"Extendify Overview","LiveDateTime":"02/02/1754 00:00:00","NewTillDate":null,"FeaturedTillDate":null,"ModifiedDateTime":"05/21/2026"},{"ArticleId":10752,"Title":"How to update WordPress admin email via a database","ArticleName":"How to update WordPress admin email via a database","LiveDateTime":"02/02/1754 00:00:00","NewTillDate":null,"FeaturedTillDate":null,"ModifiedDateTime":"10/09/2025"},{"ArticleId":1255,"Title":"How to install WordPress using Softaculous","ArticleName":"How to install WordPress using Softaculous","LiveDateTime":"02/02/1754 00:00:00","NewTillDate":null,"FeaturedTillDate":null,"ModifiedDateTime":"09/25/2024"},{"ArticleId":9495,"Title":"How to move WordPress from a subfolder","ArticleName":"How to move WordPress from a subfolder","LiveDateTime":"02/02/1754 00:00:00","NewTillDate":null,"FeaturedTillDate":null,"ModifiedDateTime":"12/21/2021"},{"ArticleId":9202,"Title":"How to reset/change WordPress admin password","ArticleName":"How to reset/change WordPress admin password","LiveDateTime":"02/02/1754 00:00:00","NewTillDate":null,"FeaturedTillDate":null,"ModifiedDateTime":"04/27/2025"},{"ArticleId":9972,"Title":"How to log in to WordPress using Softaculous","ArticleName":"How to log in to WordPress using Softaculous","LiveDateTime":"02/02/1754 00:00:00","NewTillDate":null,"FeaturedTillDate":null,"ModifiedDateTime":"12/27/2022"},{"ArticleId":9809,"Title":"How to change your WordPress Admin URL","ArticleName":"How to change your WordPress Admin URL","LiveDateTime":"02/02/1754 00:00:00","NewTillDate":null,"FeaturedTillDate":null,"ModifiedDateTime":"12/21/2021"},{"ArticleId":9451,"Title":"How to manage WordPress user roles","ArticleName":"How to manage WordPress user roles","LiveDateTime":"02/02/1754 00:00:00","NewTillDate":null,"FeaturedTillDate":null,"ModifiedDateTime":"10/23/2024"},{"ArticleId":9328,"Title":"How to install a new theme for WordPress","ArticleName":"How to install a new theme for WordPress","LiveDateTime":"02/02/1754 00:00:00","NewTillDate":null,"FeaturedTillDate":null,"ModifiedDateTime":"09/25/2024"},{"ArticleId":9761,"Title":"How to add a favicon to a WordPress website","ArticleName":"How to add a favicon to a WordPress website","LiveDateTime":"02/02/1754 00:00:00","NewTillDate":null,"FeaturedTillDate":null,"ModifiedDateTime":"12/10/2021"},{"ArticleId":9433,"Title":"How to manage plugins in WordPress","ArticleName":"How to manage plugins in WordPress","LiveDateTime":"02/02/1754 00:00:00","NewTillDate":null,"FeaturedTillDate":null,"ModifiedDateTime":"09/25/2024"},{"ArticleId":9555,"Title":"How to disable WordPress plugins","ArticleName":"How to disable WordPress plugins","LiveDateTime":"02/02/1754 00:00:00","NewTillDate":null,"FeaturedTillDate":null,"ModifiedDateTime":"05/28/2026"},{"ArticleId":9516,"Title":"How to flush WordPress caching plugins","ArticleName":"How to flush WordPress caching plugins","LiveDateTime":"02/02/1754 00:00:00","NewTillDate":null,"FeaturedTillDate":null,"ModifiedDateTime":"12/15/2021"},{"ArticleId":9201,"Title":"How to change WordPress site address (URL)","ArticleName":"How to change WordPress site address (URL)","LiveDateTime":"02/02/1754 00:00:00","NewTillDate":null,"FeaturedTillDate":null,"ModifiedDateTime":"09/25/2024"},{"ArticleId":9452,"Title":"How to set up WordPress Contact Form 7","ArticleName":"How to set up WordPress Contact Form 7","LiveDateTime":"02/02/1754 00:00:00","NewTillDate":null,"FeaturedTillDate":null,"ModifiedDateTime":"09/25/2024"},{"ArticleId":1414,"Title":"How to back up a WordPress site using CodeGuard","ArticleName":"How to back up a WordPress site using CodeGuard","LiveDateTime":"02/02/1754 00:00:00","NewTillDate":null,"FeaturedTillDate":null,"ModifiedDateTime":"07/08/2019"},{"ArticleId":9948,"Title":"What is WordPress cron and how to work with it","ArticleName":"What is WordPress cron and how to work with it","LiveDateTime":"02/02/1754 00:00:00","NewTillDate":null,"FeaturedTillDate":null,"ModifiedDateTime":"05/30/2024"},{"ArticleId":9971,"Title":"What is WordPress heartbeat and how to deal with admin-ajax.php usage","ArticleName":"What is WordPress heartbeat and how to deal with admin-ajax.php usage","LiveDateTime":"02/02/1754 00:00:00","NewTillDate":null,"FeaturedTillDate":null,"ModifiedDateTime":"04/24/2020"},{"ArticleId":9491,"Title":"How to set up HTTPS for WordPress","ArticleName":"How to set up HTTPS for WordPress","LiveDateTime":"02/02/1754 00:00:00","NewTillDate":null,"FeaturedTillDate":null,"ModifiedDateTime":"04/04/2022"},{"ArticleId":9937,"Title":"How to create temporary login details for WordPress","ArticleName":"How to create temporary login details for WordPress","LiveDateTime":"02/02/1754 00:00:00","NewTillDate":null,"FeaturedTillDate":null,"ModifiedDateTime":"12/10/2021"},{"ArticleId":9941,"Title":"How to manually add an admin user to the WordPress database via phpMyAdmin","ArticleName":"How to manually add an admin user to the WordPress database via phpMyAdmin","LiveDateTime":"02/02/1754 00:00:00","NewTillDate":null,"FeaturedTillDate":null,"ModifiedDateTime":"05/20/2024"},{"ArticleId":9951,"Title":"Maintenance mode for different CMS","ArticleName":"Maintenance mode for different CMS","LiveDateTime":"02/02/1754 00:00:00","NewTillDate":null,"FeaturedTillDate":null,"ModifiedDateTime":"10/21/2022"},{"ArticleId":9399,"Title":"How to speed up and optimize a WordPress website","ArticleName":"How to speed up and optimize a WordPress website","LiveDateTime":"02/02/1754 00:00:00","NewTillDate":null,"FeaturedTillDate":null,"ModifiedDateTime":"01/14/2025"},{"ArticleId":9564,"Title":"How to create a mobile version of a WordPress website","ArticleName":"How to create a mobile version of a WordPress website","LiveDateTime":"02/02/1754 00:00:00","NewTillDate":null,"FeaturedTillDate":null,"ModifiedDateTime":"11/30/2021"},{"ArticleId":9892,"Title":"How to edit wp-config.php file in WordPress","ArticleName":"How to edit wp-config.php file in WordPress","LiveDateTime":"02/02/1754 00:00:00","NewTillDate":null,"FeaturedTillDate":null,"ModifiedDateTime":"06/24/2025"},{"ArticleId":9959,"Title":"How to add Google AdSense to your WordPress website","ArticleName":"How to add Google AdSense to your WordPress website","LiveDateTime":"02/02/1754 00:00:00","NewTillDate":null,"FeaturedTillDate":null,"ModifiedDateTime":"11/22/2021"},{"ArticleId":9663,"Title":"How to fix Error Establishing A Database Connection in WordPress","ArticleName":"How to fix Error Establishing A Database Connection in WordPress","LiveDateTime":"02/02/1754 00:00:00","NewTillDate":null,"FeaturedTillDate":null,"ModifiedDateTime":"09/25/2024"},{"ArticleId":9947,"Title":"How to increase WordPress memory limit","ArticleName":"How to increase WordPress memory limit","LiveDateTime":"02/02/1754 00:00:00","NewTillDate":null,"FeaturedTillDate":null,"ModifiedDateTime":"11/29/2021"},{"ArticleId":9463,"Title":"What is the robots.txt file and how to use it","ArticleName":"What is the robots.txt file and how to use it","LiveDateTime":"02/02/1754 00:00:00","NewTillDate":null,"FeaturedTillDate":null,"ModifiedDateTime":"01/09/2024"},{"ArticleId":9156,"Title":"How to improve WordPress website security","ArticleName":"How to improve WordPress website security","LiveDateTime":"02/02/1754 00:00:00","NewTillDate":null,"FeaturedTillDate":null,"ModifiedDateTime":"11/23/2023"},{"ArticleId":9411,"Title":"How to set up and manage WordPress Multisite (WPMU)","ArticleName":"How to set up and manage WordPress Multisite (WPMU)","LiveDateTime":"02/02/1754 00:00:00","NewTillDate":null,"FeaturedTillDate":null,"ModifiedDateTime":"08/03/2022"},{"ArticleId":9427,"Title":"How to transfer WordPress Multisite (WPMU)","ArticleName":"How to transfer WordPress Multisite (WPMU)","LiveDateTime":"02/02/1754 00:00:00","NewTillDate":null,"FeaturedTillDate":null,"ModifiedDateTime":"05/30/2024"},{"ArticleId":9243,"Title":"How to transfer a WordPress website to Namecheap manually","ArticleName":"How to transfer a WordPress website to Namecheap manually","LiveDateTime":"02/02/1754 00:00:00","NewTillDate":null,"FeaturedTillDate":null,"ModifiedDateTime":"05/10/2025"},{"ArticleId":9359,"Title":"How to migrate website from wordpress.com to Namecheap","ArticleName":"How to migrate website from wordpress.com to Namecheap","LiveDateTime":"02/02/1754 00:00:00","NewTillDate":null,"FeaturedTillDate":null,"ModifiedDateTime":"12/10/2021"},{"ArticleId":9950,"Title":"How to move a website from Wix to WordPress","ArticleName":"How to move a website from Wix to WordPress","LiveDateTime":"02/02/1754 00:00:00","NewTillDate":null,"FeaturedTillDate":null,"ModifiedDateTime":"12/28/2020"},{"ArticleId":9949,"Title":"How to move a website from Squarespace to WordPress","ArticleName":"How to move a website from Squarespace to WordPress","LiveDateTime":"02/02/1754 00:00:00","NewTillDate":null,"FeaturedTillDate":null,"ModifiedDateTime":"12/14/2021"},{"ArticleId":9714,"Title":"How to move from Blogger to WordPress hosted with us","ArticleName":"How to move from Blogger to WordPress hosted with us","LiveDateTime":"02/02/1754 00:00:00","NewTillDate":null,"FeaturedTillDate":null,"ModifiedDateTime":"12/10/2021"}],"AssociatedTags":[],"CategoryId":2187,"CategoryName":"cPanel: WordPress"},"status":200,"statusText":"OK"},"/api/v1/ncpl/simplekb/getcategories:\"{\\\"parentCategoryId\\\":0,\\\"getTree\\\":true}\"":{"body":[{"__type":"Nc:SimpleKB:Abstractions:Dtos:CategoryItemDto","ParentCategoryId":93,"TreatAsTopicYN":false,"Description":"","ImageUrl":"","ShortDesc":"","CategoryId":2216,"CategoryName":"Spam Protection"},{"__type":"Nc:SimpleKB:Abstractions:Dtos:CategoryItemDto","ParentCategoryId":14,"TreatAsTopicYN":false,"Description":"","ImageUrl":"","ShortDesc":"","CategoryId":2217,"CategoryName":"Renewal"},{"__type":"Nc:SimpleKB:Abstractions:Dtos:CategoryItemDto","ParentCategoryId":14,"TreatAsTopicYN":false,"Description":"","ImageUrl":"","ShortDesc":"","CategoryId":2218,"CategoryName":"cPanel SSL Plugin"},{"__type":"Nc:SimpleKB:Abstractions:Dtos:CategoryItemDto","ParentCategoryId":12,"TreatAsTopicYN":false,"Description":"","ImageUrl":"","ShortDesc":"","CategoryId":2219,"CategoryName":"PHP Configuration"},{"__type":"Nc:SimpleKB:Abstractions:Dtos:CategoryItemDto","ParentCategoryId":14,"TreatAsTopicYN":false,"Description":"","ImageUrl":"","ShortDesc":"","CategoryId":2221,"CategoryName":"Multi-Domain SSL Certificates"},{"__type":"Nc:SimpleKB:Abstractions:Dtos:CategoryItemDto","ParentCategoryId":14,"TreatAsTopicYN":false,"Description":"","ImageUrl":"","ShortDesc":"","CategoryId":2222,"CategoryName":"Cancellation"},{"__type":"Nc:SimpleKB:Abstractions:Dtos:CategoryItemDto","ParentCategoryId":14,"TreatAsTopicYN":false,"Description":"","ImageUrl":"","ShortDesc":"","CategoryId":2223,"CategoryName":"Browser errors"},{"__type":"Nc:SimpleKB:Abstractions:Dtos:CategoryItemDto","ParentCategoryId":14,"TreatAsTopicYN":false,"Description":"","ImageUrl":"","ShortDesc":"","CategoryId":2224,"CategoryName":"Site Seal, Logo"},{"__type":"Nc:SimpleKB:Abstractions:Dtos:CategoryItemDto","ParentCategoryId":12,"TreatAsTopicYN":false,"Description":"","ImageUrl":"","ShortDesc":"","CategoryId":2225,"CategoryName":"SEO"},{"__type":"Nc:SimpleKB:Abstractions:Dtos:CategoryItemDto","ParentCategoryId":93,"TreatAsTopicYN":false,"Description":"","ImageUrl":"","ShortDesc":"","CategoryId":2226,"CategoryName":"Email Migration"},{"__type":"Nc:SimpleKB:Abstractions:Dtos:CategoryItemDto","ParentCategoryId":2211,"TreatAsTopicYN":false,"Description":"","ImageUrl":"","ShortDesc":"","CategoryId":2227,"CategoryName":"SSL Resellers"},{"__type":"Nc:SimpleKB:Abstractions:Dtos:CategoryItemDto","ParentCategoryId":0,"TreatAsTopicYN":true,"Description":"","ImageUrl":"/assets/img/pictograms/150/cloud-red.png","ShortDesc":"","CategoryId":2228,"CategoryName":"Apps","SubCategories":[{"__type":"Nc:SimpleKB:Abstractions:Dtos:CategoryItemDto","ParentCategoryId":2228,"TreatAsTopicYN":false,"Description":"","ImageUrl":"","ShortDesc":"","CategoryId":2251,"CategoryName":"Supersonic CDN"},{"__type":"Nc:SimpleKB:Abstractions:Dtos:CategoryItemDto","ParentCategoryId":2228,"TreatAsTopicYN":false,"Description":"","ImageUrl":"","ShortDesc":"","CategoryId":2298,"CategoryName":"Site Maker"},{"__type":"Nc:SimpleKB:Abstractions:Dtos:CategoryItemDto","ParentCategoryId":2228,"TreatAsTopicYN":false,"Description":"","ImageUrl":"","ShortDesc":"","CategoryId":177,"CategoryName":"Google Workspace (formerly G Suite)"}]},{"__type":"Nc:SimpleKB:Abstractions:Dtos:CategoryItemDto","ParentCategoryId":2211,"TreatAsTopicYN":false,"Description":"","ImageUrl":"","ShortDesc":"","CategoryId":2229,"CategoryName":"Hosting Resellers"},{"__type":"Nc:SimpleKB:Abstractions:Dtos:CategoryItemDto","ParentCategoryId":34,"TreatAsTopicYN":false,"Description":"","ImageUrl":"","ShortDesc":"","CategoryId":2232,"CategoryName":"DNSSEC"},{"__type":"Nc:SimpleKB:Abstractions:Dtos:CategoryItemDto","ParentCategoryId":34,"TreatAsTopicYN":false,"Description":"","ImageUrl":"","ShortDesc":"","CategoryId":2234,"CategoryName":"Google Workspace (formerly G Suite)"},{"__type":"Nc:SimpleKB:Abstractions:Dtos:CategoryItemDto","ParentCategoryId":34,"TreatAsTopicYN":false,"Description":"","ImageUrl":"","ShortDesc":"","CategoryId":2237,"CategoryName":"Host records setup"},{"__type":"Nc:SimpleKB:Abstractions:Dtos:CategoryItemDto","ParentCategoryId":14,"TreatAsTopicYN":false,"Description":"","ImageUrl":"","ShortDesc":"","CategoryId":2238,"CategoryName":"SSL installation errors"},{"__type":"Nc:SimpleKB:Abstractions:Dtos:CategoryItemDto","ParentCategoryId":0,"TreatAsTopicYN":false,"Description":"","ImageUrl":"/assets/img/pictograms/150/easywp-red.png","ShortDesc":"","CategoryId":2239,"CategoryName":"EasyWP","SubCategories":[{"__type":"Nc:SimpleKB:Abstractions:Dtos:CategoryItemDto","ParentCategoryId":2239,"TreatAsTopicYN":false,"Description":"","ImageUrl":"","ShortDesc":"","CategoryId":2280,"CategoryName":"Getting Started"},{"__type":"Nc:SimpleKB:Abstractions:Dtos:CategoryItemDto","ParentCategoryId":2239,"TreatAsTopicYN":false,"Description":"","ImageUrl":"","ShortDesc":"","CategoryId":2279,"CategoryName":"General Information"},{"__type":"Nc:SimpleKB:Abstractions:Dtos:CategoryItemDto","ParentCategoryId":2239,"TreatAsTopicYN":false,"Description":"","ImageUrl":"","ShortDesc":"","CategoryId":2281,"CategoryName":"WordPress Migration"},{"__type":"Nc:SimpleKB:Abstractions:Dtos:CategoryItemDto","ParentCategoryId":2239,"TreatAsTopicYN":false,"Description":"","ImageUrl":"","ShortDesc":"","CategoryId":2282,"CategoryName":"Plugins and Themes"},{"__type":"Nc:SimpleKB:Abstractions:Dtos:CategoryItemDto","ParentCategoryId":2239,"TreatAsTopicYN":false,"Description":"","ImageUrl":"","ShortDesc":"","CategoryId":2284,"CategoryName":"WordPress Management"},{"__type":"Nc:SimpleKB:Abstractions:Dtos:CategoryItemDto","ParentCategoryId":2239,"TreatAsTopicYN":false,"Description":"","ImageUrl":"","ShortDesc":"","CategoryId":2285,"CategoryName":"SFTP and Database access"},{"__type":"Nc:SimpleKB:Abstractions:Dtos:CategoryItemDto","ParentCategoryId":2239,"TreatAsTopicYN":false,"Description":"","ImageUrl":"","ShortDesc":"","CategoryId":2286,"CategoryName":"Domains questions"},{"__type":"Nc:SimpleKB:Abstractions:Dtos:CategoryItemDto","ParentCategoryId":2239,"TreatAsTopicYN":false,"Description":"","ImageUrl":"","ShortDesc":"","CategoryId":2288,"CategoryName":"Billing questions"},{"__type":"Nc:SimpleKB:Abstractions:Dtos:CategoryItemDto","ParentCategoryId":2239,"TreatAsTopicYN":false,"Description":"","ImageUrl":"","ShortDesc":"","CategoryId":2287,"CategoryName":"SSL questions"}]},{"__type":"Nc:SimpleKB:Abstractions:Dtos:CategoryItemDto","ParentCategoryId":2228,"TreatAsTopicYN":false,"Description":"","ImageUrl":"","ShortDesc":"","CategoryId":2251,"CategoryName":"Supersonic CDN"},{"__type":"Nc:SimpleKB:Abstractions:Dtos:CategoryItemDto","ParentCategoryId":12,"TreatAsTopicYN":false,"Description":"","ImageUrl":"","ShortDesc":"","CategoryId":2252,"CategoryName":"InterWorx questions"},{"__type":"Nc:SimpleKB:Abstractions:Dtos:CategoryItemDto","ParentCategoryId":2253,"TreatAsTopicYN":false,"Description":"","ImageUrl":"","ShortDesc":"","CategoryId":2254,"CategoryName":"Domains How-To"},{"__type":"Nc:SimpleKB:Abstractions:Dtos:CategoryItemDto","ParentCategoryId":2253,"TreatAsTopicYN":false,"Description":"","ImageUrl":"","ShortDesc":"","CategoryId":2255,"CategoryName":"Hosting How-To"},{"__type":"Nc:SimpleKB:Abstractions:Dtos:CategoryItemDto","ParentCategoryId":2253,"TreatAsTopicYN":false,"Description":"","ImageUrl":"","ShortDesc":"","CategoryId":2257,"CategoryName":"Sales & Payments How-To"},{"__type":"Nc:SimpleKB:Abstractions:Dtos:CategoryItemDto","ParentCategoryId":2253,"TreatAsTopicYN":false,"Description":"","ImageUrl":"","ShortDesc":"","CategoryId":2258,"CategoryName":"cPanel Email How-To"},{"__type":"Nc:SimpleKB:Abstractions:Dtos:CategoryItemDto","ParentCategoryId":93,"TreatAsTopicYN":false,"Description":"","ImageUrl":"","ShortDesc":"","CategoryId":2260,"CategoryName":"Private Email Contacts and Calendars Setup"},{"__type":"Nc:SimpleKB:Abstractions:Dtos:CategoryItemDto","ParentCategoryId":2253,"TreatAsTopicYN":false,"Description":"","ImageUrl":"","ShortDesc":"","CategoryId":2262,"CategoryName":"EasyWP How-To"},{"__type":"Nc:SimpleKB:Abstractions:Dtos:CategoryItemDto","ParentCategoryId":0,"TreatAsTopicYN":false,"Description":"","ImageUrl":"https://download.namecheap.com/assets/img/domainvault-red@2x.png","ShortDesc":"","CategoryId":2289,"CategoryName":"Domain Vault","SubCategories":[]},{"__type":"Nc:SimpleKB:Abstractions:Dtos:CategoryItemDto","ParentCategoryId":14,"TreatAsTopicYN":false,"Description":"","ImageUrl":"","ShortDesc":"","CategoryId":2290,"CategoryName":"CSR code"},{"__type":"Nc:SimpleKB:Abstractions:Dtos:CategoryItemDto","ParentCategoryId":12,"TreatAsTopicYN":false,"Description":"","ImageUrl":"","ShortDesc":"","CategoryId":2291,"CategoryName":"Webuzo questions"},{"__type":"Nc:SimpleKB:Abstractions:Dtos:CategoryItemDto","ParentCategoryId":2265,"TreatAsTopicYN":false,"Description":"","ImageUrl":"","ShortDesc":"","CategoryId":2292,"CategoryName":"Browser Extensions"},{"__type":"Nc:SimpleKB:Abstractions:Dtos:CategoryItemDto","ParentCategoryId":14,"TreatAsTopicYN":false,"Description":"","ImageUrl":"","ShortDesc":"","CategoryId":2293,"CategoryName":"Automated SSL management"},{"__type":"Nc:SimpleKB:Abstractions:Dtos:CategoryItemDto","ParentCategoryId":2228,"TreatAsTopicYN":false,"Description":"","ImageUrl":"","ShortDesc":"","CategoryId":2298,"CategoryName":"Site Maker"},{"__type":"Nc:SimpleKB:Abstractions:Dtos:CategoryItemDto","ParentCategoryId":93,"TreatAsTopicYN":false,"Description":"","ImageUrl":"","ShortDesc":"","CategoryId":2306,"CategoryName":"New Private Email Platform"},{"__type":"Nc:SimpleKB:Abstractions:Dtos:CategoryItemDto","ParentCategoryId":12,"TreatAsTopicYN":false,"Description":"","ImageUrl":"","ShortDesc":"","CategoryId":27,"CategoryName":"Getting Started"},{"__type":"Nc:SimpleKB:Abstractions:Dtos:CategoryItemDto","ParentCategoryId":0,"TreatAsTopicYN":false,"Description":"","ImageUrl":"/assets/img/pictograms/150/support-red.png","ShortDesc":"","CategoryId":5,"CategoryName":"General & Support","SubCategories":[]},{"__type":"Nc:SimpleKB:Abstractions:Dtos:CategoryItemDto","ParentCategoryId":2200,"TreatAsTopicYN":false,"Description":"","ImageUrl":"","ShortDesc":"","CategoryId":7,"CategoryName":"Billing FAQ"},{"__type":"Nc:SimpleKB:Abstractions:Dtos:CategoryItemDto","ParentCategoryId":2209,"TreatAsTopicYN":false,"Description":"","ImageUrl":"","ShortDesc":"","CategoryId":8,"CategoryName":"Transfer Information"},{"__type":"Nc:SimpleKB:Abstractions:Dtos:CategoryItemDto","ParentCategoryId":12,"TreatAsTopicYN":false,"Description":"","ImageUrl":"","ShortDesc":"","CategoryId":22,"CategoryName":"Hosting Information"},{"__type":"Nc:SimpleKB:Abstractions:Dtos:CategoryItemDto","ParentCategoryId":14,"TreatAsTopicYN":false,"Description":"","ImageUrl":"","ShortDesc":"","CategoryId":38,"CategoryName":"SSL General"},{"__type":"Nc:SimpleKB:Abstractions:Dtos:CategoryItemDto","ParentCategoryId":9,"TreatAsTopicYN":false,"Description":"","ImageUrl":"","ShortDesc":"","CategoryId":45,"CategoryName":"Account Security"},{"__type":"Nc:SimpleKB:Abstractions:Dtos:CategoryItemDto","ParentCategoryId":34,"TreatAsTopicYN":false,"Description":"","ImageUrl":"","ShortDesc":"","CategoryId":46,"CategoryName":"Domain Management"},{"__type":"Nc:SimpleKB:Abstractions:Dtos:CategoryItemDto","ParentCategoryId":2211,"TreatAsTopicYN":false,"Description":"","ImageUrl":"","ShortDesc":"","CategoryId":63,"CategoryName":"Namecheap API"},{"__type":"Nc:SimpleKB:Abstractions:Dtos:CategoryItemDto","ParentCategoryId":2228,"TreatAsTopicYN":false,"Description":"","ImageUrl":"","ShortDesc":"","CategoryId":177,"CategoryName":"Google Workspace (formerly G Suite)"},{"__type":"Nc:SimpleKB:Abstractions:Dtos:CategoryItemDto","ParentCategoryId":93,"TreatAsTopicYN":false,"Description":"","ImageUrl":"","ShortDesc":"","CategoryId":2179,"CategoryName":"Private Email: General Information"},{"__type":"Nc:SimpleKB:Abstractions:Dtos:CategoryItemDto","ParentCategoryId":2265,"TreatAsTopicYN":false,"Description":"","ImageUrl":"","ShortDesc":"","CategoryId":2274,"CategoryName":"General"},{"__type":"Nc:SimpleKB:Abstractions:Dtos:CategoryItemDto","ParentCategoryId":2239,"TreatAsTopicYN":false,"Description":"","ImageUrl":"","ShortDesc":"","CategoryId":2280,"CategoryName":"Getting Started"},{"__type":"Nc:SimpleKB:Abstractions:Dtos:CategoryItemDto","ParentCategoryId":2239,"TreatAsTopicYN":false,"Description":"","ImageUrl":"","ShortDesc":"","CategoryId":2279,"CategoryName":"General Information"},{"__type":"Nc:SimpleKB:Abstractions:Dtos:CategoryItemDto","ParentCategoryId":93,"TreatAsTopicYN":false,"Description":"","ImageUrl":"","ShortDesc":"","CategoryId":2215,"CategoryName":"Private Email: Mailbox Management"},{"__type":"Nc:SimpleKB:Abstractions:Dtos:CategoryItemDto","ParentCategoryId":2211,"TreatAsTopicYN":false,"Description":"","ImageUrl":"","ShortDesc":"","CategoryId":2196,"CategoryName":"WHMCS module for SSL"},{"__type":"Nc:SimpleKB:Abstractions:Dtos:CategoryItemDto","ParentCategoryId":0,"TreatAsTopicYN":false,"Description":"","ImageUrl":"/assets/img/pictograms/150/savings-red.png","ShortDesc":"","CategoryId":2200,"CategoryName":"Checkout & Billing","SubCategories":[{"__type":"Nc:SimpleKB:Abstractions:Dtos:CategoryItemDto","ParentCategoryId":2200,"TreatAsTopicYN":false,"Description":"","ImageUrl":"","ShortDesc":"","CategoryId":7,"CategoryName":"Billing FAQ"},{"__type":"Nc:SimpleKB:Abstractions:Dtos:CategoryItemDto","ParentCategoryId":2200,"TreatAsTopicYN":false,"Description":"","ImageUrl":"","ShortDesc":"","CategoryId":2201,"CategoryName":"Domains Billing"},{"__type":"Nc:SimpleKB:Abstractions:Dtos:CategoryItemDto","ParentCategoryId":2200,"TreatAsTopicYN":false,"Description":"","ImageUrl":"","ShortDesc":"","CategoryId":21,"CategoryName":"Hosting Billing"},{"__type":"Nc:SimpleKB:Abstractions:Dtos:CategoryItemDto","ParentCategoryId":2200,"TreatAsTopicYN":false,"Description":"","ImageUrl":"","ShortDesc":"","CategoryId":71,"CategoryName":"SSL Certificates Billing"},{"__type":"Nc:SimpleKB:Abstractions:Dtos:CategoryItemDto","ParentCategoryId":2200,"TreatAsTopicYN":false,"Description":"","ImageUrl":"","ShortDesc":"","CategoryId":2177,"CategoryName":"Private Email"}]},{"__type":"Nc:SimpleKB:Abstractions:Dtos:CategoryItemDto","ParentCategoryId":2200,"TreatAsTopicYN":false,"Description":"","ImageUrl":"","ShortDesc":"","CategoryId":2201,"CategoryName":"Domains Billing"},{"__type":"Nc:SimpleKB:Abstractions:Dtos:CategoryItemDto","ParentCategoryId":14,"TreatAsTopicYN":false,"Description":"","ImageUrl":"","ShortDesc":"","CategoryId":67,"CategoryName":"Activation"},{"__type":"Nc:SimpleKB:Abstractions:Dtos:CategoryItemDto","ParentCategoryId":2209,"TreatAsTopicYN":false,"Description":"","ImageUrl":"","ShortDesc":"","CategoryId":83,"CategoryName":"Transfer to Namecheap"},{"__type":"Nc:SimpleKB:Abstractions:Dtos:CategoryItemDto","ParentCategoryId":9,"TreatAsTopicYN":false,"Description":"","ImageUrl":"","ShortDesc":"","CategoryId":43,"CategoryName":"Profile Management"},{"__type":"Nc:SimpleKB:Abstractions:Dtos:CategoryItemDto","ParentCategoryId":34,"TreatAsTopicYN":false,"Description":"","ImageUrl":"","ShortDesc":"","CategoryId":10,"CategoryName":"DNS Questions"},{"__type":"Nc:SimpleKB:Abstractions:Dtos:CategoryItemDto","ParentCategoryId":12,"TreatAsTopicYN":false,"Description":"","ImageUrl":"","ShortDesc":"","CategoryId":29,"CategoryName":"cPanel questions"},{"__type":"Nc:SimpleKB:Abstractions:Dtos:CategoryItemDto","ParentCategoryId":2200,"TreatAsTopicYN":false,"Description":"","ImageUrl":"","ShortDesc":"","CategoryId":21,"CategoryName":"Hosting Billing"},{"__type":"Nc:SimpleKB:Abstractions:Dtos:CategoryItemDto","ParentCategoryId":34,"TreatAsTopicYN":false,"Description":"","ImageUrl":"","ShortDesc":"","CategoryId":11,"CategoryName":"Dynamic DNS"},{"__type":"Nc:SimpleKB:Abstractions:Dtos:CategoryItemDto","ParentCategoryId":9,"TreatAsTopicYN":false,"Description":"","ImageUrl":"","ShortDesc":"","CategoryId":44,"CategoryName":"Account Access"},{"__type":"Nc:SimpleKB:Abstractions:Dtos:CategoryItemDto","ParentCategoryId":2209,"TreatAsTopicYN":false,"Description":"","ImageUrl":"","ShortDesc":"","CategoryId":84,"CategoryName":"Transfer to another provider"},{"__type":"Nc:SimpleKB:Abstractions:Dtos:CategoryItemDto","ParentCategoryId":14,"TreatAsTopicYN":false,"Description":"","ImageUrl":"","ShortDesc":"","CategoryId":68,"CategoryName":"Validation"},{"__type":"Nc:SimpleKB:Abstractions:Dtos:CategoryItemDto","ParentCategoryId":12,"TreatAsTopicYN":false,"Description":"","ImageUrl":"","ShortDesc":"","CategoryId":2182,"CategoryName":"cPanel: Software Management"},{"__type":"Nc:SimpleKB:Abstractions:Dtos:CategoryItemDto","ParentCategoryId":93,"TreatAsTopicYN":false,"Description":"","ImageUrl":"","ShortDesc":"","CategoryId":2214,"CategoryName":"Email Forwarding"},{"__type":"Nc:SimpleKB:Abstractions:Dtos:CategoryItemDto","ParentCategoryId":2265,"TreatAsTopicYN":false,"Description":"","ImageUrl":"","ShortDesc":"","CategoryId":2270,"CategoryName":"Routers"},{"__type":"Nc:SimpleKB:Abstractions:Dtos:CategoryItemDto","ParentCategoryId":2239,"TreatAsTopicYN":false,"Description":"","ImageUrl":"","ShortDesc":"","CategoryId":2281,"CategoryName":"WordPress Migration"},{"__type":"Nc:SimpleKB:Abstractions:Dtos:CategoryItemDto","ParentCategoryId":2239,"TreatAsTopicYN":false,"Description":"","ImageUrl":"","ShortDesc":"","CategoryId":2282,"CategoryName":"Plugins and Themes"},{"__type":"Nc:SimpleKB:Abstractions:Dtos:CategoryItemDto","ParentCategoryId":2265,"TreatAsTopicYN":false,"Description":"","ImageUrl":"","ShortDesc":"","CategoryId":2272,"CategoryName":"TV"},{"__type":"Nc:SimpleKB:Abstractions:Dtos:CategoryItemDto","ParentCategoryId":12,"TreatAsTopicYN":false,"Description":"","ImageUrl":"","ShortDesc":"","CategoryId":2187,"CategoryName":"cPanel: WordPress"},{"__type":"Nc:SimpleKB:Abstractions:Dtos:CategoryItemDto","ParentCategoryId":2209,"TreatAsTopicYN":false,"Description":"","ImageUrl":"","ShortDesc":"","CategoryId":219,"CategoryName":"Canceled Transfers"},{"__type":"Nc:SimpleKB:Abstractions:Dtos:CategoryItemDto","ParentCategoryId":2200,"TreatAsTopicYN":false,"Description":"","ImageUrl":"","ShortDesc":"","CategoryId":71,"CategoryName":"SSL Certificates Billing"},{"__type":"Nc:SimpleKB:Abstractions:Dtos:CategoryItemDto","ParentCategoryId":93,"TreatAsTopicYN":false,"Description":"","ImageUrl":"","ShortDesc":"","CategoryId":2176,"CategoryName":"Private Email: DNS Settings"},{"__type":"Nc:SimpleKB:Abstractions:Dtos:CategoryItemDto","ParentCategoryId":14,"TreatAsTopicYN":false,"Description":"","ImageUrl":"","ShortDesc":"","CategoryId":69,"CategoryName":"Installation"},{"__type":"Nc:SimpleKB:Abstractions:Dtos:CategoryItemDto","ParentCategoryId":0,"TreatAsTopicYN":false,"Description":"","ImageUrl":"/assets/img/pictograms/150/reseller-red.png","ShortDesc":"","CategoryId":34,"CategoryName":"Domains","SubCategories":[{"__type":"Nc:SimpleKB:Abstractions:Dtos:CategoryItemDto","ParentCategoryId":34,"TreatAsTopicYN":false,"Description":"","ImageUrl":"","ShortDesc":"","CategoryId":2232,"CategoryName":"DNSSEC"},{"__type":"Nc:SimpleKB:Abstractions:Dtos:CategoryItemDto","ParentCategoryId":34,"TreatAsTopicYN":false,"Description":"","ImageUrl":"","ShortDesc":"","CategoryId":2234,"CategoryName":"Google Workspace (formerly G Suite)"},{"__type":"Nc:SimpleKB:Abstractions:Dtos:CategoryItemDto","ParentCategoryId":34,"TreatAsTopicYN":false,"Description":"","ImageUrl":"","ShortDesc":"","CategoryId":2237,"CategoryName":"Host records setup"},{"__type":"Nc:SimpleKB:Abstractions:Dtos:CategoryItemDto","ParentCategoryId":34,"TreatAsTopicYN":false,"Description":"","ImageUrl":"","ShortDesc":"","CategoryId":46,"CategoryName":"Domain Management"},{"__type":"Nc:SimpleKB:Abstractions:Dtos:CategoryItemDto","ParentCategoryId":34,"TreatAsTopicYN":false,"Description":"","ImageUrl":"","ShortDesc":"","CategoryId":10,"CategoryName":"DNS Questions"},{"__type":"Nc:SimpleKB:Abstractions:Dtos:CategoryItemDto","ParentCategoryId":34,"TreatAsTopicYN":false,"Description":"","ImageUrl":"","ShortDesc":"","CategoryId":11,"CategoryName":"Dynamic DNS"},{"__type":"Nc:SimpleKB:Abstractions:Dtos:CategoryItemDto","ParentCategoryId":34,"TreatAsTopicYN":false,"Description":"","ImageUrl":"","ShortDesc":"","CategoryId":35,"CategoryName":"Registrations"},{"__type":"Nc:SimpleKB:Abstractions:Dtos:CategoryItemDto","ParentCategoryId":34,"TreatAsTopicYN":false,"Description":"","ImageUrl":"","ShortDesc":"","CategoryId":2207,"CategoryName":"Renewal questions"},{"__type":"Nc:SimpleKB:Abstractions:Dtos:CategoryItemDto","ParentCategoryId":34,"TreatAsTopicYN":false,"Description":"","ImageUrl":"","ShortDesc":"","CategoryId":36,"CategoryName":"Domains with extended attributes"},{"__type":"Nc:SimpleKB:Abstractions:Dtos:CategoryItemDto","ParentCategoryId":34,"TreatAsTopicYN":false,"Description":"","ImageUrl":"","ShortDesc":"","CategoryId":51,"CategoryName":"FreeDNS"},{"__type":"Nc:SimpleKB:Abstractions:Dtos:CategoryItemDto","ParentCategoryId":34,"TreatAsTopicYN":false,"Description":"","ImageUrl":"","ShortDesc":"","CategoryId":15,"CategoryName":"Namecheap Market"},{"__type":"Nc:SimpleKB:Abstractions:Dtos:CategoryItemDto","ParentCategoryId":34,"TreatAsTopicYN":false,"Description":"","ImageUrl":"","ShortDesc":"","CategoryId":2208,"CategoryName":"3rd Party Services Setup"},{"__type":"Nc:SimpleKB:Abstractions:Dtos:CategoryItemDto","ParentCategoryId":34,"TreatAsTopicYN":false,"Description":"","ImageUrl":"","ShortDesc":"","CategoryId":2278,"CategoryName":"Handshake TLDs"}]},{"__type":"Nc:SimpleKB:Abstractions:Dtos:CategoryItemDto","ParentCategoryId":34,"TreatAsTopicYN":false,"Description":"","ImageUrl":"","ShortDesc":"","CategoryId":35,"CategoryName":"Registrations"},{"__type":"Nc:SimpleKB:Abstractions:Dtos:CategoryItemDto","ParentCategoryId":14,"TreatAsTopicYN":false,"Description":"","ImageUrl":"","ShortDesc":"","CategoryId":70,"CategoryName":"Reissuance"},{"__type":"Nc:SimpleKB:Abstractions:Dtos:CategoryItemDto","ParentCategoryId":0,"TreatAsTopicYN":false,"Description":"","ImageUrl":"/assets/img/pictograms/150/protection-red.png","ShortDesc":"","CategoryId":37,"CategoryName":"Domain Privacy Protection","SubCategories":[]},{"__type":"Nc:SimpleKB:Abstractions:Dtos:CategoryItemDto","ParentCategoryId":2200,"TreatAsTopicYN":false,"Description":"","ImageUrl":"","ShortDesc":"","CategoryId":2177,"CategoryName":"Private Email"},{"__type":"Nc:SimpleKB:Abstractions:Dtos:CategoryItemDto","ParentCategoryId":93,"TreatAsTopicYN":false,"Description":"","ImageUrl":"","ShortDesc":"","CategoryId":2178,"CategoryName":"Private Email: Webmail Features"},{"__type":"Nc:SimpleKB:Abstractions:Dtos:CategoryItemDto","ParentCategoryId":34,"TreatAsTopicYN":false,"Description":"","ImageUrl":"","ShortDesc":"","CategoryId":2207,"CategoryName":"Renewal questions"},{"__type":"Nc:SimpleKB:Abstractions:Dtos:CategoryItemDto","ParentCategoryId":12,"TreatAsTopicYN":false,"Description":"","ImageUrl":"","ShortDesc":"","CategoryId":2210,"CategoryName":"cPanel Add-ons"},{"__type":"Nc:SimpleKB:Abstractions:Dtos:CategoryItemDto","ParentCategoryId":2265,"TreatAsTopicYN":false,"Description":"","ImageUrl":"","ShortDesc":"","CategoryId":2273,"CategoryName":"Gaming Consoles"},{"__type":"Nc:SimpleKB:Abstractions:Dtos:CategoryItemDto","ParentCategoryId":2239,"TreatAsTopicYN":false,"Description":"","ImageUrl":"","ShortDesc":"","CategoryId":2284,"CategoryName":"WordPress Management"},{"__type":"Nc:SimpleKB:Abstractions:Dtos:CategoryItemDto","ParentCategoryId":2239,"TreatAsTopicYN":false,"Description":"","ImageUrl":"","ShortDesc":"","CategoryId":2285,"CategoryName":"SFTP and Database access"},{"__type":"Nc:SimpleKB:Abstractions:Dtos:CategoryItemDto","ParentCategoryId":2265,"TreatAsTopicYN":false,"Description":"","ImageUrl":"","ShortDesc":"","CategoryId":2268,"CategoryName":"macOS"},{"__type":"Nc:SimpleKB:Abstractions:Dtos:CategoryItemDto","ParentCategoryId":93,"TreatAsTopicYN":false,"Description":"","ImageUrl":"","ShortDesc":"","CategoryId":2175,"CategoryName":"Private Email: Client Setup"},{"__type":"Nc:SimpleKB:Abstractions:Dtos:CategoryItemDto","ParentCategoryId":0,"TreatAsTopicYN":false,"Description":"","ImageUrl":"/assets/img/pictograms/150/status-red.png","ShortDesc":"","CategoryId":2209,"CategoryName":"Domain Transfers","SubCategories":[{"__type":"Nc:SimpleKB:Abstractions:Dtos:CategoryItemDto","ParentCategoryId":2209,"TreatAsTopicYN":false,"Description":"","ImageUrl":"","ShortDesc":"","CategoryId":8,"CategoryName":"Transfer Information"},{"__type":"Nc:SimpleKB:Abstractions:Dtos:CategoryItemDto","ParentCategoryId":2209,"TreatAsTopicYN":false,"Description":"","ImageUrl":"","ShortDesc":"","CategoryId":83,"CategoryName":"Transfer to Namecheap"},{"__type":"Nc:SimpleKB:Abstractions:Dtos:CategoryItemDto","ParentCategoryId":2209,"TreatAsTopicYN":false,"Description":"","ImageUrl":"","ShortDesc":"","CategoryId":84,"CategoryName":"Transfer to another provider"},{"__type":"Nc:SimpleKB:Abstractions:Dtos:CategoryItemDto","ParentCategoryId":2209,"TreatAsTopicYN":false,"Description":"","ImageUrl":"","ShortDesc":"","CategoryId":219,"CategoryName":"Canceled Transfers"}]},{"__type":"Nc:SimpleKB:Abstractions:Dtos:CategoryItemDto","ParentCategoryId":12,"TreatAsTopicYN":false,"Description":"","ImageUrl":"","ShortDesc":"","CategoryId":48,"CategoryName":"VPS"},{"__type":"Nc:SimpleKB:Abstractions:Dtos:CategoryItemDto","ParentCategoryId":34,"TreatAsTopicYN":false,"Description":"","ImageUrl":"","ShortDesc":"","CategoryId":36,"CategoryName":"Domains with extended attributes"},{"__type":"Nc:SimpleKB:Abstractions:Dtos:CategoryItemDto","ParentCategoryId":0,"TreatAsTopicYN":true,"Description":"","ImageUrl":"/assets/img/pictograms/150/server-red.png","ShortDesc":"","CategoryId":12,"CategoryName":"Hosting","SubCategories":[{"__type":"Nc:SimpleKB:Abstractions:Dtos:CategoryItemDto","ParentCategoryId":12,"TreatAsTopicYN":false,"Description":"","ImageUrl":"","ShortDesc":"","CategoryId":2219,"CategoryName":"PHP Configuration"},{"__type":"Nc:SimpleKB:Abstractions:Dtos:CategoryItemDto","ParentCategoryId":12,"TreatAsTopicYN":false,"Description":"","ImageUrl":"","ShortDesc":"","CategoryId":2225,"CategoryName":"SEO"},{"__type":"Nc:SimpleKB:Abstractions:Dtos:CategoryItemDto","ParentCategoryId":12,"TreatAsTopicYN":false,"Description":"","ImageUrl":"","ShortDesc":"","CategoryId":2252,"CategoryName":"InterWorx questions"},{"__type":"Nc:SimpleKB:Abstractions:Dtos:CategoryItemDto","ParentCategoryId":12,"TreatAsTopicYN":false,"Description":"","ImageUrl":"","ShortDesc":"","CategoryId":2291,"CategoryName":"Webuzo questions"},{"__type":"Nc:SimpleKB:Abstractions:Dtos:CategoryItemDto","ParentCategoryId":12,"TreatAsTopicYN":false,"Description":"","ImageUrl":"","ShortDesc":"","CategoryId":27,"CategoryName":"Getting Started"},{"__type":"Nc:SimpleKB:Abstractions:Dtos:CategoryItemDto","ParentCategoryId":12,"TreatAsTopicYN":false,"Description":"","ImageUrl":"","ShortDesc":"","CategoryId":22,"CategoryName":"Hosting Information"},{"__type":"Nc:SimpleKB:Abstractions:Dtos:CategoryItemDto","ParentCategoryId":12,"TreatAsTopicYN":false,"Description":"","ImageUrl":"","ShortDesc":"","CategoryId":29,"CategoryName":"cPanel questions"},{"__type":"Nc:SimpleKB:Abstractions:Dtos:CategoryItemDto","ParentCategoryId":12,"TreatAsTopicYN":false,"Description":"","ImageUrl":"","ShortDesc":"","CategoryId":2182,"CategoryName":"cPanel: Software Management"},{"__type":"Nc:SimpleKB:Abstractions:Dtos:CategoryItemDto","ParentCategoryId":12,"TreatAsTopicYN":false,"Description":"","ImageUrl":"","ShortDesc":"","CategoryId":2187,"CategoryName":"cPanel: WordPress"},{"__type":"Nc:SimpleKB:Abstractions:Dtos:CategoryItemDto","ParentCategoryId":12,"TreatAsTopicYN":false,"Description":"","ImageUrl":"","ShortDesc":"","CategoryId":2210,"CategoryName":"cPanel Add-ons"},{"__type":"Nc:SimpleKB:Abstractions:Dtos:CategoryItemDto","ParentCategoryId":12,"TreatAsTopicYN":false,"Description":"","ImageUrl":"","ShortDesc":"","CategoryId":48,"CategoryName":"VPS"},{"__type":"Nc:SimpleKB:Abstractions:Dtos:CategoryItemDto","ParentCategoryId":12,"TreatAsTopicYN":false,"Description":"","ImageUrl":"","ShortDesc":"","CategoryId":2188,"CategoryName":"Dedicated Server"},{"__type":"Nc:SimpleKB:Abstractions:Dtos:CategoryItemDto","ParentCategoryId":12,"TreatAsTopicYN":false,"Description":"","ImageUrl":"","ShortDesc":"","CategoryId":30,"CategoryName":"WHM questions"},{"__type":"Nc:SimpleKB:Abstractions:Dtos:CategoryItemDto","ParentCategoryId":12,"TreatAsTopicYN":false,"Description":"","ImageUrl":"","ShortDesc":"","CategoryId":32,"CategoryName":"DNS settings"},{"__type":"Nc:SimpleKB:Abstractions:Dtos:CategoryItemDto","ParentCategoryId":12,"TreatAsTopicYN":false,"Description":"","ImageUrl":"","ShortDesc":"","CategoryId":103,"CategoryName":"LVE (CloudLinux)"},{"__type":"Nc:SimpleKB:Abstractions:Dtos:CategoryItemDto","ParentCategoryId":12,"TreatAsTopicYN":false,"Description":"","ImageUrl":"","ShortDesc":"","CategoryId":89,"CategoryName":"SSH Access"},{"__type":"Nc:SimpleKB:Abstractions:Dtos:CategoryItemDto","ParentCategoryId":12,"TreatAsTopicYN":false,"Description":"","ImageUrl":"","ShortDesc":"","CategoryId":205,"CategoryName":"FTP questions"},{"__type":"Nc:SimpleKB:Abstractions:Dtos:CategoryItemDto","ParentCategoryId":12,"TreatAsTopicYN":false,"Description":"","ImageUrl":"","ShortDesc":"","CategoryId":2180,"CategoryName":"MySQL questions"},{"__type":"Nc:SimpleKB:Abstractions:Dtos:CategoryItemDto","ParentCategoryId":12,"TreatAsTopicYN":false,"Description":"","ImageUrl":"","ShortDesc":"","CategoryId":2199,"CategoryName":"Hosting Migration"},{"__type":"Nc:SimpleKB:Abstractions:Dtos:CategoryItemDto","ParentCategoryId":12,"TreatAsTopicYN":false,"Description":"","ImageUrl":"","ShortDesc":"","CategoryId":2194,"CategoryName":"Tips & Tricks"},{"__type":"Nc:SimpleKB:Abstractions:Dtos:CategoryItemDto","ParentCategoryId":12,"TreatAsTopicYN":false,"Description":"","ImageUrl":"","ShortDesc":"","CategoryId":239,"CategoryName":"WHMCS"},{"__type":"Nc:SimpleKB:Abstractions:Dtos:CategoryItemDto","ParentCategoryId":12,"TreatAsTopicYN":false,"Description":"","ImageUrl":"","ShortDesc":"","CategoryId":33,"CategoryName":"SSL Installation"}]},{"__type":"Nc:SimpleKB:Abstractions:Dtos:CategoryItemDto","ParentCategoryId":93,"TreatAsTopicYN":false,"Description":"","ImageUrl":"","ShortDesc":"","CategoryId":2171,"CategoryName":"Private Email: Active Sync (Exchange) Setup"},{"__type":"Nc:SimpleKB:Abstractions:Dtos:CategoryItemDto","ParentCategoryId":12,"TreatAsTopicYN":false,"Description":"","ImageUrl":"","ShortDesc":"","CategoryId":2188,"CategoryName":"Dedicated Server"},{"__type":"Nc:SimpleKB:Abstractions:Dtos:CategoryItemDto","ParentCategoryId":2265,"TreatAsTopicYN":false,"Description":"","ImageUrl":"","ShortDesc":"","CategoryId":2269,"CategoryName":"iOS"},{"__type":"Nc:SimpleKB:Abstractions:Dtos:CategoryItemDto","ParentCategoryId":2239,"TreatAsTopicYN":false,"Description":"","ImageUrl":"","ShortDesc":"","CategoryId":2286,"CategoryName":"Domains questions"},{"__type":"Nc:SimpleKB:Abstractions:Dtos:CategoryItemDto","ParentCategoryId":2239,"TreatAsTopicYN":false,"Description":"","ImageUrl":"","ShortDesc":"","CategoryId":2288,"CategoryName":"Billing questions"},{"__type":"Nc:SimpleKB:Abstractions:Dtos:CategoryItemDto","ParentCategoryId":2265,"TreatAsTopicYN":false,"Description":"","ImageUrl":"","ShortDesc":"","CategoryId":2271,"CategoryName":"Linux"},{"__type":"Nc:SimpleKB:Abstractions:Dtos:CategoryItemDto","ParentCategoryId":12,"TreatAsTopicYN":false,"Description":"","ImageUrl":"","ShortDesc":"","CategoryId":30,"CategoryName":"WHM questions"},{"__type":"Nc:SimpleKB:Abstractions:Dtos:CategoryItemDto","ParentCategoryId":93,"TreatAsTopicYN":false,"Description":"","ImageUrl":"","ShortDesc":"","CategoryId":31,"CategoryName":"cPanel Email FAQs"},{"__type":"Nc:SimpleKB:Abstractions:Dtos:CategoryItemDto","ParentCategoryId":34,"TreatAsTopicYN":false,"Description":"","ImageUrl":"","ShortDesc":"","CategoryId":51,"CategoryName":"FreeDNS"},{"__type":"Nc:SimpleKB:Abstractions:Dtos:CategoryItemDto","ParentCategoryId":0,"TreatAsTopicYN":false,"Description":"","ImageUrl":"/assets/img/pictograms/150/email-red.png","ShortDesc":"","CategoryId":93,"CategoryName":"Email service","SubCategories":[{"__type":"Nc:SimpleKB:Abstractions:Dtos:CategoryItemDto","ParentCategoryId":93,"TreatAsTopicYN":false,"Description":"","ImageUrl":"","ShortDesc":"","CategoryId":2216,"CategoryName":"Spam Protection"},{"__type":"Nc:SimpleKB:Abstractions:Dtos:CategoryItemDto","ParentCategoryId":93,"TreatAsTopicYN":false,"Description":"","ImageUrl":"","ShortDesc":"","CategoryId":2226,"CategoryName":"Email Migration"},{"__type":"Nc:SimpleKB:Abstractions:Dtos:CategoryItemDto","ParentCategoryId":93,"TreatAsTopicYN":false,"Description":"","ImageUrl":"","ShortDesc":"","CategoryId":2260,"CategoryName":"Private Email Contacts and Calendars Setup"},{"__type":"Nc:SimpleKB:Abstractions:Dtos:CategoryItemDto","ParentCategoryId":93,"TreatAsTopicYN":false,"Description":"","ImageUrl":"","ShortDesc":"","CategoryId":2306,"CategoryName":"New Private Email Platform"},{"__type":"Nc:SimpleKB:Abstractions:Dtos:CategoryItemDto","ParentCategoryId":93,"TreatAsTopicYN":false,"Description":"","ImageUrl":"","ShortDesc":"","CategoryId":2179,"CategoryName":"Private Email: General Information"},{"__type":"Nc:SimpleKB:Abstractions:Dtos:CategoryItemDto","ParentCategoryId":93,"TreatAsTopicYN":false,"Description":"","ImageUrl":"","ShortDesc":"","CategoryId":2215,"CategoryName":"Private Email: Mailbox Management"},{"__type":"Nc:SimpleKB:Abstractions:Dtos:CategoryItemDto","ParentCategoryId":93,"TreatAsTopicYN":false,"Description":"","ImageUrl":"","ShortDesc":"","CategoryId":2214,"CategoryName":"Email Forwarding"},{"__type":"Nc:SimpleKB:Abstractions:Dtos:CategoryItemDto","ParentCategoryId":93,"TreatAsTopicYN":false,"Description":"","ImageUrl":"","ShortDesc":"","CategoryId":2176,"CategoryName":"Private Email: DNS Settings"},{"__type":"Nc:SimpleKB:Abstractions:Dtos:CategoryItemDto","ParentCategoryId":93,"TreatAsTopicYN":false,"Description":"","ImageUrl":"","ShortDesc":"","CategoryId":2178,"CategoryName":"Private Email: Webmail Features"},{"__type":"Nc:SimpleKB:Abstractions:Dtos:CategoryItemDto","ParentCategoryId":93,"TreatAsTopicYN":false,"Description":"","ImageUrl":"","ShortDesc":"","CategoryId":2175,"CategoryName":"Private Email: Client Setup"},{"__type":"Nc:SimpleKB:Abstractions:Dtos:CategoryItemDto","ParentCategoryId":93,"TreatAsTopicYN":false,"Description":"","ImageUrl":"","ShortDesc":"","CategoryId":2171,"CategoryName":"Private Email: Active Sync (Exchange) Setup"},{"__type":"Nc:SimpleKB:Abstractions:Dtos:CategoryItemDto","ParentCategoryId":93,"TreatAsTopicYN":false,"Description":"","ImageUrl":"","ShortDesc":"","CategoryId":31,"CategoryName":"cPanel Email FAQs"},{"__type":"Nc:SimpleKB:Abstractions:Dtos:CategoryItemDto","ParentCategoryId":93,"TreatAsTopicYN":false,"Description":"","ImageUrl":"","ShortDesc":"","CategoryId":2186,"CategoryName":"cPanel Email: Client Setup"},{"__type":"Nc:SimpleKB:Abstractions:Dtos:CategoryItemDto","ParentCategoryId":93,"TreatAsTopicYN":false,"Description":"","ImageUrl":"","ShortDesc":"","CategoryId":2204,"CategoryName":"Private Email: Video Overview"}]},{"__type":"Nc:SimpleKB:Abstractions:Dtos:CategoryItemDto","ParentCategoryId":12,"TreatAsTopicYN":false,"Description":"","ImageUrl":"","ShortDesc":"","CategoryId":32,"CategoryName":"DNS settings"},{"__type":"Nc:SimpleKB:Abstractions:Dtos:CategoryItemDto","ParentCategoryId":34,"TreatAsTopicYN":false,"Description":"","ImageUrl":"","ShortDesc":"","CategoryId":15,"CategoryName":"Namecheap Market"},{"__type":"Nc:SimpleKB:Abstractions:Dtos:CategoryItemDto","ParentCategoryId":93,"TreatAsTopicYN":false,"Description":"","ImageUrl":"","ShortDesc":"","CategoryId":2186,"CategoryName":"cPanel Email: Client Setup"},{"__type":"Nc:SimpleKB:Abstractions:Dtos:CategoryItemDto","ParentCategoryId":2265,"TreatAsTopicYN":false,"Description":"","ImageUrl":"","ShortDesc":"","CategoryId":2266,"CategoryName":"Windows"},{"__type":"Nc:SimpleKB:Abstractions:Dtos:CategoryItemDto","ParentCategoryId":2239,"TreatAsTopicYN":false,"Description":"","ImageUrl":"","ShortDesc":"","CategoryId":2287,"CategoryName":"SSL questions"},{"__type":"Nc:SimpleKB:Abstractions:Dtos:CategoryItemDto","ParentCategoryId":2265,"TreatAsTopicYN":false,"Description":"","ImageUrl":"","ShortDesc":"","CategoryId":2267,"CategoryName":"Android"},{"__type":"Nc:SimpleKB:Abstractions:Dtos:CategoryItemDto","ParentCategoryId":34,"TreatAsTopicYN":false,"Description":"","ImageUrl":"","ShortDesc":"","CategoryId":2208,"CategoryName":"3rd Party Services Setup"},{"__type":"Nc:SimpleKB:Abstractions:Dtos:CategoryItemDto","ParentCategoryId":93,"TreatAsTopicYN":false,"Description":"","ImageUrl":"","ShortDesc":"","CategoryId":2204,"CategoryName":"Private Email: Video Overview"},{"__type":"Nc:SimpleKB:Abstractions:Dtos:CategoryItemDto","ParentCategoryId":0,"TreatAsTopicYN":false,"Description":"","ImageUrl":"/assets/img/pictograms/150/security-red.png","ShortDesc":"","CategoryId":14,"CategoryName":"SSL Certificates","SubCategories":[{"__type":"Nc:SimpleKB:Abstractions:Dtos:CategoryItemDto","ParentCategoryId":14,"TreatAsTopicYN":false,"Description":"","ImageUrl":"","ShortDesc":"","CategoryId":2217,"CategoryName":"Renewal"},{"__type":"Nc:SimpleKB:Abstractions:Dtos:CategoryItemDto","ParentCategoryId":14,"TreatAsTopicYN":false,"Description":"","ImageUrl":"","ShortDesc":"","CategoryId":2218,"CategoryName":"cPanel SSL Plugin"},{"__type":"Nc:SimpleKB:Abstractions:Dtos:CategoryItemDto","ParentCategoryId":14,"TreatAsTopicYN":false,"Description":"","ImageUrl":"","ShortDesc":"","CategoryId":2221,"CategoryName":"Multi-Domain SSL Certificates"},{"__type":"Nc:SimpleKB:Abstractions:Dtos:CategoryItemDto","ParentCategoryId":14,"TreatAsTopicYN":false,"Description":"","ImageUrl":"","ShortDesc":"","CategoryId":2222,"CategoryName":"Cancellation"},{"__type":"Nc:SimpleKB:Abstractions:Dtos:CategoryItemDto","ParentCategoryId":14,"TreatAsTopicYN":false,"Description":"","ImageUrl":"","ShortDesc":"","CategoryId":2223,"CategoryName":"Browser errors"},{"__type":"Nc:SimpleKB:Abstractions:Dtos:CategoryItemDto","ParentCategoryId":14,"TreatAsTopicYN":false,"Description":"","ImageUrl":"","ShortDesc":"","CategoryId":2224,"CategoryName":"Site Seal, Logo"},{"__type":"Nc:SimpleKB:Abstractions:Dtos:CategoryItemDto","ParentCategoryId":14,"TreatAsTopicYN":false,"Description":"","ImageUrl":"","ShortDesc":"","CategoryId":2238,"CategoryName":"SSL installation errors"},{"__type":"Nc:SimpleKB:Abstractions:Dtos:CategoryItemDto","ParentCategoryId":14,"TreatAsTopicYN":false,"Description":"","ImageUrl":"","ShortDesc":"","CategoryId":2290,"CategoryName":"CSR code"},{"__type":"Nc:SimpleKB:Abstractions:Dtos:CategoryItemDto","ParentCategoryId":14,"TreatAsTopicYN":false,"Description":"","ImageUrl":"","ShortDesc":"","CategoryId":2293,"CategoryName":"Automated SSL management"},{"__type":"Nc:SimpleKB:Abstractions:Dtos:CategoryItemDto","ParentCategoryId":14,"TreatAsTopicYN":false,"Description":"","ImageUrl":"","ShortDesc":"","CategoryId":38,"CategoryName":"SSL General"},{"__type":"Nc:SimpleKB:Abstractions:Dtos:CategoryItemDto","ParentCategoryId":14,"TreatAsTopicYN":false,"Description":"","ImageUrl":"","ShortDesc":"","CategoryId":67,"CategoryName":"Activation"},{"__type":"Nc:SimpleKB:Abstractions:Dtos:CategoryItemDto","ParentCategoryId":14,"TreatAsTopicYN":false,"Description":"","ImageUrl":"","ShortDesc":"","CategoryId":68,"CategoryName":"Validation"},{"__type":"Nc:SimpleKB:Abstractions:Dtos:CategoryItemDto","ParentCategoryId":14,"TreatAsTopicYN":false,"Description":"","ImageUrl":"","ShortDesc":"","CategoryId":69,"CategoryName":"Installation"},{"__type":"Nc:SimpleKB:Abstractions:Dtos:CategoryItemDto","ParentCategoryId":14,"TreatAsTopicYN":false,"Description":"","ImageUrl":"","ShortDesc":"","CategoryId":70,"CategoryName":"Reissuance"}]},{"__type":"Nc:SimpleKB:Abstractions:Dtos:CategoryItemDto","ParentCategoryId":0,"TreatAsTopicYN":true,"Description":"","ImageUrl":"/assets/img/pictograms/150/performance-red.png","ShortDesc":"","CategoryId":9,"CategoryName":"My Account","SubCategories":[{"__type":"Nc:SimpleKB:Abstractions:Dtos:CategoryItemDto","ParentCategoryId":9,"TreatAsTopicYN":false,"Description":"","ImageUrl":"","ShortDesc":"","CategoryId":45,"CategoryName":"Account Security"},{"__type":"Nc:SimpleKB:Abstractions:Dtos:CategoryItemDto","ParentCategoryId":9,"TreatAsTopicYN":false,"Description":"","ImageUrl":"","ShortDesc":"","CategoryId":43,"CategoryName":"Profile Management"},{"__type":"Nc:SimpleKB:Abstractions:Dtos:CategoryItemDto","ParentCategoryId":9,"TreatAsTopicYN":false,"Description":"","ImageUrl":"","ShortDesc":"","CategoryId":44,"CategoryName":"Account Access"}]},{"__type":"Nc:SimpleKB:Abstractions:Dtos:CategoryItemDto","ParentCategoryId":34,"TreatAsTopicYN":false,"Description":"","ImageUrl":"","ShortDesc":"","CategoryId":2278,"CategoryName":"Handshake TLDs"},{"__type":"Nc:SimpleKB:Abstractions:Dtos:CategoryItemDto","ParentCategoryId":12,"TreatAsTopicYN":false,"Description":"","ImageUrl":"","ShortDesc":"","CategoryId":103,"CategoryName":"LVE (CloudLinux)"},{"__type":"Nc:SimpleKB:Abstractions:Dtos:CategoryItemDto","ParentCategoryId":0,"TreatAsTopicYN":false,"Description":"","ImageUrl":"/assets/img/pictograms/150/affiliates-red.png","ShortDesc":"","CategoryId":55,"CategoryName":"Affiliates","SubCategories":[]},{"__type":"Nc:SimpleKB:Abstractions:Dtos:CategoryItemDto","ParentCategoryId":12,"TreatAsTopicYN":false,"Description":"","ImageUrl":"","ShortDesc":"","CategoryId":89,"CategoryName":"SSH Access"},{"__type":"Nc:SimpleKB:Abstractions:Dtos:CategoryItemDto","ParentCategoryId":0,"TreatAsTopicYN":false,"Description":"","ImageUrl":"/assets/img/pictograms/150/tools-red.png","ShortDesc":"","CategoryId":2211,"CategoryName":"API & Resellers","SubCategories":[{"__type":"Nc:SimpleKB:Abstractions:Dtos:CategoryItemDto","ParentCategoryId":2211,"TreatAsTopicYN":false,"Description":"","ImageUrl":"","ShortDesc":"","CategoryId":2227,"CategoryName":"SSL Resellers"},{"__type":"Nc:SimpleKB:Abstractions:Dtos:CategoryItemDto","ParentCategoryId":2211,"TreatAsTopicYN":false,"Description":"","ImageUrl":"","ShortDesc":"","CategoryId":2229,"CategoryName":"Hosting Resellers"},{"__type":"Nc:SimpleKB:Abstractions:Dtos:CategoryItemDto","ParentCategoryId":2211,"TreatAsTopicYN":false,"Description":"","ImageUrl":"","ShortDesc":"","CategoryId":63,"CategoryName":"Namecheap API"},{"__type":"Nc:SimpleKB:Abstractions:Dtos:CategoryItemDto","ParentCategoryId":2211,"TreatAsTopicYN":false,"Description":"","ImageUrl":"","ShortDesc":"","CategoryId":2196,"CategoryName":"WHMCS module for SSL"}]},{"__type":"Nc:SimpleKB:Abstractions:Dtos:CategoryItemDto","ParentCategoryId":0,"TreatAsTopicYN":false,"Description":"","ImageUrl":"/assets/img/pictograms/150/timer-red.png","ShortDesc":"","CategoryId":2212,"CategoryName":"Legacy Products","SubCategories":[]},{"__type":"Nc:SimpleKB:Abstractions:Dtos:CategoryItemDto","ParentCategoryId":12,"TreatAsTopicYN":false,"Description":"","ImageUrl":"","ShortDesc":"","CategoryId":205,"CategoryName":"FTP questions"},{"__type":"Nc:SimpleKB:Abstractions:Dtos:CategoryItemDto","ParentCategoryId":12,"TreatAsTopicYN":false,"Description":"","ImageUrl":"","ShortDesc":"","CategoryId":2180,"CategoryName":"MySQL questions"},{"__type":"Nc:SimpleKB:Abstractions:Dtos:CategoryItemDto","ParentCategoryId":12,"TreatAsTopicYN":false,"Description":"","ImageUrl":"","ShortDesc":"","CategoryId":2199,"CategoryName":"Hosting Migration"},{"__type":"Nc:SimpleKB:Abstractions:Dtos:CategoryItemDto","ParentCategoryId":0,"TreatAsTopicYN":false,"Description":"","ImageUrl":"/assets/img/pictograms/150/premiumdns-red.png","ShortDesc":"","CategoryId":2231,"CategoryName":"PremiumDNS","SubCategories":[]},{"__type":"Nc:SimpleKB:Abstractions:Dtos:CategoryItemDto","ParentCategoryId":12,"TreatAsTopicYN":false,"Description":"","ImageUrl":"","ShortDesc":"","CategoryId":2194,"CategoryName":"Tips & Tricks"},{"__type":"Nc:SimpleKB:Abstractions:Dtos:CategoryItemDto","ParentCategoryId":0,"TreatAsTopicYN":false,"Description":"","ImageUrl":"https://static.nc-img.com/live-resource/icons/knowledgebase/fastVPN_icon-150px.png","ShortDesc":"","CategoryId":2265,"CategoryName":"FastVPN","SubCategories":[{"__type":"Nc:SimpleKB:Abstractions:Dtos:CategoryItemDto","ParentCategoryId":2265,"TreatAsTopicYN":false,"Description":"","ImageUrl":"","ShortDesc":"","CategoryId":2292,"CategoryName":"Browser Extensions"},{"__type":"Nc:SimpleKB:Abstractions:Dtos:CategoryItemDto","ParentCategoryId":2265,"TreatAsTopicYN":false,"Description":"","ImageUrl":"","ShortDesc":"","CategoryId":2274,"CategoryName":"General"},{"__type":"Nc:SimpleKB:Abstractions:Dtos:CategoryItemDto","ParentCategoryId":2265,"TreatAsTopicYN":false,"Description":"","ImageUrl":"","ShortDesc":"","CategoryId":2270,"CategoryName":"Routers"},{"__type":"Nc:SimpleKB:Abstractions:Dtos:CategoryItemDto","ParentCategoryId":2265,"TreatAsTopicYN":false,"Description":"","ImageUrl":"","ShortDesc":"","CategoryId":2272,"CategoryName":"TV"},{"__type":"Nc:SimpleKB:Abstractions:Dtos:CategoryItemDto","ParentCategoryId":2265,"TreatAsTopicYN":false,"Description":"","ImageUrl":"","ShortDesc":"","CategoryId":2273,"CategoryName":"Gaming Consoles"},{"__type":"Nc:SimpleKB:Abstractions:Dtos:CategoryItemDto","ParentCategoryId":2265,"TreatAsTopicYN":false,"Description":"","ImageUrl":"","ShortDesc":"","CategoryId":2268,"CategoryName":"macOS"},{"__type":"Nc:SimpleKB:Abstractions:Dtos:CategoryItemDto","ParentCategoryId":2265,"TreatAsTopicYN":false,"Description":"","ImageUrl":"","ShortDesc":"","CategoryId":2269,"CategoryName":"iOS"},{"__type":"Nc:SimpleKB:Abstractions:Dtos:CategoryItemDto","ParentCategoryId":2265,"TreatAsTopicYN":false,"Description":"","ImageUrl":"","ShortDesc":"","CategoryId":2271,"CategoryName":"Linux"},{"__type":"Nc:SimpleKB:Abstractions:Dtos:CategoryItemDto","ParentCategoryId":2265,"TreatAsTopicYN":false,"Description":"","ImageUrl":"","ShortDesc":"","CategoryId":2266,"CategoryName":"Windows"},{"__type":"Nc:SimpleKB:Abstractions:Dtos:CategoryItemDto","ParentCategoryId":2265,"TreatAsTopicYN":false,"Description":"","ImageUrl":"","ShortDesc":"","CategoryId":2267,"CategoryName":"Android"}]},{"__type":"Nc:SimpleKB:Abstractions:Dtos:CategoryItemDto","ParentCategoryId":12,"TreatAsTopicYN":false,"Description":"","ImageUrl":"","ShortDesc":"","CategoryId":239,"CategoryName":"WHMCS"},{"__type":"Nc:SimpleKB:Abstractions:Dtos:CategoryItemDto","ParentCategoryId":12,"TreatAsTopicYN":false,"Description":"","ImageUrl":"","ShortDesc":"","CategoryId":33,"CategoryName":"SSL Installation"}],"status":200,"statusText":"OK"}}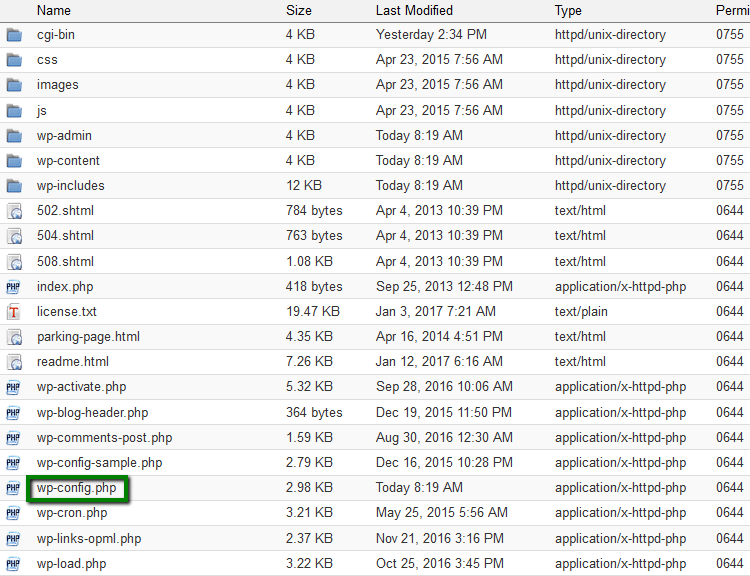
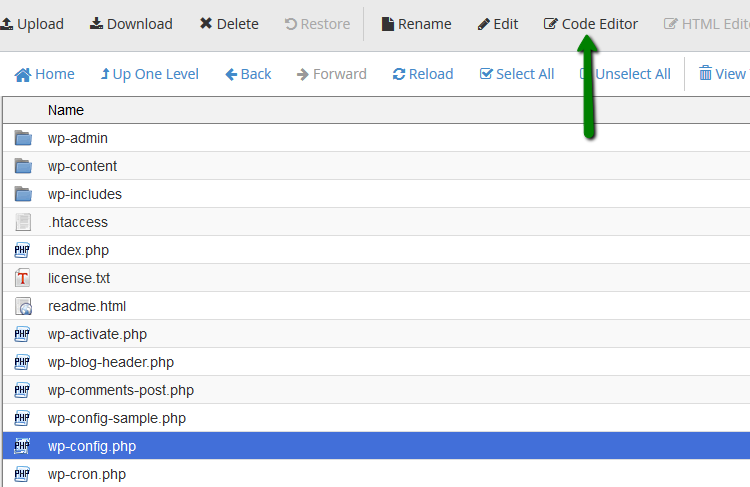
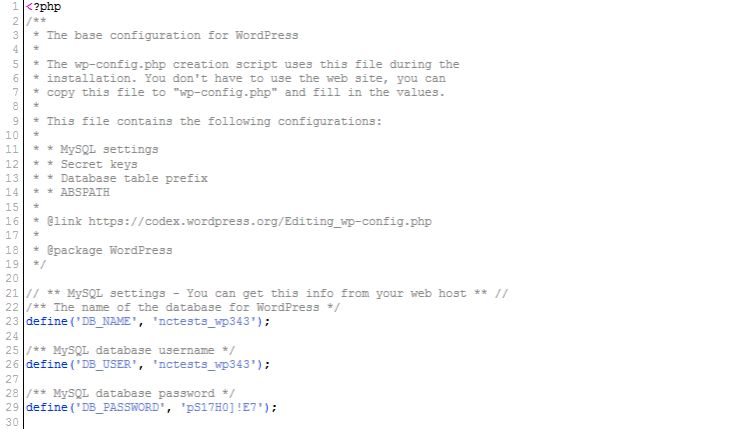
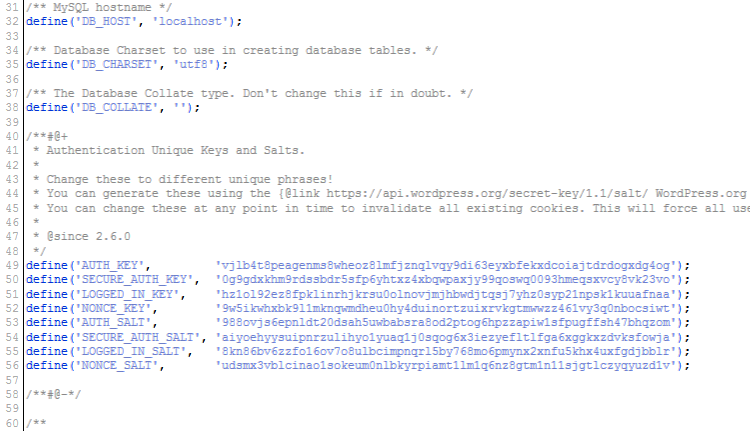
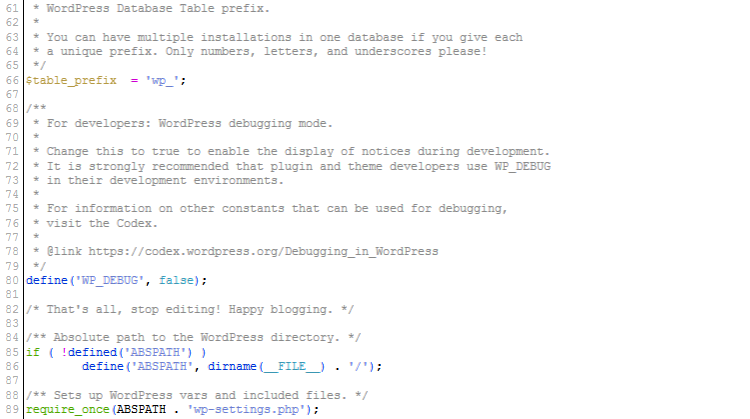
define( 'constant_name' , 'value');
// ** MySQL settings - You can get this info from your web host ** //
/** The name of the database for WordPress */
define('DB_NAME', 'cPanelusername_wp792');

/** MySQL database username */
define('DB_USER', 'cPanelusername_wp792');

/** MySQL database password */
define('DB_PASSWORD', 'qp0@P0[24S');

/** MySQL hostname */
define('DB_HOST', 'localhost');

/** Database Charset to use in creating database tables. */
define('DB_CHARSET', 'utf8mb4');

/** The Database Collate type. Don't change this if in doubt. */
define('DB_COLLATE', '');

/**#@+ * Authentication Unique Keys and Salts.
 *
 * Change these to different unique phrases!
 *
You can generate these using the {@link https://api.wordpress.org/secret-key/1.1/salt/ WordPress.org secret-key service}

 * You can change these at any point in time to invalidate all existing cookies. This will force all users to have to log in again.
 *
 * @since 2.6.0
 */
define('AUTH_KEY',         'sl4tjdnklmba7y5slkmbtmjlpiq5sktqf5atkkyf4lqchy6xqdfmdq8q8fffqetw');
define('SECURE_AUTH_KEY',  'v53il73qlah16db21i7cfk3zdrgxxm3ofv3elfaqnnfhvi5z1aemqr0xydcux9mw');
define('LOGGED_IN_KEY',    'm7enmciil9jn3z4knrp9edo3e4ihl16rf5no1nradv8kd7h7zfvr3np9ot29ew2t');
define('NONCE_KEY',        'kreqjwqb3z6werlv5cx10jykskpe3yogq50lsjszskmabyuaksm8mgd7vskl5hid');
define('AUTH_SALT',        'trijiliazfic2dboijugdbolyfj9s3iu4sxidbooavcdmejqe6xv9obmrydzqg7c');
define('SECURE_AUTH_SALT', 'p2d6b1hunwij3fokmkejia3loyvzrlvonxslgzbxusz4ytbmajfy30vfwhofophs');
define('LOGGED_IN_SALT',   '9luoa41irvafroggy9xqedd4qeltyouxpqrajky9p2y3jecduabpbx9vjpouzfab');
define('NONCE_SALT',       'belb5oknpapd0pgiifjgrsbizorkedyjed50omvjhlru65iohsk90l4dojisbdqa');

/**#@-*/
/**#@+
 * Authentication Unique Keys and Salts.
 *
 * Change these to different unique phrases!
 * You can generate these using the {@link https://api.wordpress.org/secret-key/1.1/salt/ WordPress.org secret-key service}

 * You can change these at any point in time to invalidate all existing cookies. This will force all users to have to log in again.

 *
 * @since 2.6.0
 */
define('AUTH_KEY',         'put your unique phrase here');
define('SECURE_AUTH_KEY',  'put your unique phrase here');
define('LOGGED_IN_KEY',    'put your unique phrase here');
define('NONCE_KEY',        'put your unique phrase here');
define('AUTH_SALT',        'put your unique phrase here');
define('SECURE_AUTH_SALT', 'put your unique phrase here');
define('LOGGED_IN_SALT',   'put your unique phrase here');
define('NONCE_SALT',       'put your unique phrase here');

/**#@-*/
/**
 * WordPress Database Table prefix.
 *
 * You can have multiple installations in one database if you give each
 * a unique prefix. Only numbers, letters, and underscores please!
 */
$table_prefix  = 'wp_';

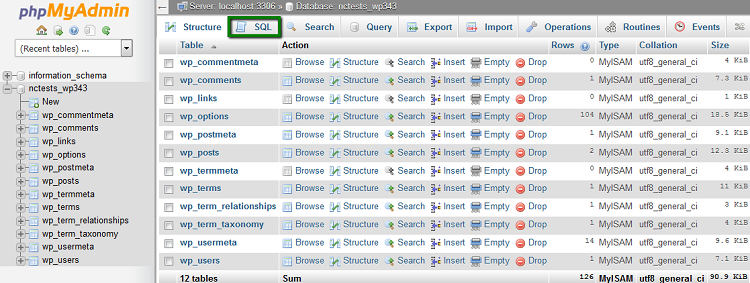
RENAME table `wp_commentmeta` TO `newprefix_commentmeta`;
RENAME table `wp_comments` TO `newprefix_comments`;
RENAME table `wp_links` TO `newprefix_links`;
RENAME table `wp_options` TO `newprefix_options`;
RENAME table `wp_postmeta` TO `newprefix_postmeta`;
RENAME table `wp_posts` TO `newprefix_posts`;
RENAME table `wp_terms` TO `newprefix_terms`;
RENAME table `wp_term_relationships` TO `newprefix_term_relationships`;
RENAME table `wp_term_taxonomy` TO `newprefix_term_taxonomy`;
RENAME table `wp_usermeta` TO `newprefix_usermeta`;
RENAME table `wp_users` TO `newprefix_users`;
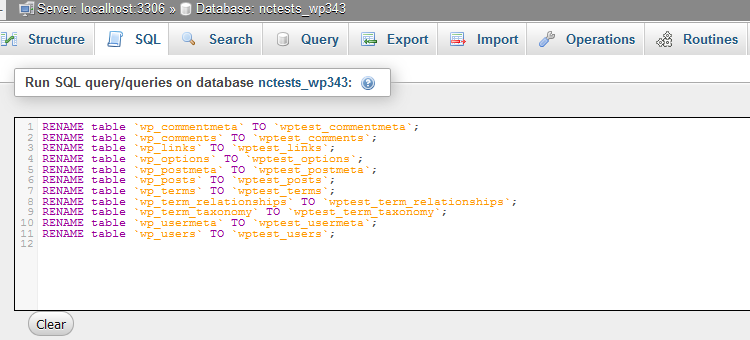
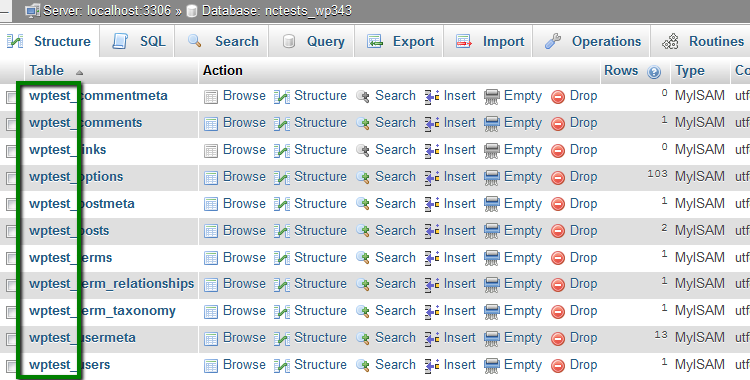
SELECT * FROM 'newprefix_options' WHERE 'option_name' LIKE '%wp_%'
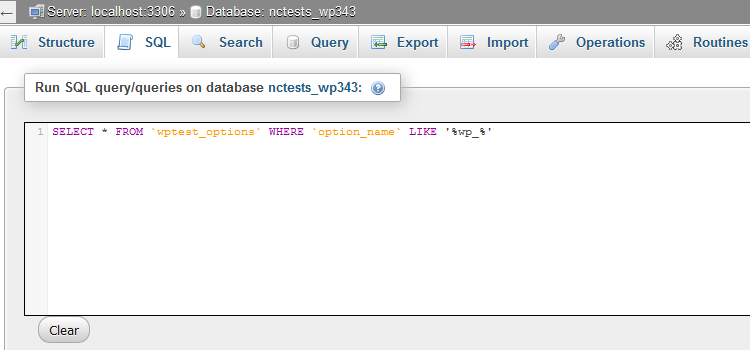
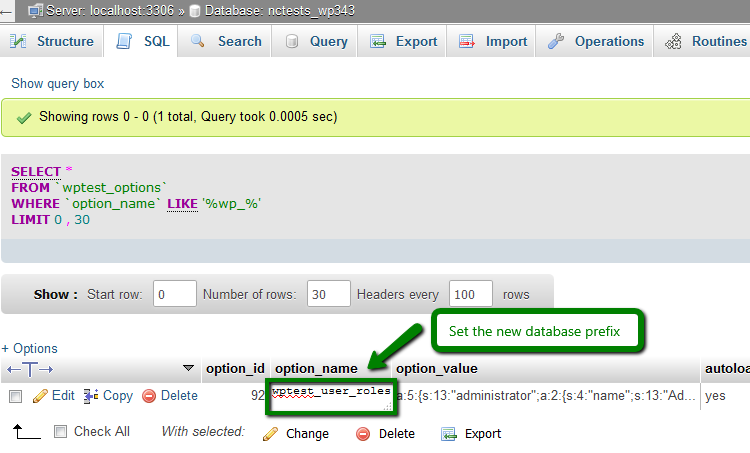
SELECT * FROM `newprefix_usermeta` WHERE `meta_key` LIKE '%wp_%'
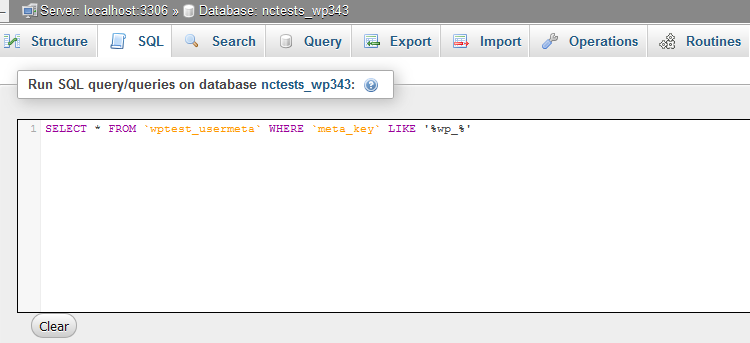

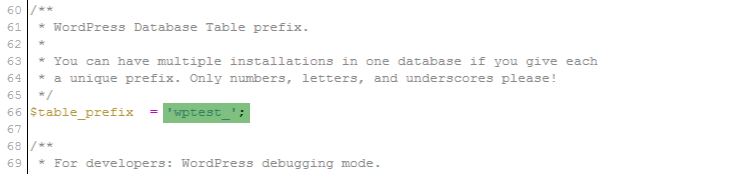
/**
 * For developers: WordPress debugging mode.
 *
 * Change this to true to enable the display of notices during development.
 * It is strongly recommended that plugin and theme developers use WP_DEBUG
 * in their development environments.
 *
 * For information on other constants that can be used for debugging,
 * visit the Codex.
 *
 * @link https://codex.wordpress.org/Debugging_in_WordPress
 */
define('WP_DEBUG', false);

/* That's all, stop editing! Happy blogging. */

If you change the following line from false to true, WordPress will show all PHP notifications.
define('WP_DEBUG', true);
/** Absolute path to the WordPress directory. */
if ( !defined('ABSPATH') )
    define('ABSPATH', dirname(__FILE__) . '/');

/** Sets up WordPress vars and included files. */
require_once(ABSPATH . 'wp-settings.php');
/* That's all, stop editing! Happy blogging. */
define( 'DB_HOST', 'localhost:5067' );
define( 'DB_HOST', 'localhost:/var/run/mysqld/mysqld.sock' );
define('WP_HOME','http://example.com');
define('WP_SITEURL','http://example.com'); define( 'UPLOADS', 'wp-content/newfolder' );
define( 'WP_AUTO_UPDATE_CORE', false );
define( 'WP_POST_REVISIONS', 3 );
define('WP_MEMORY_LIMIT', '64M');Need help? We're always here for you.