
{"/api/v1/ncpl/simplekb/getarticle:\"{\\\"articleId\\\":9802,\\\"categoryId\\\":48}\"":{"body":{"Id":9802,"FriendlyId":"","ArticleTypeId":3,"Title":"How to install LEMP stack (Linux, Nginx, MySQL, PHP-FPM) on CentOS7","ArticleName":"How to install LEMP stack (Linux, Nginx, MySQL, PHP-FPM) on CentOS7","ArticleSummary":null,"PreponedSummary":false,"Approved":true,"Body":"DQoJCTxwIHN0eWxlPSJ0ZXh0LWluZGVudDogMjVweDsiPkEgPGI+TEVNUCAoTGludXgsIE5naW54LCBNeVNRTCwgUEhQK0Zhc3QtQ0dJIFByb2Nlc3MgTWFuYWdlcik8L2I+IHN0YWNrIGlzIHRoZSBzZWNvbmQgbW9zdCBwb3B1bGFyIGFmdGVyIExBTVAgd2F5IHNldHVwIHRoZSB3ZWIgc2VydmVyIGZvciBob3N0aW5nIHdlYiBjb250ZW50LiBOZ2lueCBpcyBrbm93biBmb3IgaXRzIHN0YWJpbGl0eSwgcmljaCBmZWF0dXJlIHNldCwgc2ltcGxlIGNvbmZpZ3VyYXRpb24sIGFuZCBsb3cgcmVzb3VyY2UgY29uc3VtcHRpb24uIFRoaXMgdHV0b3JpYWwgc2hvd3MgaG93IHlvdSBjYW4gaW5zdGFsbCBOZ2lueCB3aXRoIFBIUCBzdXBwb3J0IHRocm91Z2ggRmFzdC1DR0kgUHJvY2VzcyBNYW5hZ2VyLg0KPC9wPg0KCQk8cCBzdHlsZT0idGV4dC1pbmRlbnQ6IDI1cHg7Ij5XZSB3b3VsZCBsaWtlIHRvIGluZm9ybSB5b3UgdGhhdCB3ZSBkbyBub3QgcHJvdmlkZSBmdXJ0aGVyIHN1cHBvcnQgZm9yIG5vbi1jUGFuZWwgY29uZmlndXJhdGlvbnMsIHNvIGZ1cnRoZXIgbWFuYWdlbWVudCBzaG91bGQgYmUgcHJvdmlkZWQgc29sZWx5IGF0IHlvdXIgZW5kLg0KPC9wPg0KCQk8cCBzdHlsZT0idGV4dC1pbmRlbnQ6IDI1cHg7Ij5BbGwgY29tbWFuZHMgc2hvdWxkIGJlIHBlcmZvcm1lZCB1bmRlciByb290IGFjY2VzcyBvbiBhICdibGFuaycgb3BlcmF0aW9uIHN5c3RlbSBvbmx5LiBZb3UgY2FuIGluc3RhbGwgY2xlYW4gT1MgdXNpbmcgVlBTIE1hbmFnZW1lbnQgY29uc29sZSBvciBJTVBJIGZvciBkZWRpY2F0ZWQgc2VydmVycy4gQWxzbyB5b3UgY2FuIDxhIGhyZWY9Imh0dHBzOi8vc3VwcG9ydC5uYW1lY2hlYXAuY29tL2luZGV4LnBocD8vVGlja2V0cy9TdWJtaXQiPnN1Ym1pdCBhIHRpY2tldDwvYT4gdG8gSG9zdGluZyDigJMgVlBTIGFuZCBEZWRpY2F0ZWQgc2VydmVycyBkZXBhcnRtZW50IHNvIHRoYXQgb3VyIHRlY2huaWNpYW5zIHJlLWluc3RhbGwgdGhlIHJlcXVpcmVkIE9TIChpbiB0aGlzIGNhc2UgaXQgaXMgQ2VudE9TNy4wKSBhdCB0aGVpciBlbmQuIEJlbG93IHlvdSBjYW4gc2VlIFZQUyBNYW5hZ2VtZW50IHBhbmVsIGV4YW1wbGU6DQo8YnIgLz48YnIgLz48aW1nIGNsYXNzPSJrYi1pbWFnZSIgc3JjPSJodHRwczovL05hbWVjaGVhcC5zaW1wbGVrYi5jb20vU2l0ZUNvbnRlbnRzLzItN0MyMkQ1MjM2QTQ1NDNFQjgyN0YzQkQ4OTM2RTE1M0UvbWVkaWEvbGVtcDdfMS5wbmciIC8+PGJyIC8+PGJyIC8+PGJyIC8+PGI+PGEgaHJlZj0iIzEiPjEuIFN5c3RlbSB1cGRhdGUgYW5kIHBhc3N3b3JkIGNoYW5nZTwvYT48YnIgLz48YSBocmVmPSIjMiI+Mi4gTmdpbnggYW5kIFBIUCBpbnN0YWxsYXRpb248L2E+PGJyIC8+PGEgaHJlZj0iIzMiPjMuIFN0YXJ0aW5nIGFuZCBDb25maWd1cmluZyBOZ2lueDwvYT48YnIgLz48YSBocmVmPSIjNCI+NC4gSW5zdGFsbCBNYXJpYURCIHNlcnZlcjwvYT48YnIgLz48YSBocmVmPSIjNSI+NS4gQWRkIHlvdXIgd2Vic2l0ZSBvciBzZXR1cCBzZXJ2ZXIgYmxvY2tzIChOZ2lueCB2aXJ0dWFsIGhvc3RzKTwvYT48L2I+PGJyIC8+PGJyIC8+PGJyIC8+PGI+PGEgbmFtZT0iMSI+MS4gU3lzdGVtIHVwZGF0ZSBhbmQgcGFzc3dvcmQgY2hhbmdlPC9hPjwvYj48YnIgLz48YnIgLz5GaXJzdCBjbGVhbiB5dW0sIHRoZW4gdXBkYXRlIHRoZSBvcGVyYXRpb24gc3lzdGVtIHRvIHRoZSBsYXRlc3QgdmVyc2lvbiB1c2luZzoNCg0KPGJyIC8+PGk+PGJyIC8+eXVtIGNsZWFuIGFsbA0KPGJyIC8+eXVtIHVwZGF0ZQ0KDQo8L2k+PGJyIC8+PGJyIC8+WXVtIGlzIGEgQ2VudE9TIHBhY2thZ2UgaW5zdGFsbGVyLCBlYWNoIHRpbWUgd2UgdXNlIGl0LCB3ZSBzZWUgdGhpcyB3aW5kb3c6DQoNCjxiciAvPjxiciAvPjxpbWcgY2xhc3M9ImtiLWltYWdlIiBzcmM9Imh0dHBzOi8vTmFtZWNoZWFwLnNpbXBsZWtiLmNvbS9TaXRlQ29udGVudHMvMi03QzIyRDUyMzZBNDU0M0VCODI3RjNCRDg5MzZFMTUzRS9tZWRpYS9sZW1wN18yLnBuZyIgLz48YnIgLz48YnIgLz5JZiB5b3Ugc2VlIDxiPkNvbXBsZXRlITwvYj4gYXQgdGhlIGVuZCBydW5uaW5nIHl1bSB1cGRhdGUsIGV2ZXJ5dGhpbmcgaXMgb2theS4NCjxiciAvPjxiciAvPkZvcmNlIGEgU0VMaW51eCBmaWxlc3lzdGVtIHJlbGFiZWwgYXQgbmV4dCBib290Og0KPGJyIC8+PGJyIC8+PGk+cmVzdG9yZWNvbiAtciAvDQo8L2k+PGJyIC8+PGJyIC8+PGltZyBjbGFzcz0ia2ItaW1hZ2UiIHNyYz0iaHR0cHM6Ly9OYW1lY2hlYXAuc2ltcGxla2IuY29tL1NpdGVDb250ZW50cy8yLTdDMjJENTIzNkE0NTQzRUI4MjdGM0JEODkzNkUxNTNFL21lZGlhL2xlbXA3XzMucG5nIiAvPjxiciAvPjxiciAvPllvdSBtYXkgd2FudCB0byBjaGFuZ2UgdGhlIGRlZmF1bHQgcm9vdCBwYXNzd29yZCBwcm92aWRlZCBpbiB0aGUgaG9zdGluZyB3ZWxjb21lIGVtYWlsLiBNYWtlIHN1cmUgdGhhdCB0aGUgcGFzc3dvcmQgaXMgc2VjdXJlIGVub3VnaCBhbmQgeW91IGtlZXAgaXQgaW4gc2FmZSBwbGFjZS4gSG9zdG5hbWUgc2hvdWxkIGJlIHNvbWUgc3ViZG9tYWluIHlvdSBkbyBub3QgcGxhbiB0byB1c2UgZm9yIHRoZSB3ZWJzaXRlLiBCeSBkZWZhdWx0IGl0IGlzIHNldCBhcyA8aT5zZXJ2ZXIxLnlvdXJkb21haW4udGxkPC9pPiwgYnV0IHlvdSBjYW4gY2hhbmdlIGl0IGFueXRpbWUgbGF0ZXIuDQo8YnIgLz48YnIgLz4NClBhc3N3b3JkIGNoYW5nZSBpcyBkb25lIHVzaW5nIDxpPnBhc3N3ZDwvaT4gY29tbWFuZC4NCkhvc3RuYW1lIGNhbiBiZSBjaGVja2VkIHVzaW5nIDxpPmhvc3RuYW1lPC9pPiBjb21tYW5kOg0KDQo8YnIgLz48YnIgLz48aW1nIGNsYXNzPSJrYi1pbWFnZSIgc3JjPSJodHRwczovL05hbWVjaGVhcC5zaW1wbGVrYi5jb20vU2l0ZUNvbnRlbnRzLzItN0MyMkQ1MjM2QTQ1NDNFQjgyN0YzQkQ4OTM2RTE1M0UvbWVkaWEvbGVtcDdfNC5wbmciIC8+PGJyIC8+PGJyIC8+SW4gdGhpcyBleGFtcGxlIHdlIGFyZSBwbGFubmluZyB0byBidWlsZCA8aT5odHRwOi8vbmN0ZXN0LmNvbTwvaT4gd2Vic2l0ZSBhbmQgb3VyIGhvc3RuYW1lIGlzIDxpPnNlcnZlcjEubmN0ZXN0LmNvbTwvaT4uIA0KDQo8YnIgLz48YnIgLz5SZWJvb3QgdGhlIHNlcnZlcjoNCg0KPGJyIC8+PGJyIC8+PGk+cmVib290DQo8L2k+PGJyIC8+PGJyIC8+PGltZyBjbGFzcz0ia2ItaW1hZ2UiIHNyYz0iaHR0cHM6Ly9OYW1lY2hlYXAuc2ltcGxla2IuY29tL1NpdGVDb250ZW50cy8yLTdDMjJENTIzNkE0NTQzRUI4MjdGM0JEODkzNkUxNTNFL21lZGlhL2xlbXA3XzUucG5nIiAvPjxiciAvPjxiciAvPkFmdGVyIHRoZSBzZXJ2ZXIgaXMgcmVib290ZWQgd2UgY2FuIGNoZWNrIHVwZ3JhZGVkIGtlcm5lbCBhbmQgQ2VudE9TIHZlcnNpb246DQo8YnIgLz48YnIgLz48aT51bmFtZSAtcg0KPGJyIC8+Y2F0IC9ldGMvcmVkaGF0LXJlbGVhc2UNCg0KPC9pPjxiciAvPjxiciAvPjxpbWcgY2xhc3M9ImtiLWltYWdlIiBzcmM9Imh0dHBzOi8vTmFtZWNoZWFwLnNpbXBsZWtiLmNvbS9TaXRlQ29udGVudHMvMi03QzIyRDUyMzZBNDU0M0VCODI3RjNCRDg5MzZFMTUzRS9tZWRpYS9sZW1wN182LnBuZyIgLz48YnIgLz48YnIgLz5Zb3UgbWF5IGZpbmQgYSByYXJlIG1pbm9yIDxhIGhyZWY9Imh0dHBzOi8vYnVncy5jZW50b3Mub3JnL3ZpZXcucGhwP2lkPTEwMDMwIj5idWc8L2E+IGFmdGVyIHJlYm9vdCB3aGljaCBkb2VzbuKAmXQgYWZmZWN0IGZ1cnRoZXIgc3RhYmlsaXR5OjxiciAvPjxiciAvPjxpbWcgY2xhc3M9ImtiLWltYWdlIiBzcmM9Imh0dHBzOi8vTmFtZWNoZWFwLnNpbXBsZWtiLmNvbS9TaXRlQ29udGVudHMvMi03QzIyRDUyMzZBNDU0M0VCODI3RjNCRDg5MzZFMTUzRS9tZWRpYS9sZW1wN183LnBuZyIgLz48YnIgLz48YnIgLz5KdXN0IHN0YXJ0IHRoZSBzZXJ2aWNlIGFnYWluIHJ1bm5pbmc6DQoNCjxiciAvPjxiciAvPjxpPnN5c3RlbWN0bCBzdGFydCBzeXN0ZW1kLWpvdXJuYWxkLnNlcnZpY2UNCg0KPC9pPjxiciAvPjxiciAvPlN0YXR1cyBvZiBlYWNoIHN5c3RlbWQgcHJvY2VzcyBjYW4gYmUgY2hlY2tlZCBzaW1pbGFyIHRvIENlbnRPUzYgaW5pdCBidXQgdXNpbmcgc3lzdGVtY3RsOg0KDQo8YnIgLz48YnIgLz48aT5zeXN0ZW1jdGwgc3RhdHVzIDwvaT48c2VydmljZT48aT48L2k+PGJyIC8+PGJyIC8+PGltZyBjbGFzcz0ia2ItaW1hZ2UiIHNyYz0iaHR0cHM6Ly9OYW1lY2hlYXAuc2ltcGxla2IuY29tL1NpdGVDb250ZW50cy8yLTdDMjJENTIzNkE0NTQzRUI4MjdGM0JEODkzNkUxNTNFL21lZGlhL2xlbXA3XzgucG5nIiAvPjxiciAvPjxiciAvPjxiciAvPjxhIG5hbWU9IjIiPjxiPjIuIE5naW54IGFuZCBQSFAgaW5zdGFsbGF0aW9uPC9iPjwvYT48YnIgLz48YnIgLz5OZ2lueCBpcyBub3QgaW5jbHVkZWQgaW4gQ2VudE9TNyByZXBvc2l0b3J5IGJ5IGRlZmF1bHQsIHNvIHdlIGluc3RhbGwgV2VidGF0aWMgWXVtIHJlcG9zaXRvcnkgd2hpY2ggaXMgYSBDZW50T1MvUkhFTCByZXBvc2l0b3J5IGNvbnRhaW5pbmcgdXBkYXRlZCB3ZWItcmVsYXRlZCBwYWNrYWdlcyBhbmQgRXh0cmEgUGFja2FnZXMgZm9yIEVudGVycHJpc2UgTGludXggKG9yIEVQRUwpIGZpcnN0LiBFUEVMIGZvciBOZ2lueCBhbmQgV2Vic3RhdGljIGZvciBuZXdlciBQSFAgdmVyc2lvbnMgc3VwcG9ydC4NCg0KPGJyIC8+PGJyIC8+PGk+cnBtIC1VdmggaHR0cHM6Ly9kbC5mZWRvcmFwcm9qZWN0Lm9yZy9wdWIvZXBlbC9lcGVsLXJlbGVhc2UtbGF0ZXN0LTcubm9hcmNoLnJwbQ0KPC9pPjxiciAvPjxpPnJwbSAtVXZoIGh0dHBzOi8vbWlycm9yLndlYnRhdGljLmNvbS95dW0vZWw3L3dlYnRhdGljLXJlbGVhc2UucnBtPC9pPjxiciAvPjxiciAvPjxpbWcgY2xhc3M9ImtiLWltYWdlIiBzcmM9Imh0dHBzOi8vTmFtZWNoZWFwLnNpbXBsZWtiLmNvbS9TaXRlQ29udGVudHMvMi03QzIyRDUyMzZBNDU0M0VCODI3RjNCRDg5MzZFMTUzRS9tZWRpYS9sZW1wN185LnBuZyIgLz48YnIgLz48YnIgLz5BbmQgaW5zdGFsbCBOZ2lueCB1c2luZzoNCg0KPGJyIC8+PGJyIC8+PGk+eXVtIGluc3RhbGwgbmdpbng8L2k+PGJyIC8+PGJyIC8+WW91IHdpbGwgbmVlZCB0byBpbnN0YWxsIHRoZSBDZW50T1MgUlBNIHNpZ25pbmcga2V5IHRoYXQgaXMgdXNlZCB0byBzaWduIHBhY2thZ2VzLCBqdXN0IHR5cGUgPGI+eTwvYj46DQoNCjxiciAvPjxiciAvPjxpbWcgY2xhc3M9ImtiLWltYWdlIiBzcmM9Imh0dHBzOi8vTmFtZWNoZWFwLnNpbXBsZWtiLmNvbS9TaXRlQ29udGVudHMvMi03QzIyRDUyMzZBNDU0M0VCODI3RjNCRDg5MzZFMTUzRS9tZWRpYS9sZW1wN18xMC5wbmciIC8+PGJyIC8+PGJyIC8+QWZ0ZXIgaXQgaXMgY29tcGxldGVkLCB5b3Ugc2hvdWxkIHNlZSB0aGlzIG1lc3NhZ2U6DQo8YnIgLz48YnIgLz48aW1nIGNsYXNzPSJrYi1pbWFnZSIgc3JjPSJodHRwczovL05hbWVjaGVhcC5zaW1wbGVrYi5jb20vU2l0ZUNvbnRlbnRzLzItN0MyMkQ1MjM2QTQ1NDNFQjgyN0YzQkQ4OTM2RTE1M0UvbWVkaWEvbGVtcDdfMTEucG5nIiAvPjxiciAvPjxiciAvPlRoZW4gd2Ugd2lsbCBpbnN0YWxsIDxiPlBIUCB3aXRoIE15U1FMIGFuZCBQSFAtRlBNIHN1cHBvcnQ8L2I+Og0KDQo8YnIgLz48YnIgLz5BdCB0aGUgbW9tZW50IGRlZmF1bHQgQ2VudE9TIDcgcmVwb3NpdG9yaWVzIGluY2x1ZGUgPGI+UEhQIDUuNC4xNjwvYj4gdmVyc2lvbi4gSG93ZXZlciwgdGhpcyBQSFAgdmVyc2lvbiBhbHJlYWR5IGNvbnNpZGVyZWQgdG8gYmUgb3V0ZGF0ZWQsIHVwIHRvIGRhdGUgdmVyc2lvbiBpcyA8Yj41LjY8L2I+LiBXZSBzdWdnZXN0IGNoZWNraW5nIHNjcmlwdHMgeW91IGFyZSBnb2luZyB0byBpbnN0YWxsIHRvIGNvbnNpZGVyIHdoYXQgUEhQIHZlcnNpb24geW91IG5lZWQuIA0KDQo8YnIgLz48YnIgLz5UaHVzLCBydW5uaW5nIHRoaXMgY29tbWFuZCB3ZSB3aWxsIGluc3RhbGwgUEhQIDUuNC4xNiwgaW4gY2FzZSB5b3UgbmVlZCBhbm90aGVyIG9uZSwgY2hlY2sgb3RoZXIgb3B0aW9ucyBiZWxvdzoNCg0KPGJyIC8+PGJyIC8+PGk+eXVtIGluc3RhbGwgcGhwIHBocC1teXNxbCBwaHAtZnBtDQo8L2k+PGJyIC8+PGJyIC8+U3VjY2Vzc2Z1bCBpbnN0YWxsYXRpb24gbG9va3MgbGlrZSBvbiB0aGUgc2NyZWVuc2hvdCBiZWxvdy4gQWZ0ZXIgYW4gaW5zdGFsbGF0aW9uIHdlIGNoZWNrZWQgcGhwIHZlcnNpb24gaW5zdGFsbGVkIHVzaW5nOg0KDQo8YnIgLz48YnIgLz48aT5waHAgLXYNCg0KPC9pPjxiciAvPjxiciAvPjxpbWcgY2xhc3M9ImtiLWltYWdlIiBzcmM9Imh0dHBzOi8vTmFtZWNoZWFwLnNpbXBsZWtiLmNvbS9TaXRlQ29udGVudHMvMi03QzIyRDUyMzZBNDU0M0VCODI3RjNCRDg5MzZFMTUzRS9tZWRpYS9sZW1wN18xMi5wbmciIC8+PGJyIC8+PGJyIC8+PGI+SW5zdGFsbGF0aW9uIG9mIGFub3RoZXIgUEhQIHZlcnNpb24gDQoNCjwvYj48YnIgLz48YnIgLz5ObyBuZWVkIHRvIHdvcnJ5IGluIGNhc2UgeW91IG5lZWQgYW5vdGhlciBQSFAgdmVyc2lvbi4gV2UgaW5jbHVkZWQgV2Vic3RhdGljIHJlcG9zaXRvcnkgYmVmb3JlIHdoaWNoIGNvbnRhaW5zIDUuNS03LjAgUEhQIHZlcnNpb25zLg0KDQo8YnIgLz48YnIgLz5DaGVja2luZyB3aXRoIHRoZSBjb21tYW5kIDxpPnl1bSBzZWFyY2ggcGhwPC9pPiwgd2UgY2FuIGZpbmQgdGhhdCBuZXcgUEhQIHBhY2thZ2VzIGxpa2UgcGhwNTV3LCBwaHA1NncgZXZlbiBuZXcgcGhwNzB3IGFyZSBhbHNvIGluY2x1ZGVkLiBEbyBub3QgZm9yZ2V0IHRvIGluc3RhbGwgcGhwWFh3LWZwbSBtb2R1bGUuDQoNCjxiciAvPjxiciAvPkZvciBleGFtcGxlLCB0byBpbnN0YWxsIFBIUDUuNSBpbnN0ZWFkIG9mIGRlZmF1bHQgNS40IG9uIENlbnRPUzcgd2UgcnVuOg0KDQo8YnIgLz48aT48YnIgLz55dW0gaW5zdGFsbCBwaHA1NXcgcGhwNTV3LW15c3FsIHBocDU1dy1vcGNhY2hlIHBocDU1dy1mcG0NCg0KPC9pPjxiciAvPjxiciAvPlRoZSBzYW1lIGZvciBvdGhlciBQSFAgdmVyc2lvbnMgd2hpY2ggd2lsbCBiZSByZWxldmFudCBib3RoIGJvdGggQ2VudE9TIHZlcnNpb25zLiA1LjUgLSA3LjAgdmVyc2lvbnMgaW5jbHVkZSBidW5kbGVkIFplbmQgT3BjYWNoZSBtb2R1bGUgc28gaXQgd2lsbCBiZSByZWFzb25hYmxlIHRvIGluc3RhbGwgaXQgdG9vOg0KDQo8YnIgLz48YnIgLz5QSFAgdjUuNjogPGk+eXVtIGluc3RhbGwgcGhwNTZ3IHBocDU2dy1vcGNhY2hlIHBocDU2dy1teXNxbCBwaHA1NnctZnBtDQo8YnIgLz48L2k+PGJyIC8+UEhQIHY3LjA6IDxpPnl1bSBpbnN0YWxsIHBocDcwdyBwaHA3MHctb3BjYWNoZSBwaHA3MHctbXlzcWwgcGhwNzB3LWZwbQ0KDQo8L2k+PGJyIC8+PGJyIC8+UGFja2FnZXMgYXJlIG91dHNpZGUgZGVmYXVsdCBDZW50T1MgcmVwb3NpdG9yaWVzLCBkdXJpbmcgdGhlIGluc3RhbGxhdGlvbiB5b3XigJlsbCBuZWVkIHRvIGltcG9ydCBhIHNlY3VyaXR5IGtleToNCg0KPGJyIC8+PGJyIC8+PGltZyBjbGFzcz0ia2ItaW1hZ2UiIHNyYz0iaHR0cHM6Ly9OYW1lY2hlYXAuc2ltcGxla2IuY29tL1NpdGVDb250ZW50cy8yLTdDMjJENTIzNkE0NTQzRUI4MjdGM0JEODkzNkUxNTNFL21lZGlhL2xlbXA3XzEzLnBuZyIgLz48YnIgLz48YnIgLz5UaGUgZXhhbXBsZSBvZiBzdWNjZXNzZnVsIGluc3RhbGxhdGlvbi4gV2UgaW5zdGFsbGVkIFBIUDUuNiBoZXJlIGFuZCB0aGVuIGNoZWNrZWQgUEhQIHZlcnNpb24gdXNpbmcgPGk+cGhwIC12PC9pPjoNCg0KPGJyIC8+PGJyIC8+PGltZyBjbGFzcz0ia2ItaW1hZ2UiIHNyYz0iaHR0cHM6Ly9OYW1lY2hlYXAuc2ltcGxla2IuY29tL1NpdGVDb250ZW50cy8yLTdDMjJENTIzNkE0NTQzRUI4MjdGM0JEODkzNkUxNTNFL21lZGlhL2xlbXA3XzE0LnBuZyIgLz48YnIgLz48YnIgLz48Yj5BZGRpdGlvbmFsIFBIUCBtb2R1bGVzIGluc3RhbGxhdGlvbg0KPC9iPjxiciAvPjxiciAvPklmIHlvdSBmaW5kIHRoYXQgc29tZSByZXF1aXJlZCBtb2R1bGVzIG1pc3NpbmcsIHlvdSBjYW4gbGlzdCBhdmFpbGFibGUgbW9kdWxlcyB1c2luZzoNCg0KPGJyIC8+PGJyIC8+PGk+eXVtIHNlYXJjaCBwaHANCg0KPC9pPjxiciAvPjxiciAvPkluIGNhc2UgeW91IGhhdmUgb3RoZXIgdGhhbiA1LjMgUEhQIHZlcnNpb24gaXQgd2lsbCBiZSByZWFzb25hYmxlIHRvIGV4Y2x1ZGUgbW9kdWxlcyBmb3Igb3RoZXIgdmVyc2lvbiBieSBjaGFuZ2luZyBwaHAgdG8gcGhwWFggZGVwZW5kcyBvbiB3aGF0IHZlcnNpb24geW91IHVzZS4gRm9yIGV4YW1wbGUsIGZvciBQSFA1LjYgeW91IG5lZWQgdG8gdXNlIDxpPnl1bSBzZWFyY2ggcGhwNTZ3IDwvaT5jb21tYW5kLiBZdW0gd2lsbCBzaG93IGFsbCBtb2R1bGVzIHN0YXJ0aW5nIGZyb20gPGI+cGhwPC9iPjoNCg0KPGJyIC8+PGJyIC8+PGltZyBjbGFzcz0ia2ItaW1hZ2UiIHNyYz0iaHR0cHM6Ly9OYW1lY2hlYXAuc2ltcGxla2IuY29tL1NpdGVDb250ZW50cy8yLTdDMjJENTIzNkE0NTQzRUI4MjdGM0JEODkzNkUxNTNFL21lZGlhL2xlbXA3XzE1LnBuZyIgLz48YnIgLz48YnIgLz5UbyBpbnN0YWxsIGEgbW9kdWxlIHlvdSBuZWVkIGVudGVyOg0KDQo8YnIgLz48YnIgLz48aT55dW0gaW5zdGFsbCA8L2k+PHBocC1tb2R1bGU+PGJyIC8+PGJyIC8+d2hlcmUgPGk+PHBocC1tb2R1bGU+PC9waHAtbW9kdWxlPjwvaT4gaXMgZnVsbCBuYW1lIG9mIG1vZHVsZSB0byBpbnN0YWxsOg0KPGJyIC8+PGJyIC8+PGltZyBjbGFzcz0ia2ItaW1hZ2UiIHNyYz0iaHR0cHM6Ly9OYW1lY2hlYXAuc2ltcGxla2IuY29tL1NpdGVDb250ZW50cy8yLTdDMjJENTIzNkE0NTQzRUI4MjdGM0JEODkzNkUxNTNFL21lZGlhL2xlbXA3XzE2LnBuZyIgLz48YnIgLz48YnIgLz5UbyBpbnN0YWxsIHNldmVyYWwgbW9kdWxlcyBhdCBvbmNlIHlvdSBuZWVkIHRvIHNlcGFyYXRlIHRoZSBuYW1lIG9mIGVhY2ggbW9kdWxlIHdpdGggYSBzcGFjZSwgbGlrZToNCg0KPGJyIC8+PGJyIC8+PGk+eXVtIGluc3RhbGwgcGhwLWNsaS54ODZfNjQgcGhwLWNvbW1vbi54ODZfNjQgcGhwLWRiYS54ODZfNjQNCg0KPC9pPjxiciAvPjxiciAvPjxiciAvPjxiPjxhIG5hbWU9IjMiPjMuIFN0YXJ0aW5nIGFuZCBDb25maWd1cmluZyBOZ2lueDwvYT48L2I+PGJyIC8+PGJyIC8+Rmlyc3Qgd2UgbmVlZCBzb21lIG1vZGlmaWNhdGlvbnMgdG8gY29ubmVjdCBjb25maWd1cmUgTmdpbnggd2l0aCBGYXN0Q0dJLg0KDQo8YnIgLz48YnIgLz5PcGVuPGk+IC9ldGMvcGhwLmluaTwvaT4gUEhQIG1haW4gY29uZmlndXJhdGlvbiBmaWxlIGFuZCBmaW5kIDxpPmNnaS5maXhfcGF0aGluZm8uPC9pPjxiciAvPjxiciAvPldlIGNhbiB1c2UgbmFubyB0ZXh0IGVkaXRvciB0byBtb2RpZnkgdGhlIGZpbGU6PGJyIC8+PGJyIC8+PGk+bmFubyAvZXRjL3BocC5pbmkNCg0KPC9pPjxiciAvPjxiciAvPkNoYW5nZSA8aT5jZ2kuZml4X3BhdGhpbmZvPTE8L2k+IHRvIDxpPmNnaS5maXhfcGF0aGluZm89MA0KPC9pPjxiciAvPjxiciAvPjxpbWcgY2xhc3M9ImtiLWltYWdlIiBzcmM9Imh0dHBzOi8vTmFtZWNoZWFwLnNpbXBsZWtiLmNvbS9TaXRlQ29udGVudHMvMi03QzIyRDUyMzZBNDU0M0VCODI3RjNCRDg5MzZFMTUzRS9tZWRpYS9sZW1wN18xNy5wbmciIC8+PGJyIC8+PGJyIC8+RmlsZSBpcyBodWdlLCBob3dldmVyLCB5b3UgY2FuIHVzZSB0aGVzZSBjb21iaW5hdGlvbnMgdG8gZWFzaWx5IGZpbmQgdGhlIHJlcXVlc3RlZCBsaW5lOiBoaXQgPGk+Q3RybCtWPC9pPiB0byBqdW1wIHRvIHRoZSBuZXh0IHBhZ2UsIDxiPkN0cmw8L2I+K1cgY29tYmluYXRpb24gYWxsb3dzIHNlYXJjaGluZy4gDQo8YnIgLz48YnIgLz5TYXZlIHRoZSBmaWxlIGhpdHRpbmcgPGI+Q3RybCtPPC9iPiwgPGI+RW50ZXIgPC9iPmFuZCB0aGVuIGNsb3NlIGl0IHdpdGggPGI+Q3RybCtYPC9iPi4NCg0KPGJyIC8+PGJyIC8+PGI+MTwvYj4gdmFsdWUgb2YgPGk+Y2dpLmZpeF9wYXRoaW5mbzwvaT4gd2lsbCBhbGxvdyBzZWFyY2hpbmcgZm9yIHRoZSBmaWxlIHRoYXQgaXMgYXMgbmVhciB0byB0aGUgcmVxdWVzdGVkIGZpbGUgYXMgcG9zc2libGUgd2hpY2ggaW4gdHVybiBtYXkgYWxsb3cgbm9uLVBIUCBmaWxlcyB0byBiZSBleGVjdXRlZCBhcyBQSFAuIEl0IGlzIGEgcG9zc2libGUgc2VjdXJpdHkgcmlzay4gPGI+MDwvYj4gY2F1c2VzIHRoZSBQSFAgaW50ZXJwcmV0ZXIgdG8gb25seSB0cnkgdGhlIGxpdGVyYWwgcGF0aCBnaXZlbiBhbmQgdG8gc3RvcCBwcm9jZXNzaW5nIGlmIHRoZSBmaWxlIGlzIG5vdCBmb3VuZC4gWW91IGNhbiBmaW5kIG1vcmUgaW5mb3JtYXRpb24gPGEgaHJlZj0iaHR0cHM6Ly93d3cubmdpbnguY29tL3Jlc291cmNlcy93aWtpL3N0YXJ0L3RvcGljcy90dXRvcmlhbHMvY29uZmlnX3BpdGZhbGxzLyI+aGVyZTwvYT4uDQoNCjxiciAvPjxiciAvPlRoZW4gb3BlbiBOZ2lueCBtYWlsIGNvbmZpZ3VyYXRpb24gZmlsZToNCg0KPGJyIC8+PGJyIC8+PGk+bmFubyAvZXRjL25naW54L25naW54LmNvbmYNCg0KPC9pPjxiciAvPjxiciAvPk5HSU5YIGNhbiBydW4gbXVsdGlwbGUgd29ya2VyIHByb2Nlc3NlcywgZWFjaCBjYXBhYmxlIG9mIHByb2Nlc3NpbmcgYSBsYXJnZSBudW1iZXIgb2Ygc2ltdWx0YW5lb3VzIGNvbm5lY3Rpb25zLiBJbiBtb3N0IGNhc2VzLCBydW5uaW5nIG9uZSB3b3JrZXIgcHJvY2VzcyBwZXIgQ1BVIGNvcmUgd29ya3Mgd2VsbCwgYnV0LCB3ZSByZWNvbW1lbmQgc2V0dGluZyA8Yj5hdXRvPC9iPi4gSW4gdGhpcyBleGFtcGxlIHdlIGhhdmUgYSBzZXJ2ZXIgd2l0aCAyIENQVSBjb3Jlcywgc28gc2V0IDxiPjI8L2I+Lg0KDQo8YnIgLz48YnIgLz48Yj5Xb3JrZXJfY29ubmVjdGlvbnM8L2I+IGlzIGEgbWF4aW11bSBudW1iZXIgb2YgY29ubmVjdGlvbnMgdGhhdCBlYWNoIHdvcmtlciBwcm9jZXNzIGNhbiBoYW5kbGUgc2ltdWx0YW5lb3VzbHkuIFZhbHVlIGJldHdlZW4gNTEyIGFuZCAxMDI0IGlzIGZpbmU6DQoNCjxiciAvPjxiciAvPjxpbWcgY2xhc3M9ImtiLWltYWdlIiBzcmM9Imh0dHBzOi8vTmFtZWNoZWFwLnNpbXBsZWtiLmNvbS9TaXRlQ29udGVudHMvMi03QzIyRDUyMzZBNDU0M0VCODI3RjNCRDg5MzZFMTUzRS9tZWRpYS9sZW1wN18xOC5wbmciIC8+PGJyIC8+PGJyIC8+TmVhcmx5IGV2ZXJ5IGJyb3dzZXIgc3VwcG9ydHMgcmVjZWl2aW5nIGNvbXByZXNzZWQgY29udGVudCBzbyB3ZSBkZWZpbml0ZWx5IHdhbnQgdG8gdHVybiB0aGF0IG9uLiBGaW5kIGd6aXAgc3RhdGVtZW50IGFuZCBjb3B5IHRoZXNlIGxpbmVzIGF0IHRoZSBlbmQgb2YgdGhlIGZpbGUuIEJlIGNhcmVmdWwgd2l0aCB7fSBzaWducyBvcmRlcjoNCg0KPGJyIC8+PGJyIC8+PGk+Z3ppcCBvbjsNCjxiciAvPmd6aXBfbWluX2xlbmd0aCAxMDAwOw0KPGJyIC8+Z3ppcF90eXBlcyB0ZXh0L3BsYWluIHRleHQvY3NzIGFwcGxpY2F0aW9uL2pzb24gYXBwbGljYXRpb24veC1qYXZhc2NyaXB0IHRleHQveG1sIGFwcGxpY2F0aW9uL3htbCBhcHBsaWNhdGlvbi94bWwrcnNzIHRleHQvamF2YXNjcmlwdDsNCg0KPC9pPjxiciAvPjxiciAvPjxpbWcgY2xhc3M9ImtiLWltYWdlIiBzcmM9Imh0dHBzOi8vTmFtZWNoZWFwLnNpbXBsZWtiLmNvbS9TaXRlQ29udGVudHMvMi03QzIyRDUyMzZBNDU0M0VCODI3RjNCRDg5MzZFMTUzRS9tZWRpYS9sZW1wN18xOS5wbmciIC8+PGJyIC8+PGJyIC8+U2F2ZSBhbmQgY2xvc2UgdGhlIGZpbGUuIFRoZW4gZWRpdCBwaHAtZnBtIGNvbmZpZ3VyYXRpb24gZmlsZTo8YnIgLz48YnIgLz48aT5uYW5vIC9ldGMvcGhwLWZwbS5kL3d3dy5jb25mDQoNCjwvaT48YnIgLz48YnIgLz5GaXJzdCB3ZSBmb3JjZSBwaHAtZnBtIHRvIGxpc3RlbiBvbiBVbml4IHNvY2tldCBpbnN0ZWFkIG9mIFRDUCB3aGljaCBzaG91bGQgYmUgIHNsaWdodGx5IGZhc3Rlci4gDQoNCjxiciAvPjxiciAvPjxpPmxpc3RlbiAxMjcuMC4wLjE6OTAwMCA8L2k+c2hvdWxkIGJlIGNoYW5nZWQgdG8NCjxpPmxpc3RlbiA9ICcvdmFyL3J1bi9mYXN0Y2dpLnNvY2snDQo8L2k+PGJyIC8+PGJyIC8+PGltZyBjbGFzcz0ia2ItaW1hZ2UiIHNyYz0iaHR0cHM6Ly9OYW1lY2hlYXAuc2ltcGxla2IuY29tL1NpdGVDb250ZW50cy8yLTdDMjJENTIzNkE0NTQzRUI4MjdGM0JEODkzNkUxNTNFL21lZGlhL2xlbXA3XzIwLnBuZyIgLz48YnIgLz48YnIgLz5UaGVuIHNldCBzZXQgTmdpbnggdXNlciBhbmQgZ3JvdXAgYXMgYnkgZGVmYXVsdCBpdCBjb250YWlucyBBcGFjaGUgc2V0dGluZ3Mgd2hpY2ggd2UgZG8gbm90IG5lZWQ6DQoNCjxiciAvPjxiciAvPjxpbWcgY2xhc3M9ImtiLWltYWdlIiBzcmM9Imh0dHBzOi8vTmFtZWNoZWFwLnNpbXBsZWtiLmNvbS9TaXRlQ29udGVudHMvMi03QzIyRDUyMzZBNDU0M0VCODI3RjNCRDg5MzZFMTUzRS9tZWRpYS9sZW1wN18yMS5wbmciIC8+PGJyIC8+PGJyIC8+QWxzbyB3ZSBzZXQgcGVybWlzc2lvbnMgZm9yIFVuaXggc29ja2V0IHRvIHRoZSBzYW1lIG5naW54IHVzZXIgYW5kIHNldCAwNjYwIHBlcm1pc3Npb25zIGZvciBpdDoNCg0KPGJyIC8+PGJyIC8+PGltZyBjbGFzcz0ia2ItaW1hZ2UiIHNyYz0iaHR0cHM6Ly9OYW1lY2hlYXAuc2ltcGxla2IuY29tL1NpdGVDb250ZW50cy8yLTdDMjJENTIzNkE0NTQzRUI4MjdGM0JEODkzNkUxNTNFL21lZGlhL2xlbXA3XzIyLnBuZyIgLz48YnIgLz48YnIgLz5TYXZlIGFuZCBjbG9zZSB0aGUgZmlsZS4NCg0KPGJyIC8+PGJyIC8+U3RhcnQgTmdpbnggc2VydmVyIGFuZCBwaHAtZnBtIHNlcnZpY2U6DQoNCjxiciAvPjxiciAvPjxpPnN5c3RlbWN0bCBzdGFydCBuZ2lueA0KPGJyIC8+c3lzdGVtY3RsIHN0YXJ0IHBocC1mcG0NCg0KPC9pPjxiciAvPjxiciAvPkFuZCBlbmFibGUgYXV0byBsb2FkIG9mIGJvdGggYWZ0ZXIgdGhlIHNlcnZlciBzdGFydHVwOg0KDQo8YnIgLz48YnIgLz48aT5zeXN0ZW1jdGwgZW5hYmxlIG5naW54DQo8YnIgLz5zeXN0ZW1jdGwgZW5hYmxlIHBocC1mcG0NCg0KPC9pPjxiciAvPjxiciAvPlRoYW4gYWRkIGZpcmV3YWxscyBleGNlcHRpb25zIGZvciBodHRwIHBvcnRzOg0KDQo8YnIgLz48aT48YnIgLz5maXJld2FsbC1jbWQgLS1wZXJtYW5lbnQgLS1hZGQtcG9ydD04MC90Y3ANCjxiciAvPmZpcmV3YWxsLWNtZCAtLXBlcm1hbmVudCAtLWFkZC1wb3J0PTQ0My90Y3ANCjxiciAvPmZpcmV3YWxsLWNtZCAtLXJlbG9hZA0KDQo8L2k+PGJyIC8+PGJyIC8+PGltZyBjbGFzcz0ia2ItaW1hZ2UiIHNyYz0iaHR0cHM6Ly9OYW1lY2hlYXAuc2ltcGxla2IuY29tL1NpdGVDb250ZW50cy8yLTdDMjJENTIzNkE0NTQzRUI4MjdGM0JEODkzNkUxNTNFL21lZGlhL2xlbXA3XzIzLnBuZyIgLz48YnIgLz48YnIgLz5JbiBjYXNlIGRvbWFpbiBuYW1lIGlzIHBvaW50ZWQgdG8gdGhlIHNlcnZlciB5b3UgY2FuIGNoZWNrIEFwYWNoZSBzdGFydCBwYWdlLiBPdGhlcndpc2UsIHlvdSBjYW4gZW50ZXIgdGhlIHNlcnZlciBJUCBpbiBicm93c2VyLiBEb27igJl0IGJlIGNvbmZ1c2VkIHdpdGggJ29uIEZlZG9yYScgbWVzc2FnZS4gRVBFTCBwYWNrYWdlIHdlIHVzZWQgdG8gaW5zdGFsbCBOZ2lueCBpcyBGZWRvcmEgcHJvamVjdCBzbyB0aGUgc2FtZSB3ZWxjb21lIHBhZ2UgaXMgdXNlZDoNCg0KPGJyIC8+PGJyIC8+PGltZyBjbGFzcz0ia2ItaW1hZ2UiIHNyYz0iaHR0cHM6Ly9OYW1lY2hlYXAuc2ltcGxla2IuY29tL1NpdGVDb250ZW50cy8yLTdDMjJENTIzNkE0NTQzRUI4MjdGM0JEODkzNkUxNTNFL21lZGlhL2xlbXA3XzI0LnBuZyIgLz48YnIgLz48YnIgLz48YnIgLz48Yj48YSBuYW1lPSI0Ij40LiBJbnN0YWxsIE1hcmlhREIgc2VydmVyPC9hPjwvYj48YnIgLz48YnIgLz5XZSB1c2UgdGhlIHNhbWUgWXVtIGluc3RhbGxlci4gT24gQ2VudE9TNyBpdCBpcyByZWFzb25hYmxlIHRvIGluc3RhbGwgbmF0aXZlIE1hcmlhREIgcGFja2FnZSBpbnN0ZWFkIG9mIHN0YW5kYXJkIE15U1FMLiBUaGUgZ29hbCBmb3IgTWFyaWEtREIgaXMgdG8gYmUgYSBkcm9wLWluIHJlcGxhY2VtZW50IGZvciBNeVNRTCDigJMgd2l0aCBtb3JlIGZlYXR1cmVzIGFuZCBiZXR0ZXIgcGVyZm9ybWFuY2U6DQoNCjxiciAvPjxiciAvPjxpPnl1bSBpbnN0YWxsIG1hcmlhZGItc2VydmVyDQoNCjwvaT48YnIgLz48YnIgLz5PbmNlIGRvbmUgY2hlY2sgTXlTUUwgdmVyc2lvbiBpbnN0YWxsZWQgYW5kIHN0YXJ0IE15U1FMIHNlcnZpY2U6DQoNCjxiciAvPjxiciAvPjxpPnN5c3RlbWN0bCBzdGFydCBtYXJpYWRiDQo8YnIgLz5zeXN0ZW1jdGwgZW5hYmxlIG1hcmlhZGINCg0KPC9pPjxiciAvPjxiciAvPjxpbWcgY2xhc3M9ImtiLWltYWdlIiBzcmM9Imh0dHBzOi8vTmFtZWNoZWFwLnNpbXBsZWtiLmNvbS9TaXRlQ29udGVudHMvMi03QzIyRDUyMzZBNDU0M0VCODI3RjNCRDg5MzZFMTUzRS9tZWRpYS9sZW1wN18yNS5wbmciIC8+PGJyIC8+PGJyIC8+PGk+bXlzcWwgLVYNCg0KPC9pPjxiciAvPjxiciAvPjxpbWcgY2xhc3M9ImtiLWltYWdlIiBzcmM9Imh0dHBzOi8vTmFtZWNoZWFwLnNpbXBsZWtiLmNvbS9TaXRlQ29udGVudHMvMi03QzIyRDUyMzZBNDU0M0VCODI3RjNCRDg5MzZFMTUzRS9tZWRpYS9sZW1wN18yNi5wbmciIC8+PGJyIC8+PGJyIC8+TWFyaWFEQiBzZXJ2ZXIgaGFzIGl0cyBvd24gcm9vdCB1c2VyIHdpdGggZGlmZmVyZW50IHBhc3N3b3JkLiBTbyB3ZSBuZWVkIHRvIHNldCByb290IE15U1FMIHBhc3N3b3JkOg0KDQo8YnIgLz48YnIgLz48aT4vdXNyL2Jpbi9teXNxbF9zZWN1cmVfaW5zdGFsbGF0aW9uDQoNCjwvaT48YnIgLz48YnIgLz5BcyB3ZSBkbyBub3QgaGF2ZSBhbnkgTXlTUUwgcGFzc3dvcmQgc2V0IHlldCwgeW91IG5lZWQgdG8gcHJlc3MgPGI+RW50ZXIgPC9iPndoZW4gaXQgYXNrcyBmb3IgdGhlIGN1cnJlbnQgcm9vdCBwYXNzd29yZCBhbmQgc2V0IGEgbmV3IG9uZS4gTWFyaWFEQiBoYXMgaXRzIG93biByb290IHVzZXI6PGJyIC8+PGJyIC8+PGltZyBjbGFzcz0ia2ItaW1hZ2UiIHNyYz0iaHR0cHM6Ly9OYW1lY2hlYXAuc2ltcGxla2IuY29tL1NpdGVDb250ZW50cy8yLTdDMjJENTIzNkE0NTQzRUI4MjdGM0JEODkzNkUxNTNFL21lZGlhL2xlbXA3XzI3LnBuZyIgLz48YnIgLz48YnIgLz5BbnN3ZXIgPGI+eTwvYj4gd2hlbiBpdCBwcm9tcHRzIHlvdSB0bzoNCjxiciAvPlNldCByb290IHBhc3N3b3JkPyBbWS9uXQ0KPGJyIC8+TmV3IHBhc3N3b3JkOiBFbnRlcg0KPGJyIC8+UmUtZW50ZXIgbmV3IHBhc3N3b3JkOiBFbnRlcg0KPGJyIC8+UmVtb3ZlIGFub255bW91cyB1c2Vycz8gW1kvbl0NCjxiciAvPkRpc2FsbG93IHJvb3QgbG9naW4gcmVtb3RlbHk/IFtZL25dDQo8YnIgLz5SZW1vdmUgdGVzdCBkYXRhYmFzZSBhbmQgYWNjZXNzIHRvIGl0PyBbWS9uXQ0KPGJyIC8+UmVsb2FkIHByaXZpbGVnZSB0YWJsZXMgbm93PyBbWS9uXQ0KDQo8YnIgLz48YnIgLz5BdCB0aGUgZW5kIGl0IHlvdSBzaG91bGQgc2VlIDxiPlRoYW5rcyBmb3IgdXNpbmcgTWFyaWFEQiEgDQoNCjwvYj48YnIgLz48YnIgLz48aW1nIGNsYXNzPSJrYi1pbWFnZSIgc3JjPSJodHRwczovL05hbWVjaGVhcC5zaW1wbGVrYi5jb20vU2l0ZUNvbnRlbnRzLzItN0MyMkQ1MjM2QTQ1NDNFQjgyN0YzQkQ4OTM2RTE1M0UvbWVkaWEvbGVtcDdfMjgucG5nIiAvPjxiciAvPjxiciAvPllvdSBjYW4gbGF1bmNoIE15U1FMIGNvbW1hbmQgbGluZSB1c2luZyB0aGlzIGNvbW1hbmQ6DQoNCjxiciAvPjxiciAvPjxpPm15c3FsIC11IHJvb3QgLXA8L2k+PGJyIC8+PGJyIC8+QW5kIGVudGVyIE15U1FMIHBhc3N3b3JkIHdoaWNoIHlvdSBoYXZlIGp1c3Qgc2V0Og0KDQo8YnIgLz48YnIgLz48aW1nIGNsYXNzPSJrYi1pbWFnZSIgc3JjPSJodHRwczovL05hbWVjaGVhcC5zaW1wbGVrYi5jb20vU2l0ZUNvbnRlbnRzLzItN0MyMkQ1MjM2QTQ1NDNFQjgyN0YzQkQ4OTM2RTE1M0UvbWVkaWEvbGVtcDdfMjkucG5nIiAvPjxiciAvPjxiciAvPkJlbG93IHlvdSBjYW4gZmluZCB0aGUgbW9zdCB1c2VmdWwgTXlTUUwgY29tbWFuZHM6DQoNCjxiciAvPjxiciAvPkNyZWF0ZSBkYXRhYmFzZToNCjxiciAvPjxiciAvPjxpPkNSRUFURSBEQVRBQkFTRSBkYXRhYmFzZW5hbWU7DQoNCjwvaT48YnIgLz48YnIgLz48aT5kYXRhYmFzZW5hbWUgPC9pPnNob3VsZCBiZSBhIGRhdGFiYXNlIHlvdSB3aXNoIHRvIGNyZWF0ZS4gWW91IGJldHRlciBub3QgdXNlIHNwYWNlIGluIHRoZSBuYW1lLiBJbiB0aGlzIGV4YW1wbGUgd2UgdXNlIDxpPndwPC9pPiBkYXRhYmFzZSBhbmQgPGk+d3B1c2VyIDwvaT51c2VyOg0KDQo8YnIgLz48YnIgLz48aW1nIGNsYXNzPSJrYi1pbWFnZSIgc3JjPSJodHRwczovL05hbWVjaGVhcC5zaW1wbGVrYi5jb20vU2l0ZUNvbnRlbnRzLzItN0MyMkQ1MjM2QTQ1NDNFQjgyN0YzQkQ4OTM2RTE1M0UvbWVkaWEvbGVtcDdfMzAucG5nIiAvPjxiciAvPjxiciAvPkNyZWF0ZSB1c2VyIGFuZCBncmFudCBpdCBhbGwgcGVybWlzc2lvbnM6DQo8YnIgLz48aT48YnIgLz5HUkFOVCBBTEwgT04gZGF0YWJhc2VuYW1lLiogVE8gdXNlckBsb2NhbGhvc3QgSURFTlRJRklFRCBCWSAncGFzc3dvcmQnOw0KDQo8L2k+PGJyIC8+PGJyIC8+Q2hhbmdlIGRhdGFiYXNlbmFtZSwgc3FsdXNlciBhbmQgcGFzc3dvcmQgdG8geW91ciBvd24uIFRoZSBjb21tYW5kIDxpPkdSQU5UIEFMTDwvaT4gYXNzaWducyBhbGwgcHJpdmlsZWdlcyAocmVhZCwgZGVsZXRlLCBtb2RpZnkgb3IgYWRkIGRhdGEpIHRvIHRoYXQgdXNlciBmb3Igb25seSB0aGlzIGRhdGFiYXNlOg0KDQo8YnIgLz48YnIgLz48aW1nIGNsYXNzPSJrYi1pbWFnZSIgc3JjPSJodHRwczovL05hbWVjaGVhcC5zaW1wbGVrYi5jb20vU2l0ZUNvbnRlbnRzLzItN0MyMkQ1MjM2QTQ1NDNFQjgyN0YzQkQ4OTM2RTE1M0UvbWVkaWEvbGVtcDdfMzEucG5nIiAvPjxiciAvPjxiciAvPkRvIG5vdCBmb3JnZXQgdG8gc2F2ZSB1c2VybmFtZSBhbmQgcGFzc3dvcmQuIFlvdSB3aWxsIG5lZWQgaXQgdG8gY29ubmVjdCB5b3VyIHdlYnNpdGUgdG8gTXlTUUwgZGF0YWJhc2UuIA0KDQo8YnIgLz48YnIgLz5EYXRhYmFzZSB5b3UgY3JlYXRlZCBjYW4gYmUgbGlzdGVkIHVzaW5nOg0KDQo8YnIgLz48YnIgLz48aT5zaG93IGRhdGFiYXNlczsNCg0KPC9pPjxiciAvPjxiciAvPjxpbWcgY2xhc3M9ImtiLWltYWdlIiBzcmM9Imh0dHBzOi8vTmFtZWNoZWFwLnNpbXBsZWtiLmNvbS9TaXRlQ29udGVudHMvMi03QzIyRDUyMzZBNDU0M0VCODI3RjNCRDg5MzZFMTUzRS9tZWRpYS9sZW1wN18zMi5wbmciIC8+PGJyIC8+PGJyIC8+VHlwZSA8aT5xdWl0IDwvaT50byBjbG9zZSBNYXJpYURCIGNvbnNvbGUuDQoNCjxiciAvPjxiciAvPjxiciAvPjxhIG5hbWU9IjUiPjxiPjUuIEFkZCB5b3VyIHdlYnNpdGUgb3Igc2V0dXAgc2VydmVyIGJsb2NrcyAoTmdpbnggdmlydHVhbCBob3N0cyk8L2I+PC9hPjxiciAvPjxiciAvPkJhc2ljYWxseSB3ZSBuZWVkIHRvIGNyZWF0ZSBhIGZvbGRlciB0byB1cGxvYWQgYSBzcGVjaWZpYyB3ZWJzaXRlIGZpbGVzIGFuZCB0ZWxsIE5naW54IHdoZXJlIHNwZWNpZmljIGhvc3QgZmlsZXMgYXJlIGxvY2F0ZWQuIFJlcGxhY2UgPGk+ZG9tYWluLmNvbTwvaT4gd2l0aCB5b3VyIGFjdHVhbCBkb21haW4gbmFtZS4gRG8gdGhpcyBpbiBhbGwgcGFydCBvZiB0aGlzIHR1dG9yaWFsLg0KDQo8YnIgLz48YnIgLz5Td2l0Y2ggdG8gdGhlIHJvb3QgZGlyZWN0b3J5IG9mIHRoZSBzZXJ2ZXIgYW5kIGNyZWF0ZSBhIHdlYnNpdGUgZm9sZGVyLiBPbmNlIGNyZWF0ZWQsIHdlIG5lZWQgdG8gY2hhbmdlIG93bmVyc2hpcCBwZXJtaXNzaW9ucyB0byB0aGUgTmdpbnggdXNlciAoZWFjaCBzZXJ2aWNlIGhhcyBpdHMgb3duIHVzZXIpIGFuZCBzZXQgYXBwcm9wcmlhdGUgPGI+d3d3IDwvYj5mb2xkZXIgcGVybWlzc2lvbnMgb2YgPGI+NzU1PC9iPjo8YnIgLz48YnIgLz48aT5jZCAvDQoNCjxiciAvPjxiciAvPm1rZGlyIC1wIC92YXIvd3d3L2RvbWFpbi5jb20vcHVibGljX2h0bWwNCg0KPGJyIC8+PGJyIC8+Y2hvd24gLVIgbmdpbng6bmdpbnggL3Zhci93d3cvZG9tYWluLmNvbS9wdWJsaWNfaHRtbA0KDQo8YnIgLz48YnIgLz5jaG1vZCA3NTUgL3Zhci93d3cNCg0KPC9pPjxiciAvPjxiciAvPkluIGV4YW1wbGUgYmVsb3cgd2UgdXNlZCA8aT5uY3Rlc3QuY29tPC9pPjoNCg0KPGJyIC8+PGJyIC8+PGltZyBjbGFzcz0ia2ItaW1hZ2UiIHNyYz0iaHR0cHM6Ly9OYW1lY2hlYXAuc2ltcGxla2IuY29tL1NpdGVDb250ZW50cy8yLTdDMjJENTIzNkE0NTQzRUI4MjdGM0JEODkzNkUxNTNFL21lZGlhL2xlbXA3XzMzLnBuZyIgLz48YnIgLz48YnIgLz5OZ2lueCBmZXRjaGVzIHNlcnZlciBibG9ja3MgKHZpcnR1YWwgaG9zdHMpIGZyb20gPGk+L2V0Yy9uZ2lueC9jb25mLmQgPC9pPmZvbGRlciBieSBkZWZhdWx0LiBTbyBldmVyeXRoaW5nIHlvdSBuZWVkIGlzIHRvIGNyZWF0ZSBhIGNvbmZpZ3VyYXRpb24gZmlsZSB3aXRoIHlvdXIgZmlyc3QgaG9zdCB0aGVyZS4gWW91IGNhbiBzZXQgYW55IG5hbWUgZm9yIGl0LCBidXQsIHN1cmUgdG8gYXZvaWQgYW55IGNvbmZ1c2lvbiBmdXJ0aGVyIGl0IGlzIGEgZ29vZCBpZGVhIHRvIHNldCBhbiBhcHByb3ByaWF0ZSBuYW1lLiBGb3IgZXhhbXBsZSwgd2Vic2l0ZSBuYW1lICsgY29uZiBwYXJ0LiBJbiB0aGlzIGV4YW1wbGUgd2Ugd2lsbCBjcmVhdGUgYSBjb25maWd1cmF0aW9uIGZpbGUgZm9yIG5jdGVzdC5jb20gKGFuZCB3d3cubmN0ZXN0LmNvbSBhbGlhcyk6DQoNCjxiciAvPjxiciAvPjxpPm5hbm8gL2V0Yy9uZ2lueC9jb25mLmQvbmN0ZXN0LmNvbS5jb25mDQoNCjwvaT48YnIgLz48YnIgLz5TZXJ2ZXIgYmxvY2sgbGluZXMgbG9vayBsaWtlLCBwYXN0ZSB0byB0aGUgb3BlbmVkIGZpbGUgYW5kIG1vZGlmeSBob3N0bmFtZSBhbmQgZm9sZGVyIHBhdGggKHdlIG1hcmtlZCBmaWVsZHMgdG8gbW9kaWZ5IGluIGdyZWVuKToNCg0KPGk+PGJyIC8+PGJyIC8+wqDCoHNlcnZlciB7DQogICAgPGJyIC8+wqDCoMKgwqBsaXN0ZW4gICAgICAgODA7DQogICAgPGJyIC8+wqDCoMKgwqBzZXJ2ZXJfbmFtZSA8Zm9udCBjb2xvcj0iIzMyQ0QzMiI+bmN0ZXN0LmNvbSB3d3cubmN0ZXN0LmNvbTwvZm9udD47DQoNCg0KPGJyIC8+PGJyIC8+wqDCoGxvY2F0aW9uIC8gew0KICAgICAgICA8YnIgLz7CoMKgwqDCoHJvb3QgICA8Zm9udCBjb2xvcj0iIzMyQ0QzMiI+L3Zhci93d3cvbmN0ZXN0LmNvbS9wdWJsaWNfaHRtbDwvZm9udD47DQogICAgICAgIDxiciAvPsKgwqDCoMKgaW5kZXggaW5kZXgucGhwICBpbmRleC5odG1sIGluZGV4Lmh0bTsNCiAgIDxiciAvPjxiciAvPsKgwqAgfQ0KPGJyIC8+PGJyIC8+IyBQYXNzIGFsbCAucGhwIGZpbGVzIG9udG8gYSBwaHAtZnBtL3BocC1mY2dpIHNlcnZlci4NCjxiciAvPmxvY2F0aW9uIH4gXC5waHAkIHsNCg0KICA8YnIgLz48YnIgLz7CoMKgIGZhc3RjZ2lfc3BsaXRfcGF0aF9pbmZvIF4oLitcLnBocCkoLy4rKSQ7DQogICA8YnIgLz5pZiAoIS1mICA8Zm9udCBjb2xvcj0iIzMyQ0QzMiI+L3Zhci93d3cvbmN0ZXN0LmNvbS9wdWJsaWNfaHRtbDwvZm9udD4kZmFzdGNnaV9zY3JpcHRfbmFtZSkgew0KICAgICAgICAgICAgICAgIDxiciAvPsKgwqDCoMKgcmV0dXJuIDQwNDsNCiAgICAgICA8YnIgLz48YnIgLz7CoMKgwqAgfQ0KICAgPGJyIC8+wqDCoGluY2x1ZGUgZmFzdGNnaV9wYXJhbXM7DQogICA8YnIgLz7CoMKgZmFzdGNnaV9pbmRleCBpbmRleC5waHA7DQogICA8YnIgLz7CoMKgZmFzdGNnaV9wYXJhbSBTQ1JJUFRfRklMRU5BTUUgPGZvbnQgY29sb3I9IiMzMkNEMzIiPi92YXIvd3d3L25jdGVzdC5jb20vcHVibGljX2h0bWw8L2ZvbnQ+JGZhc3RjZ2lfc2NyaXB0X25hbWU7DQogICA8YnIgLz7CoMKgZmFzdGNnaV9wYXNzIHVuaXg6L3Zhci9ydW4vZmFzdGNnaS5zb2NrOw0KICAgICAgIDxiciAvPsKgwqDCoMKgIH0NCjxiciAvPjxiciAvPsKgwqB9PC9pPg0KDQpNb3JlIGRldGFpbGVkIGV4cGxhbmF0aW9uOg0KDQo8YnIgLz48YnIgLz48aW1nIGNsYXNzPSJrYi1pbWFnZSIgc3JjPSJodHRwczovL05hbWVjaGVhcC5zaW1wbGVrYi5jb20vU2l0ZUNvbnRlbnRzLzItN0MyMkQ1MjM2QTQ1NDNFQjgyN0YzQkQ4OTM2RTE1M0UvbWVkaWEvbGVtcDdfMzQucG5nIiAvPjxiciAvPjxiciAvPkluIGNhc2Ugd2UgbmVlZCBhbm90aGVyIGhvc3RuYW1lIHRvIGJlIGhvc3RlZCwgd2UgcmVwZWF0IHRoZSBzYW1lOiBjcmVhdGluZyB0aGUgZGlyZWN0b3J5LCBzZXR0aW5nIGNvcnJlY3Qgb3duZXIgYW5kIHBlcm1pc3Npb25zIGZvciBpdCBhbmQgY3JlYXRpbmcgYW5vdGhlciBjb25maWd1cmF0aW9uIGZpbGUgaW4gPGk+L2V0Yy9uZ2lueC9jb25mLmQNCg0KDQo8L2k+PGJyIC8+PGJyIC8+RWFjaCB0aW1lIG1vZGlmeWluZyBhbnl0aGluZyBpbiA8aT4vZXRjL25naW54PC9pPiBmb2xkZXIgd2UgcmVzdGFydCBuZ2lueDoNCg0KDQo8YnIgLz48YnIgLz48aT5zZXJ2aWNlIG5naW54IHJlc3RhcnQNCg0KPC9pPjxiciAvPjxiciAvPjxpbWcgY2xhc3M9ImtiLWltYWdlIiBzcmM9Imh0dHBzOi8vTmFtZWNoZWFwLnNpbXBsZWtiLmNvbS9TaXRlQ29udGVudHMvMi03QzIyRDUyMzZBNDU0M0VCODI3RjNCRDg5MzZFMTUzRS9tZWRpYS9sZW1wN18zNS5wbmciIC8+PGJyIC8+PGJyIC8+VGhhdCBpcyBhbGwhIFlvdSBjYW4gcGxhY2Ugc29tZSBpbmRleCBmaWxlIHRvIHRoZSBmb2xkZXIgeW91IGNyZWF0ZWQgZm9yIHRoZSB3ZWJzaXRlIGFuZCBjaGVjayB0aGUgcGFnZSBpbiBicm93c2VyOjxiciAvPjxiciAvPjxpPm5hbm8gL3Zhci93d3cvZG9tYWluLmNvbS9wdWJsaWNfaHRtbC9pbmRleC5waHANCg0KDQo8L2k+PGJyIC8+PGJyIC8+TGV0J3MgY3JlYXRlIHBocGluZm8oKSBwYWdlIHRvIGNoZWNrIGVpdGhlciBzZXJ2ZXIgYmxvY2sgd2Ugc2V0IGFuZCBQSFAgY29uZmlndXJhdGlvbjoNCg0KPGJyIC8+PGJyIC8+PGk+PHBocD48YnIgLz5waHBpbmZvKCk7DQo8YnIgLz5waHBpbmZvKElORk9fTU9EVUxFUyk7PGJyIC8+PyZndDs8L3BocD48L2k+PGJyIC8+PGJyIC8+PGltZyBjbGFzcz0ia2ItaW1hZ2UiIHNyYz0iaHR0cHM6Ly9OYW1lY2hlYXAuc2ltcGxla2IuY29tL1NpdGVDb250ZW50cy8yLTdDMjJENTIzNkE0NTQzRUI4MjdGM0JEODkzNkUxNTNFL21lZGlhL2xlbXA3XzM2LnBuZyIgLz48YnIgLz48YnIgLz5XZSBjYW4gdGVzdCBzb21lIFBIUCB0ZW1wbGF0ZSBsaWtlIFdvcmRQcmVzcy4gQ2hhbmdlIGRpcmVjdG9yeSB0byB5b3VyIHdlYnNpdGUgZGlyZWN0b3J5IHdoaWNoIHdhcyBzZXQgcHJldmlvdXNseToNCg0KDQo8YnIgLz48YnIgLz48aT5jZCAvdmFyL3d3dy9uY3Rlc3QuY29tL3B1YmxpY19odG1sDQoNCg0KPC9pPjxiciAvPjxiciAvPk1ha2Ugc3VyZSB0aGF0IHlvdSBkZWxldGUgPGk+aW5kZXgucGhwPC9pPiBmaWxlIHdpdGggPGk+cGhwaW5mbygpPC9pPiBpbiBjYXNlIHlvdSBjcmVhdGVkIGEgdGVzdCBwYWdlIHByZXZpb3VzbHkuIEZpbGUgY2FuIGJlIHJlbW92ZWQgYnkgdXNpbmc6DQoNCjxiciAvPjxiciAvPjxpPnJtIC1mIGluZGV4Lmh0bWwNCg0KPC9pPjxiciAvPjxiciAvPlRoZW4gcnVuIHRoZXNlIGNvbW1hbmRzOg0KDQo8YnIgLz48YnIgLz48aT53Z2V0IGh0dHA6Ly93b3JkcHJlc3Mub3JnL2xhdGVzdC50YXIuZ3oNCjxiciAvPnRhciAtLXN0cmlwLWNvbXBvbmVudHM9MSAteHZmIGxhdGVzdC50YXIuZ3oNCjxiciAvPnJtIC1mIGxhdGVzdC50YXIuZ3oNCg0KPC9pPjxiciAvPjxiciAvPlNldCBjb3JyZWN0IG93bmVyc2hpcCBmb3IgdGhlIHdlYnNpdGUgZm9sZGVyIGFnYWluIGFzIHdnZXQgdXBsb2FkZWQgZmlsZXMgd2l0aCBuZ2lueCBwZXJtaXNzaW9ucyBpbnN0ZWFkIG9mIHJvb3Q6DQoNCjxiciAvPjxiciAvPjxpPnN1ZG8gY2hvd24gLVIgbmdpbng6bmdpbnggL3Zhci93d3cvZG9tYWluLmNvbS9wdWJsaWNfaHRtbA0KDQo8L2k+PGJyIC8+PGJyIC8+VGhlbiB5b3UgY2FuIGFjY2VzcyB5b3VyIHdlYnNpdGUgYXQgbGluayBsaWtlIDxpPmh0dHA6Ly9uY3Rlc3QuY29tL3dwLWFkbWluL3NldHVwLWNvbmZpZy5waHA8L2k+DQphbmQgY29tcGxldGUgdGhlIGluc3RhbGxhdGlvbiBieSBmaWxsaW5nIE15U1FMIGRhdGFiYXNlIGRldGFpbHMuDQoNCjxiciAvPjxiciAvPk1vcmUgYWR2YW5jZWQgV29yZFByZXNzK05naW54IGNvbmZpZ3VyYXRpb25zIGNhbiBiZSBjaGVja2VkIDxhIGhyZWY9Imh0dHBzOi8vd29yZHByZXNzLm9yZy9zdXBwb3J0L2FydGljbGUvbmdpbngvIiBsaW5rdGV4dD0iaGVyZSIgbGlua3R5cGU9IkN1c3RvbSIgdGFyZ2V0PSJfcGFyZW50Ij5oZXJlPC9hPi4NCg0KPGJyIC8+PGJyIC8+SG93ZXZlciwgdGhpcyBpcyBhbHJlYWR5IG5vdCB0aGUgcGFydCBvZiB0aGlzIHR1dG9yaWFsLCBlYWNoIENNUyBoYXMgaXRzIG93biBjb25maWd1cmF0aW9uLg0KDQoNCg0KPGJyIC8+PGJyIC8+PGJyIC8+VGhhdCdzIGl0ITxiciAvPjxiciAvPg0KwqDCoMKgwqDCoMKgwqDCoMKgwqDCoMKgwqDCoCA8YnIgLz7CoMKgwqDCoMKgwqDCoMKgwqDCoMKgwqDCoMKgwqDCoMKgwqDCoMKgwqAgTmVlZCBhbnkgaGVscD8gQ29udGFjdCBvdXIgPGEgaHJlZj0iaHR0cHM6Ly93d3cubmFtZWNoZWFwLmNvbS9oZWxwLWNlbnRlci8iPkhlbHBEZXNrPC9hPjxiciAvPjxiciAvPjwvcGhwLW1vZHVsZT48L3NlcnZpY2U+PC9wPg0KCQk8cD4NCgkJPC9wPg0KCQk8cD4NCgkJPC9wPg0K","NewTillDate":null,"FeaturedTillDate":null,"ModifiedDateTime":"2024-05-03T14:08:02.0000000","LiveDateTime":"1754-02-02T00:00:00.0000000","CreatedDateTime":"2016-09-15T02:08:38.0000000","ApprovalDatetime":"2024-05-03T14:08:02.0000000","RequestCount":36916,"MarkedAsNew":false,"MarkedAsFeatured":false,"RatingValue":3,"CategoryPaths":[{"__type":"Nc:SimpleKB:Abstractions:Dtos:CategoryPathDto","Level":1,"CategoryId":12,"CategoryName":"Hosting"},{"__type":"Nc:SimpleKB:Abstractions:Dtos:CategoryPathDto","Level":2,"CategoryId":48,"CategoryName":"VPS"}],"AssociatedCategories":[{"CategoryId":48,"CategoryName":"VPS","CategoryDisplayName":"HostingVPS"}],"AssociatedTags":[{"TagId":18756,"Tag":" MySQL"},{"TagId":19866,"Tag":" install"},{"TagId":29345,"Tag":"lemp"},{"TagId":29348,"Tag":" Nginx"},{"TagId":65777,"Tag":" Linux"},{"TagId":81906,"Tag":" centos7"},{"TagId":81907,"Tag":" PHP-FPM"},{"TagId":81908,"Tag":" lemp stack"}],"RelatedArticles":[],"AssociatedMedias":[],"PreferredCategoryId":0,"RootParentCategoryName":"","RootParentCategoryId":0},"status":200,"statusText":"OK"},"/api/v1/ncpl/simplekb/getcategorybycategoryid:\"{\\\"categoryId\\\":48}\"":{"body":{"__type":"Nc:SimpleKB:Abstractions:Dtos:CategoryDto","Description":"DQo=","ParentCategoryId":12,"Parent_Category_Name":"Hosting","FriendlyId":null,"ApprovedYN":true,"TreatAsTopicYN":false,"CreatedDateTime":"11/14/2008 15:49:04","CurrentCategoryPaths":[{"__type":"Nc:SimpleKB:Abstractions:Dtos:CategoryPathDto","Level":1,"CategoryId":12,"CategoryName":"Hosting"},{"__type":"Nc:SimpleKB:Abstractions:Dtos:CategoryPathDto","Level":2,"CategoryId":48,"CategoryName":"VPS"}],"RelatedCategories":[],"AssociatedArticles":[{"ArticleId":9211,"Title":"How to order cPanel/WHM for a VPS/Dedicated server","ArticleName":"How to order cPanel/WHM for a VPS/Dedicated server","LiveDateTime":"02/02/1754 00:00:00","NewTillDate":null,"FeaturedTillDate":null,"ModifiedDateTime":"04/22/2026"},{"ArticleId":9215,"Title":"How to upgrade RAM/bandwidth/disk space on a VPS/Dedicated server","ArticleName":"How to upgrade RAM/bandwidth/disk space on a VPS/Dedicated server","LiveDateTime":"02/02/1754 00:00:00","NewTillDate":null,"FeaturedTillDate":null,"ModifiedDateTime":"04/20/2026"},{"ArticleId":9979,"Title":"What operating systems are available with a VPS/Dedicated Server","ArticleName":"What operating systems are available with a VPS/Dedicated Server","LiveDateTime":"02/02/1754 00:00:00","NewTillDate":null,"FeaturedTillDate":null,"ModifiedDateTime":"04/14/2026"},{"ArticleId":10085,"Title":"How to set up automated backups for VPS and Dedicated server","ArticleName":"How to set up automated backups for VPS and Dedicated server","LiveDateTime":"02/02/1754 00:00:00","NewTillDate":null,"FeaturedTillDate":null,"ModifiedDateTime":"02/18/2022"},{"ArticleId":10107,"Title":"How to set up a DNS zone on a server without cPanel","ArticleName":"How to set up a DNS zone on a server without cPanel","LiveDateTime":"02/02/1754 00:00:00","NewTillDate":null,"FeaturedTillDate":null,"ModifiedDateTime":"02/07/2025"},{"ArticleId":10108,"Title":"Resolving Disk Space issues on a VPS/Dedicated server","ArticleName":"Resolving Disk Space issues on a VPS/Dedicated server","LiveDateTime":"02/02/1754 00:00:00","NewTillDate":null,"FeaturedTillDate":null,"ModifiedDateTime":"04/04/2019"},{"ArticleId":10202,"Title":"How to install Node.js on a VPS or a Dedicated server","ArticleName":"How to install Node.js on a VPS or a Dedicated server","LiveDateTime":"02/02/1754 00:00:00","NewTillDate":null,"FeaturedTillDate":null,"ModifiedDateTime":"05/20/2024"},{"ArticleId":10231,"Title":"Is there any downtime when I change between Shared Hosting plans and/or Reseller Hosting plans?","ArticleName":"Is there any downtime when I change between Shared Hosting plans and/or Reseller Hosting plans?","LiveDateTime":"02/02/1754 00:00:00","NewTillDate":null,"FeaturedTillDate":null,"ModifiedDateTime":"05/09/2025"},{"ArticleId":10232,"Title":"How can I change the operating system on my VPS/Dedicated Server","ArticleName":"How can I change the operating system on my VPS/Dedicated Server","LiveDateTime":"02/02/1754 00:00:00","NewTillDate":null,"FeaturedTillDate":null,"ModifiedDateTime":"07/19/2024"},{"ArticleId":10319,"Title":"How to install VestaCP on a VPS/Dedicated Server","ArticleName":"How to install VestaCP on a VPS/Dedicated Server","LiveDateTime":"02/02/1754 00:00:00","NewTillDate":null,"FeaturedTillDate":null,"ModifiedDateTime":"02/07/2025"},{"ArticleId":10328,"Title":"How to install Linux, Apache, MariaDB, PHP stack (LAMP) on AlmaLinux and host a website","ArticleName":"How to install Linux, Apache, MariaDB, PHP stack (LAMP) on AlmaLinux and host a website","LiveDateTime":"02/02/1754 00:00:00","NewTillDate":null,"FeaturedTillDate":null,"ModifiedDateTime":"07/21/2025"},{"ArticleId":10745,"Title":"How to log in to WHM if you have a VPS?","ArticleName":"How to log in to WHM if you have a VPS?","LiveDateTime":"02/02/1754 00:00:00","NewTillDate":null,"FeaturedTillDate":null,"ModifiedDateTime":"09/01/2025"},{"ArticleId":10776,"Title":"How to install OpenClaw on a VPS","ArticleName":"How to install OpenClaw on a VPS","LiveDateTime":"02/02/1754 00:00:00","NewTillDate":null,"FeaturedTillDate":null,"ModifiedDateTime":"04/15/2026"},{"ArticleId":10777,"Title":"How to set up a VPS: Beginner-Friendly Step-by-Step Guide","ArticleName":"How to set up a VPS: Beginner-Friendly Step-by-Step Guide","LiveDateTime":"02/02/1754 00:00:00","NewTillDate":null,"FeaturedTillDate":null,"ModifiedDateTime":"04/28/2026"},{"ArticleId":501,"Title":"What is a VPS?","ArticleName":"What is a VPS?","LiveDateTime":"02/02/1754 00:00:00","NewTillDate":null,"FeaturedTillDate":null,"ModifiedDateTime":"02/11/2021"},{"ArticleId":502,"Title":"Why should I choose VPS hosting?","ArticleName":"Why should I choose VPS hosting?","LiveDateTime":"02/02/1754 00:00:00","NewTillDate":null,"FeaturedTillDate":null,"ModifiedDateTime":"01/25/2019"},{"ArticleId":525,"Title":"What is the difference between shared hosting and VPS?","ArticleName":"What is the difference between shared hosting and VPS?","LiveDateTime":"02/02/1754 00:00:00","NewTillDate":null,"FeaturedTillDate":null,"ModifiedDateTime":"01/25/2019"},{"ArticleId":503,"Title":"What VPS hosting plans do you offer?","ArticleName":"What VPS hosting plans do you offer?","LiveDateTime":"02/02/1754 00:00:00","NewTillDate":"04/29/2009 04:00:00","FeaturedTillDate":null,"ModifiedDateTime":"04/06/2026"},{"ArticleId":523,"Title":"What VPS package should I choose?","ArticleName":"What VPS package should I choose?","LiveDateTime":"02/02/1754 00:00:00","NewTillDate":"12/19/2008 05:00:00","FeaturedTillDate":null,"ModifiedDateTime":"09/20/2022"},{"ArticleId":505,"Title":"What control panels do you provide?","ArticleName":"What control panels do you provide?","LiveDateTime":"02/02/1754 00:00:00","NewTillDate":"12/18/2008 05:00:00","FeaturedTillDate":null,"ModifiedDateTime":"03/26/2025"},{"ArticleId":9304,"Title":"What VPS management options do you provide?","ArticleName":"What VPS management options do you provide?","LiveDateTime":"02/02/1754 00:00:00","NewTillDate":null,"FeaturedTillDate":null,"ModifiedDateTime":"02/16/2026"},{"ArticleId":509,"Title":"What level of control do I receive with my VPS package?","ArticleName":"What level of control do I receive with my VPS package?","LiveDateTime":"02/02/1754 00:00:00","NewTillDate":"12/15/2008 00:00:00","FeaturedTillDate":null,"ModifiedDateTime":"11/18/2015"},{"ArticleId":917,"Title":"VPS Hosting - Getting Started","ArticleName":"VPS Hosting - Getting Started","LiveDateTime":"02/02/1754 00:00:00","NewTillDate":null,"FeaturedTillDate":null,"ModifiedDateTime":"08/18/2025"},{"ArticleId":9661,"Title":"How to manage features in WHM","ArticleName":"How to manage features in WHM","LiveDateTime":"02/02/1754 00:00:00","NewTillDate":null,"FeaturedTillDate":null,"ModifiedDateTime":"05/12/2022"},{"ArticleId":9409,"Title":"How to configure initial WHM settings (VPS and Dedicated server)","ArticleName":"How to configure initial WHM settings (VPS and Dedicated server)","LiveDateTime":"02/02/1754 00:00:00","NewTillDate":null,"FeaturedTillDate":null,"ModifiedDateTime":"12/15/2021"},{"ArticleId":207,"Title":"How to set up personal nameservers (VPS and Dedicated servers)","ArticleName":"How to set up personal nameservers (VPS and Dedicated servers)","LiveDateTime":"02/02/1754 00:00:00","NewTillDate":null,"FeaturedTillDate":null,"ModifiedDateTime":"07/01/2022"},{"ArticleId":9974,"Title":"How to manage your VPS with SolusVM (for KVM)","ArticleName":"How to manage your VPS with SolusVM (for KVM)","LiveDateTime":"02/02/1754 00:00:00","NewTillDate":null,"FeaturedTillDate":null,"ModifiedDateTime":"06/23/2025"},{"ArticleId":9975,"Title":"How to set up a VNC client with a VPS Hosting","ArticleName":"How to set up a VNC client with a VPS Hosting","LiveDateTime":"02/02/1754 00:00:00","NewTillDate":null,"FeaturedTillDate":null,"ModifiedDateTime":"10/25/2024"},{"ArticleId":511,"Title":"What software can be installed on my VPS?","ArticleName":"What software can be installed on my VPS?","LiveDateTime":"02/02/1754 00:00:00","NewTillDate":"12/15/2008 05:00:00","FeaturedTillDate":null,"ModifiedDateTime":"10/25/2019"},{"ArticleId":9942,"Title":"How to reboot VPS or dedicated server through WHM","ArticleName":"How to reboot VPS or dedicated server through WHM","LiveDateTime":"02/02/1754 00:00:00","NewTillDate":null,"FeaturedTillDate":null,"ModifiedDateTime":"12/16/2021"},{"ArticleId":9944,"Title":"How to change the root password via WHM","ArticleName":"How to change the root password via WHM","LiveDateTime":"02/02/1754 00:00:00","NewTillDate":null,"FeaturedTillDate":null,"ModifiedDateTime":"02/07/2025"},{"ArticleId":9660,"Title":"How to work with cPHulk","ArticleName":"How to work with cPHulk","LiveDateTime":"02/02/1754 00:00:00","NewTillDate":null,"FeaturedTillDate":null,"ModifiedDateTime":"11/30/2021"},{"ArticleId":9662,"Title":"How to work with the CSF plugin","ArticleName":"How to work with the CSF plugin","LiveDateTime":"02/02/1754 00:00:00","NewTillDate":null,"FeaturedTillDate":null,"ModifiedDateTime":"12/26/2024"},{"ArticleId":9719,"Title":"How to check memory usage on a VPS","ArticleName":"How to check memory usage on a VPS","LiveDateTime":"02/02/1754 00:00:00","NewTillDate":null,"FeaturedTillDate":null,"ModifiedDateTime":"10/02/2025"},{"ArticleId":9849,"Title":"How to change PHP configuration on a VPS/Dedicated server (for EasyApache 4)","ArticleName":"How to change PHP configuration on a VPS/Dedicated server (for EasyApache 4)","LiveDateTime":"02/02/1754 00:00:00","NewTillDate":null,"FeaturedTillDate":null,"ModifiedDateTime":"07/23/2024"},{"ArticleId":524,"Title":"Does the cPanel I intend to buy from you include Softaculous?","ArticleName":"Does the cPanel I intend to buy from you include Softaculous?","LiveDateTime":"02/02/1754 00:00:00","NewTillDate":"12/19/2008 05:00:00","FeaturedTillDate":null,"ModifiedDateTime":"10/25/2019"},{"ArticleId":9802,"Title":"How to install LEMP stack (Linux, Nginx, MySQL, PHP-FPM) on CentOS7","ArticleName":"How to install LEMP stack (Linux, Nginx, MySQL, PHP-FPM) on CentOS7","LiveDateTime":"02/02/1754 00:00:00","NewTillDate":null,"FeaturedTillDate":null,"ModifiedDateTime":"05/03/2024"},{"ArticleId":9670,"Title":"How to install Softaculous on a VPS/Dedicated server with cPanel/WHM","ArticleName":"How to install Softaculous on a VPS/Dedicated server with cPanel/WHM","LiveDateTime":"02/02/1754 00:00:00","NewTillDate":null,"FeaturedTillDate":null,"ModifiedDateTime":"12/21/2021"},{"ArticleId":9672,"Title":"How to install the Vade Retro Plugin on VPS/Dedicated server with cPanel/WHM","ArticleName":"How to install the Vade Retro Plugin on VPS/Dedicated server with cPanel/WHM","LiveDateTime":"02/02/1754 00:00:00","NewTillDate":null,"FeaturedTillDate":null,"ModifiedDateTime":"12/14/2021"},{"ArticleId":1261,"Title":"How to remove Fantastico from the server","ArticleName":"How to remove Fantastico from the server","LiveDateTime":"02/02/1754 00:00:00","NewTillDate":null,"FeaturedTillDate":null,"ModifiedDateTime":"12/21/2021"},{"ArticleId":522,"Title":"Can I order additional IP addresses for my VPS plan?","ArticleName":"Can I order additional IP addresses for my VPS plan?","LiveDateTime":"02/02/1754 00:00:00","NewTillDate":"12/18/2008 05:00:00","FeaturedTillDate":null,"ModifiedDateTime":"05/09/2025"},{"ArticleId":512,"Title":"Do you perform data backups for VPS users?","ArticleName":"Do you perform data backups for VPS users?","LiveDateTime":"02/02/1754 00:00:00","NewTillDate":"12/15/2008 05:00:00","FeaturedTillDate":null,"ModifiedDateTime":"01/22/2026"},{"ArticleId":507,"Title":"Can other users’ activity influence my server performance?","ArticleName":"Can other users’ activity influence my server performance?","LiveDateTime":"02/02/1754 00:00:00","NewTillDate":"12/18/2008 05:00:00","FeaturedTillDate":null,"ModifiedDateTime":"10/25/2019"},{"ArticleId":508,"Title":"If one of the users overuses the main server's resources, will it make my site slower?","ArticleName":"If one of the users overuses the main server's resources, will it make my site slower?","LiveDateTime":"02/02/1754 00:00:00","NewTillDate":"12/14/2008 05:00:00","FeaturedTillDate":null,"ModifiedDateTime":"03/26/2024"},{"ArticleId":909,"Title":"What virtualization technology is set up on VPS?","ArticleName":"What virtualization technology is set up on VPS?","LiveDateTime":"02/02/1754 00:00:00","NewTillDate":null,"FeaturedTillDate":null,"ModifiedDateTime":"12/17/2019"}],"AssociatedTags":[],"CategoryId":48,"CategoryName":"VPS"},"status":200,"statusText":"OK"},"/api/v1/ncpl/simplekb/getcategories:\"{\\\"parentCategoryId\\\":0,\\\"getTree\\\":true}\"":{"body":[{"__type":"Nc:SimpleKB:Abstractions:Dtos:CategoryItemDto","ParentCategoryId":93,"TreatAsTopicYN":false,"Description":"","ImageUrl":"","ShortDesc":"","CategoryId":2216,"CategoryName":"Spam Protection"},{"__type":"Nc:SimpleKB:Abstractions:Dtos:CategoryItemDto","ParentCategoryId":14,"TreatAsTopicYN":false,"Description":"","ImageUrl":"","ShortDesc":"","CategoryId":2217,"CategoryName":"Renewal"},{"__type":"Nc:SimpleKB:Abstractions:Dtos:CategoryItemDto","ParentCategoryId":14,"TreatAsTopicYN":false,"Description":"","ImageUrl":"","ShortDesc":"","CategoryId":2218,"CategoryName":"cPanel SSL Plugin"},{"__type":"Nc:SimpleKB:Abstractions:Dtos:CategoryItemDto","ParentCategoryId":12,"TreatAsTopicYN":false,"Description":"","ImageUrl":"","ShortDesc":"","CategoryId":2219,"CategoryName":"PHP Configuration"},{"__type":"Nc:SimpleKB:Abstractions:Dtos:CategoryItemDto","ParentCategoryId":14,"TreatAsTopicYN":false,"Description":"","ImageUrl":"","ShortDesc":"","CategoryId":2221,"CategoryName":"Multi-Domain SSL Certificates"},{"__type":"Nc:SimpleKB:Abstractions:Dtos:CategoryItemDto","ParentCategoryId":14,"TreatAsTopicYN":false,"Description":"","ImageUrl":"","ShortDesc":"","CategoryId":2222,"CategoryName":"Cancellation"},{"__type":"Nc:SimpleKB:Abstractions:Dtos:CategoryItemDto","ParentCategoryId":14,"TreatAsTopicYN":false,"Description":"","ImageUrl":"","ShortDesc":"","CategoryId":2223,"CategoryName":"Browser errors"},{"__type":"Nc:SimpleKB:Abstractions:Dtos:CategoryItemDto","ParentCategoryId":14,"TreatAsTopicYN":false,"Description":"","ImageUrl":"","ShortDesc":"","CategoryId":2224,"CategoryName":"Site Seal, Logo"},{"__type":"Nc:SimpleKB:Abstractions:Dtos:CategoryItemDto","ParentCategoryId":12,"TreatAsTopicYN":false,"Description":"","ImageUrl":"","ShortDesc":"","CategoryId":2225,"CategoryName":"SEO"},{"__type":"Nc:SimpleKB:Abstractions:Dtos:CategoryItemDto","ParentCategoryId":93,"TreatAsTopicYN":false,"Description":"","ImageUrl":"","ShortDesc":"","CategoryId":2226,"CategoryName":"Email Migration"},{"__type":"Nc:SimpleKB:Abstractions:Dtos:CategoryItemDto","ParentCategoryId":2211,"TreatAsTopicYN":false,"Description":"","ImageUrl":"","ShortDesc":"","CategoryId":2227,"CategoryName":"SSL Resellers"},{"__type":"Nc:SimpleKB:Abstractions:Dtos:CategoryItemDto","ParentCategoryId":0,"TreatAsTopicYN":true,"Description":"","ImageUrl":"/assets/img/pictograms/150/cloud-red.png","ShortDesc":"","CategoryId":2228,"CategoryName":"Apps","SubCategories":[{"__type":"Nc:SimpleKB:Abstractions:Dtos:CategoryItemDto","ParentCategoryId":2228,"TreatAsTopicYN":false,"Description":"","ImageUrl":"","ShortDesc":"","CategoryId":2251,"CategoryName":"Supersonic CDN"},{"__type":"Nc:SimpleKB:Abstractions:Dtos:CategoryItemDto","ParentCategoryId":2228,"TreatAsTopicYN":false,"Description":"","ImageUrl":"","ShortDesc":"","CategoryId":2298,"CategoryName":"Site Maker"},{"__type":"Nc:SimpleKB:Abstractions:Dtos:CategoryItemDto","ParentCategoryId":2228,"TreatAsTopicYN":false,"Description":"","ImageUrl":"","ShortDesc":"","CategoryId":177,"CategoryName":"Google Workspace (formerly G Suite)"}]},{"__type":"Nc:SimpleKB:Abstractions:Dtos:CategoryItemDto","ParentCategoryId":2211,"TreatAsTopicYN":false,"Description":"","ImageUrl":"","ShortDesc":"","CategoryId":2229,"CategoryName":"Hosting Resellers"},{"__type":"Nc:SimpleKB:Abstractions:Dtos:CategoryItemDto","ParentCategoryId":34,"TreatAsTopicYN":false,"Description":"","ImageUrl":"","ShortDesc":"","CategoryId":2232,"CategoryName":"DNSSEC"},{"__type":"Nc:SimpleKB:Abstractions:Dtos:CategoryItemDto","ParentCategoryId":34,"TreatAsTopicYN":false,"Description":"","ImageUrl":"","ShortDesc":"","CategoryId":2234,"CategoryName":"Google Workspace (formerly G Suite)"},{"__type":"Nc:SimpleKB:Abstractions:Dtos:CategoryItemDto","ParentCategoryId":34,"TreatAsTopicYN":false,"Description":"","ImageUrl":"","ShortDesc":"","CategoryId":2237,"CategoryName":"Host records setup"},{"__type":"Nc:SimpleKB:Abstractions:Dtos:CategoryItemDto","ParentCategoryId":14,"TreatAsTopicYN":false,"Description":"","ImageUrl":"","ShortDesc":"","CategoryId":2238,"CategoryName":"SSL installation errors"},{"__type":"Nc:SimpleKB:Abstractions:Dtos:CategoryItemDto","ParentCategoryId":0,"TreatAsTopicYN":false,"Description":"","ImageUrl":"/assets/img/pictograms/150/easywp-red.png","ShortDesc":"","CategoryId":2239,"CategoryName":"EasyWP","SubCategories":[{"__type":"Nc:SimpleKB:Abstractions:Dtos:CategoryItemDto","ParentCategoryId":2239,"TreatAsTopicYN":false,"Description":"","ImageUrl":"","ShortDesc":"","CategoryId":2280,"CategoryName":"Getting Started"},{"__type":"Nc:SimpleKB:Abstractions:Dtos:CategoryItemDto","ParentCategoryId":2239,"TreatAsTopicYN":false,"Description":"","ImageUrl":"","ShortDesc":"","CategoryId":2279,"CategoryName":"General Information"},{"__type":"Nc:SimpleKB:Abstractions:Dtos:CategoryItemDto","ParentCategoryId":2239,"TreatAsTopicYN":false,"Description":"","ImageUrl":"","ShortDesc":"","CategoryId":2281,"CategoryName":"WordPress Migration"},{"__type":"Nc:SimpleKB:Abstractions:Dtos:CategoryItemDto","ParentCategoryId":2239,"TreatAsTopicYN":false,"Description":"","ImageUrl":"","ShortDesc":"","CategoryId":2282,"CategoryName":"Plugins and Themes"},{"__type":"Nc:SimpleKB:Abstractions:Dtos:CategoryItemDto","ParentCategoryId":2239,"TreatAsTopicYN":false,"Description":"","ImageUrl":"","ShortDesc":"","CategoryId":2284,"CategoryName":"WordPress Management"},{"__type":"Nc:SimpleKB:Abstractions:Dtos:CategoryItemDto","ParentCategoryId":2239,"TreatAsTopicYN":false,"Description":"","ImageUrl":"","ShortDesc":"","CategoryId":2285,"CategoryName":"SFTP and Database access"},{"__type":"Nc:SimpleKB:Abstractions:Dtos:CategoryItemDto","ParentCategoryId":2239,"TreatAsTopicYN":false,"Description":"","ImageUrl":"","ShortDesc":"","CategoryId":2286,"CategoryName":"Domains questions"},{"__type":"Nc:SimpleKB:Abstractions:Dtos:CategoryItemDto","ParentCategoryId":2239,"TreatAsTopicYN":false,"Description":"","ImageUrl":"","ShortDesc":"","CategoryId":2288,"CategoryName":"Billing questions"},{"__type":"Nc:SimpleKB:Abstractions:Dtos:CategoryItemDto","ParentCategoryId":2239,"TreatAsTopicYN":false,"Description":"","ImageUrl":"","ShortDesc":"","CategoryId":2287,"CategoryName":"SSL questions"}]},{"__type":"Nc:SimpleKB:Abstractions:Dtos:CategoryItemDto","ParentCategoryId":2228,"TreatAsTopicYN":false,"Description":"","ImageUrl":"","ShortDesc":"","CategoryId":2251,"CategoryName":"Supersonic CDN"},{"__type":"Nc:SimpleKB:Abstractions:Dtos:CategoryItemDto","ParentCategoryId":12,"TreatAsTopicYN":false,"Description":"","ImageUrl":"","ShortDesc":"","CategoryId":2252,"CategoryName":"InterWorx questions"},{"__type":"Nc:SimpleKB:Abstractions:Dtos:CategoryItemDto","ParentCategoryId":2253,"TreatAsTopicYN":false,"Description":"","ImageUrl":"","ShortDesc":"","CategoryId":2254,"CategoryName":"Domains How-To"},{"__type":"Nc:SimpleKB:Abstractions:Dtos:CategoryItemDto","ParentCategoryId":2253,"TreatAsTopicYN":false,"Description":"","ImageUrl":"","ShortDesc":"","CategoryId":2255,"CategoryName":"Hosting How-To"},{"__type":"Nc:SimpleKB:Abstractions:Dtos:CategoryItemDto","ParentCategoryId":2253,"TreatAsTopicYN":false,"Description":"","ImageUrl":"","ShortDesc":"","CategoryId":2257,"CategoryName":"Sales & Payments How-To"},{"__type":"Nc:SimpleKB:Abstractions:Dtos:CategoryItemDto","ParentCategoryId":2253,"TreatAsTopicYN":false,"Description":"","ImageUrl":"","ShortDesc":"","CategoryId":2258,"CategoryName":"cPanel Email How-To"},{"__type":"Nc:SimpleKB:Abstractions:Dtos:CategoryItemDto","ParentCategoryId":93,"TreatAsTopicYN":false,"Description":"","ImageUrl":"","ShortDesc":"","CategoryId":2260,"CategoryName":"Private Email Contacts and Calendars Setup"},{"__type":"Nc:SimpleKB:Abstractions:Dtos:CategoryItemDto","ParentCategoryId":2253,"TreatAsTopicYN":false,"Description":"","ImageUrl":"","ShortDesc":"","CategoryId":2262,"CategoryName":"EasyWP How-To"},{"__type":"Nc:SimpleKB:Abstractions:Dtos:CategoryItemDto","ParentCategoryId":0,"TreatAsTopicYN":false,"Description":"","ImageUrl":"https://download.namecheap.com/assets/img/domainvault-red@2x.png","ShortDesc":"","CategoryId":2289,"CategoryName":"Domain Vault","SubCategories":[]},{"__type":"Nc:SimpleKB:Abstractions:Dtos:CategoryItemDto","ParentCategoryId":14,"TreatAsTopicYN":false,"Description":"","ImageUrl":"","ShortDesc":"","CategoryId":2290,"CategoryName":"CSR code"},{"__type":"Nc:SimpleKB:Abstractions:Dtos:CategoryItemDto","ParentCategoryId":12,"TreatAsTopicYN":false,"Description":"","ImageUrl":"","ShortDesc":"","CategoryId":2291,"CategoryName":"Webuzo questions"},{"__type":"Nc:SimpleKB:Abstractions:Dtos:CategoryItemDto","ParentCategoryId":2265,"TreatAsTopicYN":false,"Description":"","ImageUrl":"","ShortDesc":"","CategoryId":2292,"CategoryName":"Browser Extensions"},{"__type":"Nc:SimpleKB:Abstractions:Dtos:CategoryItemDto","ParentCategoryId":14,"TreatAsTopicYN":false,"Description":"","ImageUrl":"","ShortDesc":"","CategoryId":2293,"CategoryName":"Automated SSL management"},{"__type":"Nc:SimpleKB:Abstractions:Dtos:CategoryItemDto","ParentCategoryId":2228,"TreatAsTopicYN":false,"Description":"","ImageUrl":"","ShortDesc":"","CategoryId":2298,"CategoryName":"Site Maker"},{"__type":"Nc:SimpleKB:Abstractions:Dtos:CategoryItemDto","ParentCategoryId":2175,"TreatAsTopicYN":false,"Description":"","ImageUrl":"","ShortDesc":"","CategoryId":2299,"CategoryName":"Common"},{"__type":"Nc:SimpleKB:Abstractions:Dtos:CategoryItemDto","ParentCategoryId":12,"TreatAsTopicYN":false,"Description":"","ImageUrl":"","ShortDesc":"","CategoryId":27,"CategoryName":"Getting Started"},{"__type":"Nc:SimpleKB:Abstractions:Dtos:CategoryItemDto","ParentCategoryId":0,"TreatAsTopicYN":false,"Description":"","ImageUrl":"/assets/img/pictograms/150/support-red.png","ShortDesc":"","CategoryId":5,"CategoryName":"General & Support","SubCategories":[]},{"__type":"Nc:SimpleKB:Abstractions:Dtos:CategoryItemDto","ParentCategoryId":2200,"TreatAsTopicYN":false,"Description":"","ImageUrl":"","ShortDesc":"","CategoryId":7,"CategoryName":"Billing FAQ"},{"__type":"Nc:SimpleKB:Abstractions:Dtos:CategoryItemDto","ParentCategoryId":2209,"TreatAsTopicYN":false,"Description":"","ImageUrl":"","ShortDesc":"","CategoryId":8,"CategoryName":"Transfer Information"},{"__type":"Nc:SimpleKB:Abstractions:Dtos:CategoryItemDto","ParentCategoryId":12,"TreatAsTopicYN":false,"Description":"","ImageUrl":"","ShortDesc":"","CategoryId":22,"CategoryName":"Hosting Information"},{"__type":"Nc:SimpleKB:Abstractions:Dtos:CategoryItemDto","ParentCategoryId":14,"TreatAsTopicYN":false,"Description":"","ImageUrl":"","ShortDesc":"","CategoryId":38,"CategoryName":"SSL General"},{"__type":"Nc:SimpleKB:Abstractions:Dtos:CategoryItemDto","ParentCategoryId":9,"TreatAsTopicYN":false,"Description":"","ImageUrl":"","ShortDesc":"","CategoryId":45,"CategoryName":"Account Security"},{"__type":"Nc:SimpleKB:Abstractions:Dtos:CategoryItemDto","ParentCategoryId":34,"TreatAsTopicYN":false,"Description":"","ImageUrl":"","ShortDesc":"","CategoryId":46,"CategoryName":"Domain Management"},{"__type":"Nc:SimpleKB:Abstractions:Dtos:CategoryItemDto","ParentCategoryId":2211,"TreatAsTopicYN":false,"Description":"","ImageUrl":"","ShortDesc":"","CategoryId":63,"CategoryName":"Namecheap API"},{"__type":"Nc:SimpleKB:Abstractions:Dtos:CategoryItemDto","ParentCategoryId":2228,"TreatAsTopicYN":false,"Description":"","ImageUrl":"","ShortDesc":"","CategoryId":177,"CategoryName":"Google Workspace (formerly G Suite)"},{"__type":"Nc:SimpleKB:Abstractions:Dtos:CategoryItemDto","ParentCategoryId":93,"TreatAsTopicYN":false,"Description":"","ImageUrl":"","ShortDesc":"","CategoryId":2179,"CategoryName":"Private Email: General Information"},{"__type":"Nc:SimpleKB:Abstractions:Dtos:CategoryItemDto","ParentCategoryId":2265,"TreatAsTopicYN":false,"Description":"","ImageUrl":"","ShortDesc":"","CategoryId":2274,"CategoryName":"General"},{"__type":"Nc:SimpleKB:Abstractions:Dtos:CategoryItemDto","ParentCategoryId":2239,"TreatAsTopicYN":false,"Description":"","ImageUrl":"","ShortDesc":"","CategoryId":2280,"CategoryName":"Getting Started"},{"__type":"Nc:SimpleKB:Abstractions:Dtos:CategoryItemDto","ParentCategoryId":2239,"TreatAsTopicYN":false,"Description":"","ImageUrl":"","ShortDesc":"","CategoryId":2279,"CategoryName":"General Information"},{"__type":"Nc:SimpleKB:Abstractions:Dtos:CategoryItemDto","ParentCategoryId":93,"TreatAsTopicYN":false,"Description":"","ImageUrl":"","ShortDesc":"","CategoryId":2215,"CategoryName":"Private Email: Mailbox Management"},{"__type":"Nc:SimpleKB:Abstractions:Dtos:CategoryItemDto","ParentCategoryId":2211,"TreatAsTopicYN":false,"Description":"","ImageUrl":"","ShortDesc":"","CategoryId":2196,"CategoryName":"WHMCS module for SSL"},{"__type":"Nc:SimpleKB:Abstractions:Dtos:CategoryItemDto","ParentCategoryId":0,"TreatAsTopicYN":false,"Description":"","ImageUrl":"/assets/img/pictograms/150/savings-red.png","ShortDesc":"","CategoryId":2200,"CategoryName":"Checkout & Billing","SubCategories":[{"__type":"Nc:SimpleKB:Abstractions:Dtos:CategoryItemDto","ParentCategoryId":2200,"TreatAsTopicYN":false,"Description":"","ImageUrl":"","ShortDesc":"","CategoryId":7,"CategoryName":"Billing FAQ"},{"__type":"Nc:SimpleKB:Abstractions:Dtos:CategoryItemDto","ParentCategoryId":2200,"TreatAsTopicYN":false,"Description":"","ImageUrl":"","ShortDesc":"","CategoryId":2201,"CategoryName":"Domains Billing"},{"__type":"Nc:SimpleKB:Abstractions:Dtos:CategoryItemDto","ParentCategoryId":2200,"TreatAsTopicYN":false,"Description":"","ImageUrl":"","ShortDesc":"","CategoryId":21,"CategoryName":"Hosting Billing"},{"__type":"Nc:SimpleKB:Abstractions:Dtos:CategoryItemDto","ParentCategoryId":2200,"TreatAsTopicYN":false,"Description":"","ImageUrl":"","ShortDesc":"","CategoryId":71,"CategoryName":"SSL Certificates Billing"},{"__type":"Nc:SimpleKB:Abstractions:Dtos:CategoryItemDto","ParentCategoryId":2200,"TreatAsTopicYN":false,"Description":"","ImageUrl":"","ShortDesc":"","CategoryId":2177,"CategoryName":"Private Email"}]},{"__type":"Nc:SimpleKB:Abstractions:Dtos:CategoryItemDto","ParentCategoryId":2200,"TreatAsTopicYN":false,"Description":"","ImageUrl":"","ShortDesc":"","CategoryId":2201,"CategoryName":"Domains Billing"},{"__type":"Nc:SimpleKB:Abstractions:Dtos:CategoryItemDto","ParentCategoryId":14,"TreatAsTopicYN":false,"Description":"","ImageUrl":"","ShortDesc":"","CategoryId":67,"CategoryName":"Activation"},{"__type":"Nc:SimpleKB:Abstractions:Dtos:CategoryItemDto","ParentCategoryId":2209,"TreatAsTopicYN":false,"Description":"","ImageUrl":"","ShortDesc":"","CategoryId":83,"CategoryName":"Transfer to Namecheap"},{"__type":"Nc:SimpleKB:Abstractions:Dtos:CategoryItemDto","ParentCategoryId":9,"TreatAsTopicYN":false,"Description":"","ImageUrl":"","ShortDesc":"","CategoryId":43,"CategoryName":"Profile Management"},{"__type":"Nc:SimpleKB:Abstractions:Dtos:CategoryItemDto","ParentCategoryId":34,"TreatAsTopicYN":false,"Description":"","ImageUrl":"","ShortDesc":"","CategoryId":10,"CategoryName":"DNS Questions"},{"__type":"Nc:SimpleKB:Abstractions:Dtos:CategoryItemDto","ParentCategoryId":12,"TreatAsTopicYN":false,"Description":"","ImageUrl":"","ShortDesc":"","CategoryId":29,"CategoryName":"cPanel questions"},{"__type":"Nc:SimpleKB:Abstractions:Dtos:CategoryItemDto","ParentCategoryId":2200,"TreatAsTopicYN":false,"Description":"","ImageUrl":"","ShortDesc":"","CategoryId":21,"CategoryName":"Hosting Billing"},{"__type":"Nc:SimpleKB:Abstractions:Dtos:CategoryItemDto","ParentCategoryId":34,"TreatAsTopicYN":false,"Description":"","ImageUrl":"","ShortDesc":"","CategoryId":11,"CategoryName":"Dynamic DNS"},{"__type":"Nc:SimpleKB:Abstractions:Dtos:CategoryItemDto","ParentCategoryId":9,"TreatAsTopicYN":false,"Description":"","ImageUrl":"","ShortDesc":"","CategoryId":44,"CategoryName":"Account Access"},{"__type":"Nc:SimpleKB:Abstractions:Dtos:CategoryItemDto","ParentCategoryId":2209,"TreatAsTopicYN":false,"Description":"","ImageUrl":"","ShortDesc":"","CategoryId":84,"CategoryName":"Transfer to another provider"},{"__type":"Nc:SimpleKB:Abstractions:Dtos:CategoryItemDto","ParentCategoryId":14,"TreatAsTopicYN":false,"Description":"","ImageUrl":"","ShortDesc":"","CategoryId":68,"CategoryName":"Validation"},{"__type":"Nc:SimpleKB:Abstractions:Dtos:CategoryItemDto","ParentCategoryId":12,"TreatAsTopicYN":false,"Description":"","ImageUrl":"","ShortDesc":"","CategoryId":2182,"CategoryName":"cPanel: Software Management"},{"__type":"Nc:SimpleKB:Abstractions:Dtos:CategoryItemDto","ParentCategoryId":93,"TreatAsTopicYN":false,"Description":"","ImageUrl":"","ShortDesc":"","CategoryId":2214,"CategoryName":"Email Forwarding"},{"__type":"Nc:SimpleKB:Abstractions:Dtos:CategoryItemDto","ParentCategoryId":2265,"TreatAsTopicYN":false,"Description":"","ImageUrl":"","ShortDesc":"","CategoryId":2270,"CategoryName":"Routers"},{"__type":"Nc:SimpleKB:Abstractions:Dtos:CategoryItemDto","ParentCategoryId":2239,"TreatAsTopicYN":false,"Description":"","ImageUrl":"","ShortDesc":"","CategoryId":2281,"CategoryName":"WordPress Migration"},{"__type":"Nc:SimpleKB:Abstractions:Dtos:CategoryItemDto","ParentCategoryId":2239,"TreatAsTopicYN":false,"Description":"","ImageUrl":"","ShortDesc":"","CategoryId":2282,"CategoryName":"Plugins and Themes"},{"__type":"Nc:SimpleKB:Abstractions:Dtos:CategoryItemDto","ParentCategoryId":2265,"TreatAsTopicYN":false,"Description":"","ImageUrl":"","ShortDesc":"","CategoryId":2272,"CategoryName":"TV"},{"__type":"Nc:SimpleKB:Abstractions:Dtos:CategoryItemDto","ParentCategoryId":12,"TreatAsTopicYN":false,"Description":"","ImageUrl":"","ShortDesc":"","CategoryId":2187,"CategoryName":"cPanel: WordPress"},{"__type":"Nc:SimpleKB:Abstractions:Dtos:CategoryItemDto","ParentCategoryId":2209,"TreatAsTopicYN":false,"Description":"","ImageUrl":"","ShortDesc":"","CategoryId":219,"CategoryName":"Canceled Transfers"},{"__type":"Nc:SimpleKB:Abstractions:Dtos:CategoryItemDto","ParentCategoryId":2200,"TreatAsTopicYN":false,"Description":"","ImageUrl":"","ShortDesc":"","CategoryId":71,"CategoryName":"SSL Certificates Billing"},{"__type":"Nc:SimpleKB:Abstractions:Dtos:CategoryItemDto","ParentCategoryId":93,"TreatAsTopicYN":false,"Description":"","ImageUrl":"","ShortDesc":"","CategoryId":2176,"CategoryName":"Private Email: DNS Settings"},{"__type":"Nc:SimpleKB:Abstractions:Dtos:CategoryItemDto","ParentCategoryId":14,"TreatAsTopicYN":false,"Description":"","ImageUrl":"","ShortDesc":"","CategoryId":69,"CategoryName":"Installation"},{"__type":"Nc:SimpleKB:Abstractions:Dtos:CategoryItemDto","ParentCategoryId":0,"TreatAsTopicYN":false,"Description":"","ImageUrl":"/assets/img/pictograms/150/reseller-red.png","ShortDesc":"","CategoryId":34,"CategoryName":"Domains","SubCategories":[{"__type":"Nc:SimpleKB:Abstractions:Dtos:CategoryItemDto","ParentCategoryId":34,"TreatAsTopicYN":false,"Description":"","ImageUrl":"","ShortDesc":"","CategoryId":2232,"CategoryName":"DNSSEC"},{"__type":"Nc:SimpleKB:Abstractions:Dtos:CategoryItemDto","ParentCategoryId":34,"TreatAsTopicYN":false,"Description":"","ImageUrl":"","ShortDesc":"","CategoryId":2234,"CategoryName":"Google Workspace (formerly G Suite)"},{"__type":"Nc:SimpleKB:Abstractions:Dtos:CategoryItemDto","ParentCategoryId":34,"TreatAsTopicYN":false,"Description":"","ImageUrl":"","ShortDesc":"","CategoryId":2237,"CategoryName":"Host records setup"},{"__type":"Nc:SimpleKB:Abstractions:Dtos:CategoryItemDto","ParentCategoryId":34,"TreatAsTopicYN":false,"Description":"","ImageUrl":"","ShortDesc":"","CategoryId":46,"CategoryName":"Domain Management"},{"__type":"Nc:SimpleKB:Abstractions:Dtos:CategoryItemDto","ParentCategoryId":34,"TreatAsTopicYN":false,"Description":"","ImageUrl":"","ShortDesc":"","CategoryId":10,"CategoryName":"DNS Questions"},{"__type":"Nc:SimpleKB:Abstractions:Dtos:CategoryItemDto","ParentCategoryId":34,"TreatAsTopicYN":false,"Description":"","ImageUrl":"","ShortDesc":"","CategoryId":11,"CategoryName":"Dynamic DNS"},{"__type":"Nc:SimpleKB:Abstractions:Dtos:CategoryItemDto","ParentCategoryId":34,"TreatAsTopicYN":false,"Description":"","ImageUrl":"","ShortDesc":"","CategoryId":35,"CategoryName":"Registrations"},{"__type":"Nc:SimpleKB:Abstractions:Dtos:CategoryItemDto","ParentCategoryId":34,"TreatAsTopicYN":false,"Description":"","ImageUrl":"","ShortDesc":"","CategoryId":2207,"CategoryName":"Renewal questions"},{"__type":"Nc:SimpleKB:Abstractions:Dtos:CategoryItemDto","ParentCategoryId":34,"TreatAsTopicYN":false,"Description":"","ImageUrl":"","ShortDesc":"","CategoryId":36,"CategoryName":"Domains with extended attributes"},{"__type":"Nc:SimpleKB:Abstractions:Dtos:CategoryItemDto","ParentCategoryId":34,"TreatAsTopicYN":false,"Description":"","ImageUrl":"","ShortDesc":"","CategoryId":51,"CategoryName":"FreeDNS"},{"__type":"Nc:SimpleKB:Abstractions:Dtos:CategoryItemDto","ParentCategoryId":34,"TreatAsTopicYN":false,"Description":"","ImageUrl":"","ShortDesc":"","CategoryId":15,"CategoryName":"Namecheap Market"},{"__type":"Nc:SimpleKB:Abstractions:Dtos:CategoryItemDto","ParentCategoryId":34,"TreatAsTopicYN":false,"Description":"","ImageUrl":"","ShortDesc":"","CategoryId":2208,"CategoryName":"3rd Party Services Setup"},{"__type":"Nc:SimpleKB:Abstractions:Dtos:CategoryItemDto","ParentCategoryId":34,"TreatAsTopicYN":false,"Description":"","ImageUrl":"","ShortDesc":"","CategoryId":2278,"CategoryName":"Handshake TLDs"}]},{"__type":"Nc:SimpleKB:Abstractions:Dtos:CategoryItemDto","ParentCategoryId":34,"TreatAsTopicYN":false,"Description":"","ImageUrl":"","ShortDesc":"","CategoryId":35,"CategoryName":"Registrations"},{"__type":"Nc:SimpleKB:Abstractions:Dtos:CategoryItemDto","ParentCategoryId":14,"TreatAsTopicYN":false,"Description":"","ImageUrl":"","ShortDesc":"","CategoryId":70,"CategoryName":"Reissuance"},{"__type":"Nc:SimpleKB:Abstractions:Dtos:CategoryItemDto","ParentCategoryId":0,"TreatAsTopicYN":false,"Description":"","ImageUrl":"/assets/img/pictograms/150/protection-red.png","ShortDesc":"","CategoryId":37,"CategoryName":"Domain Privacy Protection","SubCategories":[]},{"__type":"Nc:SimpleKB:Abstractions:Dtos:CategoryItemDto","ParentCategoryId":2200,"TreatAsTopicYN":false,"Description":"","ImageUrl":"","ShortDesc":"","CategoryId":2177,"CategoryName":"Private Email"},{"__type":"Nc:SimpleKB:Abstractions:Dtos:CategoryItemDto","ParentCategoryId":93,"TreatAsTopicYN":false,"Description":"","ImageUrl":"","ShortDesc":"","CategoryId":2178,"CategoryName":"Private Email: Webmail Features"},{"__type":"Nc:SimpleKB:Abstractions:Dtos:CategoryItemDto","ParentCategoryId":34,"TreatAsTopicYN":false,"Description":"","ImageUrl":"","ShortDesc":"","CategoryId":2207,"CategoryName":"Renewal questions"},{"__type":"Nc:SimpleKB:Abstractions:Dtos:CategoryItemDto","ParentCategoryId":12,"TreatAsTopicYN":false,"Description":"","ImageUrl":"","ShortDesc":"","CategoryId":2210,"CategoryName":"cPanel Add-ons"},{"__type":"Nc:SimpleKB:Abstractions:Dtos:CategoryItemDto","ParentCategoryId":2265,"TreatAsTopicYN":false,"Description":"","ImageUrl":"","ShortDesc":"","CategoryId":2273,"CategoryName":"Gaming Consoles"},{"__type":"Nc:SimpleKB:Abstractions:Dtos:CategoryItemDto","ParentCategoryId":2239,"TreatAsTopicYN":false,"Description":"","ImageUrl":"","ShortDesc":"","CategoryId":2284,"CategoryName":"WordPress Management"},{"__type":"Nc:SimpleKB:Abstractions:Dtos:CategoryItemDto","ParentCategoryId":2239,"TreatAsTopicYN":false,"Description":"","ImageUrl":"","ShortDesc":"","CategoryId":2285,"CategoryName":"SFTP and Database access"},{"__type":"Nc:SimpleKB:Abstractions:Dtos:CategoryItemDto","ParentCategoryId":2265,"TreatAsTopicYN":false,"Description":"","ImageUrl":"","ShortDesc":"","CategoryId":2268,"CategoryName":"macOS"},{"__type":"Nc:SimpleKB:Abstractions:Dtos:CategoryItemDto","ParentCategoryId":93,"TreatAsTopicYN":false,"Description":"","ImageUrl":"","ShortDesc":"","CategoryId":2175,"CategoryName":"Private Email: Client Setup"},{"__type":"Nc:SimpleKB:Abstractions:Dtos:CategoryItemDto","ParentCategoryId":0,"TreatAsTopicYN":false,"Description":"","ImageUrl":"/assets/img/pictograms/150/status-red.png","ShortDesc":"","CategoryId":2209,"CategoryName":"Domain Transfers","SubCategories":[{"__type":"Nc:SimpleKB:Abstractions:Dtos:CategoryItemDto","ParentCategoryId":2209,"TreatAsTopicYN":false,"Description":"","ImageUrl":"","ShortDesc":"","CategoryId":8,"CategoryName":"Transfer Information"},{"__type":"Nc:SimpleKB:Abstractions:Dtos:CategoryItemDto","ParentCategoryId":2209,"TreatAsTopicYN":false,"Description":"","ImageUrl":"","ShortDesc":"","CategoryId":83,"CategoryName":"Transfer to Namecheap"},{"__type":"Nc:SimpleKB:Abstractions:Dtos:CategoryItemDto","ParentCategoryId":2209,"TreatAsTopicYN":false,"Description":"","ImageUrl":"","ShortDesc":"","CategoryId":84,"CategoryName":"Transfer to another provider"},{"__type":"Nc:SimpleKB:Abstractions:Dtos:CategoryItemDto","ParentCategoryId":2209,"TreatAsTopicYN":false,"Description":"","ImageUrl":"","ShortDesc":"","CategoryId":219,"CategoryName":"Canceled Transfers"}]},{"__type":"Nc:SimpleKB:Abstractions:Dtos:CategoryItemDto","ParentCategoryId":12,"TreatAsTopicYN":false,"Description":"","ImageUrl":"","ShortDesc":"","CategoryId":48,"CategoryName":"VPS"},{"__type":"Nc:SimpleKB:Abstractions:Dtos:CategoryItemDto","ParentCategoryId":34,"TreatAsTopicYN":false,"Description":"","ImageUrl":"","ShortDesc":"","CategoryId":36,"CategoryName":"Domains with extended attributes"},{"__type":"Nc:SimpleKB:Abstractions:Dtos:CategoryItemDto","ParentCategoryId":0,"TreatAsTopicYN":true,"Description":"","ImageUrl":"/assets/img/pictograms/150/server-red.png","ShortDesc":"","CategoryId":12,"CategoryName":"Hosting","SubCategories":[{"__type":"Nc:SimpleKB:Abstractions:Dtos:CategoryItemDto","ParentCategoryId":12,"TreatAsTopicYN":false,"Description":"","ImageUrl":"","ShortDesc":"","CategoryId":2219,"CategoryName":"PHP Configuration"},{"__type":"Nc:SimpleKB:Abstractions:Dtos:CategoryItemDto","ParentCategoryId":12,"TreatAsTopicYN":false,"Description":"","ImageUrl":"","ShortDesc":"","CategoryId":2225,"CategoryName":"SEO"},{"__type":"Nc:SimpleKB:Abstractions:Dtos:CategoryItemDto","ParentCategoryId":12,"TreatAsTopicYN":false,"Description":"","ImageUrl":"","ShortDesc":"","CategoryId":2252,"CategoryName":"InterWorx questions"},{"__type":"Nc:SimpleKB:Abstractions:Dtos:CategoryItemDto","ParentCategoryId":12,"TreatAsTopicYN":false,"Description":"","ImageUrl":"","ShortDesc":"","CategoryId":2291,"CategoryName":"Webuzo questions"},{"__type":"Nc:SimpleKB:Abstractions:Dtos:CategoryItemDto","ParentCategoryId":12,"TreatAsTopicYN":false,"Description":"","ImageUrl":"","ShortDesc":"","CategoryId":27,"CategoryName":"Getting Started"},{"__type":"Nc:SimpleKB:Abstractions:Dtos:CategoryItemDto","ParentCategoryId":12,"TreatAsTopicYN":false,"Description":"","ImageUrl":"","ShortDesc":"","CategoryId":22,"CategoryName":"Hosting Information"},{"__type":"Nc:SimpleKB:Abstractions:Dtos:CategoryItemDto","ParentCategoryId":12,"TreatAsTopicYN":false,"Description":"","ImageUrl":"","ShortDesc":"","CategoryId":29,"CategoryName":"cPanel questions"},{"__type":"Nc:SimpleKB:Abstractions:Dtos:CategoryItemDto","ParentCategoryId":12,"TreatAsTopicYN":false,"Description":"","ImageUrl":"","ShortDesc":"","CategoryId":2182,"CategoryName":"cPanel: Software Management"},{"__type":"Nc:SimpleKB:Abstractions:Dtos:CategoryItemDto","ParentCategoryId":12,"TreatAsTopicYN":false,"Description":"","ImageUrl":"","ShortDesc":"","CategoryId":2187,"CategoryName":"cPanel: WordPress"},{"__type":"Nc:SimpleKB:Abstractions:Dtos:CategoryItemDto","ParentCategoryId":12,"TreatAsTopicYN":false,"Description":"","ImageUrl":"","ShortDesc":"","CategoryId":2210,"CategoryName":"cPanel Add-ons"},{"__type":"Nc:SimpleKB:Abstractions:Dtos:CategoryItemDto","ParentCategoryId":12,"TreatAsTopicYN":false,"Description":"","ImageUrl":"","ShortDesc":"","CategoryId":48,"CategoryName":"VPS"},{"__type":"Nc:SimpleKB:Abstractions:Dtos:CategoryItemDto","ParentCategoryId":12,"TreatAsTopicYN":false,"Description":"","ImageUrl":"","ShortDesc":"","CategoryId":2188,"CategoryName":"Dedicated Server"},{"__type":"Nc:SimpleKB:Abstractions:Dtos:CategoryItemDto","ParentCategoryId":12,"TreatAsTopicYN":false,"Description":"","ImageUrl":"","ShortDesc":"","CategoryId":30,"CategoryName":"WHM questions"},{"__type":"Nc:SimpleKB:Abstractions:Dtos:CategoryItemDto","ParentCategoryId":12,"TreatAsTopicYN":false,"Description":"","ImageUrl":"","ShortDesc":"","CategoryId":32,"CategoryName":"DNS settings"},{"__type":"Nc:SimpleKB:Abstractions:Dtos:CategoryItemDto","ParentCategoryId":12,"TreatAsTopicYN":false,"Description":"","ImageUrl":"","ShortDesc":"","CategoryId":103,"CategoryName":"LVE (CloudLinux)"},{"__type":"Nc:SimpleKB:Abstractions:Dtos:CategoryItemDto","ParentCategoryId":12,"TreatAsTopicYN":false,"Description":"","ImageUrl":"","ShortDesc":"","CategoryId":89,"CategoryName":"SSH Access"},{"__type":"Nc:SimpleKB:Abstractions:Dtos:CategoryItemDto","ParentCategoryId":12,"TreatAsTopicYN":false,"Description":"","ImageUrl":"","ShortDesc":"","CategoryId":205,"CategoryName":"FTP questions"},{"__type":"Nc:SimpleKB:Abstractions:Dtos:CategoryItemDto","ParentCategoryId":12,"TreatAsTopicYN":false,"Description":"","ImageUrl":"","ShortDesc":"","CategoryId":2180,"CategoryName":"MySQL questions"},{"__type":"Nc:SimpleKB:Abstractions:Dtos:CategoryItemDto","ParentCategoryId":12,"TreatAsTopicYN":false,"Description":"","ImageUrl":"","ShortDesc":"","CategoryId":2199,"CategoryName":"Hosting Migration"},{"__type":"Nc:SimpleKB:Abstractions:Dtos:CategoryItemDto","ParentCategoryId":12,"TreatAsTopicYN":false,"Description":"","ImageUrl":"","ShortDesc":"","CategoryId":2194,"CategoryName":"Tips & Tricks"},{"__type":"Nc:SimpleKB:Abstractions:Dtos:CategoryItemDto","ParentCategoryId":12,"TreatAsTopicYN":false,"Description":"","ImageUrl":"","ShortDesc":"","CategoryId":239,"CategoryName":"WHMCS"},{"__type":"Nc:SimpleKB:Abstractions:Dtos:CategoryItemDto","ParentCategoryId":12,"TreatAsTopicYN":false,"Description":"","ImageUrl":"","ShortDesc":"","CategoryId":33,"CategoryName":"SSL Installation"}]},{"__type":"Nc:SimpleKB:Abstractions:Dtos:CategoryItemDto","ParentCategoryId":93,"TreatAsTopicYN":false,"Description":"","ImageUrl":"","ShortDesc":"","CategoryId":2171,"CategoryName":"Private Email: Active Sync (Exchange) Setup"},{"__type":"Nc:SimpleKB:Abstractions:Dtos:CategoryItemDto","ParentCategoryId":12,"TreatAsTopicYN":false,"Description":"","ImageUrl":"","ShortDesc":"","CategoryId":2188,"CategoryName":"Dedicated Server"},{"__type":"Nc:SimpleKB:Abstractions:Dtos:CategoryItemDto","ParentCategoryId":2265,"TreatAsTopicYN":false,"Description":"","ImageUrl":"","ShortDesc":"","CategoryId":2269,"CategoryName":"iOS"},{"__type":"Nc:SimpleKB:Abstractions:Dtos:CategoryItemDto","ParentCategoryId":2239,"TreatAsTopicYN":false,"Description":"","ImageUrl":"","ShortDesc":"","CategoryId":2286,"CategoryName":"Domains questions"},{"__type":"Nc:SimpleKB:Abstractions:Dtos:CategoryItemDto","ParentCategoryId":2239,"TreatAsTopicYN":false,"Description":"","ImageUrl":"","ShortDesc":"","CategoryId":2288,"CategoryName":"Billing questions"},{"__type":"Nc:SimpleKB:Abstractions:Dtos:CategoryItemDto","ParentCategoryId":2265,"TreatAsTopicYN":false,"Description":"","ImageUrl":"","ShortDesc":"","CategoryId":2271,"CategoryName":"Linux"},{"__type":"Nc:SimpleKB:Abstractions:Dtos:CategoryItemDto","ParentCategoryId":12,"TreatAsTopicYN":false,"Description":"","ImageUrl":"","ShortDesc":"","CategoryId":30,"CategoryName":"WHM questions"},{"__type":"Nc:SimpleKB:Abstractions:Dtos:CategoryItemDto","ParentCategoryId":93,"TreatAsTopicYN":false,"Description":"","ImageUrl":"","ShortDesc":"","CategoryId":31,"CategoryName":"cPanel Email FAQs"},{"__type":"Nc:SimpleKB:Abstractions:Dtos:CategoryItemDto","ParentCategoryId":34,"TreatAsTopicYN":false,"Description":"","ImageUrl":"","ShortDesc":"","CategoryId":51,"CategoryName":"FreeDNS"},{"__type":"Nc:SimpleKB:Abstractions:Dtos:CategoryItemDto","ParentCategoryId":0,"TreatAsTopicYN":false,"Description":"","ImageUrl":"/assets/img/pictograms/150/email-red.png","ShortDesc":"","CategoryId":93,"CategoryName":"Email service","SubCategories":[{"__type":"Nc:SimpleKB:Abstractions:Dtos:CategoryItemDto","ParentCategoryId":93,"TreatAsTopicYN":false,"Description":"","ImageUrl":"","ShortDesc":"","CategoryId":2216,"CategoryName":"Spam Protection"},{"__type":"Nc:SimpleKB:Abstractions:Dtos:CategoryItemDto","ParentCategoryId":93,"TreatAsTopicYN":false,"Description":"","ImageUrl":"","ShortDesc":"","CategoryId":2226,"CategoryName":"Email Migration"},{"__type":"Nc:SimpleKB:Abstractions:Dtos:CategoryItemDto","ParentCategoryId":93,"TreatAsTopicYN":false,"Description":"","ImageUrl":"","ShortDesc":"","CategoryId":2260,"CategoryName":"Private Email Contacts and Calendars Setup"},{"__type":"Nc:SimpleKB:Abstractions:Dtos:CategoryItemDto","ParentCategoryId":93,"TreatAsTopicYN":false,"Description":"","ImageUrl":"","ShortDesc":"","CategoryId":2179,"CategoryName":"Private Email: General Information"},{"__type":"Nc:SimpleKB:Abstractions:Dtos:CategoryItemDto","ParentCategoryId":93,"TreatAsTopicYN":false,"Description":"","ImageUrl":"","ShortDesc":"","CategoryId":2215,"CategoryName":"Private Email: Mailbox Management"},{"__type":"Nc:SimpleKB:Abstractions:Dtos:CategoryItemDto","ParentCategoryId":93,"TreatAsTopicYN":false,"Description":"","ImageUrl":"","ShortDesc":"","CategoryId":2214,"CategoryName":"Email Forwarding"},{"__type":"Nc:SimpleKB:Abstractions:Dtos:CategoryItemDto","ParentCategoryId":93,"TreatAsTopicYN":false,"Description":"","ImageUrl":"","ShortDesc":"","CategoryId":2176,"CategoryName":"Private Email: DNS Settings"},{"__type":"Nc:SimpleKB:Abstractions:Dtos:CategoryItemDto","ParentCategoryId":93,"TreatAsTopicYN":false,"Description":"","ImageUrl":"","ShortDesc":"","CategoryId":2178,"CategoryName":"Private Email: Webmail Features"},{"__type":"Nc:SimpleKB:Abstractions:Dtos:CategoryItemDto","ParentCategoryId":93,"TreatAsTopicYN":false,"Description":"","ImageUrl":"","ShortDesc":"","CategoryId":2175,"CategoryName":"Private Email: Client Setup"},{"__type":"Nc:SimpleKB:Abstractions:Dtos:CategoryItemDto","ParentCategoryId":93,"TreatAsTopicYN":false,"Description":"","ImageUrl":"","ShortDesc":"","CategoryId":2171,"CategoryName":"Private Email: Active Sync (Exchange) Setup"},{"__type":"Nc:SimpleKB:Abstractions:Dtos:CategoryItemDto","ParentCategoryId":93,"TreatAsTopicYN":false,"Description":"","ImageUrl":"","ShortDesc":"","CategoryId":31,"CategoryName":"cPanel Email FAQs"},{"__type":"Nc:SimpleKB:Abstractions:Dtos:CategoryItemDto","ParentCategoryId":93,"TreatAsTopicYN":false,"Description":"","ImageUrl":"","ShortDesc":"","CategoryId":2186,"CategoryName":"cPanel Email: Client Setup"},{"__type":"Nc:SimpleKB:Abstractions:Dtos:CategoryItemDto","ParentCategoryId":93,"TreatAsTopicYN":false,"Description":"","ImageUrl":"","ShortDesc":"","CategoryId":2204,"CategoryName":"Private Email: Video Overview"}]},{"__type":"Nc:SimpleKB:Abstractions:Dtos:CategoryItemDto","ParentCategoryId":12,"TreatAsTopicYN":false,"Description":"","ImageUrl":"","ShortDesc":"","CategoryId":32,"CategoryName":"DNS settings"},{"__type":"Nc:SimpleKB:Abstractions:Dtos:CategoryItemDto","ParentCategoryId":34,"TreatAsTopicYN":false,"Description":"","ImageUrl":"","ShortDesc":"","CategoryId":15,"CategoryName":"Namecheap Market"},{"__type":"Nc:SimpleKB:Abstractions:Dtos:CategoryItemDto","ParentCategoryId":93,"TreatAsTopicYN":false,"Description":"","ImageUrl":"","ShortDesc":"","CategoryId":2186,"CategoryName":"cPanel Email: Client Setup"},{"__type":"Nc:SimpleKB:Abstractions:Dtos:CategoryItemDto","ParentCategoryId":2265,"TreatAsTopicYN":false,"Description":"","ImageUrl":"","ShortDesc":"","CategoryId":2266,"CategoryName":"Windows"},{"__type":"Nc:SimpleKB:Abstractions:Dtos:CategoryItemDto","ParentCategoryId":2239,"TreatAsTopicYN":false,"Description":"","ImageUrl":"","ShortDesc":"","CategoryId":2287,"CategoryName":"SSL questions"},{"__type":"Nc:SimpleKB:Abstractions:Dtos:CategoryItemDto","ParentCategoryId":2265,"TreatAsTopicYN":false,"Description":"","ImageUrl":"","ShortDesc":"","CategoryId":2267,"CategoryName":"Android"},{"__type":"Nc:SimpleKB:Abstractions:Dtos:CategoryItemDto","ParentCategoryId":34,"TreatAsTopicYN":false,"Description":"","ImageUrl":"","ShortDesc":"","CategoryId":2208,"CategoryName":"3rd Party Services Setup"},{"__type":"Nc:SimpleKB:Abstractions:Dtos:CategoryItemDto","ParentCategoryId":93,"TreatAsTopicYN":false,"Description":"","ImageUrl":"","ShortDesc":"","CategoryId":2204,"CategoryName":"Private Email: Video Overview"},{"__type":"Nc:SimpleKB:Abstractions:Dtos:CategoryItemDto","ParentCategoryId":0,"TreatAsTopicYN":false,"Description":"","ImageUrl":"/assets/img/pictograms/150/security-red.png","ShortDesc":"","CategoryId":14,"CategoryName":"SSL Certificates","SubCategories":[{"__type":"Nc:SimpleKB:Abstractions:Dtos:CategoryItemDto","ParentCategoryId":14,"TreatAsTopicYN":false,"Description":"","ImageUrl":"","ShortDesc":"","CategoryId":2217,"CategoryName":"Renewal"},{"__type":"Nc:SimpleKB:Abstractions:Dtos:CategoryItemDto","ParentCategoryId":14,"TreatAsTopicYN":false,"Description":"","ImageUrl":"","ShortDesc":"","CategoryId":2218,"CategoryName":"cPanel SSL Plugin"},{"__type":"Nc:SimpleKB:Abstractions:Dtos:CategoryItemDto","ParentCategoryId":14,"TreatAsTopicYN":false,"Description":"","ImageUrl":"","ShortDesc":"","CategoryId":2221,"CategoryName":"Multi-Domain SSL Certificates"},{"__type":"Nc:SimpleKB:Abstractions:Dtos:CategoryItemDto","ParentCategoryId":14,"TreatAsTopicYN":false,"Description":"","ImageUrl":"","ShortDesc":"","CategoryId":2222,"CategoryName":"Cancellation"},{"__type":"Nc:SimpleKB:Abstractions:Dtos:CategoryItemDto","ParentCategoryId":14,"TreatAsTopicYN":false,"Description":"","ImageUrl":"","ShortDesc":"","CategoryId":2223,"CategoryName":"Browser errors"},{"__type":"Nc:SimpleKB:Abstractions:Dtos:CategoryItemDto","ParentCategoryId":14,"TreatAsTopicYN":false,"Description":"","ImageUrl":"","ShortDesc":"","CategoryId":2224,"CategoryName":"Site Seal, Logo"},{"__type":"Nc:SimpleKB:Abstractions:Dtos:CategoryItemDto","ParentCategoryId":14,"TreatAsTopicYN":false,"Description":"","ImageUrl":"","ShortDesc":"","CategoryId":2238,"CategoryName":"SSL installation errors"},{"__type":"Nc:SimpleKB:Abstractions:Dtos:CategoryItemDto","ParentCategoryId":14,"TreatAsTopicYN":false,"Description":"","ImageUrl":"","ShortDesc":"","CategoryId":2290,"CategoryName":"CSR code"},{"__type":"Nc:SimpleKB:Abstractions:Dtos:CategoryItemDto","ParentCategoryId":14,"TreatAsTopicYN":false,"Description":"","ImageUrl":"","ShortDesc":"","CategoryId":2293,"CategoryName":"Automated SSL management"},{"__type":"Nc:SimpleKB:Abstractions:Dtos:CategoryItemDto","ParentCategoryId":14,"TreatAsTopicYN":false,"Description":"","ImageUrl":"","ShortDesc":"","CategoryId":38,"CategoryName":"SSL General"},{"__type":"Nc:SimpleKB:Abstractions:Dtos:CategoryItemDto","ParentCategoryId":14,"TreatAsTopicYN":false,"Description":"","ImageUrl":"","ShortDesc":"","CategoryId":67,"CategoryName":"Activation"},{"__type":"Nc:SimpleKB:Abstractions:Dtos:CategoryItemDto","ParentCategoryId":14,"TreatAsTopicYN":false,"Description":"","ImageUrl":"","ShortDesc":"","CategoryId":68,"CategoryName":"Validation"},{"__type":"Nc:SimpleKB:Abstractions:Dtos:CategoryItemDto","ParentCategoryId":14,"TreatAsTopicYN":false,"Description":"","ImageUrl":"","ShortDesc":"","CategoryId":69,"CategoryName":"Installation"},{"__type":"Nc:SimpleKB:Abstractions:Dtos:CategoryItemDto","ParentCategoryId":14,"TreatAsTopicYN":false,"Description":"","ImageUrl":"","ShortDesc":"","CategoryId":70,"CategoryName":"Reissuance"}]},{"__type":"Nc:SimpleKB:Abstractions:Dtos:CategoryItemDto","ParentCategoryId":0,"TreatAsTopicYN":true,"Description":"","ImageUrl":"/assets/img/pictograms/150/performance-red.png","ShortDesc":"","CategoryId":9,"CategoryName":"My Account","SubCategories":[{"__type":"Nc:SimpleKB:Abstractions:Dtos:CategoryItemDto","ParentCategoryId":9,"TreatAsTopicYN":false,"Description":"","ImageUrl":"","ShortDesc":"","CategoryId":45,"CategoryName":"Account Security"},{"__type":"Nc:SimpleKB:Abstractions:Dtos:CategoryItemDto","ParentCategoryId":9,"TreatAsTopicYN":false,"Description":"","ImageUrl":"","ShortDesc":"","CategoryId":43,"CategoryName":"Profile Management"},{"__type":"Nc:SimpleKB:Abstractions:Dtos:CategoryItemDto","ParentCategoryId":9,"TreatAsTopicYN":false,"Description":"","ImageUrl":"","ShortDesc":"","CategoryId":44,"CategoryName":"Account Access"}]},{"__type":"Nc:SimpleKB:Abstractions:Dtos:CategoryItemDto","ParentCategoryId":34,"TreatAsTopicYN":false,"Description":"","ImageUrl":"","ShortDesc":"","CategoryId":2278,"CategoryName":"Handshake TLDs"},{"__type":"Nc:SimpleKB:Abstractions:Dtos:CategoryItemDto","ParentCategoryId":12,"TreatAsTopicYN":false,"Description":"","ImageUrl":"","ShortDesc":"","CategoryId":103,"CategoryName":"LVE (CloudLinux)"},{"__type":"Nc:SimpleKB:Abstractions:Dtos:CategoryItemDto","ParentCategoryId":0,"TreatAsTopicYN":false,"Description":"","ImageUrl":"/assets/img/pictograms/150/affiliates-red.png","ShortDesc":"","CategoryId":55,"CategoryName":"Affiliates","SubCategories":[]},{"__type":"Nc:SimpleKB:Abstractions:Dtos:CategoryItemDto","ParentCategoryId":12,"TreatAsTopicYN":false,"Description":"","ImageUrl":"","ShortDesc":"","CategoryId":89,"CategoryName":"SSH Access"},{"__type":"Nc:SimpleKB:Abstractions:Dtos:CategoryItemDto","ParentCategoryId":0,"TreatAsTopicYN":false,"Description":"","ImageUrl":"/assets/img/pictograms/150/tools-red.png","ShortDesc":"","CategoryId":2211,"CategoryName":"API & Resellers","SubCategories":[{"__type":"Nc:SimpleKB:Abstractions:Dtos:CategoryItemDto","ParentCategoryId":2211,"TreatAsTopicYN":false,"Description":"","ImageUrl":"","ShortDesc":"","CategoryId":2227,"CategoryName":"SSL Resellers"},{"__type":"Nc:SimpleKB:Abstractions:Dtos:CategoryItemDto","ParentCategoryId":2211,"TreatAsTopicYN":false,"Description":"","ImageUrl":"","ShortDesc":"","CategoryId":2229,"CategoryName":"Hosting Resellers"},{"__type":"Nc:SimpleKB:Abstractions:Dtos:CategoryItemDto","ParentCategoryId":2211,"TreatAsTopicYN":false,"Description":"","ImageUrl":"","ShortDesc":"","CategoryId":63,"CategoryName":"Namecheap API"},{"__type":"Nc:SimpleKB:Abstractions:Dtos:CategoryItemDto","ParentCategoryId":2211,"TreatAsTopicYN":false,"Description":"","ImageUrl":"","ShortDesc":"","CategoryId":2196,"CategoryName":"WHMCS module for SSL"}]},{"__type":"Nc:SimpleKB:Abstractions:Dtos:CategoryItemDto","ParentCategoryId":0,"TreatAsTopicYN":false,"Description":"","ImageUrl":"/assets/img/pictograms/150/timer-red.png","ShortDesc":"","CategoryId":2212,"CategoryName":"Legacy Products","SubCategories":[]},{"__type":"Nc:SimpleKB:Abstractions:Dtos:CategoryItemDto","ParentCategoryId":12,"TreatAsTopicYN":false,"Description":"","ImageUrl":"","ShortDesc":"","CategoryId":205,"CategoryName":"FTP questions"},{"__type":"Nc:SimpleKB:Abstractions:Dtos:CategoryItemDto","ParentCategoryId":12,"TreatAsTopicYN":false,"Description":"","ImageUrl":"","ShortDesc":"","CategoryId":2180,"CategoryName":"MySQL questions"},{"__type":"Nc:SimpleKB:Abstractions:Dtos:CategoryItemDto","ParentCategoryId":12,"TreatAsTopicYN":false,"Description":"","ImageUrl":"","ShortDesc":"","CategoryId":2199,"CategoryName":"Hosting Migration"},{"__type":"Nc:SimpleKB:Abstractions:Dtos:CategoryItemDto","ParentCategoryId":0,"TreatAsTopicYN":false,"Description":"","ImageUrl":"/assets/img/pictograms/150/premiumdns-red.png","ShortDesc":"","CategoryId":2231,"CategoryName":"PremiumDNS","SubCategories":[]},{"__type":"Nc:SimpleKB:Abstractions:Dtos:CategoryItemDto","ParentCategoryId":12,"TreatAsTopicYN":false,"Description":"","ImageUrl":"","ShortDesc":"","CategoryId":2194,"CategoryName":"Tips & Tricks"},{"__type":"Nc:SimpleKB:Abstractions:Dtos:CategoryItemDto","ParentCategoryId":0,"TreatAsTopicYN":false,"Description":"","ImageUrl":"https://static.nc-img.com/live-resource/icons/knowledgebase/fastVPN_icon-150px.png","ShortDesc":"","CategoryId":2265,"CategoryName":"FastVPN","SubCategories":[{"__type":"Nc:SimpleKB:Abstractions:Dtos:CategoryItemDto","ParentCategoryId":2265,"TreatAsTopicYN":false,"Description":"","ImageUrl":"","ShortDesc":"","CategoryId":2292,"CategoryName":"Browser Extensions"},{"__type":"Nc:SimpleKB:Abstractions:Dtos:CategoryItemDto","ParentCategoryId":2265,"TreatAsTopicYN":false,"Description":"","ImageUrl":"","ShortDesc":"","CategoryId":2274,"CategoryName":"General"},{"__type":"Nc:SimpleKB:Abstractions:Dtos:CategoryItemDto","ParentCategoryId":2265,"TreatAsTopicYN":false,"Description":"","ImageUrl":"","ShortDesc":"","CategoryId":2270,"CategoryName":"Routers"},{"__type":"Nc:SimpleKB:Abstractions:Dtos:CategoryItemDto","ParentCategoryId":2265,"TreatAsTopicYN":false,"Description":"","ImageUrl":"","ShortDesc":"","CategoryId":2272,"CategoryName":"TV"},{"__type":"Nc:SimpleKB:Abstractions:Dtos:CategoryItemDto","ParentCategoryId":2265,"TreatAsTopicYN":false,"Description":"","ImageUrl":"","ShortDesc":"","CategoryId":2273,"CategoryName":"Gaming Consoles"},{"__type":"Nc:SimpleKB:Abstractions:Dtos:CategoryItemDto","ParentCategoryId":2265,"TreatAsTopicYN":false,"Description":"","ImageUrl":"","ShortDesc":"","CategoryId":2268,"CategoryName":"macOS"},{"__type":"Nc:SimpleKB:Abstractions:Dtos:CategoryItemDto","ParentCategoryId":2265,"TreatAsTopicYN":false,"Description":"","ImageUrl":"","ShortDesc":"","CategoryId":2269,"CategoryName":"iOS"},{"__type":"Nc:SimpleKB:Abstractions:Dtos:CategoryItemDto","ParentCategoryId":2265,"TreatAsTopicYN":false,"Description":"","ImageUrl":"","ShortDesc":"","CategoryId":2271,"CategoryName":"Linux"},{"__type":"Nc:SimpleKB:Abstractions:Dtos:CategoryItemDto","ParentCategoryId":2265,"TreatAsTopicYN":false,"Description":"","ImageUrl":"","ShortDesc":"","CategoryId":2266,"CategoryName":"Windows"},{"__type":"Nc:SimpleKB:Abstractions:Dtos:CategoryItemDto","ParentCategoryId":2265,"TreatAsTopicYN":false,"Description":"","ImageUrl":"","ShortDesc":"","CategoryId":2267,"CategoryName":"Android"}]},{"__type":"Nc:SimpleKB:Abstractions:Dtos:CategoryItemDto","ParentCategoryId":12,"TreatAsTopicYN":false,"Description":"","ImageUrl":"","ShortDesc":"","CategoryId":239,"CategoryName":"WHMCS"},{"__type":"Nc:SimpleKB:Abstractions:Dtos:CategoryItemDto","ParentCategoryId":12,"TreatAsTopicYN":false,"Description":"","ImageUrl":"","ShortDesc":"","CategoryId":33,"CategoryName":"SSL Installation"}],"status":200,"statusText":"OK"}}A LEMP (Linux, Nginx, MySQL, PHP+Fast-CGI Process Manager) stack is the second most popular after LAMP way setup the web server for hosting web content. Nginx is known for its stability, rich feature set, simple configuration, and low resource consumption. This tutorial shows how you can install Nginx with PHP support through Fast-CGI Process Manager.
We would like to inform you that we do not provide further support for non-cPanel configurations, so further management should be provided solely at your end.
All commands should be performed under root access on a 'blank' operation system only. You can install clean OS using VPS Management console or IMPI for dedicated servers. Also you can submit a ticket to Hosting – VPS and Dedicated servers department so that our technicians re-install the required OS (in this case it is CentOS7.0) at their end. Below you can see VPS Management panel example:
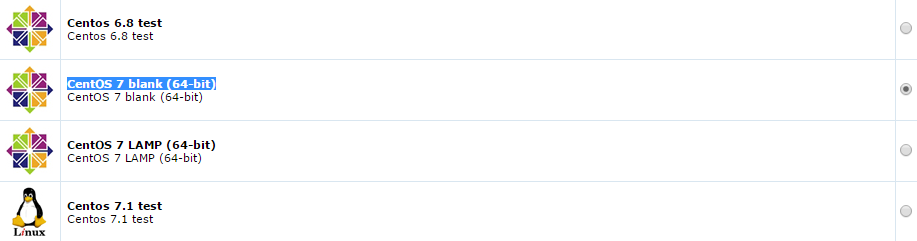
1. System update and password change
2. Nginx and PHP installation
3. Starting and Configuring Nginx
4. Install MariaDB server
5. Add your website or setup server blocks (Nginx virtual hosts)
1. System update and password change
First clean yum, then update the operation system to the latest version using:
yum clean all
yum update
Yum is a CentOS package installer, each time we use it, we see this window:

If you see Complete! at the end running yum update, everything is okay.
Force a SELinux filesystem relabel at next boot:
restorecon -r /

You may want to change the default root password provided in the hosting welcome email. Make sure that the password is secure enough and you keep it in safe place. Hostname should be some subdomain you do not plan to use for the website. By default it is set as server1.yourdomain.tld, but you can change it anytime later.
Password change is done using passwd command.
Hostname can be checked using hostname command:

In this example we are planning to build http://nctest.com website and our hostname is server1.nctest.com.
Reboot the server:
reboot

After the server is rebooted we can check upgraded kernel and CentOS version:
uname -r
cat /etc/redhat-release

You may find a rare minor bug after reboot which doesn’t affect further stability:
Just start the service again running:
systemctl start systemd-journald.service
Status of each systemd process can be checked similar to CentOS6 init but using systemctl:
systemctl status 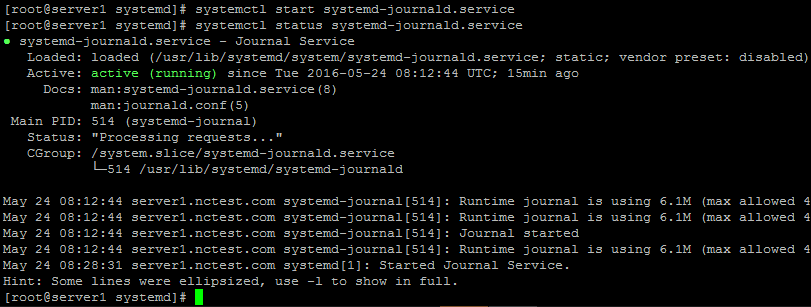
2. Nginx and PHP installation
Nginx is not included in CentOS7 repository by default, so we install Webtatic Yum repository which is a CentOS/RHEL repository containing updated web-related packages and Extra Packages for Enterprise Linux (or EPEL) first. EPEL for Nginx and Webstatic for newer PHP versions support.
rpm -Uvh https://dl.fedoraproject.org/pub/epel/epel-release-latest-7.noarch.rpm
rpm -Uvh https://mirror.webtatic.com/yum/el7/webtatic-release.rpm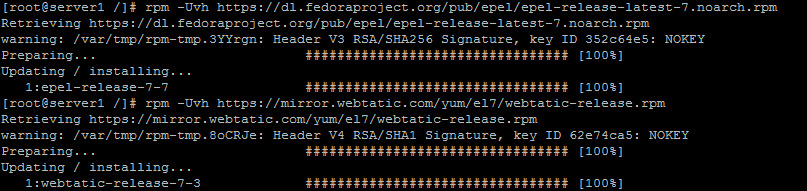
And install Nginx using:
yum install nginx
You will need to install the CentOS RPM signing key that is used to sign packages, just type y:
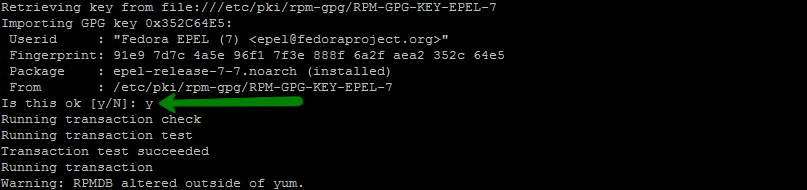
After it is completed, you should see this message:

Then we will install PHP with MySQL and PHP-FPM support:
At the moment default CentOS 7 repositories include PHP 5.4.16 version. However, this PHP version already considered to be outdated, up to date version is 5.6. We suggest checking scripts you are going to install to consider what PHP version you need.
Thus, running this command we will install PHP 5.4.16, in case you need another one, check other options below:
yum install php php-mysql php-fpm
Successful installation looks like on the screenshot below. After an installation we checked php version installed using:
php -v

Installation of another PHP version
No need to worry in case you need another PHP version. We included Webstatic repository before which contains 5.5-7.0 PHP versions.
Checking with the command yum search php, we can find that new PHP packages like php55w, php56w even new php70w are also included. Do not forget to install phpXXw-fpm module.
For example, to install PHP5.5 instead of default 5.4 on CentOS7 we run:
yum install php55w php55w-mysql php55w-opcache php55w-fpm
The same for other PHP versions which will be relevant both both CentOS versions. 5.5 - 7.0 versions include bundled Zend Opcache module so it will be reasonable to install it too:
PHP v5.6: yum install php56w php56w-opcache php56w-mysql php56w-fpm
PHP v7.0: yum install php70w php70w-opcache php70w-mysql php70w-fpm
Packages are outside default CentOS repositories, during the installation you’ll need to import a security key:

The example of successful installation. We installed PHP5.6 here and then checked PHP version using php -v:
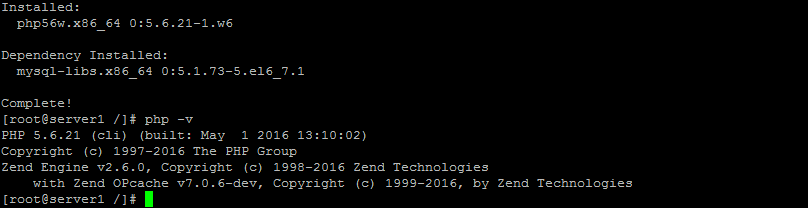
Additional PHP modules installation
If you find that some required modules missing, you can list available modules using:
yum search php
In case you have other than 5.3 PHP version it will be reasonable to exclude modules for other version by changing php to phpXX depends on what version you use. For example, for PHP5.6 you need to use yum search php56w command. Yum will show all modules starting from php:
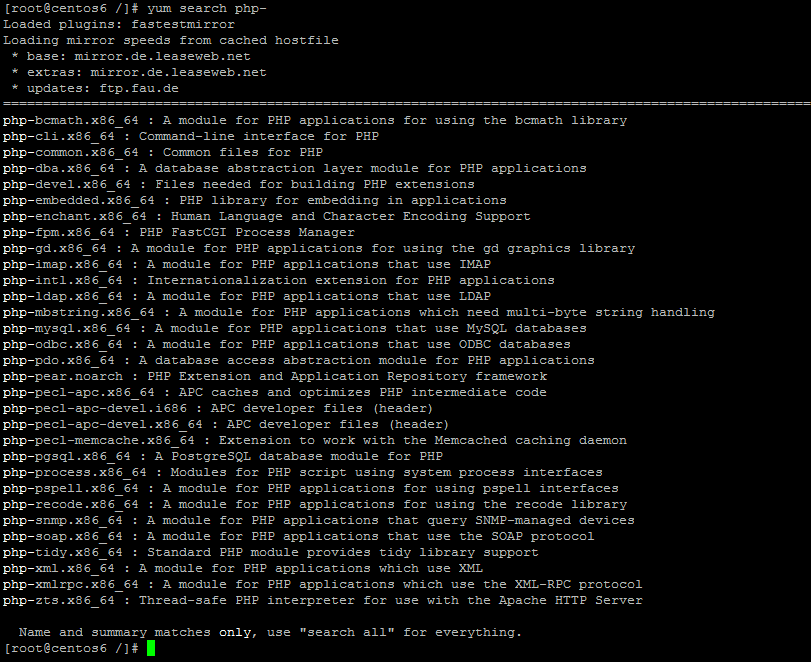
To install a module you need enter:
yum install
where 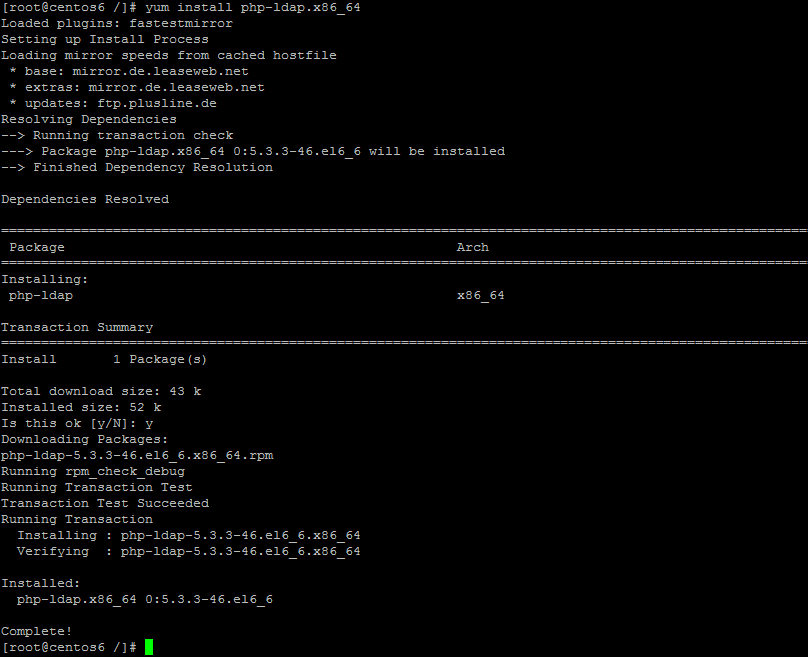
To install several modules at once you need to separate the name of each module with a space, like:
yum install php-cli.x86_64 php-common.x86_64 php-dba.x86_64
3. Starting and Configuring Nginx
First we need some modifications to connect configure Nginx with FastCGI.
Open /etc/php.ini PHP main configuration file and find cgi.fix_pathinfo.
We can use nano text editor to modify the file:
nano /etc/php.ini
Change cgi.fix_pathinfo=1 to cgi.fix_pathinfo=0

File is huge, however, you can use these combinations to easily find the requested line: hit Ctrl+V to jump to the next page, Ctrl+W combination allows searching.
Save the file hitting Ctrl+O, Enter and then close it with Ctrl+X.
1 value of cgi.fix_pathinfo will allow searching for the file that is as near to the requested file as possible which in turn may allow non-PHP files to be executed as PHP. It is a possible security risk. 0 causes the PHP interpreter to only try the literal path given and to stop processing if the file is not found. You can find more information here.
Then open Nginx mail configuration file:
nano /etc/nginx/nginx.conf
NGINX can run multiple worker processes, each capable of processing a large number of simultaneous connections. In most cases, running one worker process per CPU core works well, but, we recommend setting auto. In this example we have a server with 2 CPU cores, so set 2.
Worker_connections is a maximum number of connections that each worker process can handle simultaneously. Value between 512 and 1024 is fine:
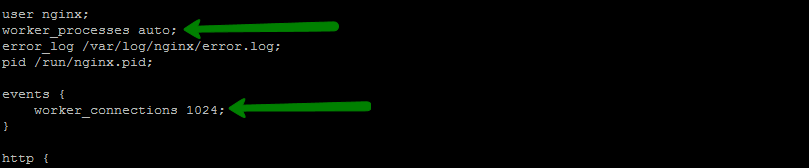
Nearly every browser supports receiving compressed content so we definitely want to turn that on. Find gzip statement and copy these lines at the end of the file. Be careful with {} signs order:
gzip on;
gzip_min_length 1000;
gzip_types text/plain text/css application/json application/x-javascript text/xml application/xml application/xml+rss text/javascript;
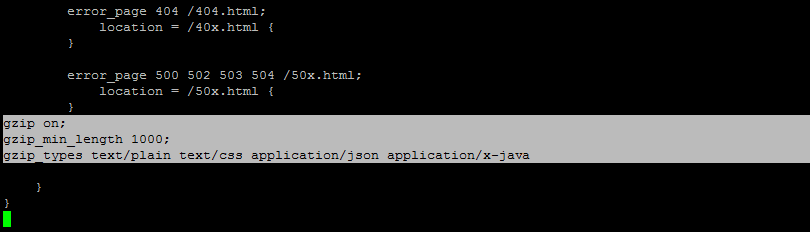
Save and close the file. Then edit php-fpm configuration file:
nano /etc/php-fpm.d/www.conf
First we force php-fpm to listen on Unix socket instead of TCP which should be slightly faster.
listen 127.0.0.1:9000 should be changed to
listen = '/var/run/fastcgi.sock'
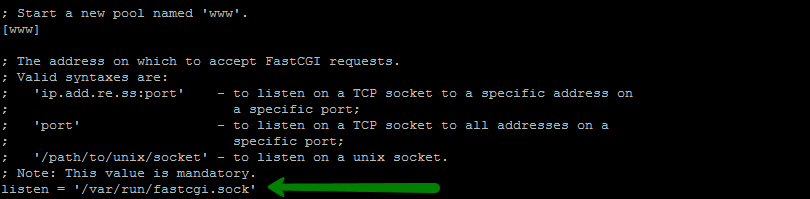
Then set set Nginx user and group as by default it contains Apache settings which we do not need:

Also we set permissions for Unix socket to the same nginx user and set 0660 permissions for it:

Save and close the file.
Start Nginx server and php-fpm service:
systemctl start nginx
systemctl start php-fpm
And enable auto load of both after the server startup:
systemctl enable nginx
systemctl enable php-fpm
Than add firewalls exceptions for http ports:
firewall-cmd --permanent --add-port=80/tcp
firewall-cmd --permanent --add-port=443/tcp
firewall-cmd --reload

In case domain name is pointed to the server you can check Apache start page. Otherwise, you can enter the server IP in browser. Don’t be confused with 'on Fedora' message. EPEL package we used to install Nginx is Fedora project so the same welcome page is used:
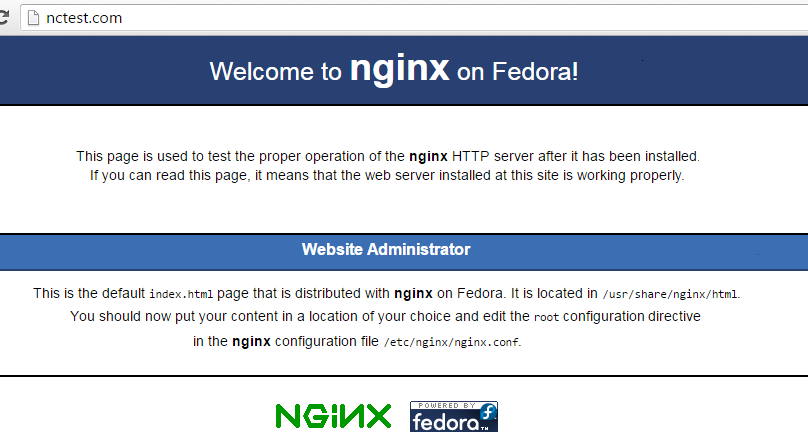
4. Install MariaDB server
We use the same Yum installer. On CentOS7 it is reasonable to install native MariaDB package instead of standard MySQL. The goal for Maria-DB is to be a drop-in replacement for MySQL – with more features and better performance:
yum install mariadb-server
Once done check MySQL version installed and start MySQL service:
systemctl start mariadb
systemctl enable mariadb

mysql -V

MariaDB server has its own root user with different password. So we need to set root MySQL password:
/usr/bin/mysql_secure_installation
As we do not have any MySQL password set yet, you need to press Enter when it asks for the current root password and set a new one. MariaDB has its own root user: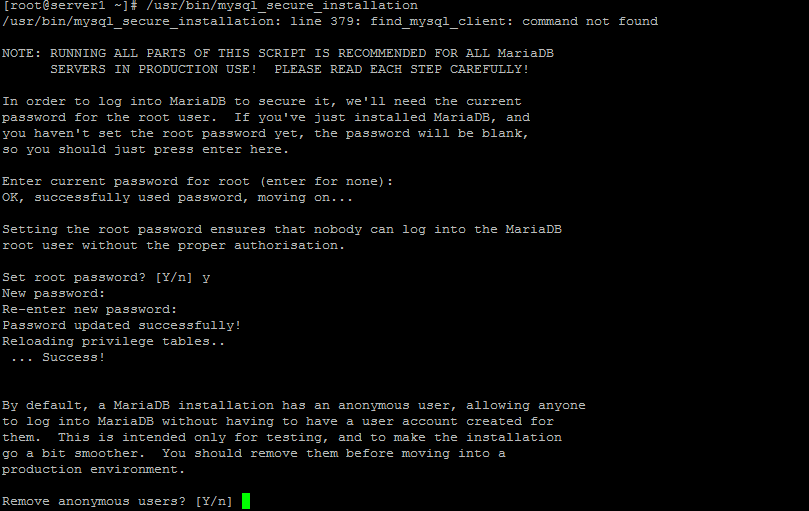
Answer y when it prompts you to:
Set root password? [Y/n]
New password: Enter
Re-enter new password: Enter
Remove anonymous users? [Y/n]
Disallow root login remotely? [Y/n]
Remove test database and access to it? [Y/n]
Reload privilege tables now? [Y/n]
At the end it you should see Thanks for using MariaDB!

You can launch MySQL command line using this command:
mysql -u root -p
And enter MySQL password which you have just set:

Below you can find the most useful MySQL commands:
Create database:
CREATE DATABASE databasename;
databasename should be a database you wish to create. You better not use space in the name. In this example we use wp database and wpuser user:

Create user and grant it all permissions:
GRANT ALL ON databasename.* TO user@localhost IDENTIFIED BY 'password';
Change databasename, sqluser and password to your own. The command GRANT ALL assigns all privileges (read, delete, modify or add data) to that user for only this database:

Do not forget to save username and password. You will need it to connect your website to MySQL database.
Database you created can be listed using:
show databases;
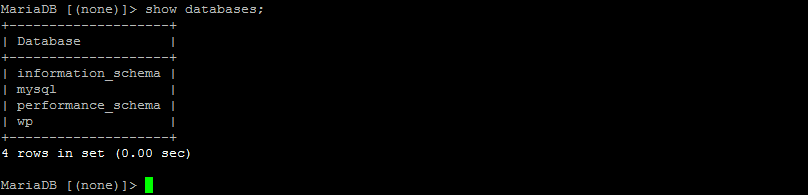
Type quit to close MariaDB console.
5. Add your website or setup server blocks (Nginx virtual hosts)
Basically we need to create a folder to upload a specific website files and tell Nginx where specific host files are located. Replace domain.com with your actual domain name. Do this in all part of this tutorial.
Switch to the root directory of the server and create a website folder. Once created, we need to change ownership permissions to the Nginx user (each service has its own user) and set appropriate www folder permissions of 755:
cd /
mkdir -p /var/www/domain.com/public_html
chown -R nginx:nginx /var/www/domain.com/public_html
chmod 755 /var/www
In example below we used nctest.com:

Nginx fetches server blocks (virtual hosts) from /etc/nginx/conf.d folder by default. So everything you need is to create a configuration file with your first host there. You can set any name for it, but, sure to avoid any confusion further it is a good idea to set an appropriate name. For example, website name + conf part. In this example we will create a configuration file for nctest.com (and www.nctest.com alias):
nano /etc/nginx/conf.d/nctest.com.conf
Server block lines look like, paste to the opened file and modify hostname and folder path (we marked fields to modify in green):
server {
listen 80;
server_name nctest.com www.nctest.com;
location / {
root /var/www/nctest.com/public_html;
index index.php index.html index.htm;
}
# Pass all .php files onto a php-fpm/php-fcgi server.
location ~ \.php$ {
fastcgi_split_path_info ^(.+\.php)(/.+)$;
if (!-f /var/www/nctest.com/public_html$fastcgi_script_name) {
return 404;
}
include fastcgi_params;
fastcgi_index index.php;
fastcgi_param SCRIPT_FILENAME /var/www/nctest.com/public_html$fastcgi_script_name;
fastcgi_pass unix:/var/run/fastcgi.sock;
}
}
More detailed explanation:
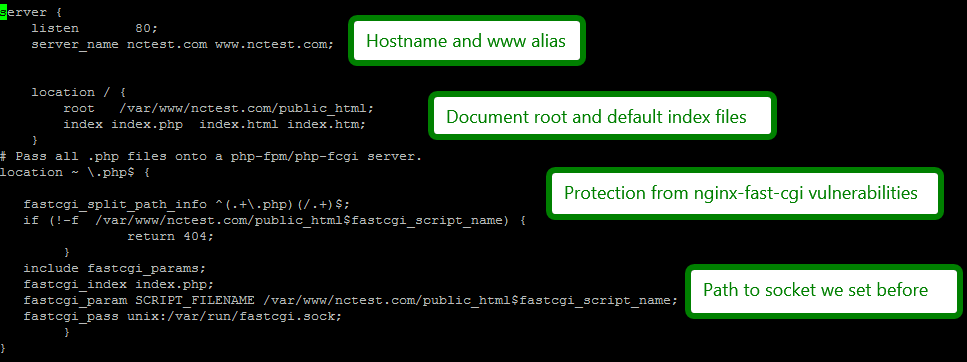
In case we need another hostname to be hosted, we repeat the same: creating the directory, setting correct owner and permissions for it and creating another configuration file in /etc/nginx/conf.d
Each time modifying anything in /etc/nginx folder we restart nginx:
service nginx restart

That is all! You can place some index file to the folder you created for the website and check the page in browser:
nano /var/www/domain.com/public_html/index.php
Let's create phpinfo() page to check either server block we set and PHP configuration:
phpinfo();
phpinfo(INFO_MODULES);
?>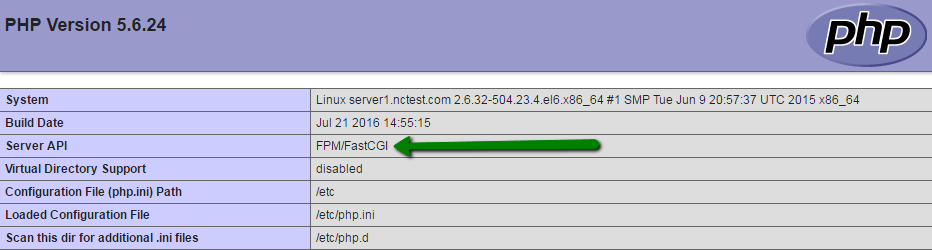
We can test some PHP template like WordPress. Change directory to your website directory which was set previously:
cd /var/www/nctest.com/public_html
Make sure that you delete index.php file with phpinfo() in case you created a test page previously. File can be removed by using:
rm -f index.html
Then run these commands:
wget http://wordpress.org/latest.tar.gz
tar --strip-components=1 -xvf latest.tar.gz
rm -f latest.tar.gz
Set correct ownership for the website folder again as wget uploaded files with nginx permissions instead of root:
sudo chown -R nginx:nginx /var/www/domain.com/public_html
Then you can access your website at link like http://nctest.com/wp-admin/setup-config.php
and complete the installation by filling MySQL database details.
More advanced WordPress+Nginx configurations can be checked here.
However, this is already not the part of this tutorial, each CMS has its own configuration.
That's it!
Need any help? Contact our HelpDesk
Need help? We're always here for you.