How to manage hosting-related services in WHMCS

Here you may see a list of described hosting package menus for quick access:

Installation process
 
1. Details menu
2. Pricing menu
3. Module settings menu
4. Custom settings menu
5. Configurable options menu
6. Upgrades menu
7. Free Domain menu
8. Other menu
9. Links menu

Setting up a cPanel package
Common issues


Installation process

Once WHMCS is installed via the Softaculous script installer or manually, access Admin Dashboard. You will get to the admin backend where you are able to manage settings and configuration for your services.
Follow the instructions below if you wish to add a hosting account:

1. From the Admin Summary page navigate to Setup (1) > Products/Services > Products/Services (2):


2. Click Create a New Group and enter a name for it – products will be organized in the order form based on their group. Click Save Changes once finished:


3. Next, click Create a New Product:


4. Choose the type of product this is (your new group is selected already) and enter the name for the product, then click Continue:


5. You will now see the product configuration page. From here you can configure all aspects of this product. This guide covers the basics to get you started.


1. Details menu

This is the first tab you see, it contains general information about a product including its name and product group:

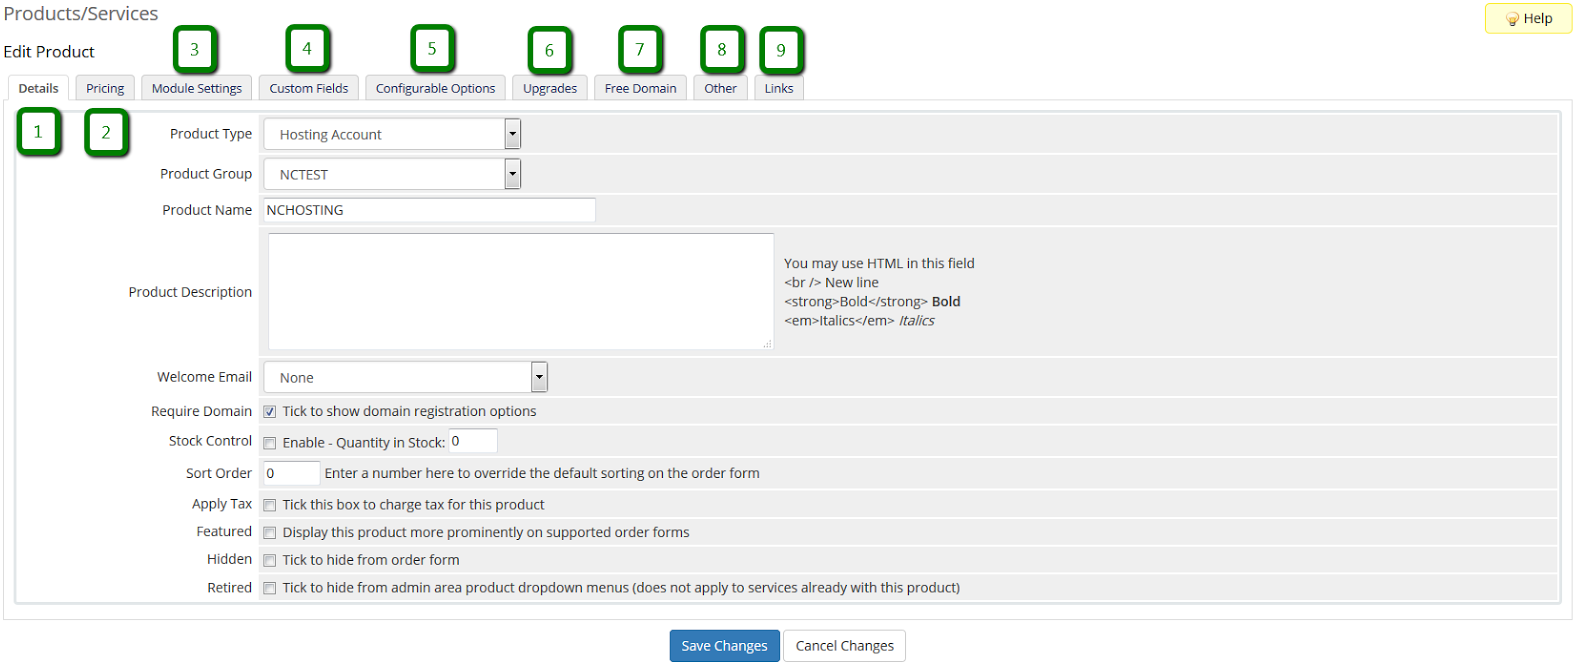
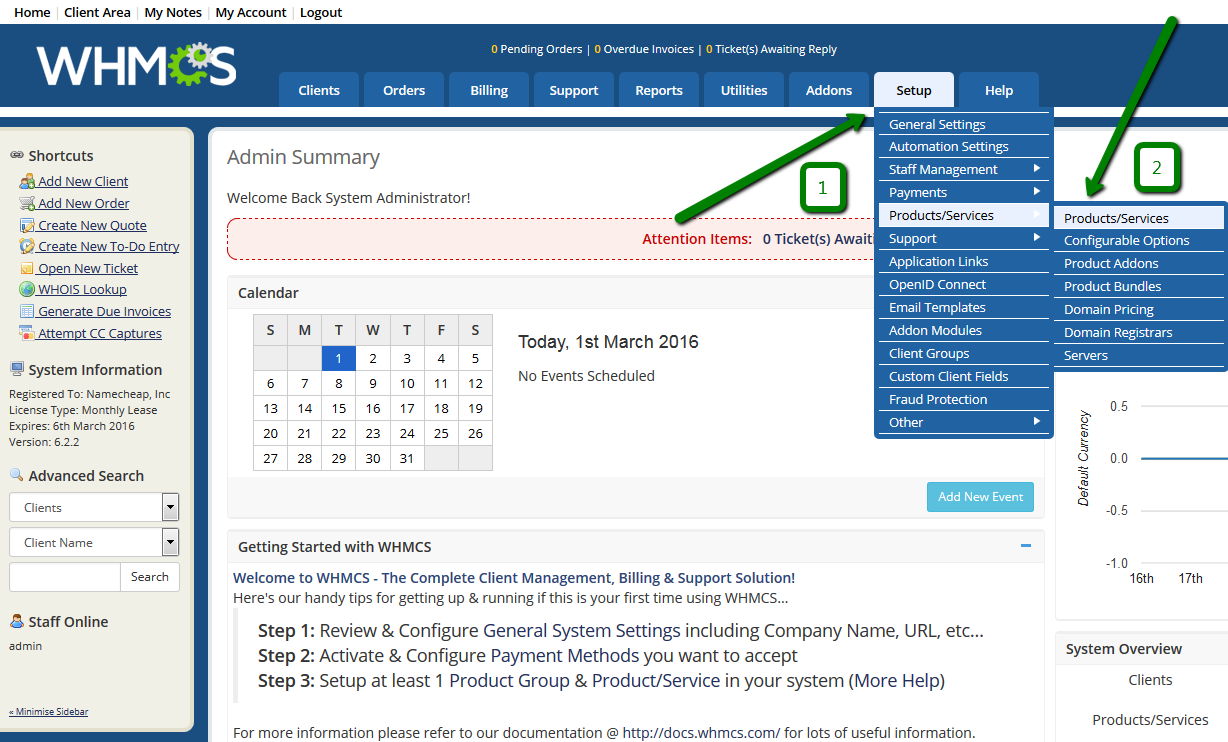
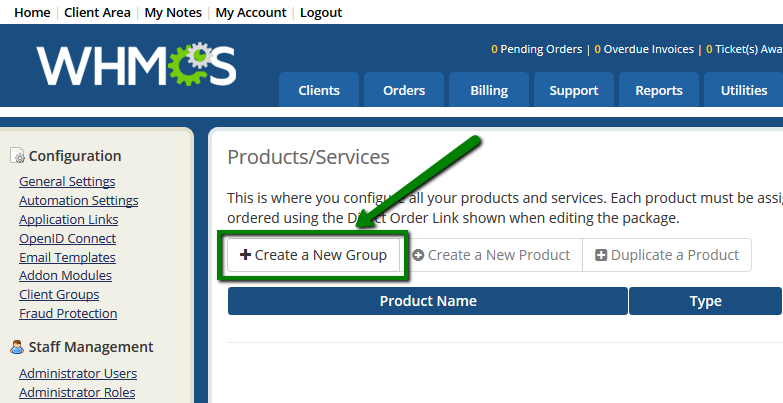
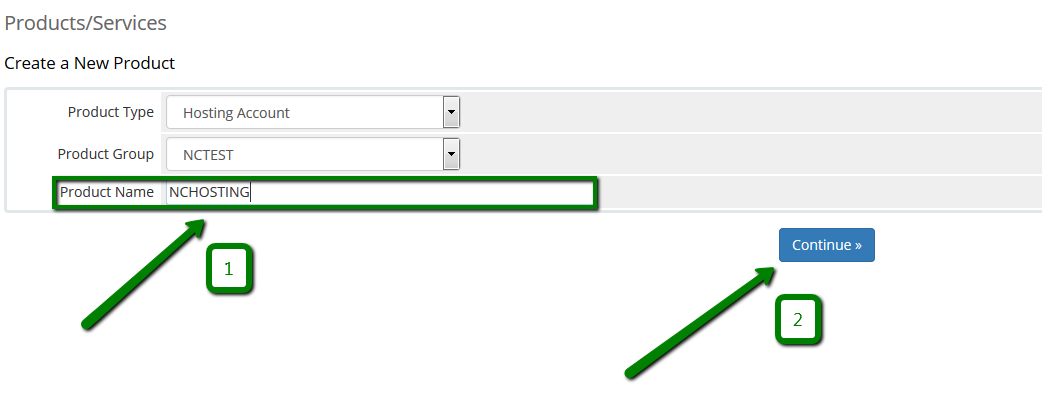
Product Type: select a Hosting account
Product Group:
group your product will be added to
Product Name: name for your product
Product Description: detailed information displayed on the order form relating to this product
Welcome Email: email template to send when the product is activated. You can create custom email templates to use with different products, see Email Templates for more info.
Require Domain: to show the domain registration options on ordering. Should always be enabled for hosting and disabled for any other products that do not require a domain name.
Stock Control:
can be used if you have a specific quantity of an item available (for example, servers) or a limited special offer product – checkmark to enable and enter a quantity remaining, WHMCS will stop orders when it reaches zero. When a stock-controlled item is cancelled (either by a cancellation request or clicking Cancel Order on an order), the stock level will automatically increase. However, if a staff member manually changes the product to the cancelled or terminated status, it will not re-add stock to the product.
Sort Order: can be set to a number to override the default product ordering of alphabetical names. A product with the order of 0 will appear in the list first, 1 will be beneath that, 2 beneath that etc.
Apply Tax: check if tax rules should be applied to this product. For more information, refer to Tax/VAT Rules.
Hidden: check this option not to show the product on the order form – can still be ordered using the direct order links.
Retire: when checked, the product is hidden from admin area lists, such as the Products/Services dropdown in the client's Products/Services tab.      


2. Pricing menu

This second tab is where the prices and length of the product are specified:

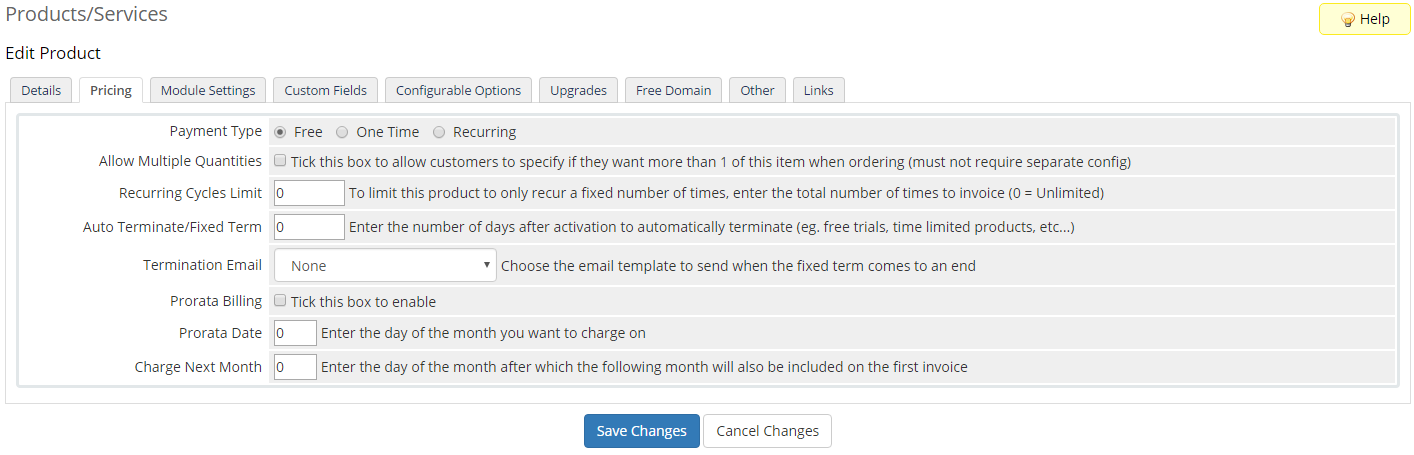
Payment Types: consists of Free, One Time & Recurring options.
When the One Time or Recurring payment types are selected, the pricing grid will appear for entry of the product price. Enable each billing cycle by checking the corresponding Enable checkbox:
  • For Free products the grid will not appear as one cannot specify a price for a free product.
  • For One Time products, enable the One Time/Monthly column and enter your prices into that column.
  • For Recurring pricing types, there are several billing cycles to choose from depending on how often you want clients to be billed. You can enable as many or as few as you like.
  • The setup fee in each column allows you to specify different setup fees depending on the cycle chosen, for example, you may charge setup fees on monthly cycles and offer free setups if paid annually.
  • If you do not wish to offer a particular billing cycle, uncheck the Enable checkbox to disable it. In this screenshot, the product will only be available monthly or annually with no setup fee.
Allow Multiple Quantities: When enabled, this option allows clients to choose the quantity of the product they wish to order; this option will be available on the checkout page. The product must require no additional configuration such as product custom fields or configurable options.

Recurring Cycles Limit: For Recurring payment types, the default value 0 will invoice indefinitely until cancelled. However, by entering a value in this field you can limit the number of times this product will invoice the client. For example, entering 5 on a monthly product would cause no invoice to be generated in the 6th month after ordering.

Auto Terminate/Fixed Term: You can set up products to automatically terminate after a set number of days from the date of signup. This can be used to offer free trial products for a certain period of time, or time-limited products that should only recur for a certain number of cycles before stopping:

  • To enable, enter the number of days to wait before terminating and choose an email template to be sent to the client when termination occurs (for example, an upselling email to promote your paid products in the case of a trial or a confirmation of payment completing for installment payment situations). Set the Auto Terminate/Fixed Term value to 0 to disable this feature.
  • Entering a number in this field will cause the product to be terminated when the cron runs x days after the product registration date.
Termination Email: When the above feature is enabled, choose an email to be sent to the client when the product is terminated.

Prorata Billing: This allows you to bill products on a specific day of the month and charge a prorated amount at the initial time of order. If enabled, all clients will be charged on one exact day each month. When disabled, the product will use the default anniversary billing system (e.g., Jun 15 - Jul 15).

NOTE: Prorata billing is not compatible with the free domain logic or having domain renewal invoices generated further in advance than other products.

Prorated Date: If you set this to 1, then all clients would be charged on the 1st of each month.

Charge Next Month: After this day of the month has been reached, a client will also be charged for the next month in their initial payment when signing up for a monthly billing cycle. If you had prorata date set to 1, and a client signed up on the 30th of the month, they'd only be charged a tiny amount without this setting. So it is pro-rated amount + next month in advance.

NOTE: If you wish to pro-rate a product but not use the 'charge next month' feature, set Prorata Date to a normal value and Charge Next Month to 32.    


3. Module Settings menu (aka Provisioning)


With our hosting servers we suggest using cPanel. To choose it, select cPanel in the Module Name section drop-down.

This tab specifies which server type the product will use and how WHMCS will behave when this product is ordered:

From the Module Name drop-down menu select the type of server you're using. The options you will see depend upon the module chosen, and more information specific to each module can be found in the Provisioning Modules section.

If a product has no specific module to be linked to, then you can set it to Autorelease in order to have the activation simulated and therefore, the welcome email will be sent automatically.

There are 4 automation settings to choose from for product activation and they are:

  • Automatically set up the product as soon as an order is placed –  usually used for free products.
  • Automatically set up the product as soon as the first payment is received – this will perform the setup as soon as the order is paid.
  • Automatically set up the product when you manually accept a pending order - this will perform the setup only when an admin has manually reviewed and accepted the order.
  • Do not automatically set up this product – never auto set up the product – admins can still initiate it manually from the product details page under a client's profile.   

4. Custom fields menu

From this tab you can create custom fields for this product, allowing you to collect additional information from your clients on the order form required for supplying the product:


Field types consist of text boxes, drop-down selections, yes/no check boxes, memo text boxes and password fields (text entered here with appear as asterisks ****).

Fields can be set as admin only for private data, required/optional on the order form, displayed on the order form or only in the client area or displayed on the invoices (such as VAT numbers). See Custom Fields for more info.


5. Configurable Options menu

Use this tab to select which configurable options are associated with the product, they can be displayed on the order form or in the client area:

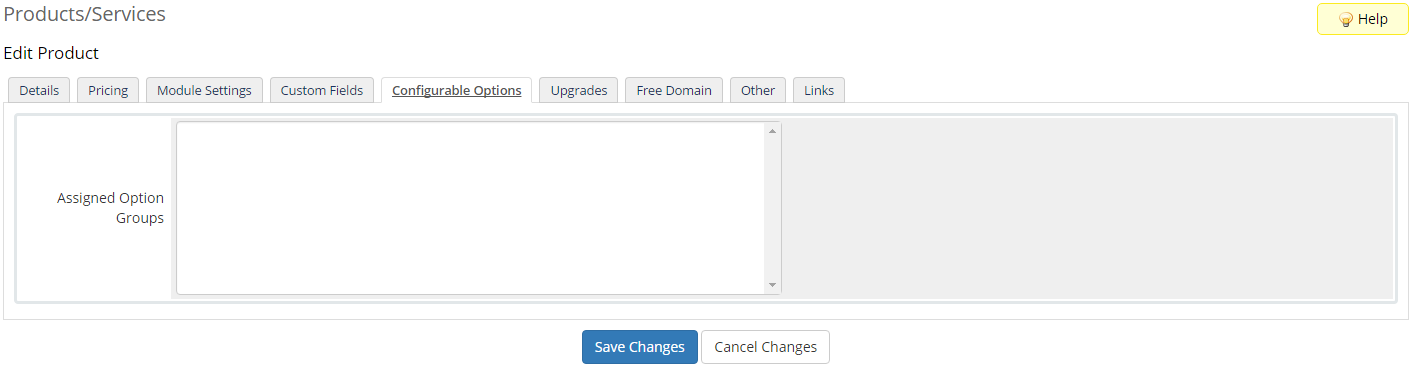
Configurable Options allow you to give your clients options which alter the price of the product. Refer to Addons & Configurable Options for more info.


6. Upgrades menu

The sixth tab allows you to specify whether the client can upgrade or downgrade from this product to another:

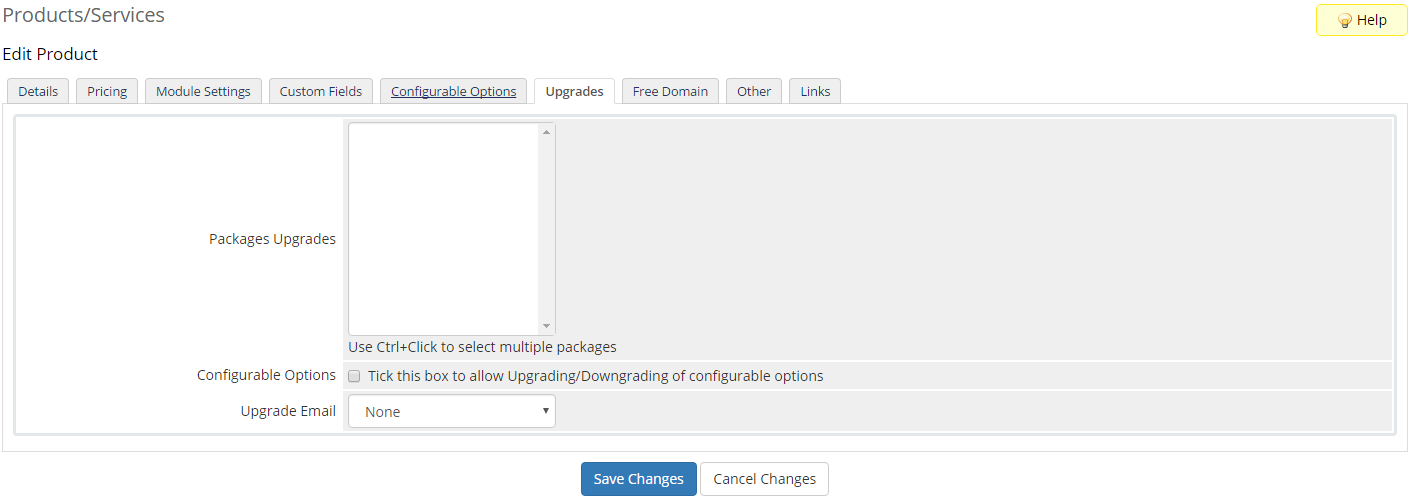
Upgrades/downgrades can be fully automated by WHMCS with many of the modules. All you need to do on this tab is select the products that the product can be upgraded or downgraded to.

Use Ctrl+Click to select multiple products.

There is also a checkbox for enabling the upgrades of configurable options if there are any on the product. From the Upgrade Email dropdown menu you can select an email template to be sent when a client upgrades to this product. A new Product email template will first need to be created under Setup > Email Templates.

See Automated Upgrades and Downgrades article for more info on how upgrades/downgrades are calculated and processed.


7. Free Domain menu

Use this tab to configure the offer of a free domain with this product is desired:


WHMCS lets you offer free domains with your packages when purchased with certain payment terms. For example, you might want to offer a free domain when a package is purchased annually as an incentive. Refer to Offering Free Domain Registration article for more details on how to configure it.


8. Other menu

The penultimate tab contains miscellaneous settings such as product affiliate rates, product downloads and overage billing:


Custom Affiliate Payout:
These settings allow you to specify a custom payout rate for this specific product if using the built-in affiliate system, this setting overrides the system default commission rate, it can even be disabled.

Affiliate Pay Amount:
Based on your setting above to either percentage or fixed amount, this is the percentage or amount paid for a purchase of this product.

One Time Payout:
check this if you want to pay only a one-off commission.

Subdomain Options:
enter a domain in the format '.yourdomain.com' if you want to offer a free subdomain option for the domain at the signup. You can offer more than one by entering a comma-separated list, e.g., '.yourdomain.com,.yourdomain.net'.

Product Downloads:
lets you offer files to be automatically released to the customer when the product is activated. See Product Downloads Distribution for more information.

Overage Billing:
allows you to bill for the product based on disk and bandwidth usage for the month. Refer to Disk Space and Bandwidth Overage Billing for more information.    


9. Links menu

The final tab contains some ready-made URLs to add to a webpage linking to this product:

Each URL will add the product to the shopping cart and jump straight to the configuration step. There are many more possible variations, refer to Linking to WHMCS.


Setting Up a cPanel Package

To set up a cPanel package, go to Setup > Products/Services > Products/Services. From there, you can create the product and configure the general settings and pricing info as normal. When it comes to the Module Settings tab, select cpanel in the module drop-down field and then for a shared hosting package:

  • In most cases, you should create a package inside WHM itself (in Packages > Add a Package) and then just enter the Package Name into WHMCS exactly as it appears in WHM (leaving all the other fields blank).
  • But there is also the option to define custom packages – you can do that by leaving the Package Name field blank and defining the individual limits into the fields the module settings page (you will need root access for this to work).
  • Max Addon Domains is the last field that applies to shared hosting accounts in the list.
  • And then finally, as with all products, you have the option of choosing the automatic setup option you want for new orders, be it immediately as soon as the order is placed, as soon as the initial payment has been received (recommended) or waiting until an admin manually reviews & accepts the pending orders.


Common Issues

  • You do not have permission to use a Selected Package
If you receive this error when trying to create an account, you need to correct the Packages Name setting. To do this, go to Setup > Products/Services > Edit > Module Settings on the package where you are receiving the error. Where it asks for the WHM Package Name, you must enter this exactly as it appears in WHM, which should be in the format username_packagename.

  • Package Not Allowed or Exceeded Resource/Account Allocation
This error most likely means you only have reseller access to your server and are trying to create an account without a valid package name. You need to make sure that WHM Package Name in the product configuration of WHMCS matches exactly what is set up in your WHM.

  • Resellers are not permitted to create subdomains of the server's main domain
This means no domain has been selected and is missing. Ensure the product has a domain name entered. You may need to enable Require Domain in Setup > Product/Services > Edit.

  • Unable to validate the setting for language: English
cPanel/WHM have made a number of changes to their API in the latest versions that are not backwards compatible. Therefore, it is no longer possible to use an old version of WHMCS with the latest version of cPanel. You will need to upgrade your WHMCS install to version 4.2.1 or above.

  • Sorry, that username is reserved
cPanel/WHM does not allow usernames to contain the phrase 'test' among others, so when this error occurs, simply change the username under the client's products/services tab and run the Create Module command again.

  • Sorry, a group for that username already exists
An account with this username already exists on the server. This error can occur on shared servers even when you do not have an account with this username in your reseller account. Another reseller on the same server may be using it already.

To resolve, navigate to the client's Products/Services tab, change Username, click Save Changes and finally click the Create Module command button.

  • Login Failed
There are two possible causes for this error:

1. The login details under Setup > Servers > Edit are incorrect. Ensure you are using either the username + access hash combination or the username + password combination and that the login details are correct.
2. The Brute Force Protection settings are preventing WHMCS from creating/suspending/terminating accounts via cPanel API. Adjust BFP settings in WHM.

  • No username supplied: 'username' is a required argument
This means the username in the client's Products/Services tab is empty.
You should enter a username, save changes and try module creation again. Also, ensure Setup > Products/Services > Products/Services > Edit > Require Domains is checked to avoid this in future.

  • WHM Username is missing for the selected server
Seeing this error when attempting to provision a hosting account is caused by a server balancing misconfiguration, that is, no server is selected upon which the account should be created.


That's it!

              
                      Need any help? Contact our HelpDesk

Updated
Viewed
30127 times

Need help? We're always here for you.

notmyip