
{"/api/v1/ncpl/simplekb/getarticle:\"{\\\"articleId\\\":9637,\\\"categoryId\\\":14}\"":{"body":{"Id":9637,"FriendlyId":"","ArticleTypeId":0,"Title":"How can I complete domain control validation (DCV) for my SSL certificate?","ArticleName":"How can I complete domain control validation (DCV) for my SSL certificate?","ArticleSummary":null,"PreponedSummary":false,"Approved":true,"Body":"DQoJCTxwPkJlZm9yZSBhbiBTU0wgY2VydGlmaWNhdGUgY2FuIGJlIGlzc3VlZCwgdGhlIGNlcnRpZmljYXRlIGFwcGxpY2FudCBzaG91bGQgY29uZmlybSB0aGVpciBkb21haW4gb3duZXJzaGlwIHJpZ2h0cy4gVGhpcyBpcyBjYWxsZWQgZG9tYWluIGNvbnRyb2wgdmFsaWRhdGlvbiAoRENWKS4gV2hlbiB5b3UgYXJlIGFjdGl2YXRpbmcgeW91ciBjZXJ0aWZpY2F0ZSwgeW91IHdpbGwgYmUgcHJlc2VudGVkIHdpdGggdGhyZWUgbWV0aG9kcyBvZiBEQ1YgdG8gY2hvb3NlIGZyb206PC9wPg0KCQk8dWw+DQoJCQkJPGxpPg0KCQkJCQkJPGEgaHJlZj0iI2NuYW1lIj5BZGQgQ05BTUUgcmVjb3JkPC9hPg0KCQkJCTwvbGk+DQoJCQkJPGxpPg0KCQkJCQkJPGEgaHJlZj0iI2ZpbGUiPlVwbG9hZCBhIHZhbGlkYXRpb24gZmlsZTwvYT4NCgkJCQk8L2xpPg0KCQkJCTxsaT4NCgkJCQkJCTxhIGhyZWY9IiNlbWFpbCI+UmVjZWl2ZSBhbiBlbWFpbDwvYT4NCgkJCQk8L2xpPg0KCQk8L3VsPg0KCQk8cD5JZiB5b3UgbmVlZCB0byBzd2l0Y2ggeW91ciBjaG9zZW4gRENWIG1ldGhvZCwgY2hlY2sgdGhlIGZvbGxvd2luZyBndWlkZTo8L3A+DQoJCTx1bD4NCgkJCQk8bGk+DQoJCQkJCQk8YSBocmVmPSIjY2hhbiI+Q2hhbmdpbmcgRENWIG1ldGhvZHM8L2E+DQoJCQkJPC9saT4NCgkJPC91bD4NCgkJPGgyIGlkPSJjbmFtZSI+DQoJCQkJPGI+QWRkIENOQU1FIHJlY29yZDwvYj4NCgkJPC9oMj4NCgkJPHA+VGhpcyB2YWxpZGF0aW9uIG1ldGhvZCBpbnZvbHZlcyBhZGRpbmcgYSBDTkFNRSByZWNvcmQgdG8gdGhlIEROUyBzZXR0aW5ncyBvZiB5b3VyIGRvbWFpbi48L3A+DQoJCTxwPg0KCQkJCTxpbWcgY2xhc3M9ImtiLWltYWdlIiBzcmM9Imh0dHBzOi8vTmFtZWNoZWFwLnNpbXBsZWtiLmNvbS9TaXRlQ29udGVudHMvMi03QzIyRDUyMzZBNDU0M0VCODI3RjNCRDg5MzZFMTUzRS9tZWRpYS9kY3ZfY25hbWUucG5nIiAvPg0KCQk8L3A+DQoJCTxwPg0KCQkJCUhlcmUgaXMgYSBob3ctdG8gdmlkZW86PC9wPg0KCQk8aWZyYW1lIHNyYz0iLy93d3cueW91dHViZS1ub2Nvb2tpZS5jb20vZW1iZWQvMzV5QzRyQ29udTg/ZmVhdHVyZT1wbGF5ZXJfZGV0YWlscGFnZSIgYWxsb3dmdWxsc2NyZWVuPSIiIHdpZHRoPSI2NDAiIGhlaWdodD0iMzYwIiBmcmFtZWJvcmRlcj0iMCI+DQoJCTwvaWZyYW1lPg0KCQk8cD4NCgkJCQk8aT4NCgkJCQkJCTxiPk5vdGU8L2I+OiBJZiB5b3UgYXJlIHVzaW5nIEROU1NFQyBmb3IgdGhlIGRvbWFpbiwgZW5zdXJlIHRoYXQgaXQgaXMgY29uZmlndXJlZCBjb3JyZWN0bHkgb3IgbWFpbnRhaW4gaXQgKGluY2x1ZGluZyBrZXkgcm9sbG92ZXJzKS4gT3RoZXJ3aXNlLCBjZXJ0aWZpY2F0ZSBpc3N1YW5jZSB3aWxsIGJlIHBhdXNlZCB1bnRpbCB0aGUgRE5TU0VDIGlzc3VlcyBhcmUgcmVzb2x2ZWQuPC9pPg0KCQk8L3A+DQoJCTxwPkhlcmUgaXMgdGhlIHRleHQgdmVyc2lvbiBvZiB0aGUgZ3VpZGU6PGJyIC8+PC9wPg0KCQk8cD5BZnRlciB5b3UgY29tcGxldGUgU1NMIGFjdGl2YXRpb24sIHlvdeKAmWxsIGZpbmQgaW5zdHJ1Y3Rpb25zIG9uIGNvbXBsZXRpbmcgdGhpcyBEQ1YgbWV0aG9kIGFzIHdlbGwgYXMgdGhlIHZhbHVlcyB5b3Ugd2lsbCBuZWVkIGZvciB0aGUgQ05BTUUgcmVjb3JkIGluIHRoZSA8Yj5TU0wgRGV0YWlsczwvYj4gcGFnZSBvZiB5b3VyIGFjY291bnQ6PC9wPg0KCQk8cD4NCgkJCQk8aW1nIGNsYXNzPSJrYi1pbWFnZSIgc3JjPSJodHRwczovL05hbWVjaGVhcC5zaW1wbGVrYi5jb20vU2l0ZUNvbnRlbnRzLzItN0MyMkQ1MjM2QTQ1NDNFQjgyN0YzQkQ4OTM2RTE1M0UvbWVkaWEvZGN2X2dldF9yZWMucG5nIiAvPg0KCQk8L3A+DQoJCTxwPkNsaWNrIG9uIDxiPkdldCBSZWNvcmQ8L2I+IHRvIHNlZSB0aGUgQ05BTUUgcmVjb3JkIHZhbHVlcy4gPGJyIC8+PC9wPg0KCQk8cD4NCgkJCQk8aW1nIGNsYXNzPSJrYi1pbWFnZSIgc3JjPSJodHRwczovL05hbWVjaGVhcC5zaW1wbGVrYi5jb20vU2l0ZUNvbnRlbnRzLzItN0MyMkQ1MjM2QTQ1NDNFQjgyN0YzQkQ4OTM2RTE1M0UvbWVkaWEvbmV3YWN0OC5wbmciIC8+DQoJCTwvcD4NCgkJPGRpdj4NCgkJCQk8aT4NCgkJCQkJCTxiPk5vdGU8L2I+OiBTb21lIEROUyBzeXN0ZW1zIChpbmNsdWRpbmcgdGhlIDxiPk5hbWVjaGVhcCBzeXN0ZW08L2I+KSBoYXZlIHRoZSB0ZW5kZW5jeSB0byBhdXRvbWF0aWNhbGx5IGFkZCB0aGUgZG9tYWluIG5hbWUgdG8gdGhlIHZhbHVlcyBzdWJtaXR0ZWQgZHVyaW5nIHJlY29yZCBjcmVhdGlvbi4gUGxlYXNlIG1ha2Ugc3VyZSB0aGF0IHlvdXIgZG9tYWluIG5hbWUgaXMgbm90IGR1cGxpY2F0ZWQgaW4gdGhlIHZhbHVlcy4gSWYgeW91ciBkb21haW4gaXMgdXNpbmcgTmFtZWNoZWFwIEJhc2ljIG5hbWVzZXJ2ZXJzIG9yIFByZW1pdW1ETlMsIHJlbW92ZSB0aGUgIi5leGFtcGxlLmNvbSIgcGFydCBvZiB0aGUgcHJvdmlkZWQgSG9zdCB2YWx1ZSBiZWZvcmUgYWRkaW5nIGl0IHRvIHRoZSB2YWxpZGF0aW9uIHJlY29yZCBmb3IgdGhlIGRvbWFpbi4gQ29weSB0aGUgSG9zdCBhbmQgVGFyZ2V0IHZhbHVlcyBhbmQgcGFzdGUgdGhlbSBpbnRvIHRoZSBjb3JyZXNwb25kaW5nIGZpZWxkcyBpbiB5b3VyIEROUyBwcm92aWRlciBhY2NvdW50LiBTZXQgdGhlIG1pbmltdW0gcG9zc2libGUgVFRMIHZhbHVlLjwvaT4NCgkJPC9kaXY+DQoJCTxkaXY+DQoJCQkJPGk+DQoJCQkJCQk8YnIgLz4NCgkJCQk8L2k+DQoJCTwvZGl2Pg0KCQk8ZGl2Pg0KCQkJCTxpPg0KCQkJCQkJPGI+Tm90ZTwvYj46IFBsZWFzZSBrZWVwIGluIG1pbmQgdGhhdCBpZiB5b3UgYXJlIGFjdGl2YXRpbmcgYSBNdWx0aS1kb21haW4gY2VydGlmaWNhdGUsIHRoZSBETlMgcmVjb3JkIGNyZWF0ZWQgZm9yIHRoZSBiYXJlIGRvbWFpbiAod2l0aG91dCB3d3cuKSB3aWxsIHZlcmlmeSB0aGlzIGRvbWFpbiBhbmQgaXRzIHN1YmRvbWFpbihzKSBpbmNsdWRlZCBpbiB0aGUgY2VydGlmaWNhdGUuIE5ldmVydGhlbGVzcywgdG8gZ2V0IHRoZSBjZXJ0aWZpY2F0ZSBpc3N1ZWQsIGFsbCBkb21haW5zL3N1YmRvbWFpbnMgaW5jbHVkZWQgaW4gdGhlIGNlcnRpZmljYXRlIHNob3VsZCBiZSB2ZXJpZmllZC48YnIgLz48L2k+DQoJCTwvZGl2Pg0KCQk8ZGl2Pg0KCQkJCTxpPg0KCQkJCQkJPGJyIC8+DQoJCQkJPC9pPg0KCQk8L2Rpdj4NCgkJPGRpdj5PbmNlIHRoZSBjb3JyZWN0IHZhbHVlcyBhcmUgc2V0IHVwLCBoZWFkIHRvIHRoZSA8Yj5TU0wgZGV0YWlsczwvYj4gcGFnZSBhZ2FpbiwgY2xpY2sgdGhlIGxpbmsgYmVzaWRlICJHZXQgYSBDTkFNRSByZWNvcmQiLjxpPjwvaT48L2Rpdj4NCgkJPGk+DQoJCQkJPHA+DQoJCQkJCQk8aW1nIGNsYXNzPSJrYi1pbWFnZSIgc3JjPSJodHRwczovL05hbWVjaGVhcC5zaW1wbGVrYi5jb20vU2l0ZUNvbnRlbnRzLzItN0MyMkQ1MjM2QTQ1NDNFQjgyN0YzQkQ4OTM2RTE1M0UvbWVkaWEvZ290b2VkaXRtZXRob2RzLnBuZyIgLz4NCgkJCQk8L3A+DQoJCQkJT24gdGhlIG5ldyBwYWdlLCBjbGljayB0aGUgJ0VESVQgTUVUSE9EUycgYnV0dG9uLjxiciAvPjxiciAvPjxwPjxpbWcgY2xhc3M9ImtiLWltYWdlIiBzcmM9Imh0dHBzOi8vTmFtZWNoZWFwLnNpbXBsZWtiLmNvbS9TaXRlQ29udGVudHMvMi03QzIyRDUyMzZBNDU0M0VCODI3RjNCRDg5MzZFMTUzRS9tZWRpYS9lZGl0X21ldGhvZHNfYnRuLnBuZyIgLz48L3A+SW4gdGhlIHBvcC11cCB3aW5kb3csIHBsZWFzZSBjbGljayA8Yj5TYXZlIENoYW5nZXMvUmV0cnkgQWx0IERDVjwvYj4gdG8gc3BlZWQgdXAgdGhlIHByb2Nlc3Mgb2YgZG9tYWluIGNvbnRyb2wgdmFsaWRhdGlvbi4gPGJyIC8+PC9pPg0KCQk8YnIgLz4NCgkJPHA+DQoJCQkJPGltZyBjbGFzcz0ia2ItaW1hZ2UiIHNyYz0iaHR0cHM6Ly9OYW1lY2hlYXAuc2ltcGxla2IuY29tL1NpdGVDb250ZW50cy8yLTdDMjJENTIzNkE0NTQzRUI4MjdGM0JEODkzNkUxNTNFL21lZGlhL3JldHJ5X2Rjdi5wbmciIC8+DQoJCTwvcD4NCgkJPHA+DQoJCQkJSWYgeW91IGFyZSBhY3RpdmF0aW5nIGEgPGEgaHJlZj0iaHR0cHM6Ly93d3cubmFtZWNoZWFwLmNvbS9zZWN1cml0eS9zc2wtY2VydGlmaWNhdGVzL3NpbmdsZS1kb21haW4uYXNweCI+c2luZ2xlLWRvbWFpbiBjZXJ0aWZpY2F0ZTwvYT4gZm9yIGEgc3ViZG9tYWluLCBmZWVsIGZyZWUgdG8gc2V0IHRoZSBETlMgcmVjb3JkIGVpdGhlciBmb3IgdGhlIGJhcmUgZG9tYWluIGRpcmVjdGx5LCBvciBmb3IgdGhlIHN1YmRvbWFpbi4gSXQgd2lsbCB3b3JrIGJvdGggd2F5cyBmb3IgdGhlIGRvbWFpbiB2YWxpZGF0aW9uIHByb2Nlc3MuPGJyIC8+PC9wPg0KCQk8aDIgaWQ9ImZpbGUiPg0KCQkJCTxiPlVwbG9hZCBhIHZhbGlkYXRpb24gZmlsZTwvYj4NCgkJPC9oMj4NCgkJPGRpdj5UaGlzIERDViBtZXRob2QgaW52b2x2ZXMgdXBsb2FkaW5nIGFuIGFjdGl2YXRpb24gZmlsZSB0byB5b3VyIHdlYnNpdGUgaG9zdGluZyBzZXJ2ZXIuPC9kaXY+DQoJCTxkaXY+DQoJCQkJPGJyIC8+DQoJCTwvZGl2Pg0KCQk8ZGl2Pg0KCQkJCTxpPg0KCQkJCQkJPGI+Tm90ZTwvYj46VGhlIGZpbGUgdXBsb2FkaW5nIG1ldGhvZCBpcyA8YSBocmVmPSJodHRwczovL3d3dy5uYW1lY2hlYXAuY29tL2Jsb2cvdXBjb21pbmctY2hhbmdlcy10by1zc2wtaHR0cC12YWxpZGF0aW9uIj5ub3QgYXZhaWxhYmxlIGZvciBXaWxkY2FyZCBTU0xzPC9hPi48L2k+DQoJCQkJPGJyIC8+DQoJCTwvZGl2Pg0KCQk8ZGl2Pg0KCQkJCTxiciAvPg0KCQk8L2Rpdj4NCgkJPGRpdj5UaGUgdmFsaWRhdGlvbiBmaWxlIGlzIGEgVFhUIGZpbGUgd2l0aCBhIG5hbWUgZmVhdHVyaW5nIGEgY29tYmluYXRpb24gb2YgbnVtYmVycyBhbmQgbGV0dGVycywgZS5nLiwgQU4yRDRDNUg3RjAxODIzS1JJREhKLnR4dC48L2Rpdj4NCgkJPGRpdj4NCgkJCQk8YnIgLz4NCgkJPC9kaXY+DQoJCTxpPg0KCQkJCTxiPkltcG9ydGFudCBub3RlPC9iPjogV2hlbiB1cGxvYWRpbmcgdGhlIGZpbGUsIHBsZWFzZSBkbyBub3QgY2hhbmdlIHRoZSBmaWxlIG5hbWUgb3IgaXRzIGNvbnRlbnQuwqAgPC9pPg0KCQk8YnIgLz4NCgkJPHA+DQoJCQkJPGltZyBjbGFzcz0ia2ItaW1hZ2UiIHNyYz0iaHR0cHM6Ly9OYW1lY2hlYXAuc2ltcGxla2IuY29tL1NpdGVDb250ZW50cy8yLTdDMjJENTIzNkE0NTQzRUI4MjdGM0JEODkzNkUxNTNFL21lZGlhL2Rjdl9maWxlLnBuZyIgLz4NCgkJPC9wPg0KCQk8cD4NCgkJCQlIZXJlIGlzIGEgaG93LXRvIHZpZGVvOjxiciAvPjwvcD4NCgkJPGlmcmFtZSBzcmM9Ii8vd3d3LnlvdXR1YmUtbm9jb29raWUuY29tL2VtYmVkL1gtcmtRMS1lX2tvP2ZlYXR1cmU9cGxheWVyX2RldGFpbHBhZ2UiIGFsbG93ZnVsbHNjcmVlbj0iIiB3aWR0aD0iNjQwIiBoZWlnaHQ9IjM2MCIgZnJhbWVib3JkZXI9IjAiPg0KCQk8L2lmcmFtZT4NCgkJPHA+DQoJCQkJPGJyIC8+SGVyZSBpcyB0aGUgdGV4dCB2ZXJzaW9uIG9mIHRoZSBndWlkZS48YnIgLz48L3A+DQoJCTxwPldoZW4geW914oCZdmUgY29tcGxldGVkIHRoZSBhY3RpdmF0aW9uIHByb2Nlc3MsIHlvdSdsbCBiZSBkaXJlY3RlZCB0byB0aGUgPGI+U1NMIERldGFpbHM8L2I+IHBhZ2UgaW4geW91ciBOYW1lY2hlYXAgYWNjb3VudCwgd2hlcmUgeW91J2xsIGZpbmQgaW5zdHJ1Y3Rpb25zIGFuZCBhIGxpbmsgdG8gdGhlIDxiPkVkaXQgbWV0aG9kczwvYj4gcGFnZSB3aGVyZSB5b3UgY2FuIGRvd25sb2FkIHRoZSB2YWxpZGF0aW9uIGZpbGUuPC9wPg0KCQk8ZGl2PllvdeKAmWxsIG5lZWQgdG8gcGxhY2UgdGhlIGZpbGUgaW4gdGhlIGRvY3VtZW50IHJvb3QgZGlyZWN0b3J5IG9mIHlvdXIgZG9tYWluIG5hbWUgaW4gdGhlIHN1YmZvbGRlciBvZiB0aGUgJy53ZWxsLWtub3duJyBmb2xkZXIgY2FsbGVkICdwa2ktdmFsaWRhdGlvbicuPC9kaXY+DQoJCTxkaXY+DQoJCQkJPGJyIC8+DQoJCTwvZGl2Pg0KCQk8ZGl2Pk9uY2UgeW91IHBsYWNlIGl0IGhlcmUsIHRoZSB2YWxpZGF0aW9uIGZpbGUgc2hvdWxkIGJlIGFjY2Vzc2libGUgdmlhIHRoZSBmb2xsb3dpbmcgbGluazogaHR0cDovL3lvdXJkb21haW5uYW1lLmNvbS8ud2VsbC1rbm93bi9wa2ktdmFsaWRhdGlvbi9BTjJENEM1SDdGMDE4MjNLUklESEoudHh0LCB3aGVyZSDigJh5b3VyZG9tYWlubmFtZS5jb23igJkgaXMgdGhlIGRvbWFpbiBuYW1lIGluIHRoZSBjZXJ0aWZpY2F0ZSwgYW5kIOKAmEFOMkQ0QzVIN0YwMTgyM0tSSURISi50eHTigJkgc2hvdWxkIGJlIHRoZSBleGFjdCBuYW1lIG9mIHRoZSB2YWxpZGF0aW9uIGZpbGUgeW91IGRvd25sb2FkZWQgZnJvbSB5b3VyIE5hbWVjaGVhcCBhY2NvdW50IHdpdGhvdXQgYW55IGNoYW5nZXMuPC9kaXY+DQoJCTxkaXY+DQoJCQkJPGJyIC8+DQoJCTwvZGl2Pg0KCQk8ZGl2Pg0KCQkJCTxiPlNpbmdsZS1kb21haW4gU1NMczo8L2I+DQoJCTwvZGl2Pg0KCQk8ZGl2Pg0KCQkJCTxiciAvPklmIHlvdSBoYXZlIGEgU2luZ2xlLWRvbWFpbiBTU0wsIHRoZSBmaWxlIHNob3VsZCBiZSBhY2Nlc3NpYmxlIGJvdGggdmlhIGh0dHA6Ly95b3VyZG9tYWlubmFtZS5jb20vLndlbGwta25vd24vcGtpLXZhbGlkYXRpb24vQU4yRDRDNUg3RjAxODIzS1JJREhKLnR4dCBhbmQgaHR0cDovL3d3dy55b3VyZG9tYWlubmFtZS5jb20vLndlbGwta25vd24vcGtpLXZhbGlkYXRpb24vQU4yRDRDNUg3RjAxODIzS1JJREhKLnR4dC4gPGJyIC8+PC9kaXY+DQoJCTxkaXY+DQoJCQkJPGJyIC8+DQoJCTwvZGl2Pg0KCQk8ZGl2PlRoZXNlIHJlcXVpcmVtZW50cyBhbHNvIGFwcGx5IHRvIFNTTHMgYWN0aXZhdGVkIGZvciBzdWJkb21haW5zLiBZb3Ugc2hvdWxkIG1ha2UgdGhlIGZpbGUgYWNjZXNzaWJsZSBib3RoIHZpYSBodHRwOi8vc3ViLnlvdXJkb21haW5uYW1lLmNvbS8ud2VsbC1rbm93bi9wa2ktdmFsaWRhdGlvbi9BTjJENEM1SDdGMDE4MjNLUklESEoudHh0IGFuZCBodHRwOi8vd3d3LnN1Yi55b3VyZG9tYWlubmFtZS5jb20vLndlbGwta25vd24vcGtpLXZhbGlkYXRpb24vQU4yRDRDNUg3RjAxODIzS1JJREhKLnR4dDwvZGl2Pg0KCQk8ZGl2Pg0KCQkJCTxiciAvPg0KCQk8L2Rpdj4NCgkJPGRpdj5JZiB5b3UgYWN0aXZhdGUgeW91ciBTU0wgZm9yIHlvdXJkb21haW5uYW1lLmNvbSBhbmQgdGhlIGZpbGUgaXMgYWNjZXNzaWJsZSB2aWEgeW91cmRvbWFpbm5hbWUuY29tIGJ1dCBub3QgYWNjZXNzaWJsZSB2aWEgd3d3LnlvdXJkb21haW5uYW1lLmNvbSwgdGhlbiB0aGUgU1NMIHdpbGwgc2VjdXJlIG9ubHkgeW91cmRvbWFpbm5hbWUuY29tLiBBdCB0aGUgc2FtZSB0aW1lLCBpZiB5b3VyIFNTTCBoYXMgYmVlbiBhY3RpdmF0ZWQgZm9yIHd3dy55b3VyZG9tYWlubmFtZS5jb20gYW5kIHRoZSBmaWxlIGNhbiBiZSBhY2Nlc3NlZCB2aWEgdGhlIHd3dyBzdWJkb21haW4gYnV0IGNhbm5vdCBiZSBhY2Nlc3NlZCB2aWEgdGhlIGJhcmUgZG9tYWluICh5b3VyZG9tYWlubmFtZS5jb20pLCB0aGVuIHRoZSBTU0wgd2lsbCBvbmx5IGJlIGlzc3VlZCBmb3Igd3d3LnlvdXJkb21haW5uYW1lLmNvbS48L2Rpdj4NCgkJPGRpdj4NCgkJCQk8YnIgLz4NCgkJPC9kaXY+DQoJCTxkaXY+DQoJCQkJPGI+TXVsdGktZG9tYWluIFNTTHM6PC9iPg0KCQk8L2Rpdj4NCgkJPGRpdj4NCgkJCQk8YnIgLz5Gb3IgTXVsdGktZG9tYWluIFNTTHMsIHRoZSB2YWxpZGF0aW9uIGZpbGUgc2hvdWxkIGJlIGFjY2Vzc2libGUgZm9yIGVhY2ggaG9zdG5hbWUgeW91IHNwZWNpZmllZCBkdXJpbmcgdGhlIFNTTCBhY3RpdmF0aW9uIHByb2Nlc3MuPC9kaXY+DQoJCTxkaXY+DQoJCQkJPGJyIC8+DQoJCTwvZGl2Pg0KCQk8ZGl2PkZvciBleGFtcGxlLCBpZiB5b3UgYWN0aXZhdGVkIHlvdXIgTXVsdGktZG9tYWluIFNTTCBmb3IgZXhhbXBsZS5jb20sIHd3dy5leGFtcGxlLmNvbSBhbmQgZG9tYWluXzIubmV0LCB0aGUgdmFsaWRhdGlvbiBmaWxlIHNob3VsZCBiZSBhY2Nlc3NpYmxlIGZvciBhbGwgb2YgdGhlc2UgaG9zdG5hbWVzLjxiciAvPjwvZGl2Pg0KCQk8ZGl2Pg0KCQkJCTxiciAvPg0KCQk8L2Rpdj4NCgkJPGRpdj5PbmNlIHlvdXIgZmlsZSBpcyB1cGxvYWRlZCwgeW91IGNhbiB2ZXJpZnkgaXQgYnkgY2xpY2tpbmcgb24gdGhlIGxpbmtzIGluIHRoZSB5ZWxsb3cgcGFuZWwgd2l0aCBEQ1YgaW5zdHJ1Y3Rpb25zIGF0IHRoZSB0b3Agb2YgdGhlIFNTTCBkZXRhaWxzIHBhZ2U6PGJyIC8+PC9kaXY+DQoJCTxwPg0KCQkJCTxpbWcgY2xhc3M9ImtiLWltYWdlIiBzcmM9Imh0dHBzOi8vTmFtZWNoZWFwLnNpbXBsZWtiLmNvbS9TaXRlQ29udGVudHMvMi03QzIyRDUyMzZBNDU0M0VCODI3RjNCRDg5MzZFMTUzRS9tZWRpYS9kY3ZfZHdubF9mbC5wbmciIC8+DQoJCTwvcD4NCgkJPHA+DQoJCQkJPGk+DQoJCQkJCQk8Yj5Ob3RlPC9iPjogSWYgeW91IGhhdmUgYSBNdWx0aS1Eb21haW4gU1NMIGFuZCBjaG9vc2UgdGhpcyBtZXRob2Qgb2YgRENWIGZvciBzZXZlcmFsIGRvbWFpbnMsIG5vIGxpbmsgd2lsbCBhcHBlYXIgaW4gdGhlIHllbGxvdyBwYW5lbCBhcyBlYWNoIGRvbWFpbiB3aWxsIGhhdmUgYSBkaWZmZXJlbnQgbGluay4gVG8gdmVyaWZ5IGVhY2ggb2YgdGhlIGRvbWFpbnMsIHlvdSB3aWxsIG5lZWQgdG8gY3JlYXRlIHRoZSBjb3JyZXNwb25kaW5nIGxpbmtzIGJ5IGZvbGxvd2luZyB0aGUgaW5zdHJ1Y3Rpb25zIGluIHRoZSB5ZWxsb3cgYm94IGFuZCBjaGVja2luZyBlYWNoIFVSTCBpbiB5b3VyIGJyb3dzZXIuIEluIG1vc3QgY2FzZXMsIGlmIGEgc2ltcGxlIHRleHQgbGluZSBsaWtlIHRoZSBvbmUgYmVsb3cgaXMgc2hvd24gb24gdGhlIHNjcmVlbiwgdGhlIHZhbGlkYXRpb24gZmlsZSBpcyBhY2Nlc3NpYmxlLjwvaT4NCgkJCQk8YnIgLz4NCgkJPC9wPg0KCQk8cD4NCgkJCQk8aW1nIGNsYXNzPSJrYi1pbWFnZSIgc3JjPSJodHRwczovL05hbWVjaGVhcC5zaW1wbGVrYi5jb20vU2l0ZUNvbnRlbnRzLzItN0MyMkQ1MjM2QTQ1NDNFQjgyN0YzQkQ4OTM2RTE1M0UvbWVkaWEvdHh0X2ZpbGVfdmlldy5wbmciIC8+DQoJCTwvcD4NCgkJPHA+T25jZSB0aGUgZmlsZSBpcyB1cGxvYWRlZCBhbmQgYWNjZXNzaWJsZSBleHRlcm5hbGx5IHZpYSB0aGUgZm9sbG93aW5nIFVSTCBodHRwOi8veW91cl9kb21haW5fbmFtZS5jb20vLndlbGwta25vd24vcGtpLXZhbGlkYXRpb24vZmlsZW5hbWUudHh0LCBwbGVhc2UgY2xpY2sgPGI+U2F2ZSBDaGFuZ2VzL1JldHJ5IEFsdCBEQ1Y8L2I+LiBUaGlzIHdpbGwgZm9yY2UgdGhlIENlcnRpZmljYXRlIEF1dGhvcml0eSB0byBwZXJmb3JtIHRoZSBEQ1YgY2hlY2suIDxiciAvPjwvcD4NCgkJPHA+DQoJCQkJPGltZyBjbGFzcz0ia2ItaW1hZ2UiIHNyYz0iaHR0cHM6Ly9OYW1lY2hlYXAuc2ltcGxla2IuY29tL1NpdGVDb250ZW50cy8yLTdDMjJENTIzNkE0NTQzRUI4MjdGM0JEODkzNkUxNTNFL21lZGlhL3JldHJ5X2Rjdl9odHRwLnBuZyIgLz4NCgkJPC9wPg0KCQk8cD4NCgkJCQk8aT4NCgkJCQkJCTxiPk5vdGU8L2I+OiBJZiB5b3UgYXJlIGFjdGl2YXRpbmcgeW91ciBjZXJ0aWZpY2F0ZSBmb3IgYSBzdWJkb21haW4sIHlvdSBjYW4gZWl0aGVyIHVwbG9hZCB0aGUgdGV4dCB0byB0aGUgZG9tYWluIG1haW4gZGlyZWN0b3J5IG9yIHRoZSBzdWJkb21haW4gZGlyZWN0b3J5LiBTbyB0aGUgZmlsZSBzaG91bGQgYmUgYWNjZXNzaWJsZSBlaXRoZXIgdmlhIGh0dHAocyk6Ly9leGFtcGxlLmNvbS8ud2VsbC1rbm93bi9wa2ktdmFsaWRhdGlvbi8gb3IgdmlhIGh0dHAocyk6Ly9zdWIuZXhhbXBsZS5jb20vLndlbGwta25vd24vcGtpLXZhbGlkYXRpb24vIElmIHlvdSBhcmUgYWN0aXZhdGluZyBhIDxhIGhyZWY9Imh0dHBzOi8vd3d3Lm5hbWVjaGVhcC5jb20vc2VjdXJpdHkvc3NsLWNlcnRpZmljYXRlcy9tdWx0aS1kb21haW4uYXNweCI+TXVsdGktZG9tYWluIGNlcnRpZmljYXRlPC9hPg0KZm9yIHN1YmRvbWFpbnMsIHRoZSB2YWxpZGF0aW9uIGZpbGUgc2hvdWxkIGJlIHBsYWNlZCBpbnRvIHRoZSBEb2N1bWVudCByb290IGRpcmVjdG9yeSBvZiBlYWNoIGNvcnJlc3BvbmRpbmcgZG9tYWluLiBXZSByZWNvbW1lbmQgdGhhdCB5b3UgdXBsb2FkIGl0IGZvciBlYWNoIHN1YmRvbWFpbiBhcyB3ZWxsLjwvaT4NCgkJPC9wPg0KCQk8cD4NCgkJCQk8aT4NCgkJCQkJCTxiPk5vdGU8L2I+OiBJZiB5b3UgaGF2ZSBhY3RpdmF0ZWQgdGhlIGNlcnRpZmljYXRlIHdpdGggZG9tYWluLmNvbSBpbmRpY2F0ZWQgYXMgdGhlIEZRRE4gKEZ1bGx5IFF1YWxpZmllZCBEb21haW4gTmFtZSkgaW4geW91ciBDU1IgY29kZSwgcGxlYXNlIG1ha2Ugc3VyZSB0aGF0IHRoZSBmaWxlIGlzIGF2YWlsYWJsZSB2aWEgaHR0cDovL2RvbWFpbi5jb20vLndlbGwta25vd24vcGtpLXZhbGlkYXRpb24vZmlsZS50eHQgLiBJbiB0aGlzIGNhc2UsIHd3dy5kb21haW4uY29tIGlzIGNvbnNpZGVyZWQgdG8gYmUgdW5kZXIgeW91ciBjb250cm9sIGFzIHdlbGwuPC9pPg0KCQk8L3A+DQoJCTxwPg0KCQkJCTxiPklmIHlvdXIgQ1NSIGNvZGUgY29udGFpbnMgd3d3LmRvbWFpbi5jb20gYXMgdGhlIEZRRE4sIHBsZWFzZSBtYWtlIHN1cmUgdGhhdCB0aGUgZmlsZSBpcyBhdmFpbGFibGUgdmlhIHRoZSBsaW5rIGh0dHA6Ly9kb21haW4uY29tLy53ZWxsLWtub3duL3BraS12YWxpZGF0aW9uL2ZpbGUudHh0IC4gPC9iPlRoZSBmaWxlIGNvbnRlbnQgc2hvdWxkbid0IGJlIGNoYW5nZWQgaW4gYW55IHdheSBhcyB0aGUgQ29tb2RvIChub3cgU2VjdGlnbykgdmFsaWRhdGlvbiBzeXN0ZW0gaXMgY2FzZSBzZW5zaXRpdmUuPGJyIC8+PC9wPg0KCQk8aDIgaWQ9ImVtYWlsIj4NCgkJCQk8Yj5SZWNlaXZlIGFuIGVtYWlsPC9iPg0KCQk8L2gyPg0KCQk8ZGl2PlRoaXMgb3B0aW9uIHJlcXVpcmVzIHlvdSB0byBoYXZlIGEgZG9tYWluLXJlbGF0ZWQgZW1haWwgYWRkcmVzcyBmcm9tIHRoZSBzdWdnZXN0ZWQgbGlzdC4gVGhlIGV4YWN0IGVtYWlsIGFkZHJlc3Mgd2hpY2ggd2lsbCBiZSB1c2VkIGZvciB0aGUgcHVycG9zZSBvZiBEQ1YgaXMgc2VsZWN0ZWQgZHVyaW5nIHRoZSBTU0wgYWN0aXZhdGlvbiBwcm9jZXNzLjwvZGl2Pg0KCQk8ZGl2Pg0KCQkJCTxiciAvPg0KCQk8L2Rpdj4NCgkJPGRpdj5IZXJlIGlzIGEgaG93LXRvIHZpZGVvOjwvZGl2Pg0KCQk8ZGl2Pg0KCQkJCTxiciAvPg0KCQkJCTxpZnJhbWUgc3JjPSIvL3d3dy55b3V0dWJlLW5vY29va2llLmNvbS9lbWJlZC84a1V5X3NzRjNRUT9mZWF0dXJlPXBsYXllcl9kZXRhaWxwYWdlIiBhbGxvd2Z1bGxzY3JlZW49IiIgd2lkdGg9IjY0MCIgaGVpZ2h0PSIzNjAiIGZyYW1lYm9yZGVyPSIwIj4NCgkJCQk8L2lmcmFtZT4NCgkJCQk8cD4NCgkJCQkJCTxiPk5vdGU8L2I+OiA8aT5UaGUgZW1haWwtYmFzZWQgdmFsaWRhdGlvbiB3aXRoIFdIT0lTIGVtYWlsIGlzIG5vdCBhdmFpbGFibGUgZHVlIHRvIHRoZSB1cHN0cmVhbSBwcm92aWRlciB1cGRhdGVzLjwvaT48L3A+DQoJCQkJPHA+DQoJCQkJCQk8YnIgLz5IZXJlIGlzIHRoZSB0ZXh0IHZlcnNpb24gb2YgdGhlIGd1aWRlOjxiciAvPjwvcD5EdWUgdG8gPGEgaHJlZj0iaHR0cHM6Ly9jYWJmb3J1bS5vcmcvd3AtY29udGVudC91cGxvYWRzL0NBLUJyb3dzZXItRm9ydW0tQlItMS4zLjctcmVkbGluZWQtdy1CYWxsb3QtMTY5LnBkZiI+Q0EvQiBmb3J1bTwvYT4gcmVndWxhdGlvbnMsIHlvdSBjYW4gb25seSB1c2Ugb25lIG9mIHRoZSBmb2xsb3dpbmcgZG9tYWluLXJlbGF0ZWQgZ2VuZXJpYyBlbWFpbHMgdG8gcmVjZWl2ZSB0aGUgYXBwcm92YWwgZW1haWw6PGJyIC8+PC9kaXY+DQoJCTx1bD4NCgkJCQk8bGk+YWRtaW5AZXhhbXBsZS5jb208L2xpPg0KCQkJCTxsaT5hZG1pbmlzdHJhdG9yQGV4YW1wbGUuY29tPC9saT4NCgkJCQk8bGk+cG9zdG1hc3RlckBleGFtcGxlLmNvbTxiciAvPjwvbGk+DQoJCQkJPGxpPndlYm1hc3RlckBleGFtcGxlLmNvbTwvbGk+DQoJCQkJPGxpPmhvc3RtYXN0ZXJAZXhhbXBsZS5jb208L2xpPg0KCQk8L3VsPg0KCQk8YnIgLz4NCgkJPHA+DQoJCQkJPGltZyBjbGFzcz0ia2ItaW1hZ2UiIHNyYz0iaHR0cHM6Ly9OYW1lY2hlYXAuc2ltcGxla2IuY29tL1NpdGVDb250ZW50cy8yLTdDMjJENTIzNkE0NTQzRUI4MjdGM0JEODkzNkUxNTNFL21lZGlhL0RDVi1lbWFpbF8xLnBuZyIgLz4NCgkJCQk8YnIgLz5BZnRlciB5b3UgY29tcGxldGUgU1NMIGFjdGl2YXRpb24gcHJvY2VzcywgdGhlIENlcnRpZmljYXRlIEF1dGhvcml0eSB3aWxsIGVtYWlswqB5b3UgYXQgdGhlIHNlbGVjdGVkIGFkZHJlc3MuPGJyIC8+PC9wPg0KCQlPbmNlIGFjdGl2YXRpb24gaXMgY29tcGxldGUsIGFuIGVtYWlsIHdpbGwgYmUgc2VudCB0byB5b3UuIFRvIGNvbmZpcm0gdGhlIGRvbWFpbiBvd25lcnNoaXAgcmlnaHRzIGZvciB5b3VyIGNlcnRpZmljYXRlLCB5b3UgbmVlZCB0byBjb3B5IHRoZSB2YWxpZGF0aW9uIGNvZGUgZnJvbSB0aGUgYXBwcm92YWwgZW1haWwsIGZvbGxvdyB0aGUgbGluaywgYW5kIHRoZW4gcGFzdGUgdGhlIHZhbGlkYXRpb24gY29kZSBpbnRvIHRoZSBjb3JyZXNwb25kaW5nIGZpZWxkIG9uIHRoZSBuZXcgcGFnZSBhbmQgY2xpY2sgPGI+TmV4dDwvYj4uPHA+PGltZyBjbGFzcz0ia2ItaW1hZ2UiIHNyYz0iaHR0cHM6Ly9OYW1lY2hlYXAuc2ltcGxla2IuY29tL1NpdGVDb250ZW50cy8yLTdDMjJENTIzNkE0NTQzRUI4MjdGM0JEODkzNkUxNTNFL21lZGlhL2Rjdl9lbWFpbC5wbmciIC8+PC9wPjxwPlBhc3RlIHRoZSBjb2RlIGZyb20gdGhlIGVtYWlsIGFuZCBoaXQgPGI+TmV4dDwvYj4uPC9wPjxwPjxpbWcgY2xhc3M9ImtiLWltYWdlIiBzcmM9Imh0dHBzOi8vTmFtZWNoZWFwLnNpbXBsZWtiLmNvbS9TaXRlQ29udGVudHMvMi03QzIyRDUyMzZBNDU0M0VCODI3RjNCRDg5MzZFMTUzRS9tZWRpYS9kY3ZfMl9lbWFpbC5wbmciIC8+PC9wPjxwPlRoYXQncyBpdCEgPGJyIC8+PC9wPjxwPklmIHlvdSBkbyBub3QgcmVjZWl2ZSB0aGUgYXBwcm92YWwgZW1haWwsIHlvdSBjYW4gYWx3YXlzIHJldHJ5IGl0IGJ5IGNsaWNraW5nIDxiPlJlc2VuZCBlbWFpbDwvYj4gb24gdGhlIDxiPkVkaXQgbWV0aG9kczwvYj4gcGFnZS4gVGhlIGxpbmsgdG8gdGhlIDxiPkVkaXQgbWV0aG9kczwvYj4gcGFnZSBpcyBhdmFpbGFibGUgaW4gdGhlIHZhbGlkYXRpb24gaW5zdHJ1Y3Rpb25zIHBhbmVsIHBsYWNlZCBvbiB0aGUgPGI+U1NMIERldGFpbHM8L2I+IHBhZ2UuPGJyIC8+PC9wPjxwPjxpbWcgY2xhc3M9ImtiLWltYWdlIiBzcmM9Imh0dHBzOi8vTmFtZWNoZWFwLnNpbXBsZWtiLmNvbS9TaXRlQ29udGVudHMvMi03QzIyRDUyMzZBNDU0M0VCODI3RjNCRDg5MzZFMTUzRS9tZWRpYS9kY3ZfcmVzX2VtLnBuZyIgLz48L3A+PHA+PC9wPjxwIGlkPSJodHRwIj48L3A+PHA+PC9wPjxoMiBpZD0iY2hhbiI+PGI+Q2hhbmdpbmcgRENWIG1ldGhvZHM8L2I+PC9oMj48ZGl2PklmIHlvdSBjaG9zZSBhIHBhcnRpY3VsYXIgRENWIG1ldGhvZCBkdXJpbmcgYWN0aXZhdGlvbiBidXQgd2FudCB0byBzd2l0Y2ggdG8gYSBkaWZmZXJlbnQgb25lIGxhdGVyLCB5b3UgY2FuIGNoYW5nZSBpdCBvbiB5b3VyIGFjY291bnQgcGFnZS4gTG9nIGluIHRvIHlvdXIgTmFtZWNoZWFwIGFjY291bnQsIG9wZW4gdGhlIDxiPlNTTCBDZXJ0aWZpY2F0ZXM8L2I+IGxpc3QsIGFuZCBsb2NhdGUgdGhlIGNlcnRpZmljYXRlIGluIHF1ZXN0aW9uIGFuZCBjbGljayA8Yj5EZXRhaWxzPC9iPiBuZXh0IHRvIGl0LjwvZGl2PjxkaXY+PGJyIC8+PC9kaXY+PGRpdj4gT24gdGhlIG5leHQgcGFnZSwgY2xpY2sgdGhlIGxpbmsgaW4gdGhlIHllbGxvdyB0YWJsZSB3aXRoIERDViBpbnN0cnVjdGlvbnMgdG8gZ28gdG8gdGhlIDxiPkVkaXQgbWV0aG9kczwvYj4gcGFnZS48L2Rpdj48ZGl2PjxiciAvPjwvZGl2Pk9uIHRoZSA8Yj5FZGl0IG1ldGhvZHM8L2I+IHBhZ2UsIHlvdSdsbCBzZWUgdGhlIGZvbGxvd2luZyBidXR0b246PHA+PGltZyBjbGFzcz0ia2ItaW1hZ2UiIHNyYz0iaHR0cHM6Ly9OYW1lY2hlYXAuc2ltcGxla2IuY29tL1NpdGVDb250ZW50cy8yLTdDMjJENTIzNkE0NTQzRUI4MjdGM0JEODkzNkUxNTNFL21lZGlhL2RjdjkucG5nIiBhbHQ9ImRjdjkiIHdpZHRoPSIyMzQiIGhlaWdodD0iMTU1IiBib3JkZXI9IjAiIC8+PC9wPjxkaXY+V2hlbiB5b3UgY2xpY2sgaXQsIHlvdSB3aWxsIGJlIHByZXNlbnRlZCB3aXRoIHRoZSB0aHJlZSBwb3NzaWJsZSBEQ1Ygb3B0aW9ucyBpbiBhIGRyb3AtZG93biBtZW51LjwvZGl2PjxkaXY+PGJyIC8+PC9kaXY+Q2hvb3NlIHRoZSBkZXNpcmVkIG1ldGhvZCBhbmQgY2xpY2sgPGI+U2F2ZSBDaGFuZ2VzIC8gUmV0cnkgQWx0IERDVjwvYj4uPHA+PGltZyBjbGFzcz0ia2ItaW1hZ2UiIHNyYz0iaHR0cHM6Ly9OYW1lY2hlYXAuc2ltcGxla2IuY29tL1NpdGVDb250ZW50cy8yLTdDMjJENTIzNkE0NTQzRUI4MjdGM0JEODkzNkUxNTNFL21lZGlhL3NhdmVfcmV0cnlfZGN2LnBuZyIgLz48YnIgLz48YnIgLz48L3A+PHA+VGhlbiwgcGVyZm9ybSB0aGUgcmVxdWlyZWQgc3RlcHMgdG8gY29tcGxldGUgdGhlIERDVi48L3A+PHA+PGk+PGI+Tm90ZTwvYj46IFlvdSBjYW4gYWxzbyB1c2UgdGhpcyA8YSBocmVmPSJodHRwczovL3d3dy5uYW1lY2hlYXAuY29tL3N1cHBvcnQva25vd2xlZGdlYmFzZS9hcnRpY2xlLmFzcHgvMTAxODEvNjgvc2VjdGlnby12YWxpZGF0aW9uLXRvb2wiIGxpbmt0ZXh0PSJTU0wgVmFsaWRhdGlvbiBUb29sIiBsaW5rdHlwZT0iQ3VzdG9tIiB0YXJnZXQ9Il9ibGFuayI+U1NMIFZhbGlkYXRpb24gVG9vbDwvYT4gdG8gY2hlY2sgeW91ciBTU0wgc3RhdHVzLCBzd2l0Y2ggdGhlIHZhbGlkYXRpb24gbWV0aG9kLCBhbmQgc3BlZWQgdXAgdGhlIFNTTCBjZXJ0aWZpY2F0ZSBpc3N1YW5jZS48L2k+PC9wPjxwPkJ5IHRoZSB3YXksIGluIHRoaXMgdG9vbCwgeW91IGhhdmUgYSBwb3NzaWJpbGl0eSB0byBzd2l0Y2ggdGhlIG9yZGVyIHRvIHRoZSAiRE5TIFRYVA0KIHJhbmRvbSB2YWx1ZSIgRENWIG1ldGhvZCBwcmVzZW50ZWQgYnkgU2VjdGlnbyBDQSBpbiBKYW51YXJ5IDIwMjUuIE1vcmUgDQpkZXRhaWxzIG9uIGhvdyB0byB1c2UgaXQgYXJlIDxhIGhyZWY9Imh0dHBzOi8vd3d3Lm5hbWVjaGVhcC5jb20vc3VwcG9ydC9rbm93bGVkZ2ViYXNlL2FydGljbGUuYXNweC8xMDE4MS82OC9zZWN0aWdvLW9yZGVyLXN0YXR1cy1jaGVja2VyLyNzd2l0Y2giIHRhcmdldD0iX2JsYW5rIj5oZXJlPC9hPi48L3A+PHA+PGk+PGI+Tm90ZTwvYj46IElmIHlvdSBoYXZlIGEgRG9tYWluIFZhbGlkYXRpb24gY2VydGlmaWNhdGUsIGl0IHdpbGwgYmUgZW1haWxlZCB0byB5b3Ugc2hvcnRseSBhZnRlciBEQ1YgaXMgY29tcGxldGUuPGJyIC8+PC9pPjwvcD48cD48aT5JZiB5b3UgaGF2ZSBhbiA8YSBocmVmPSJodHRwczovL3d3dy5uYW1lY2hlYXAuY29tL3NlY3VyaXR5L3NzbC1jZXJ0aWZpY2F0ZXMvb3JnYW5pemF0aW9uLXZhbGlkYXRpb24uYXNweCI+T1Y8L2E+IG9yIGFuIDxhIGhyZWY9Imh0dHBzOi8vd3d3Lm5hbWVjaGVhcC5jb20vc2VjdXJpdHkvc3NsLWNlcnRpZmljYXRlcy9leHRlbmRlZC12YWxpZGF0aW9uLmFzcHgiPkVWIGNlcnRpZmljYXRlPC9hPiwgeW91ciBvcmRlciBzaG91bGQgdW5kZXJnbyBidXNpbmVzcyB2YWxpZGF0aW9uLiBPbmNlIHlvdSBjb21wbGV0ZSBEQ1YsIHlvdSB3aWxsIHJlY2VpdmUgYW4gZW1haWwgZnJvbSBDb21vZG8gKG5vdyBTZWN0aWdvKSB3aXRoIGZ1cnRoZXIgaW5zdHJ1Y3Rpb25zLjxiciAvPjwvaT48L3A+","NewTillDate":null,"FeaturedTillDate":null,"ModifiedDateTime":"2026-03-10T15:19:26.0000000","LiveDateTime":"1754-02-02T00:00:00.0000000","CreatedDateTime":"2015-09-25T11:43:04.0000000","ApprovalDatetime":"2015-09-25T11:47:41.0000000","RequestCount":239759,"MarkedAsNew":false,"MarkedAsFeatured":false,"RatingValue":2,"CategoryPaths":[{"__type":"Nc:SimpleKB:Abstractions:Dtos:CategoryPathDto","Level":1,"CategoryId":14,"CategoryName":"SSL Certificates"}],"AssociatedCategories":[{"CategoryId":68,"CategoryName":"Validation","CategoryDisplayName":"SSL CertificatesValidation"},{"CategoryId":14,"CategoryName":"SSL Certificates","CategoryDisplayName":"SSL Certificates"}],"AssociatedTags":[],"RelatedArticles":[{"ArticleId":10025,"PreferedCategoryId":68,"ArticleTypeId":0,"ArticleName":"How to complete HTTP-based validation ('Upload a validation file' option)","ArticleTypeName":null,"Title":"How to complete HTTP-based validation ('Upload a validation file' option)","LiveDateTime":null,"ModifiedDateTime":"05/27/2024","MarkedAsNew":false,"MarkedAsFeatured":false}],"AssociatedMedias":[],"PreferredCategoryId":0,"RootParentCategoryName":"","RootParentCategoryId":0},"status":200,"statusText":"OK"},"/api/v1/ncpl/simplekb/getcategorybycategoryid:\"{\\\"categoryId\\\":14}\"":{"body":{"__type":"Nc:SimpleKB:Abstractions:Dtos:CategoryDto","Description":"SGVyZSB5b3UgY2FuIGZpbmQgaW5mb3JtYXRpb24gb24gd2hhdCBTU0wgY2VydGlmaWNhdGVzIGFyZSB1c2VkIGZvciwgU1NMIGNlcnRpZmljYXRlcyB0aGF0IE5hbWVjaGVhcCBvZmZlcnMgYW5kIFNTTCByZWxhdGVkIHByb2NlZHVyZXMgc3VjaCBhcyBhY3RpdmF0aW9uLCBpbnN0YWxsYXRpb24gYW5kIG90aGVy","ParentCategoryId":0,"Parent_Category_Name":null,"FriendlyId":null,"ApprovedYN":true,"TreatAsTopicYN":false,"CreatedDateTime":"10/30/2007 06:50:39","CurrentCategoryPaths":[{"__type":"Nc:SimpleKB:Abstractions:Dtos:CategoryPathDto","Level":1,"CategoryId":14,"CategoryName":"SSL Certificates"}],"RelatedCategories":[{"__type":"Nc:SimpleKB:Abstractions:Dtos:RelatedCategoryDto","CategoryId":2293,"CategoryName":"Automated SSL management"}],"AssociatedArticles":[{"ArticleId":467,"Title":"How to generate CSR (Certificate Signing Request) Code","ArticleName":"How to generate CSR (Certificate Signing Request) Code","LiveDateTime":"02/02/1754 00:00:00","NewTillDate":null,"FeaturedTillDate":"01/31/2012 05:00:00","ModifiedDateTime":"01/29/2025"},{"ArticleId":9637,"Title":"How can I complete domain control validation (DCV) for my SSL certificate?","ArticleName":"How can I complete domain control validation (DCV) for my SSL certificate?","LiveDateTime":"02/02/1754 00:00:00","NewTillDate":null,"FeaturedTillDate":null,"ModifiedDateTime":"03/10/2026"},{"ArticleId":811,"Title":"How do I reissue my SSL certificate?","ArticleName":"How do I reissue my SSL certificate?","LiveDateTime":"02/02/1754 00:00:00","NewTillDate":null,"FeaturedTillDate":null,"ModifiedDateTime":"03/26/2026"},{"ArticleId":795,"Title":"How to install SSL certificates","ArticleName":"How to install SSL certificates","LiveDateTime":"02/02/1754 00:00:00","NewTillDate":null,"FeaturedTillDate":null,"ModifiedDateTime":"09/07/2022"},{"ArticleId":816,"Title":"How to renew an SSL certificate","ArticleName":"How to renew an SSL certificate","LiveDateTime":"02/02/1754 00:00:00","NewTillDate":null,"FeaturedTillDate":null,"ModifiedDateTime":"04/16/2025"}],"AssociatedTags":[{"TagId":463,"Tag":"ssl"},{"TagId":467,"Tag":" site seal"},{"TagId":468,"Tag":" trustlogo"},{"TagId":469,"Tag":" ca"},{"TagId":470,"Tag":" csr"},{"TagId":471,"Tag":" ssl activation"},{"TagId":473,"Tag":" ssl installation"},{"TagId":474,"Tag":" rsa"},{"TagId":475,"Tag":" ssl reissue"},{"TagId":477,"Tag":" ssl renewal"},{"TagId":488,"Tag":" comodo"},{"TagId":489,"Tag":" positivessl"},{"TagId":490,"Tag":" instantssl"},{"TagId":491,"Tag":" premiumssl"},{"TagId":492,"Tag":" wildcard"},{"TagId":493,"Tag":" geotrust"},{"TagId":494,"Tag":" rapidssl"},{"TagId":495,"Tag":" quickssl"},{"TagId":496,"Tag":" true businessid with ev"},{"TagId":83081,"Tag":" ssl cancellation"}],"CategoryId":14,"CategoryName":"SSL Certificates"},"status":200,"statusText":"OK"},"/api/v1/ncpl/simplekb/getcategories:\"{\\\"parentCategoryId\\\":0,\\\"getTree\\\":true}\"":{"body":[{"__type":"Nc:SimpleKB:Abstractions:Dtos:CategoryItemDto","ParentCategoryId":93,"TreatAsTopicYN":false,"Description":"","ImageUrl":"","ShortDesc":"","CategoryId":2216,"CategoryName":"Spam Protection"},{"__type":"Nc:SimpleKB:Abstractions:Dtos:CategoryItemDto","ParentCategoryId":14,"TreatAsTopicYN":false,"Description":"","ImageUrl":"","ShortDesc":"","CategoryId":2217,"CategoryName":"Renewal"},{"__type":"Nc:SimpleKB:Abstractions:Dtos:CategoryItemDto","ParentCategoryId":14,"TreatAsTopicYN":false,"Description":"","ImageUrl":"","ShortDesc":"","CategoryId":2218,"CategoryName":"cPanel SSL Plugin"},{"__type":"Nc:SimpleKB:Abstractions:Dtos:CategoryItemDto","ParentCategoryId":12,"TreatAsTopicYN":false,"Description":"","ImageUrl":"","ShortDesc":"","CategoryId":2219,"CategoryName":"PHP Configuration"},{"__type":"Nc:SimpleKB:Abstractions:Dtos:CategoryItemDto","ParentCategoryId":14,"TreatAsTopicYN":false,"Description":"","ImageUrl":"","ShortDesc":"","CategoryId":2221,"CategoryName":"Multi-Domain SSL Certificates"},{"__type":"Nc:SimpleKB:Abstractions:Dtos:CategoryItemDto","ParentCategoryId":14,"TreatAsTopicYN":false,"Description":"","ImageUrl":"","ShortDesc":"","CategoryId":2222,"CategoryName":"Cancellation"},{"__type":"Nc:SimpleKB:Abstractions:Dtos:CategoryItemDto","ParentCategoryId":14,"TreatAsTopicYN":false,"Description":"","ImageUrl":"","ShortDesc":"","CategoryId":2223,"CategoryName":"Browser errors"},{"__type":"Nc:SimpleKB:Abstractions:Dtos:CategoryItemDto","ParentCategoryId":14,"TreatAsTopicYN":false,"Description":"","ImageUrl":"","ShortDesc":"","CategoryId":2224,"CategoryName":"Site Seal, Logo"},{"__type":"Nc:SimpleKB:Abstractions:Dtos:CategoryItemDto","ParentCategoryId":12,"TreatAsTopicYN":false,"Description":"","ImageUrl":"","ShortDesc":"","CategoryId":2225,"CategoryName":"SEO"},{"__type":"Nc:SimpleKB:Abstractions:Dtos:CategoryItemDto","ParentCategoryId":93,"TreatAsTopicYN":false,"Description":"","ImageUrl":"","ShortDesc":"","CategoryId":2226,"CategoryName":"Email Migration"},{"__type":"Nc:SimpleKB:Abstractions:Dtos:CategoryItemDto","ParentCategoryId":2211,"TreatAsTopicYN":false,"Description":"","ImageUrl":"","ShortDesc":"","CategoryId":2227,"CategoryName":"SSL Resellers"},{"__type":"Nc:SimpleKB:Abstractions:Dtos:CategoryItemDto","ParentCategoryId":0,"TreatAsTopicYN":true,"Description":"","ImageUrl":"/assets/img/pictograms/150/cloud-red.png","ShortDesc":"","CategoryId":2228,"CategoryName":"Apps","SubCategories":[{"__type":"Nc:SimpleKB:Abstractions:Dtos:CategoryItemDto","ParentCategoryId":2228,"TreatAsTopicYN":false,"Description":"","ImageUrl":"","ShortDesc":"","CategoryId":2251,"CategoryName":"Supersonic CDN"},{"__type":"Nc:SimpleKB:Abstractions:Dtos:CategoryItemDto","ParentCategoryId":2228,"TreatAsTopicYN":false,"Description":"","ImageUrl":"","ShortDesc":"","CategoryId":2298,"CategoryName":"Site Maker"},{"__type":"Nc:SimpleKB:Abstractions:Dtos:CategoryItemDto","ParentCategoryId":2228,"TreatAsTopicYN":false,"Description":"","ImageUrl":"","ShortDesc":"","CategoryId":177,"CategoryName":"Google Workspace (formerly G Suite)"}]},{"__type":"Nc:SimpleKB:Abstractions:Dtos:CategoryItemDto","ParentCategoryId":2211,"TreatAsTopicYN":false,"Description":"","ImageUrl":"","ShortDesc":"","CategoryId":2229,"CategoryName":"Hosting Resellers"},{"__type":"Nc:SimpleKB:Abstractions:Dtos:CategoryItemDto","ParentCategoryId":34,"TreatAsTopicYN":false,"Description":"","ImageUrl":"","ShortDesc":"","CategoryId":2232,"CategoryName":"DNSSEC"},{"__type":"Nc:SimpleKB:Abstractions:Dtos:CategoryItemDto","ParentCategoryId":34,"TreatAsTopicYN":false,"Description":"","ImageUrl":"","ShortDesc":"","CategoryId":2234,"CategoryName":"Google Workspace (formerly G Suite)"},{"__type":"Nc:SimpleKB:Abstractions:Dtos:CategoryItemDto","ParentCategoryId":34,"TreatAsTopicYN":false,"Description":"","ImageUrl":"","ShortDesc":"","CategoryId":2237,"CategoryName":"Host records setup"},{"__type":"Nc:SimpleKB:Abstractions:Dtos:CategoryItemDto","ParentCategoryId":14,"TreatAsTopicYN":false,"Description":"","ImageUrl":"","ShortDesc":"","CategoryId":2238,"CategoryName":"SSL installation errors"},{"__type":"Nc:SimpleKB:Abstractions:Dtos:CategoryItemDto","ParentCategoryId":0,"TreatAsTopicYN":false,"Description":"","ImageUrl":"/assets/img/pictograms/150/easywp-red.png","ShortDesc":"","CategoryId":2239,"CategoryName":"EasyWP","SubCategories":[{"__type":"Nc:SimpleKB:Abstractions:Dtos:CategoryItemDto","ParentCategoryId":2239,"TreatAsTopicYN":false,"Description":"","ImageUrl":"","ShortDesc":"","CategoryId":2280,"CategoryName":"Getting Started"},{"__type":"Nc:SimpleKB:Abstractions:Dtos:CategoryItemDto","ParentCategoryId":2239,"TreatAsTopicYN":false,"Description":"","ImageUrl":"","ShortDesc":"","CategoryId":2279,"CategoryName":"General Information"},{"__type":"Nc:SimpleKB:Abstractions:Dtos:CategoryItemDto","ParentCategoryId":2239,"TreatAsTopicYN":false,"Description":"","ImageUrl":"","ShortDesc":"","CategoryId":2281,"CategoryName":"WordPress Migration"},{"__type":"Nc:SimpleKB:Abstractions:Dtos:CategoryItemDto","ParentCategoryId":2239,"TreatAsTopicYN":false,"Description":"","ImageUrl":"","ShortDesc":"","CategoryId":2282,"CategoryName":"Plugins and Themes"},{"__type":"Nc:SimpleKB:Abstractions:Dtos:CategoryItemDto","ParentCategoryId":2239,"TreatAsTopicYN":false,"Description":"","ImageUrl":"","ShortDesc":"","CategoryId":2284,"CategoryName":"WordPress Management"},{"__type":"Nc:SimpleKB:Abstractions:Dtos:CategoryItemDto","ParentCategoryId":2239,"TreatAsTopicYN":false,"Description":"","ImageUrl":"","ShortDesc":"","CategoryId":2285,"CategoryName":"SFTP and Database access"},{"__type":"Nc:SimpleKB:Abstractions:Dtos:CategoryItemDto","ParentCategoryId":2239,"TreatAsTopicYN":false,"Description":"","ImageUrl":"","ShortDesc":"","CategoryId":2286,"CategoryName":"Domains questions"},{"__type":"Nc:SimpleKB:Abstractions:Dtos:CategoryItemDto","ParentCategoryId":2239,"TreatAsTopicYN":false,"Description":"","ImageUrl":"","ShortDesc":"","CategoryId":2288,"CategoryName":"Billing questions"},{"__type":"Nc:SimpleKB:Abstractions:Dtos:CategoryItemDto","ParentCategoryId":2239,"TreatAsTopicYN":false,"Description":"","ImageUrl":"","ShortDesc":"","CategoryId":2287,"CategoryName":"SSL questions"}]},{"__type":"Nc:SimpleKB:Abstractions:Dtos:CategoryItemDto","ParentCategoryId":2228,"TreatAsTopicYN":false,"Description":"","ImageUrl":"","ShortDesc":"","CategoryId":2251,"CategoryName":"Supersonic CDN"},{"__type":"Nc:SimpleKB:Abstractions:Dtos:CategoryItemDto","ParentCategoryId":12,"TreatAsTopicYN":false,"Description":"","ImageUrl":"","ShortDesc":"","CategoryId":2252,"CategoryName":"InterWorx questions"},{"__type":"Nc:SimpleKB:Abstractions:Dtos:CategoryItemDto","ParentCategoryId":2253,"TreatAsTopicYN":false,"Description":"","ImageUrl":"","ShortDesc":"","CategoryId":2254,"CategoryName":"Domains How-To"},{"__type":"Nc:SimpleKB:Abstractions:Dtos:CategoryItemDto","ParentCategoryId":2253,"TreatAsTopicYN":false,"Description":"","ImageUrl":"","ShortDesc":"","CategoryId":2255,"CategoryName":"Hosting How-To"},{"__type":"Nc:SimpleKB:Abstractions:Dtos:CategoryItemDto","ParentCategoryId":2253,"TreatAsTopicYN":false,"Description":"","ImageUrl":"","ShortDesc":"","CategoryId":2257,"CategoryName":"Sales & Payments How-To"},{"__type":"Nc:SimpleKB:Abstractions:Dtos:CategoryItemDto","ParentCategoryId":2253,"TreatAsTopicYN":false,"Description":"","ImageUrl":"","ShortDesc":"","CategoryId":2258,"CategoryName":"cPanel Email How-To"},{"__type":"Nc:SimpleKB:Abstractions:Dtos:CategoryItemDto","ParentCategoryId":93,"TreatAsTopicYN":false,"Description":"","ImageUrl":"","ShortDesc":"","CategoryId":2260,"CategoryName":"Private Email Contacts and Calendars Setup"},{"__type":"Nc:SimpleKB:Abstractions:Dtos:CategoryItemDto","ParentCategoryId":2253,"TreatAsTopicYN":false,"Description":"","ImageUrl":"","ShortDesc":"","CategoryId":2262,"CategoryName":"EasyWP How-To"},{"__type":"Nc:SimpleKB:Abstractions:Dtos:CategoryItemDto","ParentCategoryId":0,"TreatAsTopicYN":false,"Description":"","ImageUrl":"https://download.namecheap.com/assets/img/domainvault-red@2x.png","ShortDesc":"","CategoryId":2289,"CategoryName":"Domain Vault","SubCategories":[]},{"__type":"Nc:SimpleKB:Abstractions:Dtos:CategoryItemDto","ParentCategoryId":14,"TreatAsTopicYN":false,"Description":"","ImageUrl":"","ShortDesc":"","CategoryId":2290,"CategoryName":"CSR code"},{"__type":"Nc:SimpleKB:Abstractions:Dtos:CategoryItemDto","ParentCategoryId":12,"TreatAsTopicYN":false,"Description":"","ImageUrl":"","ShortDesc":"","CategoryId":2291,"CategoryName":"Webuzo questions"},{"__type":"Nc:SimpleKB:Abstractions:Dtos:CategoryItemDto","ParentCategoryId":2265,"TreatAsTopicYN":false,"Description":"","ImageUrl":"","ShortDesc":"","CategoryId":2292,"CategoryName":"Browser Extensions"},{"__type":"Nc:SimpleKB:Abstractions:Dtos:CategoryItemDto","ParentCategoryId":14,"TreatAsTopicYN":false,"Description":"","ImageUrl":"","ShortDesc":"","CategoryId":2293,"CategoryName":"Automated SSL management"},{"__type":"Nc:SimpleKB:Abstractions:Dtos:CategoryItemDto","ParentCategoryId":2228,"TreatAsTopicYN":false,"Description":"","ImageUrl":"","ShortDesc":"","CategoryId":2298,"CategoryName":"Site Maker"},{"__type":"Nc:SimpleKB:Abstractions:Dtos:CategoryItemDto","ParentCategoryId":12,"TreatAsTopicYN":false,"Description":"","ImageUrl":"","ShortDesc":"","CategoryId":27,"CategoryName":"Getting Started"},{"__type":"Nc:SimpleKB:Abstractions:Dtos:CategoryItemDto","ParentCategoryId":0,"TreatAsTopicYN":false,"Description":"","ImageUrl":"/assets/img/pictograms/150/support-red.png","ShortDesc":"","CategoryId":5,"CategoryName":"General & Support","SubCategories":[]},{"__type":"Nc:SimpleKB:Abstractions:Dtos:CategoryItemDto","ParentCategoryId":2200,"TreatAsTopicYN":false,"Description":"","ImageUrl":"","ShortDesc":"","CategoryId":7,"CategoryName":"Billing FAQ"},{"__type":"Nc:SimpleKB:Abstractions:Dtos:CategoryItemDto","ParentCategoryId":2209,"TreatAsTopicYN":false,"Description":"","ImageUrl":"","ShortDesc":"","CategoryId":8,"CategoryName":"Transfer Information"},{"__type":"Nc:SimpleKB:Abstractions:Dtos:CategoryItemDto","ParentCategoryId":12,"TreatAsTopicYN":false,"Description":"","ImageUrl":"","ShortDesc":"","CategoryId":22,"CategoryName":"Hosting Information"},{"__type":"Nc:SimpleKB:Abstractions:Dtos:CategoryItemDto","ParentCategoryId":14,"TreatAsTopicYN":false,"Description":"","ImageUrl":"","ShortDesc":"","CategoryId":38,"CategoryName":"SSL General"},{"__type":"Nc:SimpleKB:Abstractions:Dtos:CategoryItemDto","ParentCategoryId":9,"TreatAsTopicYN":false,"Description":"","ImageUrl":"","ShortDesc":"","CategoryId":45,"CategoryName":"Account Security"},{"__type":"Nc:SimpleKB:Abstractions:Dtos:CategoryItemDto","ParentCategoryId":34,"TreatAsTopicYN":false,"Description":"","ImageUrl":"","ShortDesc":"","CategoryId":46,"CategoryName":"Domain Management"},{"__type":"Nc:SimpleKB:Abstractions:Dtos:CategoryItemDto","ParentCategoryId":2211,"TreatAsTopicYN":false,"Description":"","ImageUrl":"","ShortDesc":"","CategoryId":63,"CategoryName":"Namecheap API"},{"__type":"Nc:SimpleKB:Abstractions:Dtos:CategoryItemDto","ParentCategoryId":2228,"TreatAsTopicYN":false,"Description":"","ImageUrl":"","ShortDesc":"","CategoryId":177,"CategoryName":"Google Workspace (formerly G Suite)"},{"__type":"Nc:SimpleKB:Abstractions:Dtos:CategoryItemDto","ParentCategoryId":93,"TreatAsTopicYN":false,"Description":"","ImageUrl":"","ShortDesc":"","CategoryId":2179,"CategoryName":"Private Email: General Information"},{"__type":"Nc:SimpleKB:Abstractions:Dtos:CategoryItemDto","ParentCategoryId":2265,"TreatAsTopicYN":false,"Description":"","ImageUrl":"","ShortDesc":"","CategoryId":2274,"CategoryName":"General"},{"__type":"Nc:SimpleKB:Abstractions:Dtos:CategoryItemDto","ParentCategoryId":2239,"TreatAsTopicYN":false,"Description":"","ImageUrl":"","ShortDesc":"","CategoryId":2280,"CategoryName":"Getting Started"},{"__type":"Nc:SimpleKB:Abstractions:Dtos:CategoryItemDto","ParentCategoryId":2239,"TreatAsTopicYN":false,"Description":"","ImageUrl":"","ShortDesc":"","CategoryId":2279,"CategoryName":"General Information"},{"__type":"Nc:SimpleKB:Abstractions:Dtos:CategoryItemDto","ParentCategoryId":93,"TreatAsTopicYN":false,"Description":"","ImageUrl":"","ShortDesc":"","CategoryId":2215,"CategoryName":"Private Email: Mailbox Management"},{"__type":"Nc:SimpleKB:Abstractions:Dtos:CategoryItemDto","ParentCategoryId":2211,"TreatAsTopicYN":false,"Description":"","ImageUrl":"","ShortDesc":"","CategoryId":2196,"CategoryName":"WHMCS module for SSL"},{"__type":"Nc:SimpleKB:Abstractions:Dtos:CategoryItemDto","ParentCategoryId":0,"TreatAsTopicYN":false,"Description":"","ImageUrl":"/assets/img/pictograms/150/savings-red.png","ShortDesc":"","CategoryId":2200,"CategoryName":"Checkout & Billing","SubCategories":[{"__type":"Nc:SimpleKB:Abstractions:Dtos:CategoryItemDto","ParentCategoryId":2200,"TreatAsTopicYN":false,"Description":"","ImageUrl":"","ShortDesc":"","CategoryId":7,"CategoryName":"Billing FAQ"},{"__type":"Nc:SimpleKB:Abstractions:Dtos:CategoryItemDto","ParentCategoryId":2200,"TreatAsTopicYN":false,"Description":"","ImageUrl":"","ShortDesc":"","CategoryId":2201,"CategoryName":"Domains Billing"},{"__type":"Nc:SimpleKB:Abstractions:Dtos:CategoryItemDto","ParentCategoryId":2200,"TreatAsTopicYN":false,"Description":"","ImageUrl":"","ShortDesc":"","CategoryId":21,"CategoryName":"Hosting Billing"},{"__type":"Nc:SimpleKB:Abstractions:Dtos:CategoryItemDto","ParentCategoryId":2200,"TreatAsTopicYN":false,"Description":"","ImageUrl":"","ShortDesc":"","CategoryId":71,"CategoryName":"SSL Certificates Billing"},{"__type":"Nc:SimpleKB:Abstractions:Dtos:CategoryItemDto","ParentCategoryId":2200,"TreatAsTopicYN":false,"Description":"","ImageUrl":"","ShortDesc":"","CategoryId":2177,"CategoryName":"Private Email"}]},{"__type":"Nc:SimpleKB:Abstractions:Dtos:CategoryItemDto","ParentCategoryId":2200,"TreatAsTopicYN":false,"Description":"","ImageUrl":"","ShortDesc":"","CategoryId":2201,"CategoryName":"Domains Billing"},{"__type":"Nc:SimpleKB:Abstractions:Dtos:CategoryItemDto","ParentCategoryId":14,"TreatAsTopicYN":false,"Description":"","ImageUrl":"","ShortDesc":"","CategoryId":67,"CategoryName":"Activation"},{"__type":"Nc:SimpleKB:Abstractions:Dtos:CategoryItemDto","ParentCategoryId":2209,"TreatAsTopicYN":false,"Description":"","ImageUrl":"","ShortDesc":"","CategoryId":83,"CategoryName":"Transfer to Namecheap"},{"__type":"Nc:SimpleKB:Abstractions:Dtos:CategoryItemDto","ParentCategoryId":9,"TreatAsTopicYN":false,"Description":"","ImageUrl":"","ShortDesc":"","CategoryId":43,"CategoryName":"Profile Management"},{"__type":"Nc:SimpleKB:Abstractions:Dtos:CategoryItemDto","ParentCategoryId":34,"TreatAsTopicYN":false,"Description":"","ImageUrl":"","ShortDesc":"","CategoryId":10,"CategoryName":"DNS Questions"},{"__type":"Nc:SimpleKB:Abstractions:Dtos:CategoryItemDto","ParentCategoryId":12,"TreatAsTopicYN":false,"Description":"","ImageUrl":"","ShortDesc":"","CategoryId":29,"CategoryName":"cPanel questions"},{"__type":"Nc:SimpleKB:Abstractions:Dtos:CategoryItemDto","ParentCategoryId":2200,"TreatAsTopicYN":false,"Description":"","ImageUrl":"","ShortDesc":"","CategoryId":21,"CategoryName":"Hosting Billing"},{"__type":"Nc:SimpleKB:Abstractions:Dtos:CategoryItemDto","ParentCategoryId":34,"TreatAsTopicYN":false,"Description":"","ImageUrl":"","ShortDesc":"","CategoryId":11,"CategoryName":"Dynamic DNS"},{"__type":"Nc:SimpleKB:Abstractions:Dtos:CategoryItemDto","ParentCategoryId":9,"TreatAsTopicYN":false,"Description":"","ImageUrl":"","ShortDesc":"","CategoryId":44,"CategoryName":"Account Access"},{"__type":"Nc:SimpleKB:Abstractions:Dtos:CategoryItemDto","ParentCategoryId":2209,"TreatAsTopicYN":false,"Description":"","ImageUrl":"","ShortDesc":"","CategoryId":84,"CategoryName":"Transfer to another provider"},{"__type":"Nc:SimpleKB:Abstractions:Dtos:CategoryItemDto","ParentCategoryId":14,"TreatAsTopicYN":false,"Description":"","ImageUrl":"","ShortDesc":"","CategoryId":68,"CategoryName":"Validation"},{"__type":"Nc:SimpleKB:Abstractions:Dtos:CategoryItemDto","ParentCategoryId":12,"TreatAsTopicYN":false,"Description":"","ImageUrl":"","ShortDesc":"","CategoryId":2182,"CategoryName":"cPanel: Software Management"},{"__type":"Nc:SimpleKB:Abstractions:Dtos:CategoryItemDto","ParentCategoryId":93,"TreatAsTopicYN":false,"Description":"","ImageUrl":"","ShortDesc":"","CategoryId":2214,"CategoryName":"Email Forwarding"},{"__type":"Nc:SimpleKB:Abstractions:Dtos:CategoryItemDto","ParentCategoryId":2265,"TreatAsTopicYN":false,"Description":"","ImageUrl":"","ShortDesc":"","CategoryId":2270,"CategoryName":"Routers"},{"__type":"Nc:SimpleKB:Abstractions:Dtos:CategoryItemDto","ParentCategoryId":2239,"TreatAsTopicYN":false,"Description":"","ImageUrl":"","ShortDesc":"","CategoryId":2281,"CategoryName":"WordPress Migration"},{"__type":"Nc:SimpleKB:Abstractions:Dtos:CategoryItemDto","ParentCategoryId":2239,"TreatAsTopicYN":false,"Description":"","ImageUrl":"","ShortDesc":"","CategoryId":2282,"CategoryName":"Plugins and Themes"},{"__type":"Nc:SimpleKB:Abstractions:Dtos:CategoryItemDto","ParentCategoryId":2265,"TreatAsTopicYN":false,"Description":"","ImageUrl":"","ShortDesc":"","CategoryId":2272,"CategoryName":"TV"},{"__type":"Nc:SimpleKB:Abstractions:Dtos:CategoryItemDto","ParentCategoryId":12,"TreatAsTopicYN":false,"Description":"","ImageUrl":"","ShortDesc":"","CategoryId":2187,"CategoryName":"cPanel: WordPress"},{"__type":"Nc:SimpleKB:Abstractions:Dtos:CategoryItemDto","ParentCategoryId":2209,"TreatAsTopicYN":false,"Description":"","ImageUrl":"","ShortDesc":"","CategoryId":219,"CategoryName":"Canceled Transfers"},{"__type":"Nc:SimpleKB:Abstractions:Dtos:CategoryItemDto","ParentCategoryId":2200,"TreatAsTopicYN":false,"Description":"","ImageUrl":"","ShortDesc":"","CategoryId":71,"CategoryName":"SSL Certificates Billing"},{"__type":"Nc:SimpleKB:Abstractions:Dtos:CategoryItemDto","ParentCategoryId":93,"TreatAsTopicYN":false,"Description":"","ImageUrl":"","ShortDesc":"","CategoryId":2176,"CategoryName":"Private Email: DNS Settings"},{"__type":"Nc:SimpleKB:Abstractions:Dtos:CategoryItemDto","ParentCategoryId":14,"TreatAsTopicYN":false,"Description":"","ImageUrl":"","ShortDesc":"","CategoryId":69,"CategoryName":"Installation"},{"__type":"Nc:SimpleKB:Abstractions:Dtos:CategoryItemDto","ParentCategoryId":0,"TreatAsTopicYN":false,"Description":"","ImageUrl":"/assets/img/pictograms/150/reseller-red.png","ShortDesc":"","CategoryId":34,"CategoryName":"Domains","SubCategories":[{"__type":"Nc:SimpleKB:Abstractions:Dtos:CategoryItemDto","ParentCategoryId":34,"TreatAsTopicYN":false,"Description":"","ImageUrl":"","ShortDesc":"","CategoryId":2232,"CategoryName":"DNSSEC"},{"__type":"Nc:SimpleKB:Abstractions:Dtos:CategoryItemDto","ParentCategoryId":34,"TreatAsTopicYN":false,"Description":"","ImageUrl":"","ShortDesc":"","CategoryId":2234,"CategoryName":"Google Workspace (formerly G Suite)"},{"__type":"Nc:SimpleKB:Abstractions:Dtos:CategoryItemDto","ParentCategoryId":34,"TreatAsTopicYN":false,"Description":"","ImageUrl":"","ShortDesc":"","CategoryId":2237,"CategoryName":"Host records setup"},{"__type":"Nc:SimpleKB:Abstractions:Dtos:CategoryItemDto","ParentCategoryId":34,"TreatAsTopicYN":false,"Description":"","ImageUrl":"","ShortDesc":"","CategoryId":46,"CategoryName":"Domain Management"},{"__type":"Nc:SimpleKB:Abstractions:Dtos:CategoryItemDto","ParentCategoryId":34,"TreatAsTopicYN":false,"Description":"","ImageUrl":"","ShortDesc":"","CategoryId":10,"CategoryName":"DNS Questions"},{"__type":"Nc:SimpleKB:Abstractions:Dtos:CategoryItemDto","ParentCategoryId":34,"TreatAsTopicYN":false,"Description":"","ImageUrl":"","ShortDesc":"","CategoryId":11,"CategoryName":"Dynamic DNS"},{"__type":"Nc:SimpleKB:Abstractions:Dtos:CategoryItemDto","ParentCategoryId":34,"TreatAsTopicYN":false,"Description":"","ImageUrl":"","ShortDesc":"","CategoryId":35,"CategoryName":"Registrations"},{"__type":"Nc:SimpleKB:Abstractions:Dtos:CategoryItemDto","ParentCategoryId":34,"TreatAsTopicYN":false,"Description":"","ImageUrl":"","ShortDesc":"","CategoryId":2207,"CategoryName":"Renewal questions"},{"__type":"Nc:SimpleKB:Abstractions:Dtos:CategoryItemDto","ParentCategoryId":34,"TreatAsTopicYN":false,"Description":"","ImageUrl":"","ShortDesc":"","CategoryId":36,"CategoryName":"Domains with extended attributes"},{"__type":"Nc:SimpleKB:Abstractions:Dtos:CategoryItemDto","ParentCategoryId":34,"TreatAsTopicYN":false,"Description":"","ImageUrl":"","ShortDesc":"","CategoryId":51,"CategoryName":"FreeDNS"},{"__type":"Nc:SimpleKB:Abstractions:Dtos:CategoryItemDto","ParentCategoryId":34,"TreatAsTopicYN":false,"Description":"","ImageUrl":"","ShortDesc":"","CategoryId":15,"CategoryName":"Namecheap Market"},{"__type":"Nc:SimpleKB:Abstractions:Dtos:CategoryItemDto","ParentCategoryId":34,"TreatAsTopicYN":false,"Description":"","ImageUrl":"","ShortDesc":"","CategoryId":2208,"CategoryName":"3rd Party Services Setup"},{"__type":"Nc:SimpleKB:Abstractions:Dtos:CategoryItemDto","ParentCategoryId":34,"TreatAsTopicYN":false,"Description":"","ImageUrl":"","ShortDesc":"","CategoryId":2278,"CategoryName":"Handshake TLDs"}]},{"__type":"Nc:SimpleKB:Abstractions:Dtos:CategoryItemDto","ParentCategoryId":34,"TreatAsTopicYN":false,"Description":"","ImageUrl":"","ShortDesc":"","CategoryId":35,"CategoryName":"Registrations"},{"__type":"Nc:SimpleKB:Abstractions:Dtos:CategoryItemDto","ParentCategoryId":14,"TreatAsTopicYN":false,"Description":"","ImageUrl":"","ShortDesc":"","CategoryId":70,"CategoryName":"Reissuance"},{"__type":"Nc:SimpleKB:Abstractions:Dtos:CategoryItemDto","ParentCategoryId":0,"TreatAsTopicYN":false,"Description":"","ImageUrl":"/assets/img/pictograms/150/protection-red.png","ShortDesc":"","CategoryId":37,"CategoryName":"Domain Privacy Protection","SubCategories":[]},{"__type":"Nc:SimpleKB:Abstractions:Dtos:CategoryItemDto","ParentCategoryId":2200,"TreatAsTopicYN":false,"Description":"","ImageUrl":"","ShortDesc":"","CategoryId":2177,"CategoryName":"Private Email"},{"__type":"Nc:SimpleKB:Abstractions:Dtos:CategoryItemDto","ParentCategoryId":93,"TreatAsTopicYN":false,"Description":"","ImageUrl":"","ShortDesc":"","CategoryId":2178,"CategoryName":"Private Email: Webmail Features"},{"__type":"Nc:SimpleKB:Abstractions:Dtos:CategoryItemDto","ParentCategoryId":34,"TreatAsTopicYN":false,"Description":"","ImageUrl":"","ShortDesc":"","CategoryId":2207,"CategoryName":"Renewal questions"},{"__type":"Nc:SimpleKB:Abstractions:Dtos:CategoryItemDto","ParentCategoryId":12,"TreatAsTopicYN":false,"Description":"","ImageUrl":"","ShortDesc":"","CategoryId":2210,"CategoryName":"cPanel Add-ons"},{"__type":"Nc:SimpleKB:Abstractions:Dtos:CategoryItemDto","ParentCategoryId":2265,"TreatAsTopicYN":false,"Description":"","ImageUrl":"","ShortDesc":"","CategoryId":2273,"CategoryName":"Gaming Consoles"},{"__type":"Nc:SimpleKB:Abstractions:Dtos:CategoryItemDto","ParentCategoryId":2239,"TreatAsTopicYN":false,"Description":"","ImageUrl":"","ShortDesc":"","CategoryId":2284,"CategoryName":"WordPress Management"},{"__type":"Nc:SimpleKB:Abstractions:Dtos:CategoryItemDto","ParentCategoryId":2239,"TreatAsTopicYN":false,"Description":"","ImageUrl":"","ShortDesc":"","CategoryId":2285,"CategoryName":"SFTP and Database access"},{"__type":"Nc:SimpleKB:Abstractions:Dtos:CategoryItemDto","ParentCategoryId":2265,"TreatAsTopicYN":false,"Description":"","ImageUrl":"","ShortDesc":"","CategoryId":2268,"CategoryName":"macOS"},{"__type":"Nc:SimpleKB:Abstractions:Dtos:CategoryItemDto","ParentCategoryId":93,"TreatAsTopicYN":false,"Description":"","ImageUrl":"","ShortDesc":"","CategoryId":2175,"CategoryName":"Private Email: Client Setup"},{"__type":"Nc:SimpleKB:Abstractions:Dtos:CategoryItemDto","ParentCategoryId":0,"TreatAsTopicYN":false,"Description":"","ImageUrl":"/assets/img/pictograms/150/status-red.png","ShortDesc":"","CategoryId":2209,"CategoryName":"Domain Transfers","SubCategories":[{"__type":"Nc:SimpleKB:Abstractions:Dtos:CategoryItemDto","ParentCategoryId":2209,"TreatAsTopicYN":false,"Description":"","ImageUrl":"","ShortDesc":"","CategoryId":8,"CategoryName":"Transfer Information"},{"__type":"Nc:SimpleKB:Abstractions:Dtos:CategoryItemDto","ParentCategoryId":2209,"TreatAsTopicYN":false,"Description":"","ImageUrl":"","ShortDesc":"","CategoryId":83,"CategoryName":"Transfer to Namecheap"},{"__type":"Nc:SimpleKB:Abstractions:Dtos:CategoryItemDto","ParentCategoryId":2209,"TreatAsTopicYN":false,"Description":"","ImageUrl":"","ShortDesc":"","CategoryId":84,"CategoryName":"Transfer to another provider"},{"__type":"Nc:SimpleKB:Abstractions:Dtos:CategoryItemDto","ParentCategoryId":2209,"TreatAsTopicYN":false,"Description":"","ImageUrl":"","ShortDesc":"","CategoryId":219,"CategoryName":"Canceled Transfers"}]},{"__type":"Nc:SimpleKB:Abstractions:Dtos:CategoryItemDto","ParentCategoryId":12,"TreatAsTopicYN":false,"Description":"","ImageUrl":"","ShortDesc":"","CategoryId":48,"CategoryName":"VPS"},{"__type":"Nc:SimpleKB:Abstractions:Dtos:CategoryItemDto","ParentCategoryId":34,"TreatAsTopicYN":false,"Description":"","ImageUrl":"","ShortDesc":"","CategoryId":36,"CategoryName":"Domains with extended attributes"},{"__type":"Nc:SimpleKB:Abstractions:Dtos:CategoryItemDto","ParentCategoryId":0,"TreatAsTopicYN":true,"Description":"","ImageUrl":"/assets/img/pictograms/150/server-red.png","ShortDesc":"","CategoryId":12,"CategoryName":"Hosting","SubCategories":[{"__type":"Nc:SimpleKB:Abstractions:Dtos:CategoryItemDto","ParentCategoryId":12,"TreatAsTopicYN":false,"Description":"","ImageUrl":"","ShortDesc":"","CategoryId":2219,"CategoryName":"PHP Configuration"},{"__type":"Nc:SimpleKB:Abstractions:Dtos:CategoryItemDto","ParentCategoryId":12,"TreatAsTopicYN":false,"Description":"","ImageUrl":"","ShortDesc":"","CategoryId":2225,"CategoryName":"SEO"},{"__type":"Nc:SimpleKB:Abstractions:Dtos:CategoryItemDto","ParentCategoryId":12,"TreatAsTopicYN":false,"Description":"","ImageUrl":"","ShortDesc":"","CategoryId":2252,"CategoryName":"InterWorx questions"},{"__type":"Nc:SimpleKB:Abstractions:Dtos:CategoryItemDto","ParentCategoryId":12,"TreatAsTopicYN":false,"Description":"","ImageUrl":"","ShortDesc":"","CategoryId":2291,"CategoryName":"Webuzo questions"},{"__type":"Nc:SimpleKB:Abstractions:Dtos:CategoryItemDto","ParentCategoryId":12,"TreatAsTopicYN":false,"Description":"","ImageUrl":"","ShortDesc":"","CategoryId":27,"CategoryName":"Getting Started"},{"__type":"Nc:SimpleKB:Abstractions:Dtos:CategoryItemDto","ParentCategoryId":12,"TreatAsTopicYN":false,"Description":"","ImageUrl":"","ShortDesc":"","CategoryId":22,"CategoryName":"Hosting Information"},{"__type":"Nc:SimpleKB:Abstractions:Dtos:CategoryItemDto","ParentCategoryId":12,"TreatAsTopicYN":false,"Description":"","ImageUrl":"","ShortDesc":"","CategoryId":29,"CategoryName":"cPanel questions"},{"__type":"Nc:SimpleKB:Abstractions:Dtos:CategoryItemDto","ParentCategoryId":12,"TreatAsTopicYN":false,"Description":"","ImageUrl":"","ShortDesc":"","CategoryId":2182,"CategoryName":"cPanel: Software Management"},{"__type":"Nc:SimpleKB:Abstractions:Dtos:CategoryItemDto","ParentCategoryId":12,"TreatAsTopicYN":false,"Description":"","ImageUrl":"","ShortDesc":"","CategoryId":2187,"CategoryName":"cPanel: WordPress"},{"__type":"Nc:SimpleKB:Abstractions:Dtos:CategoryItemDto","ParentCategoryId":12,"TreatAsTopicYN":false,"Description":"","ImageUrl":"","ShortDesc":"","CategoryId":2210,"CategoryName":"cPanel Add-ons"},{"__type":"Nc:SimpleKB:Abstractions:Dtos:CategoryItemDto","ParentCategoryId":12,"TreatAsTopicYN":false,"Description":"","ImageUrl":"","ShortDesc":"","CategoryId":48,"CategoryName":"VPS"},{"__type":"Nc:SimpleKB:Abstractions:Dtos:CategoryItemDto","ParentCategoryId":12,"TreatAsTopicYN":false,"Description":"","ImageUrl":"","ShortDesc":"","CategoryId":2188,"CategoryName":"Dedicated Server"},{"__type":"Nc:SimpleKB:Abstractions:Dtos:CategoryItemDto","ParentCategoryId":12,"TreatAsTopicYN":false,"Description":"","ImageUrl":"","ShortDesc":"","CategoryId":30,"CategoryName":"WHM questions"},{"__type":"Nc:SimpleKB:Abstractions:Dtos:CategoryItemDto","ParentCategoryId":12,"TreatAsTopicYN":false,"Description":"","ImageUrl":"","ShortDesc":"","CategoryId":32,"CategoryName":"DNS settings"},{"__type":"Nc:SimpleKB:Abstractions:Dtos:CategoryItemDto","ParentCategoryId":12,"TreatAsTopicYN":false,"Description":"","ImageUrl":"","ShortDesc":"","CategoryId":103,"CategoryName":"LVE (CloudLinux)"},{"__type":"Nc:SimpleKB:Abstractions:Dtos:CategoryItemDto","ParentCategoryId":12,"TreatAsTopicYN":false,"Description":"","ImageUrl":"","ShortDesc":"","CategoryId":89,"CategoryName":"SSH Access"},{"__type":"Nc:SimpleKB:Abstractions:Dtos:CategoryItemDto","ParentCategoryId":12,"TreatAsTopicYN":false,"Description":"","ImageUrl":"","ShortDesc":"","CategoryId":205,"CategoryName":"FTP questions"},{"__type":"Nc:SimpleKB:Abstractions:Dtos:CategoryItemDto","ParentCategoryId":12,"TreatAsTopicYN":false,"Description":"","ImageUrl":"","ShortDesc":"","CategoryId":2180,"CategoryName":"MySQL questions"},{"__type":"Nc:SimpleKB:Abstractions:Dtos:CategoryItemDto","ParentCategoryId":12,"TreatAsTopicYN":false,"Description":"","ImageUrl":"","ShortDesc":"","CategoryId":2199,"CategoryName":"Hosting Migration"},{"__type":"Nc:SimpleKB:Abstractions:Dtos:CategoryItemDto","ParentCategoryId":12,"TreatAsTopicYN":false,"Description":"","ImageUrl":"","ShortDesc":"","CategoryId":2194,"CategoryName":"Tips & Tricks"},{"__type":"Nc:SimpleKB:Abstractions:Dtos:CategoryItemDto","ParentCategoryId":12,"TreatAsTopicYN":false,"Description":"","ImageUrl":"","ShortDesc":"","CategoryId":239,"CategoryName":"WHMCS"},{"__type":"Nc:SimpleKB:Abstractions:Dtos:CategoryItemDto","ParentCategoryId":12,"TreatAsTopicYN":false,"Description":"","ImageUrl":"","ShortDesc":"","CategoryId":33,"CategoryName":"SSL Installation"}]},{"__type":"Nc:SimpleKB:Abstractions:Dtos:CategoryItemDto","ParentCategoryId":93,"TreatAsTopicYN":false,"Description":"","ImageUrl":"","ShortDesc":"","CategoryId":2171,"CategoryName":"Private Email: Active Sync (Exchange) Setup"},{"__type":"Nc:SimpleKB:Abstractions:Dtos:CategoryItemDto","ParentCategoryId":12,"TreatAsTopicYN":false,"Description":"","ImageUrl":"","ShortDesc":"","CategoryId":2188,"CategoryName":"Dedicated Server"},{"__type":"Nc:SimpleKB:Abstractions:Dtos:CategoryItemDto","ParentCategoryId":2265,"TreatAsTopicYN":false,"Description":"","ImageUrl":"","ShortDesc":"","CategoryId":2269,"CategoryName":"iOS"},{"__type":"Nc:SimpleKB:Abstractions:Dtos:CategoryItemDto","ParentCategoryId":2239,"TreatAsTopicYN":false,"Description":"","ImageUrl":"","ShortDesc":"","CategoryId":2286,"CategoryName":"Domains questions"},{"__type":"Nc:SimpleKB:Abstractions:Dtos:CategoryItemDto","ParentCategoryId":2239,"TreatAsTopicYN":false,"Description":"","ImageUrl":"","ShortDesc":"","CategoryId":2288,"CategoryName":"Billing questions"},{"__type":"Nc:SimpleKB:Abstractions:Dtos:CategoryItemDto","ParentCategoryId":2265,"TreatAsTopicYN":false,"Description":"","ImageUrl":"","ShortDesc":"","CategoryId":2271,"CategoryName":"Linux"},{"__type":"Nc:SimpleKB:Abstractions:Dtos:CategoryItemDto","ParentCategoryId":12,"TreatAsTopicYN":false,"Description":"","ImageUrl":"","ShortDesc":"","CategoryId":30,"CategoryName":"WHM questions"},{"__type":"Nc:SimpleKB:Abstractions:Dtos:CategoryItemDto","ParentCategoryId":93,"TreatAsTopicYN":false,"Description":"","ImageUrl":"","ShortDesc":"","CategoryId":31,"CategoryName":"cPanel Email FAQs"},{"__type":"Nc:SimpleKB:Abstractions:Dtos:CategoryItemDto","ParentCategoryId":34,"TreatAsTopicYN":false,"Description":"","ImageUrl":"","ShortDesc":"","CategoryId":51,"CategoryName":"FreeDNS"},{"__type":"Nc:SimpleKB:Abstractions:Dtos:CategoryItemDto","ParentCategoryId":0,"TreatAsTopicYN":false,"Description":"","ImageUrl":"/assets/img/pictograms/150/email-red.png","ShortDesc":"","CategoryId":93,"CategoryName":"Email service","SubCategories":[{"__type":"Nc:SimpleKB:Abstractions:Dtos:CategoryItemDto","ParentCategoryId":93,"TreatAsTopicYN":false,"Description":"","ImageUrl":"","ShortDesc":"","CategoryId":2216,"CategoryName":"Spam Protection"},{"__type":"Nc:SimpleKB:Abstractions:Dtos:CategoryItemDto","ParentCategoryId":93,"TreatAsTopicYN":false,"Description":"","ImageUrl":"","ShortDesc":"","CategoryId":2226,"CategoryName":"Email Migration"},{"__type":"Nc:SimpleKB:Abstractions:Dtos:CategoryItemDto","ParentCategoryId":93,"TreatAsTopicYN":false,"Description":"","ImageUrl":"","ShortDesc":"","CategoryId":2260,"CategoryName":"Private Email Contacts and Calendars Setup"},{"__type":"Nc:SimpleKB:Abstractions:Dtos:CategoryItemDto","ParentCategoryId":93,"TreatAsTopicYN":false,"Description":"","ImageUrl":"","ShortDesc":"","CategoryId":2179,"CategoryName":"Private Email: General Information"},{"__type":"Nc:SimpleKB:Abstractions:Dtos:CategoryItemDto","ParentCategoryId":93,"TreatAsTopicYN":false,"Description":"","ImageUrl":"","ShortDesc":"","CategoryId":2215,"CategoryName":"Private Email: Mailbox Management"},{"__type":"Nc:SimpleKB:Abstractions:Dtos:CategoryItemDto","ParentCategoryId":93,"TreatAsTopicYN":false,"Description":"","ImageUrl":"","ShortDesc":"","CategoryId":2214,"CategoryName":"Email Forwarding"},{"__type":"Nc:SimpleKB:Abstractions:Dtos:CategoryItemDto","ParentCategoryId":93,"TreatAsTopicYN":false,"Description":"","ImageUrl":"","ShortDesc":"","CategoryId":2176,"CategoryName":"Private Email: DNS Settings"},{"__type":"Nc:SimpleKB:Abstractions:Dtos:CategoryItemDto","ParentCategoryId":93,"TreatAsTopicYN":false,"Description":"","ImageUrl":"","ShortDesc":"","CategoryId":2178,"CategoryName":"Private Email: Webmail Features"},{"__type":"Nc:SimpleKB:Abstractions:Dtos:CategoryItemDto","ParentCategoryId":93,"TreatAsTopicYN":false,"Description":"","ImageUrl":"","ShortDesc":"","CategoryId":2175,"CategoryName":"Private Email: Client Setup"},{"__type":"Nc:SimpleKB:Abstractions:Dtos:CategoryItemDto","ParentCategoryId":93,"TreatAsTopicYN":false,"Description":"","ImageUrl":"","ShortDesc":"","CategoryId":2171,"CategoryName":"Private Email: Active Sync (Exchange) Setup"},{"__type":"Nc:SimpleKB:Abstractions:Dtos:CategoryItemDto","ParentCategoryId":93,"TreatAsTopicYN":false,"Description":"","ImageUrl":"","ShortDesc":"","CategoryId":31,"CategoryName":"cPanel Email FAQs"},{"__type":"Nc:SimpleKB:Abstractions:Dtos:CategoryItemDto","ParentCategoryId":93,"TreatAsTopicYN":false,"Description":"","ImageUrl":"","ShortDesc":"","CategoryId":2186,"CategoryName":"cPanel Email: Client Setup"},{"__type":"Nc:SimpleKB:Abstractions:Dtos:CategoryItemDto","ParentCategoryId":93,"TreatAsTopicYN":false,"Description":"","ImageUrl":"","ShortDesc":"","CategoryId":2204,"CategoryName":"Private Email: Video Overview"}]},{"__type":"Nc:SimpleKB:Abstractions:Dtos:CategoryItemDto","ParentCategoryId":12,"TreatAsTopicYN":false,"Description":"","ImageUrl":"","ShortDesc":"","CategoryId":32,"CategoryName":"DNS settings"},{"__type":"Nc:SimpleKB:Abstractions:Dtos:CategoryItemDto","ParentCategoryId":34,"TreatAsTopicYN":false,"Description":"","ImageUrl":"","ShortDesc":"","CategoryId":15,"CategoryName":"Namecheap Market"},{"__type":"Nc:SimpleKB:Abstractions:Dtos:CategoryItemDto","ParentCategoryId":93,"TreatAsTopicYN":false,"Description":"","ImageUrl":"","ShortDesc":"","CategoryId":2186,"CategoryName":"cPanel Email: Client Setup"},{"__type":"Nc:SimpleKB:Abstractions:Dtos:CategoryItemDto","ParentCategoryId":2265,"TreatAsTopicYN":false,"Description":"","ImageUrl":"","ShortDesc":"","CategoryId":2266,"CategoryName":"Windows"},{"__type":"Nc:SimpleKB:Abstractions:Dtos:CategoryItemDto","ParentCategoryId":2239,"TreatAsTopicYN":false,"Description":"","ImageUrl":"","ShortDesc":"","CategoryId":2287,"CategoryName":"SSL questions"},{"__type":"Nc:SimpleKB:Abstractions:Dtos:CategoryItemDto","ParentCategoryId":2265,"TreatAsTopicYN":false,"Description":"","ImageUrl":"","ShortDesc":"","CategoryId":2267,"CategoryName":"Android"},{"__type":"Nc:SimpleKB:Abstractions:Dtos:CategoryItemDto","ParentCategoryId":34,"TreatAsTopicYN":false,"Description":"","ImageUrl":"","ShortDesc":"","CategoryId":2208,"CategoryName":"3rd Party Services Setup"},{"__type":"Nc:SimpleKB:Abstractions:Dtos:CategoryItemDto","ParentCategoryId":93,"TreatAsTopicYN":false,"Description":"","ImageUrl":"","ShortDesc":"","CategoryId":2204,"CategoryName":"Private Email: Video Overview"},{"__type":"Nc:SimpleKB:Abstractions:Dtos:CategoryItemDto","ParentCategoryId":0,"TreatAsTopicYN":false,"Description":"","ImageUrl":"/assets/img/pictograms/150/security-red.png","ShortDesc":"","CategoryId":14,"CategoryName":"SSL Certificates","SubCategories":[{"__type":"Nc:SimpleKB:Abstractions:Dtos:CategoryItemDto","ParentCategoryId":14,"TreatAsTopicYN":false,"Description":"","ImageUrl":"","ShortDesc":"","CategoryId":2217,"CategoryName":"Renewal"},{"__type":"Nc:SimpleKB:Abstractions:Dtos:CategoryItemDto","ParentCategoryId":14,"TreatAsTopicYN":false,"Description":"","ImageUrl":"","ShortDesc":"","CategoryId":2218,"CategoryName":"cPanel SSL Plugin"},{"__type":"Nc:SimpleKB:Abstractions:Dtos:CategoryItemDto","ParentCategoryId":14,"TreatAsTopicYN":false,"Description":"","ImageUrl":"","ShortDesc":"","CategoryId":2221,"CategoryName":"Multi-Domain SSL Certificates"},{"__type":"Nc:SimpleKB:Abstractions:Dtos:CategoryItemDto","ParentCategoryId":14,"TreatAsTopicYN":false,"Description":"","ImageUrl":"","ShortDesc":"","CategoryId":2222,"CategoryName":"Cancellation"},{"__type":"Nc:SimpleKB:Abstractions:Dtos:CategoryItemDto","ParentCategoryId":14,"TreatAsTopicYN":false,"Description":"","ImageUrl":"","ShortDesc":"","CategoryId":2223,"CategoryName":"Browser errors"},{"__type":"Nc:SimpleKB:Abstractions:Dtos:CategoryItemDto","ParentCategoryId":14,"TreatAsTopicYN":false,"Description":"","ImageUrl":"","ShortDesc":"","CategoryId":2224,"CategoryName":"Site Seal, Logo"},{"__type":"Nc:SimpleKB:Abstractions:Dtos:CategoryItemDto","ParentCategoryId":14,"TreatAsTopicYN":false,"Description":"","ImageUrl":"","ShortDesc":"","CategoryId":2238,"CategoryName":"SSL installation errors"},{"__type":"Nc:SimpleKB:Abstractions:Dtos:CategoryItemDto","ParentCategoryId":14,"TreatAsTopicYN":false,"Description":"","ImageUrl":"","ShortDesc":"","CategoryId":2290,"CategoryName":"CSR code"},{"__type":"Nc:SimpleKB:Abstractions:Dtos:CategoryItemDto","ParentCategoryId":14,"TreatAsTopicYN":false,"Description":"","ImageUrl":"","ShortDesc":"","CategoryId":2293,"CategoryName":"Automated SSL management"},{"__type":"Nc:SimpleKB:Abstractions:Dtos:CategoryItemDto","ParentCategoryId":14,"TreatAsTopicYN":false,"Description":"","ImageUrl":"","ShortDesc":"","CategoryId":38,"CategoryName":"SSL General"},{"__type":"Nc:SimpleKB:Abstractions:Dtos:CategoryItemDto","ParentCategoryId":14,"TreatAsTopicYN":false,"Description":"","ImageUrl":"","ShortDesc":"","CategoryId":67,"CategoryName":"Activation"},{"__type":"Nc:SimpleKB:Abstractions:Dtos:CategoryItemDto","ParentCategoryId":14,"TreatAsTopicYN":false,"Description":"","ImageUrl":"","ShortDesc":"","CategoryId":68,"CategoryName":"Validation"},{"__type":"Nc:SimpleKB:Abstractions:Dtos:CategoryItemDto","ParentCategoryId":14,"TreatAsTopicYN":false,"Description":"","ImageUrl":"","ShortDesc":"","CategoryId":69,"CategoryName":"Installation"},{"__type":"Nc:SimpleKB:Abstractions:Dtos:CategoryItemDto","ParentCategoryId":14,"TreatAsTopicYN":false,"Description":"","ImageUrl":"","ShortDesc":"","CategoryId":70,"CategoryName":"Reissuance"}]},{"__type":"Nc:SimpleKB:Abstractions:Dtos:CategoryItemDto","ParentCategoryId":0,"TreatAsTopicYN":true,"Description":"","ImageUrl":"/assets/img/pictograms/150/performance-red.png","ShortDesc":"","CategoryId":9,"CategoryName":"My Account","SubCategories":[{"__type":"Nc:SimpleKB:Abstractions:Dtos:CategoryItemDto","ParentCategoryId":9,"TreatAsTopicYN":false,"Description":"","ImageUrl":"","ShortDesc":"","CategoryId":45,"CategoryName":"Account Security"},{"__type":"Nc:SimpleKB:Abstractions:Dtos:CategoryItemDto","ParentCategoryId":9,"TreatAsTopicYN":false,"Description":"","ImageUrl":"","ShortDesc":"","CategoryId":43,"CategoryName":"Profile Management"},{"__type":"Nc:SimpleKB:Abstractions:Dtos:CategoryItemDto","ParentCategoryId":9,"TreatAsTopicYN":false,"Description":"","ImageUrl":"","ShortDesc":"","CategoryId":44,"CategoryName":"Account Access"}]},{"__type":"Nc:SimpleKB:Abstractions:Dtos:CategoryItemDto","ParentCategoryId":34,"TreatAsTopicYN":false,"Description":"","ImageUrl":"","ShortDesc":"","CategoryId":2278,"CategoryName":"Handshake TLDs"},{"__type":"Nc:SimpleKB:Abstractions:Dtos:CategoryItemDto","ParentCategoryId":12,"TreatAsTopicYN":false,"Description":"","ImageUrl":"","ShortDesc":"","CategoryId":103,"CategoryName":"LVE (CloudLinux)"},{"__type":"Nc:SimpleKB:Abstractions:Dtos:CategoryItemDto","ParentCategoryId":0,"TreatAsTopicYN":false,"Description":"","ImageUrl":"/assets/img/pictograms/150/affiliates-red.png","ShortDesc":"","CategoryId":55,"CategoryName":"Affiliates","SubCategories":[]},{"__type":"Nc:SimpleKB:Abstractions:Dtos:CategoryItemDto","ParentCategoryId":12,"TreatAsTopicYN":false,"Description":"","ImageUrl":"","ShortDesc":"","CategoryId":89,"CategoryName":"SSH Access"},{"__type":"Nc:SimpleKB:Abstractions:Dtos:CategoryItemDto","ParentCategoryId":0,"TreatAsTopicYN":false,"Description":"","ImageUrl":"/assets/img/pictograms/150/tools-red.png","ShortDesc":"","CategoryId":2211,"CategoryName":"API & Resellers","SubCategories":[{"__type":"Nc:SimpleKB:Abstractions:Dtos:CategoryItemDto","ParentCategoryId":2211,"TreatAsTopicYN":false,"Description":"","ImageUrl":"","ShortDesc":"","CategoryId":2227,"CategoryName":"SSL Resellers"},{"__type":"Nc:SimpleKB:Abstractions:Dtos:CategoryItemDto","ParentCategoryId":2211,"TreatAsTopicYN":false,"Description":"","ImageUrl":"","ShortDesc":"","CategoryId":2229,"CategoryName":"Hosting Resellers"},{"__type":"Nc:SimpleKB:Abstractions:Dtos:CategoryItemDto","ParentCategoryId":2211,"TreatAsTopicYN":false,"Description":"","ImageUrl":"","ShortDesc":"","CategoryId":63,"CategoryName":"Namecheap API"},{"__type":"Nc:SimpleKB:Abstractions:Dtos:CategoryItemDto","ParentCategoryId":2211,"TreatAsTopicYN":false,"Description":"","ImageUrl":"","ShortDesc":"","CategoryId":2196,"CategoryName":"WHMCS module for SSL"}]},{"__type":"Nc:SimpleKB:Abstractions:Dtos:CategoryItemDto","ParentCategoryId":0,"TreatAsTopicYN":false,"Description":"","ImageUrl":"/assets/img/pictograms/150/timer-red.png","ShortDesc":"","CategoryId":2212,"CategoryName":"Legacy Products","SubCategories":[]},{"__type":"Nc:SimpleKB:Abstractions:Dtos:CategoryItemDto","ParentCategoryId":12,"TreatAsTopicYN":false,"Description":"","ImageUrl":"","ShortDesc":"","CategoryId":205,"CategoryName":"FTP questions"},{"__type":"Nc:SimpleKB:Abstractions:Dtos:CategoryItemDto","ParentCategoryId":12,"TreatAsTopicYN":false,"Description":"","ImageUrl":"","ShortDesc":"","CategoryId":2180,"CategoryName":"MySQL questions"},{"__type":"Nc:SimpleKB:Abstractions:Dtos:CategoryItemDto","ParentCategoryId":12,"TreatAsTopicYN":false,"Description":"","ImageUrl":"","ShortDesc":"","CategoryId":2199,"CategoryName":"Hosting Migration"},{"__type":"Nc:SimpleKB:Abstractions:Dtos:CategoryItemDto","ParentCategoryId":0,"TreatAsTopicYN":false,"Description":"","ImageUrl":"/assets/img/pictograms/150/premiumdns-red.png","ShortDesc":"","CategoryId":2231,"CategoryName":"PremiumDNS","SubCategories":[]},{"__type":"Nc:SimpleKB:Abstractions:Dtos:CategoryItemDto","ParentCategoryId":12,"TreatAsTopicYN":false,"Description":"","ImageUrl":"","ShortDesc":"","CategoryId":2194,"CategoryName":"Tips & Tricks"},{"__type":"Nc:SimpleKB:Abstractions:Dtos:CategoryItemDto","ParentCategoryId":0,"TreatAsTopicYN":false,"Description":"","ImageUrl":"https://static.nc-img.com/live-resource/icons/knowledgebase/fastVPN_icon-150px.png","ShortDesc":"","CategoryId":2265,"CategoryName":"FastVPN","SubCategories":[{"__type":"Nc:SimpleKB:Abstractions:Dtos:CategoryItemDto","ParentCategoryId":2265,"TreatAsTopicYN":false,"Description":"","ImageUrl":"","ShortDesc":"","CategoryId":2292,"CategoryName":"Browser Extensions"},{"__type":"Nc:SimpleKB:Abstractions:Dtos:CategoryItemDto","ParentCategoryId":2265,"TreatAsTopicYN":false,"Description":"","ImageUrl":"","ShortDesc":"","CategoryId":2274,"CategoryName":"General"},{"__type":"Nc:SimpleKB:Abstractions:Dtos:CategoryItemDto","ParentCategoryId":2265,"TreatAsTopicYN":false,"Description":"","ImageUrl":"","ShortDesc":"","CategoryId":2270,"CategoryName":"Routers"},{"__type":"Nc:SimpleKB:Abstractions:Dtos:CategoryItemDto","ParentCategoryId":2265,"TreatAsTopicYN":false,"Description":"","ImageUrl":"","ShortDesc":"","CategoryId":2272,"CategoryName":"TV"},{"__type":"Nc:SimpleKB:Abstractions:Dtos:CategoryItemDto","ParentCategoryId":2265,"TreatAsTopicYN":false,"Description":"","ImageUrl":"","ShortDesc":"","CategoryId":2273,"CategoryName":"Gaming Consoles"},{"__type":"Nc:SimpleKB:Abstractions:Dtos:CategoryItemDto","ParentCategoryId":2265,"TreatAsTopicYN":false,"Description":"","ImageUrl":"","ShortDesc":"","CategoryId":2268,"CategoryName":"macOS"},{"__type":"Nc:SimpleKB:Abstractions:Dtos:CategoryItemDto","ParentCategoryId":2265,"TreatAsTopicYN":false,"Description":"","ImageUrl":"","ShortDesc":"","CategoryId":2269,"CategoryName":"iOS"},{"__type":"Nc:SimpleKB:Abstractions:Dtos:CategoryItemDto","ParentCategoryId":2265,"TreatAsTopicYN":false,"Description":"","ImageUrl":"","ShortDesc":"","CategoryId":2271,"CategoryName":"Linux"},{"__type":"Nc:SimpleKB:Abstractions:Dtos:CategoryItemDto","ParentCategoryId":2265,"TreatAsTopicYN":false,"Description":"","ImageUrl":"","ShortDesc":"","CategoryId":2266,"CategoryName":"Windows"},{"__type":"Nc:SimpleKB:Abstractions:Dtos:CategoryItemDto","ParentCategoryId":2265,"TreatAsTopicYN":false,"Description":"","ImageUrl":"","ShortDesc":"","CategoryId":2267,"CategoryName":"Android"}]},{"__type":"Nc:SimpleKB:Abstractions:Dtos:CategoryItemDto","ParentCategoryId":12,"TreatAsTopicYN":false,"Description":"","ImageUrl":"","ShortDesc":"","CategoryId":239,"CategoryName":"WHMCS"},{"__type":"Nc:SimpleKB:Abstractions:Dtos:CategoryItemDto","ParentCategoryId":12,"TreatAsTopicYN":false,"Description":"","ImageUrl":"","ShortDesc":"","CategoryId":33,"CategoryName":"SSL Installation"}],"status":200,"statusText":"OK"}}Before an SSL certificate can be issued, the certificate applicant should confirm their domain ownership rights. This is called domain control validation (DCV). When you are activating your certificate, you will be presented with three methods of DCV to choose from:
If you need to switch your chosen DCV method, check the following guide:
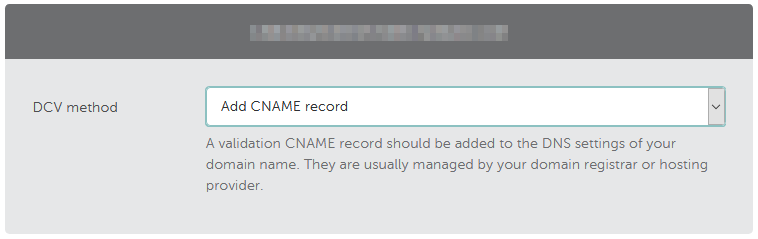
This validation method involves adding a CNAME record to the DNS settings of your domain.
Here is a how-to video:
Note: If you are using DNSSEC for the domain, ensure that it is configured correctly or maintain it (including key rollovers). Otherwise, certificate issuance will be paused until the DNSSEC issues are resolved.
Here is the text version of the guide:
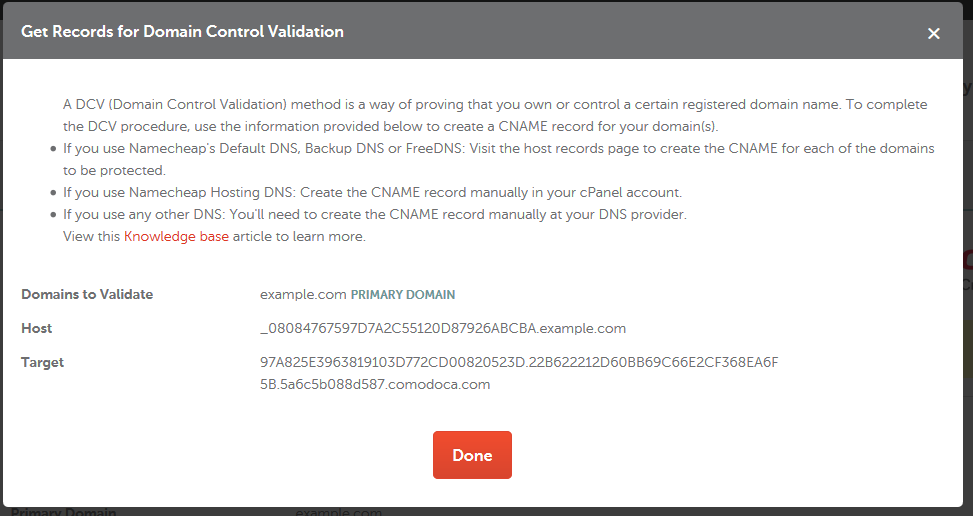
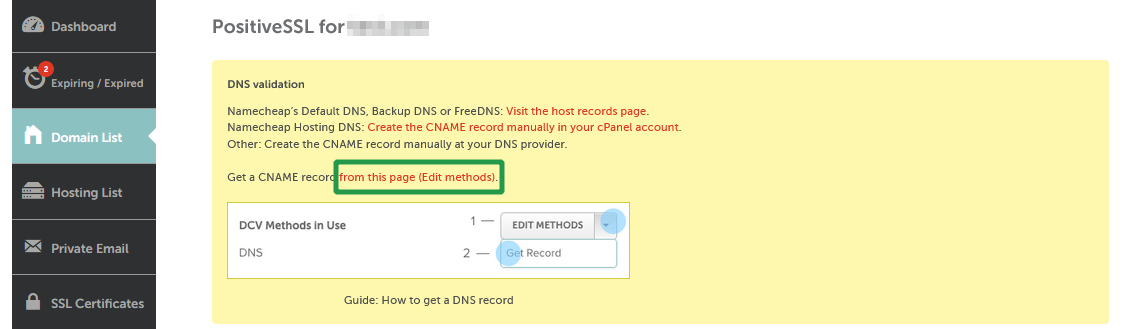
After you complete SSL activation, you’ll find instructions on completing this DCV method as well as the values you will need for the CNAME record in the SSL Details page of your account:
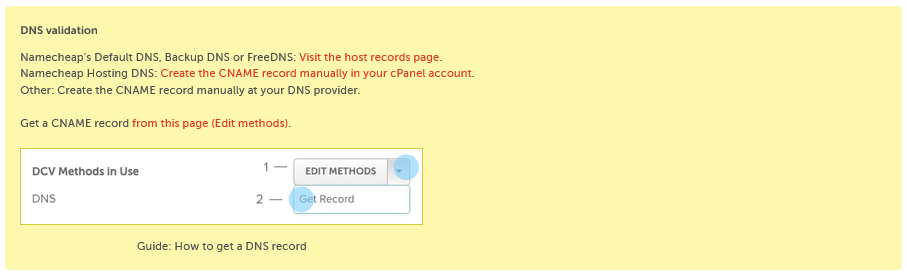
Click on Get Record to see the CNAME record values.

If you are activating a single-domain certificate for a subdomain, feel free to set the DNS record either for the bare domain directly, or for the subdomain. It will work both ways for the domain validation process.

Here is a how-to video:
Here is the text version of the guide.
When you’ve completed the activation process, you'll be directed to the SSL Details page in your Namecheap account, where you'll find instructions and a link to the Edit methods page where you can download the validation file.
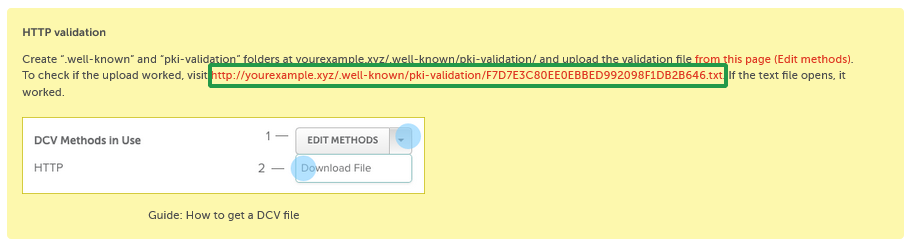
Note: If you have a Multi-Domain SSL and choose this method of DCV for several domains, no link will appear in the yellow panel as each domain will have a different link. To verify each of the domains, you will need to create the corresponding links by following the instructions in the yellow box and checking each URL in your browser. In most cases, if a simple text line like the one below is shown on the screen, the validation file is accessible.

Once the file is uploaded and accessible externally via the following URL http://your_domain_name.com/.well-known/pki-validation/filename.txt, please click Save Changes/Retry Alt DCV. This will force the Certificate Authority to perform the DCV check.
Note: If you are activating your certificate for a subdomain, you can either upload the text to the domain main directory or the subdomain directory. So the file should be accessible either via http(s)://example.com/.well-known/pki-validation/ or via http(s)://sub.example.com/.well-known/pki-validation/ If you are activating a Multi-domain certificate for subdomains, the validation file should be placed into the Document root directory of each corresponding domain. We recommend that you upload it for each subdomain as well.
Note: If you have activated the certificate with domain.com indicated as the FQDN (Fully Qualified Domain Name) in your CSR code, please make sure that the file is available via http://domain.com/.well-known/pki-validation/file.txt . In this case, www.domain.com is considered to be under your control as well.
If your CSR code contains www.domain.com as the FQDN, please make sure that the file is available via the link http://domain.com/.well-known/pki-validation/file.txt . The file content shouldn't be changed in any way as the Comodo (now Sectigo) validation system is case sensitive.
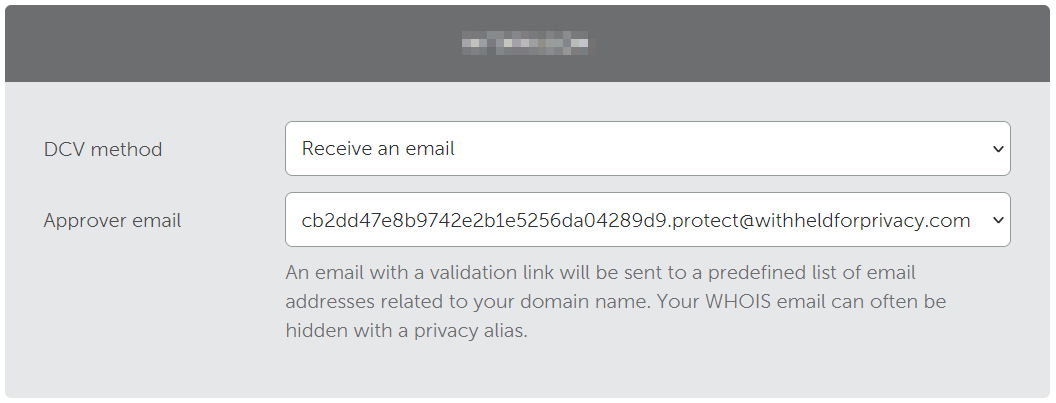
Note: The email-based validation with WHOIS email is not available due to the upstream provider updates.
Here is the text version of the guide:
After you complete SSL activation process, the Certificate Authority will email you at the selected address.
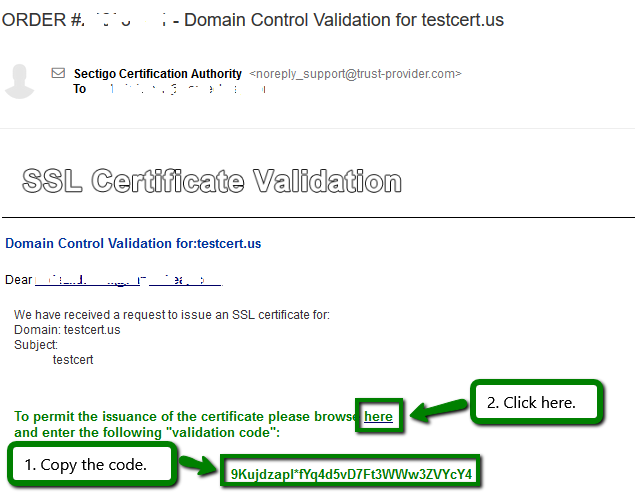
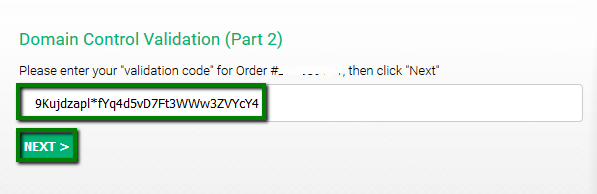
Paste the code from the email and hit Next.
That's it!
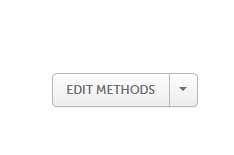
If you do not receive the approval email, you can always retry it by clicking Resend email on the Edit methods page. The link to the Edit methods page is available in the validation instructions panel placed on the SSL Details page.


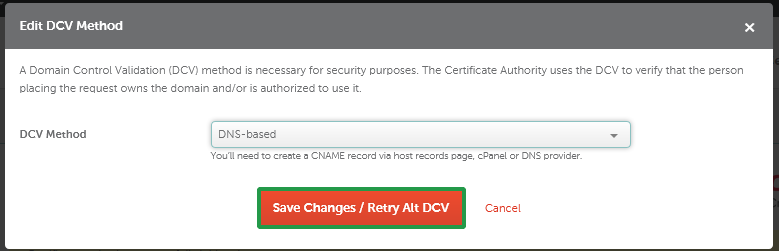
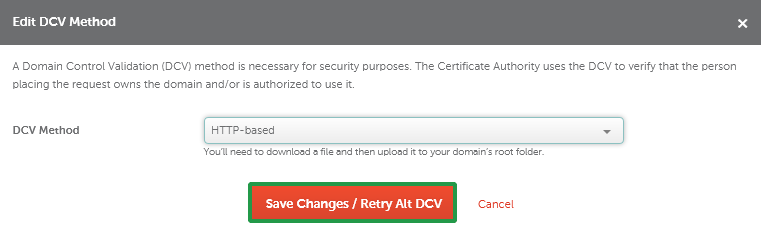
Then, perform the required steps to complete the DCV.
Note: You can also use this SSL Validation Tool to check your SSL status, switch the validation method, and speed up the SSL certificate issuance.
By the way, in this tool, you have a possibility to switch the order to the "DNS TXT random value" DCV method presented by Sectigo CA in January 2025. More details on how to use it are here.
Note: If you have a Domain Validation certificate, it will be emailed to you shortly after DCV is complete.
If you have an OV or an EV certificate, your order should undergo business validation. Once you complete DCV, you will receive an email from Comodo (now Sectigo) with further instructions.
Need help? We're always here for you.