
Considering moving your website from HostGator to Namecheap? Higher hosting renewal rates leave many site owners wondering if it is time to change service providers. If your current HostGator setup no longer fits your needs or budget, this guide will help you make the switch effortlessly.
Switching from HostGator to Namecheap comes down to value, pricing, and a stress-free migration experience. While both providers offer user-friendly cPanel hosting, Namecheap delivers better long-term affordability and stronger service guarantees:
If you're weighing entry-tier options, the choice between Namecheap Stellar and HostGator Hatchling plans comes down to long-term costs and safety nets.
For a complete comparison, including plan pricing, migration process specifics, and customer support channels, review the table below:
|
Feature |
Key difference |
||
|
Price *Prices as of October 2026 |
30-day free trial; then $2.28/mo advertised for the first year (annual billing). Annual renewal: $55.88/year (~$4.66/mo). Monthly renewal, if selected: $5.88/mo. |
~$3.75/mo promo (36-mo term) $10.99/mo renewal (36-mo term) $13.19/mo renewal (12-mo term) |
Namecheap: Lower initial investment and flexible commitment options without being locked into a long 36-month contract. Saves site owners over 50% on long-term hosting costs by avoiding steep post-promotional price hikes. |
|
Migration |
Free cPanel/WordPress migration completed within 24 hours. |
Paid for shared plans. Free transfers restricted to VPS/Dedicated 12-mo terms. |
Namecheap: Provides completely free managed cPanel transfers, whereas HostGator provides a self-service migration tool (built on InstaWP) for WordPress sites; non-WordPress users pay extra or move manually, and free migration for VPS/Dedicated server users is provided only with a 12-mo subscription. |
|
Downtime |
No more than 15 minutes of downtime during transfer (or get 1st year hosting credited). |
No downtime guarantee for website migration services. |
Namecheap: Protects business continuity with an explicit SLA and compensation of the 1st free year of hosting credited if transfer downtime exceeds 15 minutes. |
|
Customer Support |
24/7 Live Chat and Email Support on any plan tier (No phone support). |
24/7 Live Chat for Hatchling plan. Phone support is only added on Baby/Business/Pro hosting plan tiers. |
HostGator: Offers phone support options alongside live chat on higher plan tiers, providing a direct phone line for users who prefer real-time spoken technical assistance. |
|
Websites |
3 |
10 |
HostGator allows hosting more domains in 1 account. |
|
Storage |
20 GB SSD |
10 GB SSD |
Namecheap offers more disk space. |
|
Email accounts |
30 mailboxes included |
Limited by disk, each mailbox is restricted to 100 MB of storage; the number of mailboxes is not restricted. |
Namecheap provides more email account disk quota for a limited number of mailboxes, while HostGator provides an unlimited number of mailboxes but with a constrained mailbox storage. |
Namecheap provides a free Hosting Migration service from HostGator so you don't have to perform a manual transfer alone. However, if you prefer to move your cPanel account yourself, the process is straightforward.
Simple HTML websites without a database only require copying files over to Namecheap and changing your nameservers. For dynamic websites powered by a database like WordPress or Joomla, a few extra steps are required.
Below are described the steps for transferring a WordPress site between cPanels (the procedure remains the same for most other CMS platforms).
Downtime depends on the migration method, website configuration, and DNS changes. Namecheap's 24-hour completion and no more than 15-minute downtime guarantees apply to eligible full cPanel migrations; partial and manual migrations may take longer.
To minimize disruption, keep the original website active on HostGator while you transfer and test the copy on Namecheap. Preview the new website before changing DNS, and avoid making changes to the old website during the final cutover unless you can synchronize them.
The manual transfer includes three core migration steps:
First, you need to create a backup of your HostGator hosting account.
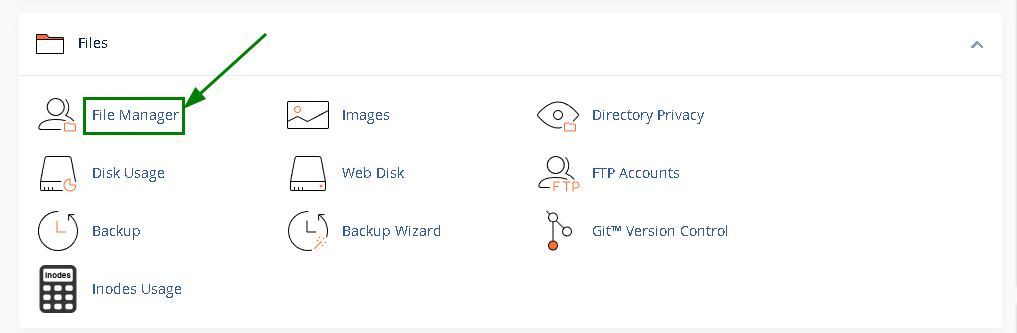
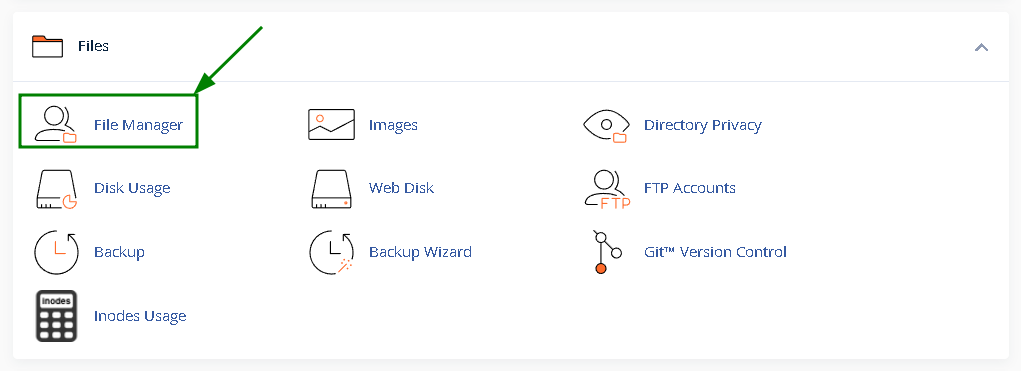
For this, log into your cPanel account with them, go to the section Files > File Manager:
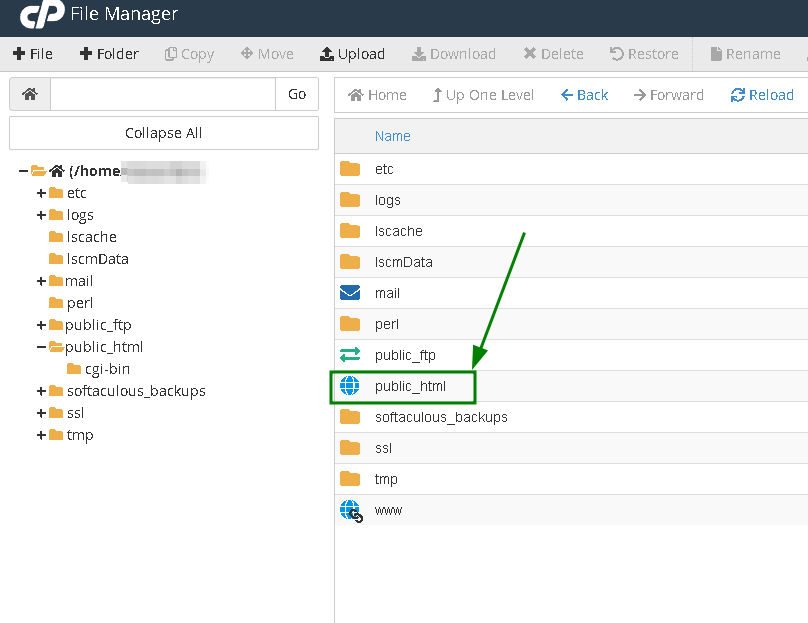
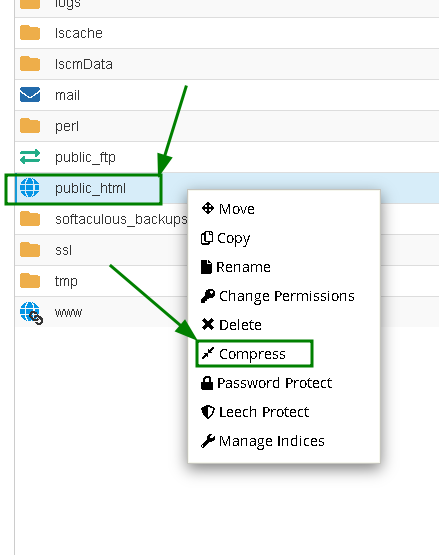
Right-click on the website root folder and compress it:
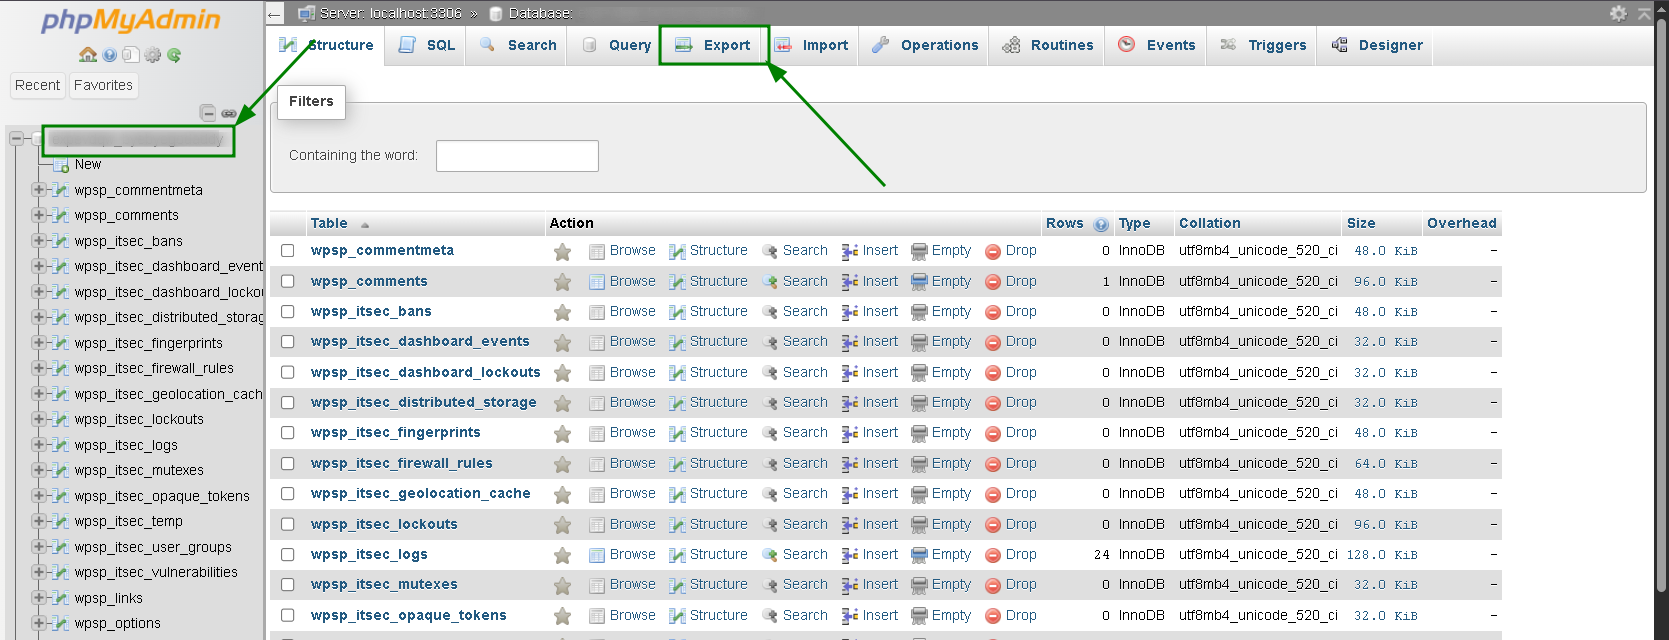
To download the site database, go to phpMyAdmin in cPanel.
Select your database from the left sidebar. Click the Export tab in the top navigation bar:
Select Quick export format and click Export to download the .sql file:
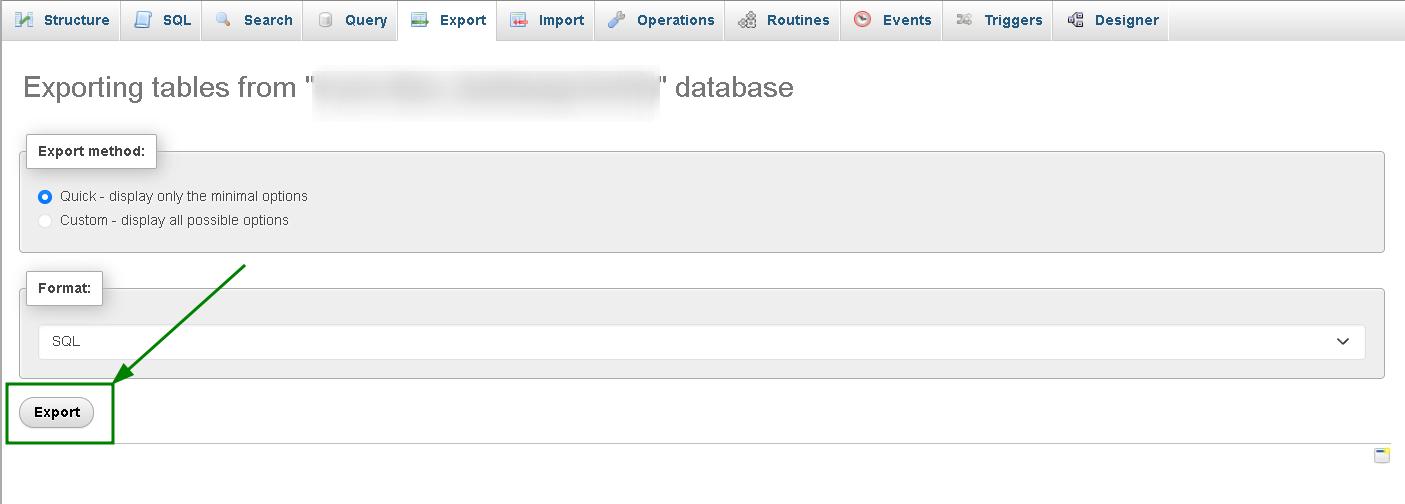
Done, you have the files and database backed up.
Now that you have it on your computer, you can proceed with the backup upload to your new hosting account.
Log in to your cPanel account with us, go to the Files section > File Manager menu:
Select Home Directory and, once in, click on Upload in the bar above to attach the backup file and upload it:
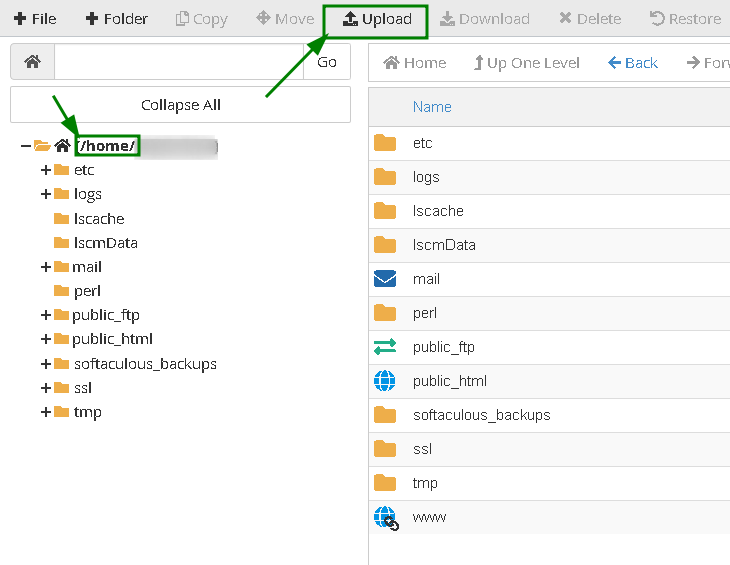
Once the backup is uploaded to your hosting account with us, let us know, and we will restore it for you, or you can proceed with a partial manual restoration on your end if you wish.
Transferring your hosting account moves your website files and databases. Your domain registration stays separate. Once your content is set up on Namecheap, point your domain to the new server by updating your nameservers inside HostGator or any other domain registrar client you have a domain with. If you want unified account management and lower renewal fees, you can also transfer the domain to Namecheap.
Before taking either step, test your site on Namecheap's servers via temporary preview URLs to prevent downtime.
Please be aware that nameservers cannot be updated while a domain transfer is active, so ensure your website resolves on the target server before DNS is pointed to Namecheap. Global DNS changes take 24–48 hours to complete.
With the free Hosting Migration service, our technical specialists handle the entire transfer for you behind the scenes. The migration team manages the migration of your entire cPanel account—files, databases, and emails—ensuring a seamless, hands-off transition.
For a partial site transfer, a partial email migration, or a migration from non-cPanel-based hosting, we assess the process on a case-by-case basis, as we may encounter limitations that can block the transfer. Email can only be migrated from cPanel-based hosting.
New SSL certificates are issued once the domains are pointed to our hosting and are present on the server.
For a complete transfer to be handled by us, make sure the following requirements are met:
Make sure that the source hosting is cPanel-based and remains accessible throughout the transfer for at least 3-7 days.
Please keep your account with the old provider active until we confirm the migration is complete and you have checked your website. Do not cancel it before then.
Access to your source hosting account.
Feel free to share the login details via a one-time secure share link in a migration request so our Hosting Migration team has the necessary access to proceed with the transfer. For security reasons, you may set a temporary password for your source account now, or share your current password and change it once the migration is complete.
If two-factor authentication is enabled on your source account, please disable it for the duration of the migration, or let us know so we can arrange alternative access.
If you already have a hosting plan with us or wish to purchase a new one, let us know. We will check your current account and suggest the best option.
Once you are ready, feel free to submit a transfer request.
Downtime varies based on your migration method, site setup, and DNS propagation. Namecheap’s guarantees completion within 24 hours and a maximum of 15 minutes of downtime. This guarantee applies strictly to eligible full cPanel-to-cPanel transfers. Manual, partial, or non-cPanel migrations (such as Managed WordPress setups) may take longer.
To ensure a seamless transition, keep your active HostGator hosting active during the transfer process, preview the destination site on Namecheap before modifying DNS settings, and establish a strategy for handling any content edits made on the original site before the final switchover.
Can I transfer my cPanel account directly from HostGator to Namecheap?
Yes, both HostGator and Namecheap utilize cPanel for account management. A direct cPanel-to-cPanel transfer is straightforward.
Our technicians can move your full cPanel backup directly, including website files, databases, email accounts, and cron jobs, without requiring manual site rebuilds.
New SSL certificates are issued once the domains are pointed to our hosting and are present on the server.
How long does a HostGator-to-Namecheap migration take?
Most cPanel account migrations are completed within 24 hours. Standard cPanel transfers start as soon as the required account credentials and access details are submitted to our migration team. However, partial migrations, such as a WordPress site transfer, take longer.
Will my HostGator email accounts move automatically?
Yes, provided you do a full cPanel migration. If Namecheap transfers your full cPanel backup, all existing email accounts, forwarders, and stored inbox messages move over automatically. However, if you opt for a manual file-only transfer (or use a plugin to migrate a single WordPress site), email accounts will not move automatically and must be recreated or migrated separately via IMAP.
Does Namecheap offer free migration from HostGator?
Yes. Namecheap provides a free Hosting Migration service for moving cPanel or WordPress sites from HostGator. This service covers the transfer of files, databases, SSL certificates installed in cPanel with HostGator (which should be reissued after the transfer), and email accounts, along with pre-launch testing on temporary URLs to avoid unexpected downtime.
Do I need to update my nameservers before or after migration?
Always update your nameservers after the migration is complete and verified. Updating nameservers beforehand routes live traffic to an empty or incomplete site on Namecheap, causing downtime. The correct order is to let Namecheap migrate your site and test it on a temporary preview URL first. Once everything works properly, update your domain's nameservers at your registrar to point to Namecheap.
Need help? We're always here for you.