When you transfer a working website to us, you can check how it resolves from our server before updating the DNS in order to make sure there will be no service disruptions.
On cPanel servers the website is usually checked with the help of a temporary URL which is http://server_ip/~cpanelusername/. However, the mod_userdir module that is responsible for this URL functioning is quite insecure and increases the risks of attacks on your account. We are concerned about users' security and use only the best security practices. Due to this, mod_userdir as well as the temporary URL is disabled on our shared servers. You can read more about mod_userdir here.
However, you can go with three other options. They are:
1. Modifying the 'hosts' file
1. Modifying the 'hosts' file
The 'Hosts' file is a computer file used by an operating system to map the hostnames (domains) to the IP addresses.
By adding the corresponding records to you local hosts file you can check how your website looks on the new server before switching the nameservers or during the DNS propagation. Once the records are added, you will be able to check your website by typing its name in the browser.
In simple words, you force your local computer to resolve the domain from the specific IP overriding actual domain DNS, which is great because this way you can work on your website hosted on the new server, and the rest of the world will be directed to the working website on the old server.
We recommend closing the browser before performing the changes to the file.
To edit the 'hosts' file in different operating systems, you need to perform the following steps:
If you use Windows 7 or Vista:
1. Open the folder C:\Windows\System32\drivers\etc:

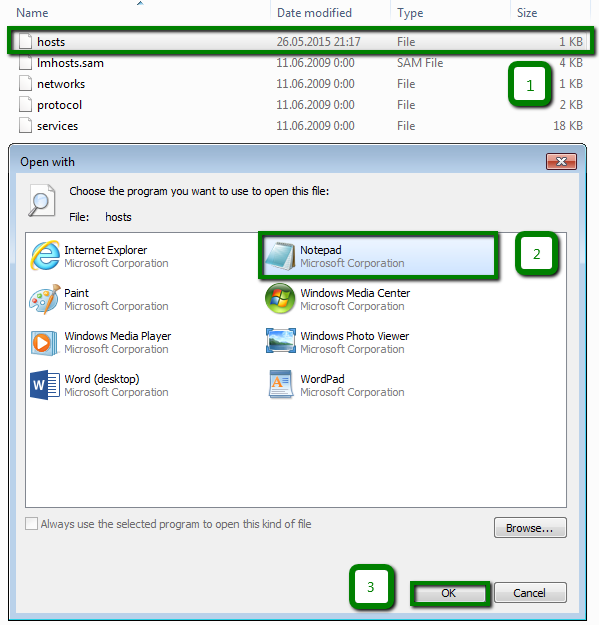
2. Double-click on the 'hosts' file and choose Notepad from the list of available software:
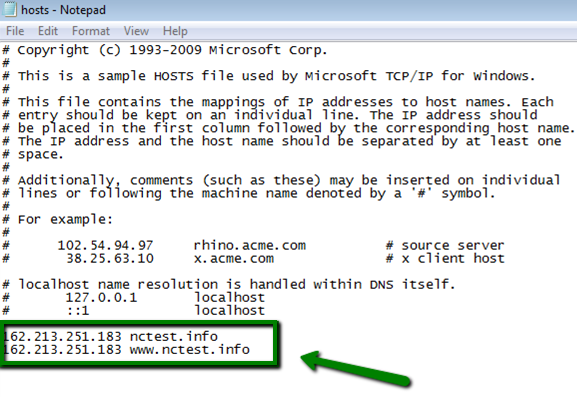
3. Input the following strings in the end of the document:
IP_address domainname.com
IP_address www.domainname.com
where IP_address is the IP address of your account on the server (it can be found in Your Hosting Welcome Guide) and domainname.com is your actual domain name:
4. Save the changes.
5. Now you need to clear the browser's cache and re-open your domain name in it to see the changes.
NOTE: To revert the changes, you need to remove the new entries added to your host file or simply comment them by adding '#' at the beginning of each line, then save the changes. You may need to clear your browser cache once again to ensure everything is fresh
If you use Windows 8 or 8.1:
As an alternative to the instructions above, you can edit the 'hosts' file on Windows 7 or Vista in another simple way as described for Windows 8 or 8.1 below:
1. Open Notepad with Administrative privileges by clicking the Start button  .
.
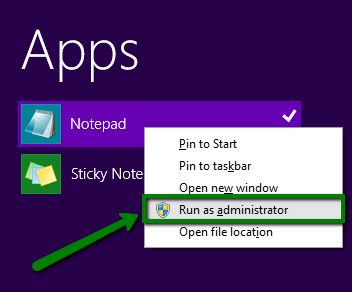
2. Find Applications > type Notepad in the search bar and then right-click Notepad and select to Run as Administrator:
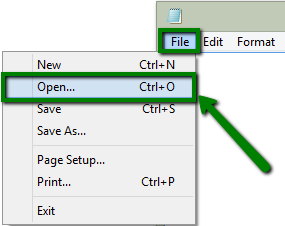
3. Once Notepad is opened with Administrative privileges, click the File menu > choose Open:
4. Browse to C:\Windows\System32\drivers\etc (you may simply copy this path into the address bar and click Enter):

5. Click to show All Files:

6. Choose the 'hosts' file and click Open:
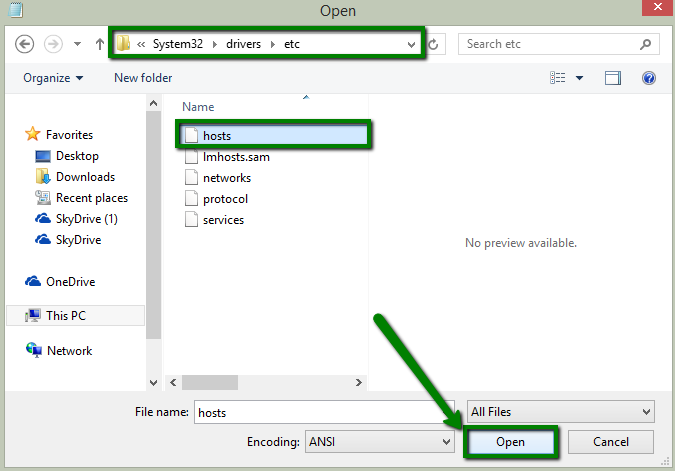
7. Insert the following strings in the end of the document:
IP_address domainname.com
IP_address www.domainname.com
where IP_address is the IP address of your account on the server (it can be found in Your Hosting Welcome Guide), and domainname.com is your actual domain name:
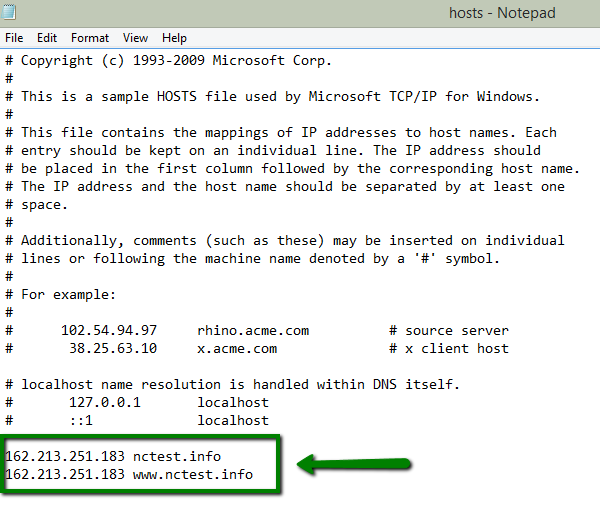
8. Save changes.
9. Now you need to clear the browser's cache and re-open your domain name in it to see the changes.
NOTE: To revert the changes, you need to remove the new entries added to your host file or simply comment them by adding '#' at the beginning of each line, then save the changes. You may need to clear your browser cache once again to ensure everything is fresh.
If you use Windows 10:
1. In the Search Window type in notepad > right-click on the Notepad icon > select Run as administrator:
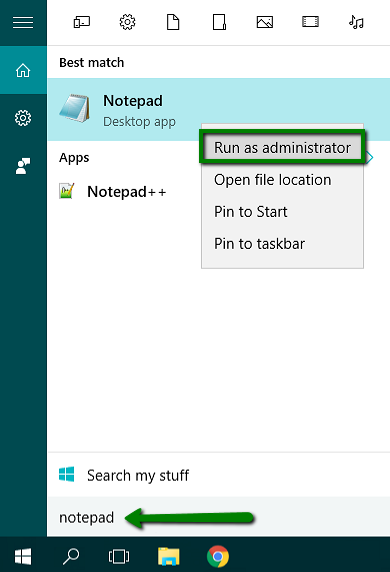
Notepad window will open.
2. In Notepad, press the Ctrl + O keymatch > navigate to the C:\Windows\System32\drivers\etc\ directory > open hosts file:
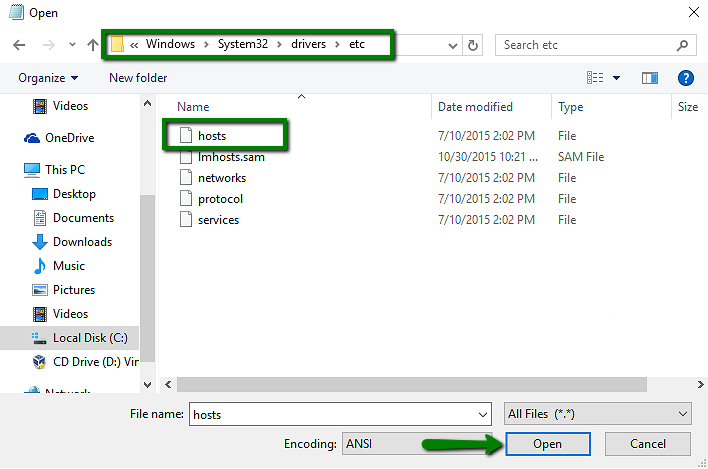
NOTE: If you cannot see the hosts file, select All Files (*.*) in the dialog box:

3. Add the following entries at the end of the file:
IP_address domainname.com
IP_address www.domainname.com
where IP_address is the IP address of your account on the server (it can be found in Your Hosting Welcome Guide), and domainname.com is your actual domain name:
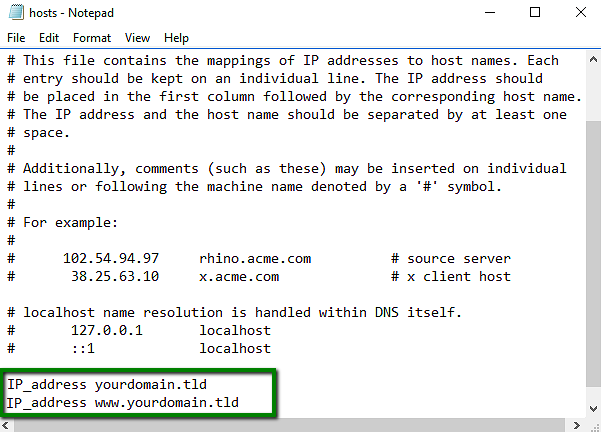
4. Press Ctrl + S to save the changes.
If you use Mac OS:
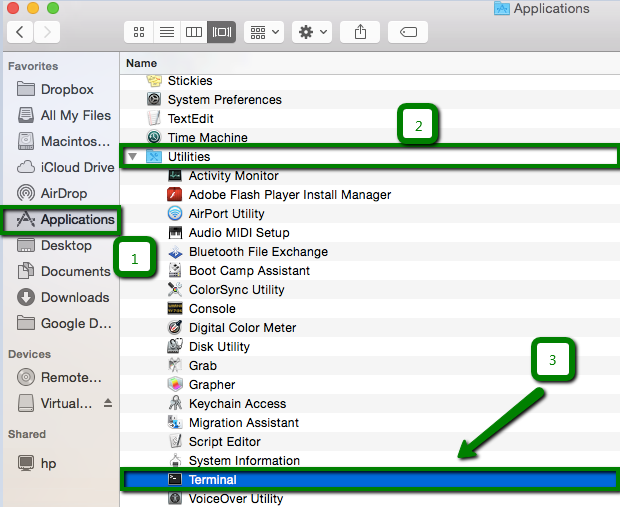
1. Open Terminal.app, either by start typing Terminal on the Spotlight, or by going into Applications > Utilities > Terminal:
2. Open the hosts by typing on the Terminal that you have just opened:
sudo nano /private/etc/hosts

3. Type your user password when prompted (you can navigate the file using the arrow keys).
4. Edit the hosts file appending your new mappings underneath the default ones:
IP_address domainname.com
IP_address www.domainname.com
where IP_address is the IP address of your account on the server (it can be found in Your Hosting Welcome Guide), anddomainname.com is your actual domain name:
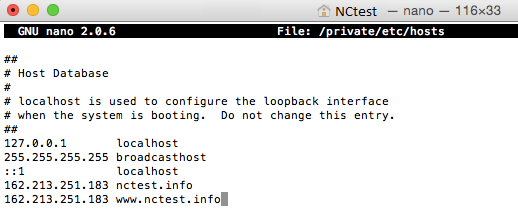
5. Save the hosts file (when done editing the hosts file, press CTRL+O to save the file > press Enter on the filename prompt > Ctrl+X to exit the editor).
6. Flush the DNS cache (you can issue a simple Terminal command to flush the DNS cache depending on the version of OS X you are using and have your host file changes to take immediate effect).
NOTE: To revert the changes, you need to remove the new entries added to your host file or simply comment them by adding '#' at the beginning of each line, then save the changes. You may need to clear your browser cache once again to ensure everything is fresh.
If you use Linux:
1. Type the following command in Terminal:
sudo nano /etc/hosts

NOTE: You will be prompted to enter your admin password.
2. Navigate to the bottom of the file by using the arrow keys and add the following lines:
IP_address domainname.com
IP_address www.domainname.com
where IP_address is the IP address of your account on the server (it can be found in Your Hosting Welcome Guide), and domainname.com is your actual domain name:
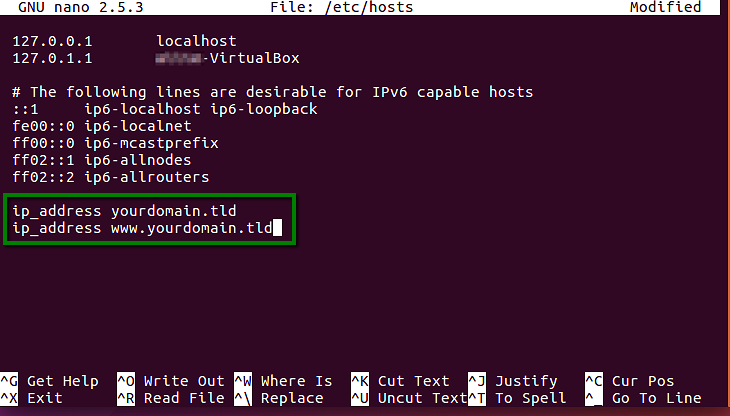
3. Press the Ctrl+X keymatch, then press the y key and Enter.
4. Flush DNS cache by running the following command in the terminal:
sudo /etc/init.d/nscd restart

2. Creating a subdomain
Another way to check your website without changing DNS records is creating a subdomain in your current hosting account:
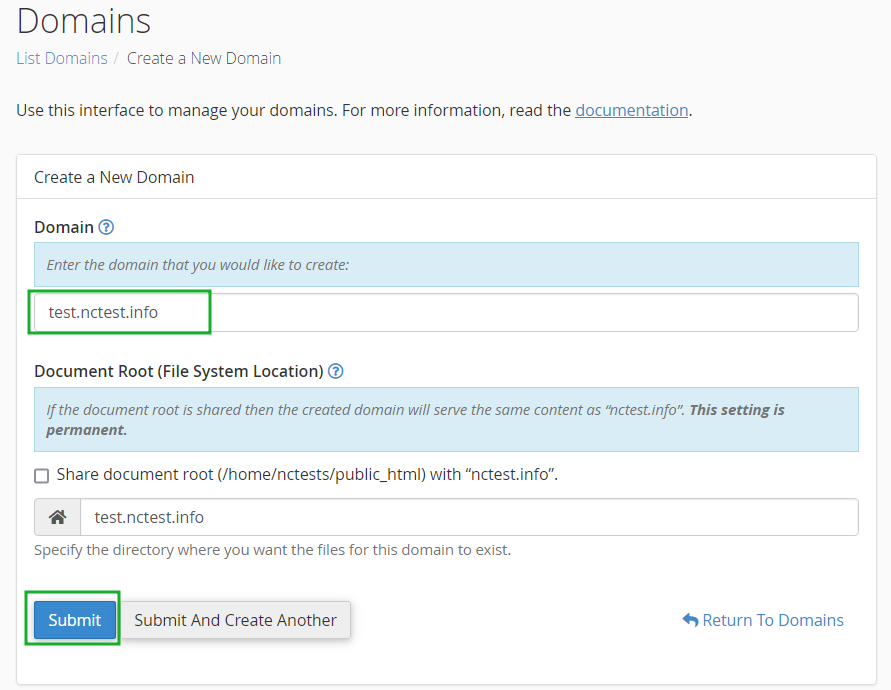
1. Create a subdomain for your domain on our server cPanel > Domains menu > Create a Domain (test.example.com, for instance):

NOTE: You can point your subdomain to the public_html directory selecting the "Share document root (/home/username/public_html) with “domain.tld”." option, and it will show all the content from your public_html folder. As a result, you will see the content of your main domain using a created subdomain:
2. Create the same subdomain (test.example.com) in your active DNS zone for your domain (on the side of your current DNS provider or domain registrar) and point it to our server's IP address by means of the A record.
3. You can find the correct IP address in Your Hosting Welcome Guide or in your cPanel. Click Server Information on the left side:
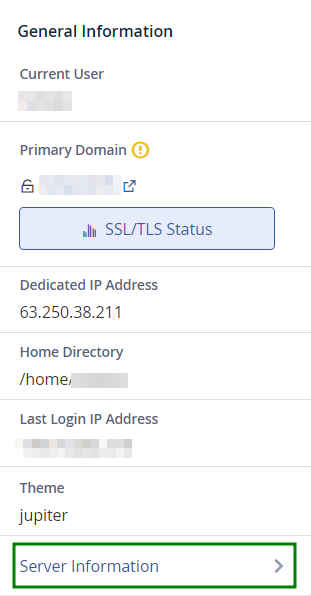
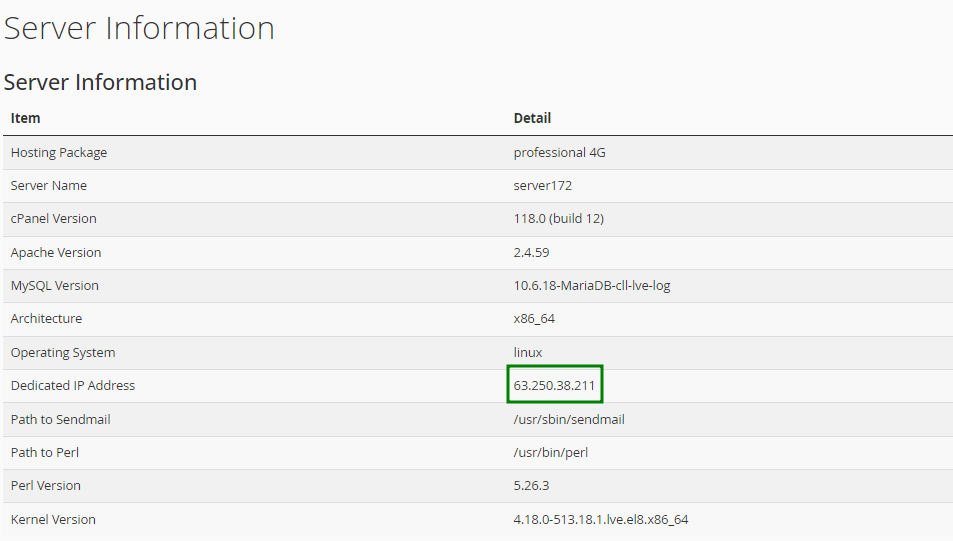
You will be taken to Server Information menu where you can find Shared (Dedicated) IP Address:
And now, after about 30 minutes (this is how long it takes for these records to propagate), you can open this subdomain in your browser or using proxy services (for instance, this one) in order to check the content from our server.
That's it!
Need any help? Contact us via
Helpdesk


