
{"/api/v1/ncpl/simplekb/getarticle:\"{\\\"articleId\\\":9275,\\\"categoryId\\\":2175}\"":{"body":{"Id":9275,"FriendlyId":"","ArticleTypeId":3,"Title":"Private Email account setup on iPhone (older OS)","ArticleName":"Private Email account setup on iPhone (older OS)","ArticleSummary":null,"PreponedSummary":false,"Approved":true,"Body":"DQoJCTxkaXY+Rm9sbG93IHRoZXNlIHN0ZXAtYnktc3RlcCBpbnN0cnVjdGlvbnMgdG8gc2V0IHVwIHlvdXIgTmFtZWNoZWFwIFByaXZhdGUgRW1haWwgYWNjb3VudCBvbiB5b3VyIGlQaG9uZS48YnIgLz48L2Rpdj4NCgkJPGRpdj4NCgkJCQk8YnIgLz4NCgkJCQk8cD4NCgkJCQkJCTxhIGhyZWY9IiNBdXRvbWF0aWMiPkF1dG9tYXRpYyBjb25maWd1cmF0aW9uPC9hPg0KCQkJCTwvcD4NCgkJCQk8cD4NCgkJCQkJCTxhIGhyZWY9IiNNYW51YWwiPk1hbnVhbCBzZXR1cDwvYT4NCgkJCQk8L3A+DQoJCQkJPHA+DQoJCQkJCQk8YnIgLz4NCgkJCQk8L3A+DQoJCQkJPHA+DQoJCQkJCQk8YSBuYW1lPSJBdXRvbWF0aWMiPg0KCQkJCQkJCQk8Yj5BdXRvbWF0aWMgY29uZmlndXJhdGlvbjwvYj4NCgkJCQkJCTwvYT4NCgkJCQk8L3A+DQoJCQkJPGJyIC8+DQoJCQkJPGRpdj5JbiBjYXNlIHlvdSB3aXNoIHRvIGNvbmZpZ3VyZSBhbGwgdGhlIG5lY2Vzc2FyeSBzZXR0aW5ncyBhdXRvbWF0aWNhbGx5IG9uIHlvdXIgaVBob25lLCBmb2xsb3cgdGhlIG5leHQgc3RlcHM6PC9kaXY+DQoJCQkJPGRpdj4NCgkJCQkJCTxiciAvPg0KCQkJCTwvZGl2Pg0KCQkJCTxkaXY+MS48YSBocmVmPSJodHRwczovL3d3dy5uYW1lY2hlYXAuY29tL3N1cHBvcnQva25vd2xlZGdlYmFzZS9hcnRpY2xlLmFzcHgvMTA1NC8yMTc4L2hvdy10by1sb2ctaW4tbmFtZWNoZWFwLXByaXZhdGUtZW1haWwtd2VibWFpbCIgdGFyZ2V0PSJfcGFyZW50Ij5Mb2cgaW50byB3ZWJtYWlsPC9hPiBmcm9tIHRoZSBwcmVmZXJyZWQgZGV2aWNlLiBUaGVuIG5hdmlnYXRlIHRvIHRoZSA8Yj5TeXN0ZW08L2I+IG1lbnUmZ3Q7Jmd0OyA8Yj5Db25uZWN0IFlvdXIgRGV2aWNlPC9iPiBzZWN0aW9uOjxiciAvPjwvZGl2Pg0KCQkJCTxiciAvPg0KCQkJCTxkaXY+DQoJCQkJCQk8c3BhbiBzdHlsZT0iZm9udC1zaXplOjExcHQ7Zm9udC1mYW1pbHk6QXJpYWw7Y29sb3I6IzExNTVjYztiYWNrZ3JvdW5kLWNvbG9yOnRyYW5zcGFyZW50O2ZvbnQtd2VpZ2h0OjQwMDtmb250LXN0eWxlOm5vcm1hbDtmb250LXZhcmlhbnQ6bm9ybWFsO3RleHQtZGVjb3JhdGlvbjpub25lO3ZlcnRpY2FsLWFsaWduOmJhc2VsaW5lO3doaXRlLXNwYWNlOnByZTt3aGl0ZS1zcGFjZTpwcmUtd3JhcDsiPg0KCQkJCQkJPC9zcGFuPg0KCQkJCTwvZGl2Pg0KCQkJCTxkaXY+DQoJCQkJCQk8aW1nIGNsYXNzPSJrYi1pbWFnZSIgc3JjPSJodHRwczovL25hbWVjaGVhcC5zaW1wbGVrYi5jb20vYWRtaW4vU2l0ZUNvbnRlbnRzLzItN0MyMkQ1MjM2QTQ1NDNFQjgyN0YzQkQ4OTM2RTE1M0UvbWVkaWEvY29ubmVjdDEucG5nIiAvPg0KCQkJCTwvZGl2Pg0KCQkJCTxkaXY+DQoJCQkJCQk8YnIgLz4NCgkJCQk8L2Rpdj4NCgkJCQk8ZGl2PjIuIENsaWNrIG9uIHRoZSA8Yj5BcHBsZTwvYj4gdGFiOjwvZGl2Pg0KCQkJCTxkaXY+DQoJCQkJCQk8YnIgLz4NCgkJCQk8L2Rpdj4NCgkJCQk8ZGl2Pg0KCQkJCQkJPGk+DQoJCQkJCQkJCTxpbWcgY2xhc3M9ImtiLWltYWdlIiBzcmM9Imh0dHBzOi8vbmFtZWNoZWFwLnNpbXBsZWtiLmNvbS9hZG1pbi9TaXRlQ29udGVudHMvMi03QzIyRDUyMzZBNDU0M0VCODI3RjNCRDg5MzZFMTUzRS9tZWRpYS9jb25uZWN0Mi5wbmciIC8+DQoJCQkJCQkJCTxiciAvPg0KCQkJCQkJPC9pPg0KCQkJCTwvZGl2Pg0KCQkJCTxkaXY+DQoJCQkJCQk8aT4NCgkJCQkJCQkJPGJyIC8+DQoJCQkJCQk8L2k+DQoJCQkJPC9kaXY+DQoJCQkJPGRpdj4zLiBOb3cgeW91IHdpbGwgc2VlIHRoZSA8Yj5Db25uZWN0IHlvdXIgZGV2aWNlPC9iPiBtZW51LjwvZGl2Pg0KCQkJCTxkaXY+DQoJCQkJCQk8YnIgLz4NCgkJCQk8L2Rpdj4NCgkJCQk8ZGl2PlRoZXJlIHlvdSB3aWxsIGJlIGFibGUgdG86PGJyIC8+PHVsPjxsaT5TeW5jaHJvbml6ZSB5b3VyIGZpbGVzIHdpdGggb3VyIDxiPkRyaXZlIGFwcGxpY2F0aW9uPC9iPi4gVGhlIGRldGFpbGVkIGluc3RydWN0aW9uIGlzIDxhIGhyZWY9Imh0dHBzOi8vd3d3Lm5hbWVjaGVhcC5jb20vc3VwcG9ydC9rbm93bGVkZ2ViYXNlL2FydGljbGUuYXNweC85MzI2LzIxNzgvaG93LXRvLXNldHVwLW94LWRyaXZlLWZvci1hcHAtc3VpdGUjaW9zIiB0YXJnZXQ9Il9wYXJlbnQiPmxvY2F0ZWQgaGVyZTwvYT4uPC9saT48bGk+U3luY2hyb25pemUgeW91ciA8Yj5NYWlsPC9iPiw8Yj4gQ2FsZW5kYXIgPC9iPmFuZDxiPiBBZGRyZXNzIEJvb2s8L2I+IGRhdGEgd2l0aCB5b3VyIGRldmljZSA8Yj5BdXRvbWF0aWNhbGx5PC9iPiBvciBjaGVjayB0aGUgTWFudWFsIHNldHRpbmdzLjwvbGk+PGxpPlN5bmNocm9uaXplIHlvdXIgPGI+TWFpbDwvYj4gd2l0aCBBcHBsZSBNYWlsIEFwcCBvciBjaGVjayB0aGUgc2V0dGluZ3MgZm9yIHRoZSBNYW51YWwgc2V0IHVwLjwvbGk+PGxpPlN5bmNocm9uaXplIHlvdXIgPGI+Q2FsZW5kYXI8L2I+IGFuZCA8Yj5BZGRyZXNzIEJvb2s8L2I+IGRhdGEgPGI+QXV0b21hdGljYWxseTwvYj4gb3IgY2hlY2sgdGhlIE1hbnVhbCBzZXR0aW5ncy48L2xpPjwvdWw+PGJyIC8+PGI+UExFQVNFIE5PVEU8L2I+OiBBdXRvbWF0aWMgQ29uZmlndXJhdGlvbiBpcyBhdmFpbGFibGUgb25seSBpbiBjYXNlIHlvdSBhcmUgbG9nZ2VkIGludG8gd2VibWFpbCBmcm9tIHRoZSBwcmVmZXJyZWQgZGV2aWNlLjxiciAvPjwvZGl2Pg0KCQkJCTxkaXY+DQoJCQkJCQk8YnIgLz4NCgkJCQk8L2Rpdj4NCgkJCQk8ZGl2Pg0KCQkJCQkJPGltZyBjbGFzcz0ia2ItaW1hZ2UiIHNyYz0iaHR0cHM6Ly9uYW1lY2hlYXAuc2ltcGxla2IuY29tL2FkbWluL1NpdGVDb250ZW50cy8yLTdDMjJENTIzNkE0NTQzRUI4MjdGM0JEODkzNkUxNTNFL21lZGlhL2Nvbm5lY3QzLnBuZyIgLz4NCgkJCQk8L2Rpdj4NCgkJCQk8ZGl2Pg0KCQkJCQkJPGJyIC8+DQoJCQkJPC9kaXY+DQoJCQkJPGltZyBjbGFzcz0ia2ItaW1hZ2UiIHNyYz0iaHR0cHM6Ly9uYW1lY2hlYXAuc2ltcGxla2IuY29tL2FkbWluL1NpdGVDb250ZW50cy8yLTdDMjJENTIzNkE0NTQzRUI4MjdGM0JEODkzNkUxNTNFL21lZGlhL2Nvbm5lY3Q0LnBuZyIgLz4NCgkJCQk8ZGl2Pg0KCQkJCQkJPGJyIC8+DQoJCQkJPC9kaXY+DQoJCQkJPGRpdj40LiBDbGljayA8Yj5JbnN0YWxsPC9iPg0KIGluIG9yZGVyIHRvIHNldCB1cCB0aGUgc2V0dGluZ3MgYXV0b21hdGljYWxseSBmb3IgdGhlIHByZWZlcnJlZCBvcHRpb24uDQogVGhlIGZvbGxvd2luZyBtZXNzYWdlIHdpbGwgYXBwZWFyLCB3aGVyZSB5b3UgbmVlZCB0byBjbGljayA8Yj5BbGxvdzwvYj46PC9kaXY+DQoJCQkJPGRpdj4NCgkJCQkJCTxiciAvPg0KCQkJCTwvZGl2Pg0KCQkJCTxkaXY+DQoJCQkJCQk8ZGl2Pg0KCQkJCQkJCQk8aW1nIGNsYXNzPSJrYi1pbWFnZSIgc3JjPSJodHRwczovL25hbWVjaGVhcC5zaW1wbGVrYi5jb20vYWRtaW4vU2l0ZUNvbnRlbnRzLzItN0MyMkQ1MjM2QTQ1NDNFQjgyN0YzQkQ4OTM2RTE1M0UvbWVkaWEvY29ubmVjdDUucG5nIiAvPg0KCQkJCQkJPC9kaXY+DQoJCQkJCQk8ZGl2Pg0KCQkJCQkJCQk8YnIgLz4NCgkJCQkJCTwvZGl2Pg0KCQkJCTwvZGl2Pg0KCQkJCTxkaXY+NS4gWW91IHdpbGwgYmUgcmVkaXJlY3RlZCB0byB0aGUgPGI+SW5zdGFsbCBQcm9maWxlPC9iPiBtZW51LiBDbGljayA8Yj5JbnN0YWxsPC9iPiB0byBwcm9jZWVkOjwvZGl2Pg0KCQkJCTxkaXY+DQoJCQkJCQk8YnIgLz4NCgkJCQk8L2Rpdj4NCgkJCQk8ZGl2Pg0KCQkJCQkJPGltZyBjbGFzcz0ia2ItaW1hZ2UiIHNyYz0iaHR0cHM6Ly9uYW1lY2hlYXAuc2ltcGxla2IuY29tL2FkbWluL1NpdGVDb250ZW50cy8yLTdDMjJENTIzNkE0NTQzRUI4MjdGM0JEODkzNkUxNTNFL21lZGlhL2Nvbm5lY3Q2LnBuZyIgLz4NCgkJCQk8L2Rpdj4NCgkJCQk8ZGl2Pg0KCQkJCQkJPGJyIC8+DQoJCQkJPC9kaXY+DQoJCQkJPGRpdj42LiBUaGVyZSBtYXkgYmUgYSB3YXJuaW5nIG1lc3NhZ2UgPGI+VGhlIHByb2ZpbGUgaXMgbm90IHNpZ25lZDwvYj4gb24gdGhlIG5leHQgcGFnZS4gSWdub3JlIGl0IGFuZCBjbGljayA8Yj5JbnN0YWxsPC9iPjo8YnIgLz48L2Rpdj4NCgkJCQk8YnIgLz4NCgkJCQk8ZGl2Pg0KCQkJCQkJPGltZyBjbGFzcz0ia2ItaW1hZ2UiIHNyYz0iaHR0cHM6Ly9uYW1lY2hlYXAuc2ltcGxla2IuY29tL2FkbWluL1NpdGVDb250ZW50cy8yLTdDMjJENTIzNkE0NTQzRUI4MjdGM0JEODkzNkUxNTNFL21lZGlhL2Nvbm5lY3Q3LnBuZyIgLz4NCgkJCQk8L2Rpdj4NCgkJCQk8ZGl2Pg0KCQkJCQkJPGJyIC8+DQoJCQkJPC9kaXY+DQoJCQkJPGRpdj43LiBOb3cgeW91IHdpbGwgbmVlZCB0byBlbnRlciB5b3VyIDxiPlByaXZhdGUgRW1haWwgcGFzc3dvcmQgPC9iPnRvIHNhdmUgdGhlIHNldHRpbmdzLiBDbGljayA8Yj5OZXh0PC9iPiBvbmNlIGRvbmU6PC9kaXY+DQoJCQkJPGRpdj4NCgkJCQkJCTxiciAvPg0KCQkJCTwvZGl2Pg0KCQkJCTxkaXY+DQoJCQkJCQk8aW1nIGNsYXNzPSJrYi1pbWFnZSIgc3JjPSJodHRwczovL25hbWVjaGVhcC5zaW1wbGVrYi5jb20vYWRtaW4vU2l0ZUNvbnRlbnRzLzItN0MyMkQ1MjM2QTQ1NDNFQjgyN0YzQkQ4OTM2RTE1M0UvbWVkaWEvY29ubmVjdDgucG5nIiAvPg0KCQkJCTwvZGl2Pg0KCQkJCTxkaXY+DQoJCQkJCQk8YnIgLz4NCgkJCQk8L2Rpdj4NCgkJCQk8ZGl2PjguIFlvdXIgcHJvZmlsZSB3aWxsIGJlIGluc3RhbGxlZC4gQ2xpY2sgPGI+RG9uZTwvYj4gdG8gZmluaXNoIHRoZSBpbnN0YWxsYXRpb246PC9kaXY+DQoJCQkJPGRpdj4NCgkJCQkJCTxiciAvPg0KCQkJCTwvZGl2Pg0KCQkJCTxkaXY+DQoJCQkJCQk8aW1nIGNsYXNzPSJrYi1pbWFnZSIgc3JjPSJodHRwczovL25hbWVjaGVhcC5zaW1wbGVrYi5jb20vYWRtaW4vU2l0ZUNvbnRlbnRzLzItN0MyMkQ1MjM2QTQ1NDNFQjgyN0YzQkQ4OTM2RTE1M0UvbWVkaWEvY29ubmVjdDkucG5nIiAvPg0KCQkJCTwvZGl2Pg0KCQkJCTxkaXY+DQoJCQkJCQk8YnIgLz4NCgkJCQk8L2Rpdj5UaGF04oCZcyBpdCEgWW91IHdpbGwgYmUgYWJsZSB0byBjaGVjayBvciBjaGFuZ2UgdGhlIHNldHRpbmdzIGluIHRoZSA8Yj5TZXR0aW5nczwvYj4gJmd0OyZndDsgPGI+R2VuZXJhbCA8L2I+Jmd0OyZndDsgPGI+UHJvZmlsZTwvYj4gbWVudSBvbiB5b3VyIGlQaG9uZS48YnIgLz48cD48YSBuYW1lPSJNYW51YWwiPjxiPjxiciAvPjwvYj48L2E+PC9wPjxwPjxhIG5hbWU9Ik1hbnVhbCBzZXR1cCI+PGI+TWFudWFsIHNldHVwPGJyIC8+PC9iPjwvYT48L3A+PGRpdj5Zb3UgY2FuIGNoZWNrIHRoZSBtYW51YWwgc2V0dGluZ3MgZm9yIHlvdXIgYWNjb3VudCBpbiB0aGUgPGI+U3lzdGVtPC9iPiBtZW51Jmd0OyZndDsgPGI+Q29ubmVjdCBZb3VyIERldmljZTwvYj4gc2VjdGlvbiAmZ3Q7Jmd0OyA8Yj5BcHBsZSA8L2I+Jmd0OyZndDs8Yj4gU2hvdyBkZXRhaWxzPC9iPjo8L2Rpdj48ZGl2PjxiciAvPjwvZGl2PjxpbWcgY2xhc3M9ImtiLWltYWdlIiBzcmM9Imh0dHBzOi8vbmFtZWNoZWFwLnNpbXBsZWtiLmNvbS9hZG1pbi9TaXRlQ29udGVudHMvMi03QzIyRDUyMzZBNDU0M0VCODI3RjNCRDg5MzZFMTUzRS9tZWRpYS9jb25uZWN0MTAucG5nIiAvPjxkaXY+PGltZyBjbGFzcz0ia2ItaW1hZ2UiIHNyYz0iaHR0cHM6Ly9uYW1lY2hlYXAuc2ltcGxla2IuY29tL2FkbWluL1NpdGVDb250ZW50cy8yLTdDMjJENTIzNkE0NTQzRUI4MjdGM0JEODkzNkUxNTNFL21lZGlhL2Nvbm5lY3QxMS5wbmciIC8+PC9kaXY+PGRpdj48YnIgLz48L2Rpdj48ZGl2PjxiciAvPjwvZGl2PjxkaXY+PGEgaHJlZj0iaHR0cHM6Ly9uYW1lY2hlYXAuc2ltcGxla2IuY29tL2FkbWluL2NvbnRlbnQvYXJ0aWNsZS5hc3B4P29wZXJhdGlvbnR5cGU9dXBkYXRlJmFtcDthaWQ9MTAwMzIjTWFudWFsIHNldHVwIj5NYW51YWwgc2V0dXA8L2E+PC9kaXY+PC9kaXY+DQoJCTxwIHN0eWxlPSJ0ZXh0LWluZGVudDogMjVweDsiPg0KCQkJCTxiciAvPjEuIFNlbGVjdCA8Yj5TZXR0aW5nczwvYj4gZnJvbSB0aGUgaG9tZSBzY3JlZW4gb2YgeW91ciBpUGhvbmU6DQo8YnIgLz48YnIgLz48aW1nIGNsYXNzPSJrYi1pbWFnZSIgc3JjPSJodHRwczovL05hbWVjaGVhcC5zaW1wbGVrYi5jb20vU2l0ZUNvbnRlbnRzLzItN0MyMkQ1MjM2QTQ1NDNFQjgyN0YzQkQ4OTM2RTE1M0UvbWVkaWEvaXBob25lX21lbnUuUE5HIiAvPjxiciAvPjxiciAvPjIuIENob29zZSA8Yj5NYWlsLCBDb250YWN0cywgQ2FsZW5kYXJzPC9iPiBhbmQgY2xpY2sgPGI+QWRkIEFjY291bnQ8L2I+Og0KPGJyIC8+PGJyIC8+PGltZyBjbGFzcz0ia2ItaW1hZ2UiIHNyYz0iaHR0cHM6Ly9OYW1lY2hlYXAuc2ltcGxla2IuY29tL1NpdGVDb250ZW50cy8yLTdDMjJENTIzNkE0NTQzRUI4MjdGM0JEODkzNkUxNTNFL21lZGlhL2lwaG9uZV9lbWFpbDEuUE5HIiAvPjxiciAvPjxiciAvPjxpbWcgY2xhc3M9ImtiLWltYWdlIiBzcmM9Imh0dHBzOi8vTmFtZWNoZWFwLnNpbXBsZWtiLmNvbS9TaXRlQ29udGVudHMvMi03QzIyRDUyMzZBNDU0M0VCODI3RjNCRDg5MzZFMTUzRS9tZWRpYS9pcGhvbmVfZW1haWwyLlBORyIgLz48YnIgLz48YnIgLz4zLiBDaG9vc2UgPGI+T3RoZXI8L2I+IGZyb20gdGhlIGxpc3QgdGhhdCBhcHBlYXJzOg0KPGJyIC8+PGJyIC8+PGltZyBjbGFzcz0ia2ItaW1hZ2UiIHNyYz0iaHR0cHM6Ly9OYW1lY2hlYXAuc2ltcGxla2IuY29tL1NpdGVDb250ZW50cy8yLTdDMjJENTIzNkE0NTQzRUI4MjdGM0JEODkzNkUxNTNFL21lZGlhL2lwaG9uZV9lbWFpbDMuUE5HIiAvPjxiciAvPjxiciAvPjQuIFNlbGVjdCA8Yj5BZGQgTWFpbCBBY2NvdW50PC9iPi4gSW4gdGhlIDxiPk5ldyBBY2NvdW50PC9iPiBtZW51LCB5b3Ugd2lsbCBuZWVkIHRvIHNwZWNpZnkgdGhlIGZvbGxvd2luZyByZWNvcmRzOiA8Yj48YnIgLz48L2I+PC9wPg0KCQk8dWw+DQoJCQkJPGxpPg0KCQkJCQkJPGI+TmFtZTwvYj4g4oCTIHlvdXIgbmFtZSAod2lsbCBhcHBlYXIgYXMgc2VuZGVyIG5hbWUpwqA8L2xpPg0KCQkJCTxsaT4NCgkJCQkJCTxiPkFkZHJlc3M8L2I+IOKAkyB5b3VyIGZ1bGwgZW1haWwgYWRkcmVzcywgYXMgY3JlYXRlZCB3aXRoIE5hbWVjaGVhcCBQcml2YXRlIEVtYWlswqA8L2xpPg0KCQkJCTxsaT4NCgkJCQkJCTxiPlBhc3N3b3JkPC9iPiDigJMgdGhlIHBhc3N3b3JkIGZvciB0aGlzIGVtYWlsIGFkZHJlc3PCoDwvbGk+DQoJCQkJPGxpPg0KCQkJCQkJPGI+RGVzY3JpcHRpb248L2I+IOKAkyBsZXRzIHlvdSBzcGVjaWZ5IGFueSBkZXNjcmlwdGlvbiAod2Ugc3VnZ2VzdCB5b3UgdXNlIHlvdXIgZW1haWwgYWRkcmVzcykgDQo8L2xpPg0KCQk8L3VsPg0KCQk8cCBzdHlsZT0idGV4dC1pbmRlbnQ6IDI1cHg7Ij4NCgkJCQk8YnIgLz4NCgkJCQk8aW1nIGNsYXNzPSJrYi1pbWFnZSIgc3JjPSJodHRwczovL05hbWVjaGVhcC5zaW1wbGVrYi5jb20vU2l0ZUNvbnRlbnRzLzItN0MyMkQ1MjM2QTQ1NDNFQjgyN0YzQkQ4OTM2RTE1M0UvbWVkaWEvaXBob25lX2VtYWlsNi5QTkciIC8+DQoJCQkJPGJyIC8+DQoJCQkJPGJyIC8+Q2xpY2sgPGI+TmV4dDwvYj4uDQoNCjxiciAvPjxiciAvPjUuIFNlbGVjdCBwcm90b2NvbCB0eXBlOiA8Yj5JTUFQPC9iPiBvciA8Yj5QT1AzPC9iPi4gV2UgYWR2aXNlIHlvdSB0byB1c2UgSU1BUC4gWW91ciBzZWxlY3Rpb24gd2lsbCBiZSBoaWdobGlnaHRlZCBibHVlLg0KDQo8YnIgLz48YnIgLz42LiBTZXR0aW5ncyBhcmUgdGhlIHNhbWUgZm9yIGJvdGggSU1BUCBhbmQgUE9QMzogDQoNCjxiPjxiciAvPjwvYj48L3A+DQoJCTx1bD4NCgkJCQk8bGk+DQoJCQkJCQk8Yj5OYW1lPC9iPiwgPGI+QWRkcmVzczwvYj4gYW5kIDxiPkRlc2NyaXB0aW9uOjwvYj4gc2hvdWxkIGhhdmUgYmVlbiBhbHJlYWR5IGZpbGxlZCBpbjwvbGk+DQoJCQkJPGxpPg0KCQkJCQkJPGI+SG9zdCBuYW1lOjwvYj4gbWFpbC5wcml2YXRlZW1haWwuY29tIDxiciAvPjwvbGk+DQoJCQkJPGxpPg0KCQkJCQkJPGI+VXNlciBOYW1lOjwvYj4geW91ciBlbWFpbCBhZGRyZXNzPC9saT4NCgkJCQk8bGk+DQoJCQkJCQk8Yj5QYXNzd29yZDo8L2I+IHBhc3N3b3JkIGZvciB5b3VyIGVtYWlsDQoNCjwvbGk+DQoJCTwvdWw+DQoJCTxwIHN0eWxlPSJ0ZXh0LWluZGVudDogMjVweDsiPg0KCQkJCTxiciAvPkluIHRoZSBmaWVsZHMgZm9yIGJvdGggPGI+SW5jb21pbmcgTWFpbCBTZXJ2ZXI8L2I+IGFuZCA8Yj5PdXRnb2luZyBNYWlsIFNlcnZlcjwvYj4sIGluZGljYXRlIHRoZSBmb2xsb3dpbmcgc2V0dGluZ3M6IA0KDQo8YnIgLz48YnIgLz48aW1nIGNsYXNzPSJrYi1pbWFnZSIgc3JjPSJodHRwczovL05hbWVjaGVhcC5zaW1wbGVrYi5jb20vU2l0ZUNvbnRlbnRzLzItN0MyMkQ1MjM2QTQ1NDNFQjgyN0YzQkQ4OTM2RTE1M0UvbWVkaWEvaXBob25lX2VtYWlsNy5QTkciIC8+PGJyIC8+PGltZyBjbGFzcz0ia2ItaW1hZ2UiIHNyYz0iaHR0cHM6Ly9OYW1lY2hlYXAuc2ltcGxla2IuY29tL1NpdGVDb250ZW50cy8yLTdDMjJENTIzNkE0NTQzRUI4MjdGM0JEODkzNkUxNTNFL21lZGlhL2lwaG9uZV9lbWFpbDguUE5HIiAvPjxiciAvPjxiciAvPkNsaWNrIDxiPk5leHQ8L2I+Lg0KDQo8YnIgLz48YnIgLz43LiBJZiB5b3UgdXNlIDxiPklNQVA8L2I+LCB5b3UgY2FuIGVuYWJsZSB0aGUgZm9sbG93aW5nIHNlcnZpY2VzOg0KPGJyIC8+PGJyIC8+PGltZyBjbGFzcz0ia2ItaW1hZ2UiIHNyYz0iaHR0cHM6Ly9OYW1lY2hlYXAuc2ltcGxla2IuY29tL1NpdGVDb250ZW50cy8yLTdDMjJENTIzNkE0NTQzRUI4MjdGM0JEODkzNkUxNTNFL21lZGlhL2lwaG9uZV9lbWFpbDkuUE5HIiAvPjxiciAvPjxiciAvPkNsaWNrIDxiPlNhdmU8L2I+IGFuZCB3YWl0IHdoaWxlIHRoZSBzeXN0ZW0gY29tcGxldGVzIG5lY2Vzc2FyeSBjaGVja3MuDQo8YnIgLz48YnIgLz44LiBXaGVuIHRoZSBjaGVja3MgYXJlIGZpbmlzaGVkLCB5b3UnbGwgYmUgcmVkaXJlY3RlZCB0byB0aGUgPGI+TWFpbCwgQ29udGFjdHMsIENhbGVuZGFyczwvYj4gc2NyZWVuLiBDaG9vc2UgeW91ciBuZXdseSBjcmVhdGVkIGFjY291bnQgdGhlcmU6DQo8YnIgLz48YnIgLz48aW1nIGNsYXNzPSJrYi1pbWFnZSIgc3JjPSJodHRwczovL05hbWVjaGVhcC5zaW1wbGVrYi5jb20vU2l0ZUNvbnRlbnRzLzItN0MyMkQ1MjM2QTQ1NDNFQjgyN0YzQkQ4OTM2RTE1M0UvbWVkaWEvaXBob25lX2VtYWlsMTAuUE5HIiAvPjxiciAvPjxiciAvPjxpbWcgY2xhc3M9ImtiLWltYWdlIiBzcmM9Imh0dHBzOi8vTmFtZWNoZWFwLnNpbXBsZWtiLmNvbS9TaXRlQ29udGVudHMvMi03QzIyRDUyMzZBNDU0M0VCODI3RjNCRDg5MzZFMTUzRS9tZWRpYS9pcGhvbmVfZW1haWwxMS5QTkciIC8+PGJyIC8+PGJyIC8+OS4gU2Nyb2xsIGRvd24gYW5kIHNlbGVjdCA8Yj5BZHZhbmNlZDwvYj46DQo8YnIgLz48YnIgLz48aW1nIGNsYXNzPSJrYi1pbWFnZSIgc3JjPSJodHRwczovL05hbWVjaGVhcC5zaW1wbGVrYi5jb20vU2l0ZUNvbnRlbnRzLzItN0MyMkQ1MjM2QTQ1NDNFQjgyN0YzQkQ4OTM2RTE1M0UvbWVkaWEvaXBob25lX2VtYWlsMTIuUE5HIiAvPjxiciAvPjxiciAvPjEwLiBIZXJlIHlvdSBjYW4gY2hvb3NlIGFkZGl0aW9uYWwgc2V0dGluZ3MgZm9yIDxiPklNQVA8L2I+IG9yIDxiPlBPUDM8L2I+Lg0KPGJyIC8+PGJyIC8+IA0KSWYgeW91IHNldCA8Yj5JTUFQPC9iPiBjb25uZWN0aW9uLCB5b3UgbmVlZCB0byB1c2UgcG9ydCA8Yj45OTMgKHdpdGggU1NMKTwvYj4gb3IgcG9ydCA8Yj4xNDMgKHdpdGhvdXQgU1NMKTwvYj4uIDxiciAvPg0KU2V0IDxiPklNQVAgUGF0aCBQcmVmaXg8L2I+IHRvIDxiPklOQk9YPC9iPjoNCjxiciAvPjxiciAvPjxpbWcgY2xhc3M9ImtiLWltYWdlIiBzcmM9Imh0dHBzOi8vTmFtZWNoZWFwLnNpbXBsZWtiLmNvbS9TaXRlQ29udGVudHMvMi03QzIyRDUyMzZBNDU0M0VCODI3RjNCRDg5MzZFMTUzRS9tZWRpYS9pcGhvbmVfZW1haWwxMy5QTkciIC8+PGJyIC8+PGJyIC8+b3INCjxiciAvPjxiciAvPjxpbWcgY2xhc3M9ImtiLWltYWdlIiBzcmM9Imh0dHBzOi8vTmFtZWNoZWFwLnNpbXBsZWtiLmNvbS9TaXRlQ29udGVudHMvMi03QzIyRDUyMzZBNDU0M0VCODI3RjNCRDg5MzZFMTUzRS9tZWRpYS9pcGhvbmVfZW1haWwxNC5QTkciIC8+PGJyIC8+PGJyIC8+SWYgeW91IGNob3NlIDxiPlBPUDM8L2I+LCB5b3UgbmVlZCB0byB1c2UgcG9ydCA8Yj45OTUgKHdpdGggU1NMKTwvYj46DQo8YnIgLz48YnIgLz48aW1nIGNsYXNzPSJrYi1pbWFnZSIgc3JjPSJodHRwczovL05hbWVjaGVhcC5zaW1wbGVrYi5jb20vU2l0ZUNvbnRlbnRzLzItN0MyMkQ1MjM2QTQ1NDNFQjgyN0YzQkQ4OTM2RTE1M0UvbWVkaWEvaXBob25lX2VtYWlsMTUuUE5HIiAvPjxiciAvPjxiciAvPm9yDQo8YnIgLz48YnIgLz48aW1nIGNsYXNzPSJrYi1pbWFnZSIgc3JjPSJodHRwczovL05hbWVjaGVhcC5zaW1wbGVrYi5jb20vU2l0ZUNvbnRlbnRzLzItN0MyMkQ1MjM2QTQ1NDNFQjgyN0YzQkQ4OTM2RTE1M0UvbWVkaWEvaXBob25lX2VtYWlsMTYuUE5HIiAvPjxiciAvPjxiciAvPjExLiBJbiBvcmRlciB0byBzZXQgdXAgYWRkaXRpb25hbCBzZXR0aW5ncyBmb3Igb3V0Z29pbmcgc2VydmVyLCB5b3Ugd2lsbCBuZWVkIHRvIHJldHVybiBpbiB0aGUgcHJldmlvdXMgbWVudSBhbmQgdGhlbiBnbyB0byA8Yj5PdXRnb2luZyBNYWlsIFNlcnZlcjwvYj4gYnkgY2xpY2tpbmcgb24gdGhlIGhvc3QgbmFtZSBvZiB0aGUgc2VydmVyOg0KDQogPGJyIC8+PGJyIC8+PGltZyBjbGFzcz0ia2ItaW1hZ2UiIHNyYz0iaHR0cHM6Ly9OYW1lY2hlYXAuc2ltcGxla2IuY29tL1NpdGVDb250ZW50cy8yLTdDMjJENTIzNkE0NTQzRUI4MjdGM0JEODkzNkUxNTNFL21lZGlhL2lwaG9uZV9lbWFpbDE3LlBORyIgLz48YnIgLz48YnIgLz4xMi4gRm9yIE91dGdvaW5nIFNlcnZlciAoU01UUCksIHNlbGVjdCBwb3J0IDxiPjQ2NSAod2l0aCBTU0wpPC9iPiBvciBwb3J0IDxiPjU4NyAod2l0aG91dCBTU0wpPC9iPjoNCjxiciAvPjxiciAvPjxpbWcgY2xhc3M9ImtiLWltYWdlIiBzcmM9Imh0dHBzOi8vTmFtZWNoZWFwLnNpbXBsZWtiLmNvbS9TaXRlQ29udGVudHMvMi03QzIyRDUyMzZBNDU0M0VCODI3RjNCRDg5MzZFMTUzRS9tZWRpYS9pcGhvbmVfZW1haWwxOC5QTkciIC8+PGJyIC8+PGJyIC8+b3INCjxiciAvPjxiciAvPjxpbWcgY2xhc3M9ImtiLWltYWdlIiBzcmM9Imh0dHBzOi8vTmFtZWNoZWFwLnNpbXBsZWtiLmNvbS9TaXRlQ29udGVudHMvMi03QzIyRDUyMzZBNDU0M0VCODI3RjNCRDg5MzZFMTUzRS9tZWRpYS9pcGhvbmVfZW1haWwxOS5QTkciIC8+PGJyIC8+PGJyIC8+T25jZSB0aGUgc2V0dGluZ3MgYXJlIHZlcmlmaWVkLCB5b3VyIGFjY291bnQgaXMgYWN0aXZlIGFuZCByZWFkeSB0byB1c2UuIDxiciAvPlRvIHRlc3QgeW91ciBuZXcgZW1haWwgYWNjb3VudCwgZ28gdG8gPGI+TWVzc2FnZXM8L2I+IGFuZCB0cnkgc2VuZGluZyBhbmQgcmVjZWl2aW5nIGVtYWlscy4gDQo8YnIgLz48YnIgLz48YnIgLz5UaGF0J3MgaXQhPGJyIC8+PGJyIC8+DQrCoMKgwqDCoMKgwqDCoMKgwqDCoMKgwqDCoMKgIDxiciAvPsKgwqDCoMKgwqDCoMKgwqDCoMKgwqDCoMKgwqDCoMKgwqDCoMKgwqDCoCBOZWVkIGhlbHA/IENvbnRhY3Qgb3VyIDxhIGhyZWY9Imh0dHBzOi8vd3d3Lm5hbWVjaGVhcC5jb20vaGVscC1jZW50ZXIvIj5IZWxwRGVzazwvYT4uPGJyIC8+PGJyIC8+PC9wPg0KCQk8cD4NCgkJPC9wPg0K","NewTillDate":null,"FeaturedTillDate":null,"ModifiedDateTime":"2021-11-29T18:06:09.0000000","LiveDateTime":"1754-02-02T00:00:00.0000000","CreatedDateTime":"2013-10-09T12:11:40.0000000","ApprovalDatetime":"2013-10-09T12:13:50.0000000","RequestCount":155747,"MarkedAsNew":false,"MarkedAsFeatured":false,"RatingValue":3,"CategoryPaths":[{"__type":"Nc:SimpleKB:Abstractions:Dtos:CategoryPathDto","Level":1,"CategoryId":93,"CategoryName":"Email service"},{"__type":"Nc:SimpleKB:Abstractions:Dtos:CategoryPathDto","Level":2,"CategoryId":2175,"CategoryName":"Private Email: Client Setup"}],"AssociatedCategories":[{"CategoryId":2175,"CategoryName":"Private Email: Client Setup","CategoryDisplayName":"Email servicePrivate Email: Client Setup"}],"AssociatedTags":[{"TagId":18096,"Tag":"iPhone"},{"TagId":19330,"Tag":" Private email"},{"TagId":26327,"Tag":" iphone"},{"TagId":69449,"Tag":" privatemail"}],"RelatedArticles":[],"AssociatedMedias":[],"PreferredCategoryId":0,"RootParentCategoryName":"","RootParentCategoryId":0},"status":200,"statusText":"OK"},"/api/v1/ncpl/simplekb/getcategorybycategoryid:\"{\\\"categoryId\\\":2175}\"":{"body":{"__type":"Nc:SimpleKB:Abstractions:Dtos:CategoryDto","Description":"RW1haWwgQ2xpZW50cyBhbmQgTW9iaWxlIERldmljZXMgc2V0dXAgZm9yIE5DIFByaXZhdGUgRW1haWwgdXNlcnMuPGJyIC8+","ParentCategoryId":93,"Parent_Category_Name":"Email service","FriendlyId":null,"ApprovedYN":true,"TreatAsTopicYN":false,"CreatedDateTime":"02/14/2013 08:15:53","CurrentCategoryPaths":[{"__type":"Nc:SimpleKB:Abstractions:Dtos:CategoryPathDto","Level":1,"CategoryId":93,"CategoryName":"Email service"},{"__type":"Nc:SimpleKB:Abstractions:Dtos:CategoryPathDto","Level":2,"CategoryId":2175,"CategoryName":"Private Email: Client Setup"}],"RelatedCategories":[],"AssociatedArticles":[{"ArticleId":10152,"Title":"Private Email account setup in Outlook for iOS","ArticleName":"Private Email account setup in Outlook for iOS","LiveDateTime":"02/02/1754 00:00:00","NewTillDate":null,"FeaturedTillDate":null,"ModifiedDateTime":"01/12/2024"},{"ArticleId":10187,"Title":"Private Email account setup on Android 9.x.x","ArticleName":"Private Email account setup on Android 9.x.x","LiveDateTime":"02/02/1754 00:00:00","NewTillDate":null,"FeaturedTillDate":null,"ModifiedDateTime":"01/12/2024"},{"ArticleId":10209,"Title":"How to add a Google Workspace or Gmail account to Private Email using the Add Mail Account option","ArticleName":"How to add a Google Workspace or Gmail account to Private Email using the Add Mail Account option","LiveDateTime":"02/02/1754 00:00:00","NewTillDate":null,"FeaturedTillDate":null,"ModifiedDateTime":"04/27/2026"},{"ArticleId":10309,"Title":"How to transfer eM Client for OX App Suite to a standard eM Client","ArticleName":"How to transfer eM Client for OX App Suite to a standard eM Client","LiveDateTime":"02/02/1754 00:00:00","NewTillDate":null,"FeaturedTillDate":null,"ModifiedDateTime":"12/22/2020"},{"ArticleId":10561,"Title":"Outlook performance issues with large Private Email accounts","ArticleName":"Outlook performance issues with large Private Email accounts","LiveDateTime":"02/02/1754 00:00:00","NewTillDate":null,"FeaturedTillDate":null,"ModifiedDateTime":"10/27/2022"},{"ArticleId":10592,"Title":"Private Email account setup for sending emails from the Gmail interface","ArticleName":"Private Email account setup for sending emails from the Gmail interface","LiveDateTime":"02/02/1754 00:00:00","NewTillDate":null,"FeaturedTillDate":null,"ModifiedDateTime":"01/06/2026"},{"ArticleId":10602,"Title":"Private Email account setup in Spark email client","ArticleName":"Private Email account setup in Spark email client","LiveDateTime":"02/02/1754 00:00:00","NewTillDate":null,"FeaturedTillDate":null,"ModifiedDateTime":"01/12/2024"},{"ArticleId":10646,"Title":"Private Email account setup in Vivaldi Mail","ArticleName":"Private Email account setup in Vivaldi Mail","LiveDateTime":"02/02/1754 00:00:00","NewTillDate":null,"FeaturedTillDate":null,"ModifiedDateTime":"01/12/2024"},{"ArticleId":10670,"Title":"Private Email account setup in the Yahoo Mail app","ArticleName":"Private Email account setup in the Yahoo Mail app","LiveDateTime":"02/02/1754 00:00:00","NewTillDate":null,"FeaturedTillDate":null,"ModifiedDateTime":"05/14/2024"},{"ArticleId":10684,"Title":"How IMAP folders synchronize in different email clients","ArticleName":"How IMAP folders synchronize in different email clients","LiveDateTime":"02/02/1754 00:00:00","NewTillDate":null,"FeaturedTillDate":null,"ModifiedDateTime":"04/23/2024"},{"ArticleId":10687,"Title":"Private Email account setup in new Outlook client","ArticleName":"Private Email account setup in new Outlook client","LiveDateTime":"02/02/1754 00:00:00","NewTillDate":null,"FeaturedTillDate":null,"ModifiedDateTime":"01/29/2025"},{"ArticleId":10701,"Title":"How to configure your Private Email account with systeme.io","ArticleName":"How to configure your Private Email account with systeme.io","LiveDateTime":"02/02/1754 00:00:00","NewTillDate":null,"FeaturedTillDate":null,"ModifiedDateTime":"09/17/2024"},{"ArticleId":10764,"Title":"How to add your Private Email account to the Gmail app","ArticleName":"How to add your Private Email account to the Gmail app","LiveDateTime":"02/02/1754 00:00:00","NewTillDate":null,"FeaturedTillDate":null,"ModifiedDateTime":"01/06/2026"},{"ArticleId":1179,"Title":"General Private Email configuration for mail clients and mobile devices","ArticleName":"General Private Email configuration for mail clients and mobile devices","LiveDateTime":"02/02/1754 00:00:00","NewTillDate":null,"FeaturedTillDate":null,"ModifiedDateTime":"01/12/2024"},{"ArticleId":9982,"Title":"Private Email account setup on Windows 10","ArticleName":"Private Email account setup on Windows 10","LiveDateTime":"02/02/1754 00:00:00","NewTillDate":null,"FeaturedTillDate":null,"ModifiedDateTime":"12/09/2021"},{"ArticleId":9238,"Title":"Private Email account setup on Android 4.x.x","ArticleName":"Private Email account setup on Android 4.x.x","LiveDateTime":"02/02/1754 00:00:00","NewTillDate":null,"FeaturedTillDate":null,"ModifiedDateTime":"05/22/2025"},{"ArticleId":9526,"Title":"Private Email account setup on Android 5.x.x","ArticleName":"Private Email account setup on Android 5.x.x","LiveDateTime":"02/02/1754 00:00:00","NewTillDate":null,"FeaturedTillDate":null,"ModifiedDateTime":"01/12/2024"},{"ArticleId":10018,"Title":"Private Email account setup on Android 7.x.x","ArticleName":"Private Email account setup on Android 7.x.x","LiveDateTime":"02/02/1754 00:00:00","NewTillDate":null,"FeaturedTillDate":null,"ModifiedDateTime":"01/12/2024"},{"ArticleId":10106,"Title":"Private Email account setup on Android 8.x.x","ArticleName":"Private Email account setup on Android 8.x.x","LiveDateTime":"02/02/1754 00:00:00","NewTillDate":null,"FeaturedTillDate":null,"ModifiedDateTime":"01/12/2024"},{"ArticleId":10032,"Title":"Private Email account setup on iPhone","ArticleName":"Private Email account setup on iPhone","LiveDateTime":"02/02/1754 00:00:00","NewTillDate":null,"FeaturedTillDate":null,"ModifiedDateTime":"01/20/2026"},{"ArticleId":9275,"Title":"Private Email account setup on iPhone (older OS)","ArticleName":"Private Email account setup on iPhone (older OS)","LiveDateTime":"02/02/1754 00:00:00","NewTillDate":null,"FeaturedTillDate":null,"ModifiedDateTime":"11/29/2021"},{"ArticleId":9669,"Title":"Private Email account setup on Windows Mobile","ArticleName":"Private Email account setup on Windows Mobile","LiveDateTime":"02/02/1754 00:00:00","NewTillDate":null,"FeaturedTillDate":null,"ModifiedDateTime":"01/12/2024"},{"ArticleId":9545,"Title":"Private Email account setup on Windows 8 (SMTP/IMAP)","ArticleName":"Private Email account setup on Windows 8 (SMTP/IMAP)","LiveDateTime":"02/02/1754 00:00:00","NewTillDate":null,"FeaturedTillDate":null,"ModifiedDateTime":"12/21/2021"},{"ArticleId":9928,"Title":"Private Email account setup in Outlook for Android","ArticleName":"Private Email account setup in Outlook for Android","LiveDateTime":"02/02/1754 00:00:00","NewTillDate":null,"FeaturedTillDate":null,"ModifiedDateTime":"03/02/2026"},{"ArticleId":10031,"Title":"Private Email account setup in Outlook 2016","ArticleName":"Private Email account setup in Outlook 2016","LiveDateTime":"02/02/1754 00:00:00","NewTillDate":null,"FeaturedTillDate":null,"ModifiedDateTime":"10/27/2022"},{"ArticleId":9183,"Title":"Private Email account setup in Microsoft Outlook 2007-2010","ArticleName":"Private Email account setup in Microsoft Outlook 2007-2010","LiveDateTime":"02/02/1754 00:00:00","NewTillDate":null,"FeaturedTillDate":null,"ModifiedDateTime":"01/12/2024"},{"ArticleId":9498,"Title":"Private Email account setup in Microsoft Outlook 2013","ArticleName":"Private Email account setup in Microsoft Outlook 2013","LiveDateTime":"02/02/1754 00:00:00","NewTillDate":null,"FeaturedTillDate":null,"ModifiedDateTime":"10/27/2022"},{"ArticleId":10091,"Title":"Private Email account setup in Outlook 2019","ArticleName":"Private Email account setup in Outlook 2019","LiveDateTime":"02/02/1754 00:00:00","NewTillDate":null,"FeaturedTillDate":null,"ModifiedDateTime":"08/11/2022"},{"ArticleId":9381,"Title":"Private Email account setup in Microsoft Outlook for OS X","ArticleName":"Private Email account setup in Microsoft Outlook for OS X","LiveDateTime":"02/02/1754 00:00:00","NewTillDate":null,"FeaturedTillDate":null,"ModifiedDateTime":"01/12/2024"},{"ArticleId":9457,"Title":"Private Email account setup in MacMail OS X Yosemite","ArticleName":"Private Email account setup in MacMail OS X Yosemite","LiveDateTime":"02/02/1754 00:00:00","NewTillDate":null,"FeaturedTillDate":null,"ModifiedDateTime":"01/12/2024"},{"ArticleId":9733,"Title":"Private Email account setup in MacMail OS X El Capitan (SMTP/IMAP)","ArticleName":"Private Email account setup in MacMail OS X El Capitan (SMTP/IMAP)","LiveDateTime":"02/02/1754 00:00:00","NewTillDate":null,"FeaturedTillDate":null,"ModifiedDateTime":"01/12/2024"},{"ArticleId":9734,"Title":"Private Email account setup in MacMail OS X El Capitan (SMTP/POP3)","ArticleName":"Private Email account setup in MacMail OS X El Capitan (SMTP/POP3)","LiveDateTime":"02/02/1754 00:00:00","NewTillDate":null,"FeaturedTillDate":null,"ModifiedDateTime":"01/12/2024"},{"ArticleId":9860,"Title":"Private Email account setup in Mail on macOS Sierra/Mojave/Catalina/Big Sur (SMTP/IMAP)","ArticleName":"Private Email account setup in Mail on macOS Sierra/Mojave/Catalina/Big Sur (SMTP/IMAP)","LiveDateTime":"02/02/1754 00:00:00","NewTillDate":null,"FeaturedTillDate":null,"ModifiedDateTime":"01/12/2024"},{"ArticleId":9861,"Title":"Private Email account setup in Mail on macOS Sierra/Mojave/Catalina/Big Sur (SMTP/POP3)","ArticleName":"Private Email account setup in Mail on macOS Sierra/Mojave/Catalina/Big Sur (SMTP/POP3)","LiveDateTime":"02/02/1754 00:00:00","NewTillDate":null,"FeaturedTillDate":null,"ModifiedDateTime":"01/12/2024"},{"ArticleId":9590,"Title":"Private Email account setup on Blackberry 10","ArticleName":"Private Email account setup on Blackberry 10","LiveDateTime":"02/02/1754 00:00:00","NewTillDate":null,"FeaturedTillDate":null,"ModifiedDateTime":"01/12/2024"},{"ArticleId":9186,"Title":"Private Email account setup in Thunderbird","ArticleName":"Private Email account setup in Thunderbird","LiveDateTime":"02/02/1754 00:00:00","NewTillDate":null,"FeaturedTillDate":null,"ModifiedDateTime":"08/26/2025"},{"ArticleId":9619,"Title":"Private Email account setup in The Bat! email client","ArticleName":"Private Email account setup in The Bat! email client","LiveDateTime":"02/02/1754 00:00:00","NewTillDate":null,"FeaturedTillDate":null,"ModifiedDateTime":"01/12/2024"},{"ArticleId":9741,"Title":"How to remove duplicate emails in Outlook 2010 and 2013","ArticleName":"How to remove duplicate emails in Outlook 2010 and 2013","LiveDateTime":"02/02/1754 00:00:00","NewTillDate":null,"FeaturedTillDate":null,"ModifiedDateTime":"12/21/2021"},{"ArticleId":9730,"Title":"How to add Private Email account to Outlook.com webmail","ArticleName":"How to add Private Email account to Outlook.com webmail","LiveDateTime":"02/02/1754 00:00:00","NewTillDate":null,"FeaturedTillDate":null,"ModifiedDateTime":"01/21/2022"},{"ArticleId":9308,"Title":"How to fix Invalid HELO Name","ArticleName":"How to fix Invalid HELO Name","LiveDateTime":"02/02/1754 00:00:00","NewTillDate":null,"FeaturedTillDate":null,"ModifiedDateTime":"12/28/2020"}],"AssociatedTags":[{"TagId":1465,"Tag":" Open Xchange"},{"TagId":1665,"Tag":"Open-Xchange"},{"TagId":17598,"Tag":" setup"},{"TagId":19330,"Tag":" Private email"},{"TagId":27206,"Tag":" email clients"}],"CategoryId":2175,"CategoryName":"Private Email: Client Setup"},"status":200,"statusText":"OK"},"/api/v1/ncpl/simplekb/getcategories:\"{\\\"parentCategoryId\\\":0,\\\"getTree\\\":true}\"":{"body":[{"__type":"Nc:SimpleKB:Abstractions:Dtos:CategoryItemDto","ParentCategoryId":93,"TreatAsTopicYN":false,"Description":"","ImageUrl":"","ShortDesc":"","CategoryId":2216,"CategoryName":"Spam Protection"},{"__type":"Nc:SimpleKB:Abstractions:Dtos:CategoryItemDto","ParentCategoryId":14,"TreatAsTopicYN":false,"Description":"","ImageUrl":"","ShortDesc":"","CategoryId":2217,"CategoryName":"Renewal"},{"__type":"Nc:SimpleKB:Abstractions:Dtos:CategoryItemDto","ParentCategoryId":14,"TreatAsTopicYN":false,"Description":"","ImageUrl":"","ShortDesc":"","CategoryId":2218,"CategoryName":"cPanel SSL Plugin"},{"__type":"Nc:SimpleKB:Abstractions:Dtos:CategoryItemDto","ParentCategoryId":12,"TreatAsTopicYN":false,"Description":"","ImageUrl":"","ShortDesc":"","CategoryId":2219,"CategoryName":"PHP Configuration"},{"__type":"Nc:SimpleKB:Abstractions:Dtos:CategoryItemDto","ParentCategoryId":14,"TreatAsTopicYN":false,"Description":"","ImageUrl":"","ShortDesc":"","CategoryId":2221,"CategoryName":"Multi-Domain SSL Certificates"},{"__type":"Nc:SimpleKB:Abstractions:Dtos:CategoryItemDto","ParentCategoryId":14,"TreatAsTopicYN":false,"Description":"","ImageUrl":"","ShortDesc":"","CategoryId":2222,"CategoryName":"Cancellation"},{"__type":"Nc:SimpleKB:Abstractions:Dtos:CategoryItemDto","ParentCategoryId":14,"TreatAsTopicYN":false,"Description":"","ImageUrl":"","ShortDesc":"","CategoryId":2223,"CategoryName":"Browser errors"},{"__type":"Nc:SimpleKB:Abstractions:Dtos:CategoryItemDto","ParentCategoryId":14,"TreatAsTopicYN":false,"Description":"","ImageUrl":"","ShortDesc":"","CategoryId":2224,"CategoryName":"Site Seal, Logo"},{"__type":"Nc:SimpleKB:Abstractions:Dtos:CategoryItemDto","ParentCategoryId":12,"TreatAsTopicYN":false,"Description":"","ImageUrl":"","ShortDesc":"","CategoryId":2225,"CategoryName":"SEO"},{"__type":"Nc:SimpleKB:Abstractions:Dtos:CategoryItemDto","ParentCategoryId":93,"TreatAsTopicYN":false,"Description":"","ImageUrl":"","ShortDesc":"","CategoryId":2226,"CategoryName":"Email Migration"},{"__type":"Nc:SimpleKB:Abstractions:Dtos:CategoryItemDto","ParentCategoryId":2211,"TreatAsTopicYN":false,"Description":"","ImageUrl":"","ShortDesc":"","CategoryId":2227,"CategoryName":"SSL Resellers"},{"__type":"Nc:SimpleKB:Abstractions:Dtos:CategoryItemDto","ParentCategoryId":0,"TreatAsTopicYN":true,"Description":"","ImageUrl":"/assets/img/pictograms/150/cloud-red.png","ShortDesc":"","CategoryId":2228,"CategoryName":"Apps","SubCategories":[{"__type":"Nc:SimpleKB:Abstractions:Dtos:CategoryItemDto","ParentCategoryId":2228,"TreatAsTopicYN":false,"Description":"","ImageUrl":"","ShortDesc":"","CategoryId":2251,"CategoryName":"Supersonic CDN"},{"__type":"Nc:SimpleKB:Abstractions:Dtos:CategoryItemDto","ParentCategoryId":2228,"TreatAsTopicYN":false,"Description":"","ImageUrl":"","ShortDesc":"","CategoryId":2298,"CategoryName":"Site Maker"},{"__type":"Nc:SimpleKB:Abstractions:Dtos:CategoryItemDto","ParentCategoryId":2228,"TreatAsTopicYN":false,"Description":"","ImageUrl":"","ShortDesc":"","CategoryId":177,"CategoryName":"Google Workspace (formerly G Suite)"}]},{"__type":"Nc:SimpleKB:Abstractions:Dtos:CategoryItemDto","ParentCategoryId":2211,"TreatAsTopicYN":false,"Description":"","ImageUrl":"","ShortDesc":"","CategoryId":2229,"CategoryName":"Hosting Resellers"},{"__type":"Nc:SimpleKB:Abstractions:Dtos:CategoryItemDto","ParentCategoryId":34,"TreatAsTopicYN":false,"Description":"","ImageUrl":"","ShortDesc":"","CategoryId":2232,"CategoryName":"DNSSEC"},{"__type":"Nc:SimpleKB:Abstractions:Dtos:CategoryItemDto","ParentCategoryId":34,"TreatAsTopicYN":false,"Description":"","ImageUrl":"","ShortDesc":"","CategoryId":2234,"CategoryName":"Google Workspace (formerly G Suite)"},{"__type":"Nc:SimpleKB:Abstractions:Dtos:CategoryItemDto","ParentCategoryId":34,"TreatAsTopicYN":false,"Description":"","ImageUrl":"","ShortDesc":"","CategoryId":2237,"CategoryName":"Host records setup"},{"__type":"Nc:SimpleKB:Abstractions:Dtos:CategoryItemDto","ParentCategoryId":14,"TreatAsTopicYN":false,"Description":"","ImageUrl":"","ShortDesc":"","CategoryId":2238,"CategoryName":"SSL installation errors"},{"__type":"Nc:SimpleKB:Abstractions:Dtos:CategoryItemDto","ParentCategoryId":0,"TreatAsTopicYN":false,"Description":"","ImageUrl":"/assets/img/pictograms/150/easywp-red.png","ShortDesc":"","CategoryId":2239,"CategoryName":"EasyWP","SubCategories":[{"__type":"Nc:SimpleKB:Abstractions:Dtos:CategoryItemDto","ParentCategoryId":2239,"TreatAsTopicYN":false,"Description":"","ImageUrl":"","ShortDesc":"","CategoryId":2280,"CategoryName":"Getting Started"},{"__type":"Nc:SimpleKB:Abstractions:Dtos:CategoryItemDto","ParentCategoryId":2239,"TreatAsTopicYN":false,"Description":"","ImageUrl":"","ShortDesc":"","CategoryId":2279,"CategoryName":"General Information"},{"__type":"Nc:SimpleKB:Abstractions:Dtos:CategoryItemDto","ParentCategoryId":2239,"TreatAsTopicYN":false,"Description":"","ImageUrl":"","ShortDesc":"","CategoryId":2281,"CategoryName":"WordPress Migration"},{"__type":"Nc:SimpleKB:Abstractions:Dtos:CategoryItemDto","ParentCategoryId":2239,"TreatAsTopicYN":false,"Description":"","ImageUrl":"","ShortDesc":"","CategoryId":2282,"CategoryName":"Plugins and Themes"},{"__type":"Nc:SimpleKB:Abstractions:Dtos:CategoryItemDto","ParentCategoryId":2239,"TreatAsTopicYN":false,"Description":"","ImageUrl":"","ShortDesc":"","CategoryId":2284,"CategoryName":"WordPress Management"},{"__type":"Nc:SimpleKB:Abstractions:Dtos:CategoryItemDto","ParentCategoryId":2239,"TreatAsTopicYN":false,"Description":"","ImageUrl":"","ShortDesc":"","CategoryId":2285,"CategoryName":"SFTP and Database access"},{"__type":"Nc:SimpleKB:Abstractions:Dtos:CategoryItemDto","ParentCategoryId":2239,"TreatAsTopicYN":false,"Description":"","ImageUrl":"","ShortDesc":"","CategoryId":2286,"CategoryName":"Domains questions"},{"__type":"Nc:SimpleKB:Abstractions:Dtos:CategoryItemDto","ParentCategoryId":2239,"TreatAsTopicYN":false,"Description":"","ImageUrl":"","ShortDesc":"","CategoryId":2288,"CategoryName":"Billing questions"},{"__type":"Nc:SimpleKB:Abstractions:Dtos:CategoryItemDto","ParentCategoryId":2239,"TreatAsTopicYN":false,"Description":"","ImageUrl":"","ShortDesc":"","CategoryId":2287,"CategoryName":"SSL questions"}]},{"__type":"Nc:SimpleKB:Abstractions:Dtos:CategoryItemDto","ParentCategoryId":2228,"TreatAsTopicYN":false,"Description":"","ImageUrl":"","ShortDesc":"","CategoryId":2251,"CategoryName":"Supersonic CDN"},{"__type":"Nc:SimpleKB:Abstractions:Dtos:CategoryItemDto","ParentCategoryId":12,"TreatAsTopicYN":false,"Description":"","ImageUrl":"","ShortDesc":"","CategoryId":2252,"CategoryName":"InterWorx questions"},{"__type":"Nc:SimpleKB:Abstractions:Dtos:CategoryItemDto","ParentCategoryId":2253,"TreatAsTopicYN":false,"Description":"","ImageUrl":"","ShortDesc":"","CategoryId":2254,"CategoryName":"Domains How-To"},{"__type":"Nc:SimpleKB:Abstractions:Dtos:CategoryItemDto","ParentCategoryId":2253,"TreatAsTopicYN":false,"Description":"","ImageUrl":"","ShortDesc":"","CategoryId":2255,"CategoryName":"Hosting How-To"},{"__type":"Nc:SimpleKB:Abstractions:Dtos:CategoryItemDto","ParentCategoryId":2253,"TreatAsTopicYN":false,"Description":"","ImageUrl":"","ShortDesc":"","CategoryId":2257,"CategoryName":"Sales & Payments How-To"},{"__type":"Nc:SimpleKB:Abstractions:Dtos:CategoryItemDto","ParentCategoryId":2253,"TreatAsTopicYN":false,"Description":"","ImageUrl":"","ShortDesc":"","CategoryId":2258,"CategoryName":"cPanel Email How-To"},{"__type":"Nc:SimpleKB:Abstractions:Dtos:CategoryItemDto","ParentCategoryId":93,"TreatAsTopicYN":false,"Description":"","ImageUrl":"","ShortDesc":"","CategoryId":2260,"CategoryName":"Private Email Contacts and Calendars Setup"},{"__type":"Nc:SimpleKB:Abstractions:Dtos:CategoryItemDto","ParentCategoryId":2253,"TreatAsTopicYN":false,"Description":"","ImageUrl":"","ShortDesc":"","CategoryId":2262,"CategoryName":"EasyWP How-To"},{"__type":"Nc:SimpleKB:Abstractions:Dtos:CategoryItemDto","ParentCategoryId":0,"TreatAsTopicYN":false,"Description":"","ImageUrl":"https://download.namecheap.com/assets/img/domainvault-red@2x.png","ShortDesc":"","CategoryId":2289,"CategoryName":"Domain Vault","SubCategories":[]},{"__type":"Nc:SimpleKB:Abstractions:Dtos:CategoryItemDto","ParentCategoryId":14,"TreatAsTopicYN":false,"Description":"","ImageUrl":"","ShortDesc":"","CategoryId":2290,"CategoryName":"CSR code"},{"__type":"Nc:SimpleKB:Abstractions:Dtos:CategoryItemDto","ParentCategoryId":12,"TreatAsTopicYN":false,"Description":"","ImageUrl":"","ShortDesc":"","CategoryId":2291,"CategoryName":"Webuzo questions"},{"__type":"Nc:SimpleKB:Abstractions:Dtos:CategoryItemDto","ParentCategoryId":2265,"TreatAsTopicYN":false,"Description":"","ImageUrl":"","ShortDesc":"","CategoryId":2292,"CategoryName":"Browser Extensions"},{"__type":"Nc:SimpleKB:Abstractions:Dtos:CategoryItemDto","ParentCategoryId":14,"TreatAsTopicYN":false,"Description":"","ImageUrl":"","ShortDesc":"","CategoryId":2293,"CategoryName":"Automated SSL management"},{"__type":"Nc:SimpleKB:Abstractions:Dtos:CategoryItemDto","ParentCategoryId":2228,"TreatAsTopicYN":false,"Description":"","ImageUrl":"","ShortDesc":"","CategoryId":2298,"CategoryName":"Site Maker"},{"__type":"Nc:SimpleKB:Abstractions:Dtos:CategoryItemDto","ParentCategoryId":2175,"TreatAsTopicYN":false,"Description":"","ImageUrl":"","ShortDesc":"","CategoryId":2299,"CategoryName":"Common"},{"__type":"Nc:SimpleKB:Abstractions:Dtos:CategoryItemDto","ParentCategoryId":12,"TreatAsTopicYN":false,"Description":"","ImageUrl":"","ShortDesc":"","CategoryId":27,"CategoryName":"Getting Started"},{"__type":"Nc:SimpleKB:Abstractions:Dtos:CategoryItemDto","ParentCategoryId":0,"TreatAsTopicYN":false,"Description":"","ImageUrl":"/assets/img/pictograms/150/support-red.png","ShortDesc":"","CategoryId":5,"CategoryName":"General & Support","SubCategories":[]},{"__type":"Nc:SimpleKB:Abstractions:Dtos:CategoryItemDto","ParentCategoryId":2200,"TreatAsTopicYN":false,"Description":"","ImageUrl":"","ShortDesc":"","CategoryId":7,"CategoryName":"Billing FAQ"},{"__type":"Nc:SimpleKB:Abstractions:Dtos:CategoryItemDto","ParentCategoryId":2209,"TreatAsTopicYN":false,"Description":"","ImageUrl":"","ShortDesc":"","CategoryId":8,"CategoryName":"Transfer Information"},{"__type":"Nc:SimpleKB:Abstractions:Dtos:CategoryItemDto","ParentCategoryId":12,"TreatAsTopicYN":false,"Description":"","ImageUrl":"","ShortDesc":"","CategoryId":22,"CategoryName":"Hosting Information"},{"__type":"Nc:SimpleKB:Abstractions:Dtos:CategoryItemDto","ParentCategoryId":14,"TreatAsTopicYN":false,"Description":"","ImageUrl":"","ShortDesc":"","CategoryId":38,"CategoryName":"SSL General"},{"__type":"Nc:SimpleKB:Abstractions:Dtos:CategoryItemDto","ParentCategoryId":9,"TreatAsTopicYN":false,"Description":"","ImageUrl":"","ShortDesc":"","CategoryId":45,"CategoryName":"Account Security"},{"__type":"Nc:SimpleKB:Abstractions:Dtos:CategoryItemDto","ParentCategoryId":34,"TreatAsTopicYN":false,"Description":"","ImageUrl":"","ShortDesc":"","CategoryId":46,"CategoryName":"Domain Management"},{"__type":"Nc:SimpleKB:Abstractions:Dtos:CategoryItemDto","ParentCategoryId":2211,"TreatAsTopicYN":false,"Description":"","ImageUrl":"","ShortDesc":"","CategoryId":63,"CategoryName":"Namecheap API"},{"__type":"Nc:SimpleKB:Abstractions:Dtos:CategoryItemDto","ParentCategoryId":2228,"TreatAsTopicYN":false,"Description":"","ImageUrl":"","ShortDesc":"","CategoryId":177,"CategoryName":"Google Workspace (formerly G Suite)"},{"__type":"Nc:SimpleKB:Abstractions:Dtos:CategoryItemDto","ParentCategoryId":93,"TreatAsTopicYN":false,"Description":"","ImageUrl":"","ShortDesc":"","CategoryId":2179,"CategoryName":"Private Email: General Information"},{"__type":"Nc:SimpleKB:Abstractions:Dtos:CategoryItemDto","ParentCategoryId":2265,"TreatAsTopicYN":false,"Description":"","ImageUrl":"","ShortDesc":"","CategoryId":2274,"CategoryName":"General"},{"__type":"Nc:SimpleKB:Abstractions:Dtos:CategoryItemDto","ParentCategoryId":2239,"TreatAsTopicYN":false,"Description":"","ImageUrl":"","ShortDesc":"","CategoryId":2280,"CategoryName":"Getting Started"},{"__type":"Nc:SimpleKB:Abstractions:Dtos:CategoryItemDto","ParentCategoryId":2239,"TreatAsTopicYN":false,"Description":"","ImageUrl":"","ShortDesc":"","CategoryId":2279,"CategoryName":"General Information"},{"__type":"Nc:SimpleKB:Abstractions:Dtos:CategoryItemDto","ParentCategoryId":93,"TreatAsTopicYN":false,"Description":"","ImageUrl":"","ShortDesc":"","CategoryId":2215,"CategoryName":"Private Email: Mailbox Management"},{"__type":"Nc:SimpleKB:Abstractions:Dtos:CategoryItemDto","ParentCategoryId":2211,"TreatAsTopicYN":false,"Description":"","ImageUrl":"","ShortDesc":"","CategoryId":2196,"CategoryName":"WHMCS module for SSL"},{"__type":"Nc:SimpleKB:Abstractions:Dtos:CategoryItemDto","ParentCategoryId":0,"TreatAsTopicYN":false,"Description":"","ImageUrl":"/assets/img/pictograms/150/savings-red.png","ShortDesc":"","CategoryId":2200,"CategoryName":"Checkout & Billing","SubCategories":[{"__type":"Nc:SimpleKB:Abstractions:Dtos:CategoryItemDto","ParentCategoryId":2200,"TreatAsTopicYN":false,"Description":"","ImageUrl":"","ShortDesc":"","CategoryId":7,"CategoryName":"Billing FAQ"},{"__type":"Nc:SimpleKB:Abstractions:Dtos:CategoryItemDto","ParentCategoryId":2200,"TreatAsTopicYN":false,"Description":"","ImageUrl":"","ShortDesc":"","CategoryId":2201,"CategoryName":"Domains Billing"},{"__type":"Nc:SimpleKB:Abstractions:Dtos:CategoryItemDto","ParentCategoryId":2200,"TreatAsTopicYN":false,"Description":"","ImageUrl":"","ShortDesc":"","CategoryId":21,"CategoryName":"Hosting Billing"},{"__type":"Nc:SimpleKB:Abstractions:Dtos:CategoryItemDto","ParentCategoryId":2200,"TreatAsTopicYN":false,"Description":"","ImageUrl":"","ShortDesc":"","CategoryId":71,"CategoryName":"SSL Certificates Billing"},{"__type":"Nc:SimpleKB:Abstractions:Dtos:CategoryItemDto","ParentCategoryId":2200,"TreatAsTopicYN":false,"Description":"","ImageUrl":"","ShortDesc":"","CategoryId":2177,"CategoryName":"Private Email"}]},{"__type":"Nc:SimpleKB:Abstractions:Dtos:CategoryItemDto","ParentCategoryId":2200,"TreatAsTopicYN":false,"Description":"","ImageUrl":"","ShortDesc":"","CategoryId":2201,"CategoryName":"Domains Billing"},{"__type":"Nc:SimpleKB:Abstractions:Dtos:CategoryItemDto","ParentCategoryId":14,"TreatAsTopicYN":false,"Description":"","ImageUrl":"","ShortDesc":"","CategoryId":67,"CategoryName":"Activation"},{"__type":"Nc:SimpleKB:Abstractions:Dtos:CategoryItemDto","ParentCategoryId":2209,"TreatAsTopicYN":false,"Description":"","ImageUrl":"","ShortDesc":"","CategoryId":83,"CategoryName":"Transfer to Namecheap"},{"__type":"Nc:SimpleKB:Abstractions:Dtos:CategoryItemDto","ParentCategoryId":9,"TreatAsTopicYN":false,"Description":"","ImageUrl":"","ShortDesc":"","CategoryId":43,"CategoryName":"Profile Management"},{"__type":"Nc:SimpleKB:Abstractions:Dtos:CategoryItemDto","ParentCategoryId":34,"TreatAsTopicYN":false,"Description":"","ImageUrl":"","ShortDesc":"","CategoryId":10,"CategoryName":"DNS Questions"},{"__type":"Nc:SimpleKB:Abstractions:Dtos:CategoryItemDto","ParentCategoryId":12,"TreatAsTopicYN":false,"Description":"","ImageUrl":"","ShortDesc":"","CategoryId":29,"CategoryName":"cPanel questions"},{"__type":"Nc:SimpleKB:Abstractions:Dtos:CategoryItemDto","ParentCategoryId":2200,"TreatAsTopicYN":false,"Description":"","ImageUrl":"","ShortDesc":"","CategoryId":21,"CategoryName":"Hosting Billing"},{"__type":"Nc:SimpleKB:Abstractions:Dtos:CategoryItemDto","ParentCategoryId":34,"TreatAsTopicYN":false,"Description":"","ImageUrl":"","ShortDesc":"","CategoryId":11,"CategoryName":"Dynamic DNS"},{"__type":"Nc:SimpleKB:Abstractions:Dtos:CategoryItemDto","ParentCategoryId":9,"TreatAsTopicYN":false,"Description":"","ImageUrl":"","ShortDesc":"","CategoryId":44,"CategoryName":"Account Access"},{"__type":"Nc:SimpleKB:Abstractions:Dtos:CategoryItemDto","ParentCategoryId":2209,"TreatAsTopicYN":false,"Description":"","ImageUrl":"","ShortDesc":"","CategoryId":84,"CategoryName":"Transfer to another provider"},{"__type":"Nc:SimpleKB:Abstractions:Dtos:CategoryItemDto","ParentCategoryId":14,"TreatAsTopicYN":false,"Description":"","ImageUrl":"","ShortDesc":"","CategoryId":68,"CategoryName":"Validation"},{"__type":"Nc:SimpleKB:Abstractions:Dtos:CategoryItemDto","ParentCategoryId":12,"TreatAsTopicYN":false,"Description":"","ImageUrl":"","ShortDesc":"","CategoryId":2182,"CategoryName":"cPanel: Software Management"},{"__type":"Nc:SimpleKB:Abstractions:Dtos:CategoryItemDto","ParentCategoryId":93,"TreatAsTopicYN":false,"Description":"","ImageUrl":"","ShortDesc":"","CategoryId":2214,"CategoryName":"Email Forwarding"},{"__type":"Nc:SimpleKB:Abstractions:Dtos:CategoryItemDto","ParentCategoryId":2265,"TreatAsTopicYN":false,"Description":"","ImageUrl":"","ShortDesc":"","CategoryId":2270,"CategoryName":"Routers"},{"__type":"Nc:SimpleKB:Abstractions:Dtos:CategoryItemDto","ParentCategoryId":2239,"TreatAsTopicYN":false,"Description":"","ImageUrl":"","ShortDesc":"","CategoryId":2281,"CategoryName":"WordPress Migration"},{"__type":"Nc:SimpleKB:Abstractions:Dtos:CategoryItemDto","ParentCategoryId":2239,"TreatAsTopicYN":false,"Description":"","ImageUrl":"","ShortDesc":"","CategoryId":2282,"CategoryName":"Plugins and Themes"},{"__type":"Nc:SimpleKB:Abstractions:Dtos:CategoryItemDto","ParentCategoryId":2265,"TreatAsTopicYN":false,"Description":"","ImageUrl":"","ShortDesc":"","CategoryId":2272,"CategoryName":"TV"},{"__type":"Nc:SimpleKB:Abstractions:Dtos:CategoryItemDto","ParentCategoryId":12,"TreatAsTopicYN":false,"Description":"","ImageUrl":"","ShortDesc":"","CategoryId":2187,"CategoryName":"cPanel: WordPress"},{"__type":"Nc:SimpleKB:Abstractions:Dtos:CategoryItemDto","ParentCategoryId":2209,"TreatAsTopicYN":false,"Description":"","ImageUrl":"","ShortDesc":"","CategoryId":219,"CategoryName":"Canceled Transfers"},{"__type":"Nc:SimpleKB:Abstractions:Dtos:CategoryItemDto","ParentCategoryId":2200,"TreatAsTopicYN":false,"Description":"","ImageUrl":"","ShortDesc":"","CategoryId":71,"CategoryName":"SSL Certificates Billing"},{"__type":"Nc:SimpleKB:Abstractions:Dtos:CategoryItemDto","ParentCategoryId":93,"TreatAsTopicYN":false,"Description":"","ImageUrl":"","ShortDesc":"","CategoryId":2176,"CategoryName":"Private Email: DNS Settings"},{"__type":"Nc:SimpleKB:Abstractions:Dtos:CategoryItemDto","ParentCategoryId":14,"TreatAsTopicYN":false,"Description":"","ImageUrl":"","ShortDesc":"","CategoryId":69,"CategoryName":"Installation"},{"__type":"Nc:SimpleKB:Abstractions:Dtos:CategoryItemDto","ParentCategoryId":0,"TreatAsTopicYN":false,"Description":"","ImageUrl":"/assets/img/pictograms/150/reseller-red.png","ShortDesc":"","CategoryId":34,"CategoryName":"Domains","SubCategories":[{"__type":"Nc:SimpleKB:Abstractions:Dtos:CategoryItemDto","ParentCategoryId":34,"TreatAsTopicYN":false,"Description":"","ImageUrl":"","ShortDesc":"","CategoryId":2232,"CategoryName":"DNSSEC"},{"__type":"Nc:SimpleKB:Abstractions:Dtos:CategoryItemDto","ParentCategoryId":34,"TreatAsTopicYN":false,"Description":"","ImageUrl":"","ShortDesc":"","CategoryId":2234,"CategoryName":"Google Workspace (formerly G Suite)"},{"__type":"Nc:SimpleKB:Abstractions:Dtos:CategoryItemDto","ParentCategoryId":34,"TreatAsTopicYN":false,"Description":"","ImageUrl":"","ShortDesc":"","CategoryId":2237,"CategoryName":"Host records setup"},{"__type":"Nc:SimpleKB:Abstractions:Dtos:CategoryItemDto","ParentCategoryId":34,"TreatAsTopicYN":false,"Description":"","ImageUrl":"","ShortDesc":"","CategoryId":46,"CategoryName":"Domain Management"},{"__type":"Nc:SimpleKB:Abstractions:Dtos:CategoryItemDto","ParentCategoryId":34,"TreatAsTopicYN":false,"Description":"","ImageUrl":"","ShortDesc":"","CategoryId":10,"CategoryName":"DNS Questions"},{"__type":"Nc:SimpleKB:Abstractions:Dtos:CategoryItemDto","ParentCategoryId":34,"TreatAsTopicYN":false,"Description":"","ImageUrl":"","ShortDesc":"","CategoryId":11,"CategoryName":"Dynamic DNS"},{"__type":"Nc:SimpleKB:Abstractions:Dtos:CategoryItemDto","ParentCategoryId":34,"TreatAsTopicYN":false,"Description":"","ImageUrl":"","ShortDesc":"","CategoryId":35,"CategoryName":"Registrations"},{"__type":"Nc:SimpleKB:Abstractions:Dtos:CategoryItemDto","ParentCategoryId":34,"TreatAsTopicYN":false,"Description":"","ImageUrl":"","ShortDesc":"","CategoryId":2207,"CategoryName":"Renewal questions"},{"__type":"Nc:SimpleKB:Abstractions:Dtos:CategoryItemDto","ParentCategoryId":34,"TreatAsTopicYN":false,"Description":"","ImageUrl":"","ShortDesc":"","CategoryId":36,"CategoryName":"Domains with extended attributes"},{"__type":"Nc:SimpleKB:Abstractions:Dtos:CategoryItemDto","ParentCategoryId":34,"TreatAsTopicYN":false,"Description":"","ImageUrl":"","ShortDesc":"","CategoryId":51,"CategoryName":"FreeDNS"},{"__type":"Nc:SimpleKB:Abstractions:Dtos:CategoryItemDto","ParentCategoryId":34,"TreatAsTopicYN":false,"Description":"","ImageUrl":"","ShortDesc":"","CategoryId":15,"CategoryName":"Namecheap Market"},{"__type":"Nc:SimpleKB:Abstractions:Dtos:CategoryItemDto","ParentCategoryId":34,"TreatAsTopicYN":false,"Description":"","ImageUrl":"","ShortDesc":"","CategoryId":2208,"CategoryName":"3rd Party Services Setup"},{"__type":"Nc:SimpleKB:Abstractions:Dtos:CategoryItemDto","ParentCategoryId":34,"TreatAsTopicYN":false,"Description":"","ImageUrl":"","ShortDesc":"","CategoryId":2278,"CategoryName":"Handshake TLDs"}]},{"__type":"Nc:SimpleKB:Abstractions:Dtos:CategoryItemDto","ParentCategoryId":34,"TreatAsTopicYN":false,"Description":"","ImageUrl":"","ShortDesc":"","CategoryId":35,"CategoryName":"Registrations"},{"__type":"Nc:SimpleKB:Abstractions:Dtos:CategoryItemDto","ParentCategoryId":14,"TreatAsTopicYN":false,"Description":"","ImageUrl":"","ShortDesc":"","CategoryId":70,"CategoryName":"Reissuance"},{"__type":"Nc:SimpleKB:Abstractions:Dtos:CategoryItemDto","ParentCategoryId":0,"TreatAsTopicYN":false,"Description":"","ImageUrl":"/assets/img/pictograms/150/protection-red.png","ShortDesc":"","CategoryId":37,"CategoryName":"Domain Privacy Protection","SubCategories":[]},{"__type":"Nc:SimpleKB:Abstractions:Dtos:CategoryItemDto","ParentCategoryId":2200,"TreatAsTopicYN":false,"Description":"","ImageUrl":"","ShortDesc":"","CategoryId":2177,"CategoryName":"Private Email"},{"__type":"Nc:SimpleKB:Abstractions:Dtos:CategoryItemDto","ParentCategoryId":93,"TreatAsTopicYN":false,"Description":"","ImageUrl":"","ShortDesc":"","CategoryId":2178,"CategoryName":"Private Email: Webmail Features"},{"__type":"Nc:SimpleKB:Abstractions:Dtos:CategoryItemDto","ParentCategoryId":34,"TreatAsTopicYN":false,"Description":"","ImageUrl":"","ShortDesc":"","CategoryId":2207,"CategoryName":"Renewal questions"},{"__type":"Nc:SimpleKB:Abstractions:Dtos:CategoryItemDto","ParentCategoryId":12,"TreatAsTopicYN":false,"Description":"","ImageUrl":"","ShortDesc":"","CategoryId":2210,"CategoryName":"cPanel Add-ons"},{"__type":"Nc:SimpleKB:Abstractions:Dtos:CategoryItemDto","ParentCategoryId":2265,"TreatAsTopicYN":false,"Description":"","ImageUrl":"","ShortDesc":"","CategoryId":2273,"CategoryName":"Gaming Consoles"},{"__type":"Nc:SimpleKB:Abstractions:Dtos:CategoryItemDto","ParentCategoryId":2239,"TreatAsTopicYN":false,"Description":"","ImageUrl":"","ShortDesc":"","CategoryId":2284,"CategoryName":"WordPress Management"},{"__type":"Nc:SimpleKB:Abstractions:Dtos:CategoryItemDto","ParentCategoryId":2239,"TreatAsTopicYN":false,"Description":"","ImageUrl":"","ShortDesc":"","CategoryId":2285,"CategoryName":"SFTP and Database access"},{"__type":"Nc:SimpleKB:Abstractions:Dtos:CategoryItemDto","ParentCategoryId":2265,"TreatAsTopicYN":false,"Description":"","ImageUrl":"","ShortDesc":"","CategoryId":2268,"CategoryName":"macOS"},{"__type":"Nc:SimpleKB:Abstractions:Dtos:CategoryItemDto","ParentCategoryId":93,"TreatAsTopicYN":false,"Description":"","ImageUrl":"","ShortDesc":"","CategoryId":2175,"CategoryName":"Private Email: Client Setup"},{"__type":"Nc:SimpleKB:Abstractions:Dtos:CategoryItemDto","ParentCategoryId":0,"TreatAsTopicYN":false,"Description":"","ImageUrl":"/assets/img/pictograms/150/status-red.png","ShortDesc":"","CategoryId":2209,"CategoryName":"Domain Transfers","SubCategories":[{"__type":"Nc:SimpleKB:Abstractions:Dtos:CategoryItemDto","ParentCategoryId":2209,"TreatAsTopicYN":false,"Description":"","ImageUrl":"","ShortDesc":"","CategoryId":8,"CategoryName":"Transfer Information"},{"__type":"Nc:SimpleKB:Abstractions:Dtos:CategoryItemDto","ParentCategoryId":2209,"TreatAsTopicYN":false,"Description":"","ImageUrl":"","ShortDesc":"","CategoryId":83,"CategoryName":"Transfer to Namecheap"},{"__type":"Nc:SimpleKB:Abstractions:Dtos:CategoryItemDto","ParentCategoryId":2209,"TreatAsTopicYN":false,"Description":"","ImageUrl":"","ShortDesc":"","CategoryId":84,"CategoryName":"Transfer to another provider"},{"__type":"Nc:SimpleKB:Abstractions:Dtos:CategoryItemDto","ParentCategoryId":2209,"TreatAsTopicYN":false,"Description":"","ImageUrl":"","ShortDesc":"","CategoryId":219,"CategoryName":"Canceled Transfers"}]},{"__type":"Nc:SimpleKB:Abstractions:Dtos:CategoryItemDto","ParentCategoryId":12,"TreatAsTopicYN":false,"Description":"","ImageUrl":"","ShortDesc":"","CategoryId":48,"CategoryName":"VPS"},{"__type":"Nc:SimpleKB:Abstractions:Dtos:CategoryItemDto","ParentCategoryId":34,"TreatAsTopicYN":false,"Description":"","ImageUrl":"","ShortDesc":"","CategoryId":36,"CategoryName":"Domains with extended attributes"},{"__type":"Nc:SimpleKB:Abstractions:Dtos:CategoryItemDto","ParentCategoryId":0,"TreatAsTopicYN":true,"Description":"","ImageUrl":"/assets/img/pictograms/150/server-red.png","ShortDesc":"","CategoryId":12,"CategoryName":"Hosting","SubCategories":[{"__type":"Nc:SimpleKB:Abstractions:Dtos:CategoryItemDto","ParentCategoryId":12,"TreatAsTopicYN":false,"Description":"","ImageUrl":"","ShortDesc":"","CategoryId":2219,"CategoryName":"PHP Configuration"},{"__type":"Nc:SimpleKB:Abstractions:Dtos:CategoryItemDto","ParentCategoryId":12,"TreatAsTopicYN":false,"Description":"","ImageUrl":"","ShortDesc":"","CategoryId":2225,"CategoryName":"SEO"},{"__type":"Nc:SimpleKB:Abstractions:Dtos:CategoryItemDto","ParentCategoryId":12,"TreatAsTopicYN":false,"Description":"","ImageUrl":"","ShortDesc":"","CategoryId":2252,"CategoryName":"InterWorx questions"},{"__type":"Nc:SimpleKB:Abstractions:Dtos:CategoryItemDto","ParentCategoryId":12,"TreatAsTopicYN":false,"Description":"","ImageUrl":"","ShortDesc":"","CategoryId":2291,"CategoryName":"Webuzo questions"},{"__type":"Nc:SimpleKB:Abstractions:Dtos:CategoryItemDto","ParentCategoryId":12,"TreatAsTopicYN":false,"Description":"","ImageUrl":"","ShortDesc":"","CategoryId":27,"CategoryName":"Getting Started"},{"__type":"Nc:SimpleKB:Abstractions:Dtos:CategoryItemDto","ParentCategoryId":12,"TreatAsTopicYN":false,"Description":"","ImageUrl":"","ShortDesc":"","CategoryId":22,"CategoryName":"Hosting Information"},{"__type":"Nc:SimpleKB:Abstractions:Dtos:CategoryItemDto","ParentCategoryId":12,"TreatAsTopicYN":false,"Description":"","ImageUrl":"","ShortDesc":"","CategoryId":29,"CategoryName":"cPanel questions"},{"__type":"Nc:SimpleKB:Abstractions:Dtos:CategoryItemDto","ParentCategoryId":12,"TreatAsTopicYN":false,"Description":"","ImageUrl":"","ShortDesc":"","CategoryId":2182,"CategoryName":"cPanel: Software Management"},{"__type":"Nc:SimpleKB:Abstractions:Dtos:CategoryItemDto","ParentCategoryId":12,"TreatAsTopicYN":false,"Description":"","ImageUrl":"","ShortDesc":"","CategoryId":2187,"CategoryName":"cPanel: WordPress"},{"__type":"Nc:SimpleKB:Abstractions:Dtos:CategoryItemDto","ParentCategoryId":12,"TreatAsTopicYN":false,"Description":"","ImageUrl":"","ShortDesc":"","CategoryId":2210,"CategoryName":"cPanel Add-ons"},{"__type":"Nc:SimpleKB:Abstractions:Dtos:CategoryItemDto","ParentCategoryId":12,"TreatAsTopicYN":false,"Description":"","ImageUrl":"","ShortDesc":"","CategoryId":48,"CategoryName":"VPS"},{"__type":"Nc:SimpleKB:Abstractions:Dtos:CategoryItemDto","ParentCategoryId":12,"TreatAsTopicYN":false,"Description":"","ImageUrl":"","ShortDesc":"","CategoryId":2188,"CategoryName":"Dedicated Server"},{"__type":"Nc:SimpleKB:Abstractions:Dtos:CategoryItemDto","ParentCategoryId":12,"TreatAsTopicYN":false,"Description":"","ImageUrl":"","ShortDesc":"","CategoryId":30,"CategoryName":"WHM questions"},{"__type":"Nc:SimpleKB:Abstractions:Dtos:CategoryItemDto","ParentCategoryId":12,"TreatAsTopicYN":false,"Description":"","ImageUrl":"","ShortDesc":"","CategoryId":32,"CategoryName":"DNS settings"},{"__type":"Nc:SimpleKB:Abstractions:Dtos:CategoryItemDto","ParentCategoryId":12,"TreatAsTopicYN":false,"Description":"","ImageUrl":"","ShortDesc":"","CategoryId":103,"CategoryName":"LVE (CloudLinux)"},{"__type":"Nc:SimpleKB:Abstractions:Dtos:CategoryItemDto","ParentCategoryId":12,"TreatAsTopicYN":false,"Description":"","ImageUrl":"","ShortDesc":"","CategoryId":89,"CategoryName":"SSH Access"},{"__type":"Nc:SimpleKB:Abstractions:Dtos:CategoryItemDto","ParentCategoryId":12,"TreatAsTopicYN":false,"Description":"","ImageUrl":"","ShortDesc":"","CategoryId":205,"CategoryName":"FTP questions"},{"__type":"Nc:SimpleKB:Abstractions:Dtos:CategoryItemDto","ParentCategoryId":12,"TreatAsTopicYN":false,"Description":"","ImageUrl":"","ShortDesc":"","CategoryId":2180,"CategoryName":"MySQL questions"},{"__type":"Nc:SimpleKB:Abstractions:Dtos:CategoryItemDto","ParentCategoryId":12,"TreatAsTopicYN":false,"Description":"","ImageUrl":"","ShortDesc":"","CategoryId":2199,"CategoryName":"Hosting Migration"},{"__type":"Nc:SimpleKB:Abstractions:Dtos:CategoryItemDto","ParentCategoryId":12,"TreatAsTopicYN":false,"Description":"","ImageUrl":"","ShortDesc":"","CategoryId":2194,"CategoryName":"Tips & Tricks"},{"__type":"Nc:SimpleKB:Abstractions:Dtos:CategoryItemDto","ParentCategoryId":12,"TreatAsTopicYN":false,"Description":"","ImageUrl":"","ShortDesc":"","CategoryId":239,"CategoryName":"WHMCS"},{"__type":"Nc:SimpleKB:Abstractions:Dtos:CategoryItemDto","ParentCategoryId":12,"TreatAsTopicYN":false,"Description":"","ImageUrl":"","ShortDesc":"","CategoryId":33,"CategoryName":"SSL Installation"}]},{"__type":"Nc:SimpleKB:Abstractions:Dtos:CategoryItemDto","ParentCategoryId":93,"TreatAsTopicYN":false,"Description":"","ImageUrl":"","ShortDesc":"","CategoryId":2171,"CategoryName":"Private Email: Active Sync (Exchange) Setup"},{"__type":"Nc:SimpleKB:Abstractions:Dtos:CategoryItemDto","ParentCategoryId":12,"TreatAsTopicYN":false,"Description":"","ImageUrl":"","ShortDesc":"","CategoryId":2188,"CategoryName":"Dedicated Server"},{"__type":"Nc:SimpleKB:Abstractions:Dtos:CategoryItemDto","ParentCategoryId":2265,"TreatAsTopicYN":false,"Description":"","ImageUrl":"","ShortDesc":"","CategoryId":2269,"CategoryName":"iOS"},{"__type":"Nc:SimpleKB:Abstractions:Dtos:CategoryItemDto","ParentCategoryId":2239,"TreatAsTopicYN":false,"Description":"","ImageUrl":"","ShortDesc":"","CategoryId":2286,"CategoryName":"Domains questions"},{"__type":"Nc:SimpleKB:Abstractions:Dtos:CategoryItemDto","ParentCategoryId":2239,"TreatAsTopicYN":false,"Description":"","ImageUrl":"","ShortDesc":"","CategoryId":2288,"CategoryName":"Billing questions"},{"__type":"Nc:SimpleKB:Abstractions:Dtos:CategoryItemDto","ParentCategoryId":2265,"TreatAsTopicYN":false,"Description":"","ImageUrl":"","ShortDesc":"","CategoryId":2271,"CategoryName":"Linux"},{"__type":"Nc:SimpleKB:Abstractions:Dtos:CategoryItemDto","ParentCategoryId":12,"TreatAsTopicYN":false,"Description":"","ImageUrl":"","ShortDesc":"","CategoryId":30,"CategoryName":"WHM questions"},{"__type":"Nc:SimpleKB:Abstractions:Dtos:CategoryItemDto","ParentCategoryId":93,"TreatAsTopicYN":false,"Description":"","ImageUrl":"","ShortDesc":"","CategoryId":31,"CategoryName":"cPanel Email FAQs"},{"__type":"Nc:SimpleKB:Abstractions:Dtos:CategoryItemDto","ParentCategoryId":34,"TreatAsTopicYN":false,"Description":"","ImageUrl":"","ShortDesc":"","CategoryId":51,"CategoryName":"FreeDNS"},{"__type":"Nc:SimpleKB:Abstractions:Dtos:CategoryItemDto","ParentCategoryId":0,"TreatAsTopicYN":false,"Description":"","ImageUrl":"/assets/img/pictograms/150/email-red.png","ShortDesc":"","CategoryId":93,"CategoryName":"Email service","SubCategories":[{"__type":"Nc:SimpleKB:Abstractions:Dtos:CategoryItemDto","ParentCategoryId":93,"TreatAsTopicYN":false,"Description":"","ImageUrl":"","ShortDesc":"","CategoryId":2216,"CategoryName":"Spam Protection"},{"__type":"Nc:SimpleKB:Abstractions:Dtos:CategoryItemDto","ParentCategoryId":93,"TreatAsTopicYN":false,"Description":"","ImageUrl":"","ShortDesc":"","CategoryId":2226,"CategoryName":"Email Migration"},{"__type":"Nc:SimpleKB:Abstractions:Dtos:CategoryItemDto","ParentCategoryId":93,"TreatAsTopicYN":false,"Description":"","ImageUrl":"","ShortDesc":"","CategoryId":2260,"CategoryName":"Private Email Contacts and Calendars Setup"},{"__type":"Nc:SimpleKB:Abstractions:Dtos:CategoryItemDto","ParentCategoryId":93,"TreatAsTopicYN":false,"Description":"","ImageUrl":"","ShortDesc":"","CategoryId":2179,"CategoryName":"Private Email: General Information"},{"__type":"Nc:SimpleKB:Abstractions:Dtos:CategoryItemDto","ParentCategoryId":93,"TreatAsTopicYN":false,"Description":"","ImageUrl":"","ShortDesc":"","CategoryId":2215,"CategoryName":"Private Email: Mailbox Management"},{"__type":"Nc:SimpleKB:Abstractions:Dtos:CategoryItemDto","ParentCategoryId":93,"TreatAsTopicYN":false,"Description":"","ImageUrl":"","ShortDesc":"","CategoryId":2214,"CategoryName":"Email Forwarding"},{"__type":"Nc:SimpleKB:Abstractions:Dtos:CategoryItemDto","ParentCategoryId":93,"TreatAsTopicYN":false,"Description":"","ImageUrl":"","ShortDesc":"","CategoryId":2176,"CategoryName":"Private Email: DNS Settings"},{"__type":"Nc:SimpleKB:Abstractions:Dtos:CategoryItemDto","ParentCategoryId":93,"TreatAsTopicYN":false,"Description":"","ImageUrl":"","ShortDesc":"","CategoryId":2178,"CategoryName":"Private Email: Webmail Features"},{"__type":"Nc:SimpleKB:Abstractions:Dtos:CategoryItemDto","ParentCategoryId":93,"TreatAsTopicYN":false,"Description":"","ImageUrl":"","ShortDesc":"","CategoryId":2175,"CategoryName":"Private Email: Client Setup"},{"__type":"Nc:SimpleKB:Abstractions:Dtos:CategoryItemDto","ParentCategoryId":93,"TreatAsTopicYN":false,"Description":"","ImageUrl":"","ShortDesc":"","CategoryId":2171,"CategoryName":"Private Email: Active Sync (Exchange) Setup"},{"__type":"Nc:SimpleKB:Abstractions:Dtos:CategoryItemDto","ParentCategoryId":93,"TreatAsTopicYN":false,"Description":"","ImageUrl":"","ShortDesc":"","CategoryId":31,"CategoryName":"cPanel Email FAQs"},{"__type":"Nc:SimpleKB:Abstractions:Dtos:CategoryItemDto","ParentCategoryId":93,"TreatAsTopicYN":false,"Description":"","ImageUrl":"","ShortDesc":"","CategoryId":2186,"CategoryName":"cPanel Email: Client Setup"},{"__type":"Nc:SimpleKB:Abstractions:Dtos:CategoryItemDto","ParentCategoryId":93,"TreatAsTopicYN":false,"Description":"","ImageUrl":"","ShortDesc":"","CategoryId":2204,"CategoryName":"Private Email: Video Overview"}]},{"__type":"Nc:SimpleKB:Abstractions:Dtos:CategoryItemDto","ParentCategoryId":12,"TreatAsTopicYN":false,"Description":"","ImageUrl":"","ShortDesc":"","CategoryId":32,"CategoryName":"DNS settings"},{"__type":"Nc:SimpleKB:Abstractions:Dtos:CategoryItemDto","ParentCategoryId":34,"TreatAsTopicYN":false,"Description":"","ImageUrl":"","ShortDesc":"","CategoryId":15,"CategoryName":"Namecheap Market"},{"__type":"Nc:SimpleKB:Abstractions:Dtos:CategoryItemDto","ParentCategoryId":93,"TreatAsTopicYN":false,"Description":"","ImageUrl":"","ShortDesc":"","CategoryId":2186,"CategoryName":"cPanel Email: Client Setup"},{"__type":"Nc:SimpleKB:Abstractions:Dtos:CategoryItemDto","ParentCategoryId":2265,"TreatAsTopicYN":false,"Description":"","ImageUrl":"","ShortDesc":"","CategoryId":2266,"CategoryName":"Windows"},{"__type":"Nc:SimpleKB:Abstractions:Dtos:CategoryItemDto","ParentCategoryId":2239,"TreatAsTopicYN":false,"Description":"","ImageUrl":"","ShortDesc":"","CategoryId":2287,"CategoryName":"SSL questions"},{"__type":"Nc:SimpleKB:Abstractions:Dtos:CategoryItemDto","ParentCategoryId":2265,"TreatAsTopicYN":false,"Description":"","ImageUrl":"","ShortDesc":"","CategoryId":2267,"CategoryName":"Android"},{"__type":"Nc:SimpleKB:Abstractions:Dtos:CategoryItemDto","ParentCategoryId":34,"TreatAsTopicYN":false,"Description":"","ImageUrl":"","ShortDesc":"","CategoryId":2208,"CategoryName":"3rd Party Services Setup"},{"__type":"Nc:SimpleKB:Abstractions:Dtos:CategoryItemDto","ParentCategoryId":93,"TreatAsTopicYN":false,"Description":"","ImageUrl":"","ShortDesc":"","CategoryId":2204,"CategoryName":"Private Email: Video Overview"},{"__type":"Nc:SimpleKB:Abstractions:Dtos:CategoryItemDto","ParentCategoryId":0,"TreatAsTopicYN":false,"Description":"","ImageUrl":"/assets/img/pictograms/150/security-red.png","ShortDesc":"","CategoryId":14,"CategoryName":"SSL Certificates","SubCategories":[{"__type":"Nc:SimpleKB:Abstractions:Dtos:CategoryItemDto","ParentCategoryId":14,"TreatAsTopicYN":false,"Description":"","ImageUrl":"","ShortDesc":"","CategoryId":2217,"CategoryName":"Renewal"},{"__type":"Nc:SimpleKB:Abstractions:Dtos:CategoryItemDto","ParentCategoryId":14,"TreatAsTopicYN":false,"Description":"","ImageUrl":"","ShortDesc":"","CategoryId":2218,"CategoryName":"cPanel SSL Plugin"},{"__type":"Nc:SimpleKB:Abstractions:Dtos:CategoryItemDto","ParentCategoryId":14,"TreatAsTopicYN":false,"Description":"","ImageUrl":"","ShortDesc":"","CategoryId":2221,"CategoryName":"Multi-Domain SSL Certificates"},{"__type":"Nc:SimpleKB:Abstractions:Dtos:CategoryItemDto","ParentCategoryId":14,"TreatAsTopicYN":false,"Description":"","ImageUrl":"","ShortDesc":"","CategoryId":2222,"CategoryName":"Cancellation"},{"__type":"Nc:SimpleKB:Abstractions:Dtos:CategoryItemDto","ParentCategoryId":14,"TreatAsTopicYN":false,"Description":"","ImageUrl":"","ShortDesc":"","CategoryId":2223,"CategoryName":"Browser errors"},{"__type":"Nc:SimpleKB:Abstractions:Dtos:CategoryItemDto","ParentCategoryId":14,"TreatAsTopicYN":false,"Description":"","ImageUrl":"","ShortDesc":"","CategoryId":2224,"CategoryName":"Site Seal, Logo"},{"__type":"Nc:SimpleKB:Abstractions:Dtos:CategoryItemDto","ParentCategoryId":14,"TreatAsTopicYN":false,"Description":"","ImageUrl":"","ShortDesc":"","CategoryId":2238,"CategoryName":"SSL installation errors"},{"__type":"Nc:SimpleKB:Abstractions:Dtos:CategoryItemDto","ParentCategoryId":14,"TreatAsTopicYN":false,"Description":"","ImageUrl":"","ShortDesc":"","CategoryId":2290,"CategoryName":"CSR code"},{"__type":"Nc:SimpleKB:Abstractions:Dtos:CategoryItemDto","ParentCategoryId":14,"TreatAsTopicYN":false,"Description":"","ImageUrl":"","ShortDesc":"","CategoryId":2293,"CategoryName":"Automated SSL management"},{"__type":"Nc:SimpleKB:Abstractions:Dtos:CategoryItemDto","ParentCategoryId":14,"TreatAsTopicYN":false,"Description":"","ImageUrl":"","ShortDesc":"","CategoryId":38,"CategoryName":"SSL General"},{"__type":"Nc:SimpleKB:Abstractions:Dtos:CategoryItemDto","ParentCategoryId":14,"TreatAsTopicYN":false,"Description":"","ImageUrl":"","ShortDesc":"","CategoryId":67,"CategoryName":"Activation"},{"__type":"Nc:SimpleKB:Abstractions:Dtos:CategoryItemDto","ParentCategoryId":14,"TreatAsTopicYN":false,"Description":"","ImageUrl":"","ShortDesc":"","CategoryId":68,"CategoryName":"Validation"},{"__type":"Nc:SimpleKB:Abstractions:Dtos:CategoryItemDto","ParentCategoryId":14,"TreatAsTopicYN":false,"Description":"","ImageUrl":"","ShortDesc":"","CategoryId":69,"CategoryName":"Installation"},{"__type":"Nc:SimpleKB:Abstractions:Dtos:CategoryItemDto","ParentCategoryId":14,"TreatAsTopicYN":false,"Description":"","ImageUrl":"","ShortDesc":"","CategoryId":70,"CategoryName":"Reissuance"}]},{"__type":"Nc:SimpleKB:Abstractions:Dtos:CategoryItemDto","ParentCategoryId":0,"TreatAsTopicYN":true,"Description":"","ImageUrl":"/assets/img/pictograms/150/performance-red.png","ShortDesc":"","CategoryId":9,"CategoryName":"My Account","SubCategories":[{"__type":"Nc:SimpleKB:Abstractions:Dtos:CategoryItemDto","ParentCategoryId":9,"TreatAsTopicYN":false,"Description":"","ImageUrl":"","ShortDesc":"","CategoryId":45,"CategoryName":"Account Security"},{"__type":"Nc:SimpleKB:Abstractions:Dtos:CategoryItemDto","ParentCategoryId":9,"TreatAsTopicYN":false,"Description":"","ImageUrl":"","ShortDesc":"","CategoryId":43,"CategoryName":"Profile Management"},{"__type":"Nc:SimpleKB:Abstractions:Dtos:CategoryItemDto","ParentCategoryId":9,"TreatAsTopicYN":false,"Description":"","ImageUrl":"","ShortDesc":"","CategoryId":44,"CategoryName":"Account Access"}]},{"__type":"Nc:SimpleKB:Abstractions:Dtos:CategoryItemDto","ParentCategoryId":34,"TreatAsTopicYN":false,"Description":"","ImageUrl":"","ShortDesc":"","CategoryId":2278,"CategoryName":"Handshake TLDs"},{"__type":"Nc:SimpleKB:Abstractions:Dtos:CategoryItemDto","ParentCategoryId":12,"TreatAsTopicYN":false,"Description":"","ImageUrl":"","ShortDesc":"","CategoryId":103,"CategoryName":"LVE (CloudLinux)"},{"__type":"Nc:SimpleKB:Abstractions:Dtos:CategoryItemDto","ParentCategoryId":0,"TreatAsTopicYN":false,"Description":"","ImageUrl":"/assets/img/pictograms/150/affiliates-red.png","ShortDesc":"","CategoryId":55,"CategoryName":"Affiliates","SubCategories":[]},{"__type":"Nc:SimpleKB:Abstractions:Dtos:CategoryItemDto","ParentCategoryId":12,"TreatAsTopicYN":false,"Description":"","ImageUrl":"","ShortDesc":"","CategoryId":89,"CategoryName":"SSH Access"},{"__type":"Nc:SimpleKB:Abstractions:Dtos:CategoryItemDto","ParentCategoryId":0,"TreatAsTopicYN":false,"Description":"","ImageUrl":"/assets/img/pictograms/150/tools-red.png","ShortDesc":"","CategoryId":2211,"CategoryName":"API & Resellers","SubCategories":[{"__type":"Nc:SimpleKB:Abstractions:Dtos:CategoryItemDto","ParentCategoryId":2211,"TreatAsTopicYN":false,"Description":"","ImageUrl":"","ShortDesc":"","CategoryId":2227,"CategoryName":"SSL Resellers"},{"__type":"Nc:SimpleKB:Abstractions:Dtos:CategoryItemDto","ParentCategoryId":2211,"TreatAsTopicYN":false,"Description":"","ImageUrl":"","ShortDesc":"","CategoryId":2229,"CategoryName":"Hosting Resellers"},{"__type":"Nc:SimpleKB:Abstractions:Dtos:CategoryItemDto","ParentCategoryId":2211,"TreatAsTopicYN":false,"Description":"","ImageUrl":"","ShortDesc":"","CategoryId":63,"CategoryName":"Namecheap API"},{"__type":"Nc:SimpleKB:Abstractions:Dtos:CategoryItemDto","ParentCategoryId":2211,"TreatAsTopicYN":false,"Description":"","ImageUrl":"","ShortDesc":"","CategoryId":2196,"CategoryName":"WHMCS module for SSL"}]},{"__type":"Nc:SimpleKB:Abstractions:Dtos:CategoryItemDto","ParentCategoryId":0,"TreatAsTopicYN":false,"Description":"","ImageUrl":"/assets/img/pictograms/150/timer-red.png","ShortDesc":"","CategoryId":2212,"CategoryName":"Legacy Products","SubCategories":[]},{"__type":"Nc:SimpleKB:Abstractions:Dtos:CategoryItemDto","ParentCategoryId":12,"TreatAsTopicYN":false,"Description":"","ImageUrl":"","ShortDesc":"","CategoryId":205,"CategoryName":"FTP questions"},{"__type":"Nc:SimpleKB:Abstractions:Dtos:CategoryItemDto","ParentCategoryId":12,"TreatAsTopicYN":false,"Description":"","ImageUrl":"","ShortDesc":"","CategoryId":2180,"CategoryName":"MySQL questions"},{"__type":"Nc:SimpleKB:Abstractions:Dtos:CategoryItemDto","ParentCategoryId":12,"TreatAsTopicYN":false,"Description":"","ImageUrl":"","ShortDesc":"","CategoryId":2199,"CategoryName":"Hosting Migration"},{"__type":"Nc:SimpleKB:Abstractions:Dtos:CategoryItemDto","ParentCategoryId":0,"TreatAsTopicYN":false,"Description":"","ImageUrl":"/assets/img/pictograms/150/premiumdns-red.png","ShortDesc":"","CategoryId":2231,"CategoryName":"PremiumDNS","SubCategories":[]},{"__type":"Nc:SimpleKB:Abstractions:Dtos:CategoryItemDto","ParentCategoryId":12,"TreatAsTopicYN":false,"Description":"","ImageUrl":"","ShortDesc":"","CategoryId":2194,"CategoryName":"Tips & Tricks"},{"__type":"Nc:SimpleKB:Abstractions:Dtos:CategoryItemDto","ParentCategoryId":0,"TreatAsTopicYN":false,"Description":"","ImageUrl":"https://static.nc-img.com/live-resource/icons/knowledgebase/fastVPN_icon-150px.png","ShortDesc":"","CategoryId":2265,"CategoryName":"FastVPN","SubCategories":[{"__type":"Nc:SimpleKB:Abstractions:Dtos:CategoryItemDto","ParentCategoryId":2265,"TreatAsTopicYN":false,"Description":"","ImageUrl":"","ShortDesc":"","CategoryId":2292,"CategoryName":"Browser Extensions"},{"__type":"Nc:SimpleKB:Abstractions:Dtos:CategoryItemDto","ParentCategoryId":2265,"TreatAsTopicYN":false,"Description":"","ImageUrl":"","ShortDesc":"","CategoryId":2274,"CategoryName":"General"},{"__type":"Nc:SimpleKB:Abstractions:Dtos:CategoryItemDto","ParentCategoryId":2265,"TreatAsTopicYN":false,"Description":"","ImageUrl":"","ShortDesc":"","CategoryId":2270,"CategoryName":"Routers"},{"__type":"Nc:SimpleKB:Abstractions:Dtos:CategoryItemDto","ParentCategoryId":2265,"TreatAsTopicYN":false,"Description":"","ImageUrl":"","ShortDesc":"","CategoryId":2272,"CategoryName":"TV"},{"__type":"Nc:SimpleKB:Abstractions:Dtos:CategoryItemDto","ParentCategoryId":2265,"TreatAsTopicYN":false,"Description":"","ImageUrl":"","ShortDesc":"","CategoryId":2273,"CategoryName":"Gaming Consoles"},{"__type":"Nc:SimpleKB:Abstractions:Dtos:CategoryItemDto","ParentCategoryId":2265,"TreatAsTopicYN":false,"Description":"","ImageUrl":"","ShortDesc":"","CategoryId":2268,"CategoryName":"macOS"},{"__type":"Nc:SimpleKB:Abstractions:Dtos:CategoryItemDto","ParentCategoryId":2265,"TreatAsTopicYN":false,"Description":"","ImageUrl":"","ShortDesc":"","CategoryId":2269,"CategoryName":"iOS"},{"__type":"Nc:SimpleKB:Abstractions:Dtos:CategoryItemDto","ParentCategoryId":2265,"TreatAsTopicYN":false,"Description":"","ImageUrl":"","ShortDesc":"","CategoryId":2271,"CategoryName":"Linux"},{"__type":"Nc:SimpleKB:Abstractions:Dtos:CategoryItemDto","ParentCategoryId":2265,"TreatAsTopicYN":false,"Description":"","ImageUrl":"","ShortDesc":"","CategoryId":2266,"CategoryName":"Windows"},{"__type":"Nc:SimpleKB:Abstractions:Dtos:CategoryItemDto","ParentCategoryId":2265,"TreatAsTopicYN":false,"Description":"","ImageUrl":"","ShortDesc":"","CategoryId":2267,"CategoryName":"Android"}]},{"__type":"Nc:SimpleKB:Abstractions:Dtos:CategoryItemDto","ParentCategoryId":12,"TreatAsTopicYN":false,"Description":"","ImageUrl":"","ShortDesc":"","CategoryId":239,"CategoryName":"WHMCS"},{"__type":"Nc:SimpleKB:Abstractions:Dtos:CategoryItemDto","ParentCategoryId":12,"TreatAsTopicYN":false,"Description":"","ImageUrl":"","ShortDesc":"","CategoryId":33,"CategoryName":"SSL Installation"}],"status":200,"statusText":"OK"}}


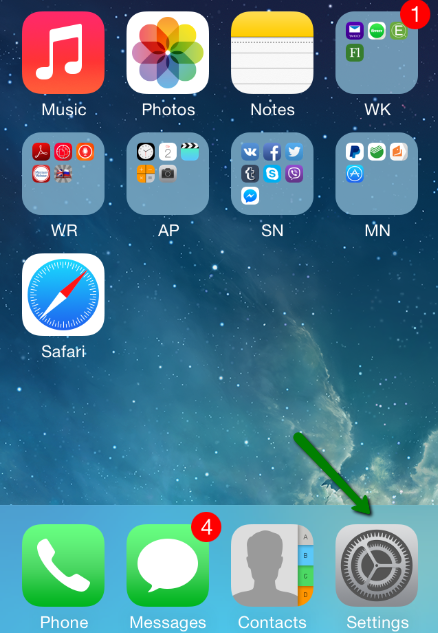
1. Select Settings from the home screen of your iPhone:
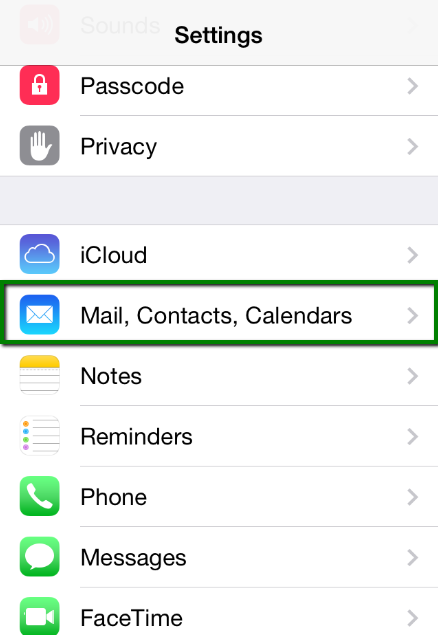
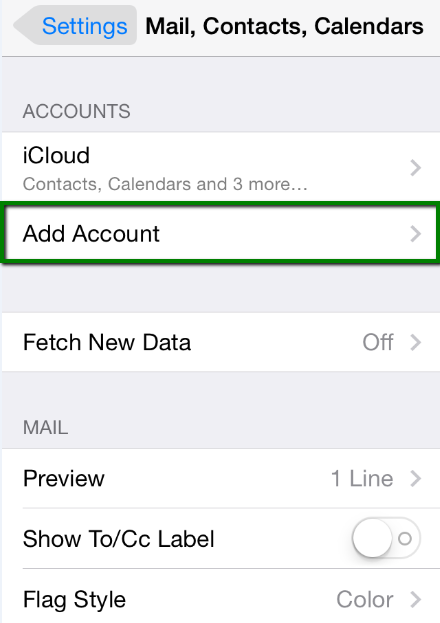
2. Choose Mail, Contacts, Calendars and click Add Account:
3. Choose Other from the list that appears:

4. Select Add Mail Account. In the New Account menu, you will need to specify the following records:
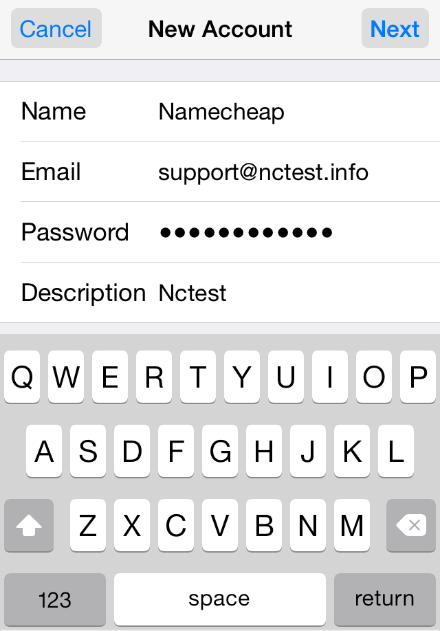
Click Next.
5. Select protocol type: IMAP or POP3. We advise you to use IMAP. Your selection will be highlighted blue.
6. Settings are the same for both IMAP and POP3:
In the fields for both Incoming Mail Server and Outgoing Mail Server, indicate the following settings:
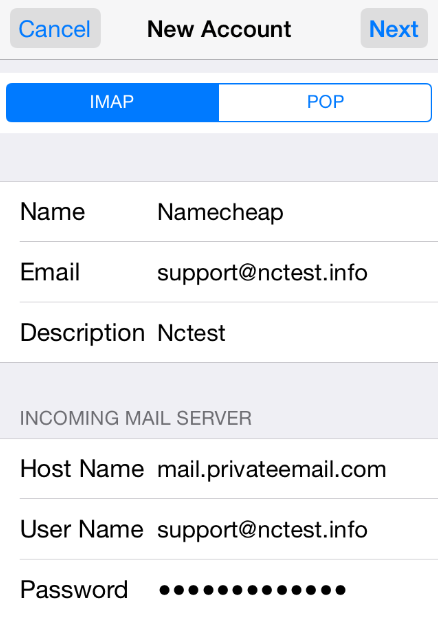
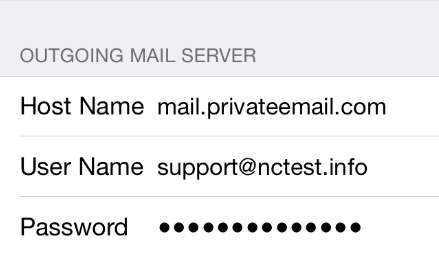
Click Next.
7. If you use IMAP, you can enable the following services:
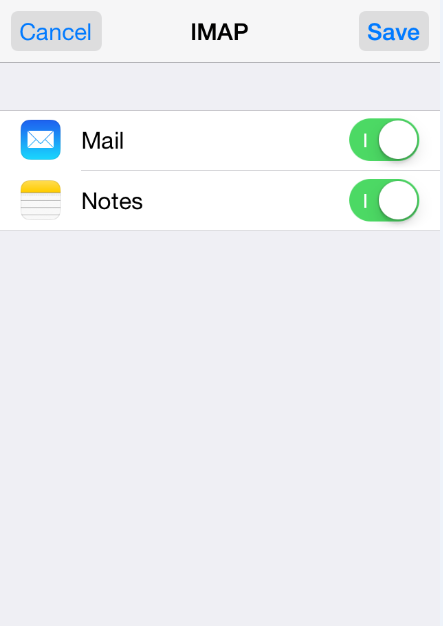
Click Save and wait while the system completes necessary checks.
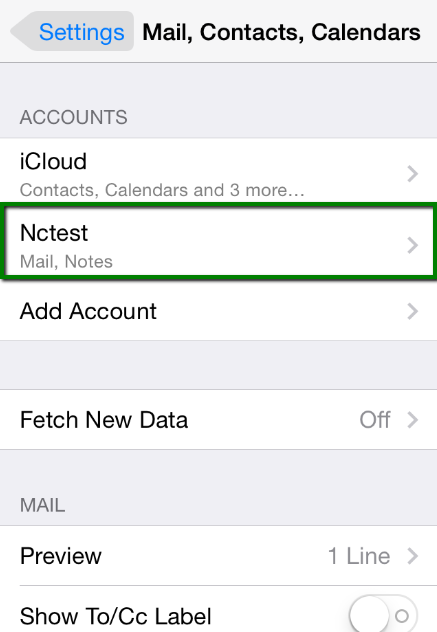
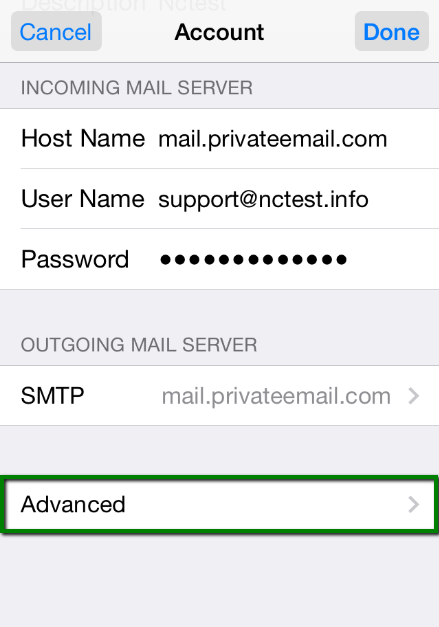
8. When the checks are finished, you'll be redirected to the Mail, Contacts, Calendars screen. Choose your newly created account there:
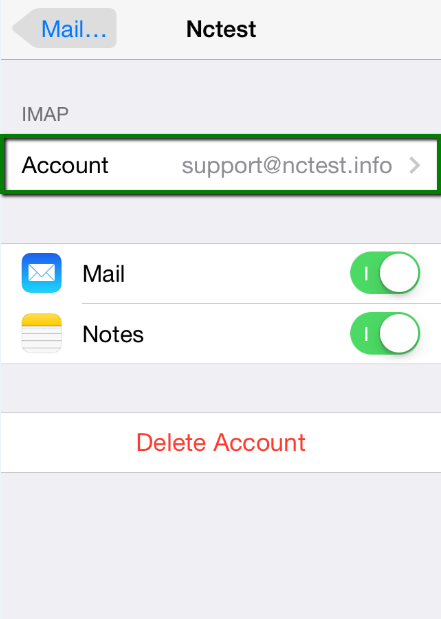
9. Scroll down and select Advanced:
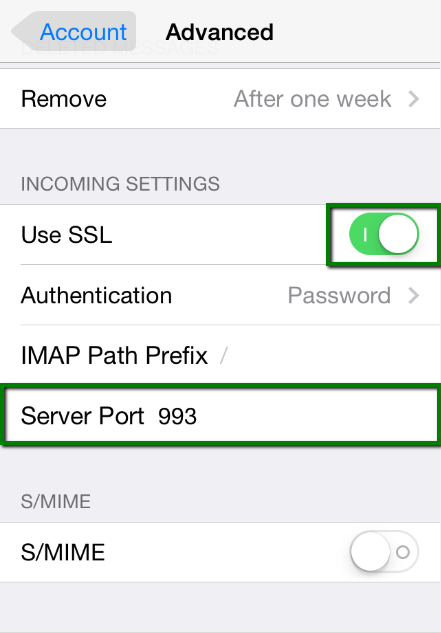
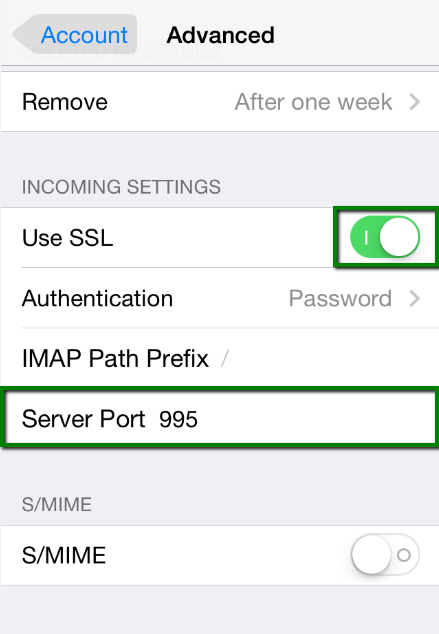
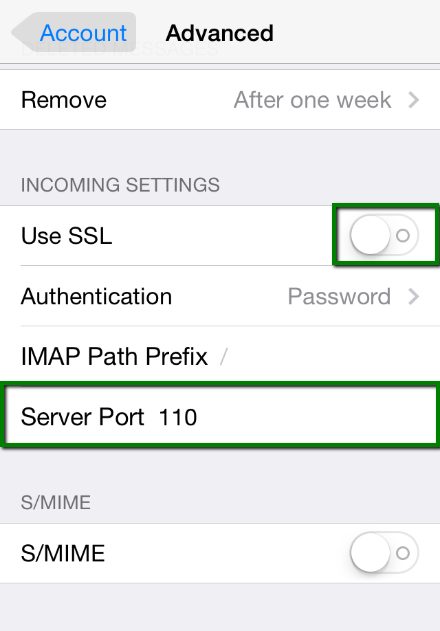
10. Here you can choose additional settings for IMAP or POP3.
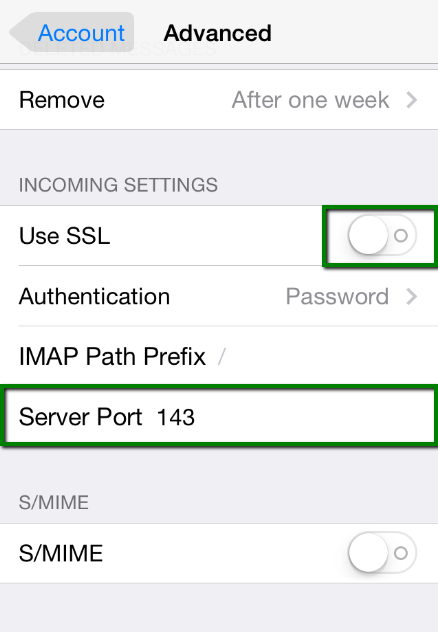
If you set IMAP connection, you need to use port 993 (with SSL) or port 143 (without SSL).
Set IMAP Path Prefix to INBOX:
or
If you chose POP3, you need to use port 995 (with SSL):
or
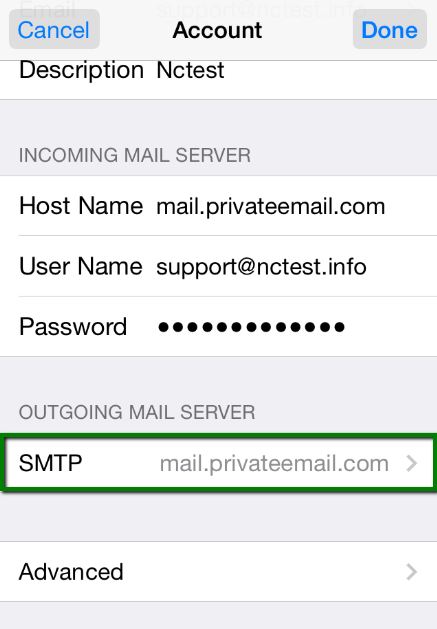
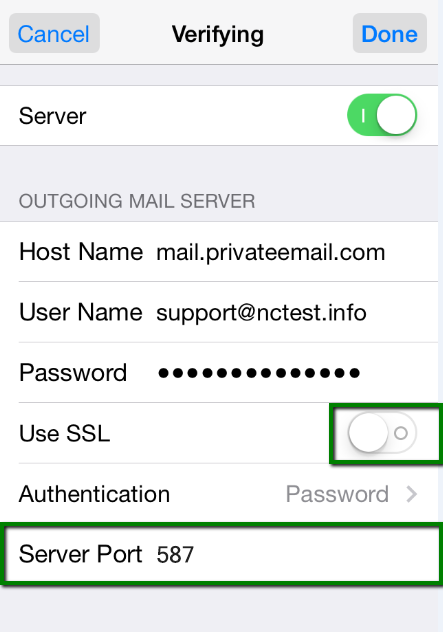
11. In order to set up additional settings for outgoing server, you will need to return in the previous menu and then go to Outgoing Mail Server by clicking on the host name of the server:
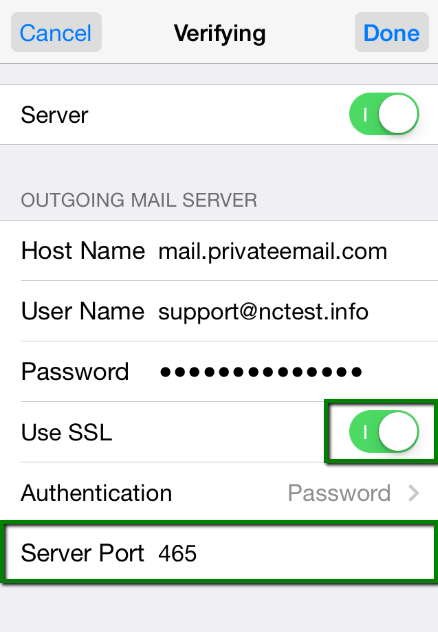
12. For Outgoing Server (SMTP), select port 465 (with SSL) or port 587 (without SSL):
or
Once the settings are verified, your account is active and ready to use.
To test your new email account, go to Messages and try sending and receiving emails.
That's it!
Need help? Contact our HelpDesk.
Need help? We're always here for you.