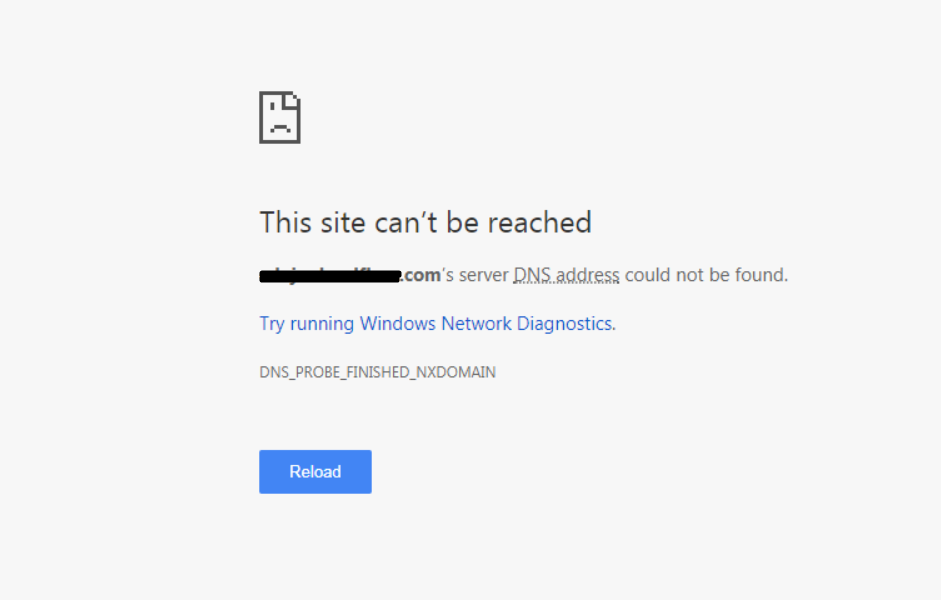
What is a 'DNS Server Not Responding' (or DNS_PROBE_FINISHED_NXDOMAIN) error?
To check the IP address is correct, the authoritative DNS verifies the IP address belongs to the authentic website and sends the query back to your device. DNS protocols govern this journey. These are the 'rules' that translate website lookups into steps or 'hops':
- The DNS system includes millions of resolving DNS servers.
- Some of these DNS servers take the answer to your device.
- As long as every server agrees all the way, you will see the website.
You’ll get a DNS Server Not Responding error if any servers don’t agree.
Why do DNS Server Errors happen?
When a sudden DNS error message occurs on your device, it’s likely to be an external problem. If the website you are trying to look up has DNS issues, you don’t need to worry. The problem will sort itself out, and you can try the website again later.
Some standard error scenarios include the following:
1. DNS gaps: The street address (IP address number) of a domain changes when the website owner switches their DNS hosting to a new provider. The time it takes for all the world’s servers to update the DNS records (in the table routing protocol database) with the new IP address location is known as DNS propagation time.
This can take up to 72 hours. If you look up that website during this gap, you will not see the website and receive a DNS Server Not Responding error.
2. Distributed Denial of Service (DDoS) Attacks: These cyberattacks target one or more DNS system servers. The attacks cause any DNS website lookup queries running via that server to back up. If this server is serving your website, DDoS slows down DNS query response times.
For the user, it can take time for the query to find another way around the bottleneck. Worryingly, if the attacked server struggles to re-direct queries and too much time lapses, the server will drop your query, and you’ll get a DNS Server Not Responding (DNS_PROBE_FINISHED_NXDOMAIN) error on your device.
Another way of explaining this is to imagine each server contains a huge database with the latest records about every website address in the world - but at the same time, every server has to agree the records are exactly the same. This, called the table routing protocol, will flag a DNS server error if anything (including the above two scenarios) causes a mismatch or timeout between any server record held by a DNS resolver and the corresponding record held by the authoritative DNS.
Can I fix my DNS Error?
Hopefully, you can see that the 'DNS Server Not Responding' error might occur on your device when your device is functioning normally. This means a server somewhere is stuck on the query.
You can’t do anything but wait. You can visit this handy free website tool https://downforeveryoneorjustme.com, and check if this is a known DNS issue and when it might be fixed. Then you know for sure your device is fine, and you only need to wait and try the website later on.
On the other hand, if you notice you are getting many of these error messages and experiencing slow loading times, the DNS might be stuck from your end. Lots of queries about different websites going to and from your device every day can easily cause a DNS issue - if there’s any interruption to your service or something is wrong with your DNS device setup.
This is when you can try these very simple solutions below.
12 Easy Fixes for DNS device errors
1. Switch browsers
The easiest fix to try is to troubleshoot your current browser by checking if the website you want to see appears correctly in another browser. The most common browsers to try this in are Google, Safari, Mozilla Firefox, or Microsoft Edge.
If this works, go back to your favorite browser and manually update your version of the browser. Try to view the website again. If still not appearing, try to uninstall and reinstall the browser. If you still get DNS Server Not Responding messages, you can rule out your browser as the source of the problem.
2. Connect on a different device
The next thing to help you narrow down the issue is to try another device in your network. If you still cannot load the site, try to use mobile data to access the website. If it won’t show up, the issue is definitely on the website’s end, and you can rule out your device as the problem. If it does show on another device, double-check if you still can’t see it on your original device, and if you can’t, you need to go on to the next steps to fix the device's DNS.
3. Switch to Safe Mode
Whenever you boot your computer or device in safe mode, limiting the number of files and resources it uses to run, this can be an effective way to troubleshoot your operating system and unstick a stuck DNS query.
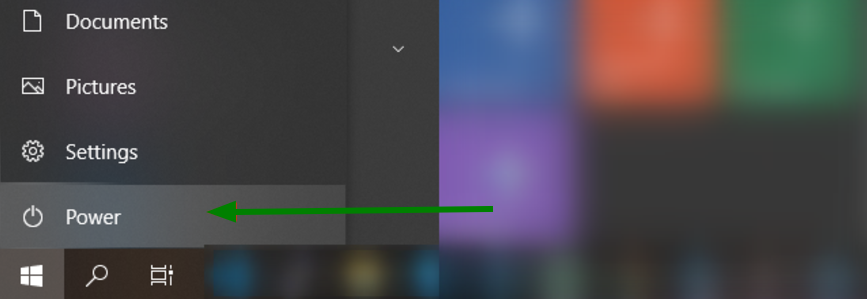
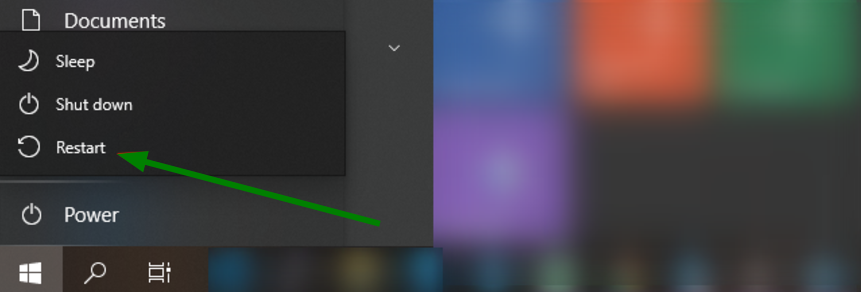
For Windows users: First, select the Windows button, and from the Power button icon, click Restart:
Depending on your operating system, starting in safe mode varies, so check these guides.
To put your Apple iOS in safe mode, first shut down. Then boot up and press and hold the Shift key while it boots up. When you see an Apple logo and progress bar, quickly release the shift key. Your Mac is in now safe mode. Then you want to leave Safe Mode and restart your Mac as usual without holding the Shift key. This detailed guide has all the steps.
Once you’ve tried switching your operating system into safe mode and restarting, try to see if you can look up the website. If it appears, your troubles are over. If not, go on to the next solution.
4. Restart router and modem
It might be as simple to resolve your DNS errors as that old hardware fix, "just turn it off and on again". Restarting your router and modem clears the cache-store of IP addresses and clears your local area network’s router cache.
A clean slate could fix any DNS errors stuck in the system. Take these steps:
- Unplug your modem and router power cables.
- Allow both your modem and your router to sit for at least 30 seconds.
- Reconnect your modem and wait for it to come back online.
- Reconnect your router to your modem and wait for it to come back online.
Try the website again. If you still get a DNS server not responding error, try connecting an Ethernet cable to your desktop or tablet device (if this is the device you are having the problem with). If you get to this step and are still having DNS issues, your DNS settings might be the problem. Go on to the next solution.
5. Switch off your firewall
Temporarily disabling your antivirus software and firewall is something to try because these programs can interfere with network connections and cause DNS issues.
Deactivate for Windows users: Go to your control panel and navigate to Update & Security > Windows Security > Virus & Threat Protection > Manage Settings. Follow the prompts to disable your firewall.
Deactivate for Mac users: Navigate to System Preferences > Security & Privacy > Firewall. Choose disable.
Once your firewall is deactivated, try looking up the website again. If this resolves the issue, keep an eye on if you need to do this again. You might consider switching antivirus programs or checking if your existing application settings are blocking any websites you wish to view. Either way, remember to reactivate your firewall once you’re done.
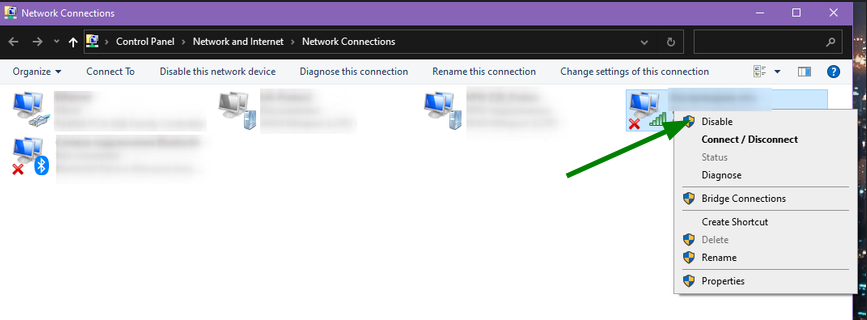
6. Disable secondary connections
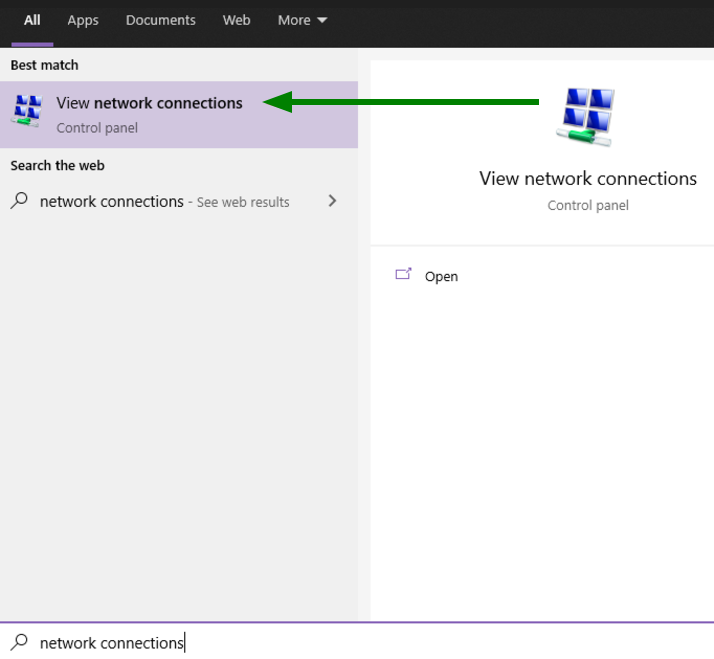
If you are still stuck, clearing any secondary Internet connections available on your device ensures your network connection is only running through one source. To do this in Windows, type Network connections into the search box of your desktop taskbar. Next, click on View network connections:
From there, navigate to Control Panel > Network and Internet > Network Connections and select Disable to place a red ‘X’ on any extra connections you are not using:
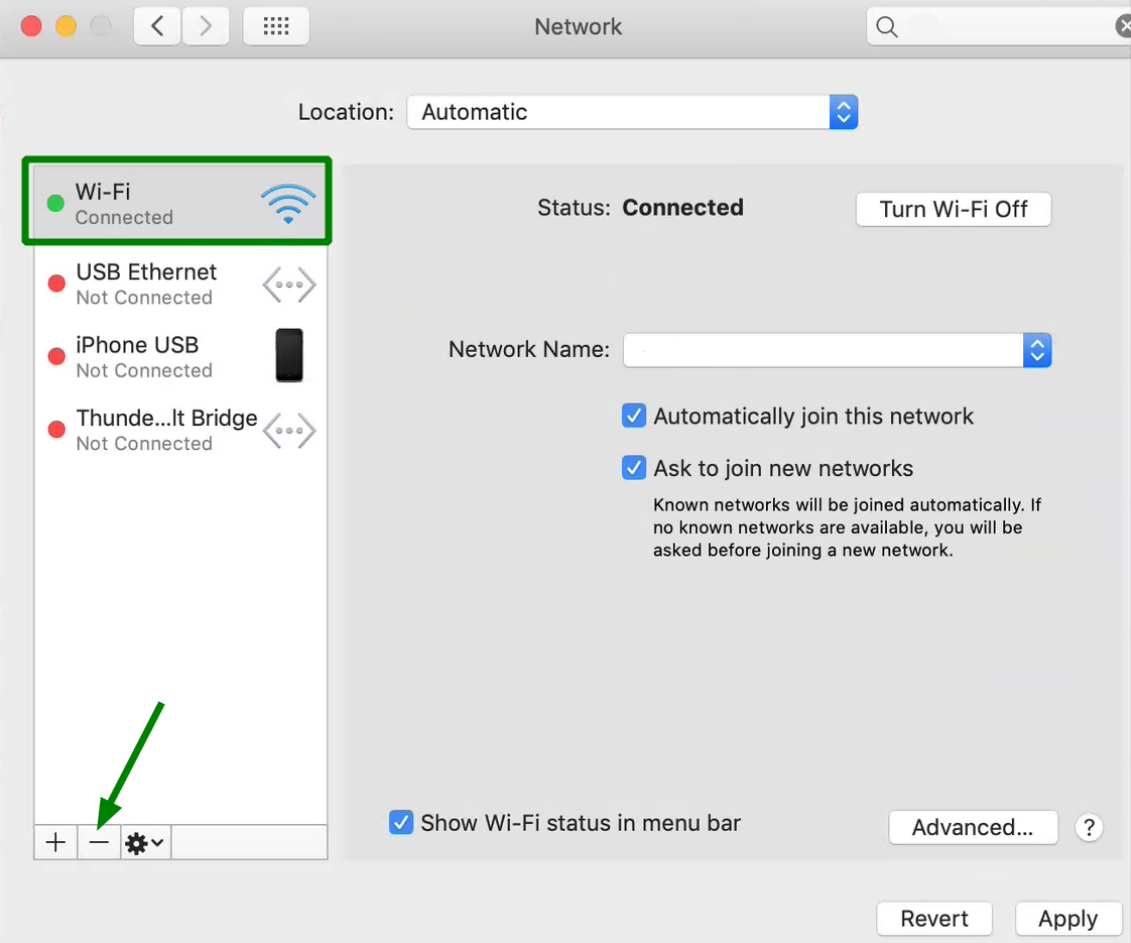
If you’re using macOS, click the Wi-Fi symbol at the top right corner of your screen, and Network will appear. You can also navigate from the Apple icon > System Preferences > Network and then see if any extra connections appear. If any have a green dot, disconnect them by selecting it and clicking on the (–) sign in the bottom left corner:
Once done, try to restart your browser and visit the website.
No luck? Take the next step below for Windows 10 only and skip to step 8 for everyone else.
7. Disable Windows Peer-to-Peer
The Windows peer-to-peer feature is unique to Windows 10. What it does is preserve your bandwidth by allowing your device to download one update at a time. Without getting too deep, it can interrupt DNS processes, so it’s worth disabling.
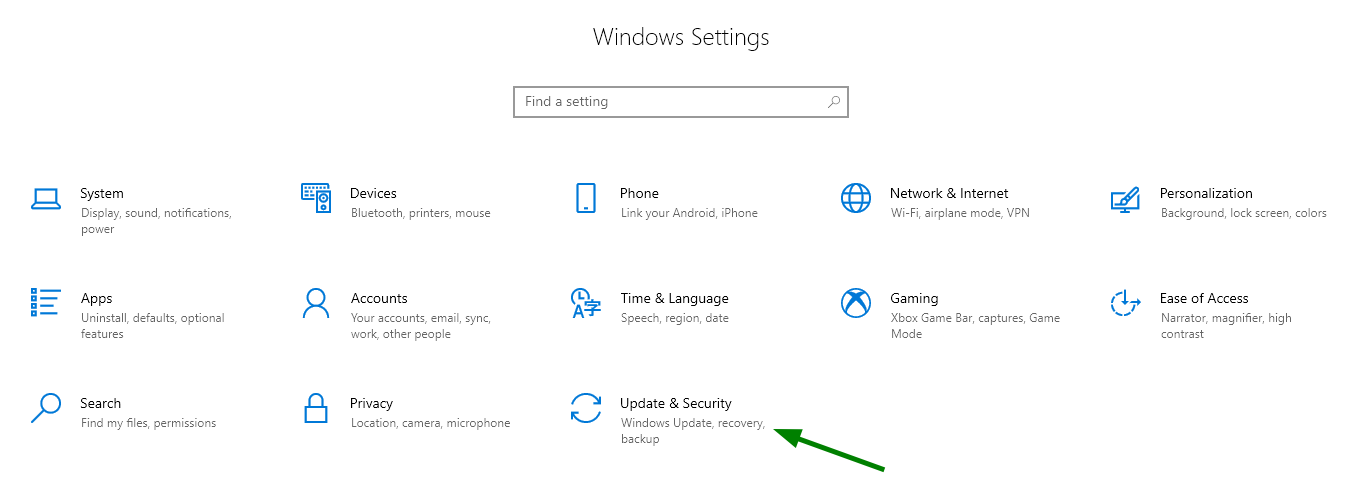
Press the Windows keyboard symbol and click the gear icon. Window’s Settings should appear (pictured below). You need to select Update & Security:
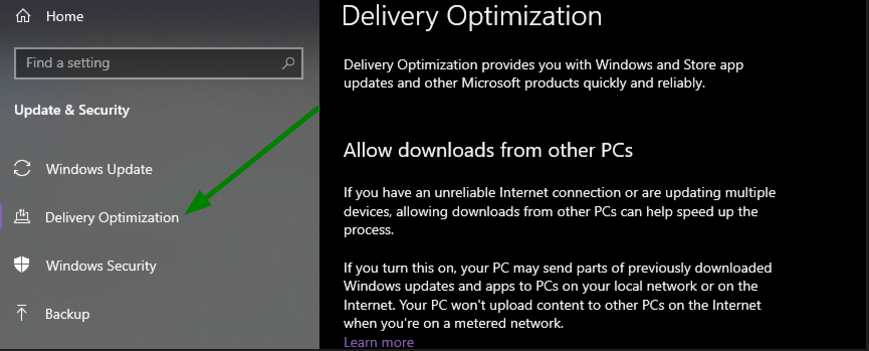
In the next window on the left-hand side, select Delivery Optimization:
And turn to off "Allow downloads from other PCs":
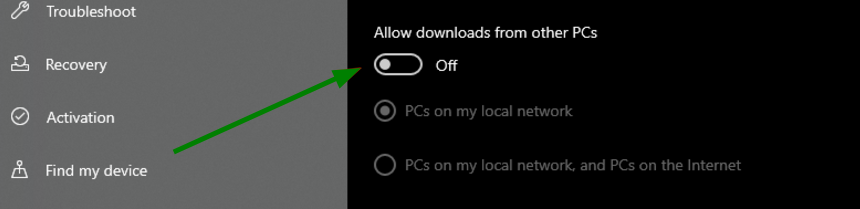
Once done, complete a restart and try the website.
8. Disable your IPv6 protocol
You might be familiar with IPv4 (Internet Protocol version 4), the default transmission control protocol for networks. IPv6 is the newest protocol that provides communication across interconnected networks. To disable this protocol, navigate once again to Control Panel > Network and Internet > Network Connections. Select your WiFi connection and in the bar above, select Change settings of this connection and choose the Properties box pictured below:

First, check the IPv6 checkbox is selected. Unselect the box, then click OK. Open your browser and try searching the website again.
If all is ok, go back in again and reset the tick box.
On macOS disabling IPv6 is much simpler.
- Open the Terminal app and type into the command line prompt: networksetup -listallnetworkservices
- Then disable the connection with this command: networksetup -setv6off Wi-Fi
- For an Ethernet connection, use this command: networksetup -setv6off Ethernet
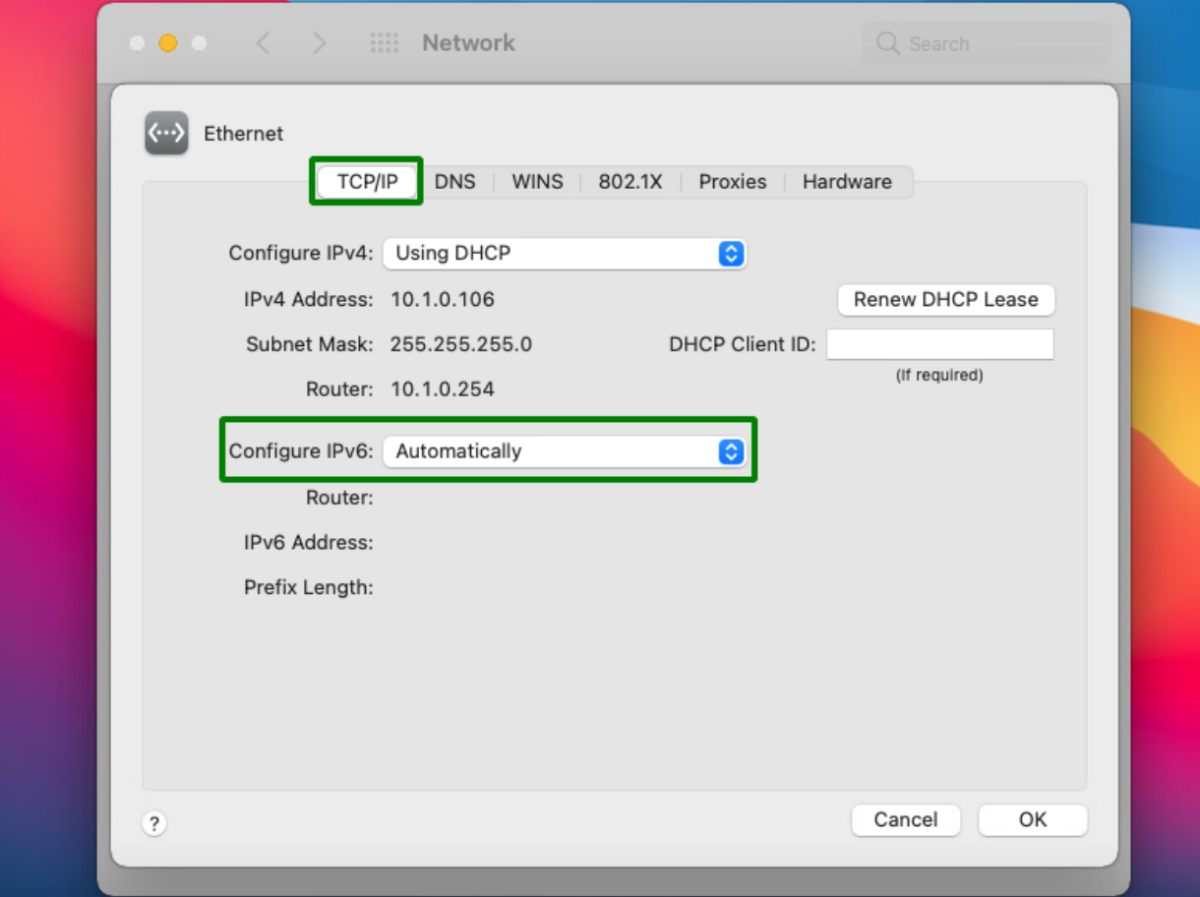
Hit enter and then refresh your browser. If you can find the website, the issue is fixed. Afterward, reset your IPv6 on your Mac by this method:
- Select the Apple icon to open the Apple menu.
- Select System Preferences.
- Select Network.
- From the left-hand menu, select your connection.
- Select Advanced.
- Adjust Configure IPv6 to Automatically.
Select OK.
Still not working? Don’t give up!
9. Flush DNS cache and reset
Flush your DNS cache for Windows or Macs with this handy guide. This action clears out old IP address records stored by your device and resets your IP Server. This can fix your Internet search problems.
In all cases, do a restart and go to your browser to see if you can look up the website you desire.
Hopefully, by now, you’ve solved your DNS server not responding error, but in case you haven’t, there are three more common solutions to try.
10. Update your network adapter drivers
Getting the latest updates can involve a few technical steps. For best results, follow these guides:
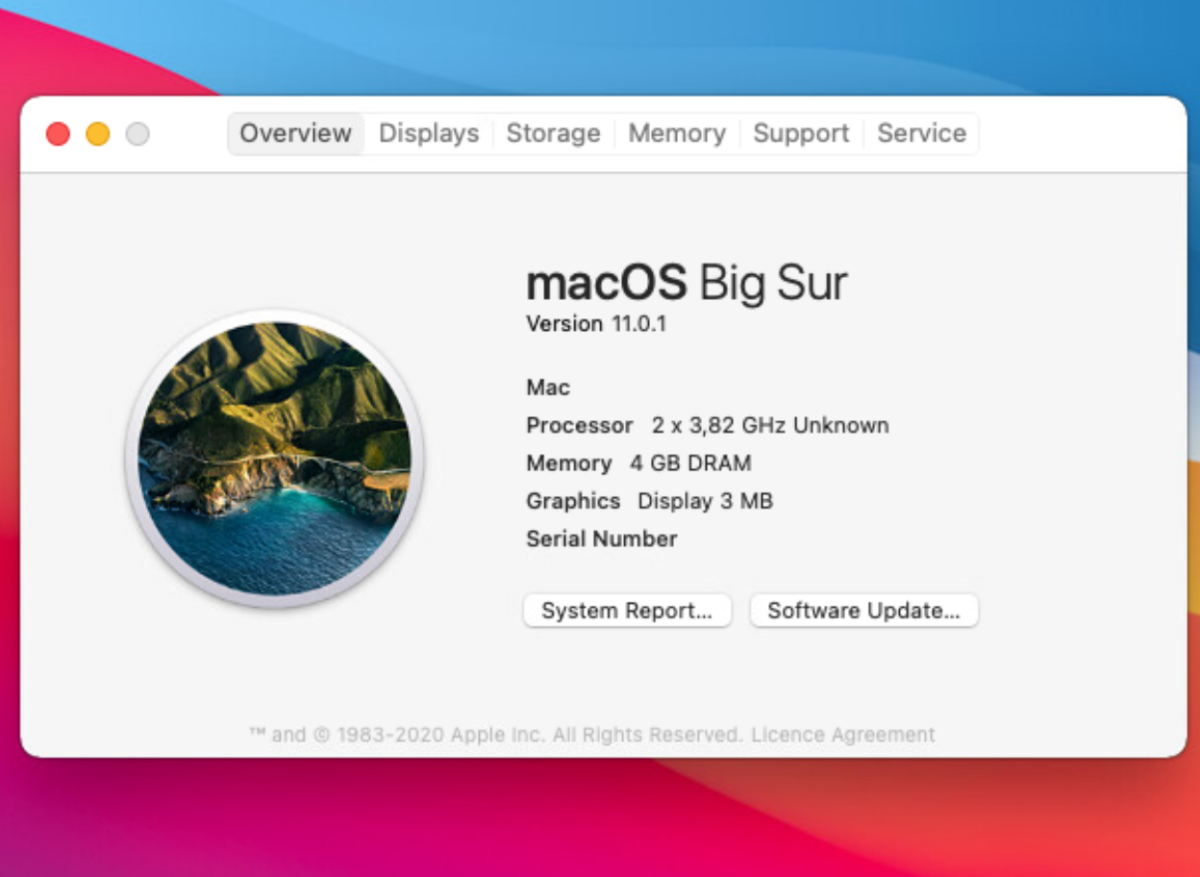
On macOS, all updates are automatically sent, so it is unlikely a new driver update will be the problem. But you can always check by selecting the Apple logo in the top left corner for About this Mac and then selecting Software Update. If you need to update your network, there’ll be a prompt there to do so. Just follow the instructions from there.
11. Choose new Windows DNS settings
If you choose your DNS settings, you change how the table routing protocol sends web queries to your device. By adjusting the transmission route for queries, you can fix the DNS server not responding error.
To enter different IP address numbers for your DNS settings and make this easy because there are so many free DNS options out there, we recommend following the instructions on this link for Namecheap’s Public DNS. We provide an alternative but safe and free DNS service. It’s suitable for changing device DNS settings (not mobiles) and, as a special bonus, boosts your privacy when browsing.
Once set up, open any browser on the device and try connecting to any website. If it loads, then everything works fine.
You’ll also find these instructions below. For Windows, the order of steps is the following:
- Select your connection name Control Panel > Network and Internet > Network Connections.
- Click Change settings of this connection.
- Click the Internet Protocol Version 4 menu and click Properties to reach the menu below:
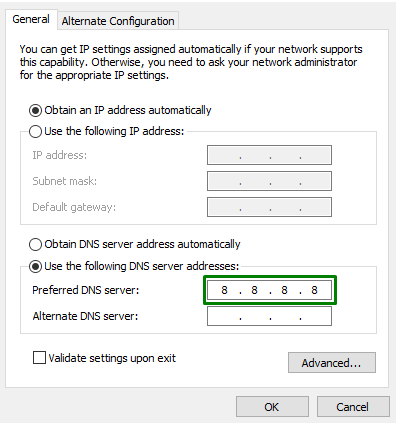
- In the lower half, where it says Use the following DNS server addresses enter:
198.54.117.10 in the Preferred DNS server
198.54.117.11 for the Alternate DNS server
- Press OK. Try your website again. Everything should work.
12. Choose the DNS settings on your Mac
On your Mac, you can also change your DNS settings. You can follow the instructions under Setting up is simple on the Namecheap Safeserve DNS page or use these below:
- From the Apple icon, select System Preferences.
- Choose Networks settings.
- Select the WiFi network you are connected to and select the Advanced button in the right bottom corner of the page.
- Select DNS and delete all current DNS settings by clicking on the “--” button.
- Click the + button to add your new DNS Server and enter the IP address: 198.54.117.10
- Click Ok, then click Apply.
- Try the website again. Everything should work.
That’s it. Enjoy the private and secure DNS browsing experience.
DNS error fixes for website owners
Hopefully, you have fixed your DNS device issues. In case you want to know what kind of DNS service is available for those who run a website, Namecheap provides two of the best options:
PremiumDNS
Your customers can be affected by DNS server not responding errors caused by your website DNS. During this DNS downtime, you will lose visitors and possibly revenue - mainly if you run an e-commerce website, have live streaming, lots of traffic, or have a website with followers downloading your content.
It’s worth saying you can prevent DNS service errors affecting your website server by adding Namecheap’s PremiumDNS to your domain - no matter where your DNS hosting is. For around $5/year, PremiumDNS provides a stable and secure DNS service to cover any DNS downtime gaps caused by stuck servers. It’s also super-fast because PremiumDNS uses a worldwide server delivery setup. Instead of bottlenecks and dropped requests, you get faster query resolution, a 100% uptime guarantee - the only one on the market - and diamond-grade DNS DDoS attack mitigation. Take a look at PremiumDNS if you run a website.
FreeDNS
If you’re not sure about the difference an advanced DNS system will make to your website, try out our FreeDNS - which is perfect for newly registered domains, or if your domain registrar does not provide DNS hosting. You can also use this as a backup or secondary DNS for your existing website to keep your site online during DNS updates.
That's it!
If any questions left, contact our friendly customer service team, who are happy to help you 24/7.