Most websites, regardless of their main purpose, include contact forms, subscription options, and other means of user communication. All of this makes up a large portion of a positive user experience and therefore, a successful business. This is why keeping a trustworthy email reputation is of the utmost importance to your website. Because of this, you may want to look into ways on how to protect your mailing and registration pages from unauthorized use. This includes:
- Mass registration of accounts using fake email addresses
- Automated mailings through the contact/subscription forms
- Usage of bots for posting comments, etc.
The main way to resolve these vulnerabilities? Using the CAPTCHA script on these webpages.
Why do I need CAPTCHA?
The main purpose of CAPTCHA is to determine whether or not the visitor attempting to send a message is a human being or a bot. While "good" bots are encouraged, e.g. search engine crawlers to access your website, be wary of the "bad" ones. Automated scripts and agents that were created with malicious intent can cause unwanted loads on your website and use up its resources (including email) to attack you or its legitimate visitors/users.
In other words, persistent email failures due to the mass registration of fake accounts or contact-form spam affect your website’s reputation, not only your domain name but also your hosting cPanel IP address. This is not desirable, especially because senders with a low reputation have their emails delivered to spam/junk folders, even when they are sent directly from the webmail address. In addition, constant use of an email script creates a large load on the account resources, drawing them away from other functions of your website.
How does CAPTCHA work?
CAPTCHA demands a simple (or sometimes complicated) task to be performed before it’s possible to submit a form on your website. These tasks either require human logic or the ability to read and interpret them.
While CAPTCHA might be seen as inconvenient to some, it offers a great deal of security. If the task is correctly passed, the login is immediate. However, CAPTCHA can prove troublesome at times. Some offer complex mathematical or linguistic tasks that cannot be solved immediately. In other instances, the visual task that’s offered to the user can look distorted or grainy.
In order to protect your website’s visitors and not frustrate them, a first-level check like CAPTCHA should suffice. Image-based checks will always have a lower picture quality because automated scanners have a difficult time interpreting blurred or grainy content. Nevertheless, it’s necessary to check how CAPTCHA looks, after the installation, to make sure it’s visible across different devices and browsers.

Google reCAPTCHA is one of the most popular CAPTCHA services. It’s offered, free of charge, with its basic functions. There is also a paid Enterprise version with expanded features and integration possibilities. Both subscriptions can be found in the
Products part of the
Google Developers
section:
 Let’s now check how the most basic free section looks. The installation starts from the short overview at the
Developer's Guide
page. Before clicking on "sign up for an API key pair,” make sure that you are logged in to your Google account:
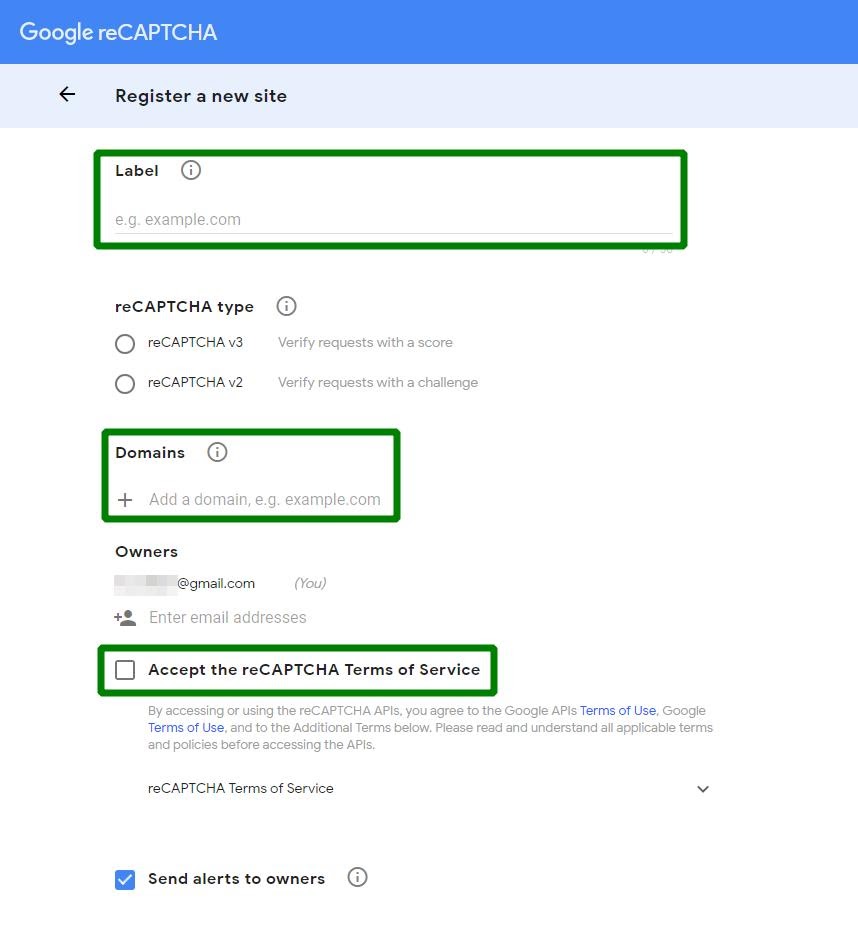
On the next page, you will need to fill in your website information:
1. Label is the identifying name of the website in your Google panel.
2. Domain should be an existing domain name that’s already pointed to your hosting plan.
NOTE: It should not be a URL of the website with https:// but just a bare domain name (or a subdomain) itself, e.g., domain.com.
Make sure to check the Terms of Use and tick the box to accept its conditions.
You may find the detailed explanation of the settings
here.
On the next screen, you will receive your Site Key and Secret Key codes. Copy them somewhere and have them at hand before you start setting up CAPTCHA directly on your website.
At the moment, Google reCAPTCHA is offered in two versions: v2 and v3. Developers describe the difference on the
versions comparison page.
Google reCAPTCHA v2 analyzes the traffic and asks that the checkbox be ticked only in the most suspicious of cases. If you are developing a mobile application or website, reCAPTCHA v2 offers an Android-specific API. It’s more dependable and comfortable to use with mobile content.
Google reCAPTCHA v3 is a checker that does not have a field to fill in or any special checkbox. Its logic is based on the actions it’s tracking and building the score to validate a user’s activity. It acts according to the behavior matches rules and suggests corresponding tasks.
Both versions are a set of scripts you add to your website for its corresponding pages. In popular CMS websites like WordPress or Joomla, it’s possible to add the functionality through plugins or modules. You can look them up on the respective official website of your CMS. In self-coded projects, the files can be edited directly in the
File Manager of the cPanel. Here is a
video tutorial explaining how to edit the file content in cPanel.
Installing CAPTCHA in WordPress
There are numerous plugins for WordPress that offer protection for different kinds of fill-in fields. It’s easy to find them using the search field in the Add New tab of the Plugins section:
 It’s important to choose the version of the plugin that is most compatible with your current WordPress release. Luckily, the system automatically marks it:
A full guide on the WordPress plugins installation process can be found
here.
Unchecked or incompatible versions of plugins are likely to cause issues within your website, e.g. making it unavailable. In case you have to disable the newly-installed plugin, with or without the access to the admin dashboard, you can do so through the database or File Manager. Both options are described
here.
CAPTCHA protection is already integrated into the most popular WordPress contact plugins. For example, you can easily find it in the latest version of the Contact Form 7 plugin.
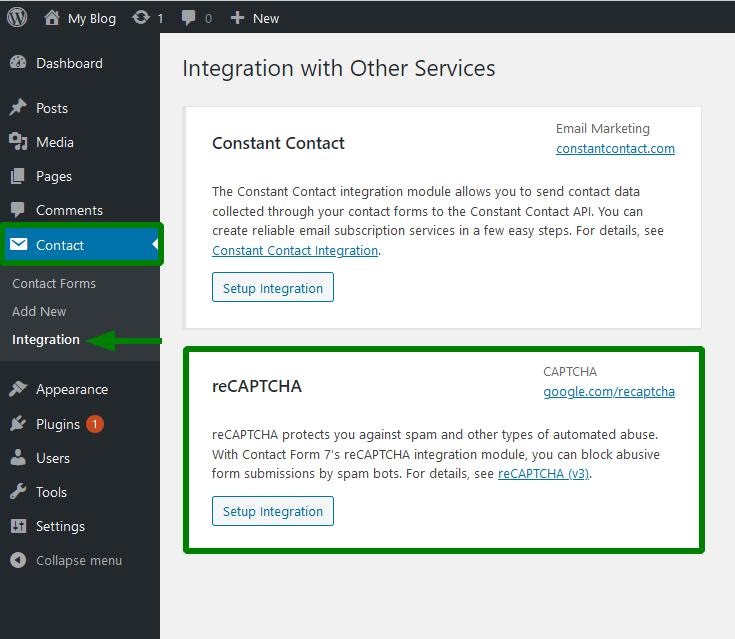
Log in to your website admin dashboard and proceed to the Integration tab of the Contact section to find the reCAPTCHA addon:
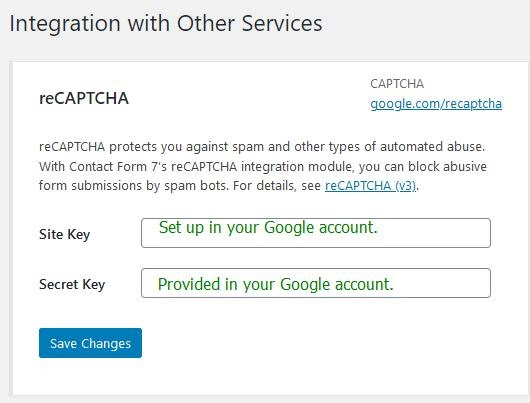
Fill in the information you received in your Google Developers dashboard in the next fields and save the changes:
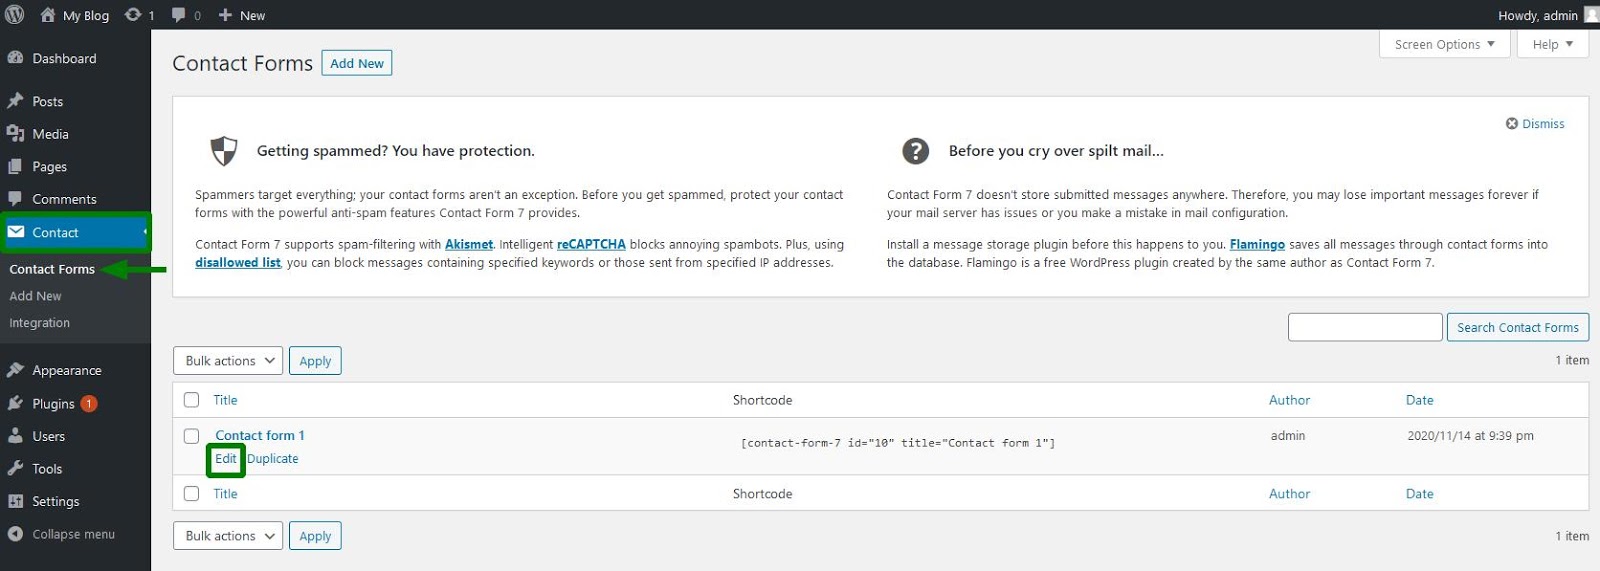
Move to the Contact Forms tab of the Contact section and select the form you want to edit:
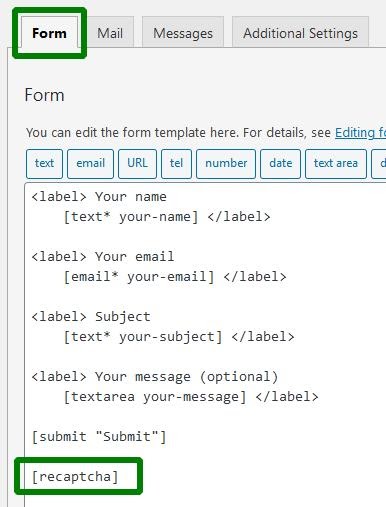
 Insert [recaptcha] in the code of your contact form and save the changes:
Further codes and settings for this integration in the contact form, such as size, behavior, and other options can be found on the reCAPTCHA code lab page in your Google account.

 Let’s now check how the most basic free section looks. The installation starts from the short overview at the
Developer's Guide
page. Before clicking on "sign up for an API key pair,” make sure that you are logged in to your Google account:
 It’s important to choose the version of the plugin that is most compatible with your current WordPress release. Luckily, the system automatically marks it:
 Insert [recaptcha] in the code of your contact form and save the changes: