In order to edit the DNS zone of the domain in your Web Host Manager (WHM) account on VPS or Dedicated server hosting, follow the steps below.
Log into WHM account. You can do it using the details provided in the welcome email you received after purchasing hosting.
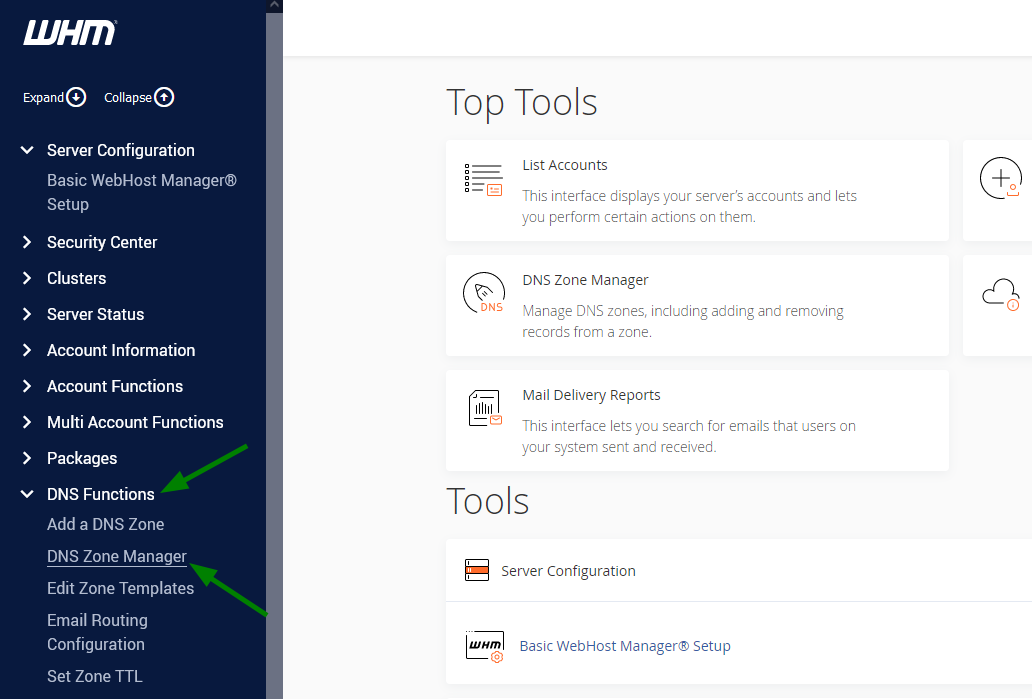
Navigate to the DNS functions section and click on the DNS Zone Manager menu:
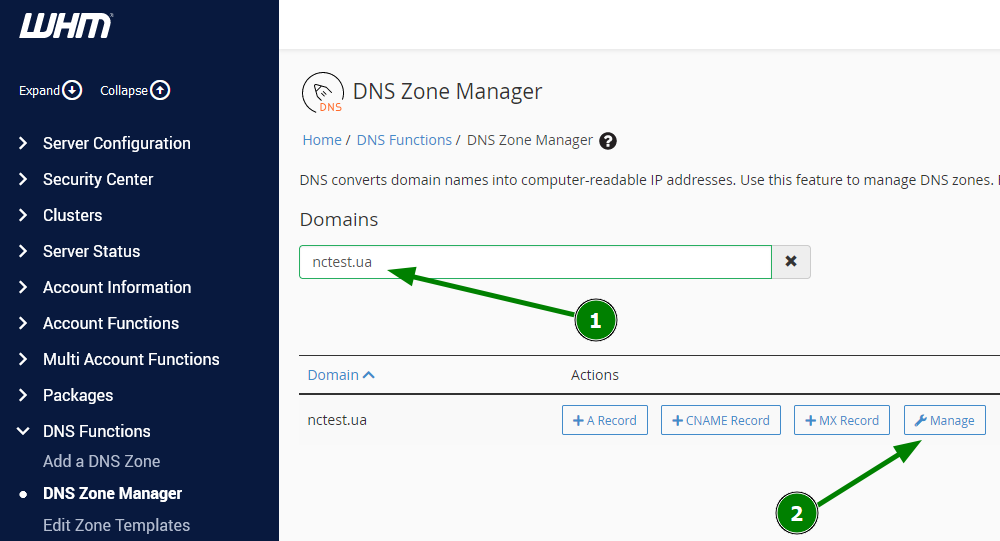
Enter your domain in the search bar, choose it from the list and click Manage:
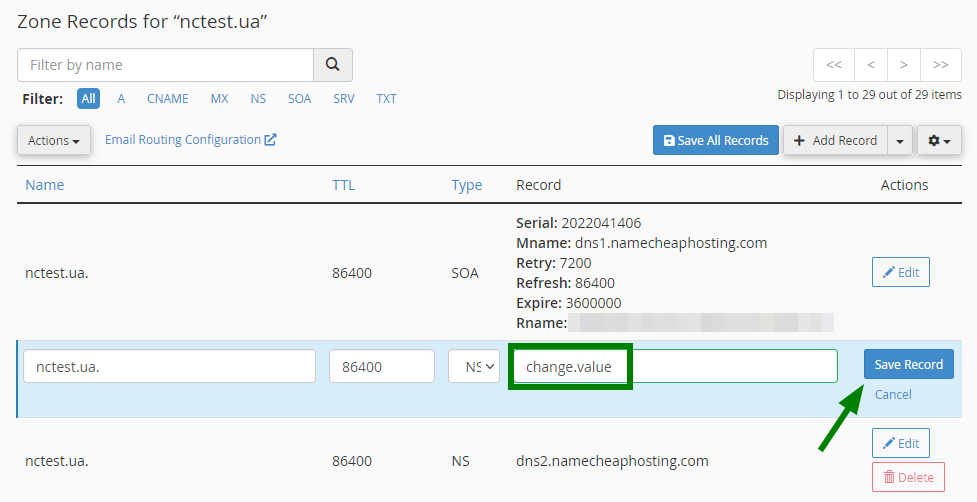
In the next menu, you can create new host records and edit the existing ones.
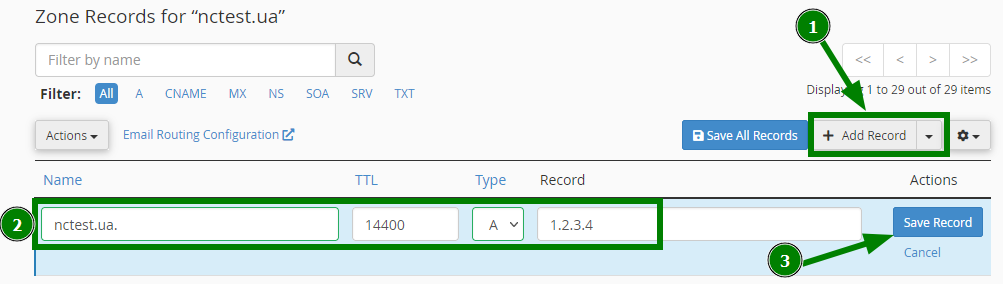
To edit the existing record, find it in the list, click Edit next to the required record to change its value. Click Save Record next to the record to confirm the change.
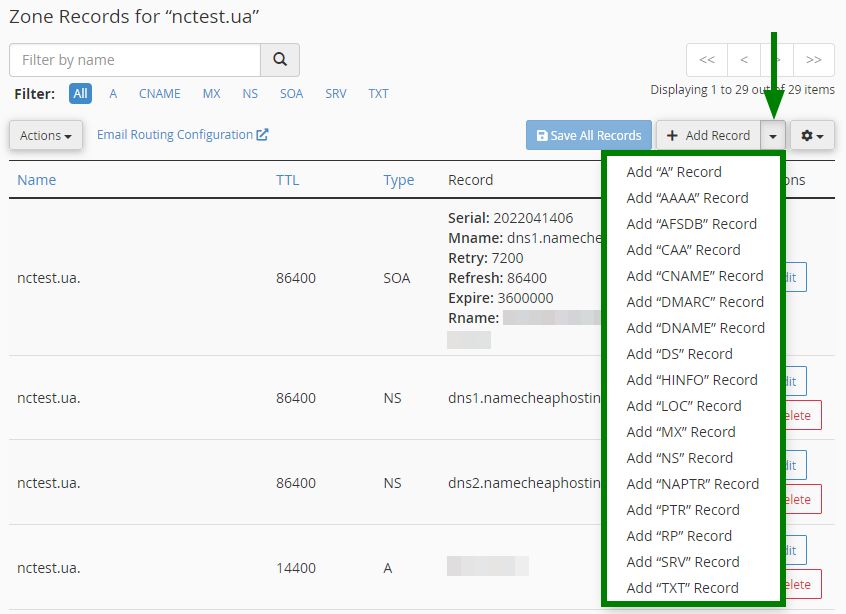
To add a new record, click the arrow-down button to see the types of records you can create:
There are four main columns for entering DNS entries for your domain:
Name — the record's name (usually, a domain name or a subdomain)
TTL — the DNS entry’s TTL
Type — the DNS record type
Record — the value of the DNS record
For example, to create an A record for your domain, enter the details this way and click Save Record once done:
PLEASE NOTE: When you create a record for a subdomain, you will need to add only the subdomain name without adding a domain after it in the Domain field. For example, you should enter subdomain to create a record for the subdomain.domain.com name.
Further steps depend on the record type you wish to add.
AAAA record
Choose AAAA in the drop-down menu next to the Type field.
AAAA record, also known as 'IPv6 address record', maps a hostname to a 128-bit IPv6 address in the Domain Name System (DNS).
CAA record
Choose CAA in the drop-down menu next to the Type field.
A CAA (Certification Authority Authorization) record specifies which certificate authorities (CAs) can issue certificates for a domain.
Name: must be a domain
TTL: must be a positive integer (in seconds)
Issuer Critical Flag: 0 or 1
Tag: issue, issuewild, or iodef
Record: must be a valid zone name with the issue and issue wild tags or a valid mailto or standard URL with the iodef tag
CNAME record
Choose CNAME in the drop-down menu next to the Type field.
CNAME (Canonical Name) points one domain or subdomain to another domain name, allowing you to update one A Record each time you make a change, regardless of how many Host Records need to resolve to that IP address.
Name: must be a domain or a subdomain in question
TTL: must be a positive integer (in seconds)
Hostname: must be a valid zone name
NS record
Choose NS in the drop-down menu next to the Type field.
NS (Name Server) record identifies a domain’s authoritative DNS servers.
Name: must be a domain or a subdomain in question
TTL: must be a positive integer (in seconds)
Hostname: must be a valid zone name
SRV record
Choose SRV in the drop-down menu next to the Type field.
An SRV record points one domain to another domain name using a specific destination port.
Name: includes the service (the symbolic name of the desired service) and protocol (the Protocol used by the service, usually either TCP or UDP)
TTL: must be a positive integer (in seconds)
Priority: priority of the target host, lower value means more preferred
Weight: relative weight for records with the same priority, a higher value means a more preferred one
Port: TCP or UDP port on which the service is to be found
Target: canonical hostname of the machine providing the service
Example:
Name: _autodiscover._tcp
TTL: 1200
Priority: 0
Weight: 0
Port: 443
Target: privateemail.com
TXT record
Choose TXT in the drop-down menu next to the Type field.
These records hold free-text forms of any type. A fully qualified domain may have many TXT records. The most common uses for TXT records are Sender Policy Framework (SPF), DomainKeys (DK), DomainKeys IdentifiedE-mail (DKIM). Historically, TXT records contain human-readable information about a server, network, data center, and other accounting information.
Name: must be a domain or a subdomain in question
TTL: must be a positive integer (in seconds)
Text Information: cannot be empty or more than 2500 symbols
How to change MX records and Email Routing in WHM
An MX (Mail Exchanger) record specifies a mail server responsible for accepting email messages on behalf of a domain. This record is essential for email delivery.
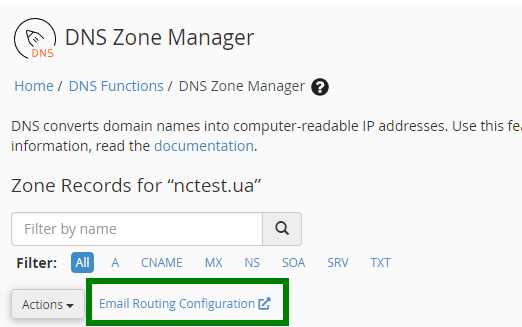
You can manage DNS records right in the DNS Zone Manager. But if there are no MX records created for your domain, and you would like to configure email routing as well, navigate to the Email Routing Configuration menu at the top of the page:
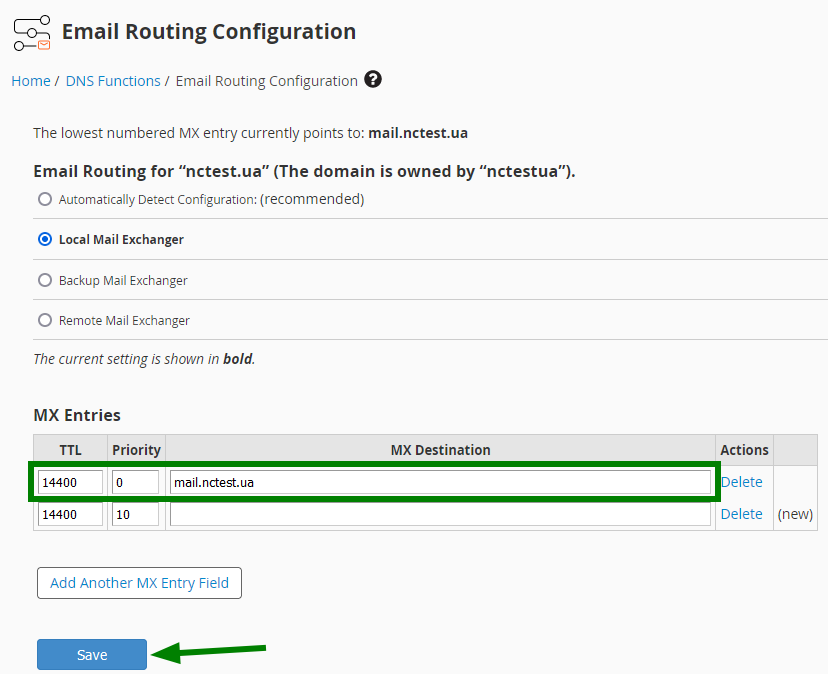
Then, go to the MX Entries section, and enter the necessary information into the record fields correspondingly:
TTL: must be a positive integer (in seconds)
Priority: must be an integer; lower value means more preferred
MX Destination: must be a valid zone name
Then, you will need to choose the Email Routing option, which defines which server will be responsible for your email delivery domain.
Local Mail Exchanger means that the server will always accept mail for your domain, and the system will deliver mail to the local mailbox. This option should be chosen when you wish to use the cPanel email service.
Remote Mail Exchanger means that the server will not accept mail for this domain, and the system sends all mail for this domain to the lowest numbered mail exchanger. You need to choose it in case you are using third-party email services (such as GSuite, Namecheap Private Email, etc.) for your domain.
Once the MX record is created, and the email routing is chosen, click Save to confirm the changes.