
{"/api/v1/ncpl/simplekb/getarticle:\"{\\\"articleId\\\":10192,\\\"categoryId\\\":2251}\"":{"body":{"Id":10192,"FriendlyId":"","ArticleTypeId":0,"Title":"Installing an SSL certificate on Supersonic CDN","ArticleName":"Installing an SSL certificate on Supersonic CDN","ArticleSummary":null,"PreponedSummary":false,"Approved":true,"Body":"DQoJCTxkaXY+Tm93IHRoYXQgeW914oCZdmUgdXBncmFkZWQgeW91ciB3ZWJzaXRlIHBlcmZvcm1hbmNlIHdpdGggdGhlIDxhIGhyZWY9Imh0dHBzOi8vd3d3Lm5hbWVjaGVhcC5jb20vc3VwZXJzb25pYy1jZG4vIiBsaW5rdGV4dD0iU3VwZXJzb25pYyBDRE4iIGxpbmt0eXBlPSJDdXN0b20iIHRhcmdldD0iX2JsYW5rIj5TdXBlcnNvbmljIENETjwvYT4sIHRoZSBuZXh0IHN0ZXAgZm9yIGl0IHRvIG9wZXJhdGUgaXMgaW5zdGFsbGluZyBhbiA8YSBocmVmPSJodHRwczovL3d3dy5uYW1lY2hlYXAuY29tL3NlY3VyaXR5L3NzbC1jZXJ0aWZpY2F0ZXMvIj5TU0wgY2VydGlmaWNhdGU8L2E+LiBUaGlzIGd1aWRlIHdpbGwgc2hvdyB5b3UgaG93LjwvZGl2Pg0KCQk8ZGl2Pg0KCQkJCTxiciAvPg0KCQk8L2Rpdj4NCgkJPGRpdj5UaGUgc2FtZSBTU0wgQ2VydGlmaWNhdGUgd2lsbCBjb3ZlciBib3RoIHlvdXIgd2Vic2l0ZSBvbiB0aGUgaG9zdGluZyBzZXJ2ZXIgZW5kIGFuZCBvbiB0aGUgQ0ROIHNpZGUuIEZpcnN0LCBnbyBhaGVhZCBhbmQgPGEgaHJlZj0iaHR0cHM6Ly93d3cubmFtZWNoZWFwLmNvbS9zdXBwb3J0L2tub3dsZWRnZWJhc2UvYXJ0aWNsZS85ODc0LzIyMzkvZWFzeXdwLWhvdy10by1hZGQtc3NsLXRvLXlvdXItd29yZHByZXNzLXNpdGUiIGxpbmt0ZXh0PSJpbnN0YWxsIGFuIFNTTCBvbiBFYXN5V1AiIGxpbmt0eXBlPSJDdXN0b20iIHRhcmdldD0iX2JsYW5rIj5pbnN0YWxsIGFuIFNTTCBvbiBFYXN5V1A8L2E+IG9yIDxhIGhyZWY9Imh0dHBzOi8vd3d3Lm5hbWVjaGVhcC5jb20vc3VwcG9ydC9rbm93bGVkZ2ViYXNlL2FydGljbGUuYXNweC85NDE4LzMzL2luc3RhbGxpbmctYW4tc3NsLWNlcnRpZmljYXRlLW9uLXlvdXItc2VydmVyLXVzaW5nLWNwYW5lbCIgbGlua3RleHQ9Imluc3RhbGwgaXQgaW4gY1BhbmVsIG9uIHlvdXIgU2hhcmVkIGhvc3RpbmciIGxpbmt0eXBlPSJDdXN0b20iIHRhcmdldD0iX2JsYW5rIj5pbnN0YWxsIGl0IGluIGNQYW5lbCBvbiB5b3VyIFNoYXJlZCBob3N0aW5nPC9hPi48L2Rpdj4NCgkJPGRpdj4NCgkJCQk8YnIgLz4NCgkJPC9kaXY+DQoJCTxkaXY+Tm93IHlvdeKAmXJlIHJlYWR5IGZvciBpbnN0YWxsYXRpb24gb24geW91ciBDb250ZW50IERlbGl2ZXJ5IE5ldHdvcmsuIEZvciB0aGlzLCBuYXZpZ2F0ZSB0byB0aGUgQ0ROIG1hbmFnZW1lbnQgcGFuZWw6PGJyIC8+PGJyIC8+PC9kaXY+DQoJCTxkaXY+MS4gSW4geW91ciBOYW1lY2hlYXAgQWNjb3VudCwgY2xpY2tpbmcgdGhlIDxiPkFwcHM8L2I+IHNlY3Rpb24gb2YgdGhlIGxlZnQgaGFuZCBtZW51LCBhbmQgc2VsZWN0IDxiPlN1cGVyc29uaWMgQ0ROPC9iPjo8L2Rpdj4NCgkJPGRpdj4NCgkJCQk8YnIgLz4NCgkJPC9kaXY+DQoJCTxwPg0KCQkJCTxpbWcgY2xhc3M9ImtiLWltYWdlIiBzcmM9Imh0dHBzOi8vTmFtZWNoZWFwLnNpbXBsZWtiLmNvbS9TaXRlQ29udGVudHMvMi03QzIyRDUyMzZBNDU0M0VCODI3RjNCRDg5MzZFMTUzRS9tZWRpYS9jZG5fc3NsXzEucG5nIiBhbHQ9IlNjcmVlbnNob3QgZnJvbSB0aGUgTmFtZWNoZWFwIGRhc2hib2FyZCBoaWdobGlnaHRpbmcgd2hlcmUgdG8gYWNjZXNzIENETiBzZXR0aW5ncyIgd2lkdGg9Ijc1MCIgaGVpZ2h0PSIzMDAiIGJvcmRlcj0iMCIgLz4NCgkJPC9wPg0KCQk8cD4yLiBJbiB5b3VyIDxiPlN1cGVyc29uaWMgQ0ROPC9iPiBEYXNoYm9hcmQsIGNsaWNrIHRoZSA8Yj5TU0w8L2I+IG9wdGlvbiBpbiB0aGUgbGVmdCBoYW5kIG1lbnU6PC9wPg0KCQk8cD4NCgkJCQk8aW1nIGNsYXNzPSJrYi1pbWFnZSIgc3JjPSJodHRwczovL05hbWVjaGVhcC5zaW1wbGVrYi5jb20vU2l0ZUNvbnRlbnRzLzItN0MyMkQ1MjM2QTQ1NDNFQjgyN0YzQkQ4OTM2RTE1M0UvbWVkaWEvMjAyMS0wMi0xOF8wOS0zNi5wbmciIGFsdD0iVGhlIFNTTCBvcHRpb24gaXMgaGlnaGxpZ2h0ZWQgaW4gbGVmdCBuYXYgZXhhbXBsZSIgLz4NCgkJPC9wPg0KCQk8cD4zLiBJZiB5b3UgdXNlIENETiBhbG9uZyB3aXRoIG91ciBTaGFyZWQgaG9zdGluZyBhbmQgdGhlcmUncyBhbiBTU0wgY2VydGlmaWNhdGUgYWxyZWFkeSBpbnN0YWxsZWQgaW4geW91ciBob3N0aW5nIGNQYW5lbCwgaXQgY2FuIGJlIGVhc2lseSBlbmFibGVkIGZvciB5b3VyIENETiBpbiBvbmUgY2xpY2sgYnkgdXNpbmcgdGhlIDxiPkZldGNoIGZyb20gSG9zdGluZzwvYj4gb3B0aW9uIGluIHRoZSA8Yj5DdXJyZW50IGFjdGl2ZSBTU0w8L2I+IHNlY3Rpb246PGJyIC8+PGJyIC8+PC9wPg0KCQk8cD4NCgkJCQk8aW1nIGNsYXNzPSJrYi1pbWFnZSIgc3JjPSJodHRwczovL05hbWVjaGVhcC5zaW1wbGVrYi5jb20vU2l0ZUNvbnRlbnRzLzItN0MyMkQ1MjM2QTQ1NDNFQjgyN0YzQkQ4OTM2RTE1M0UvbWVkaWEvY2RuX2ZldGNoLnBuZyIgLz4NCgkJPC9wPg0KCQk8cD5JbiBjYXNlIHlvdSBoYXZlIGFuIEVhc3lXUCB3ZWJzaXRlIHdpdGggaW5zdGFsbGVkIFNTTCBvbiBpdCwgYW5kIHlvdSB1c2UgU3VwZXJzb25pYyBDRE4gYXMgd2VsbCwgZ28gdG8geW91ciA8YSBocmVmPSJodHRwczovL2Rhc2hib2FyZC5lYXN5d3AuY29tIj5FYXN5V1AgRGFzaGJvYXJkPC9hPiAmZ3Q7Jmd0OyA8Yj5PdmVydmlldzwvYj4gJmd0OyZndDsgPGI+V2Vic2l0ZTwvYj4gc2VjdGlvbiAmZ3Q7Jmd0OyBjbGljayA8Yj5NYW5hZ2U8L2I+IG5leHQgdG8gPGI+U1NMIENlcnRpZmljYXRlPC9iPiAmZ3Q7Jmd0OyBjbGljayB0aGUgPGI+U3luYzwvYj4gYnV0dG9uIG9uIHRoZSBjZXJ0aWZpY2F0ZSBzdGF0dXMgcGFnZTo8YnIgLz48YnIgLz48L3A+DQoJCTxwPg0KCQkJCTxpbWcgY2xhc3M9ImtiLWltYWdlIiBzcmM9Imh0dHBzOi8vTmFtZWNoZWFwLnNpbXBsZWtiLmNvbS9TaXRlQ29udGVudHMvMi03QzIyRDUyMzZBNDU0M0VCODI3RjNCRDg5MzZFMTUzRS9tZWRpYS9ld3BfY2RuX3N5bmMucG5nIiAvPg0KCQk8L3A+DQoJCTxkaXY+DQoJCUFuZCB0aGF0J3MgaXQsIG5vdyB5b3VyIFNTTCBhbHNvIHdvcmtzIGZvciB0aGUgQ0ROIHNlcnZpY2UuPC9kaXY+DQoJCTxiciAvPg0KCQk8ZGl2PklmIHlvdSBuZWVkIHRvIGluc3RhbGwgdGhlIFNTTCBtYW51YWxseSwgdXNlIHRoZSBiZWxvdyBzdGVwczo8YnIgLz48L2Rpdj4NCgkJPGRpdj4NCgkJCQk8YnIgLz4NCgkJPC9kaXY+DQoJCTxkaXY+MS4gQ2xpY2sgPGI+VXBsb2FkIEN1c3RvbSBTU0w8L2I+IGluIHRoZSA8Yj5TU0w8L2I+IHRhYjo8L2Rpdj4NCgkJPGRpdj4NCgkJCQk8YnIgLz4NCgkJPC9kaXY+DQoJCTxwPg0KCQkJCTxpbWcgY2xhc3M9ImtiLWltYWdlIiBzcmM9Imh0dHBzOi8vTmFtZWNoZWFwLnNpbXBsZWtiLmNvbS9TaXRlQ29udGVudHMvMi03QzIyRDUyMzZBNDU0M0VCODI3RjNCRDg5MzZFMTUzRS9tZWRpYS8yMDIxLTAyLTE4XzA5LTM2XzEucG5nIiBhbHQ9IlRoZSBVcGxvYWQgQ3VzdG9tIFNTTCBvcHRpb24gaXMgaGlnaGxpZ2h0ZWQgd2l0aGluIHRoZSBkYXNoYm9hcmQiIC8+DQoJCTwvcD4NCgkJPHA+Mi4gT24gdGhlIG5leHQgcGFnZSwgeW914oCZbGwgc2VlIHRocmVlIGZpZWxkcyB0byBmaWxsIG91dC4gVGhlc2UgYXJlIHdoZXJlIHlvdeKAmWxsIHBhc3RlIHlvdXIgdW5pcXVlIGNvZGVzIGZvciB0aGUgU1NMIENlcnRpZmljYXRlLCBQcml2YXRlIEtleSBhbmQgQ0EgQnVuZGxlLiA8YnIgLz48YnIgLz5PcGVuIHRoZXNlIGZpbGVzIG9uIHlvdXIgUEMgdXNpbmcgdGV4dCBlZGl0b3IgKGUuZy4gTm90ZXBhZCksIGFuZCBwYXN0ZSBpbiB0aGUgdGV4dCBjb2Rlcy4gPGJyIC8+PGJyIC8+PGI+Tm90ZTwvYj46IEFueSBwbGFpbiB0ZXh0IGZvcm1hdCB3aXRoIHRoZSBwcm9wZXIgY29kZSB3aWxsIHdvcmsgKC50eHQsIC5jcnQsIC5jYS1idW5kbGUsIC5rZXksIC5wZW0pLjxiciAvPjwvcD4NCgkJPHA+DQoJCQkJPGltZyBjbGFzcz0ia2ItaW1hZ2UiIHNyYz0iaHR0cHM6Ly9OYW1lY2hlYXAuc2ltcGxla2IuY29tL1NpdGVDb250ZW50cy8yLTdDMjJENTIzNkE0NTQzRUI4MjdGM0JEODkzNkUxNTNFL21lZGlhL2Nkbl9zc2xfMTMucG5nIiBhbHQ9IlNjcmVlbnNob3Qgb2YgdGhlIFNMIHVwbG9hZCBzY3JlZW4gd2l0aGluIHRoZSBDRE4gZGFzaGJvYXJkIiB3aWR0aD0iNjAwIiBoZWlnaHQ9IjY1MCIgYm9yZGVyPSIwIiAvPg0KCQk8L3A+DQoJCTxwPkFsdGVybmF0aXZlbHksIHRoZSBmaWxlIGNvZGVzIGZvciB5b3VyIFNTTCBDZXJ0aWZpY2F0ZSwgUHJpdmF0ZSBLZXkgYW5kIENBIEJ1bmRsZSBjYW4gYmUgdXBsb2FkZWQgdXNpbmcgPGI+VXBsb2FkIEZpbGU8L2I+IG9wdGlvbi4gQ2xpY2sgdGhpcyBidXR0b24gYW5kIHNlbGVjdCB0aGUgY29ycmVjdCBmaWxlIGZyb20gdGhlIHBvcC11cCB3aW5kb3cuIFRoZSBjb2RlIHdpbGwgYXV0b21hdGljYWxseSBiZSBhZGRlZCB0byB0aGUgZmllbGQuIDxiciAvPjwvcD4NCgkJPHA+My4gVGhlbiBjbGljayB0aGUgPGI+VXBsb2FkIDwvYj5idXR0b24uPGJyIC8+PGJyIC8+WW914oCZbGwgc2VlIHRoZSBkb21haW5zIHRoYXQgdGhlIGN1c3RvbSBTU0wgc2VjdXJlcyBpbiA8Yj5TU0w8L2I+ICZndDsmZ3Q7IDxiPkN1cnJlbnQgYWN0aXZlIFNTTDwvYj46PGJyIC8+PC9wPg0KCQk8cD4NCgkJCQk8aW1nIGNsYXNzPSJrYi1pbWFnZSIgc3JjPSJodHRwczovL05hbWVjaGVhcC5zaW1wbGVrYi5jb20vU2l0ZUNvbnRlbnRzLzItN0MyMkQ1MjM2QTQ1NDNFQjgyN0YzQkQ4OTM2RTE1M0UvbWVkaWEvMjAyMS0wMi0xOF8wOS0zOC5wbmciIGFsdD0iU2NyZWVuc2hvdCBleGFtcGxlIHdoZW4geW91ciBDRE4gaXMgcHJvdGVjdGVkIGJ5IFNTTCIgLz4NCgkJPC9wPg0KCQk8cD5UaGF0J3MgaXQhPGJyIC8+PC9wPg0KCQk8cD5Vbmxpa2UgbW9zdCBzY2VuYXJpb3Mgd2hlcmUgcmVkaXJlY3RpbmcgdG8gdGhlIHNlY3VyZWQgaHR0cHM6Ly8gdmVyc2lvbiBvZiBhIHdlYnNpdGUgaXMgYSBzZXBhcmF0ZSBzdGVwLCB0aGUgTmFtZWNoZWFwIFN1cGVyc29uaWMgPGEgaHJlZj0iaHR0cHM6Ly93d3cubmFtZWNoZWFwLmNvbS9zdXBlcnNvbmljLWNkbi9jZG4td2FmLyIgbGlua3RleHQ9IkNETiBwbGF0Zm9ybSIgbGlua3R5cGU9IkN1c3RvbSIgdGFyZ2V0PSJfcGFyZW50Ij5DRE4gcGxhdGZvcm08L2E+IGF1dG9tYXRpY2FsbHkgZG9lcyB0aGlzIGZvciB5b3UsIHNvIHlvdeKAmXJlIGFsbCBzZXQuPGJyIC8+PGJyIC8+SWYgeW91IG5lZWQgYW55IGZ1cnRoZXIgaGVscCBkdXJpbmcgdGhlIFNTTCBpbnN0YWxsYXRpb24sIHBsZWFzZSBjb250YWN0IG91ciA8YSBocmVmPSJodHRwczovL3d3dy5uYW1lY2hlYXAuY29tL3N1cHBvcnQvbGl2ZS1jaGF0L3NzbC8iIGxpbmt0ZXh0PSJTU0wgU3VwcG9ydCBUZWFtIiBsaW5rdHlwZT0iQ3VzdG9tIiB0YXJnZXQ9Il9ibGFuayI+U1NMIFN1cHBvcnQgVGVhbTwvYT4uIExlYXJuIHdoeSBhbGwgb25saW5lIGJ1c2luZXNzIGNhbiBlbmpveSB0aGUgPGEgaHJlZj0iaHR0cHM6Ly93d3cubmFtZWNoZWFwLmNvbS9zdXBlcnNvbmljLWNkbi9vbmxpbmUtYnVzaW5lc3MtY2RuLyIgbGlua3RleHQ9ImJlbmVmaXRzIG9mIGEgQ0ROIiBsaW5rdHlwZT0iQ3VzdG9tIiB0YXJnZXQ9Il9wYXJlbnQiPmJlbmVmaXRzIG9mIGEgQ0ROPC9hPi48YnIgLz48L3A+DQo=","NewTillDate":null,"FeaturedTillDate":null,"ModifiedDateTime":"2023-02-09T10:42:50.0000000","LiveDateTime":"1754-02-02T00:00:00.0000000","CreatedDateTime":"2019-12-06T17:52:19.0000000","ApprovalDatetime":"2019-12-06T17:52:19.0000000","RequestCount":41089,"MarkedAsNew":false,"MarkedAsFeatured":false,"RatingValue":0,"CategoryPaths":[{"__type":"Nc:SimpleKB:Abstractions:Dtos:CategoryPathDto","Level":1,"CategoryId":2228,"CategoryName":"Apps"},{"__type":"Nc:SimpleKB:Abstractions:Dtos:CategoryPathDto","Level":2,"CategoryId":2251,"CategoryName":"Supersonic CDN"}],"AssociatedCategories":[{"CategoryId":2251,"CategoryName":"Supersonic CDN","CategoryDisplayName":"AppsSupersonic CDN"}],"AssociatedTags":[],"RelatedArticles":[{"ArticleId":9874,"PreferedCategoryId":2287,"ArticleTypeId":0,"ArticleName":"EasyWP: How to add SSL to your WordPress site + Video","ArticleTypeName":null,"Title":"EasyWP: How to add SSL to your WordPress site + Video","LiveDateTime":null,"ModifiedDateTime":"10/11/2024","MarkedAsNew":false,"MarkedAsFeatured":false},{"ArticleId":9418,"PreferedCategoryId":33,"ArticleTypeId":0,"ArticleName":"Installing an SSL certificate on your server, using cPanel","ArticleTypeName":null,"Title":"Installing an SSL certificate on your server, using cPanel","LiveDateTime":null,"ModifiedDateTime":"07/02/2025","MarkedAsNew":false,"MarkedAsFeatured":false}],"AssociatedMedias":[],"PreferredCategoryId":0,"RootParentCategoryName":"","RootParentCategoryId":0},"status":200,"statusText":"OK"},"/api/v1/ncpl/simplekb/getcategorybycategoryid:\"{\\\"categoryId\\\":2251}\"":{"body":{"__type":"Nc:SimpleKB:Abstractions:Dtos:CategoryDto","ParentCategoryId":2228,"Parent_Category_Name":"Apps","FriendlyId":null,"ApprovedYN":true,"TreatAsTopicYN":false,"CreatedDateTime":"12/03/2019 12:16:02","CurrentCategoryPaths":[{"__type":"Nc:SimpleKB:Abstractions:Dtos:CategoryPathDto","Level":1,"CategoryId":2228,"CategoryName":"Apps"},{"__type":"Nc:SimpleKB:Abstractions:Dtos:CategoryPathDto","Level":2,"CategoryId":2251,"CategoryName":"Supersonic CDN"}],"RelatedCategories":[],"AssociatedArticles":[{"ArticleId":10188,"Title":"Supersonic CDN overview","ArticleName":"Supersonic CDN overview","LiveDateTime":"02/02/1754 00:00:00","NewTillDate":null,"FeaturedTillDate":null,"ModifiedDateTime":"07/09/2025"},{"ArticleId":10190,"Title":"How to upgrade/downgrade Supersonic CDN","ArticleName":"How to upgrade/downgrade Supersonic CDN","LiveDateTime":"02/02/1754 00:00:00","NewTillDate":null,"FeaturedTillDate":null,"ModifiedDateTime":"02/18/2021"},{"ArticleId":10191,"Title":"How to setup Supersonic CDN with EasyWP","ArticleName":"How to setup Supersonic CDN with EasyWP","LiveDateTime":"02/02/1754 00:00:00","NewTillDate":null,"FeaturedTillDate":null,"ModifiedDateTime":"07/09/2025"},{"ArticleId":10192,"Title":"Installing an SSL certificate on Supersonic CDN","ArticleName":"Installing an SSL certificate on Supersonic CDN","LiveDateTime":"02/02/1754 00:00:00","NewTillDate":null,"FeaturedTillDate":null,"ModifiedDateTime":"02/09/2023"},{"ArticleId":10225,"Title":"How to setup Supersonic CDN with Shared hosting","ArticleName":"How to setup Supersonic CDN with Shared hosting","LiveDateTime":"02/02/1754 00:00:00","NewTillDate":null,"FeaturedTillDate":null,"ModifiedDateTime":"06/10/2025"},{"ArticleId":10452,"Title":"How to change domain for a Supersonic CDN subscription","ArticleName":"How to change domain for a Supersonic CDN subscription","LiveDateTime":"02/02/1754 00:00:00","NewTillDate":null,"FeaturedTillDate":null,"ModifiedDateTime":"05/20/2021"},{"ArticleId":10469,"Title":"How to purchase a Supersonic CDN subscription","ArticleName":"How to purchase a Supersonic CDN subscription","LiveDateTime":"02/02/1754 00:00:00","NewTillDate":null,"FeaturedTillDate":null,"ModifiedDateTime":"02/17/2023"},{"ArticleId":10470,"Title":"How to set up Supersonic CDN","ArticleName":"How to set up Supersonic CDN","LiveDateTime":"02/02/1754 00:00:00","NewTillDate":null,"FeaturedTillDate":null,"ModifiedDateTime":"03/18/2026"},{"ArticleId":10559,"Title":"How to fix a corrupted wp-admin page","ArticleName":"How to fix a corrupted wp-admin page","LiveDateTime":"02/02/1754 00:00:00","NewTillDate":null,"FeaturedTillDate":null,"ModifiedDateTime":"10/07/2022"},{"ArticleId":10672,"Title":"How to remove the CDN service for a domain","ArticleName":"How to remove the CDN service for a domain","LiveDateTime":"02/02/1754 00:00:00","NewTillDate":null,"FeaturedTillDate":null,"ModifiedDateTime":"02/05/2025"}],"AssociatedTags":[],"CategoryId":2251,"CategoryName":"Supersonic CDN"},"status":200,"statusText":"OK"},"/api/v1/ncpl/simplekb/getcategories:\"{\\\"parentCategoryId\\\":0,\\\"getTree\\\":true}\"":{"body":[{"__type":"Nc:SimpleKB:Abstractions:Dtos:CategoryItemDto","ParentCategoryId":93,"TreatAsTopicYN":false,"Description":"","ImageUrl":"","ShortDesc":"","CategoryId":2216,"CategoryName":"Spam Protection"},{"__type":"Nc:SimpleKB:Abstractions:Dtos:CategoryItemDto","ParentCategoryId":14,"TreatAsTopicYN":false,"Description":"","ImageUrl":"","ShortDesc":"","CategoryId":2217,"CategoryName":"Renewal"},{"__type":"Nc:SimpleKB:Abstractions:Dtos:CategoryItemDto","ParentCategoryId":14,"TreatAsTopicYN":false,"Description":"","ImageUrl":"","ShortDesc":"","CategoryId":2218,"CategoryName":"cPanel SSL Plugin"},{"__type":"Nc:SimpleKB:Abstractions:Dtos:CategoryItemDto","ParentCategoryId":12,"TreatAsTopicYN":false,"Description":"","ImageUrl":"","ShortDesc":"","CategoryId":2219,"CategoryName":"PHP Configuration"},{"__type":"Nc:SimpleKB:Abstractions:Dtos:CategoryItemDto","ParentCategoryId":14,"TreatAsTopicYN":false,"Description":"","ImageUrl":"","ShortDesc":"","CategoryId":2221,"CategoryName":"Multi-Domain SSL Certificates"},{"__type":"Nc:SimpleKB:Abstractions:Dtos:CategoryItemDto","ParentCategoryId":14,"TreatAsTopicYN":false,"Description":"","ImageUrl":"","ShortDesc":"","CategoryId":2222,"CategoryName":"Cancellation"},{"__type":"Nc:SimpleKB:Abstractions:Dtos:CategoryItemDto","ParentCategoryId":14,"TreatAsTopicYN":false,"Description":"","ImageUrl":"","ShortDesc":"","CategoryId":2223,"CategoryName":"Browser errors"},{"__type":"Nc:SimpleKB:Abstractions:Dtos:CategoryItemDto","ParentCategoryId":14,"TreatAsTopicYN":false,"Description":"","ImageUrl":"","ShortDesc":"","CategoryId":2224,"CategoryName":"Site Seal, Logo"},{"__type":"Nc:SimpleKB:Abstractions:Dtos:CategoryItemDto","ParentCategoryId":12,"TreatAsTopicYN":false,"Description":"","ImageUrl":"","ShortDesc":"","CategoryId":2225,"CategoryName":"SEO"},{"__type":"Nc:SimpleKB:Abstractions:Dtos:CategoryItemDto","ParentCategoryId":93,"TreatAsTopicYN":false,"Description":"","ImageUrl":"","ShortDesc":"","CategoryId":2226,"CategoryName":"Email Migration"},{"__type":"Nc:SimpleKB:Abstractions:Dtos:CategoryItemDto","ParentCategoryId":2211,"TreatAsTopicYN":false,"Description":"","ImageUrl":"","ShortDesc":"","CategoryId":2227,"CategoryName":"SSL Resellers"},{"__type":"Nc:SimpleKB:Abstractions:Dtos:CategoryItemDto","ParentCategoryId":0,"TreatAsTopicYN":true,"Description":"","ImageUrl":"/assets/img/pictograms/150/cloud-red.png","ShortDesc":"","CategoryId":2228,"CategoryName":"Apps","SubCategories":[{"__type":"Nc:SimpleKB:Abstractions:Dtos:CategoryItemDto","ParentCategoryId":2228,"TreatAsTopicYN":false,"Description":"","ImageUrl":"","ShortDesc":"","CategoryId":2251,"CategoryName":"Supersonic CDN"},{"__type":"Nc:SimpleKB:Abstractions:Dtos:CategoryItemDto","ParentCategoryId":2228,"TreatAsTopicYN":false,"Description":"","ImageUrl":"","ShortDesc":"","CategoryId":2298,"CategoryName":"Site Maker"},{"__type":"Nc:SimpleKB:Abstractions:Dtos:CategoryItemDto","ParentCategoryId":2228,"TreatAsTopicYN":false,"Description":"","ImageUrl":"","ShortDesc":"","CategoryId":177,"CategoryName":"Google Workspace (formerly G Suite)"}]},{"__type":"Nc:SimpleKB:Abstractions:Dtos:CategoryItemDto","ParentCategoryId":2211,"TreatAsTopicYN":false,"Description":"","ImageUrl":"","ShortDesc":"","CategoryId":2229,"CategoryName":"Hosting Resellers"},{"__type":"Nc:SimpleKB:Abstractions:Dtos:CategoryItemDto","ParentCategoryId":34,"TreatAsTopicYN":false,"Description":"","ImageUrl":"","ShortDesc":"","CategoryId":2232,"CategoryName":"DNSSEC"},{"__type":"Nc:SimpleKB:Abstractions:Dtos:CategoryItemDto","ParentCategoryId":34,"TreatAsTopicYN":false,"Description":"","ImageUrl":"","ShortDesc":"","CategoryId":2234,"CategoryName":"Google Workspace (formerly G Suite)"},{"__type":"Nc:SimpleKB:Abstractions:Dtos:CategoryItemDto","ParentCategoryId":34,"TreatAsTopicYN":false,"Description":"","ImageUrl":"","ShortDesc":"","CategoryId":2237,"CategoryName":"Host records setup"},{"__type":"Nc:SimpleKB:Abstractions:Dtos:CategoryItemDto","ParentCategoryId":14,"TreatAsTopicYN":false,"Description":"","ImageUrl":"","ShortDesc":"","CategoryId":2238,"CategoryName":"SSL installation errors"},{"__type":"Nc:SimpleKB:Abstractions:Dtos:CategoryItemDto","ParentCategoryId":0,"TreatAsTopicYN":false,"Description":"","ImageUrl":"/assets/img/pictograms/150/easywp-red.png","ShortDesc":"","CategoryId":2239,"CategoryName":"EasyWP","SubCategories":[{"__type":"Nc:SimpleKB:Abstractions:Dtos:CategoryItemDto","ParentCategoryId":2239,"TreatAsTopicYN":false,"Description":"","ImageUrl":"","ShortDesc":"","CategoryId":2280,"CategoryName":"Getting Started"},{"__type":"Nc:SimpleKB:Abstractions:Dtos:CategoryItemDto","ParentCategoryId":2239,"TreatAsTopicYN":false,"Description":"","ImageUrl":"","ShortDesc":"","CategoryId":2279,"CategoryName":"General Information"},{"__type":"Nc:SimpleKB:Abstractions:Dtos:CategoryItemDto","ParentCategoryId":2239,"TreatAsTopicYN":false,"Description":"","ImageUrl":"","ShortDesc":"","CategoryId":2281,"CategoryName":"WordPress Migration"},{"__type":"Nc:SimpleKB:Abstractions:Dtos:CategoryItemDto","ParentCategoryId":2239,"TreatAsTopicYN":false,"Description":"","ImageUrl":"","ShortDesc":"","CategoryId":2282,"CategoryName":"Plugins and Themes"},{"__type":"Nc:SimpleKB:Abstractions:Dtos:CategoryItemDto","ParentCategoryId":2239,"TreatAsTopicYN":false,"Description":"","ImageUrl":"","ShortDesc":"","CategoryId":2284,"CategoryName":"WordPress Management"},{"__type":"Nc:SimpleKB:Abstractions:Dtos:CategoryItemDto","ParentCategoryId":2239,"TreatAsTopicYN":false,"Description":"","ImageUrl":"","ShortDesc":"","CategoryId":2285,"CategoryName":"SFTP and Database access"},{"__type":"Nc:SimpleKB:Abstractions:Dtos:CategoryItemDto","ParentCategoryId":2239,"TreatAsTopicYN":false,"Description":"","ImageUrl":"","ShortDesc":"","CategoryId":2286,"CategoryName":"Domains questions"},{"__type":"Nc:SimpleKB:Abstractions:Dtos:CategoryItemDto","ParentCategoryId":2239,"TreatAsTopicYN":false,"Description":"","ImageUrl":"","ShortDesc":"","CategoryId":2288,"CategoryName":"Billing questions"},{"__type":"Nc:SimpleKB:Abstractions:Dtos:CategoryItemDto","ParentCategoryId":2239,"TreatAsTopicYN":false,"Description":"","ImageUrl":"","ShortDesc":"","CategoryId":2287,"CategoryName":"SSL questions"}]},{"__type":"Nc:SimpleKB:Abstractions:Dtos:CategoryItemDto","ParentCategoryId":2228,"TreatAsTopicYN":false,"Description":"","ImageUrl":"","ShortDesc":"","CategoryId":2251,"CategoryName":"Supersonic CDN"},{"__type":"Nc:SimpleKB:Abstractions:Dtos:CategoryItemDto","ParentCategoryId":12,"TreatAsTopicYN":false,"Description":"","ImageUrl":"","ShortDesc":"","CategoryId":2252,"CategoryName":"InterWorx questions"},{"__type":"Nc:SimpleKB:Abstractions:Dtos:CategoryItemDto","ParentCategoryId":2253,"TreatAsTopicYN":false,"Description":"","ImageUrl":"","ShortDesc":"","CategoryId":2254,"CategoryName":"Domains How-To"},{"__type":"Nc:SimpleKB:Abstractions:Dtos:CategoryItemDto","ParentCategoryId":2253,"TreatAsTopicYN":false,"Description":"","ImageUrl":"","ShortDesc":"","CategoryId":2255,"CategoryName":"Hosting How-To"},{"__type":"Nc:SimpleKB:Abstractions:Dtos:CategoryItemDto","ParentCategoryId":2253,"TreatAsTopicYN":false,"Description":"","ImageUrl":"","ShortDesc":"","CategoryId":2257,"CategoryName":"Sales & Payments How-To"},{"__type":"Nc:SimpleKB:Abstractions:Dtos:CategoryItemDto","ParentCategoryId":2253,"TreatAsTopicYN":false,"Description":"","ImageUrl":"","ShortDesc":"","CategoryId":2258,"CategoryName":"cPanel Email How-To"},{"__type":"Nc:SimpleKB:Abstractions:Dtos:CategoryItemDto","ParentCategoryId":93,"TreatAsTopicYN":false,"Description":"","ImageUrl":"","ShortDesc":"","CategoryId":2260,"CategoryName":"Private Email Contacts and Calendars Setup"},{"__type":"Nc:SimpleKB:Abstractions:Dtos:CategoryItemDto","ParentCategoryId":2253,"TreatAsTopicYN":false,"Description":"","ImageUrl":"","ShortDesc":"","CategoryId":2262,"CategoryName":"EasyWP How-To"},{"__type":"Nc:SimpleKB:Abstractions:Dtos:CategoryItemDto","ParentCategoryId":0,"TreatAsTopicYN":false,"Description":"","ImageUrl":"https://download.namecheap.com/assets/img/domainvault-red@2x.png","ShortDesc":"","CategoryId":2289,"CategoryName":"Domain Vault","SubCategories":[]},{"__type":"Nc:SimpleKB:Abstractions:Dtos:CategoryItemDto","ParentCategoryId":14,"TreatAsTopicYN":false,"Description":"","ImageUrl":"","ShortDesc":"","CategoryId":2290,"CategoryName":"CSR code"},{"__type":"Nc:SimpleKB:Abstractions:Dtos:CategoryItemDto","ParentCategoryId":12,"TreatAsTopicYN":false,"Description":"","ImageUrl":"","ShortDesc":"","CategoryId":2291,"CategoryName":"Webuzo questions"},{"__type":"Nc:SimpleKB:Abstractions:Dtos:CategoryItemDto","ParentCategoryId":2265,"TreatAsTopicYN":false,"Description":"","ImageUrl":"","ShortDesc":"","CategoryId":2292,"CategoryName":"Browser Extensions"},{"__type":"Nc:SimpleKB:Abstractions:Dtos:CategoryItemDto","ParentCategoryId":14,"TreatAsTopicYN":false,"Description":"","ImageUrl":"","ShortDesc":"","CategoryId":2293,"CategoryName":"Automated SSL management"},{"__type":"Nc:SimpleKB:Abstractions:Dtos:CategoryItemDto","ParentCategoryId":2228,"TreatAsTopicYN":false,"Description":"","ImageUrl":"","ShortDesc":"","CategoryId":2298,"CategoryName":"Site Maker"},{"__type":"Nc:SimpleKB:Abstractions:Dtos:CategoryItemDto","ParentCategoryId":12,"TreatAsTopicYN":false,"Description":"","ImageUrl":"","ShortDesc":"","CategoryId":27,"CategoryName":"Getting Started"},{"__type":"Nc:SimpleKB:Abstractions:Dtos:CategoryItemDto","ParentCategoryId":0,"TreatAsTopicYN":false,"Description":"","ImageUrl":"/assets/img/pictograms/150/support-red.png","ShortDesc":"","CategoryId":5,"CategoryName":"General & Support","SubCategories":[]},{"__type":"Nc:SimpleKB:Abstractions:Dtos:CategoryItemDto","ParentCategoryId":2200,"TreatAsTopicYN":false,"Description":"","ImageUrl":"","ShortDesc":"","CategoryId":7,"CategoryName":"Billing FAQ"},{"__type":"Nc:SimpleKB:Abstractions:Dtos:CategoryItemDto","ParentCategoryId":2209,"TreatAsTopicYN":false,"Description":"","ImageUrl":"","ShortDesc":"","CategoryId":8,"CategoryName":"Transfer Information"},{"__type":"Nc:SimpleKB:Abstractions:Dtos:CategoryItemDto","ParentCategoryId":12,"TreatAsTopicYN":false,"Description":"","ImageUrl":"","ShortDesc":"","CategoryId":22,"CategoryName":"Hosting Information"},{"__type":"Nc:SimpleKB:Abstractions:Dtos:CategoryItemDto","ParentCategoryId":14,"TreatAsTopicYN":false,"Description":"","ImageUrl":"","ShortDesc":"","CategoryId":38,"CategoryName":"SSL General"},{"__type":"Nc:SimpleKB:Abstractions:Dtos:CategoryItemDto","ParentCategoryId":9,"TreatAsTopicYN":false,"Description":"","ImageUrl":"","ShortDesc":"","CategoryId":45,"CategoryName":"Account Security"},{"__type":"Nc:SimpleKB:Abstractions:Dtos:CategoryItemDto","ParentCategoryId":34,"TreatAsTopicYN":false,"Description":"","ImageUrl":"","ShortDesc":"","CategoryId":46,"CategoryName":"Domain Management"},{"__type":"Nc:SimpleKB:Abstractions:Dtos:CategoryItemDto","ParentCategoryId":2211,"TreatAsTopicYN":false,"Description":"","ImageUrl":"","ShortDesc":"","CategoryId":63,"CategoryName":"Namecheap API"},{"__type":"Nc:SimpleKB:Abstractions:Dtos:CategoryItemDto","ParentCategoryId":2228,"TreatAsTopicYN":false,"Description":"","ImageUrl":"","ShortDesc":"","CategoryId":177,"CategoryName":"Google Workspace (formerly G Suite)"},{"__type":"Nc:SimpleKB:Abstractions:Dtos:CategoryItemDto","ParentCategoryId":93,"TreatAsTopicYN":false,"Description":"","ImageUrl":"","ShortDesc":"","CategoryId":2179,"CategoryName":"Private Email: General Information"},{"__type":"Nc:SimpleKB:Abstractions:Dtos:CategoryItemDto","ParentCategoryId":2265,"TreatAsTopicYN":false,"Description":"","ImageUrl":"","ShortDesc":"","CategoryId":2274,"CategoryName":"General"},{"__type":"Nc:SimpleKB:Abstractions:Dtos:CategoryItemDto","ParentCategoryId":2239,"TreatAsTopicYN":false,"Description":"","ImageUrl":"","ShortDesc":"","CategoryId":2280,"CategoryName":"Getting Started"},{"__type":"Nc:SimpleKB:Abstractions:Dtos:CategoryItemDto","ParentCategoryId":2239,"TreatAsTopicYN":false,"Description":"","ImageUrl":"","ShortDesc":"","CategoryId":2279,"CategoryName":"General Information"},{"__type":"Nc:SimpleKB:Abstractions:Dtos:CategoryItemDto","ParentCategoryId":93,"TreatAsTopicYN":false,"Description":"","ImageUrl":"","ShortDesc":"","CategoryId":2215,"CategoryName":"Private Email: Mailbox Management"},{"__type":"Nc:SimpleKB:Abstractions:Dtos:CategoryItemDto","ParentCategoryId":2211,"TreatAsTopicYN":false,"Description":"","ImageUrl":"","ShortDesc":"","CategoryId":2196,"CategoryName":"WHMCS module for SSL"},{"__type":"Nc:SimpleKB:Abstractions:Dtos:CategoryItemDto","ParentCategoryId":0,"TreatAsTopicYN":false,"Description":"","ImageUrl":"/assets/img/pictograms/150/savings-red.png","ShortDesc":"","CategoryId":2200,"CategoryName":"Checkout & Billing","SubCategories":[{"__type":"Nc:SimpleKB:Abstractions:Dtos:CategoryItemDto","ParentCategoryId":2200,"TreatAsTopicYN":false,"Description":"","ImageUrl":"","ShortDesc":"","CategoryId":7,"CategoryName":"Billing FAQ"},{"__type":"Nc:SimpleKB:Abstractions:Dtos:CategoryItemDto","ParentCategoryId":2200,"TreatAsTopicYN":false,"Description":"","ImageUrl":"","ShortDesc":"","CategoryId":2201,"CategoryName":"Domains Billing"},{"__type":"Nc:SimpleKB:Abstractions:Dtos:CategoryItemDto","ParentCategoryId":2200,"TreatAsTopicYN":false,"Description":"","ImageUrl":"","ShortDesc":"","CategoryId":21,"CategoryName":"Hosting Billing"},{"__type":"Nc:SimpleKB:Abstractions:Dtos:CategoryItemDto","ParentCategoryId":2200,"TreatAsTopicYN":false,"Description":"","ImageUrl":"","ShortDesc":"","CategoryId":71,"CategoryName":"SSL Certificates Billing"},{"__type":"Nc:SimpleKB:Abstractions:Dtos:CategoryItemDto","ParentCategoryId":2200,"TreatAsTopicYN":false,"Description":"","ImageUrl":"","ShortDesc":"","CategoryId":2177,"CategoryName":"Private Email"}]},{"__type":"Nc:SimpleKB:Abstractions:Dtos:CategoryItemDto","ParentCategoryId":2200,"TreatAsTopicYN":false,"Description":"","ImageUrl":"","ShortDesc":"","CategoryId":2201,"CategoryName":"Domains Billing"},{"__type":"Nc:SimpleKB:Abstractions:Dtos:CategoryItemDto","ParentCategoryId":14,"TreatAsTopicYN":false,"Description":"","ImageUrl":"","ShortDesc":"","CategoryId":67,"CategoryName":"Activation"},{"__type":"Nc:SimpleKB:Abstractions:Dtos:CategoryItemDto","ParentCategoryId":2209,"TreatAsTopicYN":false,"Description":"","ImageUrl":"","ShortDesc":"","CategoryId":83,"CategoryName":"Transfer to Namecheap"},{"__type":"Nc:SimpleKB:Abstractions:Dtos:CategoryItemDto","ParentCategoryId":9,"TreatAsTopicYN":false,"Description":"","ImageUrl":"","ShortDesc":"","CategoryId":43,"CategoryName":"Profile Management"},{"__type":"Nc:SimpleKB:Abstractions:Dtos:CategoryItemDto","ParentCategoryId":34,"TreatAsTopicYN":false,"Description":"","ImageUrl":"","ShortDesc":"","CategoryId":10,"CategoryName":"DNS Questions"},{"__type":"Nc:SimpleKB:Abstractions:Dtos:CategoryItemDto","ParentCategoryId":12,"TreatAsTopicYN":false,"Description":"","ImageUrl":"","ShortDesc":"","CategoryId":29,"CategoryName":"cPanel questions"},{"__type":"Nc:SimpleKB:Abstractions:Dtos:CategoryItemDto","ParentCategoryId":2200,"TreatAsTopicYN":false,"Description":"","ImageUrl":"","ShortDesc":"","CategoryId":21,"CategoryName":"Hosting Billing"},{"__type":"Nc:SimpleKB:Abstractions:Dtos:CategoryItemDto","ParentCategoryId":34,"TreatAsTopicYN":false,"Description":"","ImageUrl":"","ShortDesc":"","CategoryId":11,"CategoryName":"Dynamic DNS"},{"__type":"Nc:SimpleKB:Abstractions:Dtos:CategoryItemDto","ParentCategoryId":9,"TreatAsTopicYN":false,"Description":"","ImageUrl":"","ShortDesc":"","CategoryId":44,"CategoryName":"Account Access"},{"__type":"Nc:SimpleKB:Abstractions:Dtos:CategoryItemDto","ParentCategoryId":2209,"TreatAsTopicYN":false,"Description":"","ImageUrl":"","ShortDesc":"","CategoryId":84,"CategoryName":"Transfer to another provider"},{"__type":"Nc:SimpleKB:Abstractions:Dtos:CategoryItemDto","ParentCategoryId":14,"TreatAsTopicYN":false,"Description":"","ImageUrl":"","ShortDesc":"","CategoryId":68,"CategoryName":"Validation"},{"__type":"Nc:SimpleKB:Abstractions:Dtos:CategoryItemDto","ParentCategoryId":12,"TreatAsTopicYN":false,"Description":"","ImageUrl":"","ShortDesc":"","CategoryId":2182,"CategoryName":"cPanel: Software Management"},{"__type":"Nc:SimpleKB:Abstractions:Dtos:CategoryItemDto","ParentCategoryId":93,"TreatAsTopicYN":false,"Description":"","ImageUrl":"","ShortDesc":"","CategoryId":2214,"CategoryName":"Email Forwarding"},{"__type":"Nc:SimpleKB:Abstractions:Dtos:CategoryItemDto","ParentCategoryId":2265,"TreatAsTopicYN":false,"Description":"","ImageUrl":"","ShortDesc":"","CategoryId":2270,"CategoryName":"Routers"},{"__type":"Nc:SimpleKB:Abstractions:Dtos:CategoryItemDto","ParentCategoryId":2239,"TreatAsTopicYN":false,"Description":"","ImageUrl":"","ShortDesc":"","CategoryId":2281,"CategoryName":"WordPress Migration"},{"__type":"Nc:SimpleKB:Abstractions:Dtos:CategoryItemDto","ParentCategoryId":2239,"TreatAsTopicYN":false,"Description":"","ImageUrl":"","ShortDesc":"","CategoryId":2282,"CategoryName":"Plugins and Themes"},{"__type":"Nc:SimpleKB:Abstractions:Dtos:CategoryItemDto","ParentCategoryId":2265,"TreatAsTopicYN":false,"Description":"","ImageUrl":"","ShortDesc":"","CategoryId":2272,"CategoryName":"TV"},{"__type":"Nc:SimpleKB:Abstractions:Dtos:CategoryItemDto","ParentCategoryId":12,"TreatAsTopicYN":false,"Description":"","ImageUrl":"","ShortDesc":"","CategoryId":2187,"CategoryName":"cPanel: WordPress"},{"__type":"Nc:SimpleKB:Abstractions:Dtos:CategoryItemDto","ParentCategoryId":2209,"TreatAsTopicYN":false,"Description":"","ImageUrl":"","ShortDesc":"","CategoryId":219,"CategoryName":"Canceled Transfers"},{"__type":"Nc:SimpleKB:Abstractions:Dtos:CategoryItemDto","ParentCategoryId":2200,"TreatAsTopicYN":false,"Description":"","ImageUrl":"","ShortDesc":"","CategoryId":71,"CategoryName":"SSL Certificates Billing"},{"__type":"Nc:SimpleKB:Abstractions:Dtos:CategoryItemDto","ParentCategoryId":93,"TreatAsTopicYN":false,"Description":"","ImageUrl":"","ShortDesc":"","CategoryId":2176,"CategoryName":"Private Email: DNS Settings"},{"__type":"Nc:SimpleKB:Abstractions:Dtos:CategoryItemDto","ParentCategoryId":14,"TreatAsTopicYN":false,"Description":"","ImageUrl":"","ShortDesc":"","CategoryId":69,"CategoryName":"Installation"},{"__type":"Nc:SimpleKB:Abstractions:Dtos:CategoryItemDto","ParentCategoryId":0,"TreatAsTopicYN":false,"Description":"","ImageUrl":"/assets/img/pictograms/150/reseller-red.png","ShortDesc":"","CategoryId":34,"CategoryName":"Domains","SubCategories":[{"__type":"Nc:SimpleKB:Abstractions:Dtos:CategoryItemDto","ParentCategoryId":34,"TreatAsTopicYN":false,"Description":"","ImageUrl":"","ShortDesc":"","CategoryId":2232,"CategoryName":"DNSSEC"},{"__type":"Nc:SimpleKB:Abstractions:Dtos:CategoryItemDto","ParentCategoryId":34,"TreatAsTopicYN":false,"Description":"","ImageUrl":"","ShortDesc":"","CategoryId":2234,"CategoryName":"Google Workspace (formerly G Suite)"},{"__type":"Nc:SimpleKB:Abstractions:Dtos:CategoryItemDto","ParentCategoryId":34,"TreatAsTopicYN":false,"Description":"","ImageUrl":"","ShortDesc":"","CategoryId":2237,"CategoryName":"Host records setup"},{"__type":"Nc:SimpleKB:Abstractions:Dtos:CategoryItemDto","ParentCategoryId":34,"TreatAsTopicYN":false,"Description":"","ImageUrl":"","ShortDesc":"","CategoryId":46,"CategoryName":"Domain Management"},{"__type":"Nc:SimpleKB:Abstractions:Dtos:CategoryItemDto","ParentCategoryId":34,"TreatAsTopicYN":false,"Description":"","ImageUrl":"","ShortDesc":"","CategoryId":10,"CategoryName":"DNS Questions"},{"__type":"Nc:SimpleKB:Abstractions:Dtos:CategoryItemDto","ParentCategoryId":34,"TreatAsTopicYN":false,"Description":"","ImageUrl":"","ShortDesc":"","CategoryId":11,"CategoryName":"Dynamic DNS"},{"__type":"Nc:SimpleKB:Abstractions:Dtos:CategoryItemDto","ParentCategoryId":34,"TreatAsTopicYN":false,"Description":"","ImageUrl":"","ShortDesc":"","CategoryId":35,"CategoryName":"Registrations"},{"__type":"Nc:SimpleKB:Abstractions:Dtos:CategoryItemDto","ParentCategoryId":34,"TreatAsTopicYN":false,"Description":"","ImageUrl":"","ShortDesc":"","CategoryId":2207,"CategoryName":"Renewal questions"},{"__type":"Nc:SimpleKB:Abstractions:Dtos:CategoryItemDto","ParentCategoryId":34,"TreatAsTopicYN":false,"Description":"","ImageUrl":"","ShortDesc":"","CategoryId":36,"CategoryName":"Domains with extended attributes"},{"__type":"Nc:SimpleKB:Abstractions:Dtos:CategoryItemDto","ParentCategoryId":34,"TreatAsTopicYN":false,"Description":"","ImageUrl":"","ShortDesc":"","CategoryId":51,"CategoryName":"FreeDNS"},{"__type":"Nc:SimpleKB:Abstractions:Dtos:CategoryItemDto","ParentCategoryId":34,"TreatAsTopicYN":false,"Description":"","ImageUrl":"","ShortDesc":"","CategoryId":15,"CategoryName":"Namecheap Market"},{"__type":"Nc:SimpleKB:Abstractions:Dtos:CategoryItemDto","ParentCategoryId":34,"TreatAsTopicYN":false,"Description":"","ImageUrl":"","ShortDesc":"","CategoryId":2208,"CategoryName":"3rd Party Services Setup"},{"__type":"Nc:SimpleKB:Abstractions:Dtos:CategoryItemDto","ParentCategoryId":34,"TreatAsTopicYN":false,"Description":"","ImageUrl":"","ShortDesc":"","CategoryId":2278,"CategoryName":"Handshake TLDs"}]},{"__type":"Nc:SimpleKB:Abstractions:Dtos:CategoryItemDto","ParentCategoryId":34,"TreatAsTopicYN":false,"Description":"","ImageUrl":"","ShortDesc":"","CategoryId":35,"CategoryName":"Registrations"},{"__type":"Nc:SimpleKB:Abstractions:Dtos:CategoryItemDto","ParentCategoryId":14,"TreatAsTopicYN":false,"Description":"","ImageUrl":"","ShortDesc":"","CategoryId":70,"CategoryName":"Reissuance"},{"__type":"Nc:SimpleKB:Abstractions:Dtos:CategoryItemDto","ParentCategoryId":0,"TreatAsTopicYN":false,"Description":"","ImageUrl":"/assets/img/pictograms/150/protection-red.png","ShortDesc":"","CategoryId":37,"CategoryName":"Domain Privacy Protection","SubCategories":[]},{"__type":"Nc:SimpleKB:Abstractions:Dtos:CategoryItemDto","ParentCategoryId":2200,"TreatAsTopicYN":false,"Description":"","ImageUrl":"","ShortDesc":"","CategoryId":2177,"CategoryName":"Private Email"},{"__type":"Nc:SimpleKB:Abstractions:Dtos:CategoryItemDto","ParentCategoryId":93,"TreatAsTopicYN":false,"Description":"","ImageUrl":"","ShortDesc":"","CategoryId":2178,"CategoryName":"Private Email: Webmail Features"},{"__type":"Nc:SimpleKB:Abstractions:Dtos:CategoryItemDto","ParentCategoryId":34,"TreatAsTopicYN":false,"Description":"","ImageUrl":"","ShortDesc":"","CategoryId":2207,"CategoryName":"Renewal questions"},{"__type":"Nc:SimpleKB:Abstractions:Dtos:CategoryItemDto","ParentCategoryId":12,"TreatAsTopicYN":false,"Description":"","ImageUrl":"","ShortDesc":"","CategoryId":2210,"CategoryName":"cPanel Add-ons"},{"__type":"Nc:SimpleKB:Abstractions:Dtos:CategoryItemDto","ParentCategoryId":2265,"TreatAsTopicYN":false,"Description":"","ImageUrl":"","ShortDesc":"","CategoryId":2273,"CategoryName":"Gaming Consoles"},{"__type":"Nc:SimpleKB:Abstractions:Dtos:CategoryItemDto","ParentCategoryId":2239,"TreatAsTopicYN":false,"Description":"","ImageUrl":"","ShortDesc":"","CategoryId":2284,"CategoryName":"WordPress Management"},{"__type":"Nc:SimpleKB:Abstractions:Dtos:CategoryItemDto","ParentCategoryId":2239,"TreatAsTopicYN":false,"Description":"","ImageUrl":"","ShortDesc":"","CategoryId":2285,"CategoryName":"SFTP and Database access"},{"__type":"Nc:SimpleKB:Abstractions:Dtos:CategoryItemDto","ParentCategoryId":2265,"TreatAsTopicYN":false,"Description":"","ImageUrl":"","ShortDesc":"","CategoryId":2268,"CategoryName":"macOS"},{"__type":"Nc:SimpleKB:Abstractions:Dtos:CategoryItemDto","ParentCategoryId":93,"TreatAsTopicYN":false,"Description":"","ImageUrl":"","ShortDesc":"","CategoryId":2175,"CategoryName":"Private Email: Client Setup"},{"__type":"Nc:SimpleKB:Abstractions:Dtos:CategoryItemDto","ParentCategoryId":0,"TreatAsTopicYN":false,"Description":"","ImageUrl":"/assets/img/pictograms/150/status-red.png","ShortDesc":"","CategoryId":2209,"CategoryName":"Domain Transfers","SubCategories":[{"__type":"Nc:SimpleKB:Abstractions:Dtos:CategoryItemDto","ParentCategoryId":2209,"TreatAsTopicYN":false,"Description":"","ImageUrl":"","ShortDesc":"","CategoryId":8,"CategoryName":"Transfer Information"},{"__type":"Nc:SimpleKB:Abstractions:Dtos:CategoryItemDto","ParentCategoryId":2209,"TreatAsTopicYN":false,"Description":"","ImageUrl":"","ShortDesc":"","CategoryId":83,"CategoryName":"Transfer to Namecheap"},{"__type":"Nc:SimpleKB:Abstractions:Dtos:CategoryItemDto","ParentCategoryId":2209,"TreatAsTopicYN":false,"Description":"","ImageUrl":"","ShortDesc":"","CategoryId":84,"CategoryName":"Transfer to another provider"},{"__type":"Nc:SimpleKB:Abstractions:Dtos:CategoryItemDto","ParentCategoryId":2209,"TreatAsTopicYN":false,"Description":"","ImageUrl":"","ShortDesc":"","CategoryId":219,"CategoryName":"Canceled Transfers"}]},{"__type":"Nc:SimpleKB:Abstractions:Dtos:CategoryItemDto","ParentCategoryId":12,"TreatAsTopicYN":false,"Description":"","ImageUrl":"","ShortDesc":"","CategoryId":48,"CategoryName":"VPS"},{"__type":"Nc:SimpleKB:Abstractions:Dtos:CategoryItemDto","ParentCategoryId":34,"TreatAsTopicYN":false,"Description":"","ImageUrl":"","ShortDesc":"","CategoryId":36,"CategoryName":"Domains with extended attributes"},{"__type":"Nc:SimpleKB:Abstractions:Dtos:CategoryItemDto","ParentCategoryId":0,"TreatAsTopicYN":true,"Description":"","ImageUrl":"/assets/img/pictograms/150/server-red.png","ShortDesc":"","CategoryId":12,"CategoryName":"Hosting","SubCategories":[{"__type":"Nc:SimpleKB:Abstractions:Dtos:CategoryItemDto","ParentCategoryId":12,"TreatAsTopicYN":false,"Description":"","ImageUrl":"","ShortDesc":"","CategoryId":2219,"CategoryName":"PHP Configuration"},{"__type":"Nc:SimpleKB:Abstractions:Dtos:CategoryItemDto","ParentCategoryId":12,"TreatAsTopicYN":false,"Description":"","ImageUrl":"","ShortDesc":"","CategoryId":2225,"CategoryName":"SEO"},{"__type":"Nc:SimpleKB:Abstractions:Dtos:CategoryItemDto","ParentCategoryId":12,"TreatAsTopicYN":false,"Description":"","ImageUrl":"","ShortDesc":"","CategoryId":2252,"CategoryName":"InterWorx questions"},{"__type":"Nc:SimpleKB:Abstractions:Dtos:CategoryItemDto","ParentCategoryId":12,"TreatAsTopicYN":false,"Description":"","ImageUrl":"","ShortDesc":"","CategoryId":2291,"CategoryName":"Webuzo questions"},{"__type":"Nc:SimpleKB:Abstractions:Dtos:CategoryItemDto","ParentCategoryId":12,"TreatAsTopicYN":false,"Description":"","ImageUrl":"","ShortDesc":"","CategoryId":27,"CategoryName":"Getting Started"},{"__type":"Nc:SimpleKB:Abstractions:Dtos:CategoryItemDto","ParentCategoryId":12,"TreatAsTopicYN":false,"Description":"","ImageUrl":"","ShortDesc":"","CategoryId":22,"CategoryName":"Hosting Information"},{"__type":"Nc:SimpleKB:Abstractions:Dtos:CategoryItemDto","ParentCategoryId":12,"TreatAsTopicYN":false,"Description":"","ImageUrl":"","ShortDesc":"","CategoryId":29,"CategoryName":"cPanel questions"},{"__type":"Nc:SimpleKB:Abstractions:Dtos:CategoryItemDto","ParentCategoryId":12,"TreatAsTopicYN":false,"Description":"","ImageUrl":"","ShortDesc":"","CategoryId":2182,"CategoryName":"cPanel: Software Management"},{"__type":"Nc:SimpleKB:Abstractions:Dtos:CategoryItemDto","ParentCategoryId":12,"TreatAsTopicYN":false,"Description":"","ImageUrl":"","ShortDesc":"","CategoryId":2187,"CategoryName":"cPanel: WordPress"},{"__type":"Nc:SimpleKB:Abstractions:Dtos:CategoryItemDto","ParentCategoryId":12,"TreatAsTopicYN":false,"Description":"","ImageUrl":"","ShortDesc":"","CategoryId":2210,"CategoryName":"cPanel Add-ons"},{"__type":"Nc:SimpleKB:Abstractions:Dtos:CategoryItemDto","ParentCategoryId":12,"TreatAsTopicYN":false,"Description":"","ImageUrl":"","ShortDesc":"","CategoryId":48,"CategoryName":"VPS"},{"__type":"Nc:SimpleKB:Abstractions:Dtos:CategoryItemDto","ParentCategoryId":12,"TreatAsTopicYN":false,"Description":"","ImageUrl":"","ShortDesc":"","CategoryId":2188,"CategoryName":"Dedicated Server"},{"__type":"Nc:SimpleKB:Abstractions:Dtos:CategoryItemDto","ParentCategoryId":12,"TreatAsTopicYN":false,"Description":"","ImageUrl":"","ShortDesc":"","CategoryId":30,"CategoryName":"WHM questions"},{"__type":"Nc:SimpleKB:Abstractions:Dtos:CategoryItemDto","ParentCategoryId":12,"TreatAsTopicYN":false,"Description":"","ImageUrl":"","ShortDesc":"","CategoryId":32,"CategoryName":"DNS settings"},{"__type":"Nc:SimpleKB:Abstractions:Dtos:CategoryItemDto","ParentCategoryId":12,"TreatAsTopicYN":false,"Description":"","ImageUrl":"","ShortDesc":"","CategoryId":103,"CategoryName":"LVE (CloudLinux)"},{"__type":"Nc:SimpleKB:Abstractions:Dtos:CategoryItemDto","ParentCategoryId":12,"TreatAsTopicYN":false,"Description":"","ImageUrl":"","ShortDesc":"","CategoryId":89,"CategoryName":"SSH Access"},{"__type":"Nc:SimpleKB:Abstractions:Dtos:CategoryItemDto","ParentCategoryId":12,"TreatAsTopicYN":false,"Description":"","ImageUrl":"","ShortDesc":"","CategoryId":205,"CategoryName":"FTP questions"},{"__type":"Nc:SimpleKB:Abstractions:Dtos:CategoryItemDto","ParentCategoryId":12,"TreatAsTopicYN":false,"Description":"","ImageUrl":"","ShortDesc":"","CategoryId":2180,"CategoryName":"MySQL questions"},{"__type":"Nc:SimpleKB:Abstractions:Dtos:CategoryItemDto","ParentCategoryId":12,"TreatAsTopicYN":false,"Description":"","ImageUrl":"","ShortDesc":"","CategoryId":2199,"CategoryName":"Hosting Migration"},{"__type":"Nc:SimpleKB:Abstractions:Dtos:CategoryItemDto","ParentCategoryId":12,"TreatAsTopicYN":false,"Description":"","ImageUrl":"","ShortDesc":"","CategoryId":2194,"CategoryName":"Tips & Tricks"},{"__type":"Nc:SimpleKB:Abstractions:Dtos:CategoryItemDto","ParentCategoryId":12,"TreatAsTopicYN":false,"Description":"","ImageUrl":"","ShortDesc":"","CategoryId":239,"CategoryName":"WHMCS"},{"__type":"Nc:SimpleKB:Abstractions:Dtos:CategoryItemDto","ParentCategoryId":12,"TreatAsTopicYN":false,"Description":"","ImageUrl":"","ShortDesc":"","CategoryId":33,"CategoryName":"SSL Installation"}]},{"__type":"Nc:SimpleKB:Abstractions:Dtos:CategoryItemDto","ParentCategoryId":93,"TreatAsTopicYN":false,"Description":"","ImageUrl":"","ShortDesc":"","CategoryId":2171,"CategoryName":"Private Email: Active Sync (Exchange) Setup"},{"__type":"Nc:SimpleKB:Abstractions:Dtos:CategoryItemDto","ParentCategoryId":12,"TreatAsTopicYN":false,"Description":"","ImageUrl":"","ShortDesc":"","CategoryId":2188,"CategoryName":"Dedicated Server"},{"__type":"Nc:SimpleKB:Abstractions:Dtos:CategoryItemDto","ParentCategoryId":2265,"TreatAsTopicYN":false,"Description":"","ImageUrl":"","ShortDesc":"","CategoryId":2269,"CategoryName":"iOS"},{"__type":"Nc:SimpleKB:Abstractions:Dtos:CategoryItemDto","ParentCategoryId":2239,"TreatAsTopicYN":false,"Description":"","ImageUrl":"","ShortDesc":"","CategoryId":2286,"CategoryName":"Domains questions"},{"__type":"Nc:SimpleKB:Abstractions:Dtos:CategoryItemDto","ParentCategoryId":2239,"TreatAsTopicYN":false,"Description":"","ImageUrl":"","ShortDesc":"","CategoryId":2288,"CategoryName":"Billing questions"},{"__type":"Nc:SimpleKB:Abstractions:Dtos:CategoryItemDto","ParentCategoryId":2265,"TreatAsTopicYN":false,"Description":"","ImageUrl":"","ShortDesc":"","CategoryId":2271,"CategoryName":"Linux"},{"__type":"Nc:SimpleKB:Abstractions:Dtos:CategoryItemDto","ParentCategoryId":12,"TreatAsTopicYN":false,"Description":"","ImageUrl":"","ShortDesc":"","CategoryId":30,"CategoryName":"WHM questions"},{"__type":"Nc:SimpleKB:Abstractions:Dtos:CategoryItemDto","ParentCategoryId":93,"TreatAsTopicYN":false,"Description":"","ImageUrl":"","ShortDesc":"","CategoryId":31,"CategoryName":"cPanel Email FAQs"},{"__type":"Nc:SimpleKB:Abstractions:Dtos:CategoryItemDto","ParentCategoryId":34,"TreatAsTopicYN":false,"Description":"","ImageUrl":"","ShortDesc":"","CategoryId":51,"CategoryName":"FreeDNS"},{"__type":"Nc:SimpleKB:Abstractions:Dtos:CategoryItemDto","ParentCategoryId":0,"TreatAsTopicYN":false,"Description":"","ImageUrl":"/assets/img/pictograms/150/email-red.png","ShortDesc":"","CategoryId":93,"CategoryName":"Email service","SubCategories":[{"__type":"Nc:SimpleKB:Abstractions:Dtos:CategoryItemDto","ParentCategoryId":93,"TreatAsTopicYN":false,"Description":"","ImageUrl":"","ShortDesc":"","CategoryId":2216,"CategoryName":"Spam Protection"},{"__type":"Nc:SimpleKB:Abstractions:Dtos:CategoryItemDto","ParentCategoryId":93,"TreatAsTopicYN":false,"Description":"","ImageUrl":"","ShortDesc":"","CategoryId":2226,"CategoryName":"Email Migration"},{"__type":"Nc:SimpleKB:Abstractions:Dtos:CategoryItemDto","ParentCategoryId":93,"TreatAsTopicYN":false,"Description":"","ImageUrl":"","ShortDesc":"","CategoryId":2260,"CategoryName":"Private Email Contacts and Calendars Setup"},{"__type":"Nc:SimpleKB:Abstractions:Dtos:CategoryItemDto","ParentCategoryId":93,"TreatAsTopicYN":false,"Description":"","ImageUrl":"","ShortDesc":"","CategoryId":2179,"CategoryName":"Private Email: General Information"},{"__type":"Nc:SimpleKB:Abstractions:Dtos:CategoryItemDto","ParentCategoryId":93,"TreatAsTopicYN":false,"Description":"","ImageUrl":"","ShortDesc":"","CategoryId":2215,"CategoryName":"Private Email: Mailbox Management"},{"__type":"Nc:SimpleKB:Abstractions:Dtos:CategoryItemDto","ParentCategoryId":93,"TreatAsTopicYN":false,"Description":"","ImageUrl":"","ShortDesc":"","CategoryId":2214,"CategoryName":"Email Forwarding"},{"__type":"Nc:SimpleKB:Abstractions:Dtos:CategoryItemDto","ParentCategoryId":93,"TreatAsTopicYN":false,"Description":"","ImageUrl":"","ShortDesc":"","CategoryId":2176,"CategoryName":"Private Email: DNS Settings"},{"__type":"Nc:SimpleKB:Abstractions:Dtos:CategoryItemDto","ParentCategoryId":93,"TreatAsTopicYN":false,"Description":"","ImageUrl":"","ShortDesc":"","CategoryId":2178,"CategoryName":"Private Email: Webmail Features"},{"__type":"Nc:SimpleKB:Abstractions:Dtos:CategoryItemDto","ParentCategoryId":93,"TreatAsTopicYN":false,"Description":"","ImageUrl":"","ShortDesc":"","CategoryId":2175,"CategoryName":"Private Email: Client Setup"},{"__type":"Nc:SimpleKB:Abstractions:Dtos:CategoryItemDto","ParentCategoryId":93,"TreatAsTopicYN":false,"Description":"","ImageUrl":"","ShortDesc":"","CategoryId":2171,"CategoryName":"Private Email: Active Sync (Exchange) Setup"},{"__type":"Nc:SimpleKB:Abstractions:Dtos:CategoryItemDto","ParentCategoryId":93,"TreatAsTopicYN":false,"Description":"","ImageUrl":"","ShortDesc":"","CategoryId":31,"CategoryName":"cPanel Email FAQs"},{"__type":"Nc:SimpleKB:Abstractions:Dtos:CategoryItemDto","ParentCategoryId":93,"TreatAsTopicYN":false,"Description":"","ImageUrl":"","ShortDesc":"","CategoryId":2186,"CategoryName":"cPanel Email: Client Setup"},{"__type":"Nc:SimpleKB:Abstractions:Dtos:CategoryItemDto","ParentCategoryId":93,"TreatAsTopicYN":false,"Description":"","ImageUrl":"","ShortDesc":"","CategoryId":2204,"CategoryName":"Private Email: Video Overview"}]},{"__type":"Nc:SimpleKB:Abstractions:Dtos:CategoryItemDto","ParentCategoryId":12,"TreatAsTopicYN":false,"Description":"","ImageUrl":"","ShortDesc":"","CategoryId":32,"CategoryName":"DNS settings"},{"__type":"Nc:SimpleKB:Abstractions:Dtos:CategoryItemDto","ParentCategoryId":34,"TreatAsTopicYN":false,"Description":"","ImageUrl":"","ShortDesc":"","CategoryId":15,"CategoryName":"Namecheap Market"},{"__type":"Nc:SimpleKB:Abstractions:Dtos:CategoryItemDto","ParentCategoryId":93,"TreatAsTopicYN":false,"Description":"","ImageUrl":"","ShortDesc":"","CategoryId":2186,"CategoryName":"cPanel Email: Client Setup"},{"__type":"Nc:SimpleKB:Abstractions:Dtos:CategoryItemDto","ParentCategoryId":2265,"TreatAsTopicYN":false,"Description":"","ImageUrl":"","ShortDesc":"","CategoryId":2266,"CategoryName":"Windows"},{"__type":"Nc:SimpleKB:Abstractions:Dtos:CategoryItemDto","ParentCategoryId":2239,"TreatAsTopicYN":false,"Description":"","ImageUrl":"","ShortDesc":"","CategoryId":2287,"CategoryName":"SSL questions"},{"__type":"Nc:SimpleKB:Abstractions:Dtos:CategoryItemDto","ParentCategoryId":2265,"TreatAsTopicYN":false,"Description":"","ImageUrl":"","ShortDesc":"","CategoryId":2267,"CategoryName":"Android"},{"__type":"Nc:SimpleKB:Abstractions:Dtos:CategoryItemDto","ParentCategoryId":34,"TreatAsTopicYN":false,"Description":"","ImageUrl":"","ShortDesc":"","CategoryId":2208,"CategoryName":"3rd Party Services Setup"},{"__type":"Nc:SimpleKB:Abstractions:Dtos:CategoryItemDto","ParentCategoryId":93,"TreatAsTopicYN":false,"Description":"","ImageUrl":"","ShortDesc":"","CategoryId":2204,"CategoryName":"Private Email: Video Overview"},{"__type":"Nc:SimpleKB:Abstractions:Dtos:CategoryItemDto","ParentCategoryId":0,"TreatAsTopicYN":false,"Description":"","ImageUrl":"/assets/img/pictograms/150/security-red.png","ShortDesc":"","CategoryId":14,"CategoryName":"SSL Certificates","SubCategories":[{"__type":"Nc:SimpleKB:Abstractions:Dtos:CategoryItemDto","ParentCategoryId":14,"TreatAsTopicYN":false,"Description":"","ImageUrl":"","ShortDesc":"","CategoryId":2217,"CategoryName":"Renewal"},{"__type":"Nc:SimpleKB:Abstractions:Dtos:CategoryItemDto","ParentCategoryId":14,"TreatAsTopicYN":false,"Description":"","ImageUrl":"","ShortDesc":"","CategoryId":2218,"CategoryName":"cPanel SSL Plugin"},{"__type":"Nc:SimpleKB:Abstractions:Dtos:CategoryItemDto","ParentCategoryId":14,"TreatAsTopicYN":false,"Description":"","ImageUrl":"","ShortDesc":"","CategoryId":2221,"CategoryName":"Multi-Domain SSL Certificates"},{"__type":"Nc:SimpleKB:Abstractions:Dtos:CategoryItemDto","ParentCategoryId":14,"TreatAsTopicYN":false,"Description":"","ImageUrl":"","ShortDesc":"","CategoryId":2222,"CategoryName":"Cancellation"},{"__type":"Nc:SimpleKB:Abstractions:Dtos:CategoryItemDto","ParentCategoryId":14,"TreatAsTopicYN":false,"Description":"","ImageUrl":"","ShortDesc":"","CategoryId":2223,"CategoryName":"Browser errors"},{"__type":"Nc:SimpleKB:Abstractions:Dtos:CategoryItemDto","ParentCategoryId":14,"TreatAsTopicYN":false,"Description":"","ImageUrl":"","ShortDesc":"","CategoryId":2224,"CategoryName":"Site Seal, Logo"},{"__type":"Nc:SimpleKB:Abstractions:Dtos:CategoryItemDto","ParentCategoryId":14,"TreatAsTopicYN":false,"Description":"","ImageUrl":"","ShortDesc":"","CategoryId":2238,"CategoryName":"SSL installation errors"},{"__type":"Nc:SimpleKB:Abstractions:Dtos:CategoryItemDto","ParentCategoryId":14,"TreatAsTopicYN":false,"Description":"","ImageUrl":"","ShortDesc":"","CategoryId":2290,"CategoryName":"CSR code"},{"__type":"Nc:SimpleKB:Abstractions:Dtos:CategoryItemDto","ParentCategoryId":14,"TreatAsTopicYN":false,"Description":"","ImageUrl":"","ShortDesc":"","CategoryId":2293,"CategoryName":"Automated SSL management"},{"__type":"Nc:SimpleKB:Abstractions:Dtos:CategoryItemDto","ParentCategoryId":14,"TreatAsTopicYN":false,"Description":"","ImageUrl":"","ShortDesc":"","CategoryId":38,"CategoryName":"SSL General"},{"__type":"Nc:SimpleKB:Abstractions:Dtos:CategoryItemDto","ParentCategoryId":14,"TreatAsTopicYN":false,"Description":"","ImageUrl":"","ShortDesc":"","CategoryId":67,"CategoryName":"Activation"},{"__type":"Nc:SimpleKB:Abstractions:Dtos:CategoryItemDto","ParentCategoryId":14,"TreatAsTopicYN":false,"Description":"","ImageUrl":"","ShortDesc":"","CategoryId":68,"CategoryName":"Validation"},{"__type":"Nc:SimpleKB:Abstractions:Dtos:CategoryItemDto","ParentCategoryId":14,"TreatAsTopicYN":false,"Description":"","ImageUrl":"","ShortDesc":"","CategoryId":69,"CategoryName":"Installation"},{"__type":"Nc:SimpleKB:Abstractions:Dtos:CategoryItemDto","ParentCategoryId":14,"TreatAsTopicYN":false,"Description":"","ImageUrl":"","ShortDesc":"","CategoryId":70,"CategoryName":"Reissuance"}]},{"__type":"Nc:SimpleKB:Abstractions:Dtos:CategoryItemDto","ParentCategoryId":0,"TreatAsTopicYN":true,"Description":"","ImageUrl":"/assets/img/pictograms/150/performance-red.png","ShortDesc":"","CategoryId":9,"CategoryName":"My Account","SubCategories":[{"__type":"Nc:SimpleKB:Abstractions:Dtos:CategoryItemDto","ParentCategoryId":9,"TreatAsTopicYN":false,"Description":"","ImageUrl":"","ShortDesc":"","CategoryId":45,"CategoryName":"Account Security"},{"__type":"Nc:SimpleKB:Abstractions:Dtos:CategoryItemDto","ParentCategoryId":9,"TreatAsTopicYN":false,"Description":"","ImageUrl":"","ShortDesc":"","CategoryId":43,"CategoryName":"Profile Management"},{"__type":"Nc:SimpleKB:Abstractions:Dtos:CategoryItemDto","ParentCategoryId":9,"TreatAsTopicYN":false,"Description":"","ImageUrl":"","ShortDesc":"","CategoryId":44,"CategoryName":"Account Access"}]},{"__type":"Nc:SimpleKB:Abstractions:Dtos:CategoryItemDto","ParentCategoryId":34,"TreatAsTopicYN":false,"Description":"","ImageUrl":"","ShortDesc":"","CategoryId":2278,"CategoryName":"Handshake TLDs"},{"__type":"Nc:SimpleKB:Abstractions:Dtos:CategoryItemDto","ParentCategoryId":12,"TreatAsTopicYN":false,"Description":"","ImageUrl":"","ShortDesc":"","CategoryId":103,"CategoryName":"LVE (CloudLinux)"},{"__type":"Nc:SimpleKB:Abstractions:Dtos:CategoryItemDto","ParentCategoryId":0,"TreatAsTopicYN":false,"Description":"","ImageUrl":"/assets/img/pictograms/150/affiliates-red.png","ShortDesc":"","CategoryId":55,"CategoryName":"Affiliates","SubCategories":[]},{"__type":"Nc:SimpleKB:Abstractions:Dtos:CategoryItemDto","ParentCategoryId":12,"TreatAsTopicYN":false,"Description":"","ImageUrl":"","ShortDesc":"","CategoryId":89,"CategoryName":"SSH Access"},{"__type":"Nc:SimpleKB:Abstractions:Dtos:CategoryItemDto","ParentCategoryId":0,"TreatAsTopicYN":false,"Description":"","ImageUrl":"/assets/img/pictograms/150/tools-red.png","ShortDesc":"","CategoryId":2211,"CategoryName":"API & Resellers","SubCategories":[{"__type":"Nc:SimpleKB:Abstractions:Dtos:CategoryItemDto","ParentCategoryId":2211,"TreatAsTopicYN":false,"Description":"","ImageUrl":"","ShortDesc":"","CategoryId":2227,"CategoryName":"SSL Resellers"},{"__type":"Nc:SimpleKB:Abstractions:Dtos:CategoryItemDto","ParentCategoryId":2211,"TreatAsTopicYN":false,"Description":"","ImageUrl":"","ShortDesc":"","CategoryId":2229,"CategoryName":"Hosting Resellers"},{"__type":"Nc:SimpleKB:Abstractions:Dtos:CategoryItemDto","ParentCategoryId":2211,"TreatAsTopicYN":false,"Description":"","ImageUrl":"","ShortDesc":"","CategoryId":63,"CategoryName":"Namecheap API"},{"__type":"Nc:SimpleKB:Abstractions:Dtos:CategoryItemDto","ParentCategoryId":2211,"TreatAsTopicYN":false,"Description":"","ImageUrl":"","ShortDesc":"","CategoryId":2196,"CategoryName":"WHMCS module for SSL"}]},{"__type":"Nc:SimpleKB:Abstractions:Dtos:CategoryItemDto","ParentCategoryId":0,"TreatAsTopicYN":false,"Description":"","ImageUrl":"/assets/img/pictograms/150/timer-red.png","ShortDesc":"","CategoryId":2212,"CategoryName":"Legacy Products","SubCategories":[]},{"__type":"Nc:SimpleKB:Abstractions:Dtos:CategoryItemDto","ParentCategoryId":12,"TreatAsTopicYN":false,"Description":"","ImageUrl":"","ShortDesc":"","CategoryId":205,"CategoryName":"FTP questions"},{"__type":"Nc:SimpleKB:Abstractions:Dtos:CategoryItemDto","ParentCategoryId":12,"TreatAsTopicYN":false,"Description":"","ImageUrl":"","ShortDesc":"","CategoryId":2180,"CategoryName":"MySQL questions"},{"__type":"Nc:SimpleKB:Abstractions:Dtos:CategoryItemDto","ParentCategoryId":12,"TreatAsTopicYN":false,"Description":"","ImageUrl":"","ShortDesc":"","CategoryId":2199,"CategoryName":"Hosting Migration"},{"__type":"Nc:SimpleKB:Abstractions:Dtos:CategoryItemDto","ParentCategoryId":0,"TreatAsTopicYN":false,"Description":"","ImageUrl":"/assets/img/pictograms/150/premiumdns-red.png","ShortDesc":"","CategoryId":2231,"CategoryName":"PremiumDNS","SubCategories":[]},{"__type":"Nc:SimpleKB:Abstractions:Dtos:CategoryItemDto","ParentCategoryId":12,"TreatAsTopicYN":false,"Description":"","ImageUrl":"","ShortDesc":"","CategoryId":2194,"CategoryName":"Tips & Tricks"},{"__type":"Nc:SimpleKB:Abstractions:Dtos:CategoryItemDto","ParentCategoryId":0,"TreatAsTopicYN":false,"Description":"","ImageUrl":"https://static.nc-img.com/live-resource/icons/knowledgebase/fastVPN_icon-150px.png","ShortDesc":"","CategoryId":2265,"CategoryName":"FastVPN","SubCategories":[{"__type":"Nc:SimpleKB:Abstractions:Dtos:CategoryItemDto","ParentCategoryId":2265,"TreatAsTopicYN":false,"Description":"","ImageUrl":"","ShortDesc":"","CategoryId":2292,"CategoryName":"Browser Extensions"},{"__type":"Nc:SimpleKB:Abstractions:Dtos:CategoryItemDto","ParentCategoryId":2265,"TreatAsTopicYN":false,"Description":"","ImageUrl":"","ShortDesc":"","CategoryId":2274,"CategoryName":"General"},{"__type":"Nc:SimpleKB:Abstractions:Dtos:CategoryItemDto","ParentCategoryId":2265,"TreatAsTopicYN":false,"Description":"","ImageUrl":"","ShortDesc":"","CategoryId":2270,"CategoryName":"Routers"},{"__type":"Nc:SimpleKB:Abstractions:Dtos:CategoryItemDto","ParentCategoryId":2265,"TreatAsTopicYN":false,"Description":"","ImageUrl":"","ShortDesc":"","CategoryId":2272,"CategoryName":"TV"},{"__type":"Nc:SimpleKB:Abstractions:Dtos:CategoryItemDto","ParentCategoryId":2265,"TreatAsTopicYN":false,"Description":"","ImageUrl":"","ShortDesc":"","CategoryId":2273,"CategoryName":"Gaming Consoles"},{"__type":"Nc:SimpleKB:Abstractions:Dtos:CategoryItemDto","ParentCategoryId":2265,"TreatAsTopicYN":false,"Description":"","ImageUrl":"","ShortDesc":"","CategoryId":2268,"CategoryName":"macOS"},{"__type":"Nc:SimpleKB:Abstractions:Dtos:CategoryItemDto","ParentCategoryId":2265,"TreatAsTopicYN":false,"Description":"","ImageUrl":"","ShortDesc":"","CategoryId":2269,"CategoryName":"iOS"},{"__type":"Nc:SimpleKB:Abstractions:Dtos:CategoryItemDto","ParentCategoryId":2265,"TreatAsTopicYN":false,"Description":"","ImageUrl":"","ShortDesc":"","CategoryId":2271,"CategoryName":"Linux"},{"__type":"Nc:SimpleKB:Abstractions:Dtos:CategoryItemDto","ParentCategoryId":2265,"TreatAsTopicYN":false,"Description":"","ImageUrl":"","ShortDesc":"","CategoryId":2266,"CategoryName":"Windows"},{"__type":"Nc:SimpleKB:Abstractions:Dtos:CategoryItemDto","ParentCategoryId":2265,"TreatAsTopicYN":false,"Description":"","ImageUrl":"","ShortDesc":"","CategoryId":2267,"CategoryName":"Android"}]},{"__type":"Nc:SimpleKB:Abstractions:Dtos:CategoryItemDto","ParentCategoryId":12,"TreatAsTopicYN":false,"Description":"","ImageUrl":"","ShortDesc":"","CategoryId":239,"CategoryName":"WHMCS"},{"__type":"Nc:SimpleKB:Abstractions:Dtos:CategoryItemDto","ParentCategoryId":12,"TreatAsTopicYN":false,"Description":"","ImageUrl":"","ShortDesc":"","CategoryId":33,"CategoryName":"SSL Installation"}],"status":200,"statusText":"OK"}}

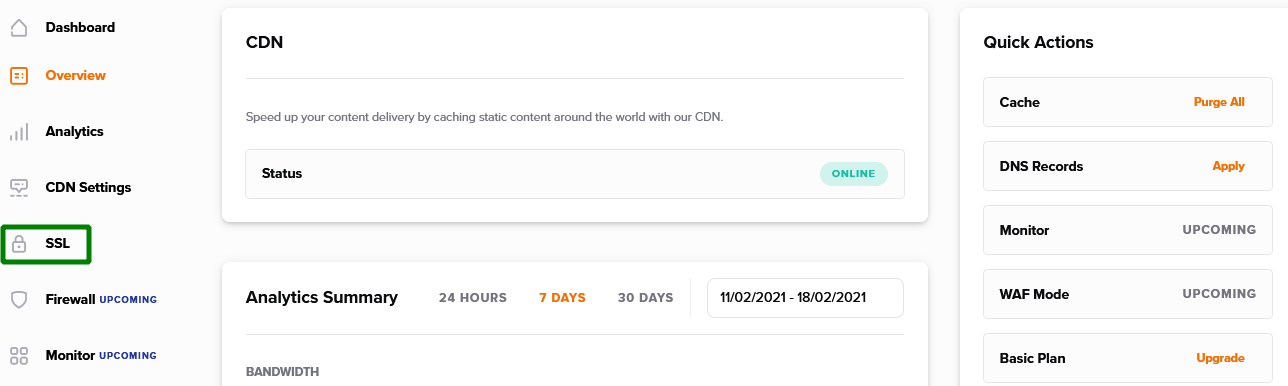
2. In your Supersonic CDN Dashboard, click the SSL option in the left hand menu:
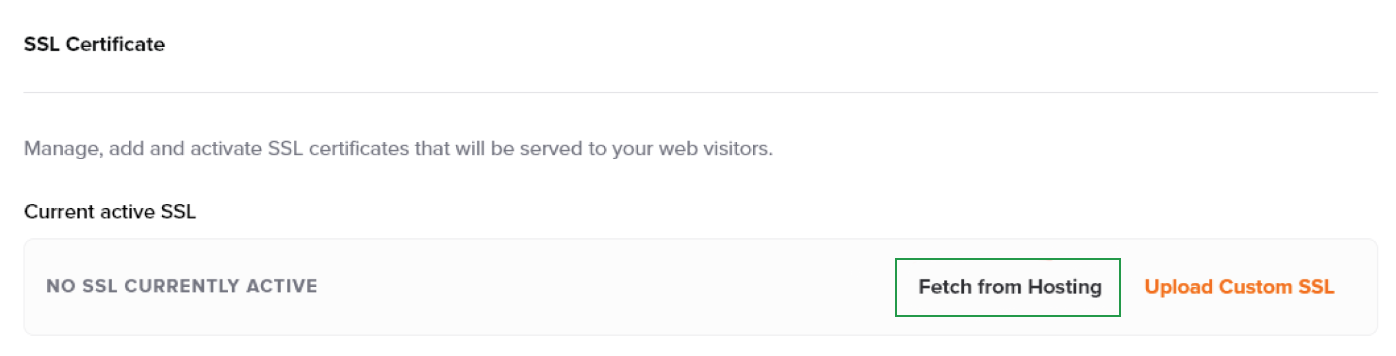
3. If you use CDN along with our Shared hosting and there's an SSL certificate already installed in your hosting cPanel, it can be easily enabled for your CDN in one click by using the Fetch from Hosting option in the Current active SSL section:
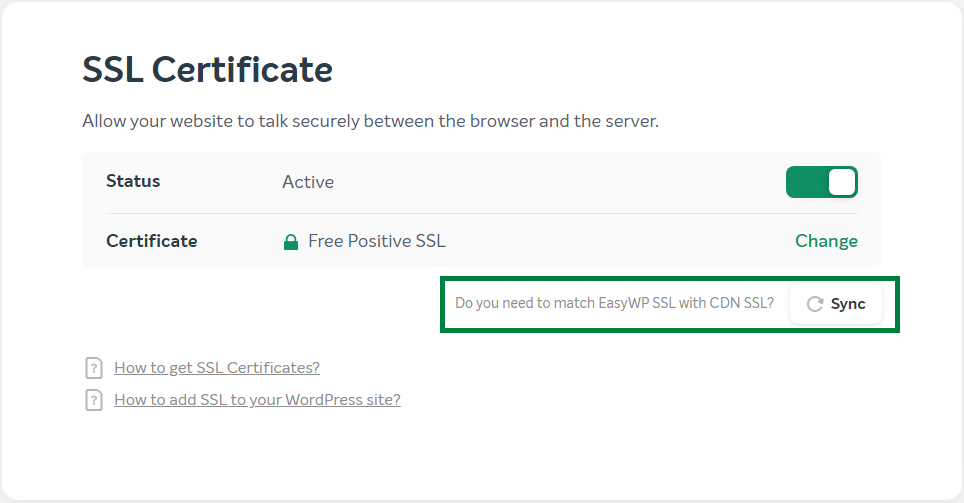
In case you have an EasyWP website with installed SSL on it, and you use Supersonic CDN as well, go to your EasyWP Dashboard >> Overview >> Website section >> click Manage next to SSL Certificate >> click the Sync button on the certificate status page:
2. On the next page, you’ll see three fields to fill out. These are where you’ll paste your unique codes for the SSL Certificate, Private Key and CA Bundle.
Open these files on your PC using text editor (e.g. Notepad), and paste in the text codes.
Note: Any plain text format with the proper code will work (.txt, .crt, .ca-bundle, .key, .pem).
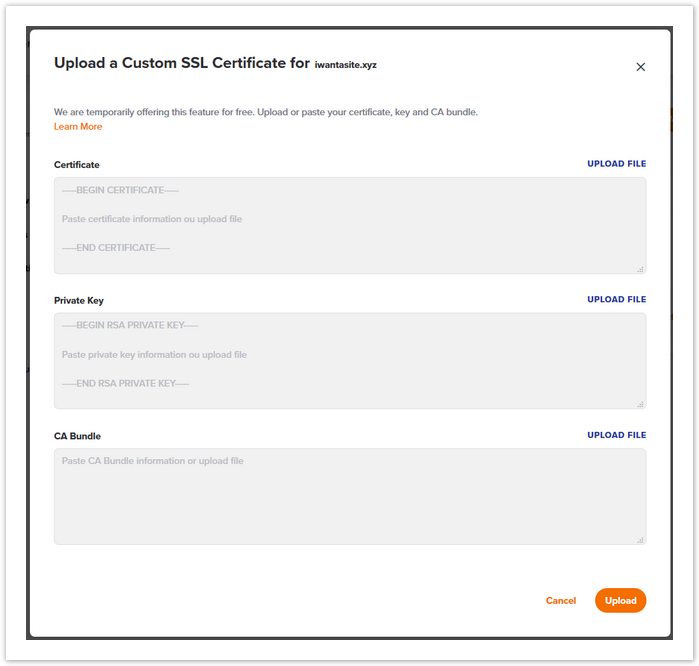
Alternatively, the file codes for your SSL Certificate, Private Key and CA Bundle can be uploaded using Upload File option. Click this button and select the correct file from the pop-up window. The code will automatically be added to the field.
3. Then click the Upload button.
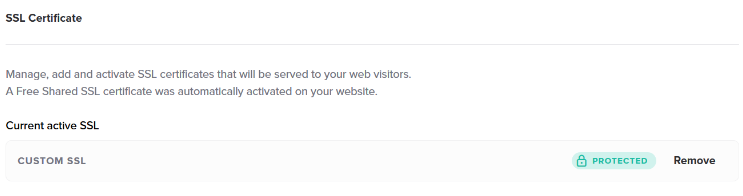
You’ll see the domains that the custom SSL secures in SSL >> Current active SSL:
That's it!
Unlike most scenarios where redirecting to the secured https:// version of a website is a separate step, the Namecheap Supersonic CDN platform automatically does this for you, so you’re all set.
If you need any further help during the SSL installation, please contact our SSL Support Team. Learn why all online business can enjoy the benefits of a CDN.
Need help? We're always here for you.