If you wish to transfer your website to Namecheap, your hosting plan with the old service provider should be active for another 3 days at least, as it will allow you to avoid downtime during the transfer. In order to transfer your WordPress site from another provider to us, you will need to perform two main steps:
-
Transfer your files/databases to your hosting account with Namecheap, adjust necessary configuration settings.
- Point nameservers to the Namecheap hosting DNS system.
Note that you may change your nameservers before or after transferring content (it’s up to you), but we strongly suggest you change the nameservers after the content transfer and configuration are completed.
If you do have cPanel with your former hosting provider, we suggest that you follow the instructions from
this article.
If you do not have cPanel with your current hosting provider, you will need to proceed with the following steps:
1. Sign in to your hosting account with your former provider and navigate to the
folder where you have your WordPress website is installed.
2. Choose all WordPress-files and
download them to your PC:

3. Download a
MySQL database that is used for your WordPress blog in question. If you face any difficulties getting your database from your former provider, we suggest you contact their support and ask them to provide you with the MySQL database.
4. Connect to your hosting account with Namecheap via
FTP. We have a separate
guide that will be helpful for you during this process. Choose the folder for your domain and
upload WordPress files from your former hosting provider that were saved on your PC at step 1.
If you transfer the WordPress installation for your main domain with us, you need to upload files to /home/cpanelusername/public_html/
If you transfer the WordPress installation for another domain, first of all, make sure this domain is added to your Namecheap hosting account as an
addon. This can be checked via the
Domains menu of your cPanel account > look for the domain name in question in the list of all the domains added to your Namecheap hosting package.
If the needed domain is not added to your cPanel account yet, follow the steps from this
guide to create an addon domain.
Once done, it is needed to import the website files to the addon domain root folder. It usually looks like this:
/home/cpanelusername/addondomain/.
The root folder of the addon domain can be checked in the "Domains" cPanel menu > look for the domain name in question > the folder where the website files should be imported will be located under the "
Document Root" column. Click on it and you'll be redirected to the corresponding folder inside the "File Manager" menu automatically.
5. After the website files are uploaded, it's time to connect your WordPress installation to the database. To do so, create a new database and database user in your cPanel account.
This tutorial will help you.
6. Once the database and its user are created, you need to import the content from your former host into it.
NOTE: If the database in question exceeds the 1 GB size, refer to this guide.
7. After the database creation and import are completed, navigate to the root folder of your WordPress installation in the File Manager menu of your cPanel account:

8. In the installation root folder, choose the wp-config.php file, right-click on it and press Edit:

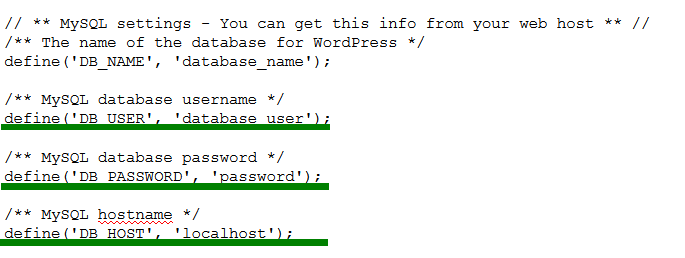
9. Fill in the lines with the appropriate database name, database user and password of the database that has been created and imported before as shown in the screenshot. The MySQL hostname should be localhost. Once the changes are made, save changes:
10. Make sure the domain name is pointed to the Namecheap hosting DNS system.
That's it!
Need any help? Contact our HelpDesk
