The Namecheap API allows you to build web and desktop applications that integrate with your Namecheap account. It enables you to programmatically perform operations such as domain search, domain registration, SSL purchase etc., from within your application.
With Namecheap API you can:
-
(a) Sell domains, SSL certificates etc., on your website, at any price you choose
-
(b) Integrate domain registrations with billing applications such as Modernbill and Ubersmith
-
(c) Create applications to monitor domains and send alerts
-
(d) Build custom applications to manage your domains
-
(e) And more
Namecheap Environments
We have production as well as test server environments. The test server environment is called sandbox. You are advised to signup for a free account in sandbox, enable API access and test all your API calls on the sandbox environment before pointing your application to production. To point an application to production, you need make only minor changes. In most cases, you simply need to change the service URL, APIusername and APIkey.
Sandbox Environment
The following is the API Service URL for our sandbox environment:
https://api.sandbox.namecheap.com/xml.response
Production Environment
We can't stress this enough: Please test your APIs against our sandbox environment before pointing them to production. We prefer to avoid service disruptions in production caused by untested code.
Here is the API Service URL for our production environment:
https://api.namecheap.com/xml.response
Enabling API Access
There is no restriction on trying out our APIs in the sandbox environment. However, to enable API access on the production environment, you must meet our requirements. If you don’t meet any of our requirements but still wish to use our APIs in production, contact our support team and we will get back to you.
The steps to enable API access are similar for both production and sandbox environments. To enable API access, follow these steps on the appropriate environment:
-
Login to your Namecheap account.
-
Go to the Profile > Tools menu.
-
Scroll down to the Business & Dev Tools section. Click on MANAGE next to Namecheap API Access.
-
Toggle ON/OFF, read our Terms of Service, enter your account password.
After enabling API access, you will be allotted an APIKey. Your Namecheap account username will act as API username. Your access to the API is authenticated using these elements.
Whitelisting IP
You should whitelist at least one IP before your API access will begin to work. Please keep in mind that only IPv4 addresses can be used.
The IP can be whitelisted in the following way:
-
Login to your Namecheap account.
-
Go to the Profile > Tools menu.
-
Scroll down to the Business & Dev Tools section. Click on MANAGE next to Namecheap API Access.
-
Click on Edit next to the Whitelisted IPs > Add IP > Enter the required details and proceed with Save Changes.
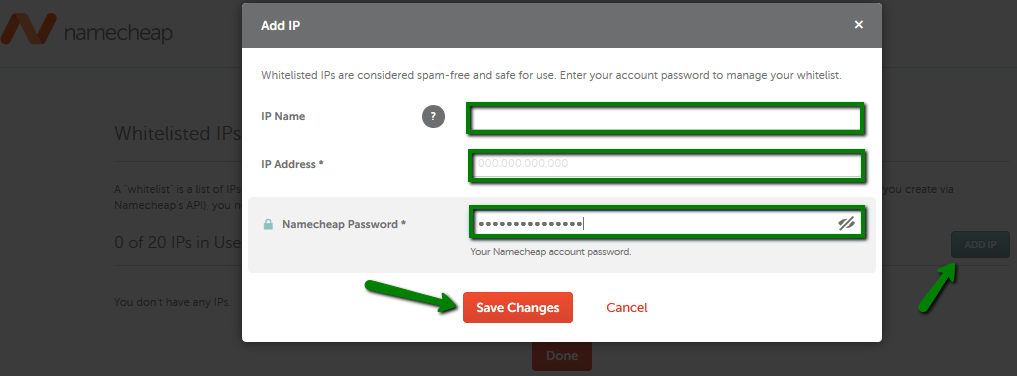
Whitelisted IPs are considered spam-free and safe for use.
Making an API Call
You can easily access API by sending your parameters as a HTTP-GET request query string to the service URLs. The response is given in XML format. The HTTP-GET request URL is formed by adding query parameters and values to a service URL. The first parameter begins after a ? symbol. Successive parameters are included by adding an & symbol before each parameter. The format for adding queries is parameter=values. The following is the syntax of an API call:
https://<service url>/xml.response?ApiUser=<api_username>&ApiKey=<api_key>&UserName=<nc_username>&Command=<cmd_name>&ClientIp=<clientIPaddress>
Sample API Call
https://api.sandbox.namecheap.com/xml.response?ApiUser=ncuser&ApiKey=apikey&UserName=ncuser&ClientIp=121.22.123.22&Command=namecheap.domains.check&DomainList=domain1.com,domain2.com
The above call returns a response in XML format. You can parse this XML file to obtain the results and embed the data into the application you are creating. Please take a look at API Reference for all available commands and required parameters.
Successful Call
You can find out if an API call was successful or not by checking the ApiResponse Status. The following is the syntax of a successful API call:
<ApiResponse Status="OK">
  <Errors/>
  [#Requested data in XML format...]
</ApiResponse>
Erroneous Call
The following is the syntax of an erroneous API call:
<ApiResponse Status="ERROR">
  <Errors>
    <Error Number="0">Error message</Error>
  </Errors>
</ApiResponse>
Resetting the API key
After logging in to your Namecheap account, go to the Profile > Tools menu. In the Business & Dev Tools section, click on MANAGE next to Namecheap API Access. Click Reset and enter your account password. If you reset the API key, be sure to update the API key on every API call.
CAUTION Any application using your existing API key will stop working immediately.
Disabling API Access
To discontinue using Namecheap API, go to the Profile > Tools menu. Find Business & Dev Tools > API Access and toggle the ON/OFF switch.
CAUTION Any application using the API key will stop working immediately.