The domain transfer process itself does not cause any downtime. Downtime happens only after the transfer is completed and only if the domain is using the default nameservers of your Registrar.
To outline the matter in greater detail:
The nameservers of the domain will not be changed automatically after the transfer; the domain will stay pointed to the same nameservers to which it was pointed before the process. So, if the nameservers of your domain continue to function after the domain is transferred away from your old Registrar, you are all set – there will be no downtime in this case.
Listed below are the types of nameserves that will continue to function after the domain transfer:
These are the nameservers of your hosting company (if you have hosting with a different company than your Registrar).
These can also be the nameservers of your Registrar’s hosting service.
For example, if your domain is using Namecheap hosting and is pointed to Namecheap hosting nameservers (dns1.namecheaphosting.com and dns2.namecheaphosting.com), there will not be any downtime during your domain’s transfer.
Private nameservers, also referred to as to self-hosted nameservers, are nameservers that are hosted by you on your own hosting server. For example, if you have the domain example.com and have nameservers ns1.example.com and ns2.example.com, there will not be any downtime during transfer for any of your domains that are pointed to these private nameservers.- CDN nameservers/nameservers with third-party providers
There are some companies that provide nameservers as a separate service, like our PremiumDNS service, for example. If you have your domain registered with one company and use nameservers of another company, there will not be any downtime during transfer.
In all three of the above cases, there will not be any downtime for domain-based services and you will not need to re-configure any settings after the transfer.
NOTE: We recommend that you have your domain pointed to the nameservers of your hosting provider, if they have them.
Still, there may be downtime if the domain is pointed to the default nameservers of your current Registrar.
Default nameservers are a kind of added service to your domain. Your Registrar provides you access to these default nameservers as long as your domain is registered with them. Once your domain leaves their system, access to the old Registrar’s default nameservers will be revoked for that domain.
So if your domain is using your current Registrar’s default nameservers, they will stop working after the transfer and your website will become unreachable.
If you are unsure whether your nameservers are default or hosting, we strongly advise that you check with your current Registrar to see if the nameservers will continue to function for your domain after transfer. If they continue to function, then there’s no need to worry about downtime and you will not need to re-configure any settings after the transfer.
If your domain is using default nameservers, but the downtime is not critical for you, you may complete the transfer and re-configure the DNS setting afterwards.
However, if your domain is using default nameservers and it is critical for you to have the least possible downtime, please follow the instructions below:
How to reduce this downtime? Before transferring your domain to Namecheap, you need to set up FreeDNS nameservers. Here's how:
1. Add your domain to our FreeDNS service at the FreeDNS page.- Sign In to your Namecheap account.
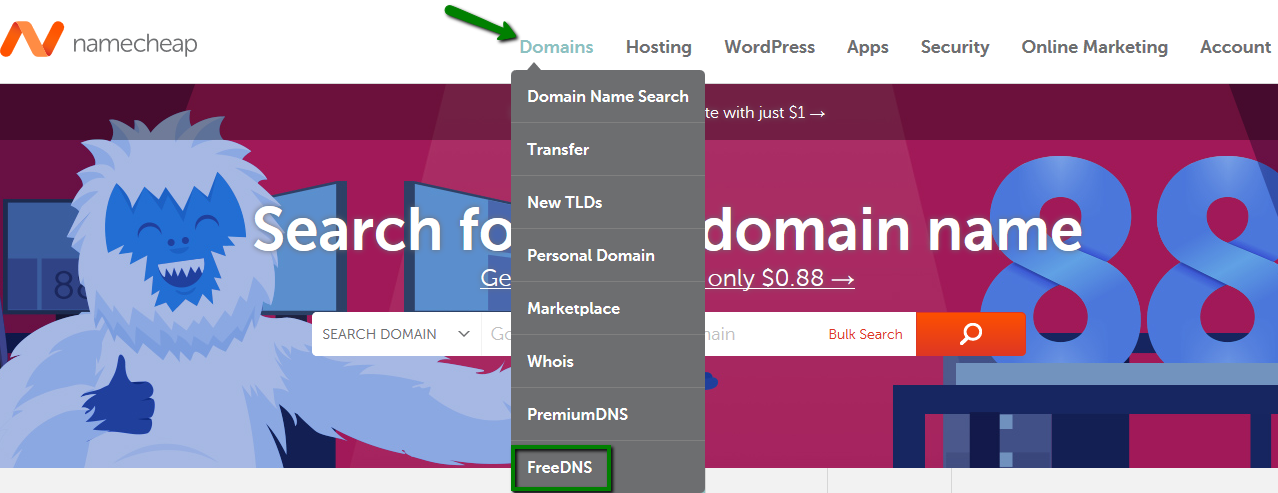
- Mouse over Domains at the top of the page and click FreeDNS:
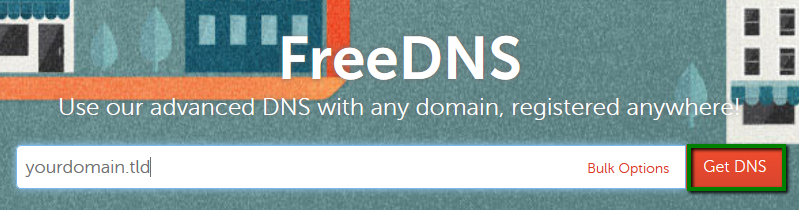
- Add your domain (yourdomain.tld) to our FreeDNS service (please make sure to add it without www):
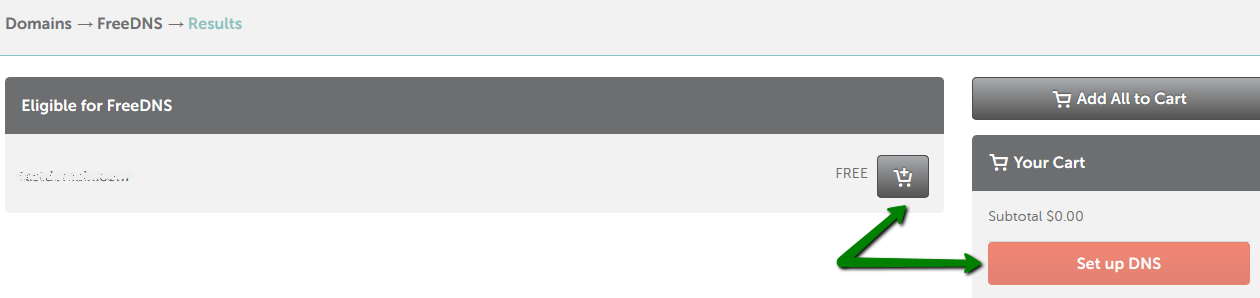
- Click on the Shopping Cart icon next to your domain, then click the Set up DNS button:
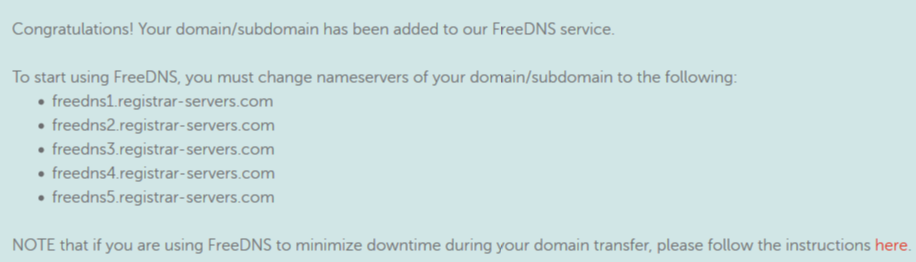
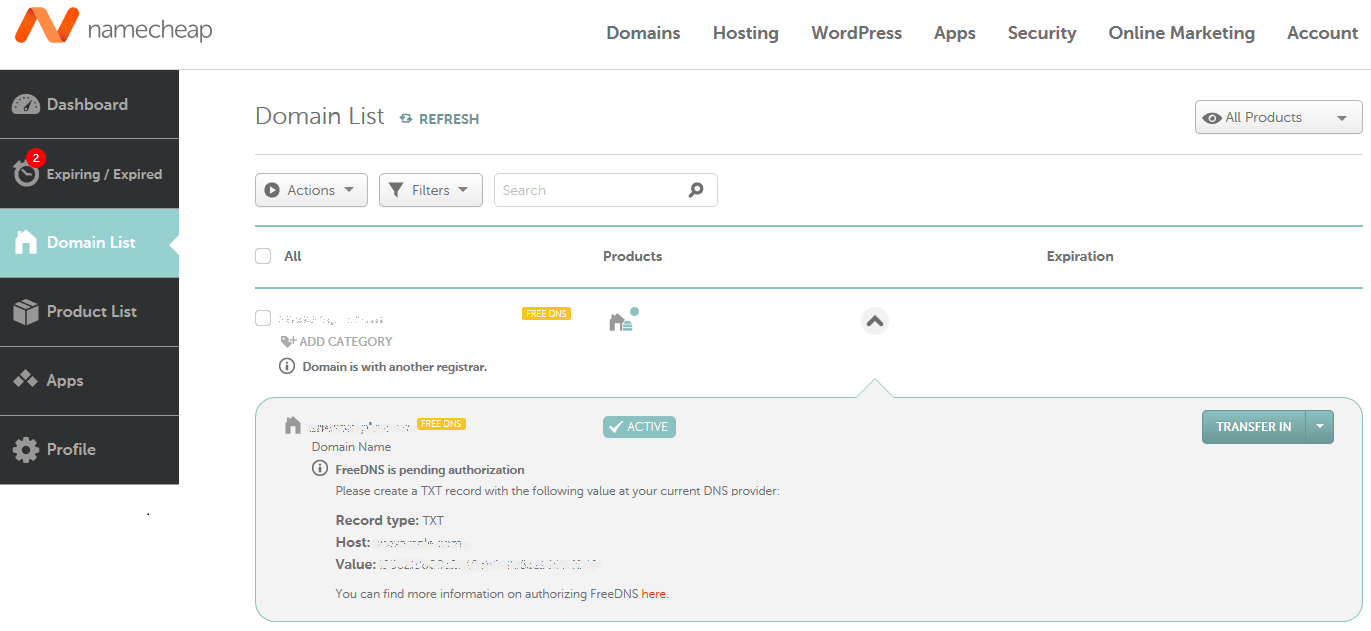
- Once you've done this, the following message will be displayed and the domain will appear in Dashboard and Domain List. Please note that you will need to authorize your domain to use FreeDNS service and add the necessary host records before pointing the domain to FreeDNS nameservers as shown in Step 2 below:
2. The next step is authorizing your domain and inserting the corresponding host records (DNS settings like A records, MX records, etc.):
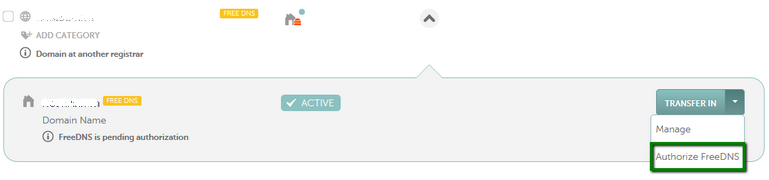
- Select Domain List from the left sidebar:

- Select All Products in the drop down list (in the top-right corner of the page), then click on the drop down menu for your domain and select the Authorize FreeDNS option:
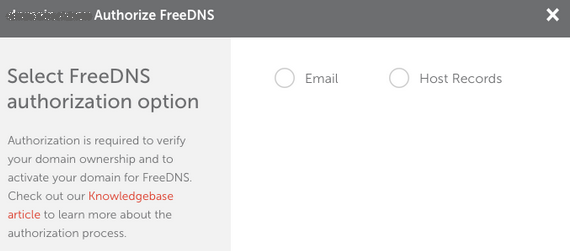
Here, you have the opportunity to choose how to authorize FreeDNS: either by using your domain-based email or TXT record setup:
Please keep in mind that
TXT record authorization is the default authorization method.
This means that once you enroll your domain/subdomain in FreeDNS, you should authorize FreeDNS by creating a TXT record with the values provided in your account’s Dashboard/Domain List. You may also select authorization via email in your Namecheap account.
In the "Select FreeDNS authorization option" window, choose a valid, domain-based email address and click the Save changes button:
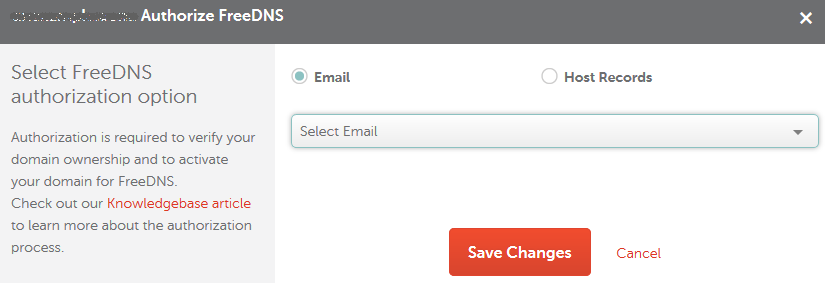
The system will send a verification email through which you can activate FreeDNS for your domain.
For security reasons, an authorization link cannot be sent to any email address other than those shown as your chosen authorization email options. The authorization link is valid for 48 hours only.
NOTE: If you are having problems with email verification, please contact our Support Team for assistance.
If the Host records option is chosen, our system will generate a TXT record that should be created at your current DNS provider (on the nameservers the domain is pointed to):
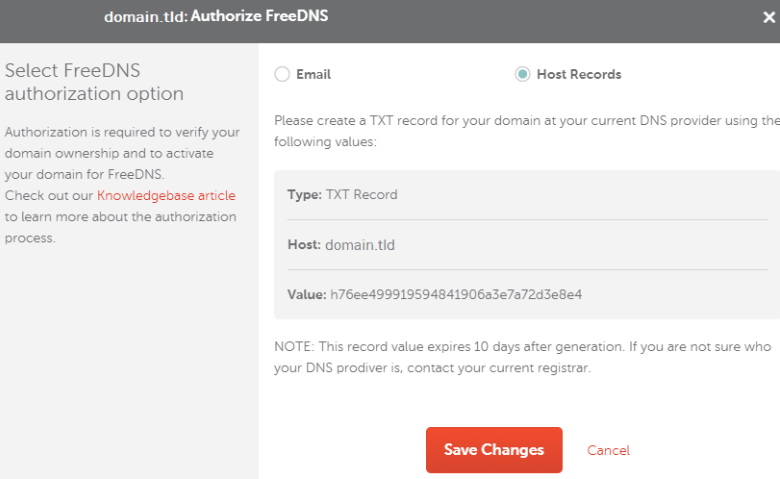
*Please note that the Host value may vary depending on your DNS provider (e.g, it could be just '@').
NOTE: A TXT record expires 10 days after being generated. If your TXT record has expired, you will need to select the authorization method once again and create a new TXT record.
Once the changes are saved, you will be able to locate the TXT record values in your account directly from the Dashboard:

The required TXT record values can be checked in the Domain List as well:
With most registrars, to match the bare domain name, you need to use @, so to be sure that you are setting the correct host records, check your registrar's knowledgebase or contact them for assistance.
Once the FreeDNS service is authorized, you can manage your host records by following these steps:
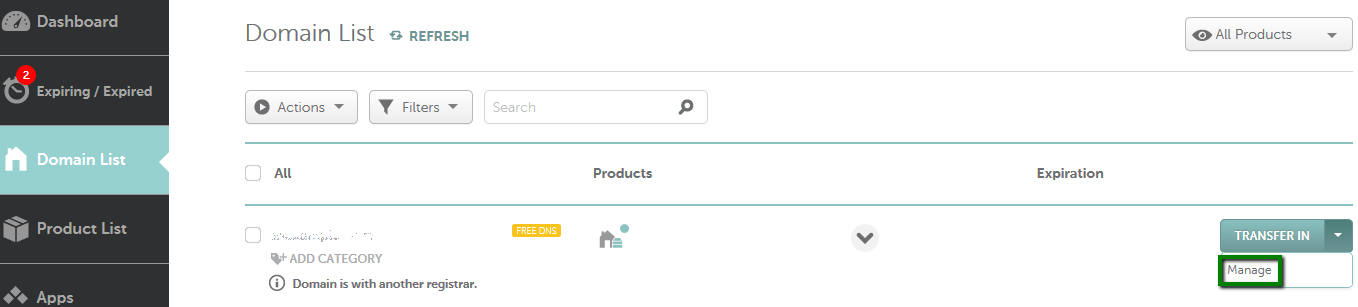
- Select Domain List from the left sidebar and click the Manage button next to your domain:
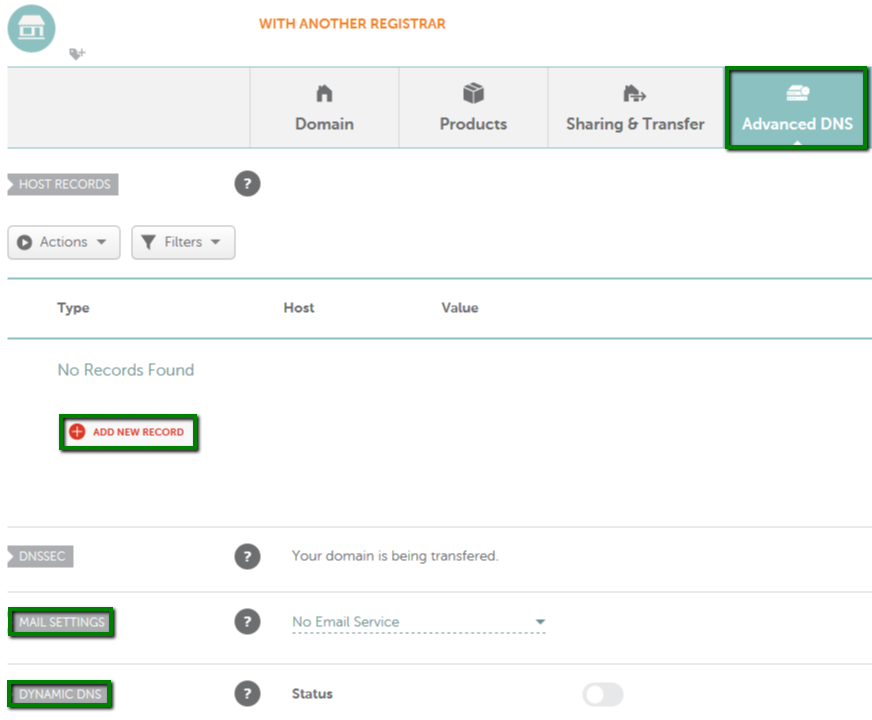
- Click on Advanced DNS at the top of the page. On this page, you’ll need to reconfigure all the necessary host records that are present for your domain with the old Registrar:
For more details on how a host record can be configured in your account, read
this article.
3. After the host records are configured, you need to point your domain to
at least two of our FreeDNS nameservers, or add the FreeDNS nameservers along with the current nameservers from your Registrar (if it is allowed). Our FreeDNS nameservers are:
freedns1.registrar-servers.com
freedns2.registrar-servers.com
freedns3.registrar-servers.com
freedns4.registrar-servers.com
freedns5.registrar-servers.com
For information on how to set up custom nameservers at your current Registrar, please check their FAQ documentation or contact their support team.
The FreeDNS service will be activated once we ensure everything is properly set up.
If you've added FreeDNS nameservers along with the current nameservers on your Registrar's side, please allow 24 to 48 hours for DNS settings to take effect globally. Then
remove the nameservers of your old Registrar, leaving your domain pointed
only to the FreeDNS nameservers. Once you've done this, you may initiate the transfer of your domain to Namecheap using a normal
transfer process.
NOTE: If you decide to switch nameservers to FreeDNS at this stage, end users will experience a downtime as the nameservers of the old Registrar might stop responding immediately after you switch them to FreeDNS.
If you keep both sets of nameservers (custom and FreeDNS ones), they will not be automatically changed to our default nameservers. Therefore, host records will not be copied and your site will be unavailable until the domain is manually switched to our BasicDNS, host records are re-entered, and DNS propagation is completed. Usually, DNS propagation takes 24 to 48 hours but may take up to 72 hours in some rare cases.
That's it!
If you have any questions, feel free to contact our Support Team.