Namecheap Private Email (powered by Open-Xchange) is open-source collaboration software that meets all necessary email, calendar and contacts, tasks management and document storage needs.
That`s why Private Email is a great choice for organizations and for the optimization of teamwork. This article gives an overview of the Private email features and instructions on how to organize them efficiently for your personal usage.
NOTE: depending on the email plan you use, some webmail functions or features can be disabled for your package. You can compare technical specifications of Private email plans here.
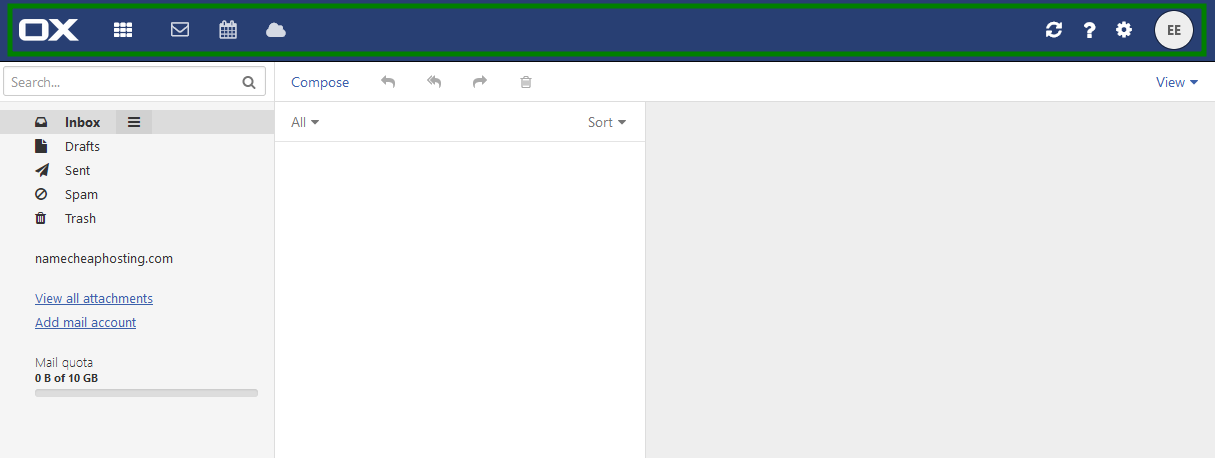
In order to start using your mail service and set up the necessary features, log in to webmail.
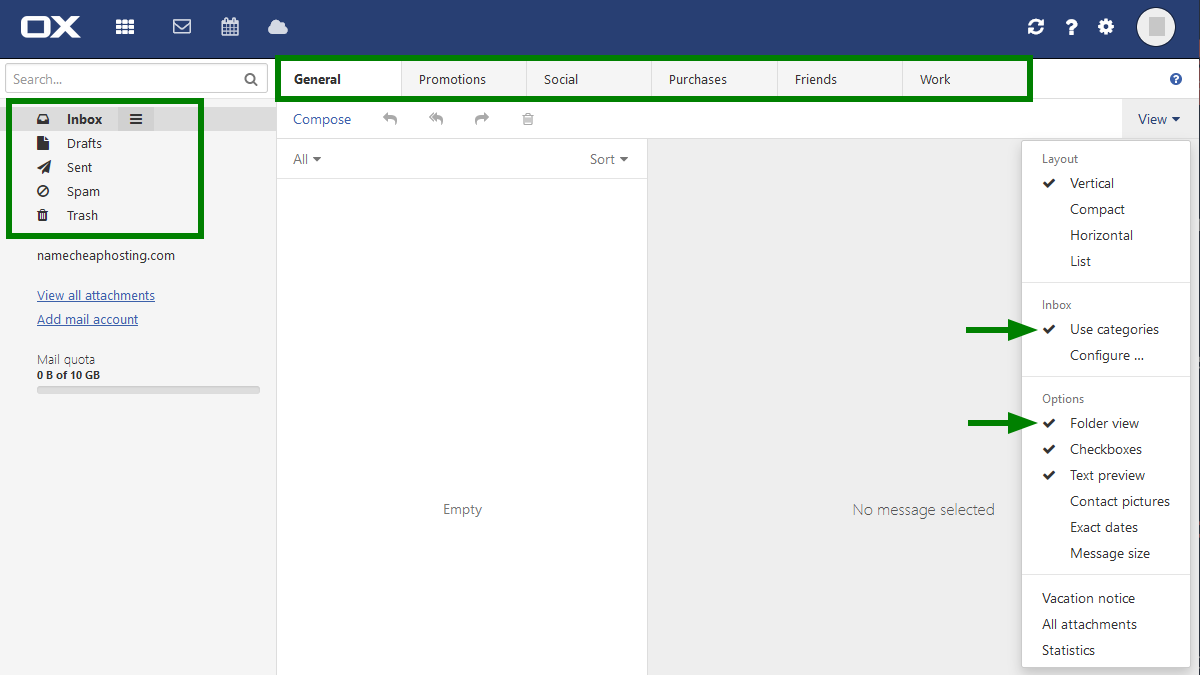
On top of the page you will see Menu bar that contains the following options:
NOTE: OX Text and OX Spreadsheet features are available only for Ultimate subscription users.
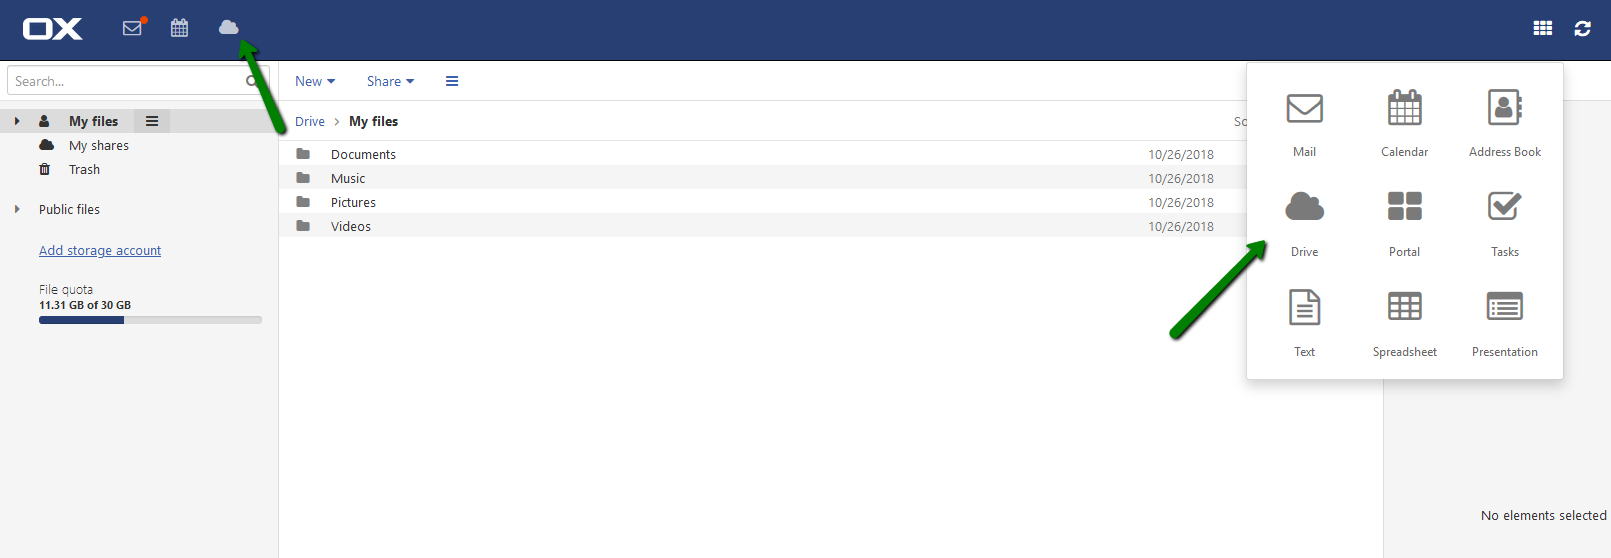
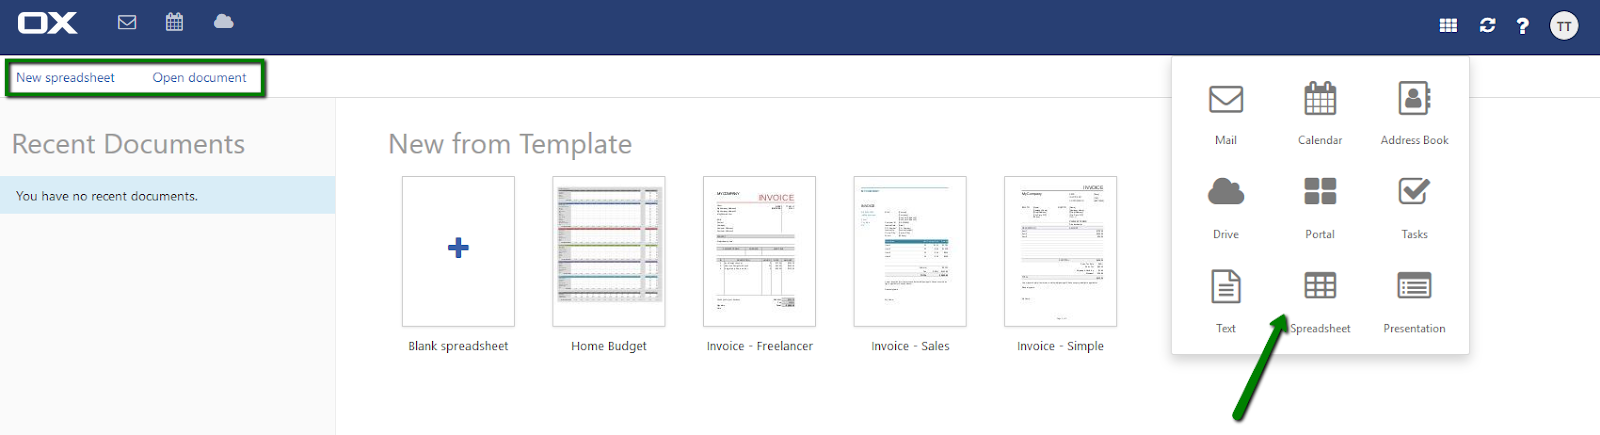
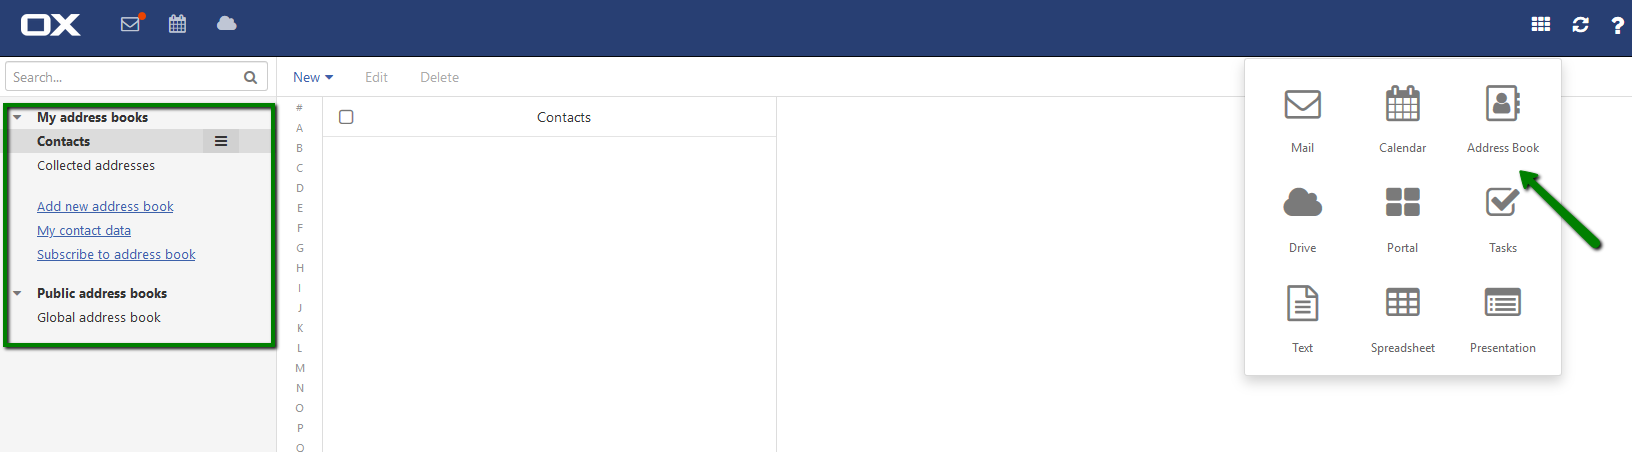
App Launcher
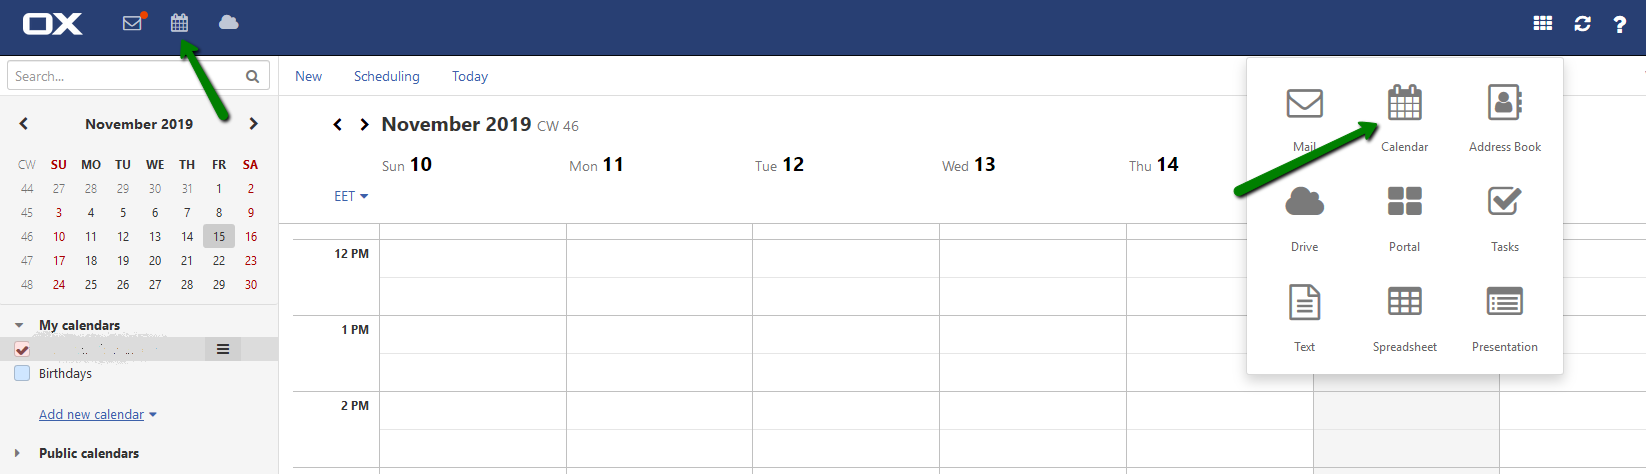
The system menu icon is located in the top left corner and shows the main features of the Private Email webmail:
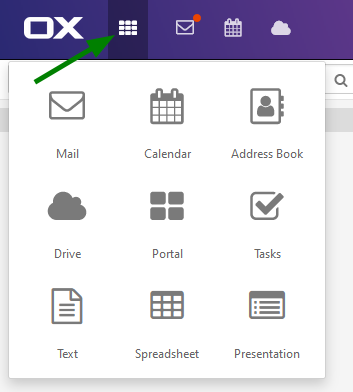
Mail
In this section you can compose and send new
emails, view received ones and organize your current data. The handy
folder-tree menu on the left can be enabled to sort the mail into the
folders. Also, you can use
Inbox tabs (categories) to categorize your emails by senders:
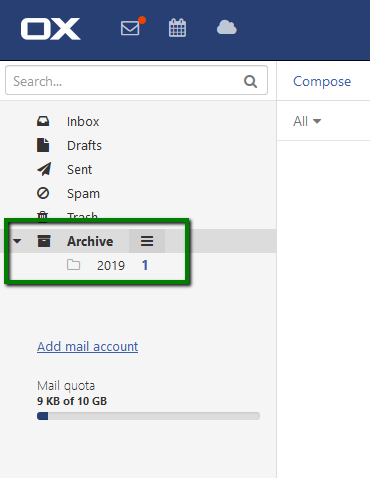
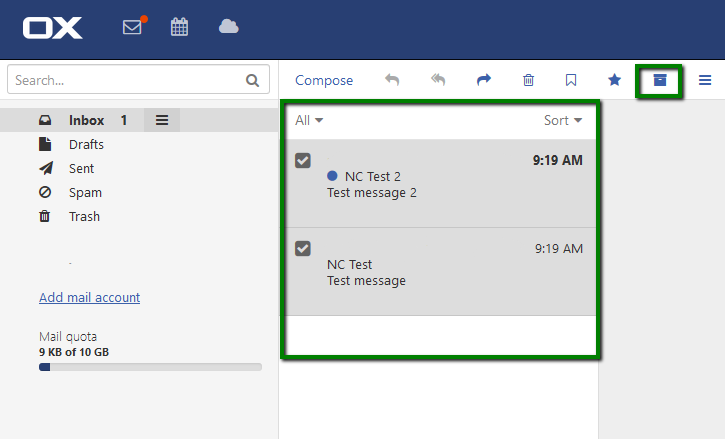
When archiving emails, those emails are moved to
Archive
folder. The Archive folder contains a separate subfolder for each
calendar year. The archived emails are saved to those subfolders sorted
by the year of receipt.
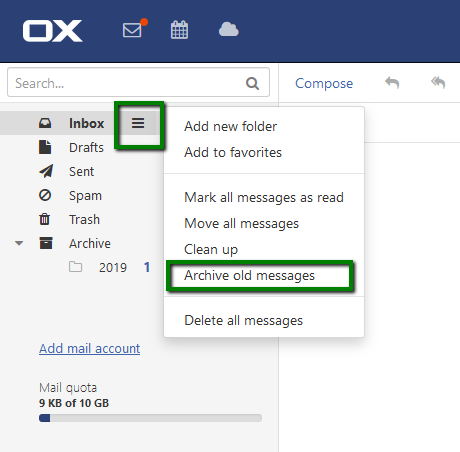
You can use Archive option to in two
possible ways. The first one is to archive single emails. Simply select
the emails that should be moved and click on Archive icon:
Additionally,
you can archive folder's emails that are older than 90 days. In order
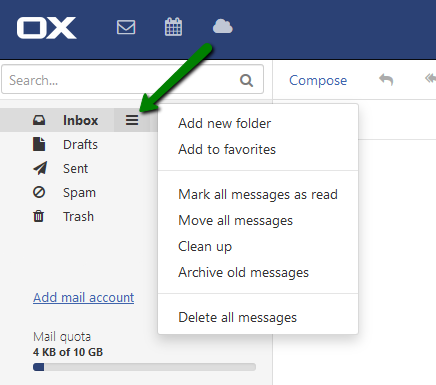
to do so, select the needed folder, click on folder-specific actions
icon next to the folder name and hit Archive old messages:
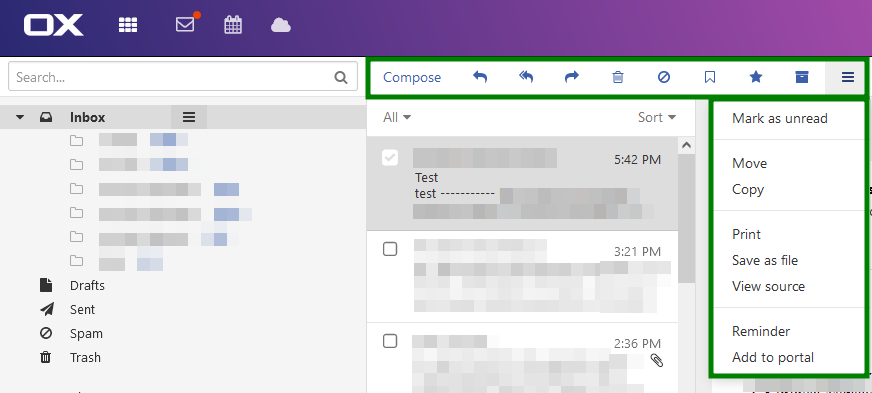
You
may also use different options for your emails such as: Reply, Forward, Delete, Mark read/unread, Mark as spam/not spam, Move, Copy, Flag, Print, View source, etc:
Calendar
Private Email Calendar will help you to keep your
business appointments organized in a handy way. In the Calendar module,
you can display calendars and appointments, create appointments, manage
calendars and appointments. It allows you to schedule meetings and
activities, specifying the members who can access selected calendars:
Having Pro or Ultimate email plan you can
share the calendar with other users within your subscription.
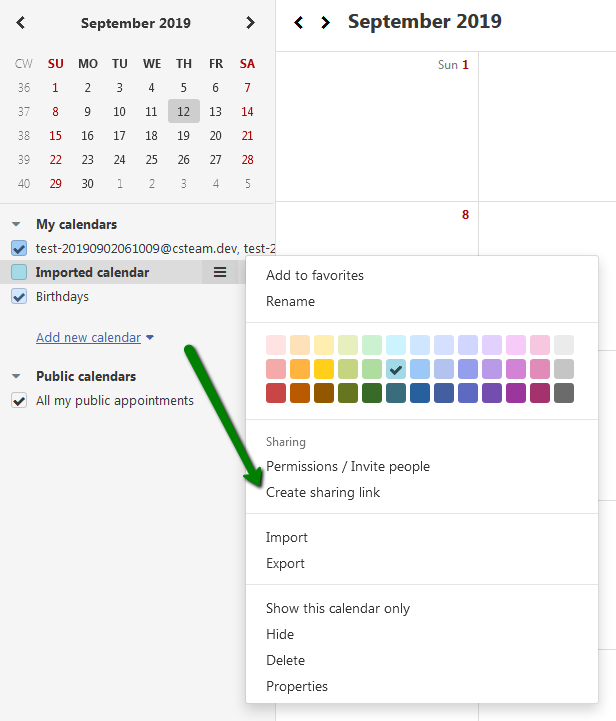
With all Private Email plans you can share a calendar via a link. To generate the link right-click the three horizontal lines next to the calendar name > select Create sharing link:
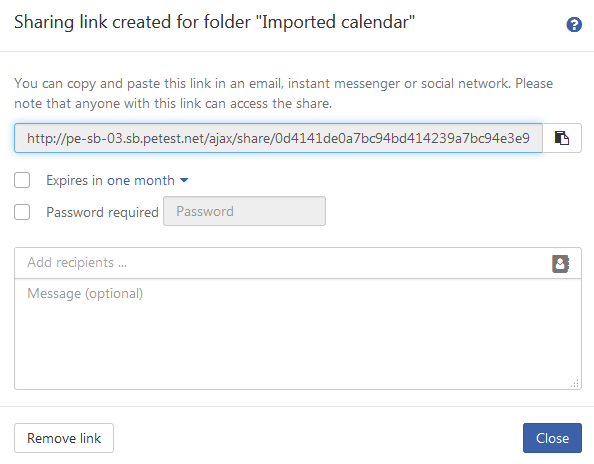
You can then set a password, expiration date, add recipients and a message and copy the link:
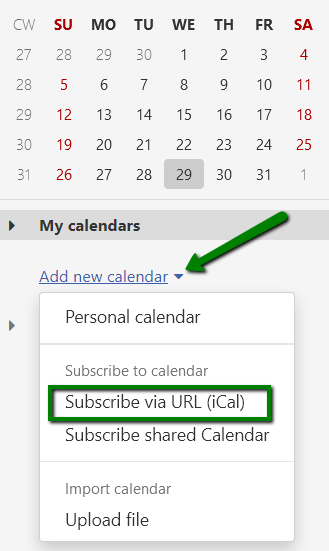
It is possible to create your own calendar or subscribe to the existing one using these options:
If you wish to add a calendar, go to
Subscribe via URL and paste the URL to your calendar. Click
Subscribe. After that the appointments will be imported to a new calendar.
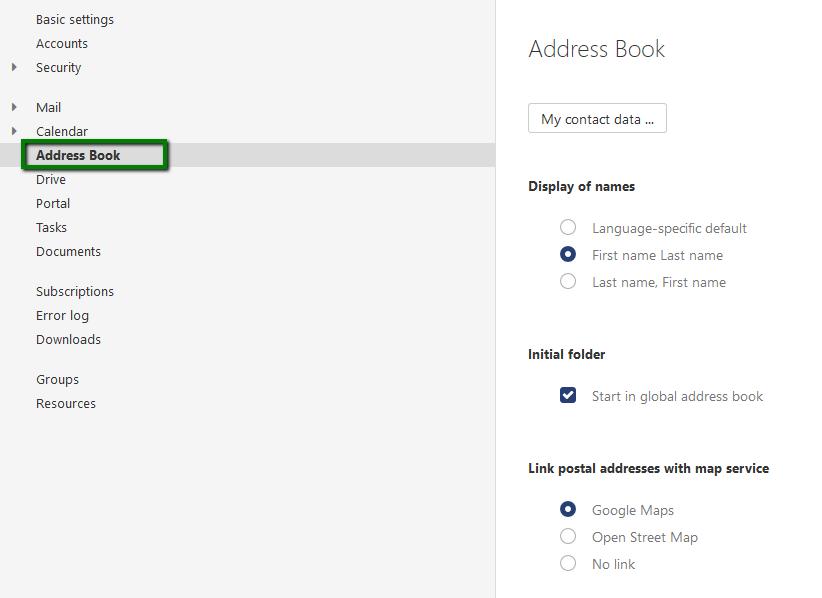
Address Book
Address Book allows you to keep and
organize your internal and business contacts, sharing public folders
with internal participants and creating private ones for your personal
overview:
In this menu you can create, edit, delete, move contacts between your folders, create and manage
distribution lists for sending emails to the group of recipients.
Pro and
Ultimate email plans provide you with the
sharing contacts feature.
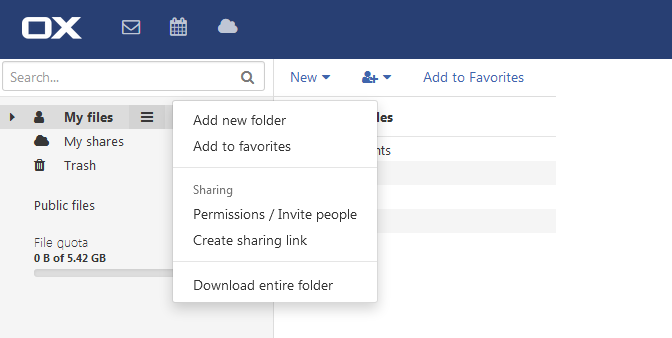
Drive
It is a file storage created for uploading and
keeping any files, notes, and internet links. You can save the
information, share with other users and edit them managing file versions
and viewing the history of modifications:
The detailed guidelines about this OX module can be found
here.
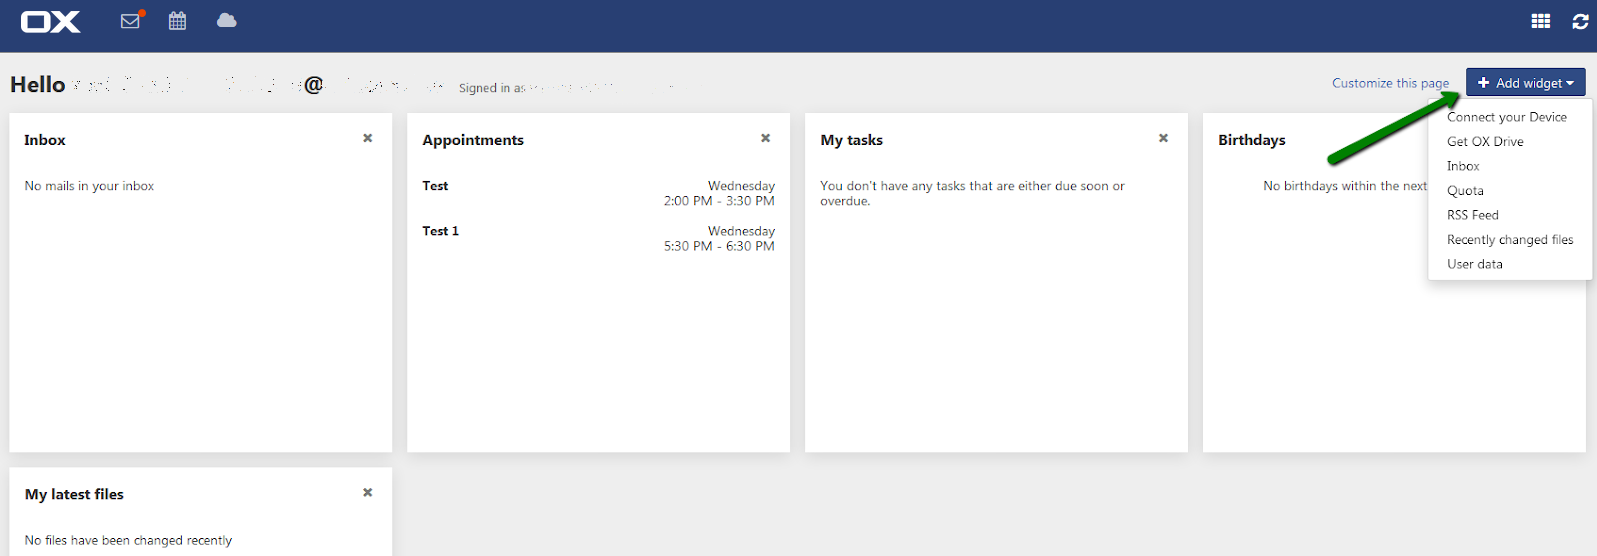
Portal
It is your customizable information center,
showing scheduled appointments, mailbox quota, new messages and favorite
news from your social networks.
You can add the widget to the Portal page by clicking on Add widget button in the upper right corner of the page:
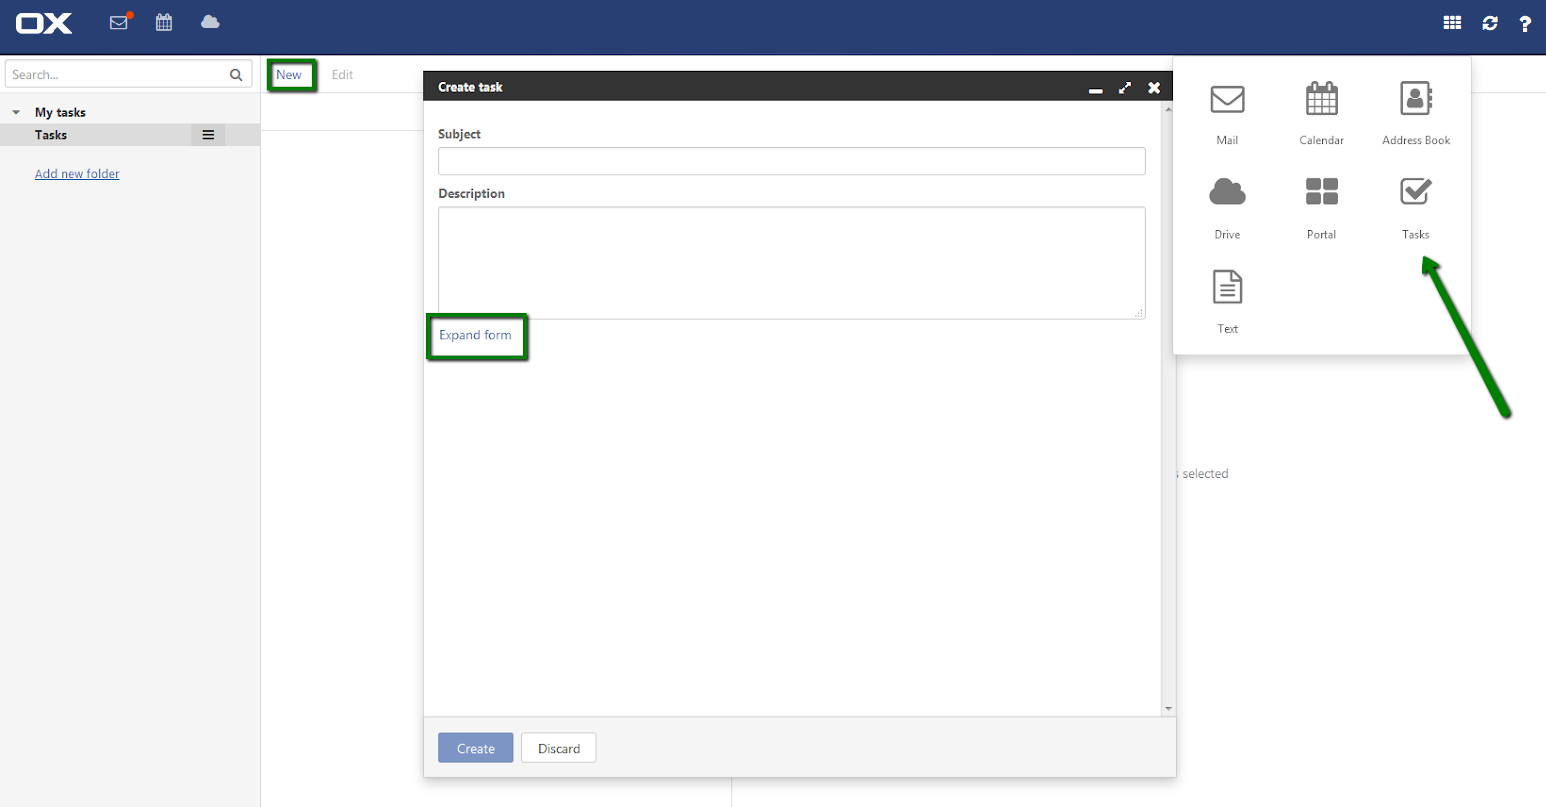
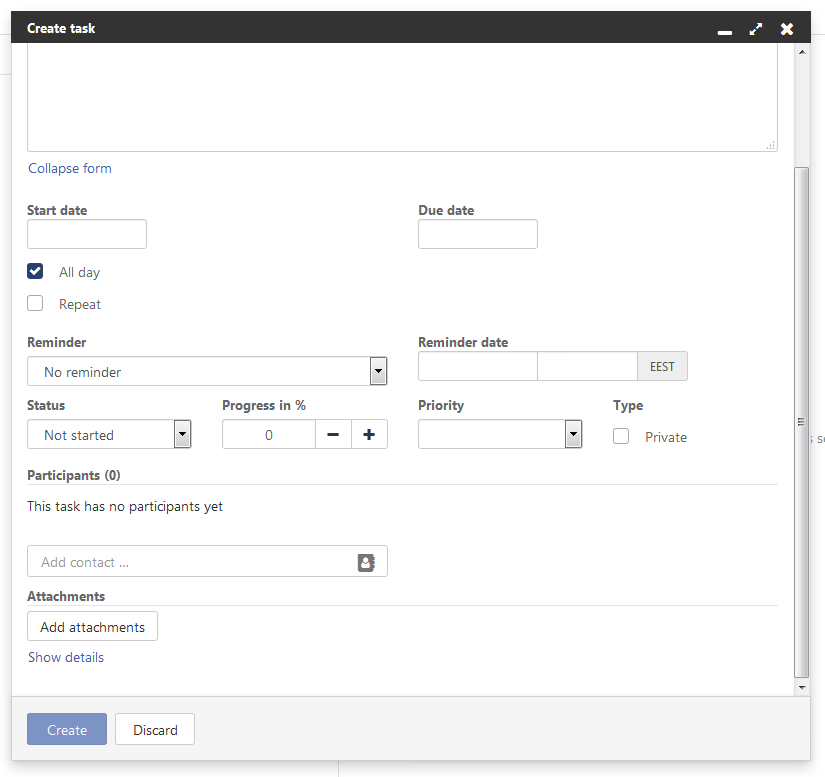
Tasks module provides you with such options as
creation, view and managing tasks, setting due date and reminders to
your tasks. Also, you can delegate selected tasks to other members by
clicking the Expand Form tab:
Text
OX Text is a web-based collaborative
word processing solution. It gives you a capability to create or upload
text documents, edit the file and monitor the changes at a real time:
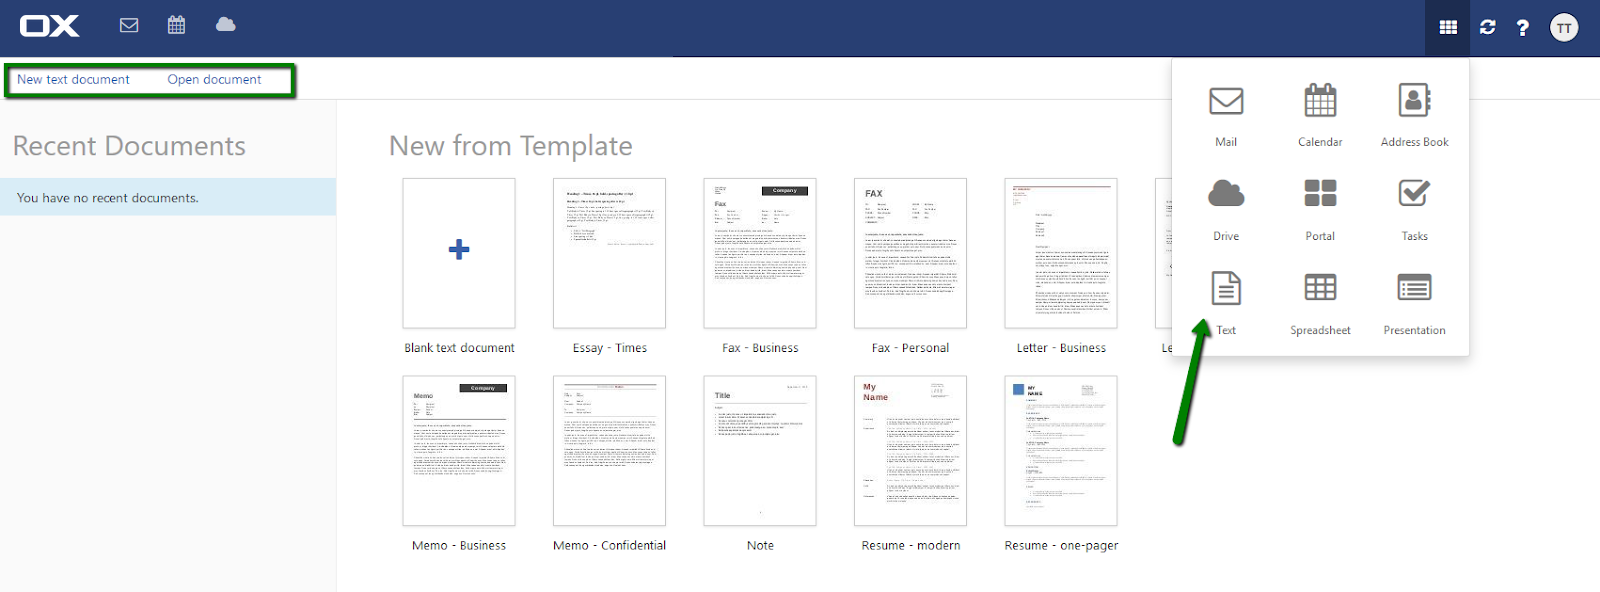
Additionally, there is a number of templates, simplifying the process of
composing new document/fax/letter and providing you with the
ready-to-use form of the document:
Documents are shared through the file organizer, where you can manage access rights to files and folders for other users.
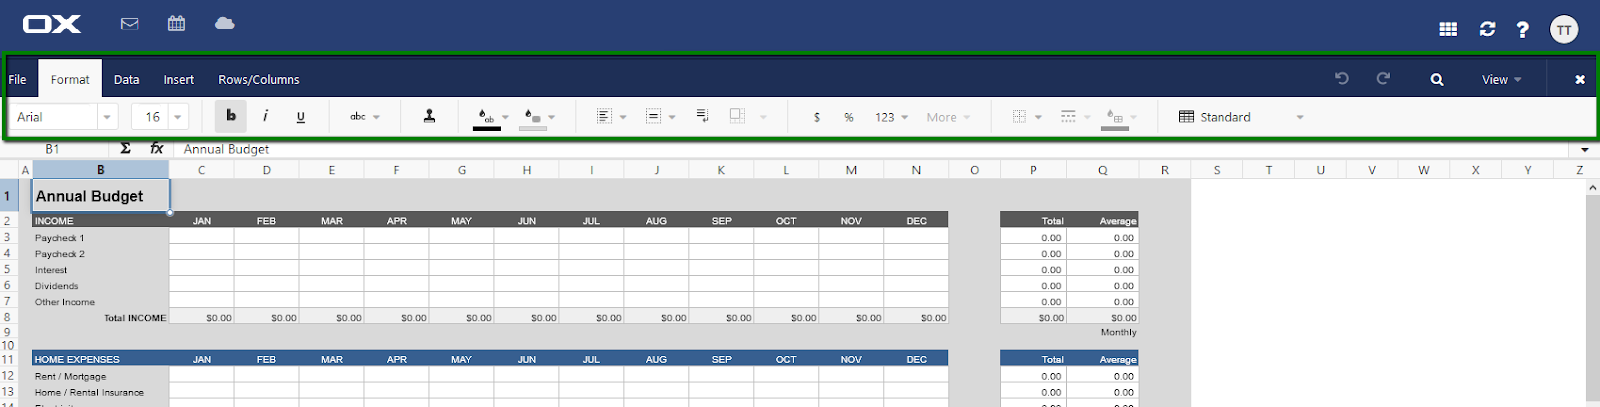
Spreadsheet
This feature is round-trip editor of MS
Excel files. You can easily upload excel document, edit it, save and
share without losing the format and properties:
The application supports over 300 formulas and allows collaborative sharing with exclusive editing rights to internal members:
Additional Tools
This group provides you with three additional tools: Notifications  , Refresh
  and Help
  .
.
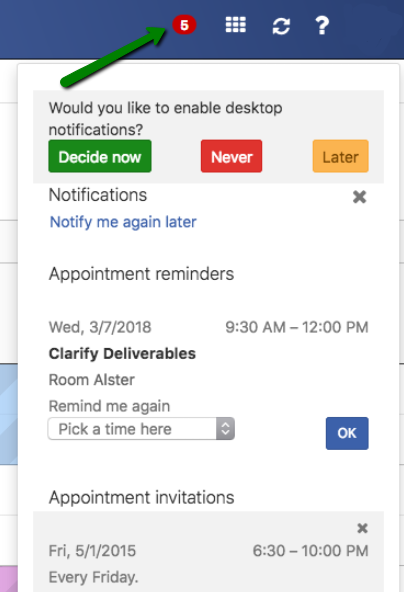
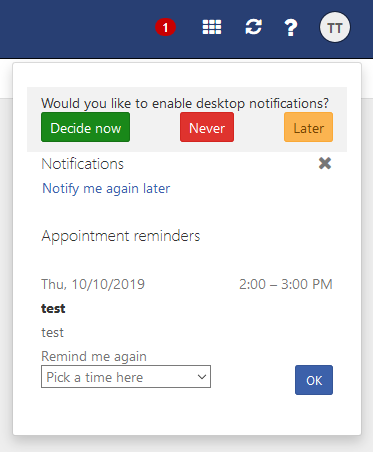
Using Notifications option you can manage desktop notifications. You will see a pop-up window each time a new email is delivered:
Additionally, you will be informed about all the upcoming and past events:
With the help of Refresh button you will be able to update the current state of the webmail to see the latest information.
Help option will take you to OX guide.
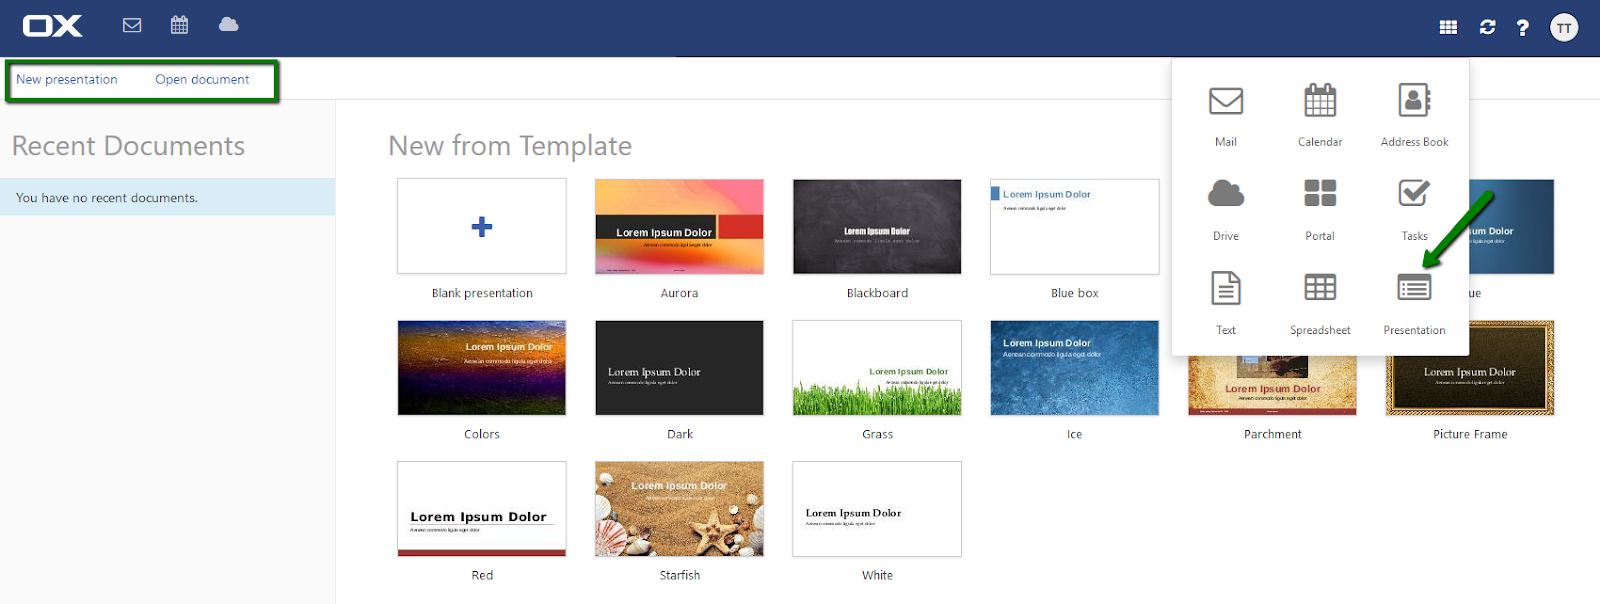
Presentation
This feature allows you to create presentations
on your computer, or on-the-go using your mobile phone. You can use one
of the many flexible templates, which can be adjusted according to your
needs or create your own:
Work alone or in a group, and your presentation will be synchronized automatically and can be shared.
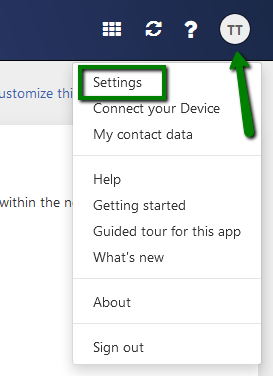
Here you can customize the settings of your account in Webmail > click on the User icon > Settings:
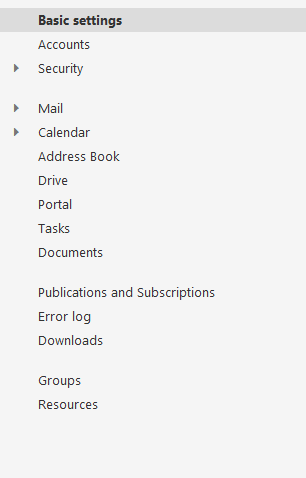
In this menu you will be able to configure these features:
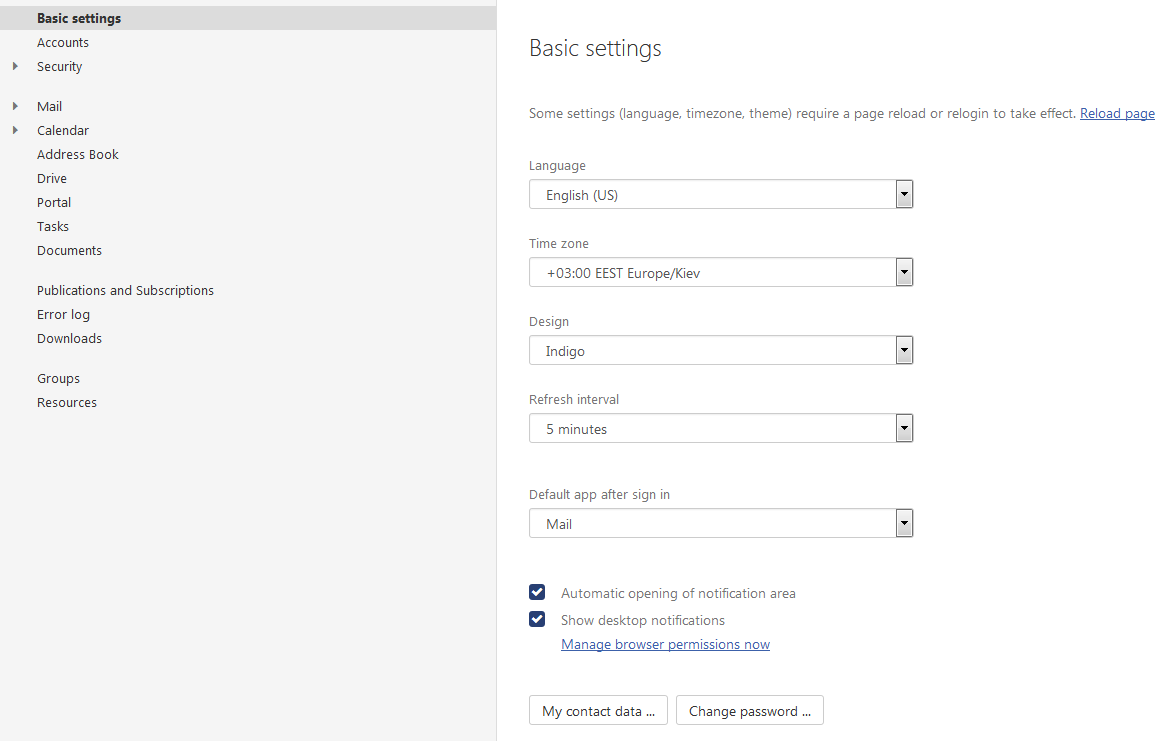
This option allows you to set basic settings for your account in order to make the interface of webmail more adjusted for your individual preferences:
1. Here you can set language, time-zone, refresh-interval and design settings by choosing the suitable value from drop-down menu.
2. Refresh interval defines the period of time for retrieving new objects from the server.
3. In the Design tab you will be able to change the colour of the background of menu bar.
4. Default app after sign in
option defines the application displayed after singing into the email
account via webmail. By default you will see your mail after logging in.
5. Automatic opening of notification area specifies whether the new notification or incoming email will be automatically opened.
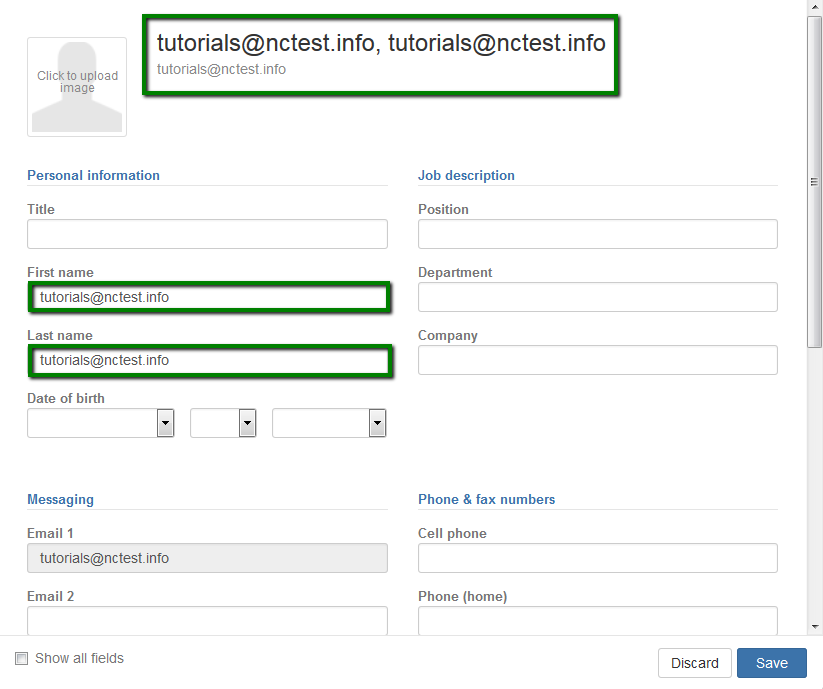
6. My contact data
button overlaps the screen with a pop-up window with your Personal
Profile. By default First and Last name are submitted by your email
address, therefore, you can see user@domain.com user@domain.com in FROM field.
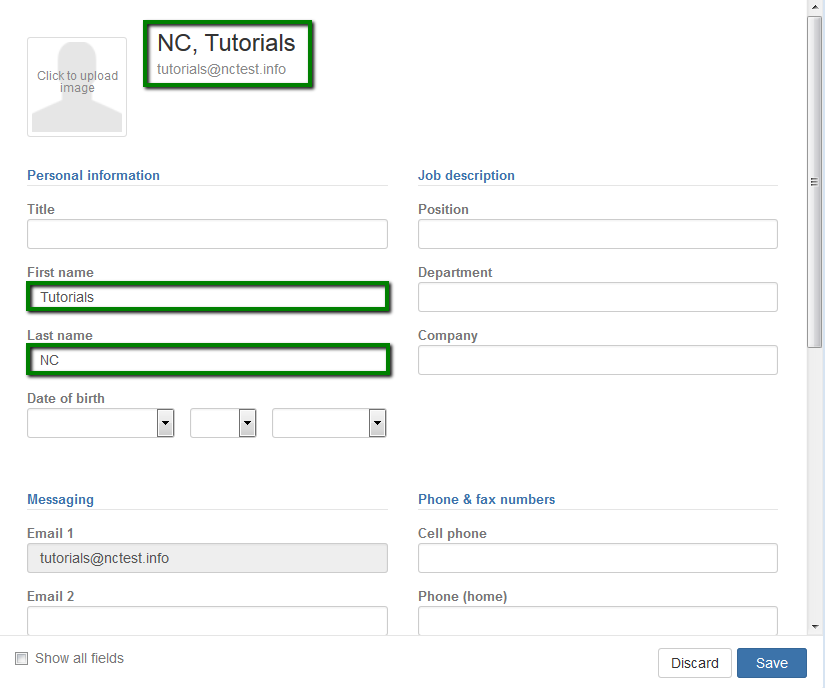
In order to set up your actual name, you need to change the contact data, namely, First and Last name fields.
There
you can specify personal information such as position, information
regarding the contacts of your company etc. Additionally, you can upload
the photo to present yourself to other members. Once clicking Show all fields, more fields come out:
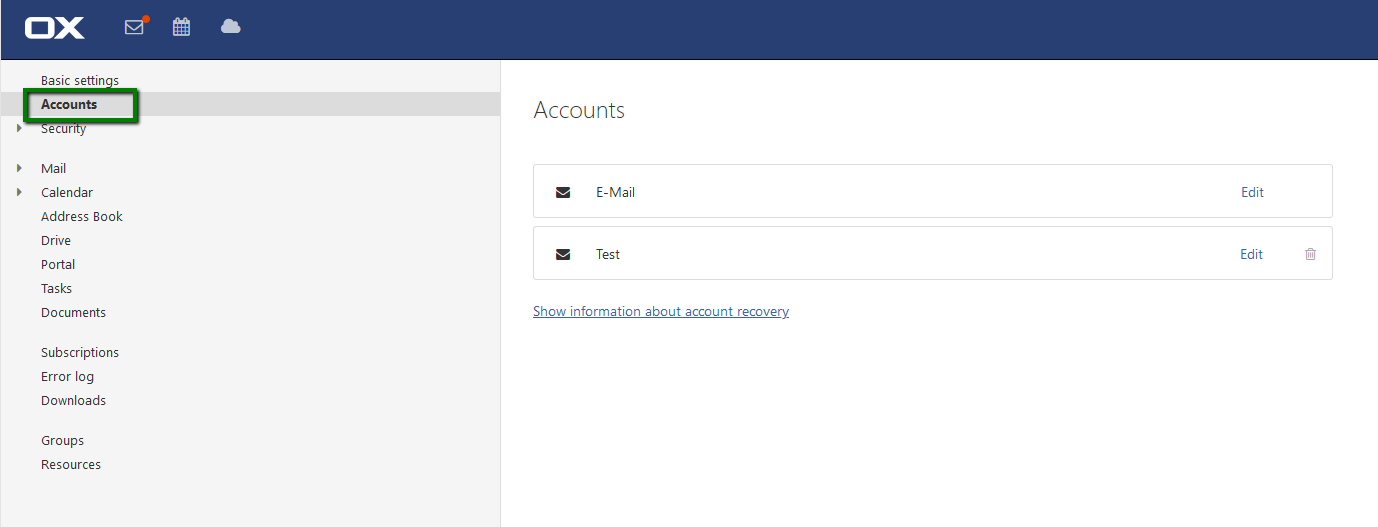
NOTE 1: If you have previously changed the Your name field in the System Menu >> Accounts >> E-Mail, such a name will be used instead of the one specified in My contact data.
NOTE 2:
The profile photo will be seen only for the recipients who use the same
PE subscription. The photo will not be displayed on the third-party
email accounts.
7. Change password. You may also change the password for your mailbox via Namecheap account, more details can be found here.
There you can link any of your Facebook and Twitter social media profiles to your Private Email webmail account.
It
will make easier for you to keep your personal networks at your
fingertips, all without having to log in to Facebook or Twitter
separately. For example, to post/read tweets, update your account etc.:
Add Mail Account
option allows you to configure sharing and unified mail accounts, which
is practically the same as adding another (Gmail, Yahoo) email account
into webmail interface. Click here for detailed instructions.
Furthermore, you will be able to edit your email account settings clicking on Edit button on the email account tile.
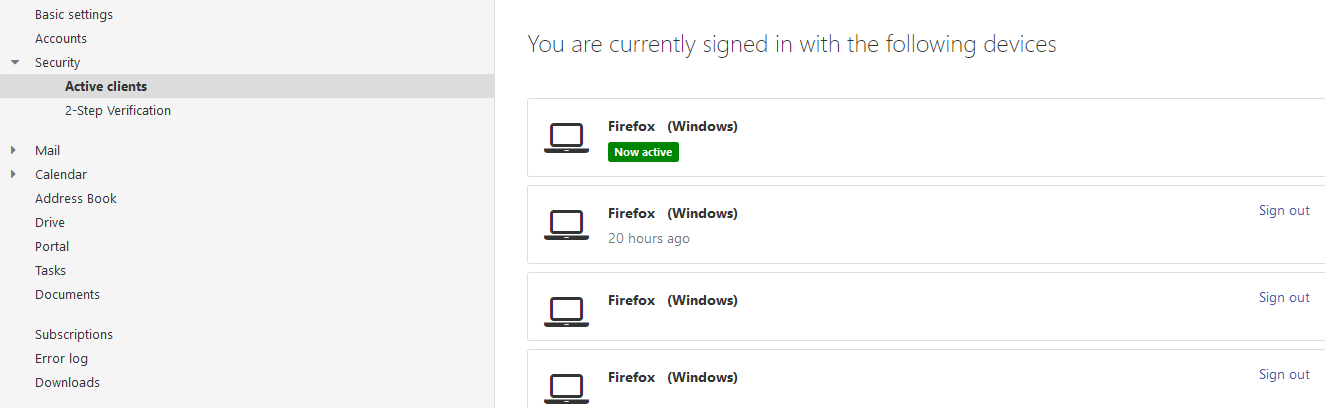
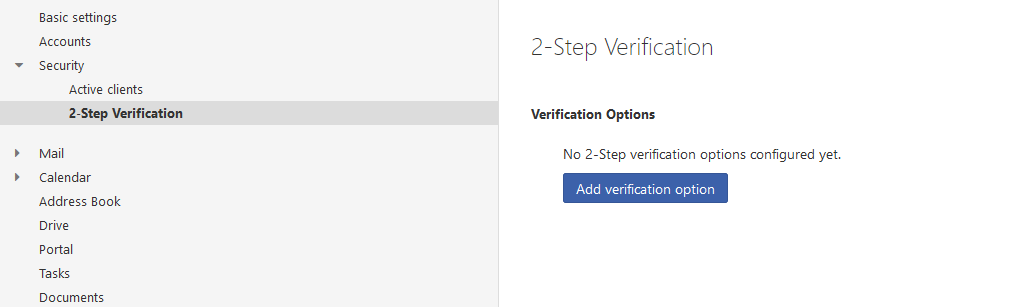
Security
The Active clients section
lists all active sessions sorted by mobile, desktop and other devices.
You can also terminate any session, except the current one,or terminate
all sessions at once, except the current one:
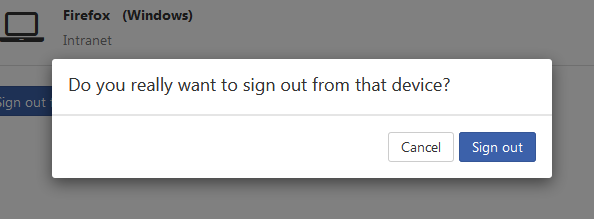
When removing a session a confirm dialog will appear:
2-Step Verification section provides you with the possibility to set up a verification option for your account. More about Two-Factor Authentication for Private Email you can check in
this article.
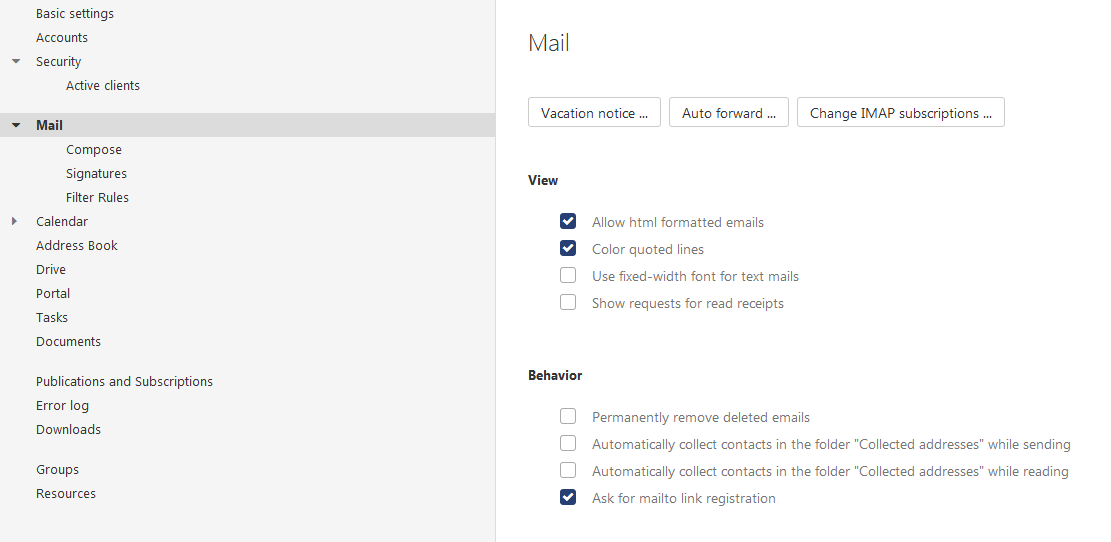
Mail
Here you will see four groups of settings regarding mail configuration of mail app in the display area:
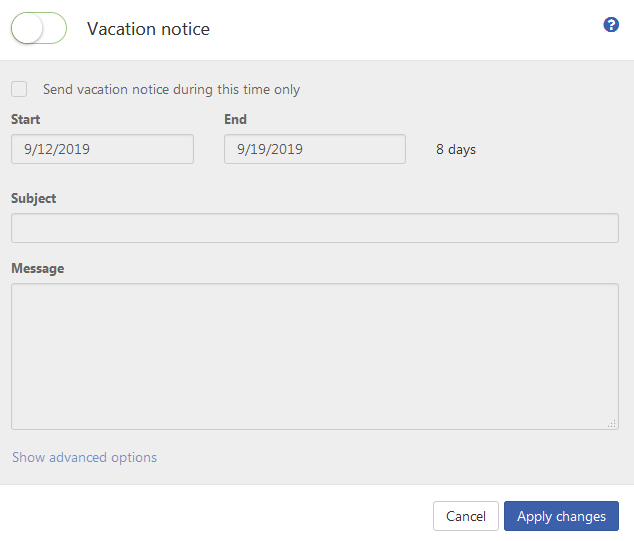
Vacation notice
This
feature is a module for managing user email vacation notices or
auto-responders. The instructions on how to set up vacation notice can
be found
here.
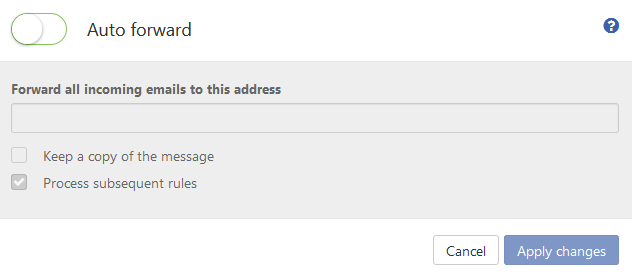
Auto Forward
In order to set up forwarding from your Private Email account to another account, follow the instructions provided
here.
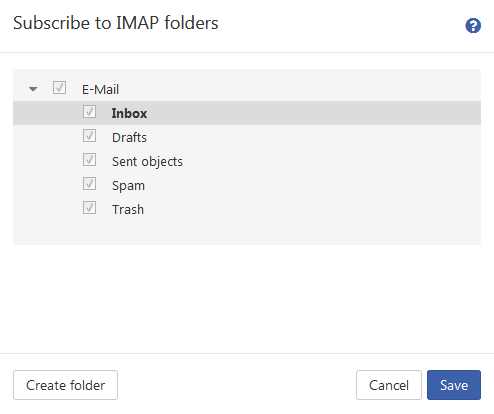
Change IMAP subscriptions
If you use IMAP
email account, you can specify an IMAP folder list that is synced with
all the folders contained in your account on the mail server. Simply
click on Change IMAP Subscription button and the pop-up window with the list of folder will appear:
View section
Here you can specify the settings for the email creation:
-
Allow html formatted emails - defines whether the emails are displayed in html
format, although in case the feature is turned off, all mail in your
account is displayed in plain text format (no images, italics or bold
text).
- Color quoted lines - defines whether original
messages are highlighted with a vertical line, while forwarding or
replying to one. The messages or replies will be displayed as embedded.
-
Use fixed-width font for text mails - this option specifies whether a
fixed-width font is used when composing a plain text email. Fixed-width
font or monospaced font is font whose characters occupy the same amount
of horizontal space, in a contrary to variable-width fonts.
- When sending email, you might want to know whether the message was opened (read receipt). Show requests for read receipts feature allows you to enable requesting the receipts for mail you send. Please note that this feature works properly only if sender and recipient are Private Email users.
Behavior section - Permanently remove deleted emails
- allows you to specify whether emails will be removed permanently
immediately after you click the Delete button or whether they will go to
the trash folder.
- Automatically collect contacts in the folder "Collected addresses" while sending specifies whether new email addresses are automatically collected in the Collected contacts folder when sending a new email.
- While marking Automatically collect contacts in the folder "Collected addresses" while reading box, will enable collecting addresses when reading a new email.
- Ask for mailto link registration option defines whether the groupware can ask for a mailto link registration.
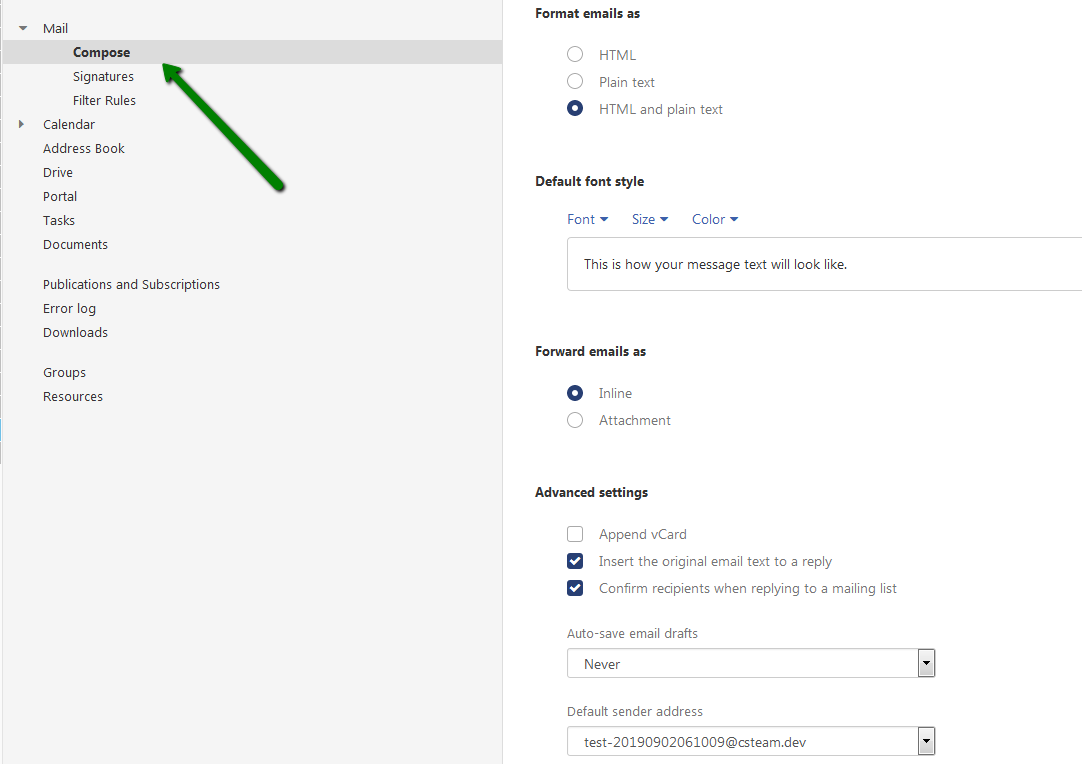
Compose tab:
This menu allows you to set the preferred email format, font style, and some advanced settings:
- Format emails as option allows you to specify whether you would like the text of your emails being sent as HTML markup, Plain Text
or both HTML and plain text. Choosing HTML, you will be able to create
formatted text, such as italics and bold, unnumbered lists etc; include
images in your email and add hyperlinks. Plain text email contains text
only without any formatting and images.
- Default font style option defines the font style, size and colour.
- The Forward
email as section allows you to choose an Inline option, the email will
be resent within the new email text body, however in case you set
Attachment option to be used, the text will be sent as an attachment to
the new Email.
Advanced settings section
- Ticking Append vCard
box you will enable adding your contact data to a new mail in vCard
format. vCard is a file format standard for electronic business cards.
- While enabling Insert the original email text to a reply will append the original text to your reply.
- Confirm recipients when replying to a mailing list, defines whether you have to confirm the recipient when replying to a mailing list.
NOTE 1: It is advised to use HTML and plain text option, as it allows you to use
all pros of HTML markup as well as main advantage of plain text that is
increasing the deliverability of the message.
NOTE 2: Format email as plain text option should be enabled. Default sender
address field specifies the pre-set address for your new emails.
- In
order to specify the interval for saving an email while being composed
to the Drafts folder, you should choose the suitable value from the
drop-down menu under the Auto-save email drafts option.
- With the Default sender address option you will be able to specify the pre-set sender address for new email.
- And by using the Auto-save email drafts option you will be able to define the interval for saving an email while being composed to the Drafts folder. The disabled option deactivates this function.
Signatures
This option will allow you to create your custom signatures for outgoing emails. The detailed guide can be found
here.
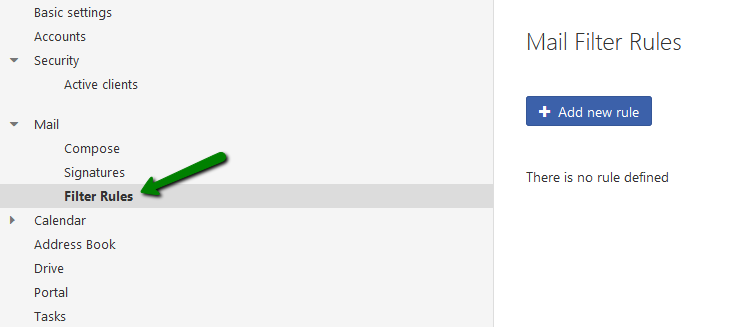
Filter Rules
Using
this option, you can set up custom rules, for incoming mail filtration.
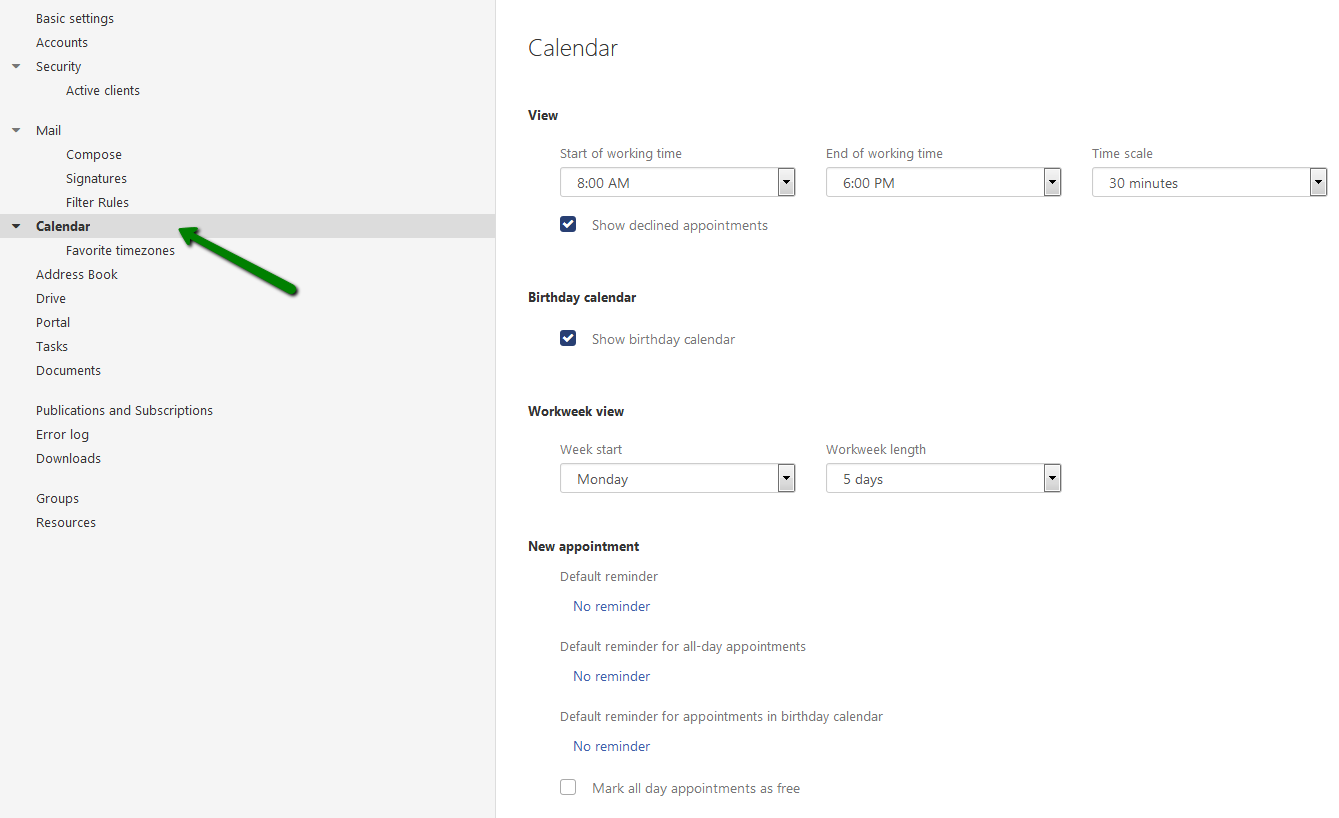
Calendar
This tab allows you to manage your calendar settings:
Start of working time: defines the start of the working hours.
End of working time: defines the end of the working hours.
Time scale in minutes: specifies the interval for dividing the time grid in the Day, Work week or Week calendar views.
Show declined appointments: defines whether appointments that you refused are displayed.
Birthday calendar - based on the address book it allows you to add all birthdays by selecting the checkbox next to the Birthday calendar.
Workweek view:
- Week start - defines the beginning of a work week.
- Workweek length - defines the number of days of a work week.
Default reminder: defines the pre-set time interval for the appointment reminder.
Mark all day appointments as free: defines whether all day appointments are displayed as free per default:
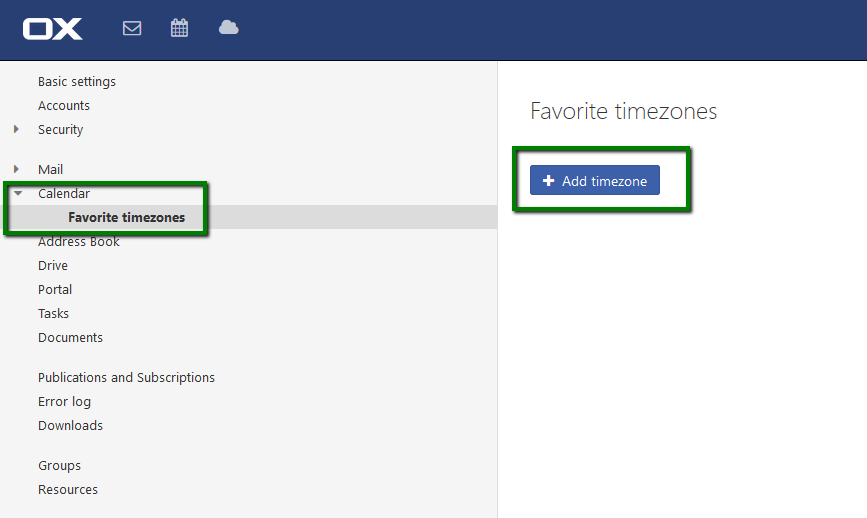
Favorite timezones
Timezones
marked as favorites by you, can be displayed in the calendar sheet in
addition to the preset timezone. To add one, click on Add timezone:
Address Book
Here
you can define the suitable variant of displaying names in your Address
book:
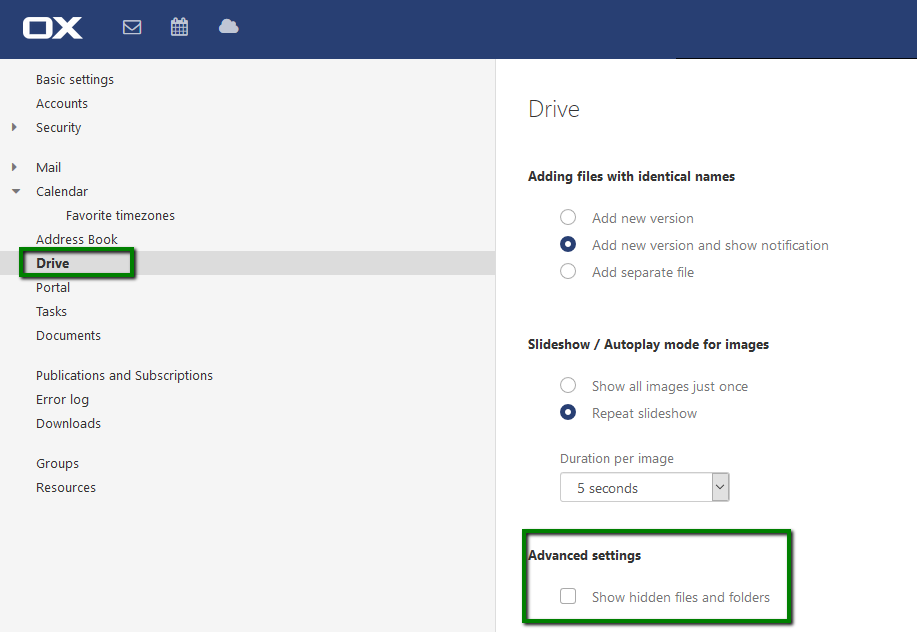
Here you can enable Show hidden files option:
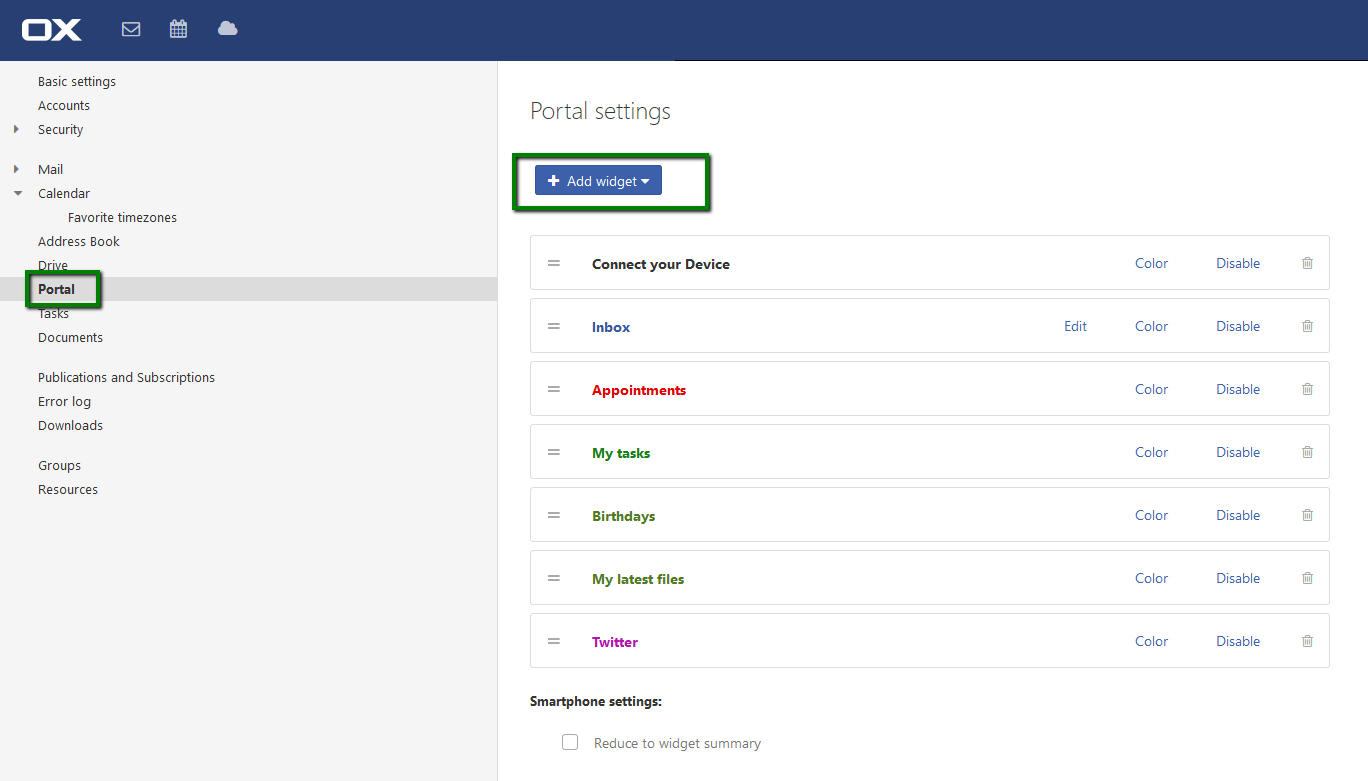
It
is your customizable information center, showing scheduled
appointments, mailbox quota, new messages and favorite news from your
social networks.
You can add the widget to the Portal page by clicking on Add widget button:
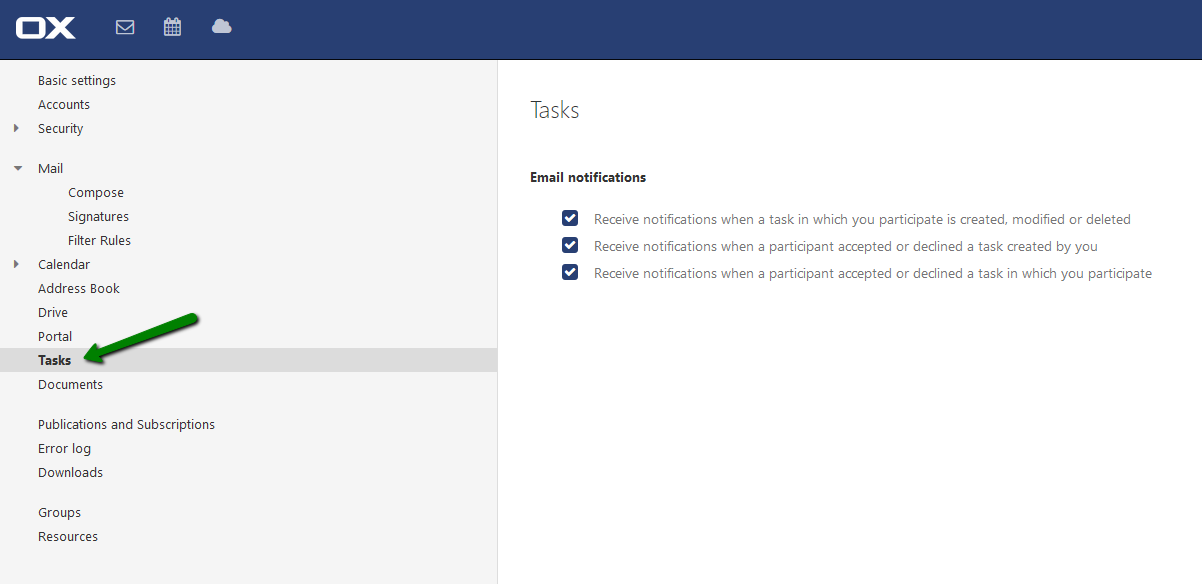
Receive notifications when a task in which you participate is created, modified or deleted:
specifies whether you will receive an email notification if the
following is true: A task in which you participate has been re-created,
changed or deleted.
Receive notifications when a participant accepted or declined a task created by you:
specifies whether you will receive an email notification if the
following is true - a participant accepted or declined a task created by
you.
Receive notifications when a participant accepted or declined a task in which you participate:
specifies whether you will receive an email notification if the
following is true - a participant accepted or declined a task in which
you participate.
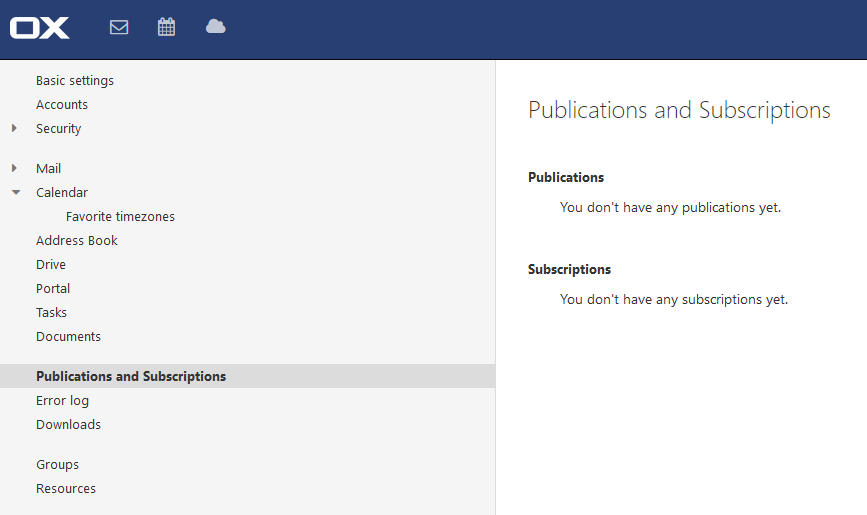
This
feature allows you to get an overview of your subscribed and published
data and to manage them: activate, edit or remove subscriptions or
publications and edit or remove a social network's account.
This option allows you to create, edit and access folders for storing and managing content using Drive application:
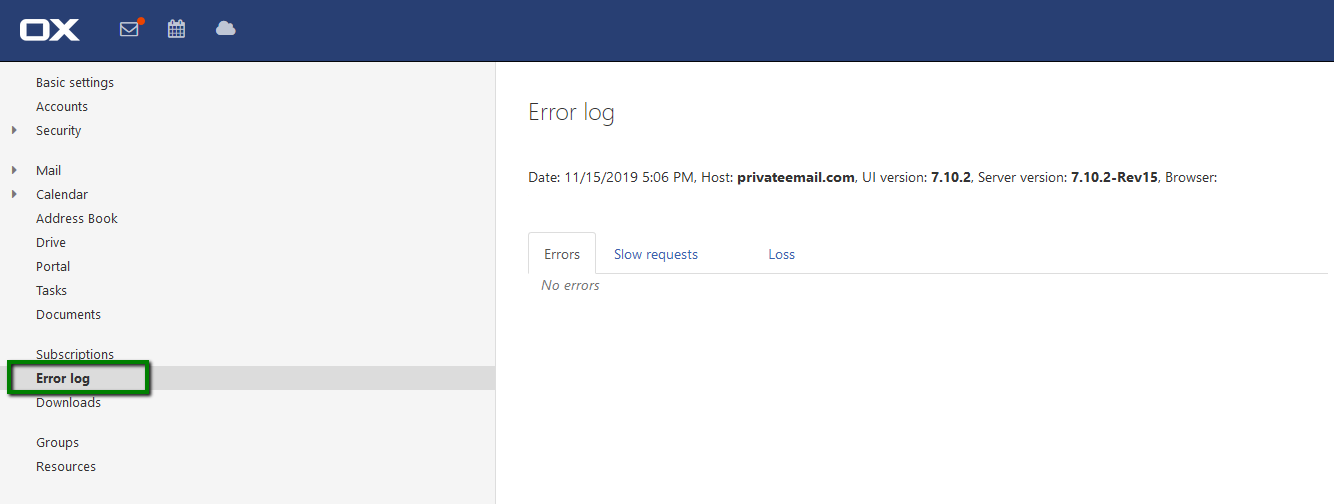
Webmail also provides an Error Log for all applications available in the web frontend. Here you will be able to check filed, slow and lost requests:
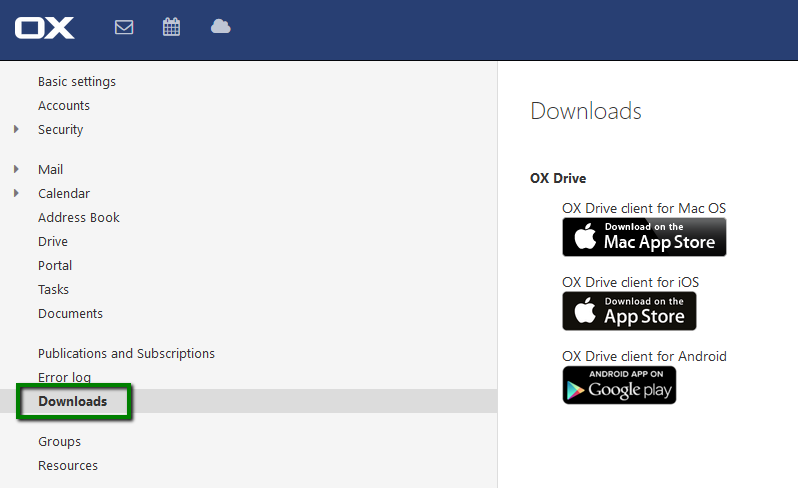
In section Downloads you can find active links to download Installation Wizard, in order to set up OX Drive clients for Mac, iOS and Android:
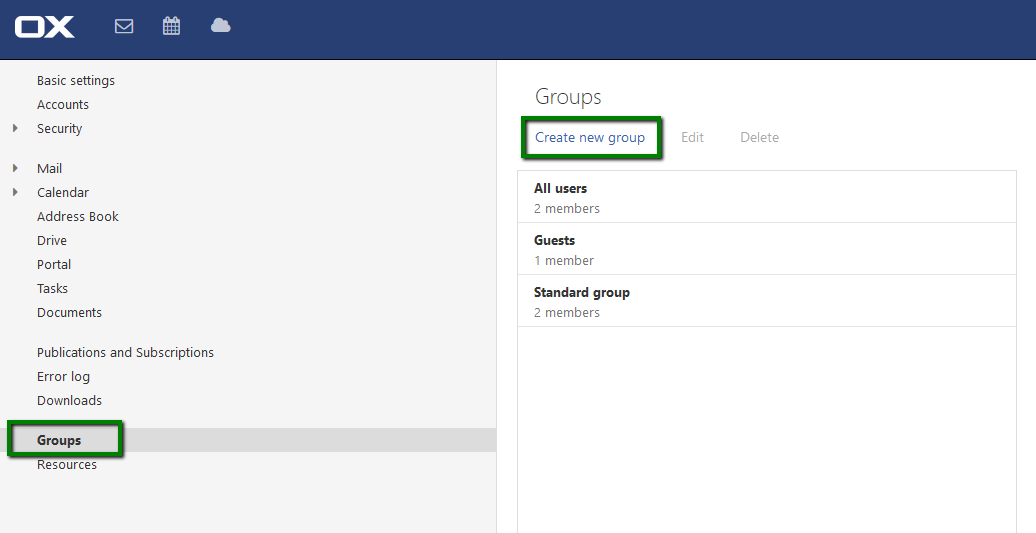
Here you can create Groups and add members there from your address book. One simple click on Add new group
button, specifying the name and choosing the privileged members. This
feature give you capability to share your contacts with external
partners and involve internal members into shared activities: e.g.
providing with the permission to edit documents:
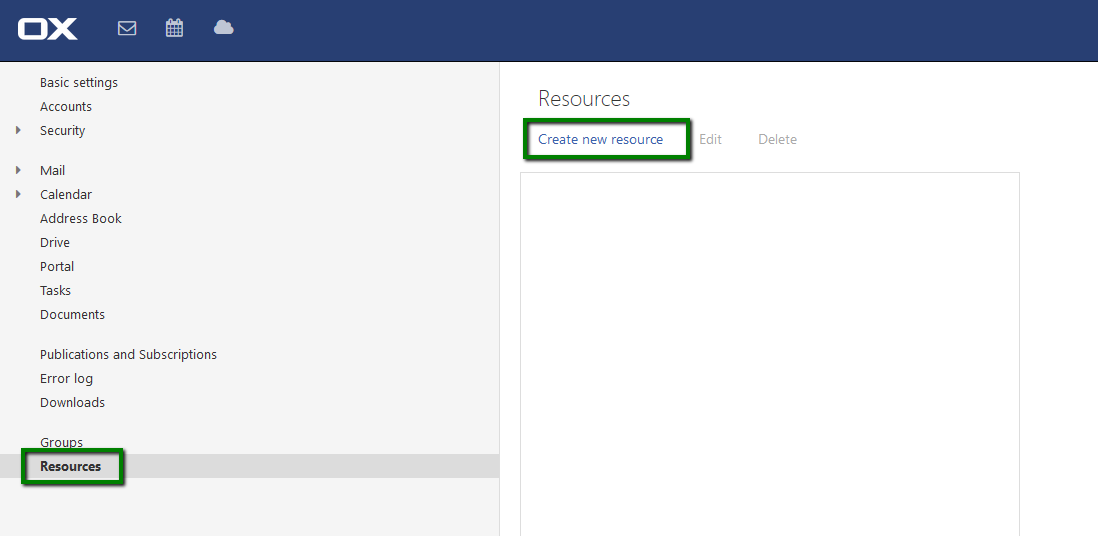
Creating new recourse
– any room equipment that you schedule instead of a person, is required
for resource managing (booking) in Outlook email-client. An email
address for a resource is required by Outlook so that Outlook is able to
manage resources:
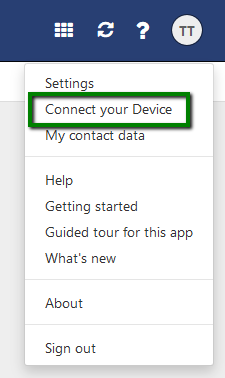
In order to set up the necessary features,
log in to webmail from the preferred device. Then navigate to the
System menu>>
Connect Your Device section:
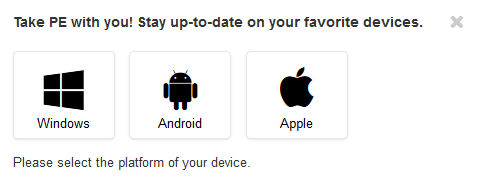
Choose the preferred platform:
Windows set-up
This option allows you to set basic settings for your account in order to connect it to the Laptop or PC:
Once you click on the
Laptop+PC icon, you will be able to:
1. Download the
Drive application to synchronize your files with it. The detailed instruction you may find
here.
2. Check the settings for the
Manual set up of your email account.
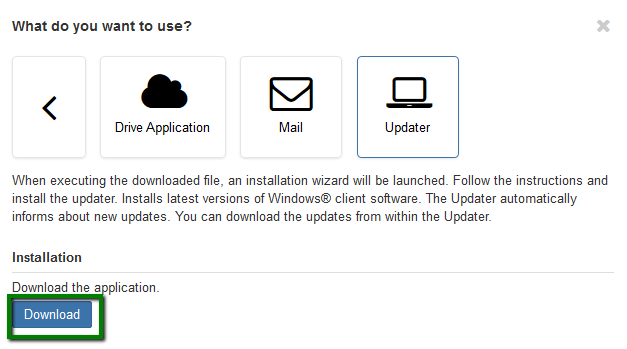
3. Download the Installation Wizard, in order to set up Updater:
Android set-up
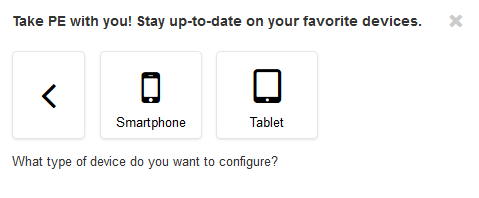
This option allows to connect your account to the Smartphone or Tablet :
Once you click on the
Smartphone or
Tablet tab, you will be able to:
1. Synchronize your files with our
Drive application. The detailed instruction
you may find here.
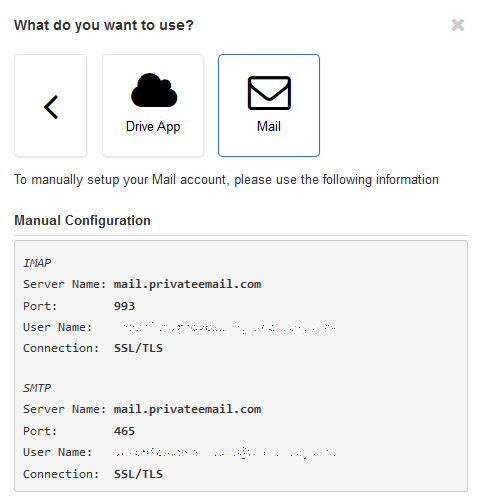
2.Check the settings for the
Manual set up of your email account.
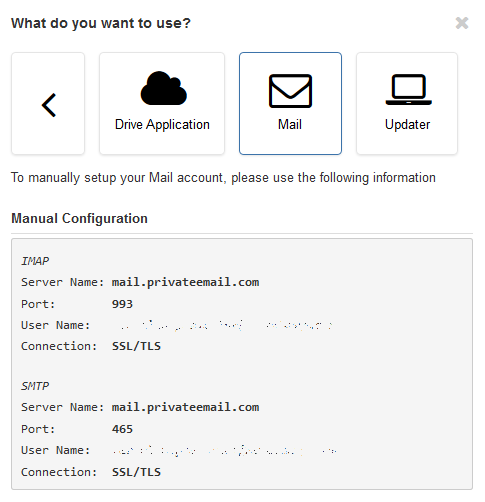
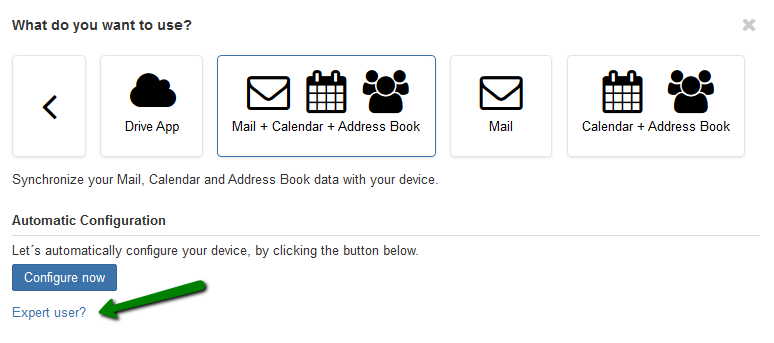
Apple set-up
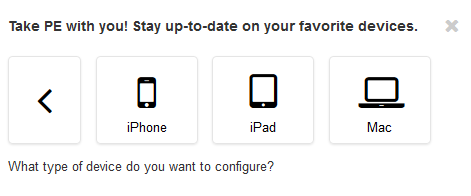
Here you will find the settings for the email account set up on the iPhone/iPad/Mac:
If you click on the
iPhone or
iPad or
Mac tab you will be able to:
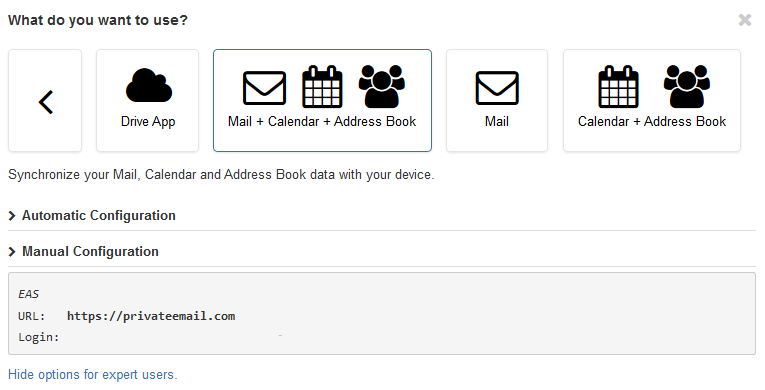
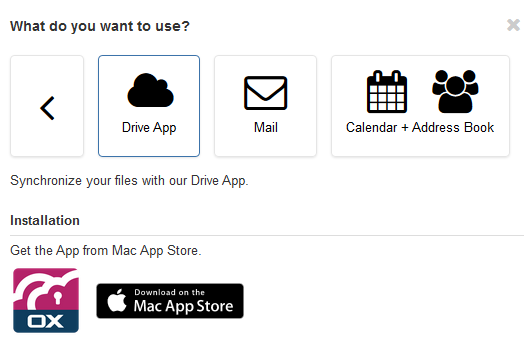
1. Synchronize your files with our
Drive application. The detailed instruction is located
here.2.Synchronize your
Mail,
Calendar and
Address Book data with your device
Automatically, or check the
Manual settings in the
Expert user tab.
PLEASE NOTE: Automatic Configuration is available only in case you are logged into webmail from the preferred device (iPhone/iPad/Mac).
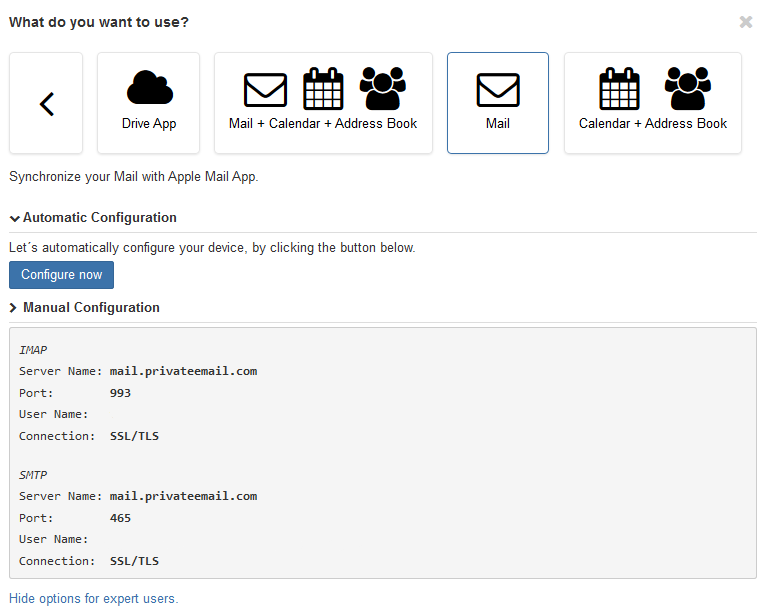
3. Synchronize your
Mail with Apple Mail App. In this section you will be able to
Automatically configure your device or check the settings for the
Manual set up:
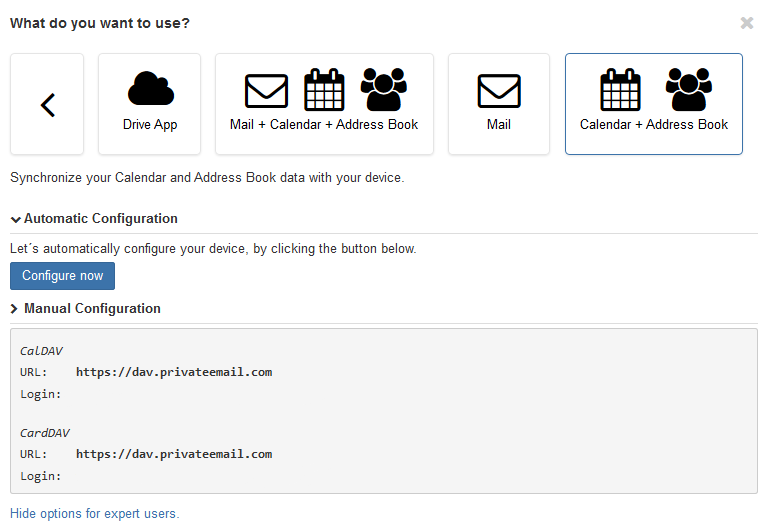
4. Synchronize your
Calendar and
Address Book data
Automatically or
Manually with your device:
In the Mac tab you will be able to:
- Synchronize your files with our Drive application.
- Synchronize your Mail in MacMail.
- In this section you will be able to Automatically configure your device or check the settings for the Manual set up.
- Synchronize your Calendar and Address Book data Automatically or Manually with your device.
More specific Email Clients and Mobile Devices setup instructions can be found
here.
That's it!
Need any help? Contact our HelpDesk