WordPress Tutorial

WordPress help for beginners

A quick guide to WordPress

If you're looking to learn WordPress and build a website you've come to the right place. With our plain English guide to WordPress, you'll learn how easy it can be to use this free content management system to create and manage a website.

With this WordPress tutorial, you'll have the skills to create posts, add pages and embed media such as images and videos. We'll even show you how to change templates, add widgets, install plugins, customize menus and much more.

WordPress.org vs. WordPress.com

To get WordPress set up, you need to choose a hosting platform. A host is necessary for your website because it makes it possible for others to view it on the internet.

WordPress is available on two different platforms, the main difference between them comes down to hosting. Hosting is included with WordPress.com while WordPress.org is self-hosted. With a site hosted on WordPress.com, you have to pay extra for their hosting and have a limited set of features and functionalities compared to your own installation.

To host a WordPress site yourself, you need to install the software on your hosting account, either by uploading it directly or using an automated solution like Namecheap's Softaculous Apps installer. Softaculous installs WordPress, creates the associated databases and otherwise makes managing your website yourself much easier.

If you want something that offers greater security and stability, a managed Wordpress hosting solution like Namecheap's EasyWP eliminates much of the worry. This is a concierge service where the host takes care of all the technical aspects of keeping a WordPress site up and running including security, speed, WordPress updates (to the latest version), daily backups (to protect your content) and website uptime (to ensure your site is available online). Managed hosting is a good option for future scalability. Namecheap users can use this hosting platform to build a brand-new WordPress website in a snap, with all the tools to manage their site with just a few clicks.


How to use WordPress

Once you've installed WordPress, it's time to get familiar with the software itself. Log in with your username and password, and you'll see a dashboard that offers a clear user interface with the most common tasks at your fingertips.

Navigating WordPress

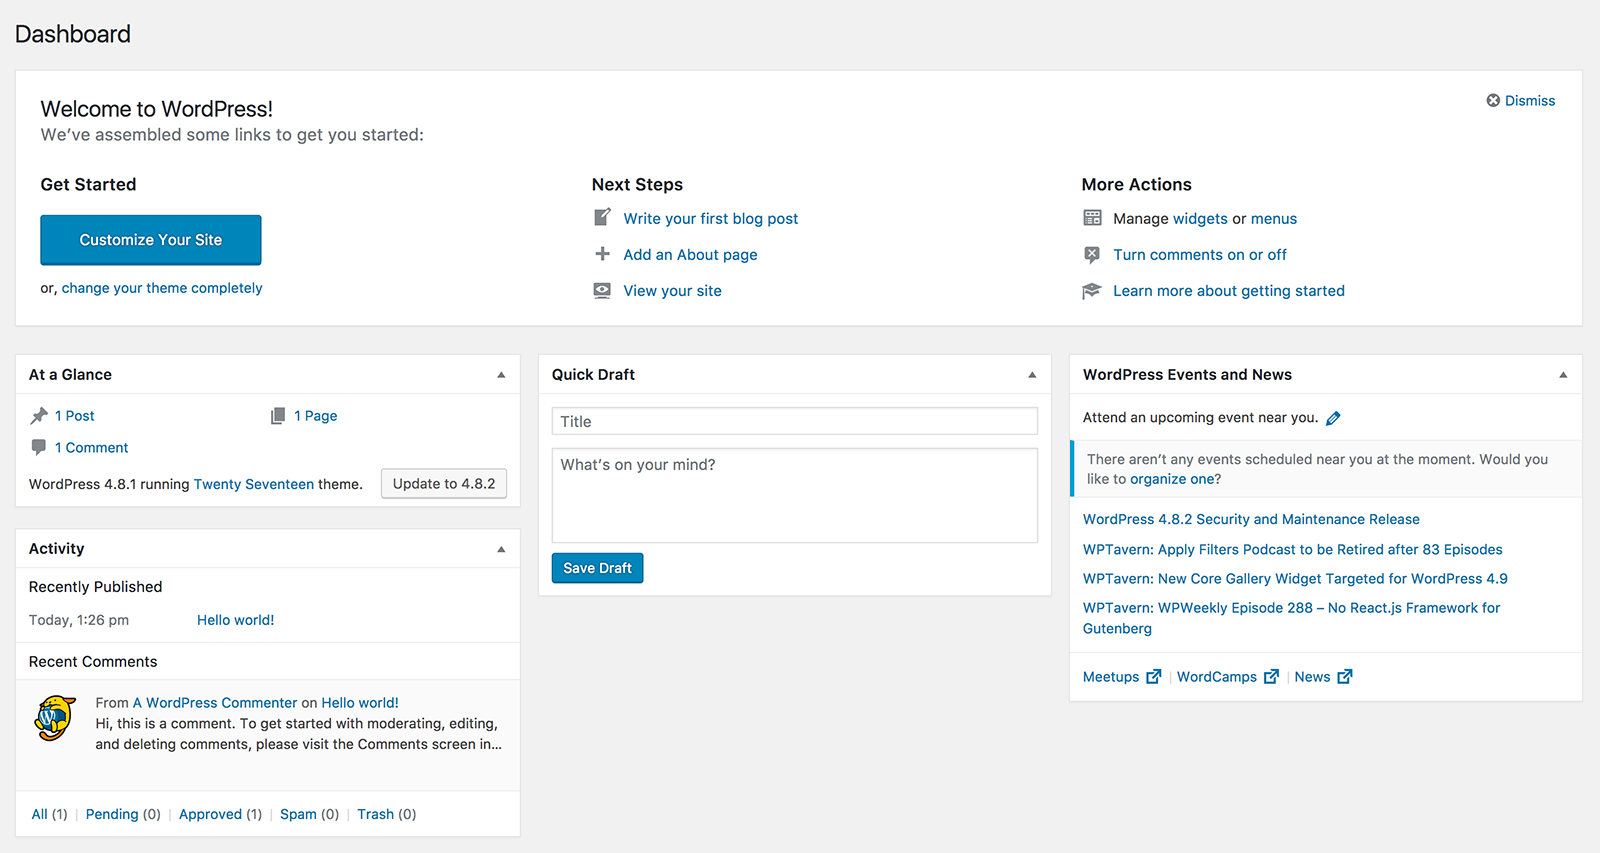
Once you open the WordPress dashboard, you’ll see information organized in blocks known as widgets. You'll find five widgets added to get you started with the software; At a Glance, Quick Draft, WordPress News, Activity, and most important of all for people who are new to WordPress, the Welcome Widget.

  • At a Glance features a summary of your posts and pages as well as any comments received. There's also a statement which tells if you are up-to-date with the most recent version of WordPress the theme currently uses.

  • The Activity section includes a roundup of your site’s latest activities. This area includes recently published pages and scheduled posts along with the latest comments from your blog readers. From here you can moderate comments before they are in public view.

  • The Quick Draft Widget lets you write quick draft articles and posts using a simplified version of the post editor.

  • WordPress News is worth checking out if you're interested in what’s happening in the WordPress developer community and any other related news.

  • Pay attention to the Welcome Widget since this caters to the needs of new users. Here you'll find links to the most common actions required to set up a new WordPress website.

To personalize your dash, rearrange and edit the default Widget sections by clicking Screen Options and selecting the widgets you want to use.

The last area to explore is the sidebar to the left of the dash; here you'll find links to all the features and settings available to update and configure your site. Each sidebar menu item includes a fly-out menu to display further options. Hovering over Posts, for example, will reveal options to view and create posts, categories, and tags.

WordPress settings

WordPress General Settings lets you control how your site is displayed. From here you may change your site's title, tagline, language, and visibility.

  • The first setting you will encounter is the Site Title. Changing your title won't affect your URL address, it's used by WordPress to identify you. The title you choose will be seen by your readers in various places across your site, for example, it will appear when your followers receive notifications. It's also displayed when viewing your blogs and others linked to your account. Your site's title can be anything you like, a neatened up version of your URL or anything that reflects your pages is the best way to go.

  • The next setting is the Tagline, the place to include a short description or something catchy to describe what your site is about.

  • Language settings can change some of the theme texts shown to your visitors.

  • The Privacy controls give you the power to make your site private or public. Changing these settings will affect your website's visibility because they limit who can and cannot view it.

Using WordPress as CMS

Many people think of WordPress just as a blogging platform but having the ability to create and update static pages make it a content management system in its own right. If you're using WordPress as a professional website, you'll be using pages, not posts for the majority of content that you'll publish. You'll also create a homepage that serves as the initial landing page when people visit your site.

WordPress does quite a lot on its own, but Plugins expand its functionality. Whether you're concerned about SEO or just want to have an easy way to upload a gallery of images, the WordPress active developer community has you covered.

Keep secure and back up

To get the best out of what software has to offer it's important to make sure you're using the most up to date version of WordPress. Many of the WordPress sites that get hacked have not updated to the latest version. It's not only beneficial to the security of your site; the newest software will include updated core plugins and themes, extra features and more practical functions.

WordPress upgrades its software to keep the system secure, and by default, it can update itself when a minor release is available. When it comes to a major release, you have to initiate the update yourself, but you can automate this process. Use the Easy Updates Manager plugin to take control of updates. It enables global updates on your site including WordPress core, plugins and themes, so you don't have to check for new versions yourself.

In addition to regular updates, backups are a key part of keeping your site secure. There are plenty of tools to help manage your site from importing and exporting to backing up your content to keep it safe. Vaultpress and Backup Buddy are two popular backup plugins. By synchronizing with your site in real time, these plugins generate a complete replica on their servers when you make any changes to your site. This way, in the case of any disruption to your site or data, you can automatically restore any backup to your website in a matter of clicks.

A managed solution like our own EasyWP handles this easily, with no additional plugins needed.


How to build a WordPress website

Once you've completed the main site settings, you're ready to begin on the content pages. WordPress comes with an editor similar to Microsoft Word allowing anyone to add or edit content in their browser without HTML know-how. When you create content using WordPress you have the option to choose between creating a post or a page; both have particular uses depending on what you want to do with your website.

Structure your WordPress website

Each site has different needs. Is it a blog for a retail location, or a service company? Is it intended as a professional website or will it serve as an ongoing publication? Think about the services you are offering and what will appear on your site.

A well conceived layout, when combined with proper categorization, will help make it easier for users to navigate and find what they are looking for. Many people want a website with just a few pages and to do so, you will organize your content from a homepage with a menu linking to the remaining pages on your site.

How to create a WordPress menu

Custom menus are a list of links displayed to direct visitors to select pages on your site. Your website will have a primary navigation menu to switch between main pages. You may also wish to organize your footer pages and social links with similar navigation style menus. Once you've published a page or a post you can add it to an existing menu. To create a menu, follow these steps:

  • Click on Visit Site in your Admin toolbar to preview the front end of your site. If your theme suggests it, click Add a Menu in the upper left-hand corner or under Appearance in the dash, click the Menu option.

  • Give your menu a name and click Create Menu

  • Select the type of content to add to the page. Your menu may link to Pages, Posts or specific Post categories. Check the items you wish to feature and click Add to Menu.

  • All checked items, Posts, Pages or Post categories will now display below the Menu structure. From here you can reorder them as you'd like them to appear.

  • Menu Settings lets you choose which type of Menu you're creating. Check the Primary Menu theme to use this menu as your main page navigation or opt for the Secondary Menu theme for any other use.

  • To add your newly created menu to your site select the Save Menu option. This is also a good time to preview your website to check if you're happy with the results.

How to create and edit WordPress Pages

Use WordPress pages for static content or information, the kind which includes content that doesn't change frequently. These can include your About Us page or any product pages.

  1. Locate the Pages menu available in the WordPress dashboard and select the Add new button.

  2. Give your page a logical title for quick reference, name the About us page on your domain 'about' for example. The title you choose may double up as the URL slug, which is the exact address of a specific page. By setting up permalinks, the title 'about' creates the automatic URL slug http://yourdomain.com/about/.

  3. To set up permalinks (optional step) head to the dash and follow Settings > Permalinks and select Post name as your default permalink structure.

  4. Type your content in the content area.

  5. Now that you've begun creating a page you have a few options. You can post immediately, save your work as a draft and come back to it later or schedule the page for future publishing. You may want to preview your page one last time before clicking Publish. You've now added a new page to your WordPress site.

You may edit the contents of published pages. To make any changes click on the page's title under Pages in your dash to re-open the corresponding page's editor. Once you're happy with any changes you've made to the original contents, hit the publish button to see them go live.


Creating a blog post: Starting a WordPress post

Posts typically appear in a blog and contain general news or informational updates keeping your site fresh with new content. Many business websites have a blog alongside their main pages since they offer more creative license and let you connect further with your target audience. A restauranteur, for example, might use blog posts for featured menu item stories. Here customers can access information about seasonal items on the menu or new recipes and gives them a chance to share their comments in the post.

Posts can be listed in reverse chronological order, tagged, categorized and archived as you see fit. Follow the instructions given below to publish a WordPress post:

  • Find the Post Menu on the left-hand side of the WordPress Administration Panel (Dashboard) and click the Add New sub-tab to open the post editor.

  • Similar to the Pages editor, you need fill in the blanks by entering a title in the upper field and add body content in the main post editing box below it.

  • You'll also want to choose a category for your new posts. Categories allow you to sort and group posts that cover similar topics, like “Fashion” or “Technology.” You can create a new category at any time.

  • Once you're ready, publish using the corresponding icon in the top right of the page to put the post online. Here you also have the option to save your post as a draft if you'd like to work on it later or post date and schedule for a later time. Click the Preview button for a preview of how the post will look before you publish it to the public.

That's a quick summary of how to get post content online. Once you're comfortable with the basics, there are tons of post formats to use which display content in different styles. You can also experiment with the text editing tools, add a featured image and assign categories and tags to your post.

Add a WordPress theme

Finding a suitable theme with the right menu is one of the fun steps to creating a WordPress CMS site. Menu layouts vary depending on the theme, choose from thousands of free and premium items. To install a theme head to the Appearance tab in your WordPress Administrator Dashboard, select Themes and start browsing. Be sure to use the Live Preview button to preview a theme before adding it to your website.

Install widgets

If you're looking for extra features, head to the Appearance tab in your dash and click Widgets from the drop-down menu. The widget menu includes the designated areas on your WordPress site where you can place widgets. Clicking on the widget titles prompts WordPress to let you know which sidebars they fit into.

Your WordPress theme defines widget-ready areas, but If the specific type that you're looking for isn't in the widget area, it's possible that you can add it as a plugin.


You may also like

Need help? We're always here for you.

× Close