

Production-ready Vue SSR in 5 Simple Steps
Here at Namecheap, we often use Vue.js on the frontend with server-side rendering (SSR). Setting up SSR in the first place, however, isn’t always so easy. That’s why I decided to describe this process in simple steps to make it easier for understanding.
Also, after reading the official documentation, I started thinking that it might be useful to see the full picture: how the application should look at the end. So I created a repo with an example.
In this article we’ll cover how to set up production-ready SSR for Vue application using:
- Webpack 4
- Babel 7
- Node.js Express server
- Webpack-dev-middleware and webpack-hot-middleware for comfortable dev environment
- Vuex for state management
- vue-meta plugin for metadata management
Let me note that we won’t cover the basics of these technologies. We’ll concentrate on SSR only, and jump right into the action. I hope you find it helpful… Now let’s get into it!
Step 1. Configure Webpack
At this point, you probably already have a Vue app, and if you don’t, feel free to use my repo as a boilerplate.
First, let’s take a look at our folders and files structure:
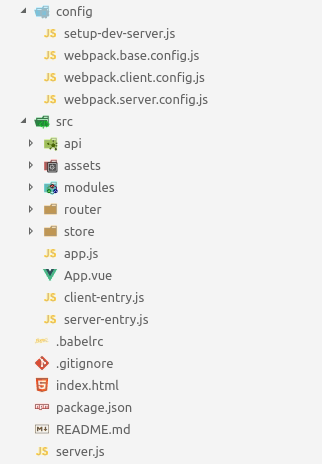
As you can see, it’s pretty standard except for a couple of things that might catch your eye:
- there are two separate webpack configs for client and server builds:
webpack.client.config.jsandwebpack.server.config.js. - there are two respective entry files:
client-entry.jsandserver-entry.js.
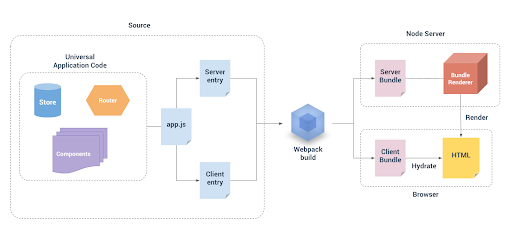
This is actually a key configuration point of our application. Here is a great diagram from the official documentation that provides the architecture overview we’re implementing:
Client config is the one that you’ve probably already dealt with. It’s basically for building our application into plain JS and CSS files.
// config/webpack.client.config.js
const path = require('path');
const webpack = require('webpack');
const merge = require('webpack-merge');
const MiniCssExtractPlugin = require('mini-css-extract-plugin');
const VueLoaderPlugin = require('vue-loader/lib/plugin');
const autoprefixer = require('autoprefixer');

const base = require('./webpack.base.config');
const isProduction = process.env.NODE_ENV === 'production';
const srcPath = path.resolve(process.cwd(), 'src');

module.exports = merge(base, {
   entry: {
       app: path.join(srcPath, 'client-entry.js')
   },
   output: {
       path: path.resolve(process.cwd(), 'dist'),
       publicPath: '/public',
       filename: isProduction ? '[name].[hash].js' : '[name].js',
       sourceMapFilename: isProduction
           ? '[name].[hash].js.map'
           : '[name].js.map',
   },
   resolve: {
       extensions: ['.js', '.vue'],
   },
   module: {
       rules: [
           {
               test: /\.css$/,
               use: [
                   MiniCssExtractPlugin.loader,
                   {
                       loader: 'css-loader',
                       options: {
                           sourceMap: !isProduction
                       }
                   },
               ]
           },
           {
               test: /\.scss$/,
               use: [
                   MiniCssExtractPlugin.loader,
                   'css-loader',
                   {
                       loader: 'postcss-loader',
                       options: {
                           plugins: () => [autoprefixer]
                       }
                   },
                   'sass-loader',
               ],
           },
       ]
   },

   plugins: [
       new VueLoaderPlugin(),
       ...(isProduction ? [
           new MiniCssExtractPlugin({
               filename: '[name].[contenthash].css',
           }),
       ] : [
           new MiniCssExtractPlugin({
               filename: '[name].css',
               hmr: true,
           }),
           new webpack.HotModuleReplacementPlugin(),
       ])
   ]
});
Server config is an interesting one. We need it to generate a special json file-server bundle, that will be used on the server-side for rendering the plain html of our Vue app. We use vue-server-renderer/server-plugin for this purpose.
// config/webpack.server.config.js
const nodeExternals = require('webpack-node-externals');
const VueLoaderPlugin = require('vue-loader/lib/plugin');
const VueSSRServerPlugin = require('vue-server-renderer/server-plugin');
const path = require('path');
const merge = require('webpack-merge');

const base = require('./webpack.base.config');
const srcPath = path.resolve(process.cwd(), 'src');

module.exports = merge(base, {
   entry: path.join(srcPath, 'server-entry.js'),
   target: 'node',
   // This tells the server bundle to use Node-style exports
   output: {
       libraryTarget: 'commonjs2'
   },

   // This is a plugin that turns the entire output of the server build
   // into a single JSON file. The default file name will be
   // `vue-ssr-server-bundle.json`
   plugins: [
       new VueSSRServerPlugin(),
       new VueLoaderPlugin(),
   ]
});
Another thing that is different from the client config is that we don’t need to process CSS files, so there are no loaders and plugins for it.
As you may have figured out, all common settings for client and server configs we put to the base config.
// config/webpack.base.config.js
const path = require('path');
const srcPath = path.resolve(process.cwd(), 'src');
const isProduction = process.env.NODE_ENV === 'production';

module.exports = {
   mode: process.env.NODE_ENV,
   devtool: isProduction ? 'source-map' : 'eval-source-map',
   module: {
       rules: [
           {
               test: /\.vue$/,
               loader: 'vue-loader',
               include: [ srcPath ],
           },
           {
               test: /\.js$/,
               loader: 'babel-loader',
               include: [ srcPath ],
               exclude: /node_modules/,
           },
           {
               test: /\.(png|jpe?g|gif|svg)(\?.*)?$/,
               use: [
                   {
                       loader: 'url-loader',
                       options: {
                           limit: 10000,
                           name: '[path][name].[hash:7].[ext]',
                           context: srcPath
                       }
                   }
               ]
           },
           {
               test: /\.(woff2?|eot|ttf|otf)(\?.*)?$/,
               use: [
                   {
                       loader: 'url-loader',
                       options: {
                           limit: 10000,
                           name: '[name].[hash:7].[ext]'
                       }
                   }
               ]
           },
       ]
   }
};
Step 2. Create Application Entries
Before we get into the client and server entries, let’s have a look at the app.js file:
// app.js
import Vue from 'vue';
import Vuex from 'vuex';
import Meta from 'vue-meta';
import App from './App.vue';
import {createRouter} from './router';
import createStore from './store';

Vue.use(Vuex);
Vue.use(Meta, {
   ssrAppId: 1
});

export const createApp = (context) =>  {
   const router = createRouter();
   const store = createStore(context.state);

   const app = new Vue({
       store,
       router,
       render: h => h(App),
   });

   return {app, router, store};
};
Note that instead of just creating an app instance, we export a factory function createApp(). If our app were running in the browser env only, we wouldn’t have to worry about our users getting a fresh new Vue instance for each request. But since we’re creating the app in the node.js process, our code will be evaluated once and stay in the memory of the same context.
So if we use one Vue instance across multiple requests, it can lead to a situation when one user gets the app state of another’s. In order to avoid this scenario, we should create a new app instance for each request. Also, for the same reason, it’s not recommended that you use stateful singletons in Vue app.
Every real-life app will have some metadata, like title or description, that should be different from page to page. You can achieve this with a vue-meta plugin. Click here to understand why we’re using the ssrAppId option.
// client-entry.js
import { createApp } from './app';

const { app, router } = createApp({state: window.__INITIAL_STATE__});

import './assets/style.scss';

router.onReady(() => {
   app.$mount('#app');
});
In the client entry, we call createApp(), passing the initial state injected by the server. After the router has completed the initial navigation, we mount the app to the DOM. Also in this file, you can import global styles and initialize directives or plugins that work with the DOM.
// src/server-entry.js
import { createApp } from './app';

export default context => {
   // since there could potentially be asynchronous route hooks or
   // components, we will be returning a Promise so that the server can
   // wait until everything is ready before rendering.
   return new Promise((resolve, reject) => {
       const { app, router, store } = createApp(context);
       // metadata is provided by vue-meta plugin
       const meta = app.$meta();

       // set server-side router's location
       router.push(context.url);

       context.meta = meta;

       // wait until router has resolved possible async components and
       // hooks
       router.onReady(() => {
           const matchedComponents = router.getMatchedComponents();
           // no matched routes, reject with 404
           if (!matchedComponents.length) {
               return reject({ code: 404 });
           }
           // This `rendered` hook is called when the app has finished
           // rendering
           context.rendered = () => {
               // After the app is rendered, our store is now
               // filled with the state from our components.
               // When we attach the state to the context, and the
               // `template` option is used for the renderer, the state
               // will automatically be serialized and injected into the
               // HTML as `window.__INITIAL_STATE__`.
               context.state = store.state;
           };

           // the Promise should resolve to the app instance so it can
           // be rendered
           resolve(app);
       }, reject);
   })
}
Server entry is pretty much described by the comments in the code. The one thing I’d add regarding the router.onReady() callback is that if we use a serverPrefetch hook for data prefetching in some of our components, it waits until the promise returning from the hook is resolved. We’ll see an example of how to use it a bit later.
Now we can add scripts for building our app to the package.json:
// package.json
"build:client":
    "cross-env NODE_ENV=production webpack --config ./config/webpack.client.config.js",
"build:server":
    "cross-env NODE_ENV=production webpack --config ./config/webpack.server.config.js"
Step 3. Run Express Server with Bundle Renderer
In order to render our app into plain HTML on the server side, we’ll use vue-server-renderer module and the ./dist/vue-ssr-server-bundle.json file that we generated by running build:server script. Let’s not think about development mode for now, we’ll discuss it in the next step.
// server.js
const express = require('express');
const path = require('path');
const fs = require('fs');
const vueServerRenderer = require('vue-server-renderer');
const setupDevServer = require('./config/setup-dev-server');

const port = 3000;
const app = express();

const createRenderer = (bundle) =>
   vueServerRenderer.createBundleRenderer(bundle, {
       runInNewContext: false,
       template: fs.readFileSync(
           path.resolve(__dirname, 'index.html'),
           'utf-8'
       )
   });
let renderer;

// you may want to serve static files with nginx or CDN
app.use('/public',  express.static(path.resolve(__dirname, './dist')));

if (process.env.NODE_ENV === 'development') {
    setupDevServer(app, (serverBundle) => {
        renderer = createRenderer(serverBundle);
    });
} else {
    renderer = createRenderer(
        require('./dist/vue-ssr-server-bundle.json')
    );
}

app.get(/^\/(about)?\/?$/, async (req, res) => {
   const context = {
       url: req.params['0'] || '/',
       state: {
           title: 'Vue SSR Simple Steps,
           users: []
       }
   };
   let html;

   try {
       html = await renderer.renderToString(context);
   } catch (error) {
       if (error.code === 404) {
           return res.status(404).send('404 | Page Not Found');
       }
       return res.status(500).send('500 | Internal Server Error');
   }

   res.end(html);
});

app.listen(port, () => console.log(`Listening on: ${port}`));
First, we need to create a renderer by calling the createBundleRenderer() method and passing two arguments: the bundle that we generated earlier and the next options:
runInNewContext
Do you remember the problem with sharing application state between multiple requests that we discussed in the previous step? This option aims to solve that. But creating a new V8 context and re-executing the bundle for each request is an expensive operation, so it’s recommended that you set this flag to false due to possible performance issues. Also, beware of using stateful singletons in the app.
- template
// index.html
<!DOCTYPE html>
<html lang="en">
   <head>
       {{{ meta.inject().title.text() }}}
       {{{ meta.inject().meta.text() }}}
       <link rel="stylesheet" href="public/app.css">
       <script async src="public/app.js"></script>
   </head>
   <body>


   </body>
</html>
There is a special comment that will be replaced with HTML that’s generated by the renderer. And by the way, using the template option, the renderer will automatically add a script with declaring __INITIAL_STATE__ global variable that we use in client-entry.js to create our app.
Now, when we have a renderer instance, we can generate HTML by calling the renderToString() method, passing the initial state and current URL for the router.
Step 4. Set Up the Dev Environment
What do we need for a comfortable dev environment? I’d say the following:
- run only one node.js server without using an additional
webpack-dev-server - re-generate
vue-ssr-server-bundle.jsonfiles every time our source code is changed - hot reloading
In order to accomplish all of these things, we can use the setupDevServer() function in server.js (see the previous step).
// config/setup-dev-server.js
const setupDevServer = (app, onServerBundleReady) => {
   const webpack = require('webpack');
   const MFS = require('memory-fs')
   const path = require('path');
   const clientConfig = require('./webpack.client.config');
   const serverConfig = require('./webpack.server.config');

   // additional client entry for hot reload
   clientConfig.entry.app = ['webpack-hot-middleware/client',
       clientConfig.entry.app];

   const clientCompiler = webpack(clientConfig);

   // setup dev middleware
   app.use(require('webpack-dev-middleware')(clientCompiler, {
       publicPath: clientConfig.output.publicPath,
       serverSideRender: true,
       logLevel: 'silent'
   }));

   // setup hot middleware
   app.use(require('webpack-hot-middleware')(clientCompiler));

   // watch src files and rebuild SSR bundle
   global.console.log('Building SSR bundle...');
   const serverCompiler = webpack(serverConfig);
   const mfs = new MFS();

   serverCompiler.outputFileSystem = mfs
   serverCompiler.watch({}, (error, stats) => {
       if (error) throw error;

       global.console.log(
           `${stats.toString({
               colors: true,
               modules: false,
               children: false,
               chunks: false,
               chunkModules: false,
           })}\n\n`
       );

       if (stats.hasErrors()) {
           console.error(stats.compilation.errors);
           throw new Error(stats.compilation.errors);
       }

       // read bundle generated by vue-ssr-webpack-plugin
       bundle = JSON.parse(
           mfs.readFileSync(path.join(clientConfig.output.path,
               'vue-ssr-server-bundle.json'), 'utf-8')
       );
       onServerBundleReady(bundle);
   });
};

module.exports = setupDevServer;
This function accepts two arguments:
app– our Express app;onServerBundleReady()– callback that is called each time the source code is changed and newvue-ssr-server-bundle.jsonis generated. It takes the bundle as an argument.
In server.js we pass a callback onServerBundleReady() as an arrow function that accepts a fresh bundle and re-creates the renderer.
Note that we require all dependencies inside of the setupDevServer() function, we don’t need them to consume our process memory in production mode.
Now let’s add npm script for running the server in development mode using nodemon:
"dev": "cross-env NODE_ENV=development nodemon ./server.js",
Step 5. Use ServerPrefetch()
Most likely you’ll need to get some data from the server when your app is initializing. You can do it by simply calling API endpoint once a root component is mounted. But in this case, your user will have to observe a spinner—not the best user experience.
Instead, we can fetch the data during SSR using the serverPrefetch() component hook that was added in 2.6.0 Vue version. Let’s add an endpoint to our server.
// server.js
app.get('/users', (req, res) => {
   res.json([{
           name: 'Albert',
           lastname: 'Einstein'
       }, {
           name: 'Isaac',
           lastname: 'Newton'
       }, {
           name: 'Marie',
           lastname: 'Curie'
       }]
   );
});
We’ll call this endpoint in getUsers action. Now let’s take a look at an example of using the serverPrefetch() hook in a component.
// src/modules/home/index.vue
<template>
   <div>
       <router-link to="/about">Go to About page</router-link>
       <users-list :users="users"></users-list>
   </div>
</template>


   import {mapGetters} from 'vuex';
   import UsersList from './components/users-list/index.vue';

   export default {
       name: 'Home',

       metaInfo: {
           title: 'Vue SSR Simple Setup Home',
           meta: [
               { name: 'description', content: 'Home page description' }
           ]
       },

       components: {
           UsersList,
       },

       computed: {
           ...mapGetters({
               users: 'users',
           })
       },

       // Server-side only
       // This will be called by the server renderer automatically
       serverPrefetch () {
           // return the Promise from the action
           // so that the component waits before rendering
           return this.getUsers();
       },

       // Client-side only
       mounted () {
           // If we didn't already do it on the server, we fetch the
           // users
           if (!this.users.length) {
               this.getUsers();
           }
       },

       methods: {
           getUsers () {
               return this.$store.dispatch('getUsers');
           }
       }
   };
As you can see, we use serverPrefetch() along with a mounted() hook. We need it for cases when a user is sent to this page from another route on the client side, so the users array is empty and we call the API.
Also, check out how we define the title and the description metadata for a particular page in the metaInfo property provided by vue-meta plugin.
Well, this is it. I think we covered all the main configuration points of setting up SSR for Vue.js and I hope these steps helped you to better understand this process.


Great tutorial. Thanks 🙂
I have followed this and achieved the purpose. Only issue I am facing is I am unable to access the data used in my component in
window.__INITIAL_STATE__. I am not usingVuex/storein my app. Is it possible to access data used over my server for the rendering and inject it aswindow.__INITIAL_STATE__?Hello, thank you for your question. If I understood you correctly, you need to pass some data from the server to the client using window.__INITIAL_STATE__. If that’s the case, you can assign it to “context.state” object and provide it to “renderer.renderToString(context)” method on the server-side. And then your data should be available in window.__INITIAL_STATE__ on the client-side. But I would recommend using a state management library, like Vuex, cause when your app is getting bigger, it’s much more convenient to maintain it.
When I run the application in dev mode, each page is server-side rendering and Vue.js is not taking over on the client side. But if I build the project and then run it, then the first page is server-side rendered and the rest are loaded dynamically with Vue taking over. Why does it not behave the same way in dev?
What do you mean by “Vue.js is not taking over on the client side”? Hydration is not running? Do you have some errors in console?
Sorry I think this is down to my lack of understanding. I have two JS files that get created and used in index.html – app.js and vendor.js. These only exist in the /dist folder because they are built by webpack. When running in dev mode, they are still being served by the /dist folder which means any updates I make to Vue components requires a whole rebuild of build:client and build:server. How do I create and serve app.js and vendor.js from the MFS instead of /dist folder so that they are auto-updated when I make changes?
I get a 404 error in the network tab for http://localhost:3000/public/app.js. /public is mapping to /dist which contains a hashed app[hash].js file. This file is not being rebuilt when changes are made to files in dev mode. How come?
The file with hash should be used in prod env, the file without hash is served by webpack in dev mode from MFS, also please see the following discussion https://github.com/olegpisklov/vue-ssr-simple-setup/issues/3
How do I turn off SSR in dev mode?
I wouldn’t recommend to turn off SSR in dev mode since it can lead to unpredictable bugs in production, it’s always preferable that dev and prod environments are consistent.
The /dist/index.html template makes reference to app.js and vendor.js files that are only made during a production build. During development these are not being updated… why is that? Also on the very first load of the site, the serverPrefetch() does not work meaning items from the Vuex Store are not server-side rendered, but on refresh they are. Is there any reason for that?
During development, app.js file is served by webpack from MFS, it’s not extracted to the disk and is updating automatically when source files are changed. “build:client” script creates app.js file with a hash in dist folder – prod bundle. Regarding the serverPrefetch issue, I wasn’t able to reproduce it, are you using the latest setup from the repo?
If I modify a .vue component file and then let Nodemon restart the server, I cannot see any changes in my development environment when I refresh the browser. It is only when I rebuild running “build:client” and then “build:server” that the changes appear. Are you not facing the same issue?
Thanks for sharing! Great article!
One little question. When I add styles in one module, I get an error that say “You may need an additional loader to handle the result of these loaders.”
I reviewed the webpack config but I don’t see the problem, any idea? Thanks.
How do you add styles to your module?
I add style tag in the component:
.example {
color: red;
}
Thanks!
with the “style scoped” tag.
Little too late maybe, but I fixed this with the repo example, by changing the css loader to the base config instead of just the client config. Maybe someone will find this helpful.
Amazing tutorial gave me a bit more understanding on how i can use SSR its very clear and concise.
I am having an issue with my application i am trying to see how it would look before i build it using “npm run dev” but i keep getting a ModuleParseError : –
/*# sourceMappingURL=bootstrap.min.css.map */,ModuleParseError: Module parse failed: Unexpected token (7:0)
You may need an appropriate loader to handle this file type, currently no loaders are configured to process this file.
Can anyone point me in the right direction?