

Multilingual WooCommerce and How to Sell Worldwide
Having a WooCommerce store that sells internationally is great. But having a multilingual WooCommerce store that sells internationally while also providing visitors with product descriptions they fully understand and are completely optimized for international SEO is even better!
And it’s not only to improve your customers’ experience — it’s also great for business too.
Studies show that nearly 80% of shoppers would much rather buy from online stores that provide content in their native language. Meanwhile 40% won’t even consider making a purchase if the language is foreign to them.
And if we think about it, it makes complete sense. People want to understand what they’re buying. They need to be certain of their acquisitions and when they don’t fully understand a language, they won’t trust the business enough to actually spend their hard-earned money on it.
So why risk losing potential clients simply because they don’t fully understand your product descriptions or store policies? What if your products are exactly what they’re looking for but they just don’t know it yet because they don’t speak your language?
The Benefits of Multilingual WooCommerce
Reach New Markets
When you turn your eCommerce store multilingual, you open your virtual doors to a whole new market that’s full of new ways to position your business internationally and compete with big names from your industry or niche.
Even if you’re doing great on the local market, extending to new, bigger markets is always a good idea. If you have the possibility to provide your services or products to buyers all over the world, why wouldn’t you?
After all, more people reached = more potential conversions.
Build Credibility and Earn Customer Trust
As I said before, most people have trouble trusting a website they don’t fully understand. That’s why by offering your site in your customers’ native language, you improve its credibility in their eyes.
When you eliminate the language barrier, visitors are less likely to feel uneased at purchase since misunderstandings are less likely to happen. This gives them a more comfortable user experience and more reasons to trust your brand.

Boost SEO and Grow Organic Traffic
With a single language site, you can optimize your web pages so that they rank well in Google using SEO best practices. Ideally, this would help your website get discovered by new users and get valuable organic traffic.
But this is not an easy job. The competition is quite high for English sites and, if your website is not very well established, it could get pretty hard to check those top positions in SERPs.
When you turn multilingual, the results you get from your SEO efforts can rise to a new level as well. With multilingual SEO, you can have each of the translated versions of your site’s pages rank separately for each language. Not only is the competition lower for non-English websites, but this way you can also target users searching Google in their own languages too.
People might be already searching for products similar to yours but in their own native language. All those people might translate to brand new organic traffic (or even conversions) on your site using multilingual SEO.
WooCommerce is Translation-Ready
And finally, because WooCommerce is inherently localization and translation-ready, the process of turning your shop multilingual will be extremely simple.
All you need is a good multilingual plugin and a few minutes to set it up and you’re good to go.
WooCommerce has already been translated into lots of different languages. This means that all of the content that comes with the plugin (such as “Add to cart” buttons) is probably already available in your desired language. You’ll just need to install your multilingual plugin of choice and download the specific WooCommerce language pack.
Moreover, WooCommerce also lets you easily configure different types of payment methods (like PayPal) and pick a default currency. You can even sell in multiple currencies, but you’ll need a multi-currency extension for that.
How to Turn WooCommerce Multilingual
So, now that you know why you should turn your eCommerce store multilingual, let’s talk about how you can do it.
To get started, you’ll first need a multilingual plugin. That’s the best way to work around translating your store since it’s pretty fast to do, it’s SEO-friendly, and it required zero technical skills.
In this tutorial, we’ll be using TranslatePress, an easy-to-use, and highly intuitive translation plugin. Using this plugin for website translation, you’ll be able to quickly and easily edit your translation with the help of a visual translation editor that works something like this:
Step 1: Install and Set Up the TranslatePress Plugin
So, first, let’s get the TranslatePress plugin on your WooCommerce store.
If you’re on a budget and one additional language will suffice your online store, you can get away with the free version of the plugin, available for download at WordPress.org. If, however, you want multiple additional languages and other extra functionalities, you can always pick one of the premium TranslatePress licenses.
Once your chosen version of the plugin is uploaded and installed on your WooCommerce store, you can move on to setting it up. First, in your WordPress dashboard, go to Settings >> TranslatePress and, in the General tab, add your new languages. Search for your desired language in the “All languages” section and then click “Add”.
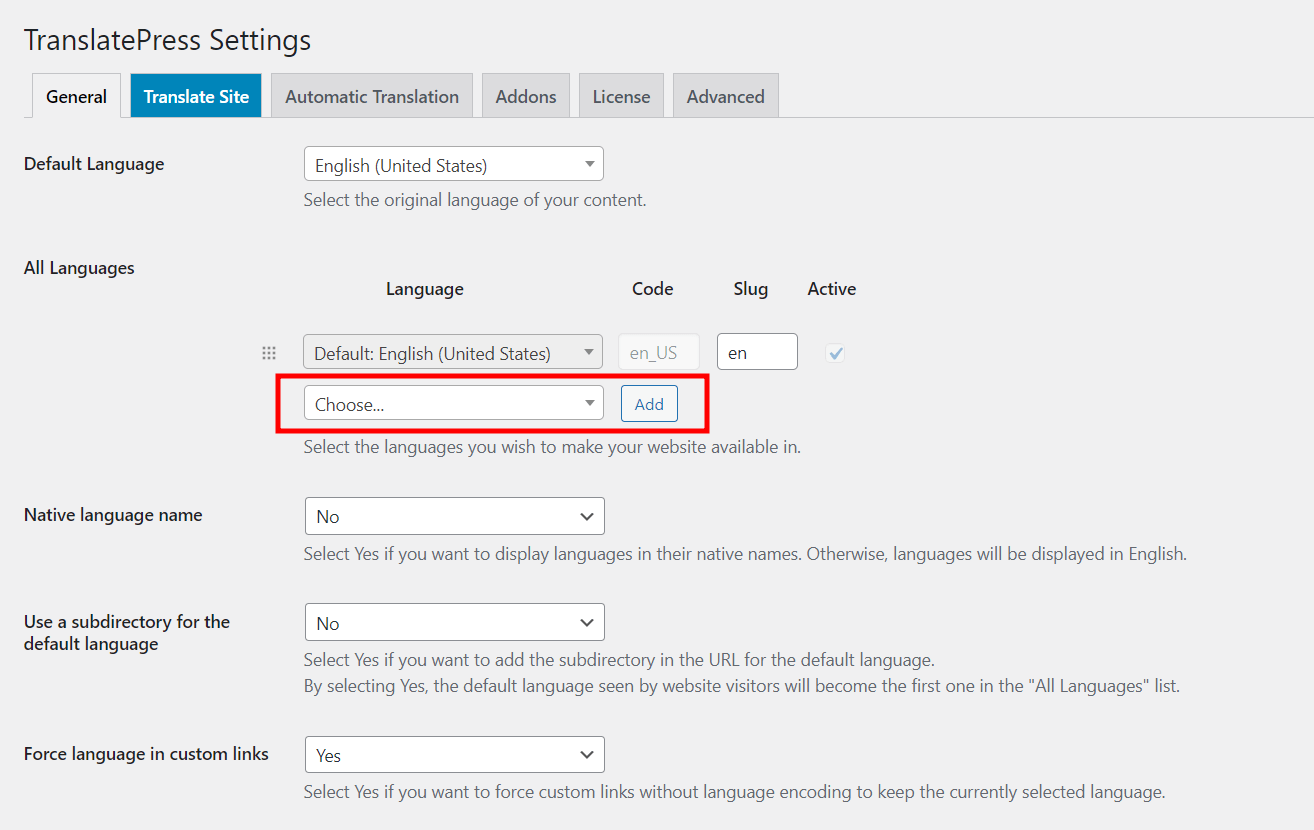
Again, if you’re using the free version you’ll be able to add one secondary language, that’s two languages total for your online shop. For unlimited languages, choose one of the premium plans.
Next, scroll down to the “Language switcher” section and choose your preferred type of switcher and how you want it displayed.
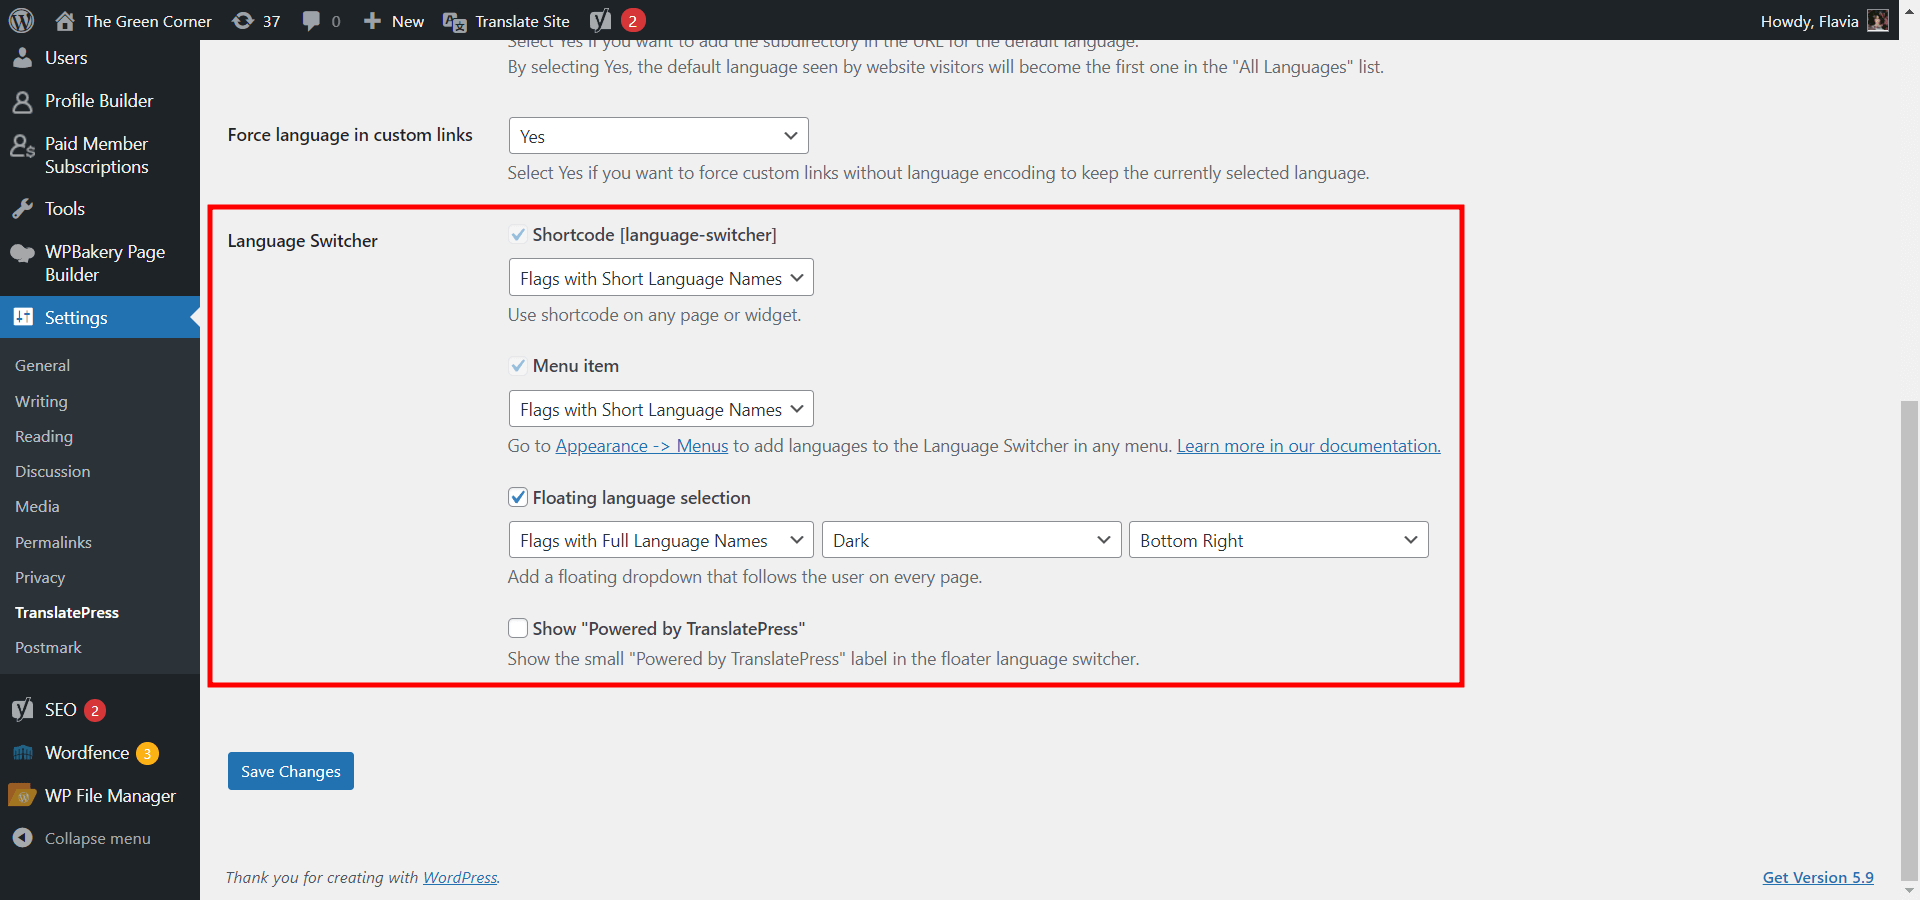
You can also choose a combination of any two or even all three switchers at the same time.
Step 2: Enable Automatic Translation (Optional)
Now if you’re in a bit of a hurry or simply do not have the time to manually translate all of your site’s content, you can always use TranslatePress’ automatic translation functionality.
This is a completely optional functionality, but it sure helps get things done, especially when you have a shop with lots of products listed. If, however, you’d prefer to stick with manual translations, feel free to skip to the next step.
So, to activate it, navigate to the Automatic Translation tab in the TranslatePress settings and choose “Yes” in the “Enable Automatic Translation” dropdown. This will open up the rest of the settings.
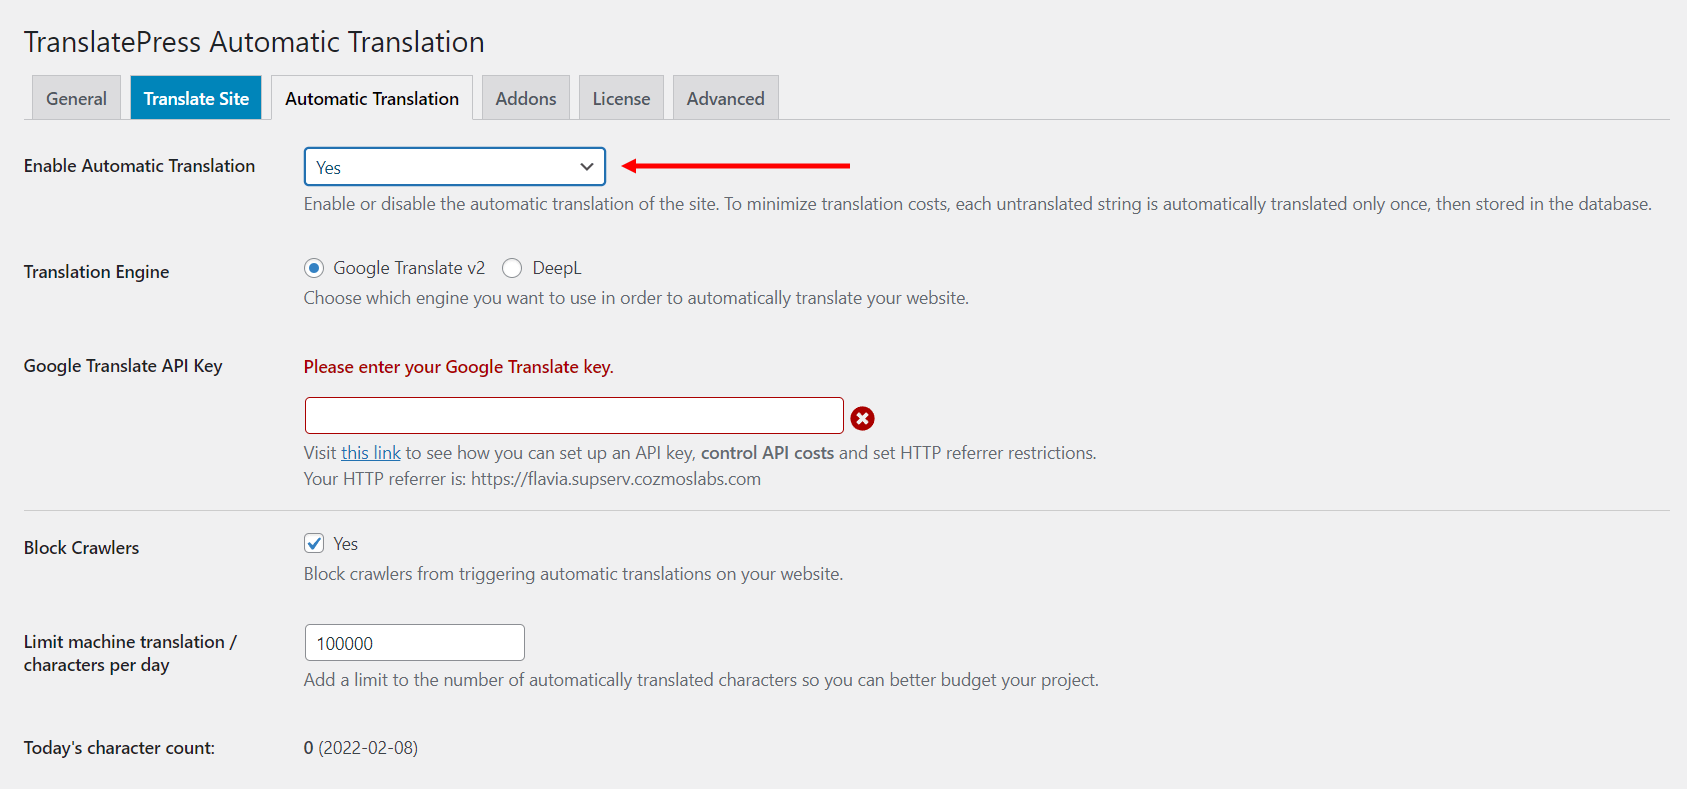
Next, you’ll have to choose your preferred translation engine. Google Translate is available with the free version of TranslatePress, while DeepL comes with any premium license of the plugin. Regardless of which service you choose, in order for the automatic translation to work, you’ll need to retrieve an API key. So, here are step-by-step tutorials on how to do that for both Google Translate and DeepL.
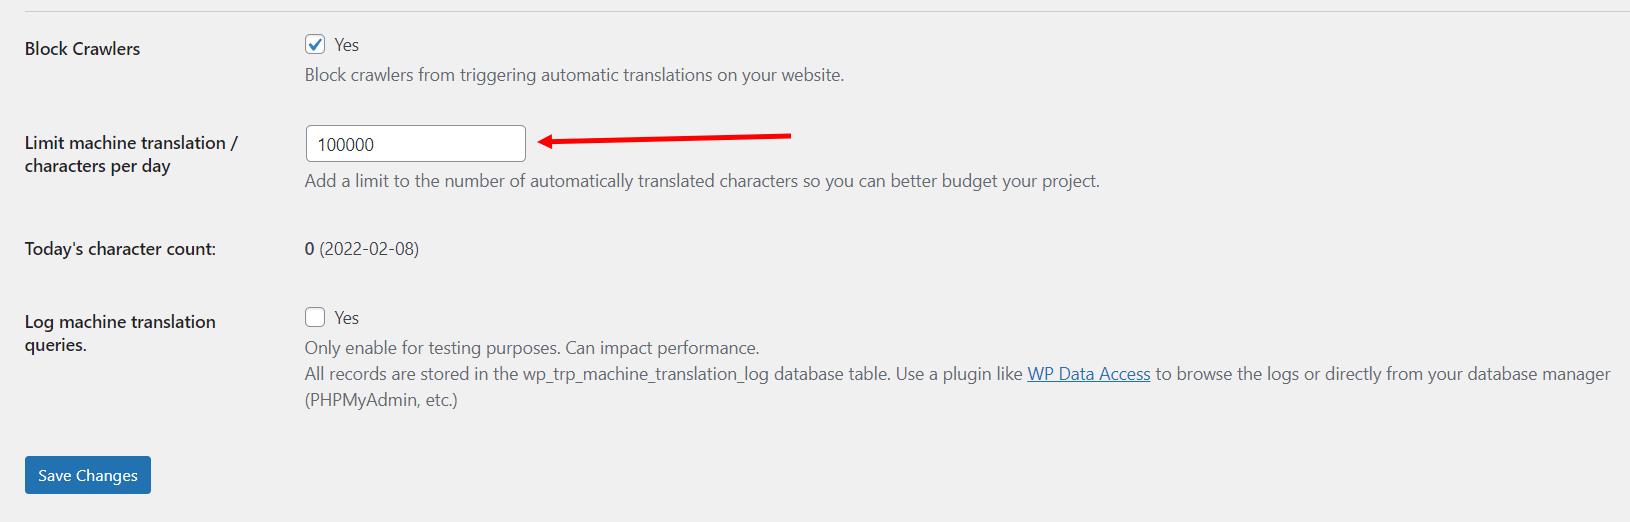
Limit Machine Translation
While TranslatePress does not charge any money for automatic translation, your chosen translation engine might, depending on how much content there is to translate. So, if you’re on a strict budget, make sure to set a limit on the daily translated characters from the “Limit machine translation/characters per day” section.
After you save your changes, navigate to a page you want to see translated, from the front end. Switch to the additional language (or one of them if you have multiple) from the language switcher and see the magic happen.
The page will be automatically translated and those translations will now be stored on your own server. This ensures that TranslatePress only retrieves the translations from the translation engine once and thus prevents load time increases. Once the page is translated, you have full control over those translations and are even able to manually modify them if needed.
Step 3: Translate Your WooCommerce Content
The next step is manual translation. Now, if you chose to go with automatic translations, this is where you’ll be able to go in manually and tweak any translations that don’t sound right to you. If not, you’ll be able to translate everything from scratch.
Whether you’ve enabled automatic translation in the previous step or not, this step will work in the same way. The only difference is that if you’ve used automatic translation, the translation fields will be pre-filled with the translations received from Google Translate or DeepL.
Translate WooCommerce Shop Page
So, first off, let’s tackle the WooCommerce shop page translation.
For all front-end translations, TranslatePress offers a convenient visual interface that lets you preview your website live while translating. This way, you never have to worry about how your shop would look like once translated, and you can also see each string in context.
Start off by navigating to your online store from the front end, while logged in to your WordPress dashboard. With the TranslatePress plugin installed, you’ll now be able to see a “Translate Page” button in the WordPress admin bar.
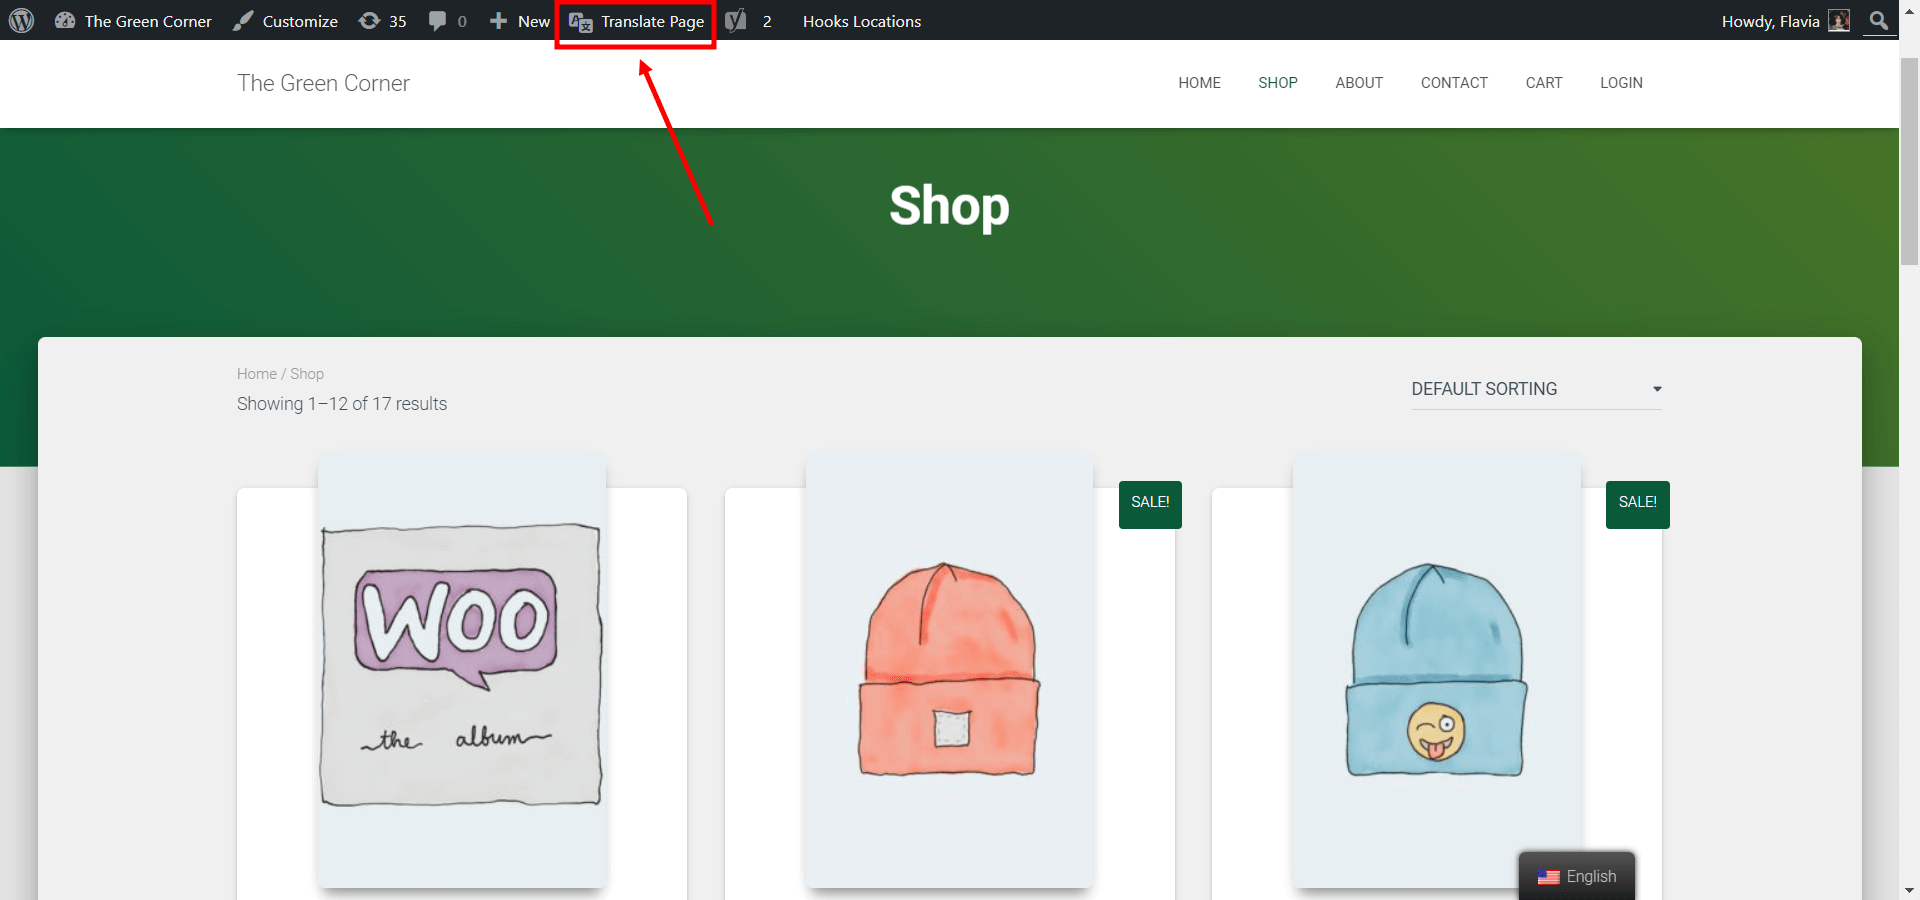
Clicking that button will take you to the visual translation editor. Here you’ll see a preview of your site on the right side of the screen and a translation sidebar on the left.
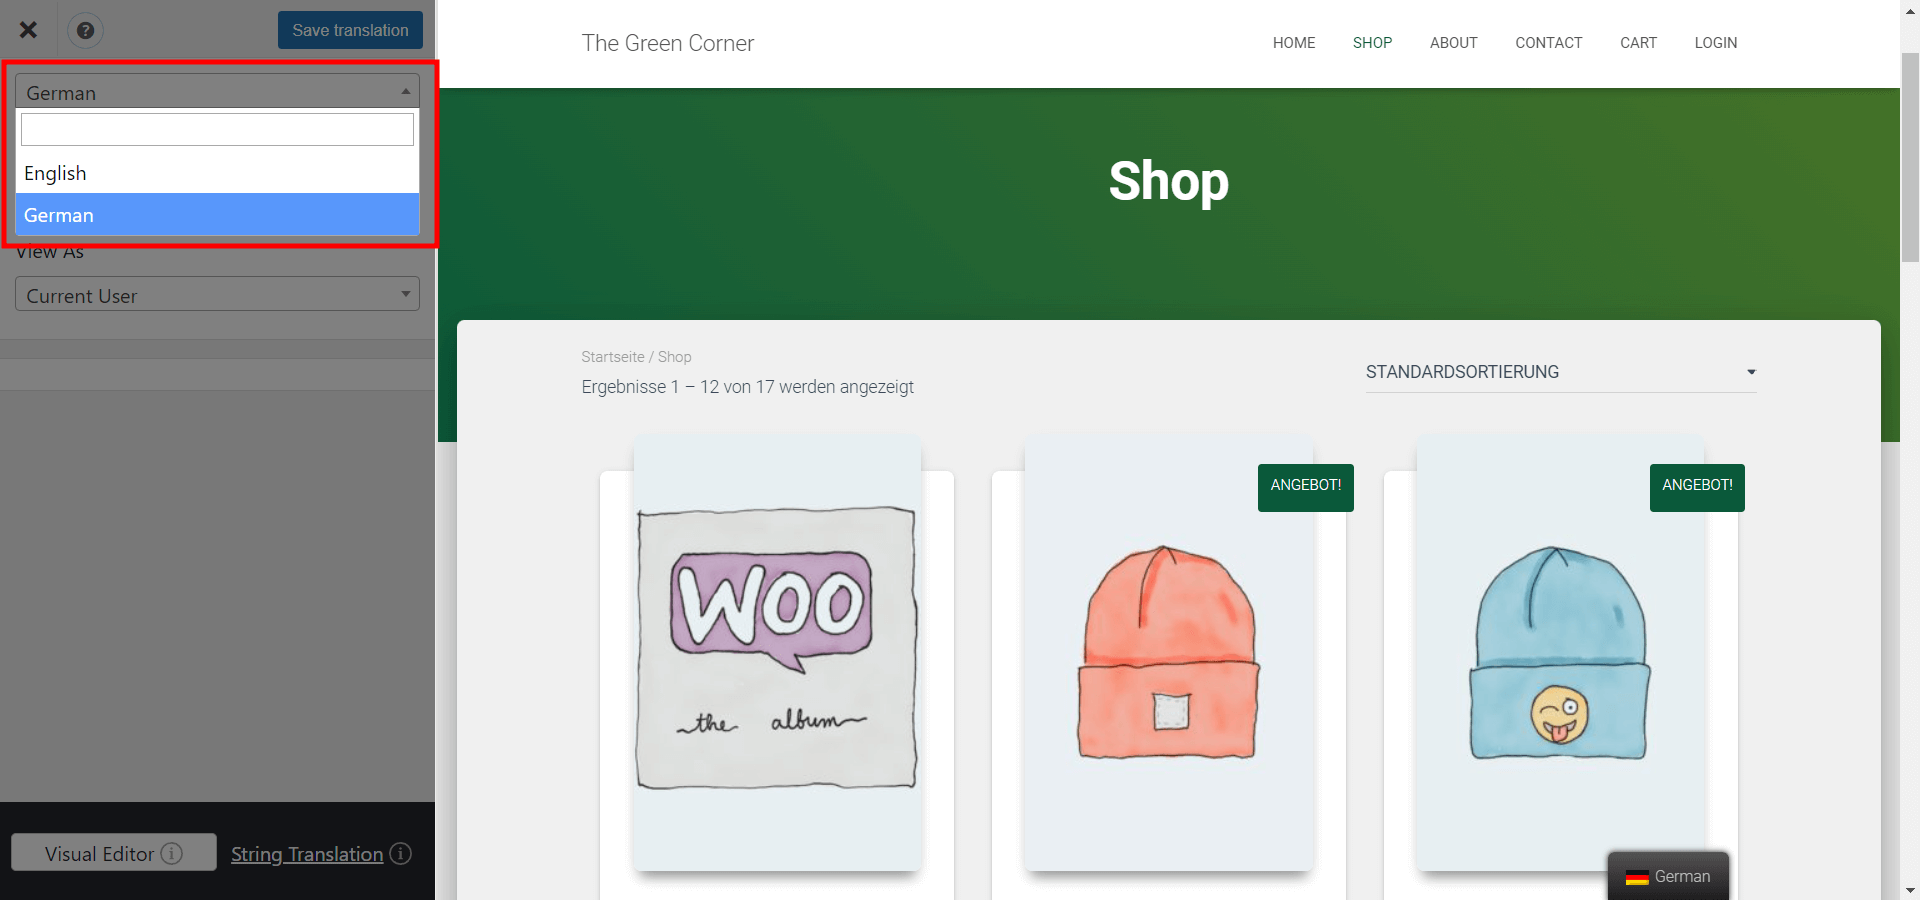
If you want to see your edits live, right as you translate, you can choose to display the language you are currently editing in the live preview. This way, when you translate a piece of content, the preview will update instantly with your translation.
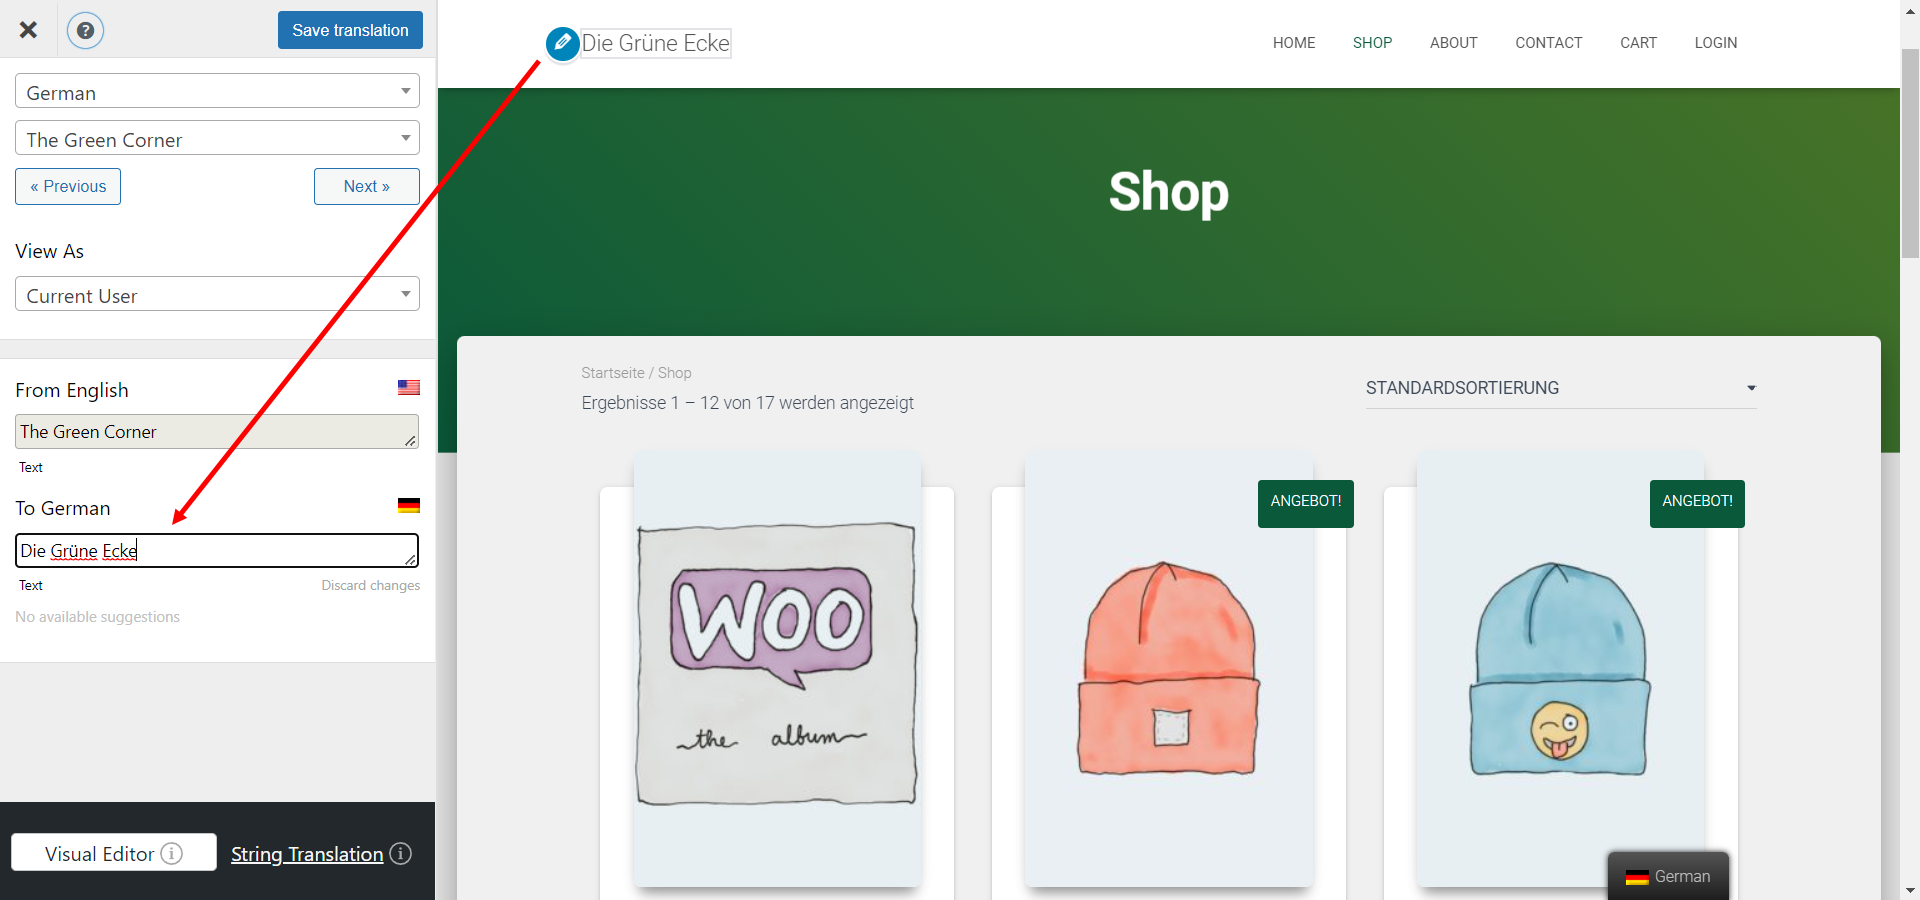
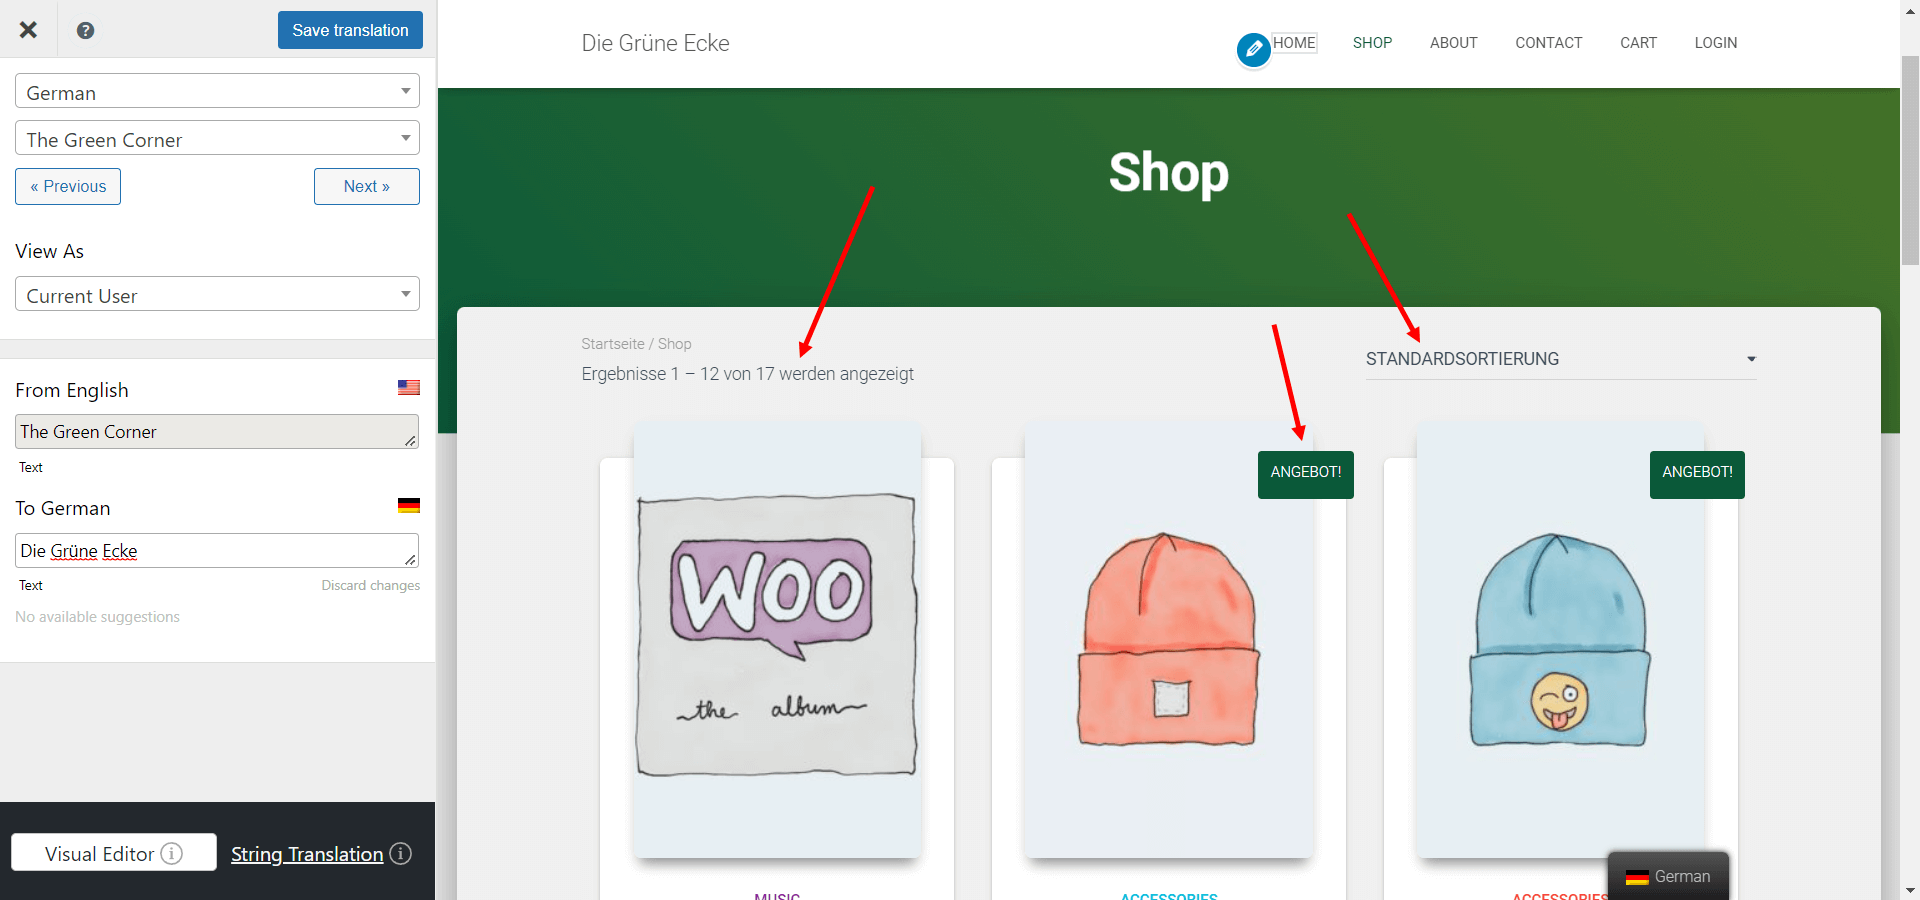
To translate any piece of content on your shop page, all you have to do is hover your mouse over any string and click the pencil icon that shows up.
Now you’ll be able to input your translation in the sidebar to the left, under your secondary language field, like so:
Don’t forget to hit “Save Translation” once your string is translated.
With this exact approach, you can easily translate any piece of content visible on your site, including menu items, page titles, product titles, and so on.
As you’ll probably notice if you’re using one of WooCommerce’s default languages, some of the strings will be translated right from the start. These are strings that come with the plugin and are automatically added to your site by WooCommerce itself once you add a secondary language. You’ll notice that the pencil icon is green in this case, as opposed to blue, as it is with the other user-generated strings.
These strings can still be edited by clicking the green pencil icon that appears on hover, if you’re not happy with WooCommerce’s choice of words,
If you can’t see these default WooCommerce string translations, just go to Dashboard >> Updates and scroll to the end of the page to update your translations.
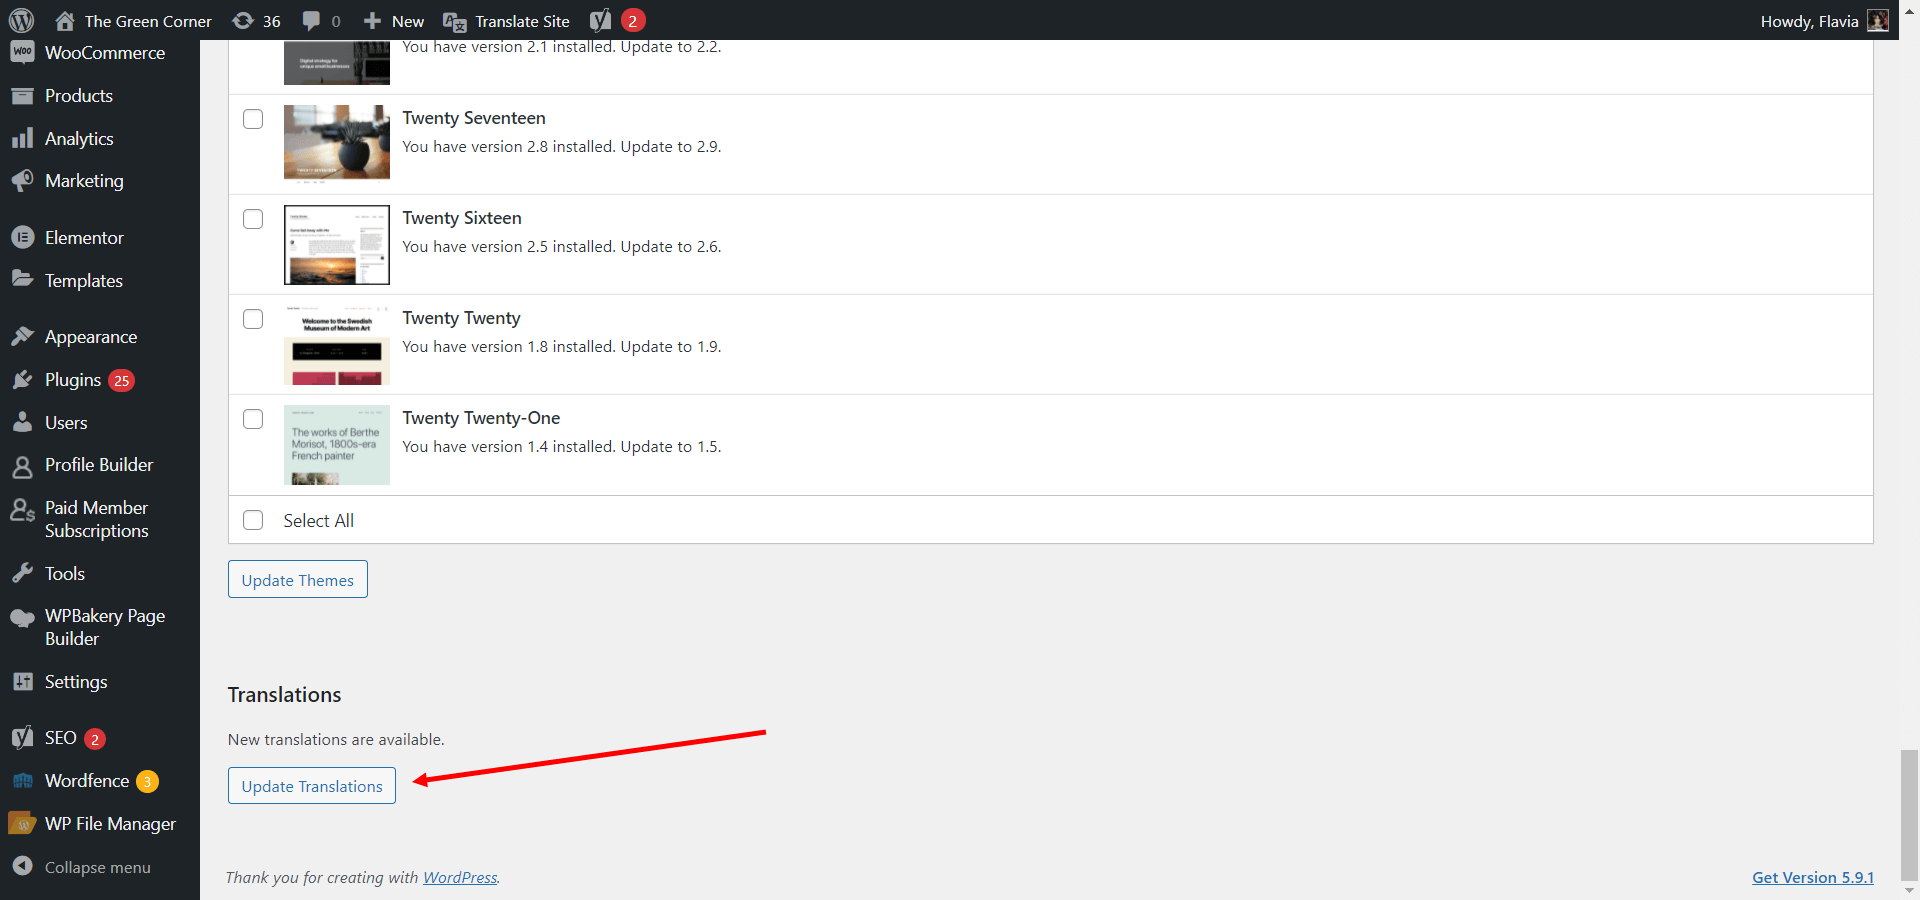
If there are still no translations to be updated, the language you’ve chosen might not be supported by WooCommerce. In this case, you’ll have to translate everything yourself, either automatically or manually.
You can check this official list to see if WooCommerce has already been translated to your specific language.
Translate WooCommerce Products
Now, when it comes to WooCommerce Products, the process is pretty much the same. Navigate to a product page you want to translate and click the “Translate Page” button.
Next, click the pencil icon on any visible string on the WooCommerce product page and input its translation in the sidebar.
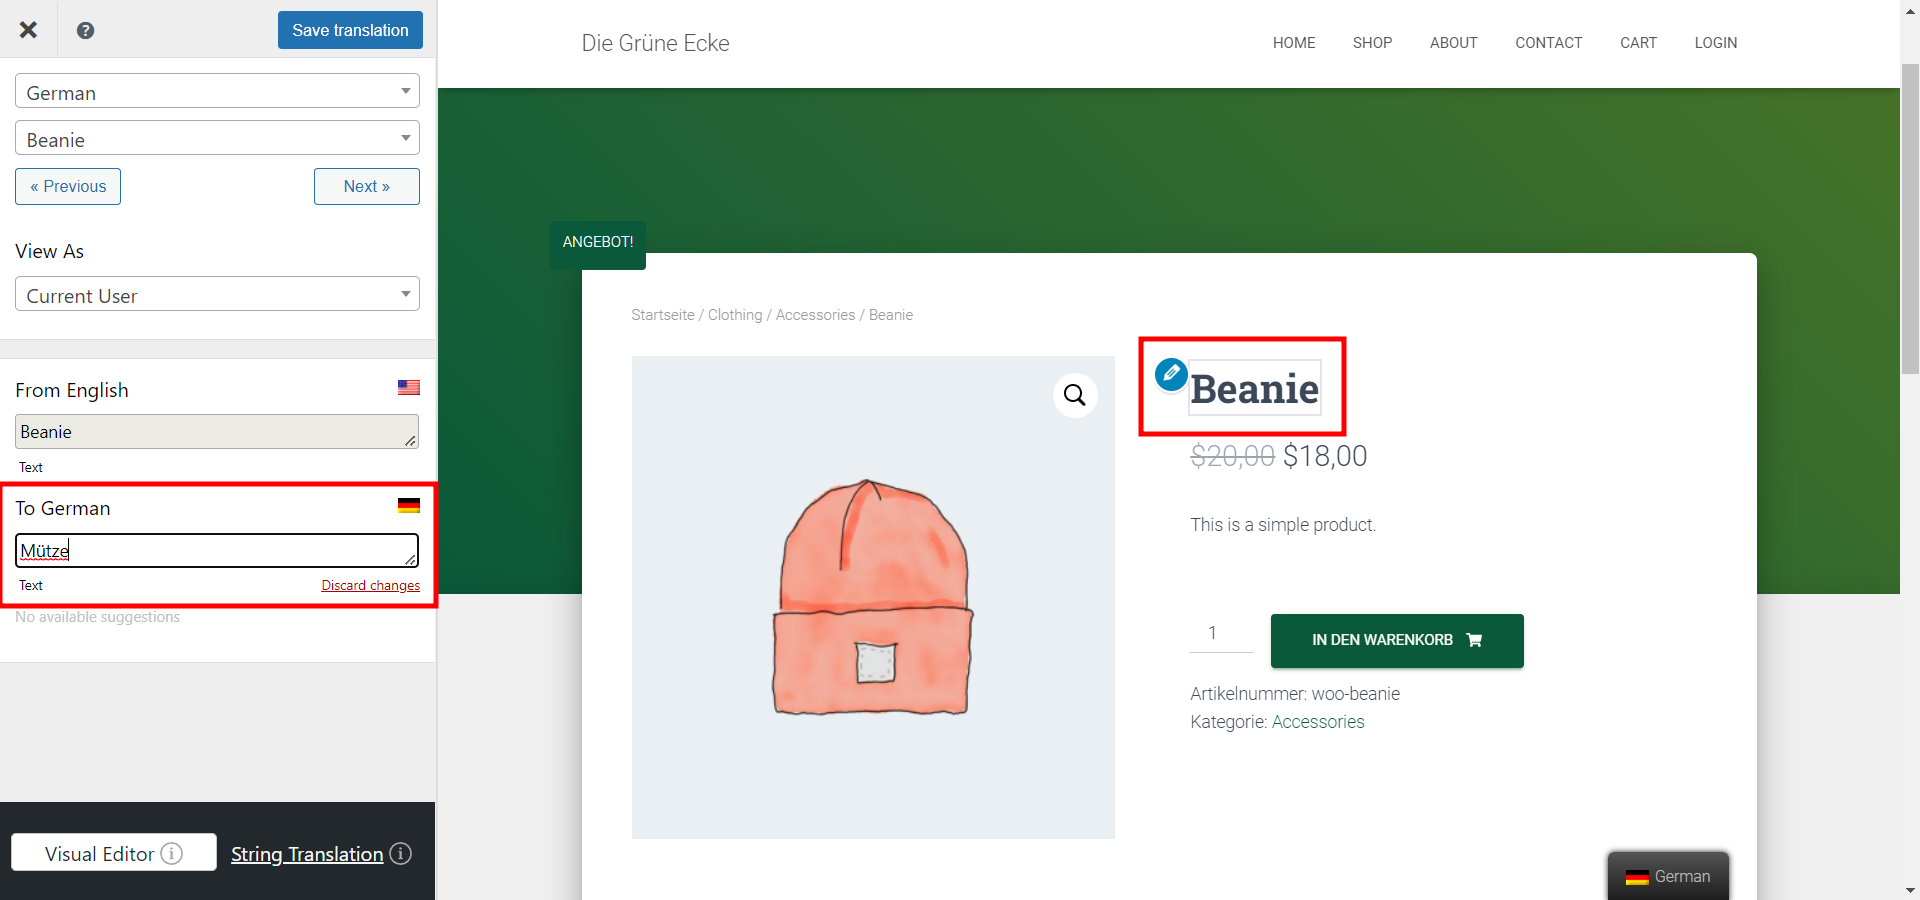
Again, you’ll probably see that some content is already translated, such as the “Add to cart” button, but you’ll still be able to edit those strings too.
Moving forward, you can translate the product description, product category, and any additional information the product page may contain, in the exact same way.
You can even “translate” your images if you want to display different media for each language. Simply hover over an image, click the pencil icon, and then input another image in the sidebar.

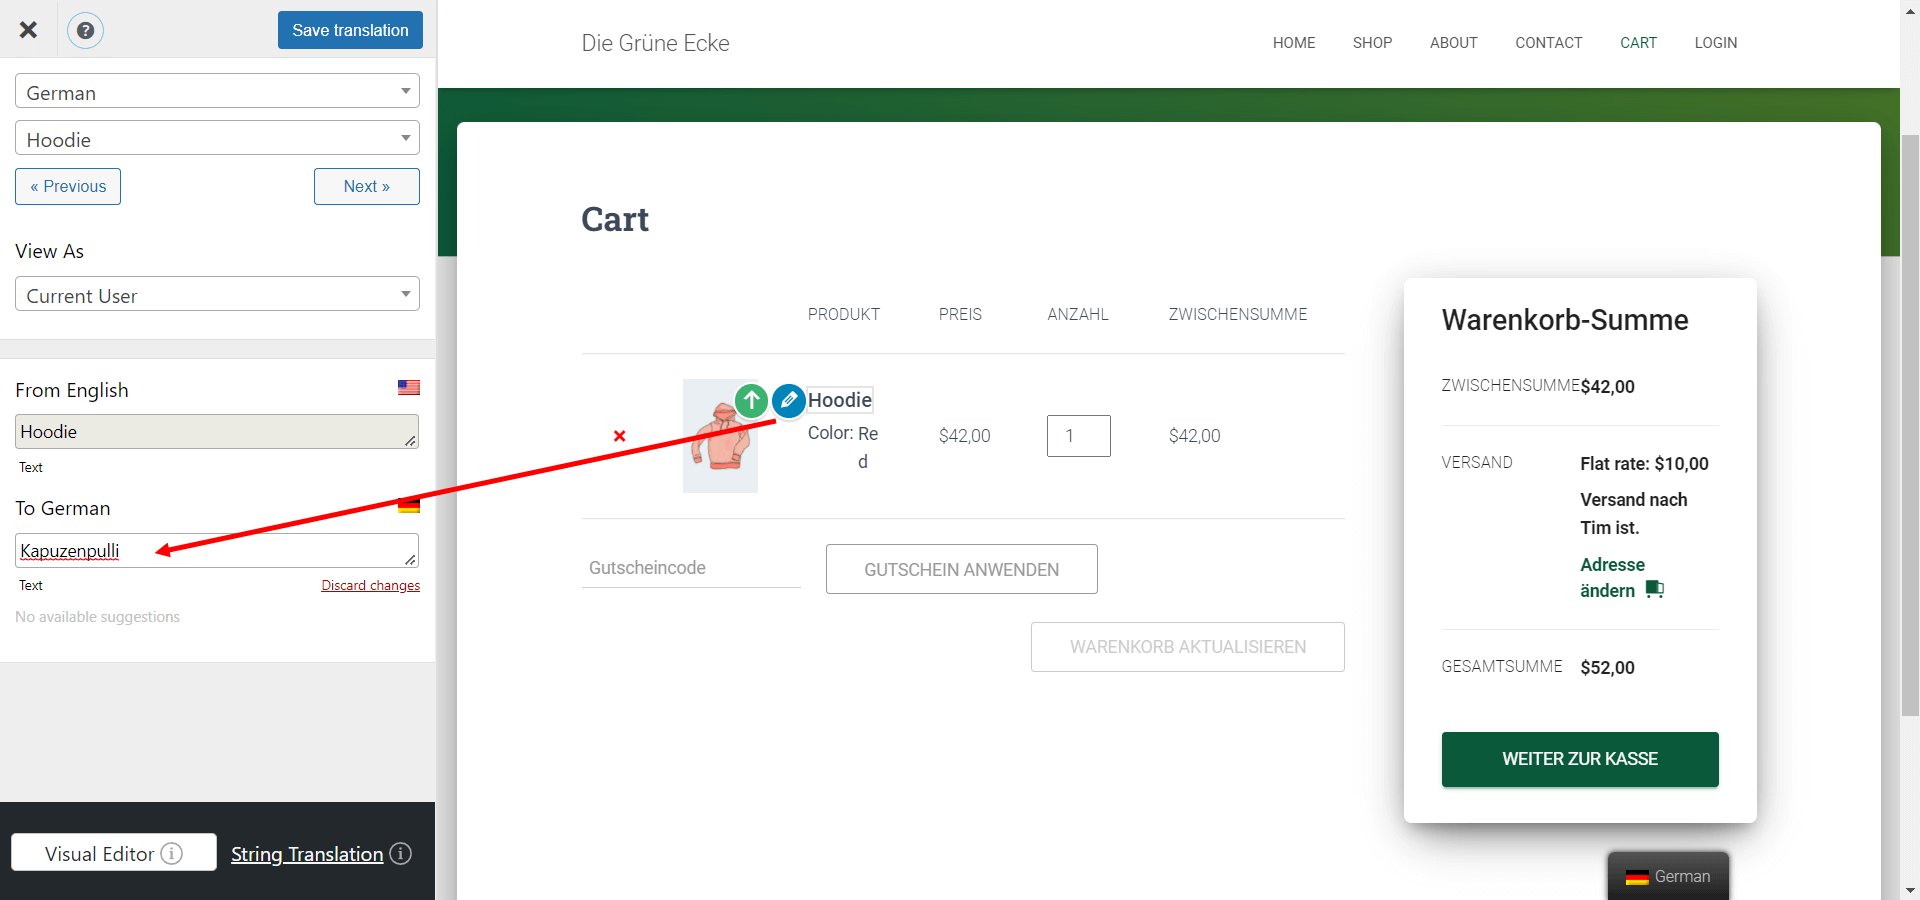
Translate WooCommerce Cart & Checkout Page
In order to translate your WooCommerce cart page, you’ll need to go ahead and add an item to your cart from the front-end. Then, navigate to the cart page and open the translation editor.
Once you’re here, you’ll be able to translate everything using the exact same approach.
When your cart is empty, your cart page will only display some default WooCommerce messages and buttons. These should be automatically translated if the specific WooCommerce language pack is installed.
If you want to edit those default strings, simply empty your cart right from the live preview, in the translation editor and edit them like usual.
To translate your WooCommerce checkout page, after adding at least one item to your cart, proceed to checkout. Once you’re on the checkout page, you can once again click the “Translate Page” button and start editing your translations.
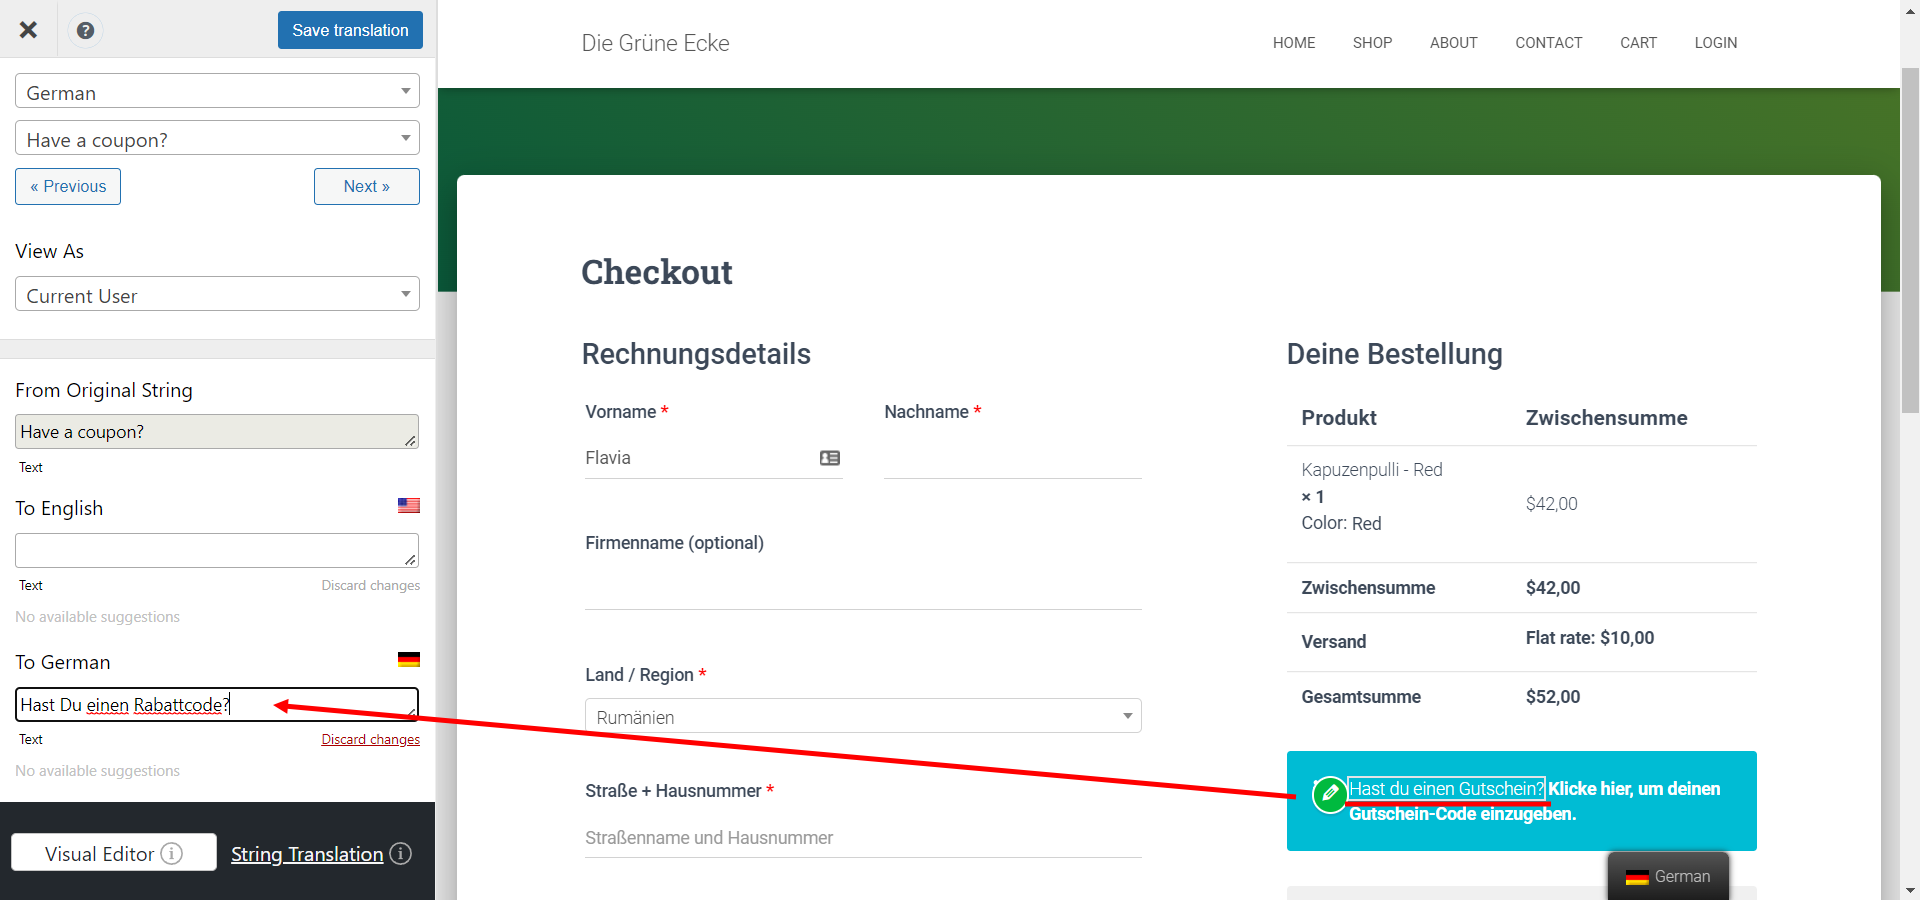
And finally, you can of course do the same for your WooCommerce account page and any other page of your eCommerce store.
Translate Important WooCommerce SEO Elements
For all of the functionalities I’ve presented above, the free version of TranslatePress works just fine. But for this last step, you’ll need the SEO Pack add-on, available only with a pro license of the plugin.
This add-on extends the functionality of TranslatePress to SEO elements (such as SEO titles and meta descriptions) and URL slugs.
To enable the add-on, go to Settings >> TranslatePress >> Addons tab and click the “Activate” button to the right of the SEO Pack add-on
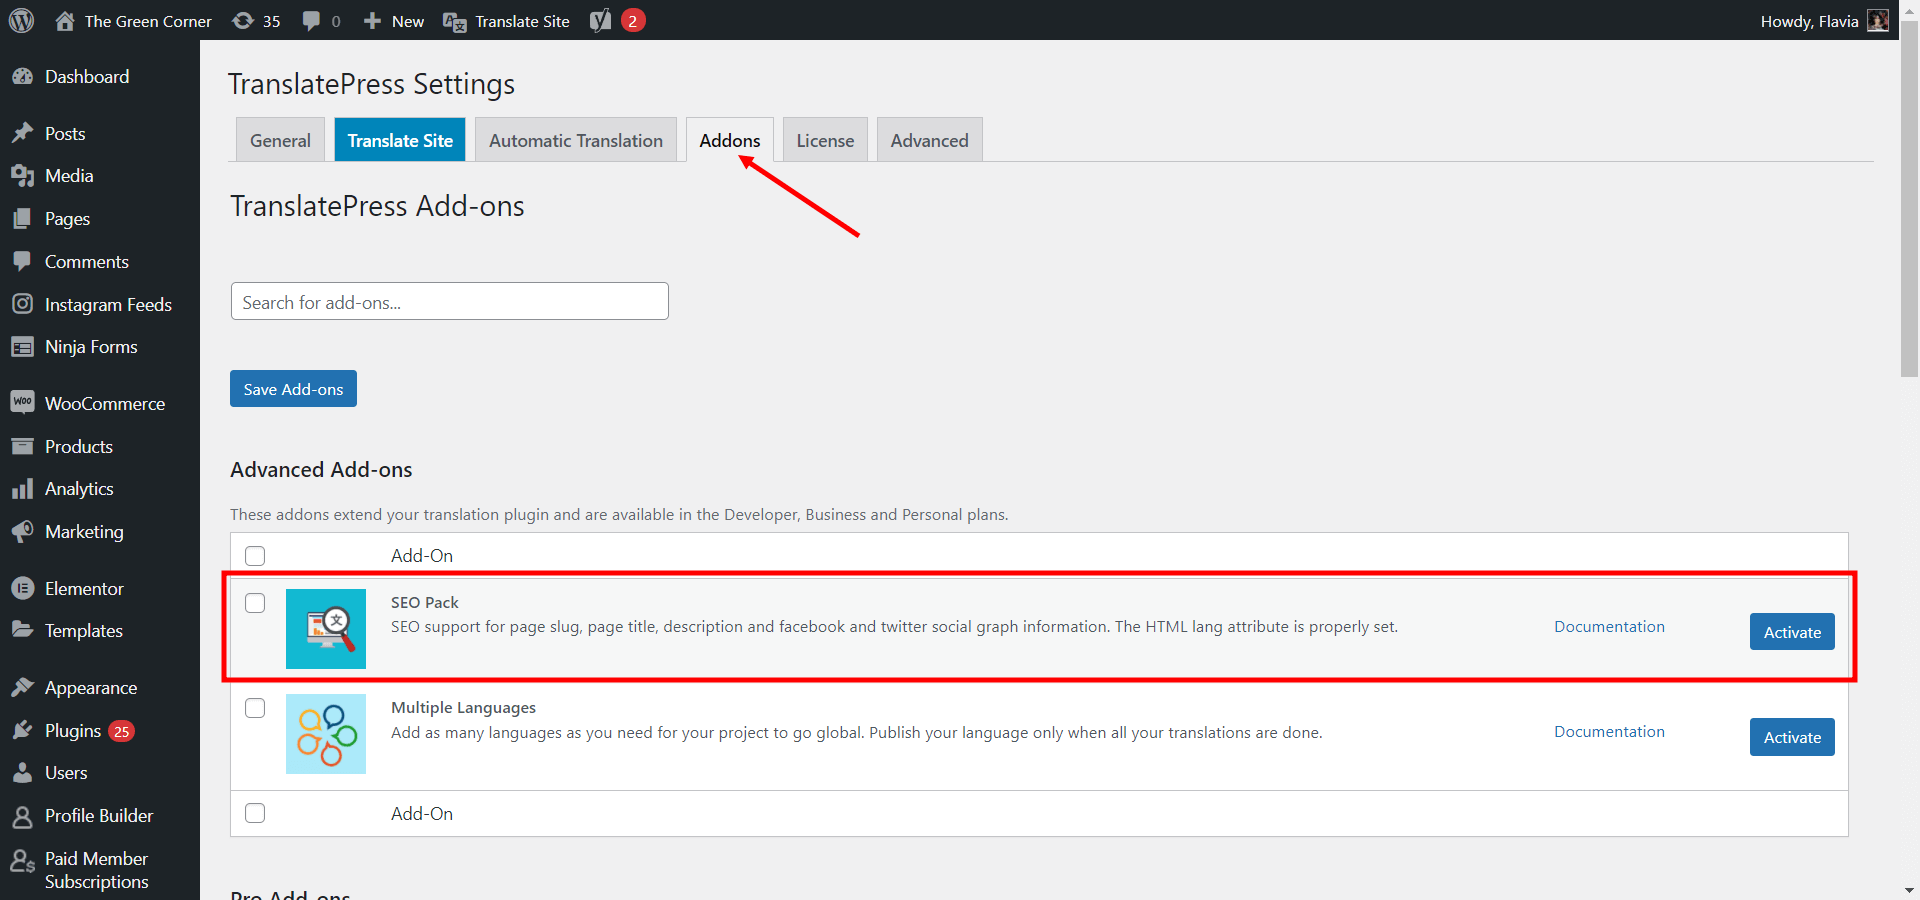
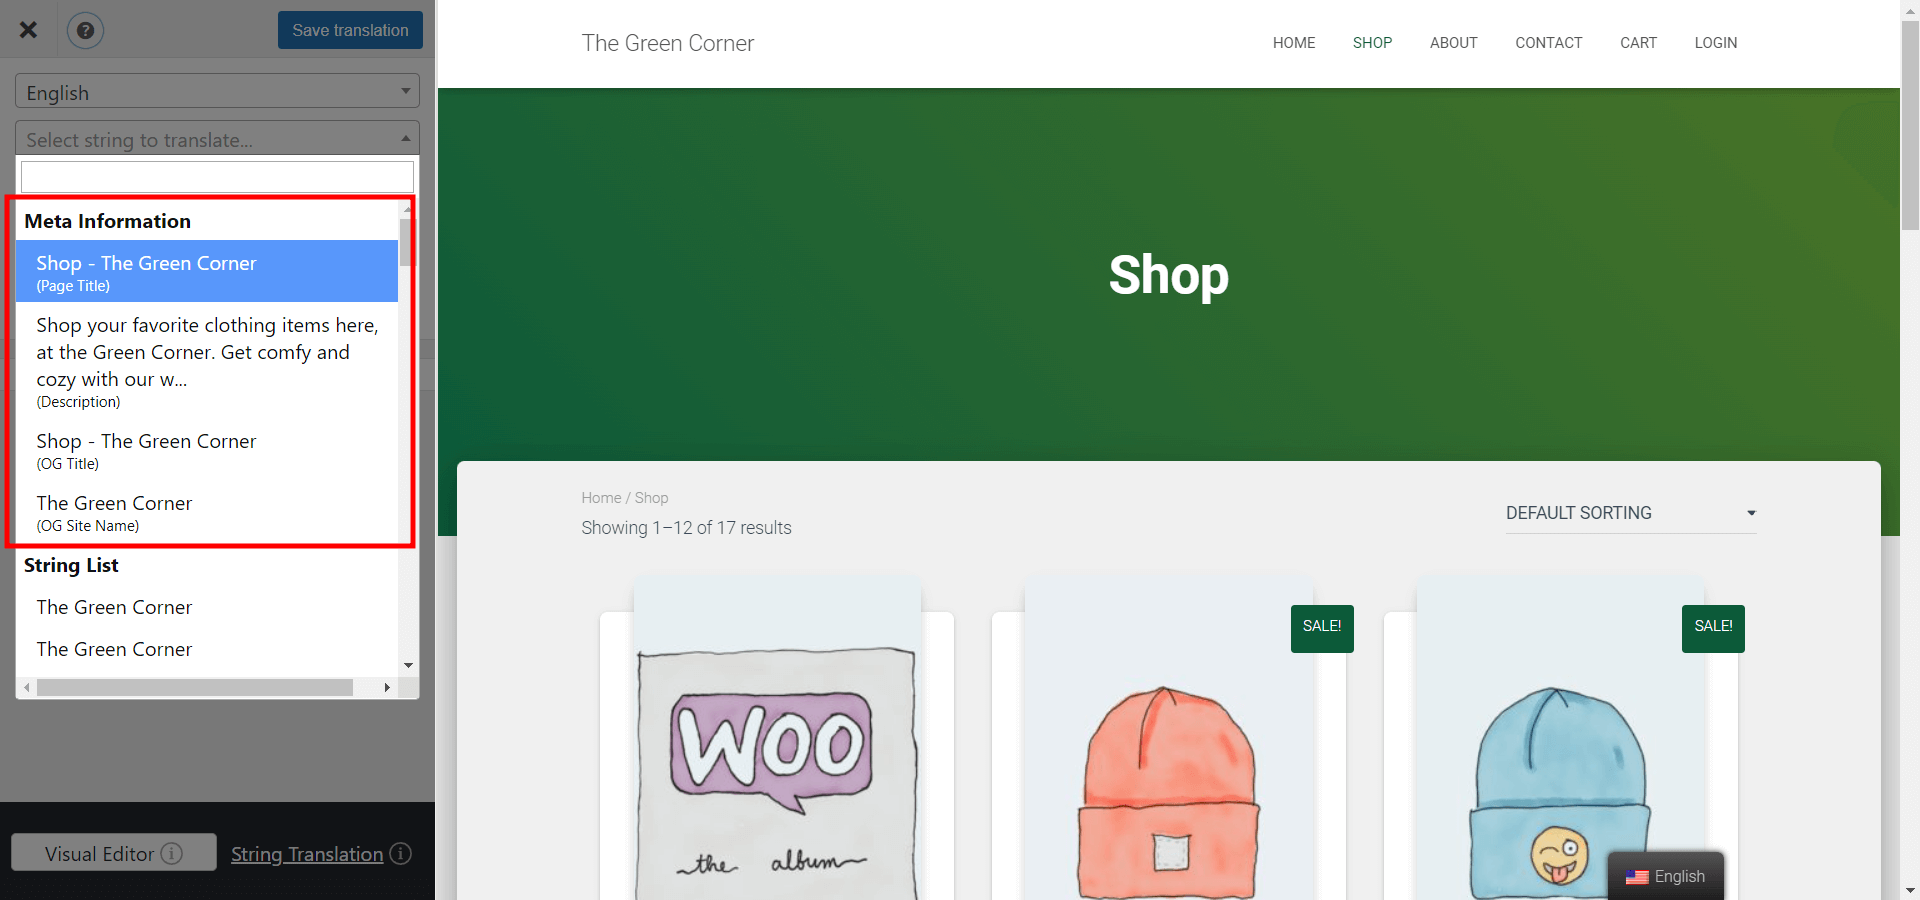
With the add-on active, you’ll now be able to access SEO metadata and URL slugs, right from the translation editor.
Simply open the strings dropdown and look for the “Meta Information” section. Now you’ll be able to select and translate the SEO page title, meta description, image alt tags, social share tags, and even URL slugs.
Turn your WooCommerce Store Multilingual Today
Ready to go multilingual with your WooCommerce store? You sure should be after this easy tutorial!
Take your online shop to the next level and reach untapped markets today! All you need is an intuitive multilingual plugin, just like TranslatePress, and a few simple steps.
You can try TranslatePress for free by downloading it from the WordPress repository or, if you long for unlimited translation languages and extended functionality, you can pick your preferred premium plan.
Do you still have questions on how to create your own multilingual WooCommerce store? Let us know in the comments below.


It’s so encouraging to see how easy it’s become to publish multilingual content. I firmly believe WordPress will be the first CMS to go intergalactic. 🙂