

How to create a website for a business or personal use
Creating a website is one of the most effective ways to establish your identity and brand online. But if you’ve never set up a website before, you might not know where to begin. To make the process as easy as possible, we’ve put together this guide to building a website. Follow our clear and simple steps to create a website for your business or personal use.
How to create a website from scratch for your business or personal use
It’s easier than ever to build a website, even for beginners with no coding or website development experience. Simple website design tools make it easy to customize your site, register a domain name, and get web hosting all in one place. Our guide covers these website-building steps in more detail and includes tips on how to create engaging content and promote your site online.
Define your website’s purpose and audience
Before jumping into the steps of creating websites, consider what type of website you want to build. Do you need a website for business purposes, like lead generation or an online storefront, or are you looking to start a personal website to showcase your accomplishments and interests?
Determining your website’s purpose and target audience will help you find the best site creator to meet your needs. For example, an online store where customers can purchase your products or professional services requires more features than a simple web page with your resume, a short bio, and social media links. Think about what you want your new website to achieve and which features will help make that happen.

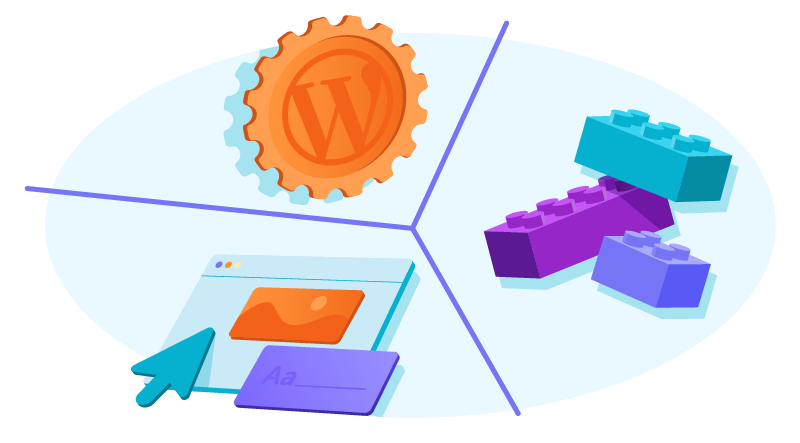
Choose your platform
A site platform provides a way to create your own website. There are three main options available:
- Website builder: Most website builders have an intuitive drag-and-drop format that allows users to customize a website. This is the fastest and easiest way to make a website on your own.
- WordPress: WordPress offers added flexibility and scalability with its design options, but it also has a steeper learning curve. This option is best for those who already have some knowledge about how to create a website.
- Custom web development: Some people prefer to hire a professional website designer/developer with experience building a website from scratch. This is definitely the most expensive option, but it may be worth the investment for those who need a complex site with high-tech features.
Create a website in 5 steps with a website builder
An easy website builder makes it possible to start a website in a matter of minutes. One of the most popular website builders, Namecheap’s Site Maker, is a simple and budget-friendly option for online website creators. It even offers three distinct tools based on your goals for your site:
- Business Site Maker: Websites for small businesses
- Personal Site Maker: Websites for personal projects, online portfolios, etc.
- Simple Links: One-page websites, landing pages, or link-in-bio sites

Interested in using Site Maker to build your website? Simply follow these five steps.
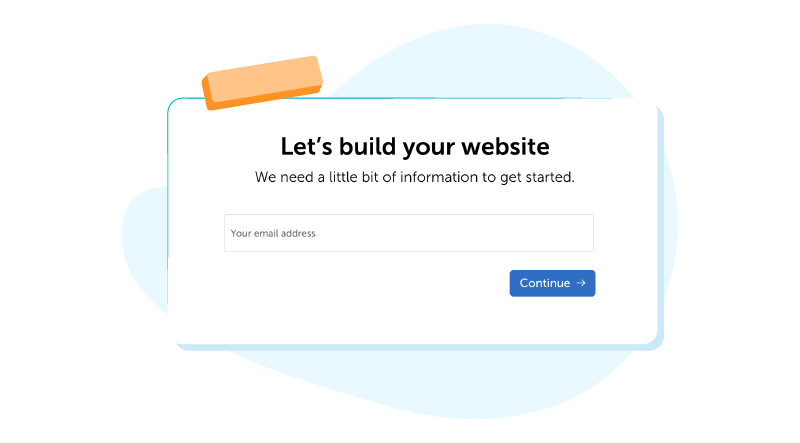
Step 1: Enter some basic information
Navigate to the Site Maker tool and select which type of site you want to create: Personal Website, Business Website, or Simple Links. Then, enter your email address to get started.
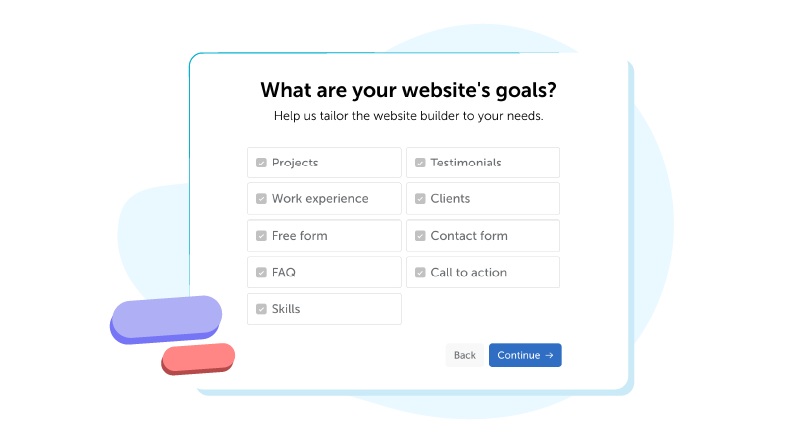
Select the main goals for your website. This will help determine which content sections are added to your website’s template.
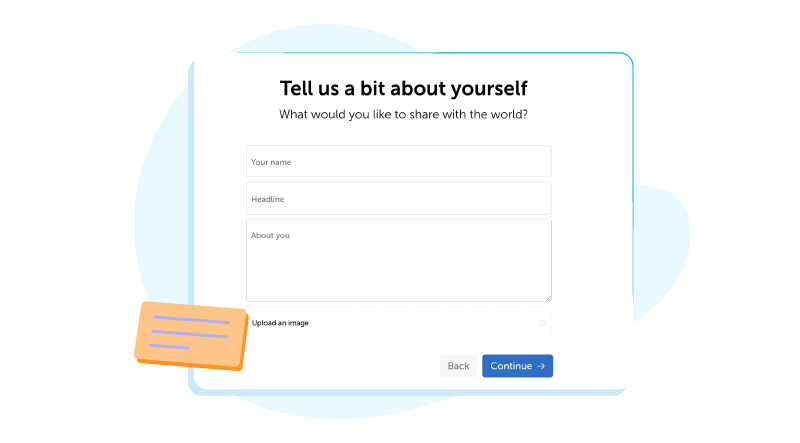
Add a few details about yourself. You can upload a photo, logo, or other image as well.
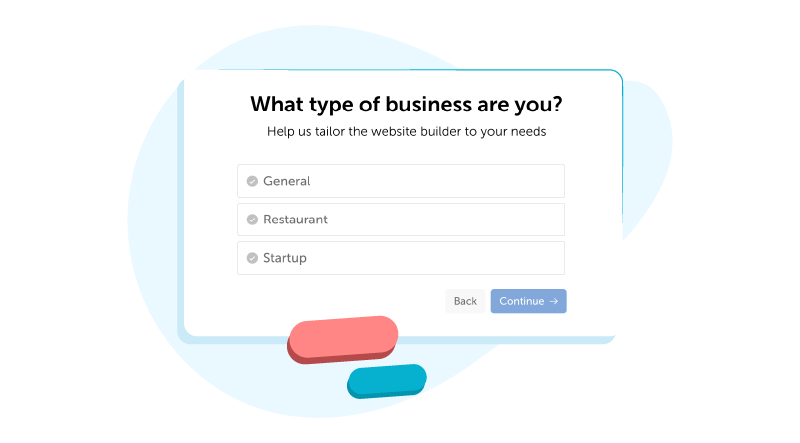
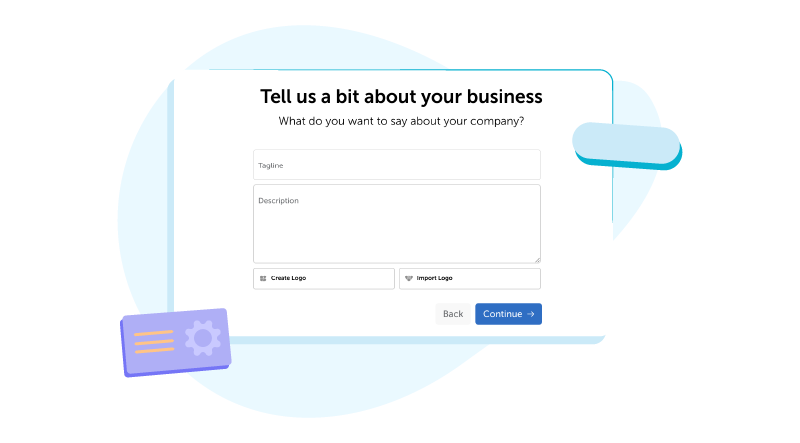
Business Site Maker: With Business Site Maker, you’ll be prompted to enter some additional information, including the type of business you have. You can also add a tagline, description, and logo. For the logo, upload your own image or use Logo Maker to create a custom logo and import it to Site Maker.
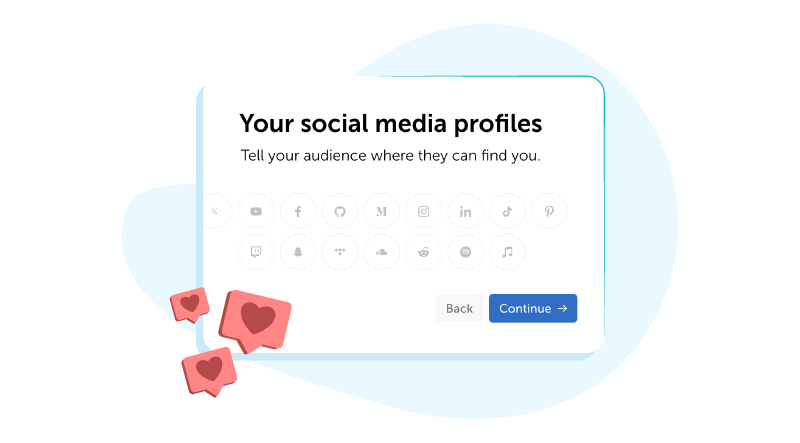
Click the social media profiles you want to link to and provide the URL for your profile on each one.
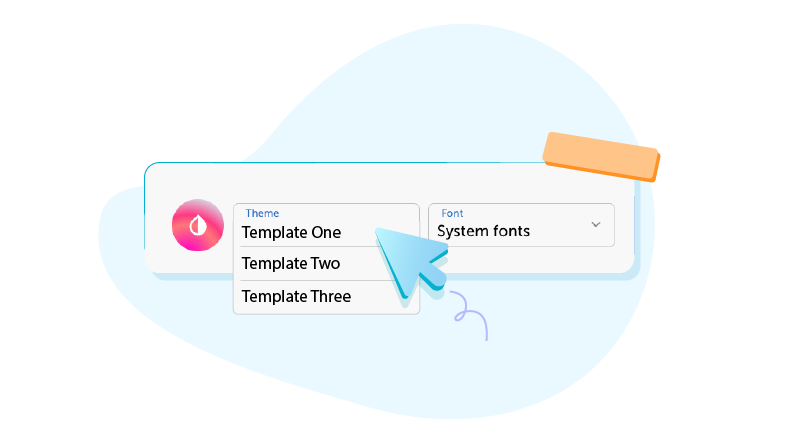
Step 2: Select a template and add customizations
Based on your responses in Step 1, Site Maker will generate several template options.

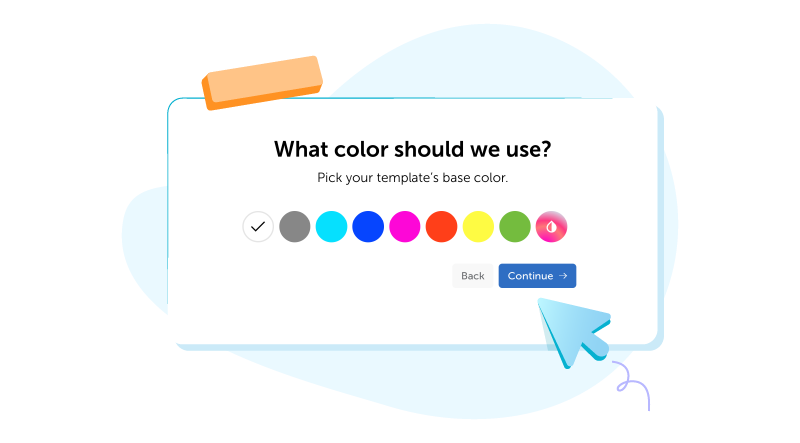
Next, choose a website background color. To see more color options, click on the last circle with a drop icon.
Select a font for your website.

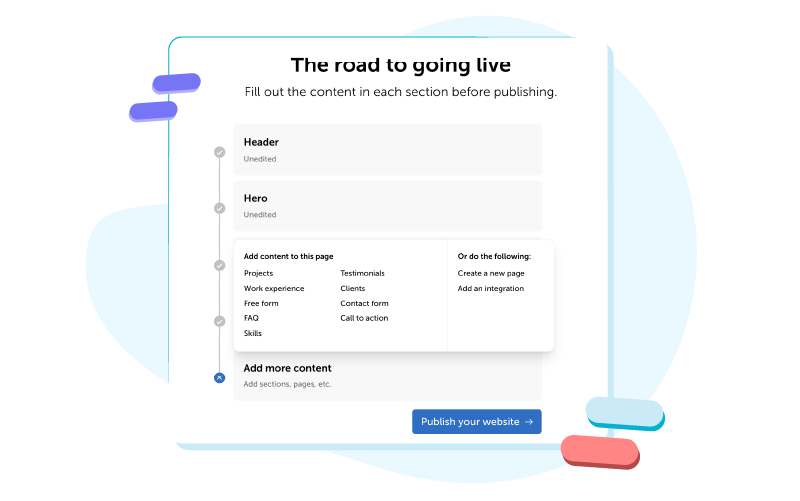
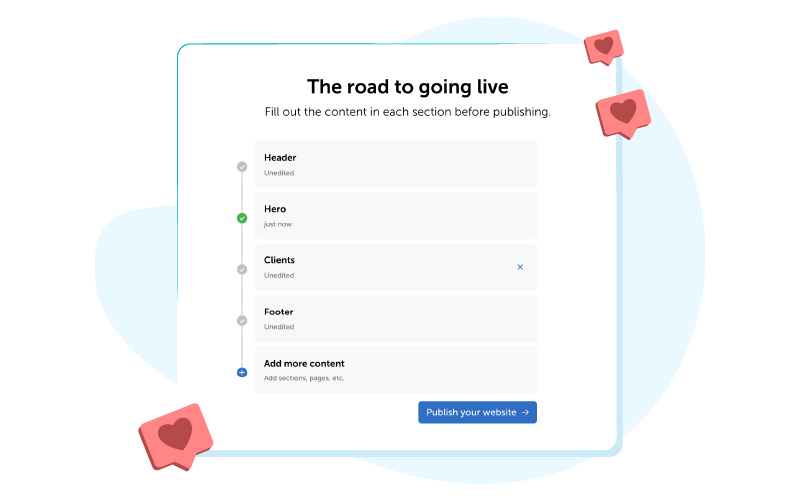
Step 3: Fill in the content blocks
Site Maker’s website editor makes it easy to add content. Click on each section to fill it in and add sections or pages as needed.
When you click on a section, you’ll see a form on the left side of the screen where you can add text, images, and links. On the right, you can preview the changes in real time.
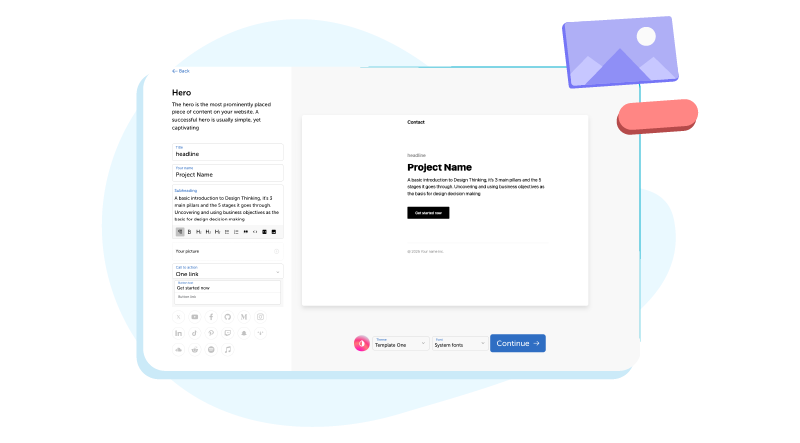
Use the buttons at the bottom of the page to switch between website templates, fonts, and background colors easily.
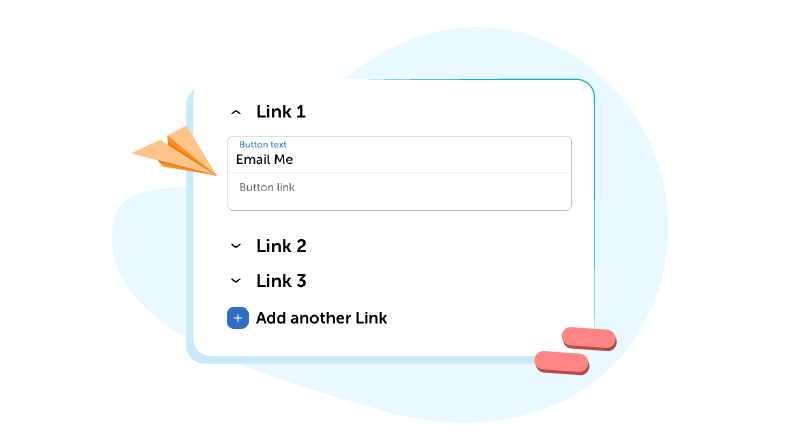
Simple Links: The Simple Links editor has only one content section. Within that section, you’ll be able to add a photo and up to 12 links to build a custom web page.
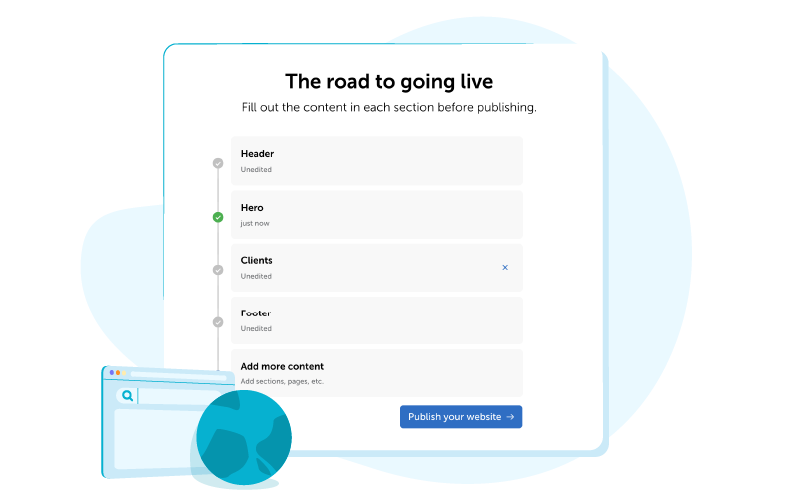
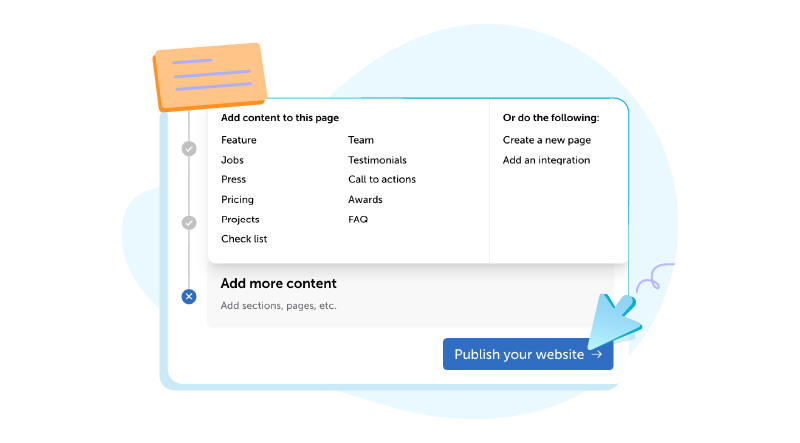
Once you’ve completed your edits on a section, click the “Continue” button. This will return you to the “Road to Publish” page so you can continue adding content to your site.
Click on “Add More Content” to include more sections, pages, or integrations.
Business Site Maker: When you click “Add More Content” in the business website builder, you’ll see additional page template options designed specifically for small businesses.
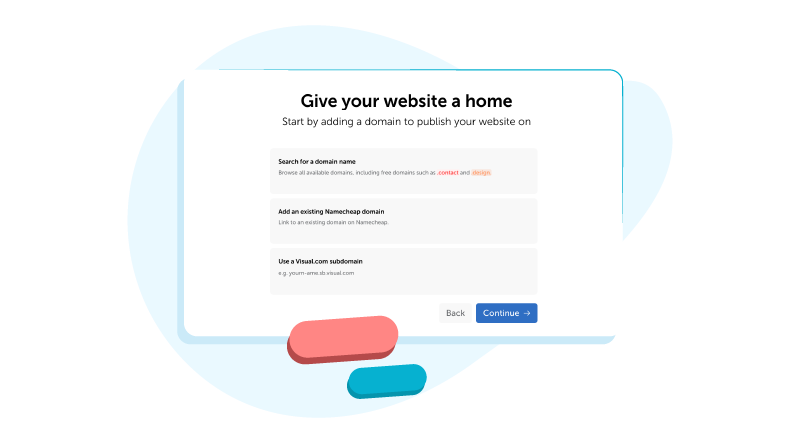
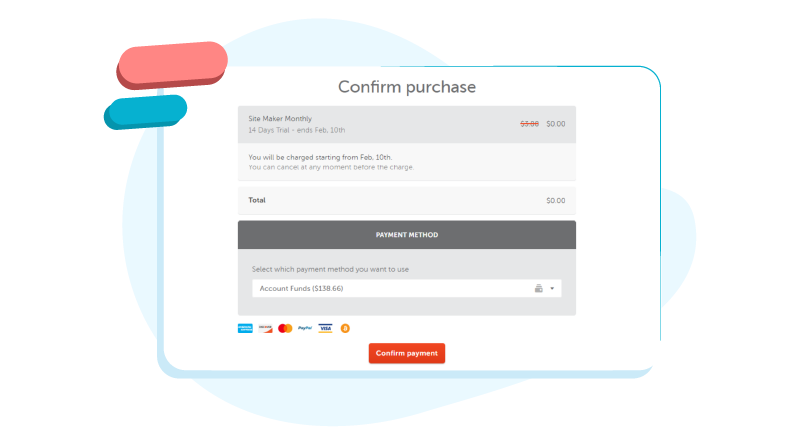
Step 4: Add a domain and complete your purchase
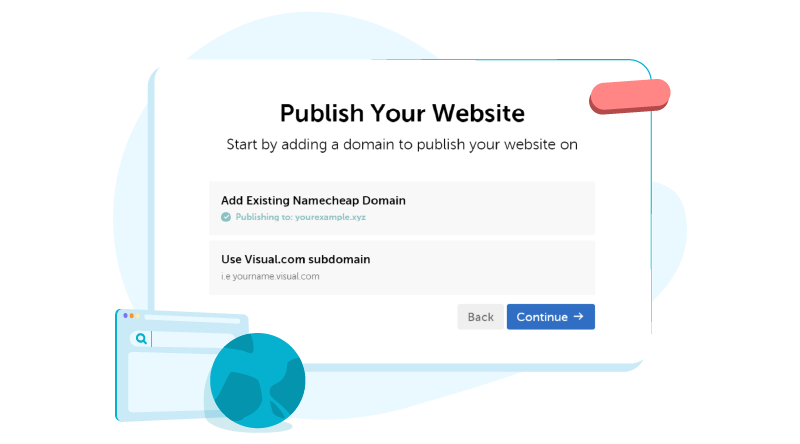
Once you’ve finished editing the content blocks, click the “Publish Website” button and choose from these options to add a domain:
- Use a free Visual.com subdomain
- Link a Namecheap domain you already own
- Search Namecheap for an available domain to use
Select a domain and follow the prompts to set up your website.
Next, choose your payment method: Pay Now or Trial. If you select the Trial tab, you’ll get a 14-day trial for free with your purchase.
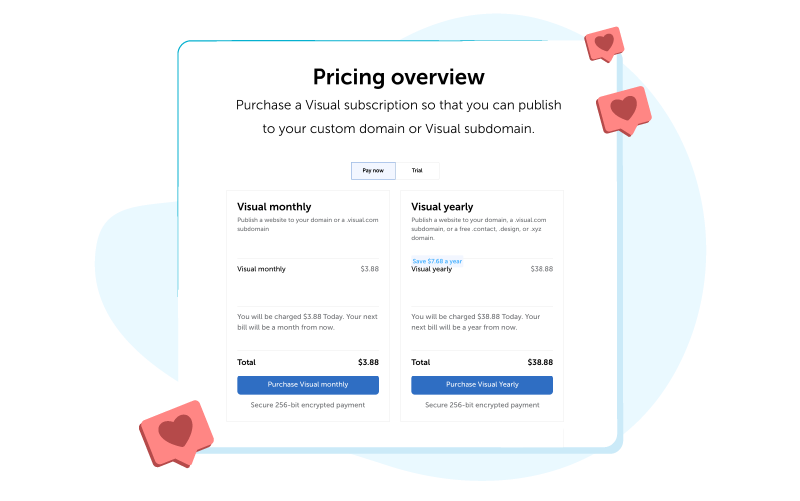
Business Site Maker: The prices listed above apply only to Personal Site Maker and Simple Links. Please note that the pricing options will be different if you use Business Site Maker.
Enter your payment method and click the “Confirm payment” button.
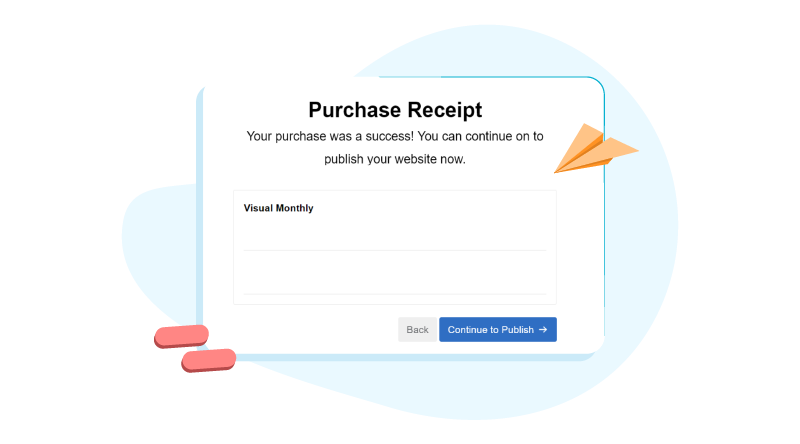
Step 5: Publish your website
When your payment receipt appears, click the “Continue to Publish” button.
Select your preferred domain name again. This confirms how you wish to host a website on Namecheap.
Check the domain name and review your website one last time, then click the “Publish” button.

Your newly published website will be live online within 24 hours.
When to pick WordPress or another CMS
Free website builders like Site Maker offer the easiest way to design a website. However, there are certain situations in which you might want to choose WordPress or another content management system (CMS) instead. Here are a few examples:
- You want more design customizations: WordPress offers added flexibility in its design options, allowing you to bring a very specific vision to life.
- You want to use plug-ins: Plug-ins add functionality to a website. For example, some people want the option to create an online store with an e-commerce plug-in.
- You need scalability: A CMS like WordPress is built to be scalable, so it can handle increased traffic and data without slowing down, making it a better option for businesses anticipating significant growth.
For most people, a website builder like Site Maker is a great choice. But if you have unique needs like those mentioned above, you may want to program your own website on WordPress or hire an expert familiar with HTML, CSS, and other languages for coding a website.
Pick and register a domain name
Every website needs a domain name, which is essentially the address used to navigate to a site. While all websites have a numerical IP (Internet Protocol) address, the Domain Name System (DNS) makes it possible to reach a website with a domain name instead of a string of numbers. DNS connects each URL with a corresponding IP address, which makes the process of accessing websites user-friendly and efficient.
The domain for a website is the part of a URL that comes after “http://www.”, so it should be easy to remember and relevant to your website’s content. Complete a domain name search to see what’s available. Once you register a domain name, you essentially take it off the market, so no one else can use it.
Make sure to link your new domain to your website before you publish it. With a website builder like Site Maker, this process is quick and easy (see Step 4 in the previous section). Namecheap has millions of domains to choose from with a variety of domain extensions (.com, .net, .io, .ai, .xyz, etc.). If you’re not sure which domain you want to register just yet, you can use a free Visual.com subdomain through Site Maker.
Get web hosting
When you develop a website, you’ll also need to have web hosting. This is essentially the space on a server where your website will be stored. Most website builders offer affordable, secure hosting that requires no additional setup or maintenance on your part. It’s built right in to create a smooth, all-in-one solution for a custom website.
If you don’t want to use a website builder, you’ll need to find a hosting provider and connect your domain to your web hosting plan. Trying to switch your hosting provider? Most will allow you to import a website so you don’t lose your content.
Plan your site structure and navigation
When developing a website, it’s important to think about the user experience. Visitors to your site should be able to navigate to key information easily, and the content should be formatted in a clear, legible way. In addition, the mobile website version should be just as intuitive as the desktop version.
There are two types of basic website structures. Websites with multiple pages typically have a drop-down menu that navigates to different pages. Websites with a one-page, scroll-down format often have links at the top that allow visitors to instantly jump from one section to another.
Managing your site structure is easy with Site Maker. The tool organizes your content by section. On the right-hand side of each content section, you’ll see an “X” and a grid of dots. Click on the “X” to delete a section, or click and drag the dotted grid to move it up or down.
Note: Certain sections (including the Header, Hero, and Footer) cannot be deleted or moved.
The website is arranged in a one-page, scroll-down format that looks good on both desktop and mobile. Add links to specific sections of the page by editing the Header. In the website editor, click on “Add a link or scroll block.” Click the “Link to:” box, select a section from the drop-down menu, and add a label. The links you add will be displayed at the top of the page so your site visitors can easily navigate to different sections without having to scroll.

Select a template or theme and set your brand basics
Whether you want to build your site for business or personal use, your website’s template and theme will help to set the tone for your brand. For example, a style that fits a website for a medical practice might look out of place on a site for a party planning business. Think about what type of feel you want for your website, whether that’s minimalist and calm, colorful and energetic, elegant and luxurious, or modern and cutting-edge.
Once you’ve decided on an overall look, apply consistent and cohesive website branding to give it a personalized look. Use a specific color palette, font style, and custom logos as you build a web page to boost brand awareness among your visitors.
Create content that ranks and converts
If you want to attract attention to your website online, creating keyword-driven content needs to be a top priority. Search engine optimization (SEO) is a strategy that uses keywords and other elements to boost a website’s ranking in search engine results.
First, you’ll want to perform keyword research to find relevant search terms that your potential customers or clients might use. Then, apply those keywords strategically in your website content (more on this in the next section). This helps drive traffic to your site so you can build brand awareness and convert visitors into customers.
On-page SEO basics
Search engines analyze specific elements of your site to provide the most relevant search results for users. While the keywords you found in your research can be used anywhere on your site, they’ll have the greatest impact when applied to prominent areas, including:
- Titles and meta descriptions
- Headings and subheadings (H1, H2, H3, etc.)
- Alt text for website images
Optimize performance and security
A slow site often leads visitors to leave early. That’s why it’s important to optimize your website’s performance so it runs smoothly. To help pages load quickly, compress images before you upload them to your site and delete any unnecessary plugins or themes. If you have access to caching settings, set the website to cache on users’ browsers to decrease the site’s load time.
Don’t forget to protect your content and your visitors by keeping the site secure. Make sure your website has an SSL certificate that establishes a secure link between the server and a browser and encrypts traffic for a safer online experience.
Promote and maintain
After publishing your website, it’s time to promote it. There are several strategies you can use to drive traffic to your website. Use the following tips to get the word out about your new site.
Post on social media
Social media is one of the most effective tools for website promotion. Try these social media strategies to increase traffic to your site:
- Create photo and video posts about your website.
- Include links in your bio that point to your website.
- Use hashtags with relevant search terms.
- Encourage customers to use a branded hashtag.
- Partner with a local influencer to drive online engagement.
Send links via email
Send occasional messages to your email list to boost your website’s traffic. Each message can include a link to your website. Don’t forget to include a call to action encouraging readers to click. If you want to increase the number of subscribers on your email list, consider offering incentives like loyalty rewards or exclusive discount codes.

Build backlinks
A backlink is a link on another website that directs to your website. The more backlinks you have, the more trustworthy your site appears to search engines like Google. Search engines also evaluate the quality of backlinks, so it’s best to have your backlinks come from trusted websites whenever possible. To learn more, review our guide to building backlinks.
Refresh your content
Search engines often rank regularly maintained sites higher. Updating your content is a great way to show that your site is active while also adding new and relevant information for your visitors. Make sure your site is backed up so you don’t lose any of your content. Most web hosting plans include automatic backups or give you the option to perform manual backups on your own schedule.
Track your site’s performance
Keeping tabs on how visitors interact with your site is a smart way to understand which promotional efforts are the most effective. Here are some of the website performance metrics that can provide some insight:
- Traffic
- Pageviews
- Bounce rate
- Conversion rate
- Click-through rate
Some website builders, such as Site Maker, include built-in analytics tools that automatically track these metrics for you. If you’re using WordPress, you can find plug-ins with similar functionality.
Follow this guide to make your own website and establish your online presence. If you’re looking for a simple, straightforward solution for building a site, try Namecheap Site Maker for free today.
Frequently Asked Questions (FAQs)
How do I create a website for free?
The easiest way to make your own website is to use a website builder like Namecheap’s Site Maker. This tool is a popular option because, in addition to being affordable, it has an intuitive, beginner-friendly design that walks you through how to create a website for free. It also serves as an all-in-one solution that includes web hosting, site security, and 24/7 support.
How do I create a business website?
When designing a website for a business, focus on your primary goals and your target audience. Make sure key information is easy for customers to find and provide a way for visitors to get in touch with you. In addition, be sure to apply consistent branding across your site, like a cohesive color palette, distinctive font, and custom logos. Refer to the guide above for detailed steps on how to create a business website.
How much does it cost to create a website?
Many website builders allow you to create a website for free, or you can hire a web developer to do the job for you. Keep in mind that even if you use a free tool to design your site, you’ll need to pay a monthly or annual web hosting fee. You’ll also need to cover the cost of a domain name if you want a specific web address.
How do I create a portfolio website?
A portfolio site should showcase your work, so choose a website template that makes it easy to view past and current projects. You can also add a short bio, contact page, testimonials, and a resume or list of services. A free website builder will help walk you through the steps of how to create a portfolio website and connect it to a custom domain.
How do I build a responsive website?
A responsive website has a design that displays properly on different devices, including desktops, smartphones, and tablets. The layout of text, images, and other content automatically adjusts to fit a user’s screen. To make sure your website is responsive, use a reputable website builder like Site Maker. This type of tool automatically makes every site mobile-friendly so it looks good on all devices. Alternatively, you can hire a web developer who knows how to build a responsive website from scratch.
How do I make an e-commerce website?
If you want to sell products or services directly from your website, it’s important to choose a compatible platform. That means the website builder or CMS should be designed specifically for e-commerce or offer e-commerce plug-ins that can be added to your site template. Once you’ve set up the basic framework, add each product or service with an image, description, and price. Don’t forget to add other key information, like contact details and an About page.


This information was extremely helpful to me in understanding the website creation process in basic terms. Especially for new entrepreneurs. Thanks!