
GeneratePress Premium Review
Before I begin this review of the GeneratePress WordPress theme, I’d like to introduce myself and why you should trust my opinion.
Hi, my name’s Ben, and I’ve been using WordPress for nigh on 10 years; in that time frame, I’ve seen and worked with a variety of WordPress plugins and themes. Some good, some bad.
While I’m not a developer, I can spot a quality WordPress product from a mile away, I review themes/plugins from your point of view.
That of a consumer, no complex coding articles, just honest to goodness opinions and verdicts.
When the team at Namecheap asked me what I’d like to review for them, GeneratePress sprang to mind.
I’ve been using it for ages, and it’s a no-brainer for me in times of the first-ever review at Namecheap.
Well, that’s me over with; hopefully, you’ll enjoy this review of the GeneratePress Premium theme.
What is GeneratePress?

To the uninitiated, GeneratePress is one of the most popular WordPress themes available.
With a staggering amount of downloads on WordPress.org and over 200k active installations, chances are some of you may well have heard of it.
Coupled with over 900 5-star reviews on the theme listing page, the GeneratePress theme is not only popular, but it’s also well received in terms of reviews.
So Can All These Reviewers Be Wrong?
Is the GeneratePress theme really all that?
Well, although the GeneratePress WordPress theme is free to download to get the most out of it, you’ll need the GeneratePress Premium plugin.
Which incidentally is what this review is all about, GeneratePress Premium.
Installing and Setting up GeneratePress Premium
With any review, I perform I like to take it from the beginning, in this case, installing GeneratePress and, of course, the premium plugin.
This way, you have all the information you need if you decide the product is worth your investment, the more info you have, the more you can make the right choice.

Installing the GeneratePress theme is as easy as you’d come to expect. Search for the theme in the admin backend, like the image above, or download it from the WordPress Repo.

Heading on over to the GeneratePress website, I’ve logged in and grabbed my copy of the plugin to enable premium functionality.

Now to install and activate the Premium plugin, make sure you copy and paste your license key, you’ll need this to receive updates.
That’s it we’re done with installing, nice and easy and who doesn’t like easy?
GeneratePress Premium Settings

This is where the meat of GeneratePress Premium comes into play. Via a simple checkbox, you can activate specific functionality for your blog/website.
The beauty of this is you only need to activate what you’re going to use, let’s take a look at what modules are on offer.
GeneratePress Premium Features
There’s quite a bit to cover here, and I think you’re going to love the features that GeneratePress Premium offers. So let’s take a deep dive into what exactly is on offer. In no discernable order.
Site Library
Stuck for creativity? Activating the Site Library module will inspire you.

It’s here you can find a selection of high-quality pre-designed GeneratePress designs ready to install at the click of a button.
There’s something for everyone here, from minimal designs, WooCommerce shop designs, blogs, and more.

You can preview all the designs via the backend and using the navigation arrows, go through them one by one.

Here you can backup existing Customizer settings and reinstall them if you’re not satisfied with how the site looks.
Installing means adding demo content, along with a list of widgets/plugins the theme comes bundled with and uses for the design.
As the screenshot suggests, using the site library is recommended for a fresh installation of WordPress.

If you use Elementor or Beaver Builder, there are more eye-catching designs at your disposal. All ready to install with your page builder of choice.
Background Module
By activating this module, you’ll have access to a new menu item in the WordPress customizer called Background Images.

Here you can add background images to specific areas of your site. The options available are Body, Header, Primary Navigation, Primary Sub-Navigation, Content, Sidebar, and lastly, the Footer.

For each area, there are a few more options. All available through the customizer. Upload an image, decide whether or not you’d like to repeat the image, either on an X or Y-axis.
Choose the size of the image, how you’d like it attached, and lastly, the position of your background image.
If you’d like to get fancy with your menus, the Primary Navigation and Sub Menu Navigation options have a few more settings available.
Here you can select a background image for a menu item, the hover image, and an image for the current selection of your menu.
Blog Module
Despite the somewhat ambiguous sounding Blog module, it’s here you can make some real changes to the layout of your site.

A wealth of options are available here, for either the archives which house your content right through to the single display of a blog post.
Each customizable element has a heading, so you know exactly where you are in the customizer.
Content Options
This section deals with the content of both the archives and the single post. A quick click on the menu item lets you switch between the two.
For Archives:
- Content-type, choose an excerpt or full content.
- Excerpt word count.
- Specify text for the Read more label.
- Choose to display the read more label as a button.
- Hide or display the post date, post categories, post tags, comment count.
- Lastly (a cool feature) use infinite scroll for posts, the user scrolls down more posts load.
For Single Posts:
- Hide or display the post date, author, categories, tags, and post navigation.
Featured Images
Another great feature is the ability to alter the featured images on archives, single posts, and pages.

Archives, Posts, and Pages Featured Images
- Choose to show or hide featured images on archives.
- Location of the image, either above the title or below.
- Alignment, choose from the center, left, or right.
- Attachment size, options for a wealth of image sizes.
- Width and height, here you can set your own size in PX.
Display Blog Posts in Columns

If you’d prefer for your blog archive to be in a column layout, you can. Here you can choose how many columns you’d like to display, whether you’d like to make the first post featured and another option to display posts in a masonry grid.
Color settings Module
Colors can make or break a site from a visitor perspective and from an accessibility one. It’s here you can change a variety of color settings via the color picker.

Colors can make or break a site from a visitor perspective and from an accessibility one. It’s here you can change a variety of color settings via the color picker.
Sections available are Body, Header, Primary Navigation, Buttons, Content, Sidebar Widgets, Forms, and the Footer.
Each respective section has its own color options. Thanks to the simple structure of GeneratePress and how it uses the customizer, you can tinker away to your heart’s content.
Change heading colors, primary menu colors, sub-menus, link hovers, and much more. Ensuring you get the right color balance for your needs.
Copyright Text Module
If you have specific text for your footers Copyright section, enabling this module enables you to add it. Shortcodes and HTML can be used here also.
Disable Elements Module
This setting doesn’t reside in the native customizer, to access it you’ll need to be in either the post or page editor. For me, this feature is a killer, and I’ll tell you why.
Imagine you need to create a landing page for advertising, an email newsletter, or whatever you need a landing page for.
Let’s face it, it can be problematic to hide elements, like your navigation bar, header, featured image, and so forth.

GeneratePress Premium takes the pain away. As you can see from the image above, the Disable Elements section is highlighted in the Document settings of the post.
Here you can disable the Top Bar, Header, Primary Navigation, Featured Image/Header, the Content Title, and the Footer.
Stripping it right back, you can create your very own unique landing page via a few simple clicks. Hide what you don’t need to show, and show what you need. This setting works on pages and posts.
It’s that simple, no convoluted method, no additional plugins required to show or hide elements.
Sections Module

Sections are available in either the post or page editor. They deal with separating content and make design changes for a post or page.
If you’re using the classic WordPress editor, sections will be a welcome addition, I’m sure.

Clicking on a specific section will load the classic WordPress editor, here you can give your section a title and add content within the editor.

Each section has settings that deal with a variety of options. Here you can change the width of the section, the background color, text color, upload a background image, and more.
See below for an example of this in action:

As you can see from the above, there’s a clear distinction between the two. So if you’re using the classic editor, you have some options from a design perspective, in posts and pages.
In truth, I don’t tend to use this feature, mainly because I use Gutenberg, which effectively will do the same thing, with more features and options.
In fairness, the section’s feature was around long before Gutenberg arrived on the scene!
Typography Module
Like color, Typography can make or break a site, more so from an aesthetic point of view as opposed to accessibility.
Enabling this module gives you a range of options, much like the colors module; it’s broken down into sections.
- Body, Header, Navigation, Buttons, Headings, Widgets, and Footer.

Each section will have a range of options available. Choose the Font family, from system fonts, through to Google Fonts.
You can change the font weight, choose to capitalize the text, make it uppercase or lowercase.
As the GeneratePress theme is responsive, it makes sense to offer different size text based on the screen display at the time.
Thankfully you can do that, clicking on the Tablet icon or Phone icon above the font size, lets you set a text size relevant to that specific screen size.
There are other options available as well, such as Line height for text in the body, along with a setting for paragraph margins.
WooCommerce Module
This is where GeneratePress really can make a difference to store owners using WooCommerce. There’s a stack of options here, all might I add for the betterment of your online store.

Again everything here is broken down into easy to understand sections, perfect for those who can get lost in options.
General Section
Under the General section, you can opt to show the cart in the menu, or display a mini cart in a sub-menu.
If you decide to show the cart on the menu, you can choose from 3 icons, which are Shopping Cart, Shopping Bag, or Shopping Basket.
If you’d like to show either the number of items in a users cart you can, or if you’d prefer to show a value of the total amount in the cart you can. All via a dropdown selection box.
Finally, under General, you can check a box to display breadcrumbs on shop pages and all product pages and product categories.
Shop Section
This deals with the layout of your shop. Here you can choose via another dropdown menu your sidebar layout:
- Sidebar / Content.
- Content / Sidebar.
- Content no sidebars
- Sidebar / Content / Sidebar
- Sidebar / Sidebar / Content
- Content / Sidebar / Sidebar
Via a slider, you can choose how many product columns you’d like to display. You can change this for desktop, tablet, and of course, mobile views hit the icon and adjust accordingly.
Column Gaps, again through a slider, you can adjust the gap between your columns, set it for desktop, tablet, and mobile views.
Image and text alignment is self-explanatory; choose from left, right, or center.
Another great feature for the WooCommerce module is the ability to enter how many products you’d like to show. Useful if you only have a handful of products.
There are lots of display settings for the shop page. Take a look at the below to see what I mean all are available on a hide or display basis:
- Display cart panel on add to cart
- Display page title
- Display product results count
- Display product sorting
- Display product image
- Display secondary image on hover
- Display product title
- Display sale flash
- Sale flash over image
- Display rating
- Display price
- Display add to cart button
- Display short description
The ability to hide the price of products in the shop archive is a great feature. Again no other plugins required, don’t want to show the price on the shop page, just uncheck the box.
Single Product Section

Here we can adjust another load of options. Adjust the Product Image area width using the slider, useful if you have some stunning product images. Nothing sells a product better than quality imagery.
Following the shop sidebar settings, the same options are available in the single product section, so display your product listing in full width or with a sidebar, whatever you need.
In a similar way to the shop layout section, we can hide or display the following:
- Display add to cart panel on scroll (see below image of what this looks like)

- Display quantity buttons
- Display sale flash
- Display product tabs
- Display related products
- Display upsell products
The number of Related products/upsells can be adjusted accordingly using a slider. So if you’d like to showcase more products to potentially sell you can.
As is a common theme with GeneratePress you can choose how many to view for tablet and mobile visitors.
Lastly:
- Display product meta data
- Display short description
There’s a bunch settings, and using the WordPress Customizer you can make as many changes you need to on shop archive level, and at product level.
The ability to show and hide specific elements is exceptional, not only in WooCommerce, but across the board.
Menus Module & Sub Menu Module
Remember I said I’d go into a little more depth when it comes to the two modules mentioned above? Good, here goes.
Menus Module
Activating the Menus Module adds to new items in layouts. Here you can enable sticky navigation, see below for what I mean:

Here you can enable or disable sticky navigation, which means the menu follows you as you scroll down the page. Setting it to on will show across the board if you’d like to enable it just for mobile only or desktop only you can.
Select a transition effect, choose from Fade, Slide, or None if you’d like to add a smaller logo for the sticky bar you can, useful to keep everything on point for your brand/blog.
The other addition via the menus module is the Off-Canvas option. It’s here you can set a menu to display off of the canvas, along with some options.

The off-canvas panel, much like the sticky navigation option, can be set to show everywhere, desktop-only or mobile-only.

The above image shows the off-canvas panel in action. There are several settings in this section:
- Naming the panel for desktop users.
- Choose the effect of the panel, either slide or overlay.
- Choose which side either left or right (if you’re using the slide option).
- The close button, choose to show it inside the panel or outside.

The overlay feature makes the menu appear over your content centrally. If you have the color module activated, you can set the color and the transparency of the overlay, much like the slide panel option.
Secondary Menu Module

Activating this gives you a new menu section. Notice in the top right corner of the screenshot? That’s the secondary menu.
It’s here you can set a variety of different options:
- Give the menu a name to display on mobile views.
- Width of the menu select from either contained or full.
- The inner width, again select from contained or full.
- Alignment of the menu, left, right, or center.
- Location options are: below the header, above header, float left/right, left-sidebar, right-sidebar, and lastly none.
- If you have sub-navigation, then you choose the dropdown direction from right or left.
Secondary menu navigation can be a great way to separate content. For example, if you have a wide range of content, you could put the usual pages, such as About Us, Contact Us, and Blog in the above header location.
Elements Module
Elements, this part is going to make your life so much easier.
Elements live in the Appearance menu in your backend, and I understand why they’re here not to clutter up the customizer, smart thinking.

There are three types of elements: Header, Hook, and Layout. Let’s take a look at each one and what they offer.
Header Element
Let’s say you want to create a custom header for your site, maybe add a background image to some text and only display it on a specific page or blog post. You can, thanks to Elements.
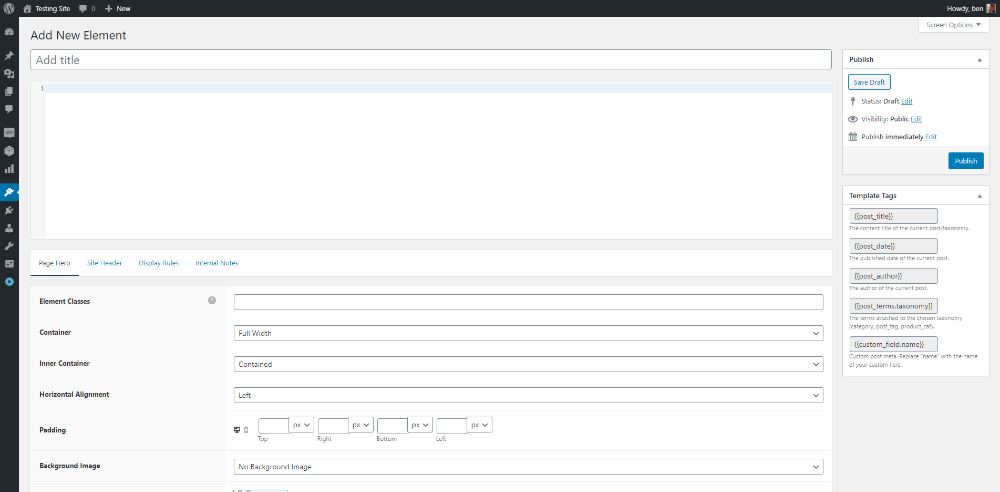
Everything here is in a tab format; it’s quite straightforward to follow. Let’s start with Page Hero.
Page Hero Tab

The very top section deals with the naming the element and the content you’d want to show. There’s support for HTML and shortcodes here. Input what you’d like to display, or use template tags.
Template tags make things even more accessible. Use the Post Title, Post Date, Post Taxonomy, or create a custom field for your pages/posts and use the Custom Field Name tag.

There are quite a few options here, let’s take a look through them one by one:
- Element Classes, if you’re familiar with CSS, you can name this element and tinker with CSS using the Additional CSS section in the native customizer.
- Container, Inner Container, choose from full width or contained.
- Horizontal Alignment deals with the position of your content, left, right, or center.
- Padding, sets the padding you’d like to give your Page Hero in pixels; you can set the padding for mobile as well.
- Background Image, here you can upload a custom image for your background or select featured image. Any post or page with a featured image will be used instead of the custom one. Or choose none, if you’d like to use color instead.
- Custom Image, if you decide on uploading a background image, you can do that here.
- Background Position, choose from left top, left bottom, left center, and the same for right as well as center.
- Parallax, if you’d like to get fancy with your hero section, ticking this will keep the image static; as you scroll, you’ll see more of the image.
- Disable Featured Image, checking this will disable any featured image you have currently set for pages/posts and use this one.
- Background Overlay, set a color to be used to overlay the image via a color picker, and adjust the opacity.Text Color, Link Color, Link Color Hover, all self-explanatory, choose a color for each via the color picker.
Site Header

Using the Site Header tab, we can make even more changes, such as merging the Page Hero with the content and selecting the navigation location for this specific instance.

Choose from No Merge, Merge on desktop only. The settings here are:
- Offset Site Header Height, here you can add padding to your Page Hero, so no overlapping occurs, choose desktop padding and mobile padding.
- Header Background, choose from the color picker, what color you’d like your header background to be, wherever this Page Hero is displayed.
- Site Title, Site Tagline, color picker time, if you’re using text for your logo and tagline, change the color.
- Navigation Location, here you change the location of your menu, useful if you have a landing page.
- Navigation colors, ticking this box gives you a load more options, see below:

Using the color picker, you can change the colors for, Navigation Background, Navigation Text, Background Hover, Text Hover, Background Current, and Current Text.
Using the above options, you can set your Page Hero apart from the rest of your content, like I said, great for landing pages, email newsletter pages, and whatever you need.
Display Rules

I’ve always been impressed with the amount of thought that’s gone into GeneratePress. Here you can select exactly where you’d like your Page Hero to show.
- Location, lots of options, to keep it brief, you can choose the entire site, front page, blog, all singular posts, products, and lots more. Using the next dropdown along, you can narrow it down even further by choosing a specific page, post, category, product (and more) you’d like to show.
- Exclude, this one deals with where you do not want to show the Page Hero.
- Users, who will see the Page Hero? You can choose what user role the Page Hero will show to all users, logged in, logged out, admin, editor, author, contributor, subscriber, customer, and shop manager.
Let’s say you’re using WooCommerce for example, wouldn’t it be great to show a Page Hero on their account page? Perhaps with thanks for registering, here’s a coupon code.
The possibilities for strong calls to action using a Page Hero are endless, whether it’s for WooCommerce or anything else you need to highlight.
Internal Notes
It could get a little crazy with the amount of Page Heros you come up with; the internal notes tab is only visible to you, it’s here you can make notes about why you created it for the sake of sanity.
Example Of Page Hero

Using the settings I’ve mentioned, I’ve created a Page Hero with navigation in a different location, different colors for the text, and added padding. I’m no designer granted, the ease of this is quite startling.
Hook Element
Hooks work in much the same way as the header element, with display rules and internal notes.

The input box works just the same as the Header Element, enter in HTML or a shortcode you’d like to display. Now here comes the exciting part.
The Hook setting will insert your content into specific areas of your site. To list all of the hooks would read like war and peace in truth.
There are hooks for pages, posts, the header, footer, WooCommerce products, sidebars, pretty much everywhere you can think of a hook; it’s covered. If that’s not enough, you can create your own custom hook.
Need to execute shortcodes check the box, execute PHP check the box. Have more than one hook in a specific area? Set the numerical priority to give them an order.
Why Use Hooks?
Let’s say you’d like to insert a contact form at the end of a page and show it only on specific pages using the Display Rules.
Or add a shortcode to display a newsletter subscription form at the end of blog posts, these are a couple of examples, but imagine the possibilities?
Layout Element
Another killer feature. You can change the layout of a page, post or custom post type (if you have one).

Sidebar Layout, here you can choose if you’d like to show a sidebar and where you’d like to display it, various options available.

Footer, if you’re building a landing page, you might want to get rid of the footer. Here you can change the number of widgets displayed.

Content, if you’re looking to set a different width for your content, change it here. For example, let’s say you’d like to show all singular blog posts in a single column with a width of 900px, you can.
Using the display rules settings, create your layout, then apply it to posts, pages, categories, the list goes on and on.
How Fast Is GeneratePress In Page Speed
Good question, here’s the answer:

Desktop speed for GeneratePress Premium, no caching plugins installed. See below for mobile page speed:

Right out of the box, GeneratePress is fast; I mean quick. It’s well coded and has no bloat, despite all the features it has.
Page speed is of the essence these days, have a slow site, why would any search engine bother with it.
It leads to poor user experience, let’s face it, search engines rely on users, so serving up something slow, is not in their interest.
People want things fast; they’re not going to sit there waiting for your website to load. So the quicker your website loads, the better your chance of ranking.
What About SEO?
GeneratePress outputs clean, precise structured data, ensuring search engines can index your site from the get-go. Take a look at the example:

Using Google’s structured data testing tool, you can see that everything is where it should be, with no errors, no warnings, clean.
Which essentially means, combining this with an SEO plugin for outputting meta descriptions, and titles, you’ll be off to a flyer in terms of your site being search engine friendly.
Final Thoughts
GeneratePress Premium blows a lot of other WordPress themes out of the water. There’s something for everyone, whether you’re technical or not.
There’s no real learning curve to GeneratePress; it can be as complex as you need it to be or as simple as you need it to be.
While it is a multi-purpose theme (which is an ugly word in the WordPress world), it doesn’t suffer from a ton of baked-in functionality, unlike other WordPress themes.
With robust theme documentation, friendly support staff, and Facebook Group, there’s always someone to help if needs be.
There’s no reliance on using page builders with GeneratePress. You can create content and build something quite quickly.
If you’d prefer to build out your site using a page builder such as Elementor, Beaver Builder, or any other page building plugins, GeneratePress plays very well indeed with them.
Combining all the features of GeneratePress, adding Elements, setting display rules, you could create something quite amazing.
If you’re looking for a fast-loading, feature-rich theme, and an excellent support team, you will do well to take GeneratePress Premium for a drive. I, for one, can’t recommend it enough.
Don’t forget GeneratePress is fast, if you’re looking for additional speed, then take EasyWP for a spin with it’s next generation cloud hosting, combine the two, and you’ll have a crazy fast site for your visitors.